Senville RG51M1 User manual

AIR CONDITIONER
REMOTE CONTROLLER ILLUSTRATION
Thank you very much for purchasing our air conditioner.
Please read this owner's manual carefully before using
your air conditioner.
GT
SENL/09CD/I
SENL/12CD/I
SENL/18CD/I
SENL/24CD/I
SENL/09CD/O
SENL/12CD/O
SENL/18CD/O
SENL/24CD/O

CONTENTS
Remote Controller Specification...............................................
Performance Features-------------------------------------------------------
Features of the Remote controller Buttons .............................
Indicators on Display panel.........................................................
Operating the Remote Controller...............................................
Warning--------------------------------------------------------------------------
1
1
1
3
4
7
NOTE: FP button is available for Model RG51M1/EU1
only.
1
Model
Transmission Distance
Rated Voltage
RG51M5/(C)EU, RG51M1/EU1
8m
3.0V(Dry batteries Lr03 2)
Remote Controller Specification
Performance Features
Features of Remote controller buttons
1. Operating Mode: AUTO COOL DRY
HEAT(Cooling only model without) and FAN .
2. Timer Setting Function in 24 hours.
3. Indoor Setting Temperature Range:
4. Full function of LCD (Liquid Crystal Display)
Fig. 1
TEMP
AUTO
COOL
DRY
HEAT
FAN
HIGH
MED
LOW
MODE
FAN SPEED
TIMER ON
SLEEP
ON/OFF
TIMER OFF
AIR
DIRECTION
RESET LOCK
12
4
5
6
7
3
8
9
10
11
12
13
14
15
Environment
SET TEMPERATURE( F)
SWING
LED
DISPLAY
TURBO
OO
62 F~ 86 F
O
OO
23 F~140 F
FP
- Buttons designis based ontypical model andmight be
slightly different from the actual one you purchased, the
actual shape shallprevail.
-All the functionsdescribed are accomplishedby the unit,if
the unit hasno this feature,there is nocorresponding
operation happened whenpress the relativebutton on the
remote controller.
-When there arewide differences between Remote controller
Illustration and USERSMANUAL on function description,
the description on USERS MANUAL shall prevail.
NOTE:
TEMP Button : Push this button to decrease the indoor
oO
temperature setting in 1 F increments to 62 F.
FP Button: During the heating operation(only when the
setting mode is HEAT), press this button and the unit will
operate at high fan speed with the temperature automatically
OO
set to 8 C/46 F. The display window of indoor unit will display
FP . Press the buttons of ON/OFF, MODE, FAN SPEED,
TEMP UP/DOWN, TIMER ON/OFF, SLEEP or FP while
operating will cancel the FP function.
RESET Button: When you press the recessed RESET button,
all current settings are cancelled and the control will return to
the initial settings.
SLEEP Button: Press this button to go into the Energy-Saving
operation mode. Press it again to cancel. This function is only
can be used on COOL, HEAT and AUTO mode and maintain the
most comfortable temperature for you.
2
1
6
ON/OFF Button: Push this button to start operation, push
the button again to stop operation.
9
TEMP Button : Push this button to increase the indoor
oO
temperature setting in 1 F increments to 86 F.
2
AIR DIRECTION Button: Used to change the louver
movement and set the desired up/down air flow direction.
O
The louver changes 6 in angle for each press.
MODE Selection Button: Each time the button is pressed,
the operation mode is shifted in the direction of the arrow:
AUTO
COOL
DRY
HEAT FAN
3
FAN SPEED Button: Used to select the Fan Speed in four steps-
AUTO LOW MED or HIGH. Each time the button is pressed,
the fan speed mode is shifted.
8
TIMER ON Button: Press this button to initiate the auto-on time
sequence. Each press will increase the auto-timed setting in 30
minutes increments. When the setting time displays 10h, each
press will increase the auto-timed setting 60 minutes increments.
To cancel the auto-timed program, simply adjust the auto-on time
to 0.0.
10
11
4
5
NOTE: While the unit is running under SLEEP operation mode, it would
be canceled if you press the MODE,FAN SPEED or ON/OFF button.
SWING Button: Push this switch button to activate auto
swing feature of the horizontal louver. Push it again to stop.
7
NOTE Please do notselect HEATmode if the machine you
purchased is coolingonly type. Heatmode is notsupported by
the cooling onlyappliance.
NOTE: Press and hold and buttons together for 3 seconds will
OO
alternate the temperature display between the C & F scale.
3
TIMER OFF Button: Press this button to initiate the auto-off time
sequence. Each press will increase the auto-timed setting in 30
minutes increments. When the setting time displays 10h, each
press will increase the auto-timed setting 60 minutes increments.
To cancel the auto-timed program, simply adjust the auto-off time
to 0.0
12
1
2
5
4
6
4
3
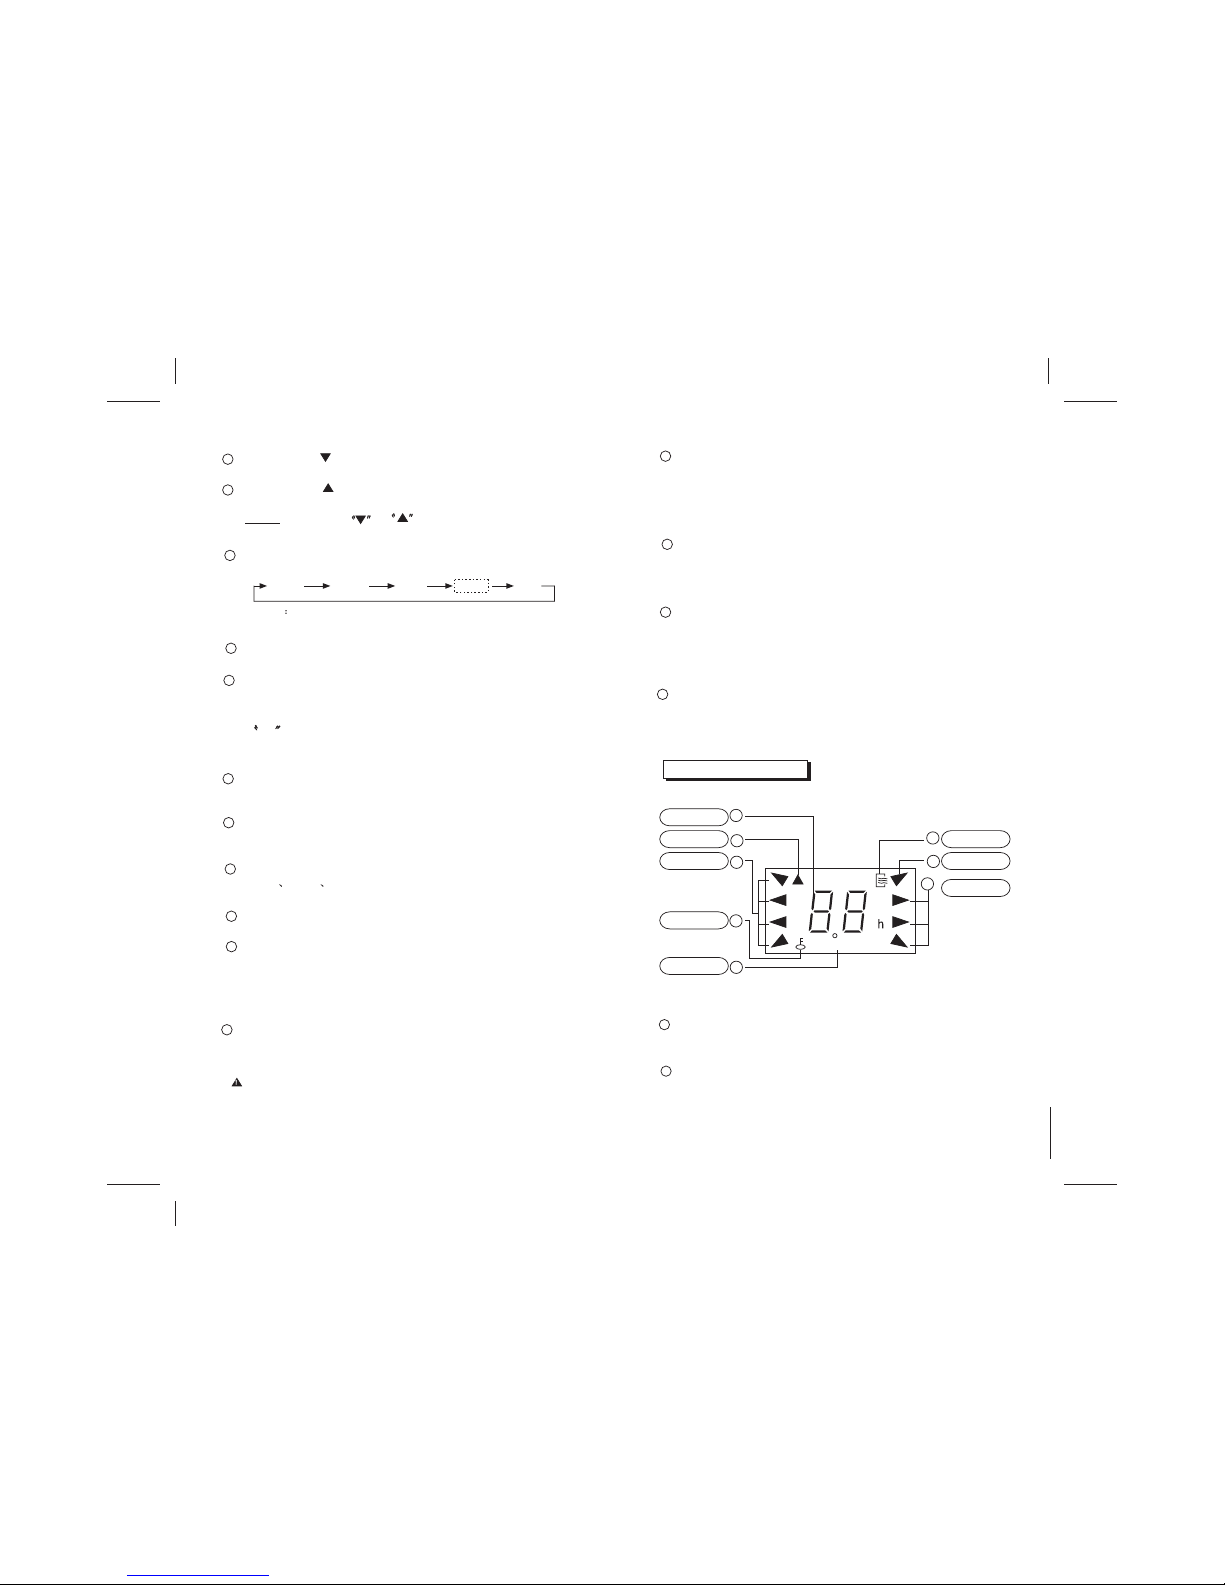
Indicators on Display Panel
Display Panel
TRANSMI-
SSION Indicator
OPERATION
MODE Indicator
LOCK Indicator
TIMER
DISPLAY Indicator
DIGITAL
DISPLAY area
ON/OFF Indicator
FAN SPEED Indicator
TIMER ON OFF
DIGITAL DISPLAY area:This area will show the set temperature
and, if in the TIMER mode, will show the ON and OFF settings of
the TIMER. If in the FAN mode, nothing is appeared.
TRANSMISSION Indicator: This indicator flashes one time
when remote controller transmits signals to the indoor unit.
Fig. 2
1
2
LOCK Button: When you press the recessed LOCK button, all
current settings are locked in and the remote controller does not
accept any operation except that of the LOCK. Press again to
cancel the LOCK mode.
13
TURBO Button: Active/Disable Turbo function. Turbo function
enables the unit to reach the preset temperature at cooling or
heating operation in the shortest time(if the indoor unit has no
this function, there is no corresponding operation happened
when press Turbo button.)
14
15
OPERATION
MODE Indicator
7
LED DISPLAY Button: Press this button to clear the digit
display in the air conditioner, press it again to illuminate (Not
available for the units without LED display window).

4
TIMER DISPLAY Indicator: This display area shows the settings
of the TIMER. That is, if only the starting time of operation is set,
it will display the TIMER ON. If only the turning off time of operation
is set, it will display the TIMER OFF. If both operations are set,
it will show TIMER ON-OFF which indicates you have chosen
to set both the starting time and off time.
6
FAN SPEED Indicator: Press the FAN SPEED button to select
the desired fan speed setting (Auto-Low-Med-High). You selection
will be displayed in the LCD window except the Auto fan speed.
7
Operating the Remote Controller
The Remote Controller uses two alkaline dry batteries(LR03X2).
1. To install the batteries, slide the back cover of the battery
compartment and install the batteries according the
direction (+and -)shown on the Remote Controller.
2. To replace the old batteries, use the same method as
mentioned above.
Install/Replace Batteries
NOTE: All signs shown in the Fig.2 is for the purpose of clear
presentation. But during the actual operation only the re-
lative functional signs are shown on the display panel.
LOCK Indicator: LOCK display is displayed by pushing the
LOCK button. Push the LOCK button to clear display.
OPERATION MODE Indicator: When press the MODE button,
it shows the current operating mode -- AUTO COOL DRY
HEAT (Cooling only model without) mode.
5
4
ON/OFF Indicator: This symbol appears when the unit is turned
on by the remote controller, and disappear when the unit is
turned off.
3
NOTE
1. When replacing batteries, do not use old batteries or a different
type battery. This may cause the remote control to malfunction.
2. If you do not use the remote controller for several weeks
remove the batteries. Otherwise battery leakage may damage
the remote controller.
3. The average battery life under normal use is about 6 months.
4. Replace the batteries when there is no answering beep from the
indoor unit or if the Transmission Indicator light fails to light.
5. Do not dispose batteries as unsorted municipal waste. Collection
of such waste separately for special treatment is necessary.
5
Switch on the power and the OPERATION indication lamp on the
display panel of the indoor unit starts flashing, and turns off after
flashes for 6 times.
1. Use the MODE button to select AUTO.
2. Push the TEMP button to set the desired temperature within
OO
a range of 62 F ~ 86 F.
3. Push the ON/OFF button to start the air conditioner. The OPE-
RATION lamp on the display panel of the indoor unit lights. The
FAN SPEED is automatically set and there are no fan speed
indicators shown on the display panel of the remote controller.
4. Push the ON/OFF button again to stop the unit operation.
1. In the AUTO mode, the air conditioner can logically choose
the mode of COOL, FAN and HEAT by sensing the difference
between the actual ambient room temperature and the set
temperature on the remote controller.
2. If the AUTO mode is not comfortable for you, the desired
mode can be selected manually.
AUTOMATIC OPERATION
NOTE
1. If the AUTO mode is not comfortable, you may manually over-ride
the settings by using COOL, HEAT or FAN modes.
2. Push the TEMP button to set the desired temperature within
OO
a range of 62 F ~ 86 F.
3. Push the FAN SPEED to select the FAN mode of AUTO, HIGH,
MED or LOW.
4. Push the ON/OFF button, the operation lamp lights and the air
conditioner start to operate as your settings. Push the ON/OFF
button again to stop this unit operation.
The FAN mode can not be used to control the temperature.
While in this mode, only steps 1 3 and 4 may be performed.
COOL/ HEAT (Cooling only model without) and
FAN Operation
NOTE

6
Due to the difference of the set temperature of the unit and
the actual indoor temperature, the Air Conditioner when in
DRY mode will automatically operate many times without
running the COOL and FAN mode.
1. Push the MODE button to select DRY.
2. Push the TEMP button to set the desired temperature within
OO
a range of 62 F ~ 86 F.
3. Push the ON/OFF button, the OPERATION lamp lights and the
air conditioner starts to operate in DRY mode at LOW fan
speed. Push the ON/OFF button again to stop this unit operation.
DRY Operation
NOTE
Push TIMER ON button to set the auto- on time and TIMER OFF
button to set the auto-off time.
1.1 Push the TIMER ON button, then the remote controller shows
TIMER ON , the last set time for the starting operation and the
signal "h" will be shown on the DIGITAL DISPLAY area. You
are now ready to reset the time to START the operation.
1.2 Push the TIMER ON button again to set desired unit start
time.
1.3 After setting the TIMER ON ,there will be a one-half second
delay before the remote controller transmits the signal to
the air conditioner. Then, after approximately another 2
seconds, the signal "h" disappears and the set temperature
will re-appear on the digital display.
TIMER Operation
1. To set the starting time.
2. To set the stopping time.
2.3 After setting the TIMER OFF ,there will be a one-half second
delay before the remote controller transmits the signal to
the air conditioner. Then, after approximately another 2
seconds, the signal "h" disappears and the set temperature
will re-appear on the digital display.
2.2 Push the TIMER OFF button again to set the time you want to
stop the operation.
2.1 Push the TIMER OFF button and the remote controller will
show TIMER OFF, the last set time for the stopping operation
and the signal "h" will be shown on the DIGITAL DISPLAY area.
You are now ready to reset the time of the STOP operation.
3. Set the starting & stopping time
3.1 Push the TIMER ON button, the remote controller will show
TIMER ON, the last set time for START operation and the
signal "h" will be shown on the DIGITAL display area. You
are now ready to readjust the TIMER ON to start the operation.
3.2 Push the TIMER ON button again to set the time you want to
start the operation.
3.3 Push the TIMER OFF button, the remote controller will show
TIMER OFF, the last set time for STOP operation and the
signal "h" will be shown on the DIGITAL display area. You
are now ready to reset the time to STOP operation.
3.4 Push the TIMER OFF button again to set the time you want to
stop the operation.
3.5 After setting the TIMER, there will be a one-half second delay
before the remote controller transmits the signal to the Air
Conditioner. Then , after approximately another 2 seconds, the
signal "h" disappears and the set temperature will re-appear on
the digital display.
Change the TIMER
To change the TIMER ON/OFF time, just press the corresponding
TIMER button and reset the time.
To cancel the TIMER ON/OFF setting, just adjust the TIMER time
to 0.0.
NOTE
The setting time is relative time. That is the time set is based
on the delay of the current time.
1. Be sure there are no obstacles between the remote controller
and the receiver of indoor unit otherwise the air conditioner will
not work.
2. Keep the Remote Controller away from any liquids.
3. Protect the remote controller from the high temperatures and
exposure to radiation.
4. Keep the indoor receiver out of direct sunlight or the Air Condi-
tioner may malfunction.
5. Keep Remote Controller away from EMI(Electro-Magnetic
Interference) supplied by other household appliances.
Warning
7
GT
SENL/09CD/I
SENL/12CD/I
SENL/18CD/I
SENL/24CD/I
SENL/09CD/O
SENL/12CD/O
SENL/18CD/O
SENL/24CD/O

TABLEDESMATIÈRES
Spécifications de la télécommande 1
Caractéristiques---------------------------------------------------------------1
Fonctions des boutons de la télécommande......................... 1
Indicateurs sur l'affichage................................................................. 3
Manipulation de la télécommande ............................................ 4
Avertissement----------------------------------------------------------------- 7
Fig. 1
1
Fonctions desboutonsdela télécommande
Spécifications de la
télécommande
Modèle
RG51M5/(C)EU
Tension nominale 3,0 V (piles alcalines sèches
LR03 2)
Distance de transmission 8 m (atteint 11 m avec
une tension de 3,0 V)
Température -5 °C -60 °C
Caractéristiques
1. Modes de fo nctionnement : AUT O ( aut om atique),
COOL (climatisation), DRY (déshumidification),
HEAT (chauffage – modèle de chauffage-climatisation
seulement) et FAN (ventilation).
2. Fonction de réglage de la minuterie sur 24 heures.
3. Plage de températures intérieures : de 17 °C à 30 °C.
4. Fonction complète de l'ACL (affichage à cristaux liquides)
23℉-140℉
TEMP
AUTO
COOL
DRY
HEAT
FAN
HIGH
MED
LOW
MODE
FAN SPEED
TIMER ON
SLEEP
ON/OFF
TIMER OFF
AIR
DIRECTION
RESET LOCK
12
4
5
6
7
3
8
9
10
11
12
13
14
15
SET TEMPERATURE( F)
SWING
LED
DISPLAY
TURBO
O
FP
NOTE: FP button is available for Model RG51M1/EU1
only.
REMARQUE : Le modèle de climatisation seulement
ne possède pas de fonction de chauffage.
!!
1 Bouton TEMP :
Appuyez sur ce bouton pour réduire le
réglage de la température intérieure.
2 Bouton TEMP :
Appuyez sur ce bouton pour augmenter le réglage
de la température intérieure.
3 Bouton MODE :
Chaque fois que vous appuyez sur ce bouton,
le mode sélectionné change dans l'ordre suivant :
AUTO COOL DRY HEAT FAN
4 Bouton SWING :
Appuyez sur ce bouton pour activer
l'oscillation de la grille d'aération horizontale. Appuyez sur le
bouton de nouveau pour désactiver cette fonction.
5 Bouton RESET :
Si vous appuyez sur bouton encastré
RESET, tous les réglages sont annulés et remis à leurs
valeurs par défaut.
6 Bouton AIR DIRECTION :
Appuyez sur ce bouton pour
modifier l'angle de la grille d'aération. La grille d'aération se
déplace d'un angle de 6 degrés chaque fois que vous appuyez
sur le bouton. Si l'oscillation de la grille d'aération nuit à la
capacité de climatisation ou de chauffage de l'appareil, le
registre change automatiquement son orientation. Aucun
symbole n'apparaît sur l'affichage quand vous appuyez sur ce
bouton. (Ne s'applique qu'aux unités équipées de cette
fonction).
7 Bouton LED DISPLAY :
Appuyez sur ce bouton pour
éteindre l'affichage numérique du climatiseur. Appuyez de
nouveau pour l'activer (appareils munis d'un affichage à DEL
seulement).
8 Bouton FAN SPEED :
Sélection de la vitesse du ventilateur –
AUTO (automatique), LOW (basse), MED (moyenne), ou
HIGH (élevée). La sélection change chaque fois que vous
appuyez sur le bouton.
9 Bouton ON/OFF :
Appuyez sur ce bouton pour mettre
l'appareil en marche. Appuyez de nouveau pour l'arrêter.
10 Bouton TIMER ON :
Appuyez sur ce bouton pour activer la
minuterie de mise en marche. Le délai réglé augmente de
30 minutes chaque fois que vous appuyez sur le bouton. Si le
délai dépasse 10 heures, le délai réglé augmente de 60 minutes
chaque fois que vous appuyez sur le bouton. Pour désactiver la
minuterie, vous n'avez qu'à régler le délai à 0.
11 Bouton SLEEP :
Appuyez sur ce bouton pour passer en
mode d'économie d'énergie. Appuyez de nouveau pour
désactiver ce mode. Cette fonction ne peut être activée qu'en
mode COOL, HEAT ou AUTO. Elle maintient la température la
plus confortable pour vous.
2
2
1
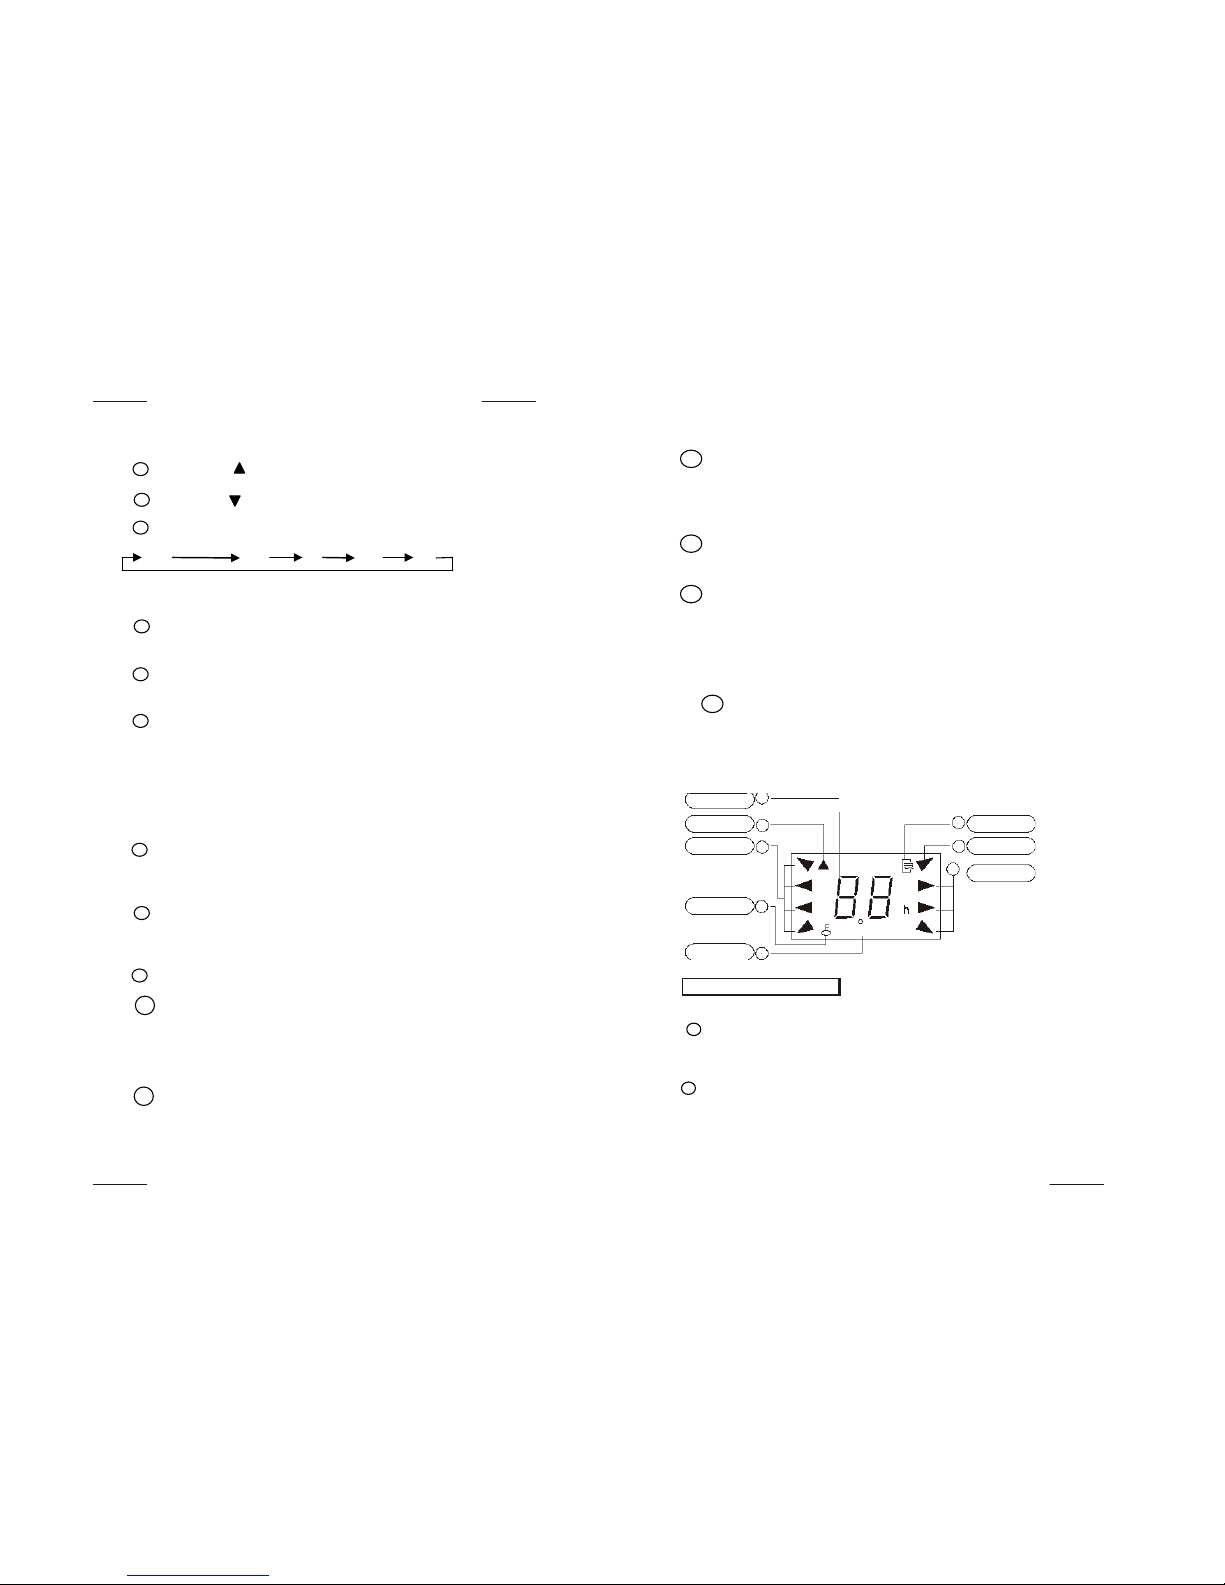
Panneau d'affichage
Indicateur de
minuterie
Indicateur de
transmission
Indicateur
de mode
Indicateur de
verrouillage
5
4
6
2
TIMER ON OFF
7
3
4
Indicateur
marche/arrêt
Indicateur
de mode
Indicateur de vitesse du
ventilateur
Fig. 2
Affichage
numérique
1
12 Bouton TIMER OFF :
Appuyez sur ce bouton pour activer la
minuterie d'arrêt. Le délai réglé augmente de 30 minutes chaque fois
que vous appuyez sur le bouton. Si le délai dépasse 10 heures, le
délai réglé augmente de 60 minutes chaque fois que vous appuyez
sur le bouton. Pour désactiver la minuterie, vous n'avez qu'à régler le
délai à 0.
13 Bouton LOCK :
Le bouton encastré LOCK verrouille tous les
réglages et désactive tous les autres boutons de la télécommande.
Appuyez de nouveau sur LOCK pour déverrouiller la télécommande.
14 Bouton TURBO :
Appuyez sur ce bouton pour activer ou
désactiver la fonction Turbo,qui permet à l'appareil d'atteindre la
température sélectionnée le plus rapidement possible. En mode de
climatisation, l'appareil souffle son air froid avec le ventilateur à
vitesse maximale. En mode de chauffage (modèles de chauffage-
climatisation seulement), l'élément chauffant produit rapidement de
la chaleur.
15 Bouton CLEAN AIR (certains modèles) :
Ce bouton
active l'ionisateur ou le collecteur de poussière à plasma (selon le
modèle), ce qui contribue à éliminer le pollen et les impuretés de
l'air.
Indicateurssur l'affichage
1 Affichage :
L'affichage indique la température sélectionnée. Si la
minuterie est activée, il indiquera les délais de mise en marche (ON)
et d'arrêt (OFF) sélectionnés. Rien n'est affiché en mode ventilateur
(FAN).
2 Indicateur de transmission :
Cet indicateur clignote une fois
lorsque la télécommande transmet un signal à l'unité intérieure.
3.

!!
Utilisation de la télécommande
Installation et remplacement de batteries
La télécommande nécessite deux piles alcalines sèches
(LR03X2).
1.Pour installer les piles, faites glisser le couvercle du
compartiment à piles et insérez les piles en positionnant les
côtés positif et négatif aux endroits indiqués par les
symboles (+) et (-) dans le compartiment.
2.Utilisez la même méthode pour remplacer les piles
REMARQUE
1. Ne remplacez pas les piles par des piles déchargées ou des
piles d'un autre type. Cela pourrait entraîner le mauvais
fonctionnement de la télécommande.
2. Si vous ne comptez pas utiliser la télécommande pendant
plusieurs semaines, retirez les piles. Une fuite des piles
pourrait endommager la télécommande.
3.
Si la télécommande est utilisée normalement, les piles devraient
durer environ 6 mois.
4. Remplacez les piles quand l'unité intérieure n'émet plus de bip
pour confirmer la réception du signal ou si l'indicateur de
transmission de la télécommande ne s'affiche plus.
5. Ne jetez pas les piles dans une décharge municipale sans
triage. Ces objets nécessitent un traitement spécial et doivent
être mis au rebut séparément.
3 Indicateur de marche/arrêt (ON/OFF) :
Ce symbole apparaît lorsque
l'appareil est mis en marche à l'aide de la télécommande, et disparaît
lorsque l'appareil est arrêté.
4 Indicateur de mode : Appuyez sur ce bouton pour
afficher le mode de fonctionnement de l'appareil – AUTO, COOL, DRY,
ou HEAT (modèles de chauffage-climatisation seulement).
5 Indicateur de verrouillage : L'indicateur de verrouillage s'affiche
lorsque vous appuyez sur le bouton de verrouillage (LOCK).
L'indicateur disparaît si vous appuyez de nouveau sur le bouton LOCK.
6 Indicateur de minuterie : Cet indicateur montre les réglages de la
minuterie (TIMER). Si seule la minuterie de mise en marche est
activée, l'indicateur TIMER ON s'affiche. Si seule la minuterie de mise
en marche est activée, l'indicateur TIMER OFF s'affiche.Si les deux
minuteries sont activées, l'indicateur TIMER ON OFF s'affiche,
indiquant que les minuteries de mise en marche et d'arrêt
automatiques sont toutes deux activées.
7 Indicateur de vitesse du ventilateur : Appuyez sur le bouton FAN
SPEED pour régler la vitesse de ventilateur désirée (automatique,
faible, moyenne ou élevée). L'affichage ACL indiquera votre sélection,
sauf si vous l'avez réglée en mode automatique.
REMARQUE :
Les bulles de texte qui accompagnent la figure 2
sont ajoutées à des fins d'identification. Seuls les indicateurs
décrits par les bulles sont présents sur l'affichage lorsque vous
utilisez la télécommande.
4.
MODE AUTOMATIQUE
!!
REMARQUE
1. Utilisez le bouton MODE pour sélectionner le mode AUTO.
2. Appuyez sur le bouton TEMP pour régler la température désirée dans la
pièce. Les réglages de température les plus confortables se situent entre
21 et 28 °C.
3. Appuyez sur le bouton ON/OFF pour mettre le climatiseur en marche.
L'indicateur de marche s'allume sur l'affichage de l'unité intérieure. La
vitesse du ventilateur est réglée automatiquement et aucun indicateur de
vitesse n'est affiché sur la télécommande.
4. Appuyez de nouveau sur le bouton ON/OFF pour arrêter l'appareil.
1.En mode automatique, le climatiseur sélectionne le mode de
fonctionnement (climatisation, ventilation ou chauffage) en
fonction de la différence entre la température de la pièce et la
température réglée à l'aide de la télécommande.
2.Si le mode automatique ne vous convient pas, vous n'avez
qu'à sélectionner vous-même le mode désiré.
Modes climatisation (COOL), chauffage (HEAT –
modèles de chauffage-climatisation seulement) et
ventilateur (FAN)
1. Si le mode automatique ne convient pas, vous pouvez
sélectionner vous-même les modes climatisation,
chauffage et ventilateur.
2. Appuyez sur le bouton TEMP pour régler la température désirée
dans la pièce. En mode climatisation, les réglages les plus
confortables sont de 21 °C ou plus. En mode chauffage, les
réglages les plus confortables sont de 28 °C ou moins.
3. Appuyez sur le bouton FAN SPEED pour régler la vitesse du
ventilateur (AUTO, HIGH, MEDouLOW).
4. Le bouton ON/OFF allume le voyant de marche et met le
climatiseur en marche selon vos réglages. Appuyez de nouveau
sur le bouton ON/OFF pour arrêter l'appareil.
REMARQUE
Il n'est pas possible de régler la température en mode
ventilateur. Dans ce mode, seules les étapes 1, 3 et 4
peuvent être effectuées.
5

Déshumidificatioon(DRY)
REMARQUE
1. Utilisez le bouton MODE pour sélectionner le mode déshumidification (DRY).
2. Appuyez sur le bouton TEMP pour régler la température désirée entre 17 et 30 °C.
3. Quand vous appuyez sur le bouton ON/OFF, le voyant de marche s'allume et le climatiseur se met
en marche en mode déshumidification et règle le ventilateur à basse vitesse. Appuyez de nouveau
sur le bouton ON/OFF pour arrêter l'appareil.
Selon la différence entre la température réglée et la
température de la pièce, le climatiseur peut s'activer et se
désactiver plusieurs fois en mode déshumidification sans utiliser
les modes climatisation et ventilation.
Minuterie
Appuyez sur TIMER ON pour régler le délai de mise en marche
automatique et sur TIMER OFF pour régler le délai d'arrêt
automatique.
1. Réglage du délai de mise en marche
1.1 Appuyez sur le bouton TIMER ON. L'affichage numérique de la
télécommande affichera les mots TIMER ON, le dernier délai
réglé pour la mise en marche, et l'indicateur « h ». Vous
pouvez maintenant régler le délai de mise en marche de
l'appareil.
1.2 Utilisez le bouton TIMER ON pour régler le délai de mise
en marche de l'appareil.
1.3 Une fois le réglage terminé, une demi-seconde s'écoule
avant que la télécommande transmette le signal
au climatiseur. Après environ 2 secondes de plus,
l'indicateur « h » disparaît et la température sélectionnée
s'affiche de nouveau sur l'affichage ACL.
2. Minuterie d'arrêt automatique
2.1 Appuyez sur le bouton TIMER OFF. L'affichage numérique de la
télécommande affichera les mots TIMER OFF, le dernier délai pour
l'arrêt et l'indicateur « h ».
Vous pouvez maintenant régler le délai d'arrêt de l'appareil.
2.2 Appuyez de nouveau sur le bouton TIMER OFF pour régler le
délai d'arrêt de l'appareil.
2.3 Une fois le réglage terminé, une demi-seconde s'écoule avant
que la télécommande transmette le signal au climatiseur.
Après environ 2 secondes de plus, l'indicateur « h » disparaît et
la température sélectionnée s'affiche de nouveau sur
l'affichage ACL.
6
!!
3. Réglage du délai de mise en marche et d'arrêt
3.1 Appuyez sur le bouton TIMER ON. L'affichage numérique de la télécommande
affichera les mots TIMER ON, le dernier délai réglé pour l'activation (START), et
l'indicateur « h ». Vous pouvez maintenant régler le délai de mise en marche de
l'appareil à l'aide de la fonction TIMER ON.
3.2 Appuyez de nouveau sur le bouton TIMER ON pour régler le délai de mise en marche
de l'appareil.
3.3 Appuyez sur le bouton TIMER OFF. L'affichage numérique de la télécommande
affichera les mots TIMER OFF, le dernier délai réglé pour l'arrêt (STOP), et
l'indicateur « h ». Vous pouvez maintenant régler le délai d'arrêt de l'appareil.
3.4 Appuyez de nouveau sur le bouton TIMER OFF pour régler le délai d'arrêt de
l'appareil.
3.5 Une fois le réglage terminé, une demi-seconde s'écoule avant que la télécommande
transmette le signal au climatiseur. Après environ 2 secondes de plus, l'indicateur « h »
disparaît et la température sélectionnée s'affiche de nouveau sur l'affichage ACL.
Modification du réglage de la minuterie
•Pour modifier le délai de mise en marche (TIMER ON) ou d'arrêt (TIMER OFF),
appuyez sur le bouton correspondant et choisissez le délai voulu.
•Pour annuler le délai de mise en marche ou d'arrêt, réglez-le à 0:00.
REMARQUE
Le délai choisi correspond à une durée relative. Il s'agit du temps qui s'écoule à partir
du moment d'activation de la minuterie.
Avertissement
1. Les obstacles entre la télécommande et le récepteur de l'unité intérieure
peuvent empêcher le climatiseur de fonctionner.
2. Évitez tout contact de la télécommande avec du liquide.
3. Évitez d'exposer la télécommande à des températures élevées ou à des sources de
radiations.
4. Le récepteur infrarouge de l'unité intérieure ne doit pas être exposé directement à la
lumière du soleil, car cela pourrait empêcher le bon fonctionnement du climatiseur.
5. Éloignez la télécommande des interférences électromagnétiques produites par les
autres appareils ménagers.
7
This manual suits for next models
3
Table of contents
Languages:
Popular Remote Control manuals by other brands


Kenwood
Kenwood KOS-A200 - Car Audio Expansion Module instruction manual

AUTEC
AUTEC Dynamic+ Series Instruction Manual for the use and the maintenance

Belden
Belden Grass Valley NV9700 user guide

One Remote
One Remote 4362 installation guide

Baldwin Boxall
Baldwin Boxall Care2 quick start guide

Philips
Philips TSU9600/05 Starter Guide