SENZARY IoTlogIQ Rotary IQ User manual

Table of Contents
Bob Assistant Overview
Purpose of predictive maintenance
Differentiating factors of the Bob Assistant
1. Quick Start-up Guide
1.1 What’s in the Box
1.2 Setting up your account online
1.2.1 Account and location (company address) creation
1.2.2 Adding device to the selected location
1.2.3 Setting up alert system
1.2.4 Setting up report system
1.2.5 Tracking the Bob Assistant
1.3 Gateway installation guide
1.3.1 LED
1.4 Bob Assistant assembly
1.4.1 Magnets –default configuration
1.5 Quick Installation Guide
1.5.1 Turning Bob Assistant ON
1.5.2 Start-up
1.5.3 Turning Bob Assistant OFF
2. Installation and Configuration
2.1 Bob Assistant assembly options
2.1.1 Rivet
2.1.2 Screw
2.1.3 Fixation Plate
2.2 Bob Assistant fundamentals
2.2.1 Learning stages
2.2.2 Reporting mode
2.2.3 Monitoring
2.2.4 Troubleshooting
3. Frequently Asked Questions
3.1 Which type of equipment is well suited for Bob
ASSISTANT?
3.2 What is the temperature limit?
3.3 When should Bob ASSISTANT be installed on the
equipment?
3.4 Can we start Bob ASSISTANT on a machine that is
not running?
3.5 Can Bob ASSISTANT or the machine be moved
without disrupting its operation?
3.6 What is the autonomy of Bob ASSISTANT sensors?
3.7 How do I interpret the gateway’s LED lights?
4. Customer Support
1
2
3
4
4
4
5
7
8
9
9
10
11
11
12
13
13
14
15
15
15
16
17
17
17
18
18
19
19
19
20
20
20
21
22

V1.0 | 03.28.2020 | Page 1
Bob Assistant Overview
The Bob Assistant is a low-power LoRaWANTM(a type of low-
power, wide-area wireless network) compatible vibration
sensor for indoor and outdoor predictive maintenance
industrial applications, coupled with a temperature sensor
for environmental conditions, a push-button, and an RBG LED
light for user interface.
Bob Assistant Overview
Bob Assistant measures and analyzes vibrations, temperature, and movement to
detect abnormal behaviors for a wide range of industrial machines, with artificial
intelligence capable of detecting operating anomalies before a failure occurs. Its
“Edge AI” allows it to analyze the vibrations coming from your machine. This vibration
data is then optimized and secured to guarantee the device’s ability to function
independently for several years.
Equipped with a dust and waterproof casing, the Bob Assistant is very easy to install
and does not require any configuration. Simply place the Bob Assistant on your
machine, start it, and after a few hours of learning, it will be able to detect any
abnormal behaviors from your machine.

When a machine starts breaking down, vibration drift is the first measurable symptom:
Purpose Of Predictive Maintenance
The Bob sensor uses AI to predict when equipment breakdowns might occur. In the process, saving costs
in machine evaluations.
However, a distinction must be made between breakdowns due to wear and tear (slow drift) and
breakage (fast drift). In certain cases, the vibration/movement/temperature anomalies can occur only a
few days before the failure. Your maintenance team will be able to analyze and intervene on the
equipment when the Bob Assistant reports an anomaly.
V1.0 | 03.28.2020 | Page 2V1.0 | 03.28.2020 | Page 2
Purpose of predictive maintenance

Differentiating Factors Of The Bob Assistant
Unlike traditional predictive maintenance
sensors, the Bob Assistant has zero infra,
zero wiring, and zero configuration. To
install Bob, simply place it on your
equipment. Bob can then work
autonomously for several years.
Bob uses its AI to learn quickly and learn
well! It applies analysis algorithms
embedded in its sensor to understand and
monitor all of your equipment.
Bob communicates across LoRaWAN®
networks, perfectly adapted to the
Internet of Things (IoT). The maximum
range for minimal energy consumption and
long battery life!
Your equipment production data is safe
with Bob. It retains it and sends only
encrypted scan reports.
V1.0 | 03.28.2020 | Page 3
Differentiating Factors of the Bob Assistant
1) Quick Start-up Guide
1.1 What’s in the box
KERLINK IFEMTOCELL Gateway 1x
NKE- Bob Assistant 1x
Magnets and nuts for Bob Assistant 2x
1.2 Setting up your device online –IOTLOGIQ SETUP
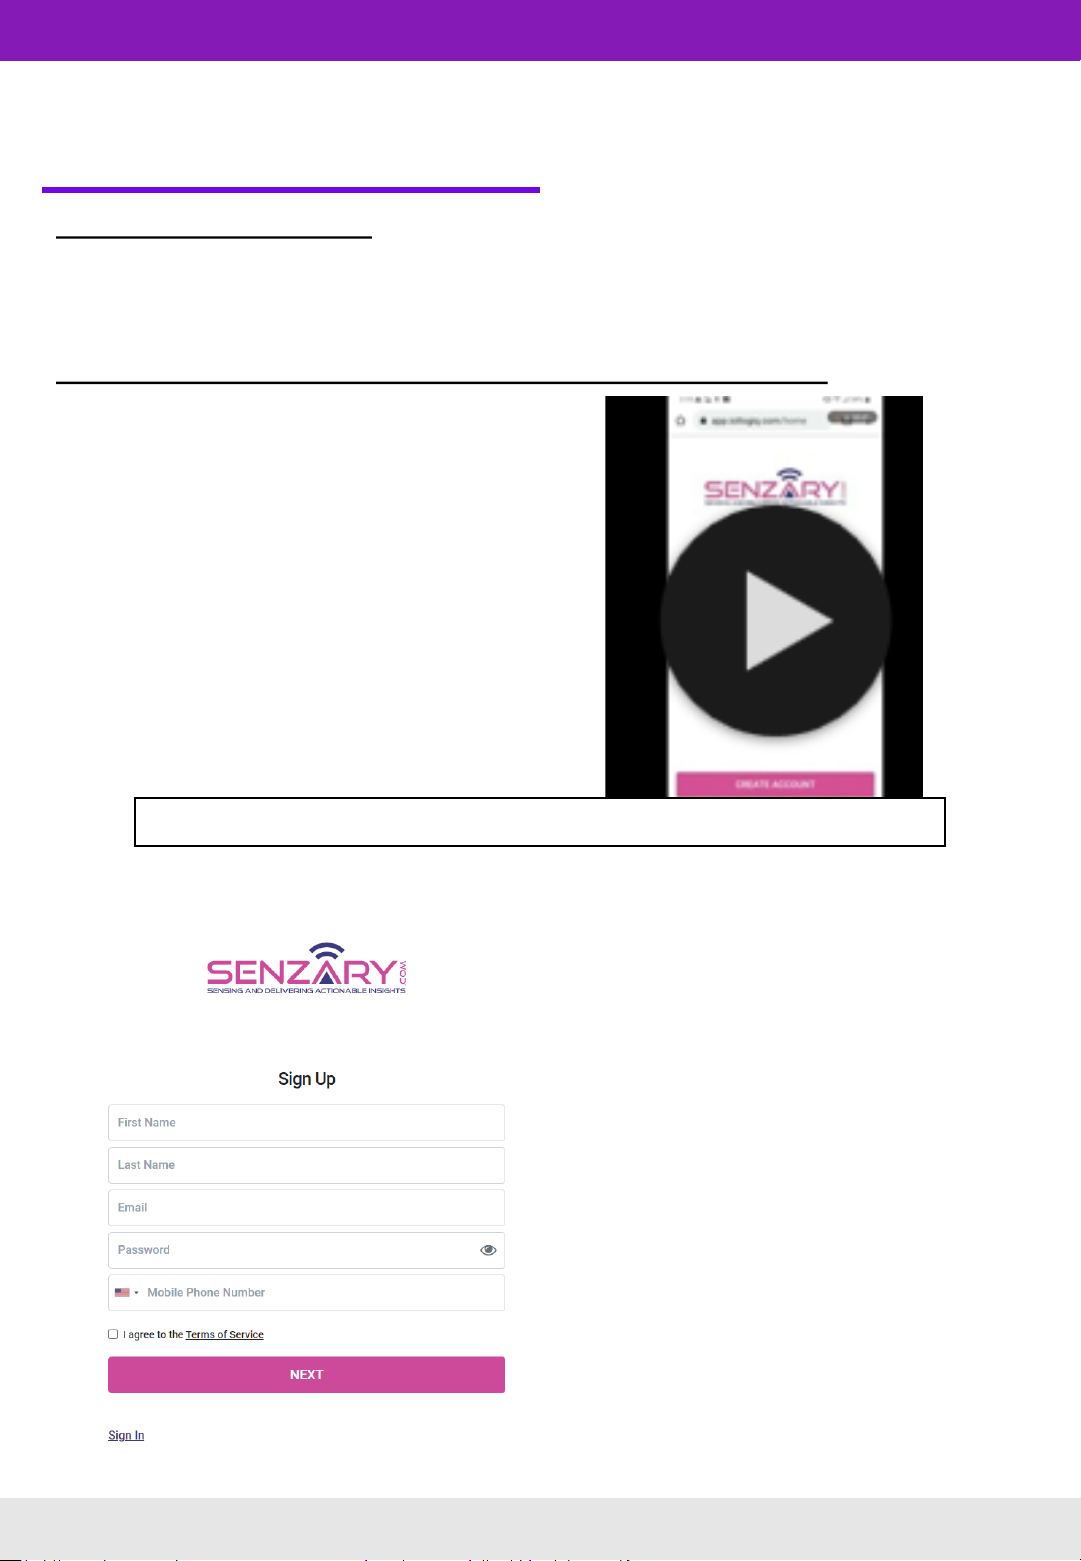
1.2.1 Account and location (company address) creation
Click on image for video
To add and view data and performance of
any sensors provided by Senzary LLC, first
create an account at app.iotlogiq.com
V1.0 | 03.28.2020 | Page 4
1.1 What’s in the Box | 1.2 Setting up your device online
This video will show you
- Setting up an account
- Adding your Bob sensor
- Using your mobile app
- Configure alerts and reports
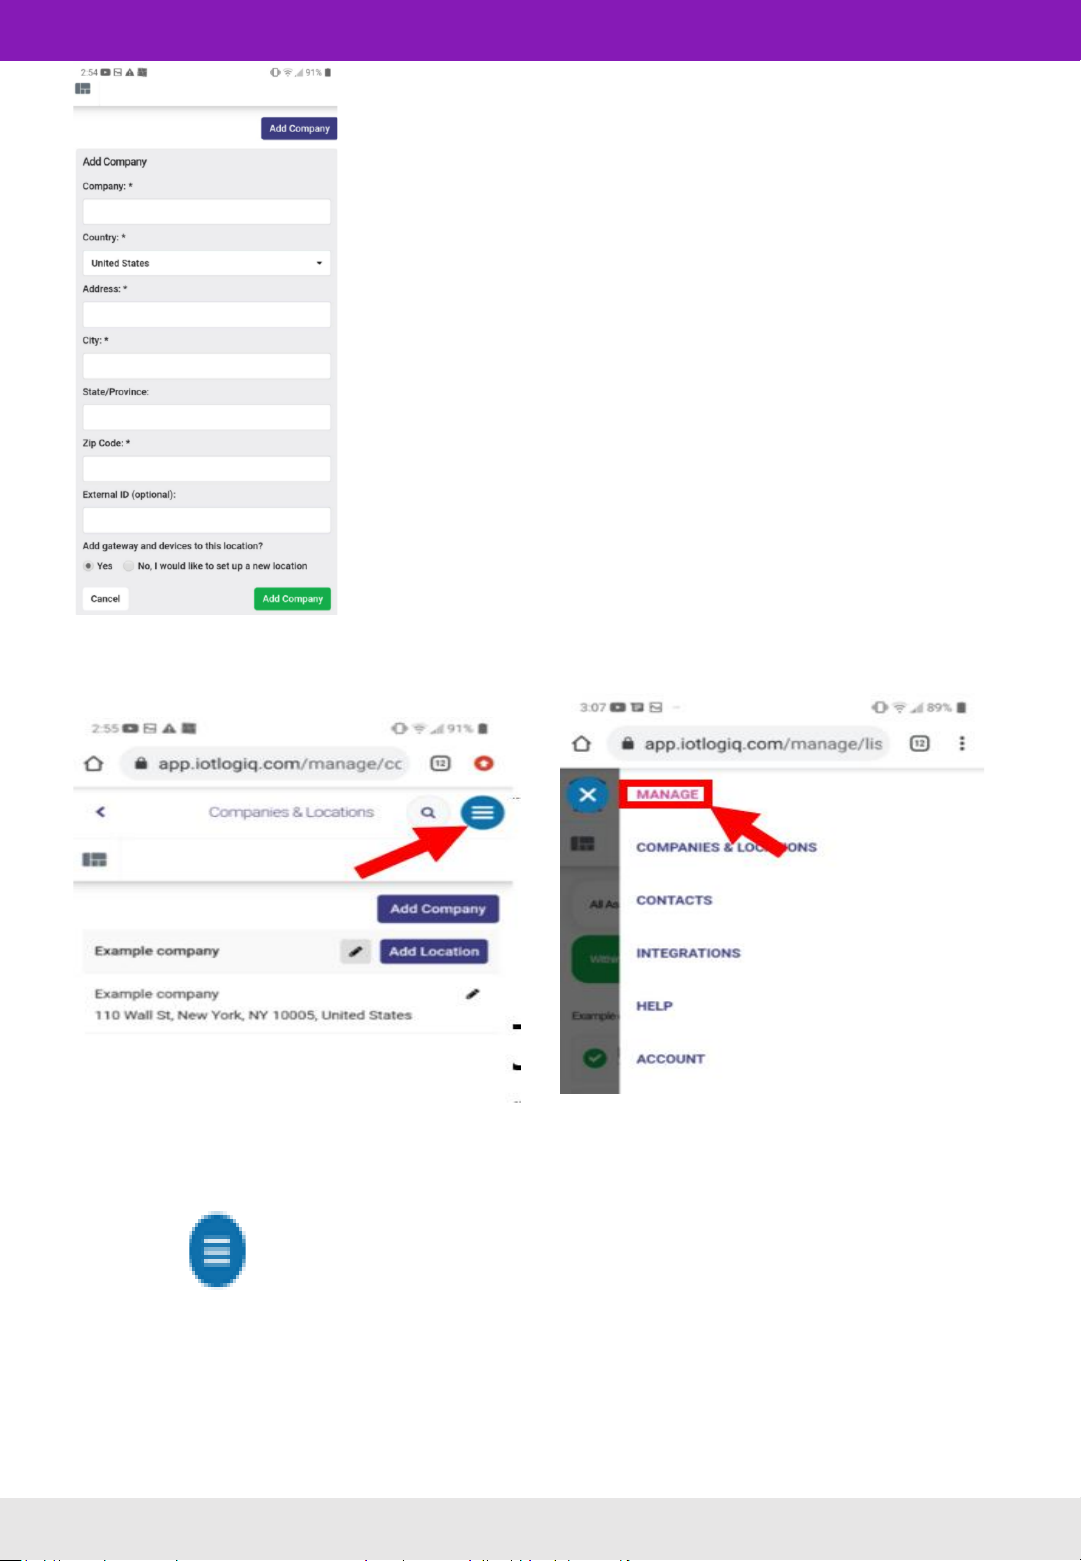
icon on the upper right side and click on MANAGE.
Include your company information
and location to continue. This will
allow you to allocate, track and
manage all devices in your
specified location.
At least ONE location must be
created to associate a sensor to
the account
1.2.2 Adding devices to the selected location
To add the Bob Assistant sensor to the list of devices used by your
company, go to the MANAGE LIST page. Here you will be able to manage
and track the performance of each device. To access this, click on:
V1.0 | 03.28.2020 | Page 5
Quick Start-up Guide
1.2 Setting up your device online

To set up the Bob Assistant sensor to your company, tap on the button. Then tap on the option.
You will then be taken to an Add Device page. Scan the QR code or enter
the Device ID to add the sensor.
V1.0 | 03.28.2020 | Page 6
1.2 Setting up your device online

You will then be directed to the Smart monitoring set up page, where you can edit alert and report
settings. An alternative way to set up and edit alerts is to return to the MANAGE page by tapping on
the icon on the upper right side. Here, tap on the
1.2.3 Setting up the alert system
button for your device, and then the
button. Then add or edit an alarm.
The Anomaly Level Alert Settings page allows for editing of alert
notifications sent to you.
Alert name: Create names for the type of alert being set up.
Threshold above: If vibration and temperature go above the listed
percentage of the norm, an alert notification will be set off.
Threshold below: If vibration and temperature go below the listed
percentage of the norm, an alert notification will be set off.
Reading(s) in a row before alert is sent: Change the number of times
an anomaly in vibration/temperature/movement has to go above or
below the threshold for an alarm to be sent
Rules (optional): Specific conditions for the alert to be set off can be
edited here
Notify Contact: Set up who receives notifications here
V1.0 | 03.28.2020 | Page 7
1.2 Setting up your device online
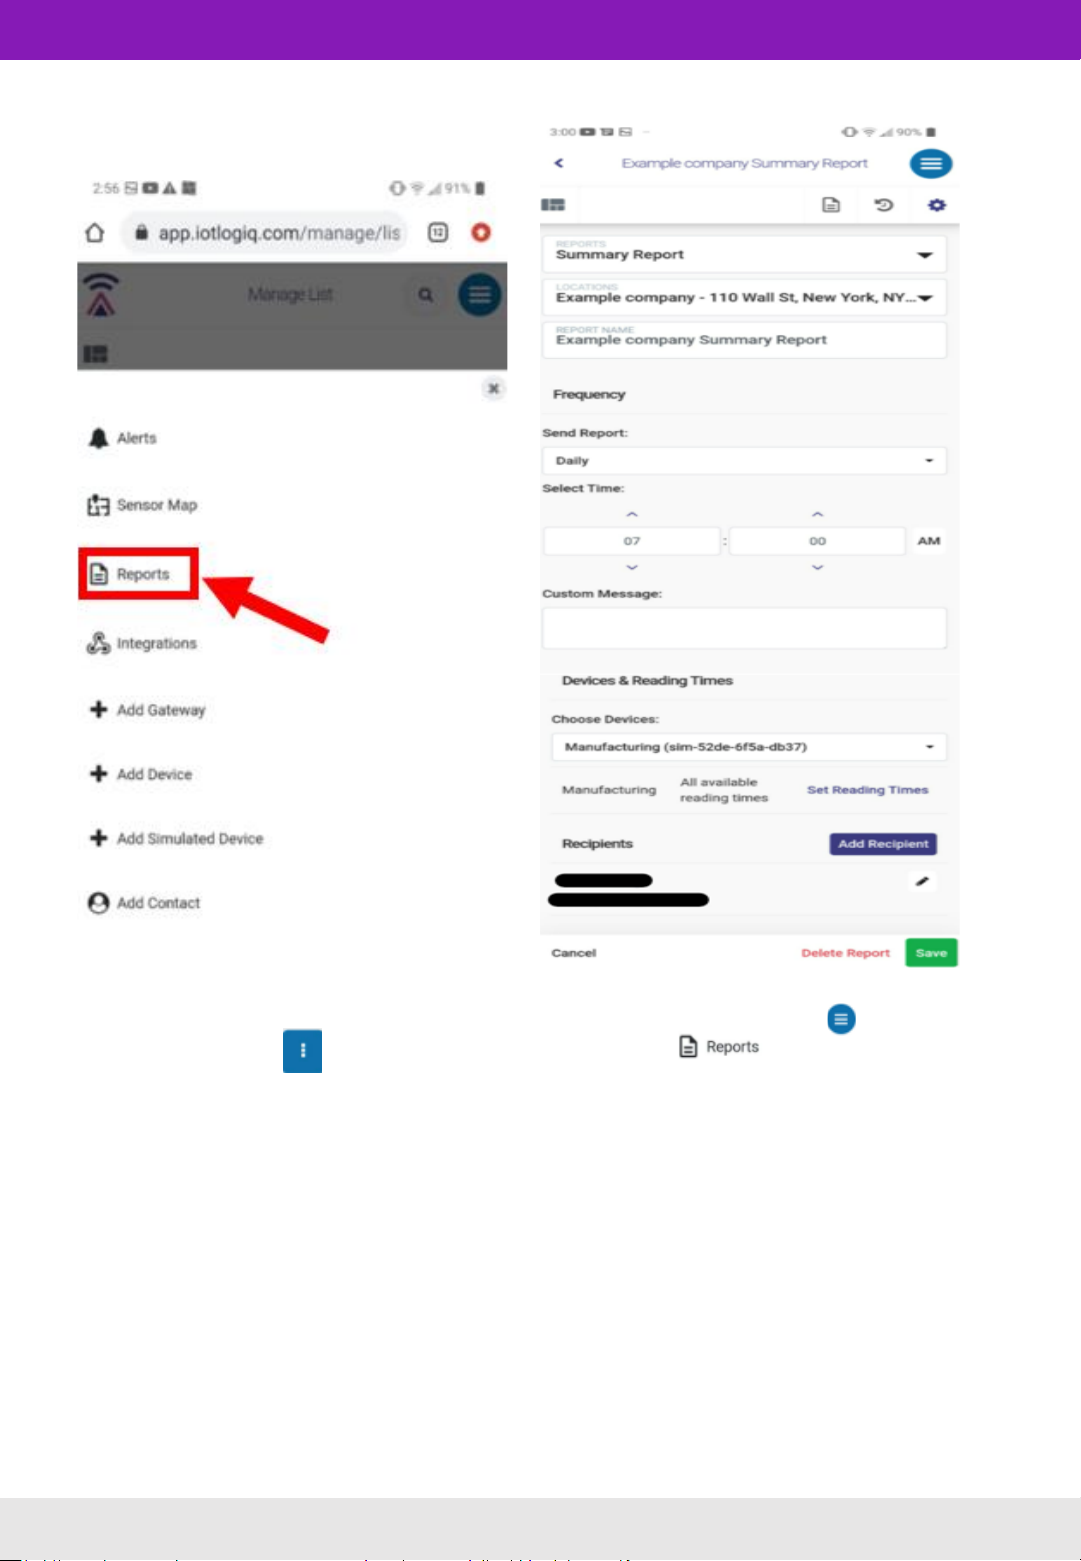
button of your device, and then the
The Summary Report page allows you to edit the type of report received and the frequency it is received.
To access the summary report page, return to the MANAGE page by tapping on the
1.2.4 Setting up the report system
icon on the upper
right side. Here, tap on the button. Then add or edit a
report.
V1.0 | 03.28.2020 | Page 8
1.2 Setting up your device online

1.2.5 Tracking the Bob Assistant
To view the status of all devices added, tap the icon on the
upper right side. Then tap MANAGE. Then tap on your company
name to view all devices associated with said company.
Tap on your device to see detailed and historical reports given
by the Bob Assistant.
V1.0 | 03.28.2020 | Page 9
1.2 Setting up your device online | 1.3 Gateway installation guide
To view more detailed data in the form of columns, click on
the icon on the upper left side of the MANAGE page.
Select your device on the list of options shown.
The dashboard shown allows you to download data, view
the operating status, view reports, anomaly distributions,
and average unnatural vibration reports.
1.3 Gateway installation guide
The gateway serves as a wireless access portal that allows the Bob Assistant to connect to the
cloud. Without it, you will not be able to access your device online. With its
LoraWancompatibility, the gateway can be placed up to 100 meters away from the Bob Assistant.
To access the internet, the device can be connected in the following ways:
-Through Ethernet connection: Plug the gateway into an ethernet connection through an RJ45
cable (not included)
-Through a 4G/3G cellular connection (only applicable for select gateways): Insert a USIM (not
included) with a data subscription (not included) to the gateway
Note that both configurations can be used in parallel.

Example:
Once the LoRa RF antenna, the Ethernet cable (if used) or the 4G/3G (with USIM card
inserted) and the power supply jack connector are plugged, the Wirnet™iFemtoCell-
evolution can be powered ON by connecting the power supply.
If both LED 1 and LED 2 are solid green and do not
blink, the device is operational.
For more information on interpreting the gateway’s
LED lights see §3.3.7 How do I interpret the
gateway’s LED lights?
V1.0 | 03.28.2020 | Page 10
1.3 Gateway installation guide
1.3.1 LED
1.4 Bob Assistant assembly
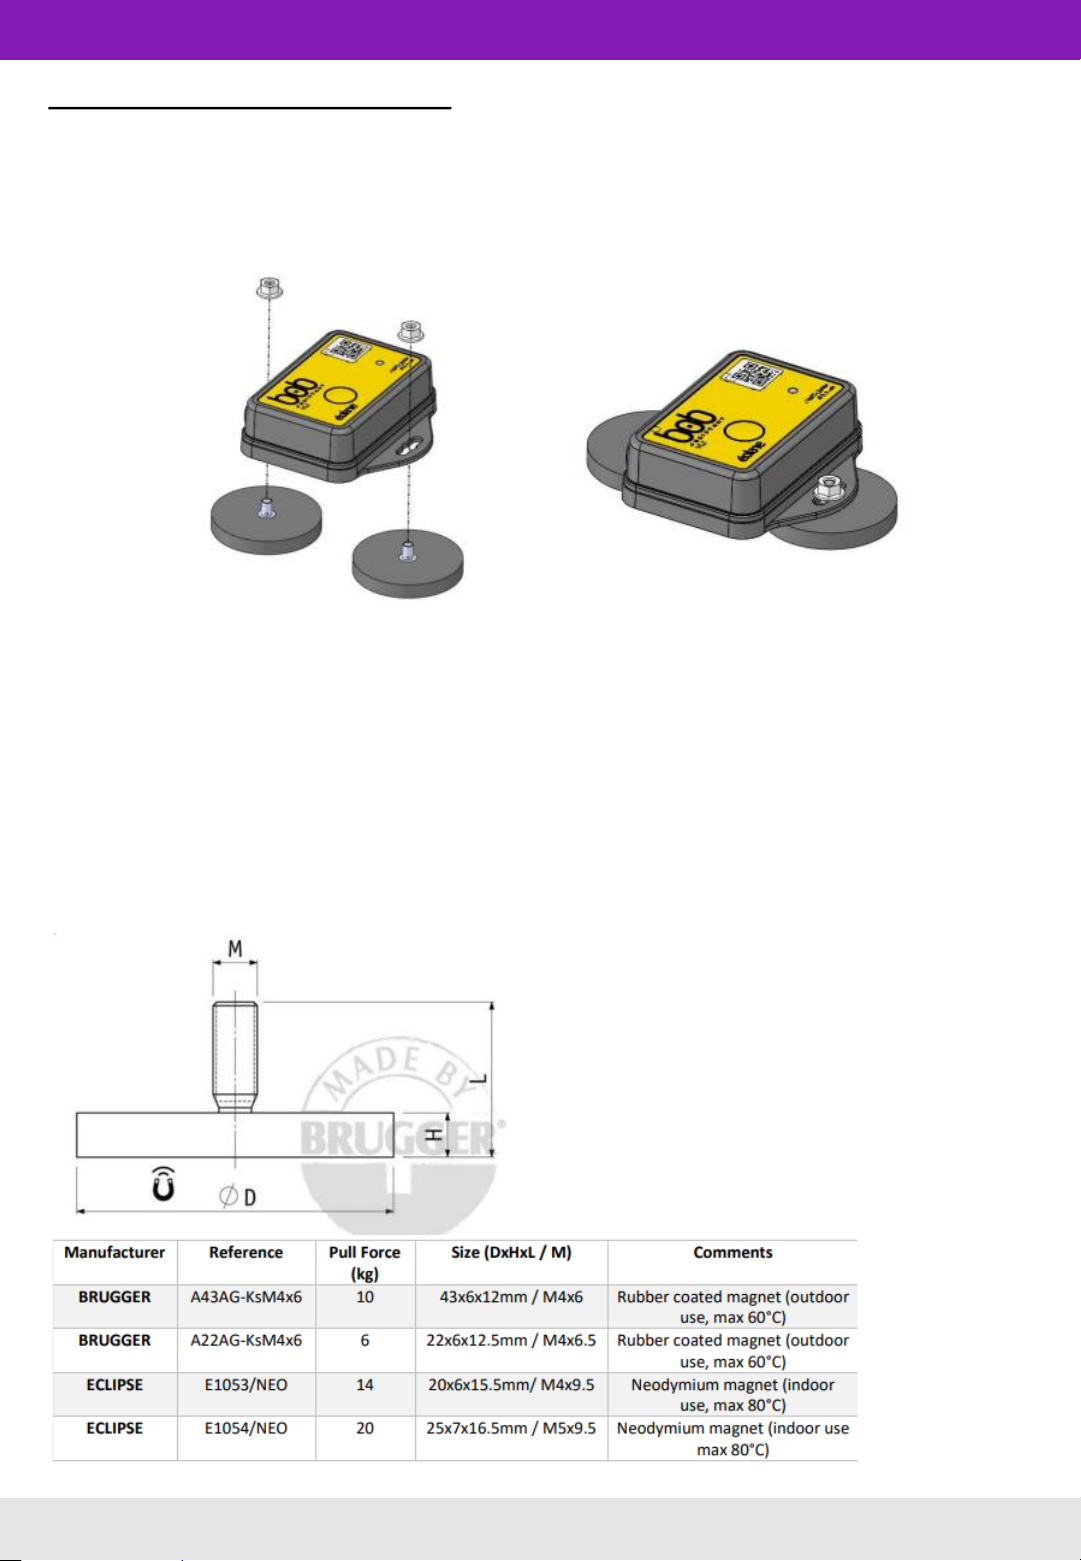
1.4.1 Magnets - default configuration
Bob Assistant is delivered with a magnet kit, so you can put your device on your machine out of
the box. To assemble, follow the image below:
Default configuration: -
Magnet (x2):
•Manufacturer: BRUGGER MAGNET
•Reference: A22AG-KsM4x6
Nut (x2):
•Manufacturer: BOSSARD
•Reference: BN11207 / 3061765
Validated references:
These magnet references have been successfully
tested as compliant with ETSI 300-019 class 5.2
when mounted on Bob ASSISTANT.
Class 5.2: all types of road vehicles used in areas
with a well-developed road system, except tracked
vehicles, motorcycles, scooters, and other vehicles
with low mass. The equipment can be mounted on
surfaces that may be subjected to flying stones. The
equipment may be mounted on passenger car
instrument panels to which high-frequency
vibrations from the engine, or from other parts
connected to the engine, may be transmitted. This
class also applies to forklift trucks and trains with
soft suspension and shock reducing buffers
V1.0 | 03.28.2020 | Page 11
1.4 Assembling Bob Assistant
1.5 Quick installation guide
Click on image for video
To install the Bob Assistant, simply place it on the device you’re measuring.
The first step when you install Bob ASSISTANT on a machine you want to monitor will be to start
the device, and make sure that:
o the LoraWanNetwork is reachable ( TWO GREEN LIGHTS ON YOUR GATEWAY )
o there is a certain vibration level of the machine
Refer to §1.5.1 Turning Bob Assistant ON for further instruction on how to turn the device on
Please be advised:
o if the vibration level was high enough at startup, but then is going below the minimum level of
detection in the first 7 days, the device might get stuck in a Learning Session. In this case, we
suggest changing Bob location on the machine to put it as close as possible to the vibration
source, or on a less vibration-insulated element.
o If a new machine cycle appears after the first seven days (e.g. production rate increase), it
might be considered by Bob ASSISTANT as an anomaly. In this case, you will have to send a
Downlink command to Bob ASSISTANT in order to add this cycle to the dataset.
Note: Bob Assistant can learn up to 32 different patterns of operation. It will learn automatically
during first SEVEN days, but you can also send a message to add a new learning pattern if a new
operating scheme will be added. ( different material, additional speed or other change affecting
the performance of the motor being monitored )
V1.0 | 03.28.2020 | Page 12
1.5 Installation guide
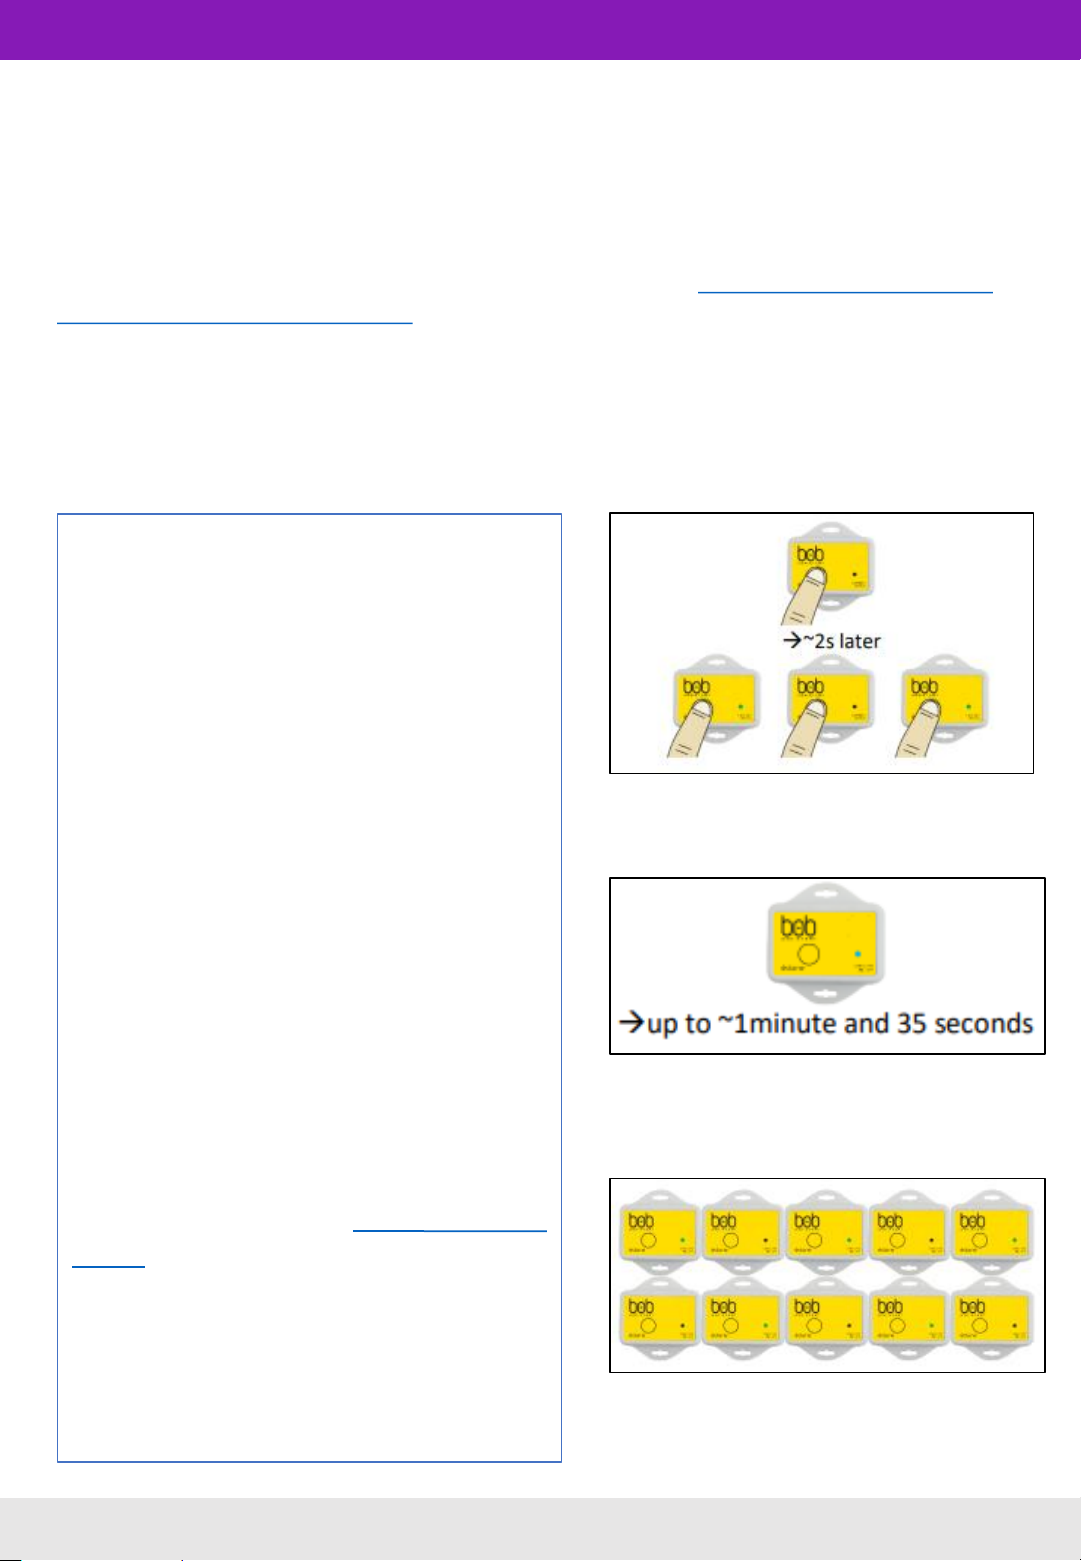
1.5.1 Turning Bob Assistant ON
To turn the device on, push and hold the button for 5 seconds. The LED will blink green twice and a
blue light will show for 15 seconds.
Bob ASSISTANT is OFF by default when delivered. In order to start Bob ASSISTANT, you need to:
•Place Bob ASSISTANT on the machine you want to monitor (see §1.4 Assembling Bob Assistant,
§2.1 Bob Assistant Assembly Options)
•Turn the device ON by pushing on the button for more than 2 seconds, the LED will then blink
twice in green. You can then release the button, the device is ON
Once switched ON, Bob Assistant starts
its initialization mode.
It then tries to reach the LoRaWAN
Network using OTAA (Over The Air
Activation) and ensures that the minimal
perceived vibration level is sufficient
(>0.01g). During this mode, the LED is
continuously blue ( ).
The initialization mode lasts for around 1
minute and 35 seconds (depending on
LoRaWAN Network coverage) A the end
of this initialization mode, if the device
has reached the Lora Wan Network, and
the perceived vibration level of the
machine is sufficient (>0,01g), then the
device will blink 5 times in green , the
LED will stay OFF and Bob Assistant is
ready to start its duty and enter the
Learning mode (see §2.2.1 Learning
stages)
Bob Assistant will then send a state
message to warn that the device has
started, and everything works fine.
V1.0 | 03.28.2020 | Page 13
1.5 Installation guide
Turn Bob Assistant ON
(2 green LED blinks)
Start up and initialization
(Continuous blue LED)
End of initialization
(5 green LED blinks)
Ensure that the machine connected to the Bob Assistant is vibrating. The device is going to try
to connect to the LoRaWAN network 6 times. If it does not connect after 3 hours, try to reset
the device by pushing the BUTTON for 15 seconds.
(For troubleshooting help, see §2.2.4 Troubleshooting)
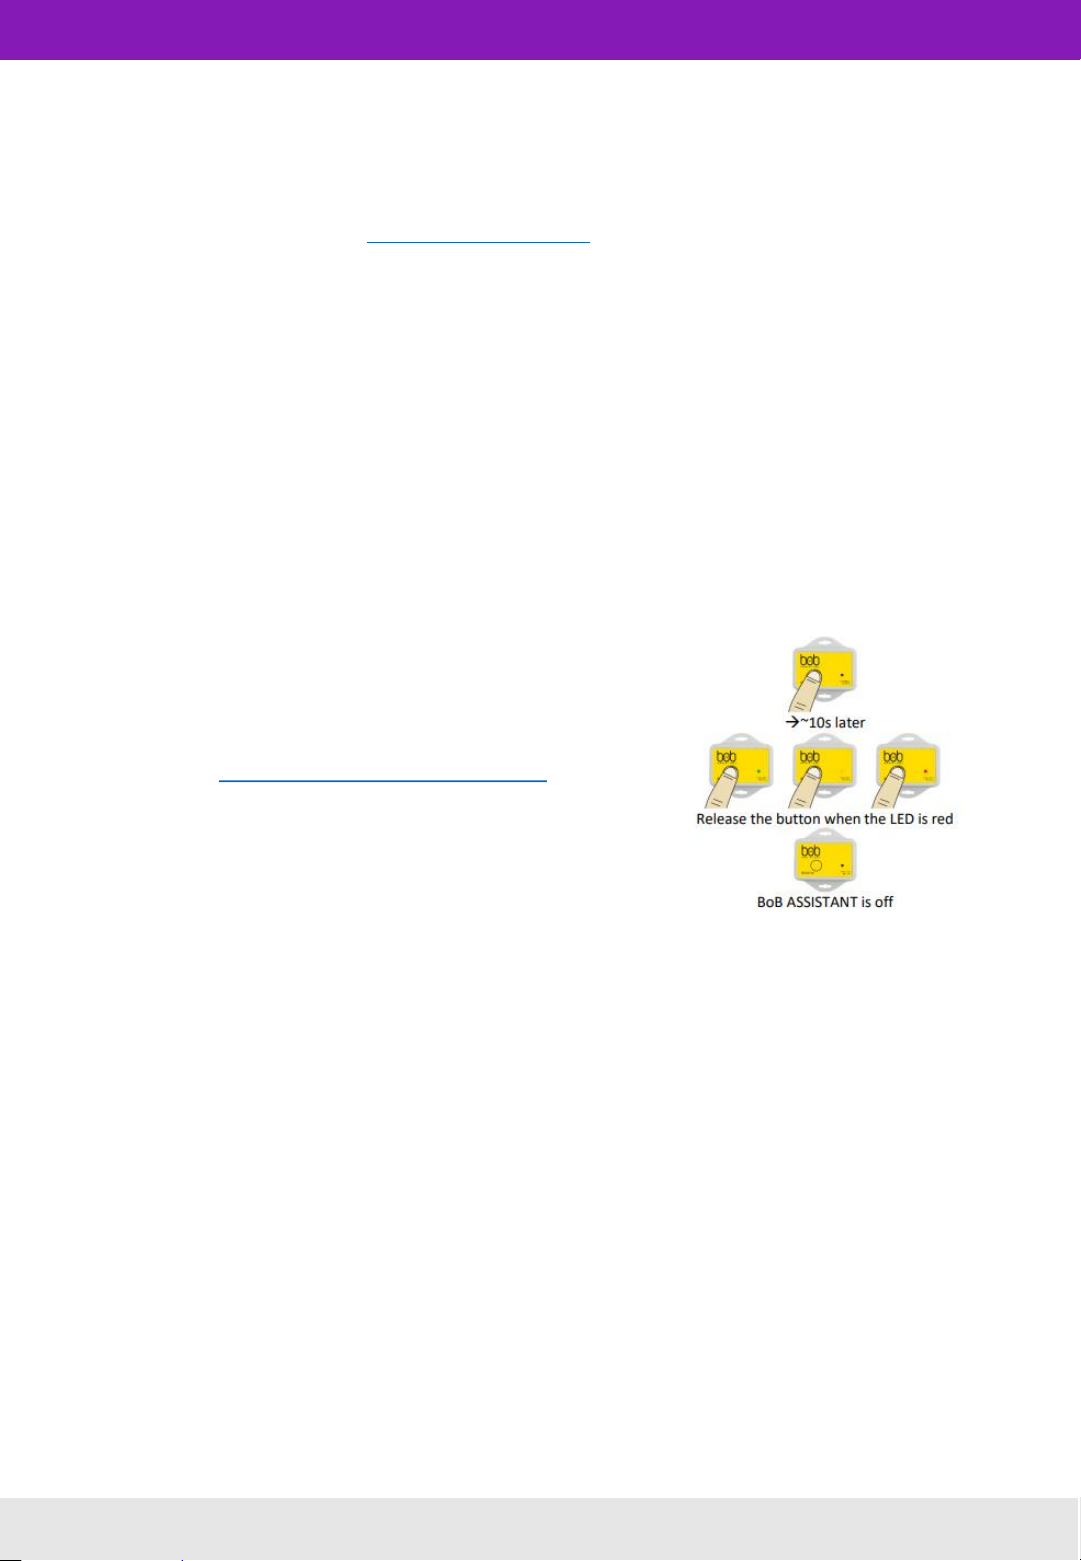
1.5.3 Turning Bob Assistant OFF
In case you need to move Bob Assistant from one machine to another and reset the vibration
learning, it is possible to turn Bob Assistant off.
To do so, push the button for ~10/12s, until you see the green/yellow/red sequence on the
LED. Once the LED is red, you can release the button, the device is off
Turn Bob Assistant is OFF (green->orange->red)
To turn Bob Assistant back on, follow the steps
described in §1.5.1 Turning Bob ASSISTANT ON
V1.0 | 03.28.2020 | Page 14
1.5 Installation guide

2) Installation and configuration
2.1 Bob Assistant assembly options
2.1.1 Rivet
Rivet properties: Ø4mm, length 7/10.2/13.3mm
Drilling: Ø4.1mm / Ø4.2mm
2.1.2 Screw
V1.0 | 03.28.2020 | Page 15
2.1 Bob Assistant assembly options
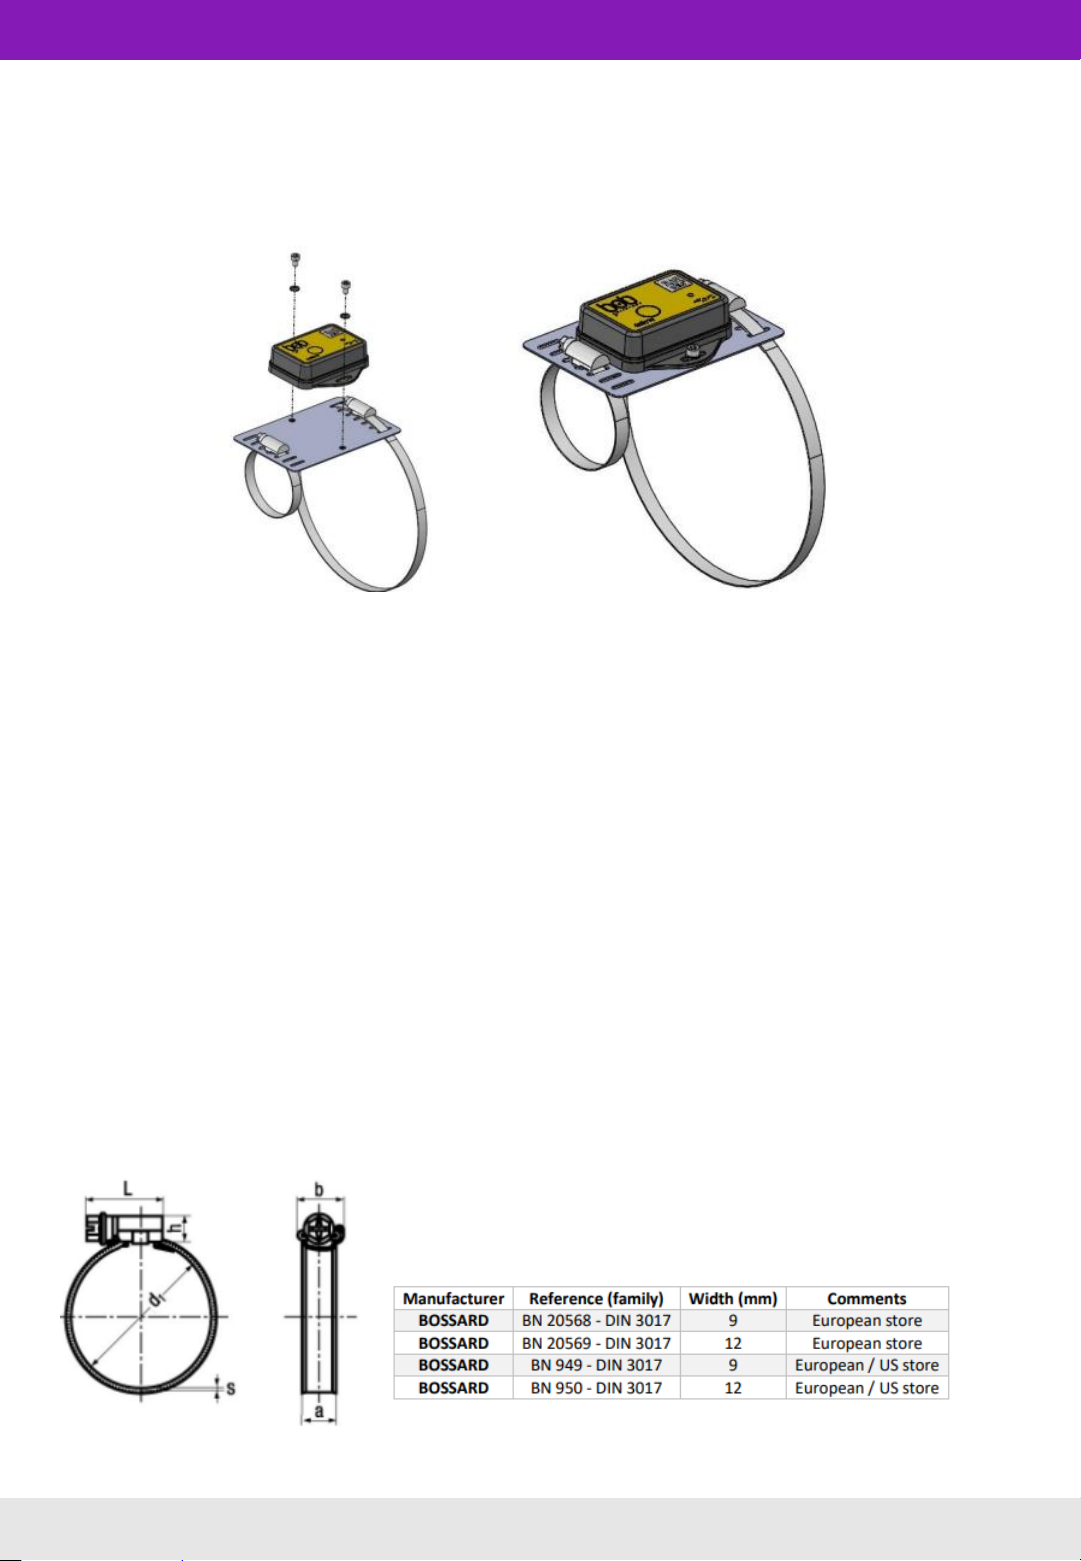
2.1.3 Fixation plate
In order to fasten Bob ASSISTANT on a circular surface, a fixation plate has been designed. It
can be fastened using hose clamps:
Default configuration:
- Fixation plate (x1):
•Manufacturer: EOLANE
•Reference: EOM1000200
- Hex socket head cap screw M4x6 (x2)
•Manufacturer: BOSSARD
•Reference: BN 612 - 1208152
- Serrated lock washer M4 (x2):
•Manufacturer: BOSSARD
•Reference: BN 4880 –1184040
Hose clamps references:
max value for width (a) = 15mm
V1.0 | 03.28.2020 | Page 16
2.1 Bob Assistant assembly options

2.2.1 Learning stages
Once the Bob Assistant is installed, it will start to learn the machine cycle(s). The Bob Assistant
will start its first learning sessions which will last for a few hours (~1 to 4 hours for a machine
with a simple vibration cycle, e.g. Air Conditioning unit).
In the next first seven days of operation, Bob Assistant will continue to its second learning
session. This session takes ~7 days and will continue to monitor new vibration signatures and
add them to the dataset.
During a learning session, Bob Assistant will wake up every 60 seconds (default values
configurable). The device will also send messages to keep you posted on the learning percentage
(0 to 100%).
2.2 Bob Assistant fundamentals
2.2.2 Reporting mode
After the first Learning session, Bob ASSISTANT will switch to the reporting mode, where it will
analyze the machine vibration every 5 minutes:
Bob ASSISTANT will process each sample to define whether a new learning session is needed, or
to prepare a report of the activity sent in periodic reports (every 3 hours, not configurable)
concerning the health of the machine during this period, regarding:
•the operation time of the machine,
•its vibration level,
•the vibration drift percentage,
•and prediction on potential failure distance in time, based on the vibration analysis of the last
24 hours, the last 30 days, and the last 6 months
The system will also report immediately when the machine starts and stops.
V1.0 | 03.28.2020 | Page 17
2.2 Bob Assistant fundamentals

2.2.3 Monitoring
After the learning mode, Bob ASSISTANT will switch to Monitoring mode, where it will continue
its reporting activity, and will start sending alarms if the drift in the vibration signature pass a
defined threshold (default value is 25% drift).
For each signal sampling (every 5 minutes by default), Bob ASSISTANT will process the sampled
signal, and compare it to its dataset.
2.2.4 Troubleshooting
Please be advised: If the LoraWan Network was unreachable or if the vibration level is below
the minimum level, the device will not start its duty, but will go back to deep sleep mode. To
restart the device, follow §1.5.1 Turning Bob Assistant on
V1.0 | 03.28.2020 | Page 18
2.2 Bob Assistant fundamentals
This manual suits for next models
1
Table of contents


