serviplus 222D9791P014 User manual

Partes y Características
Instrucciones para la Instalación
Funcionamiento
Cuidados y limpieza de su cocina
3
4
5
6
Información importante para su seguridad 2
Buenas Noticias 2
Solucionando problemas comunes
Contenidos:
Cocina EléctricaCocina Eléctrica
Guía de Usuario
Lea y conserve estas instrucciones. Esta guía contiene información útil para usted.
No. de parte: 222D9791P014
11

¡Felicidades!
Lea detenidamente este documento antes de utilizar su , contiene información útil que le permitirá obtener el mejor provecho de este
equipo. Siga los consejos de instalación, uso y cuidados de su así como las advertencias para una mayor seguridad. Conserve estas
instrucciones para futuras referencias.
Usted ha adquirido un producto de gran calidad y tecnología de avanzada. Nuestro compromiso es brindarle el mejor servicio porque su
satisfacciónesnuestraprioridadnúmerouno.
estufa
estufa
Buenas Noticias
NOTA
Conserve la factura de compra de su estufa. Este documento deberá ser presentado si requiere algún
servicio de reparación. La fecha de la factura establece el período en el que la garantía de servicio
tiene vigencia.
Las instrucciones que aparecen en este manual pueden no cubrir todas las posibles condiciones y
situaciones que puedan ocurrir. El uso del sentido común y la precaución deben ser aplicados
durante la instalación, operación y mantenimiento de éste y cualquier electrodoméstico.
IMPORTANTE
DURANTE LA INSTALACION
ADVERTENCIA Sinosesiguecorrectamentelainformacióncontenidaenestemanual,elfuegoounadescargaeléctricapodrían causar
dañosalapropiedad,lesionesalaspersonasosumuerte.
Remuevatodoelmaterialdeempaqueantesdeutilizar la estufa. Seleccione el cartón y el PSE (poliestireno expandido) y entréguelos a empresas de
reciclajeparaevitarqueestaspartesseconviertanendesechossólidos que afecten el medio ambiente. Nunca permita que los niños jueguen con los
materialesdeempaque.
Asegúrese de que su estufa sea apropiadamente instalada y conectada a tierra por un técnico calificado y de acuerdo con los requerimientos del
códigoeléctricodesupaís.(Aplicaparamodelosconprevistaeléctrica).
En caso de una emergencia, conozca como desconectar el suministro de energía desde el interruptor automático del circuito (circuit breaker) o de la
cajadefusibles.(Aplicaparamodelosconprevistaeléctrica).
Remuevalapuertadelhornodesu siestavaaseralmacenada.estufa
Al utilizar cualquier artefacto generador de calor, se deben seguir ciertas precauciones de seguridad:
DURANTE EL USO
IMPORTANTE No olvide que su estufa es para uso doméstico; el uso de ésta en actividades industriales o
comerciales reducirán notablemente la vida útil de su producto.
Información Importante de Seguridad
ADVERTENCIA Consulte un técnico calificado.
Riesgo de choque eléctrico.
El chasis está aterrizado por medio de un puente a la línea neutro,
si el código eléctrico local no permite aterrizarlo por medio del
neutro, desconecte el puente de puesta a tierra y utilice de acuerdo
al código local, una línea independiente para aterrizar el chasis a
través del tornillo de tierra.
CONEXIÓN A TIERRA
CONEXIÓN A
3 HILOS CONEXIÓN A
4 HILOS
REGLETA DE
LA COCINA
PUENTE
CONEXIÓN
ATIERRA
Para cambiar la conexión de 3 hilos a 4 hilos, desconecte el puente a tierra entre el chasis de la cocina y la línea
neutro. Conecte las fases de la extension en los extremos de la regleta de la cocina, la línea neutro en el conector
medio de la regleta y aterrice el cuarto hilo de la extensión a través del tornillo de tierra.
2
Permanezca cerca de su estufa mientras está cocinando. Muchos accidentes suceden cuando la persona se ausenta del lugar.
No almacene materiales inflamables en el horno o cerca de la plantilla; objetos de papel, plástico, objetos de tela y
latas de aerosoles podrían causar explosiones, fuego y daños de la propiedad. Mantenga estos materiales lejos de las
áreasdelosquemadoresyelhorno.
ADVERTENCIA Pararse, apoyarse o sentarse sobre la puerta abierta del horno o la gaveta de la estufa.
puede provocarqueéstasevuelquecausándolelesionesseriasyocasionándoledañosalproducto.

3
DISCOS ESPIRALES SELLADOS
INTERRUPTOR LUZ DEL HORNO
(ALGUNOS MODELOS)
INDICADOR LUMINOSO PARA EL
HORNO (MODELOS DE 30")
INDICADOR LUMINOSO GENERAL
(ALGUNOS MODELOS 20")
PERILLA DEL HORNO
PLANTILLA
INDICADOR LUMINOSO PARA LA
PLANTILLA (MODELOS DE 30")
PANEL DE CONTROL
GAVETA INFERIOR (ALGUNOS
MODELOS)
• Durante y después de su uso, no toque y no deje que materiales inflamables toquen las superficies de la
estufa hasta que se hayan enfriado. Bajo ciertas condiciones, éstas podrían sobrecalentarse y causarle
quemaduras. Las superficies alrededor de estas áreas pueden calentarse lo suficiente como para provocarle
quemaduras.
• Durante y después de su uso no toque y no deje que materiales inflamables toquen las superficies de la
estufa hasta que se hayan enfriado. Las superficies alrededor de estas áreas pueden calentarse lo suficiente como
para provocarle quemaduras. Bajo ciertas condiciones, éstas podrían sobrecalentarse y causarle quemaduras.
PRECAUCIÓN
• No utilice agua ni harina para extinguir fuegos provocados por grasas. Sofoque el fuego con una tapa o utilice bicarbonato de sodio, un químico
seco o una espuma tipo extintor.
• Mantenga la plantilla y el horno limpios. Las acumulaciones de grasa pueden provocar que se produzca fuego.
• Los residuos excesivos de limpiadores y aerosoles pueden prender fuego y causar daños y/o lesiones.
• Instale un detector de humo en su casa. Revíselo mensualmente para asegurarse que esté funcionando y reemplácele las baterías cada vez que
sea necesario.
• Coloque el asa de los utensilios lejos de los bordes de la estufa. Un golpe accidental al asa puede causar un derrame que le provoque dolorosas
quemaduras. No coloque el asa sobre el área de los otros discos pues puede sobrecalentarse; evite el riesgo de quemaduras y encendido de
materiales inflamables.
• Si el horno está en uso y debe abrir su puerta, colóquese al lado de la estufa y deje salir el aire caliente o el vapor antes de retirar o mover los
alimentos en su interior.
• El uso de forros protectores o papel de aluminio para cubrir el fondo del horno o cualquier otra parte de la estufa genera riesgo de choque eléctrico,
o corto circuito (aplica a los modelos con prevista eléctrica) o fuego. Solamente utilice papel de aluminio para hornear si este se utiliza como
cobertor de los alimentos.
• No toque el bombillo del horno con un trapo húmedo cuando esté caliente. Si lo hace podría quebrarse el bombillo. Desconecte la estufa antes de
reemplazarlo.(Aplica sólo para modelos con esta característica).
De presentarse algún incendio en su cocina:
• Llame al Departamento de Bomberos inmediatamente. El Servicio de Emergencias 911 está disponible en muchas comunidades.
• Cuando se provoque fuego por grasas, sofoque la llama cubriendo el recipiente o el área con una tapa. Apague la estufa. No quite la
tapa hasta que se enfríe.
• Si el fuego se origina en el horno, apague el horno y cierre la puerta para extinguir cualquier fuego dentro de él.
• Mantenga cerca de su estufa un extintor de incendios apropiado para este tipo de fuegos y asegúrese de saber cómo utilizarlo.
Partes y características
Este manual cubre diferentes modelos. Su estufa podría no tener algunas de las partes y características enumeradas a continuación.
RELOJ/TIMER ELECTRÓNICO
(ALGUNOS MODELOS)
INDICADOR LUMINOSO GENERAL
Algunos de nuestros modelos de 20" están equipados con un indicador luminoso general, el cual se encenderá cuando algún disco o el horno está
funcionando.
INDICADOR LUMINOSO PARA EL HORNO
Algunos de nuestros modelos están equipados con un indicador luminoso para el horno, el cual se encenderá cuando el mismo esté siendo utilizado.

Reviseellugardondeseráubicadalaestufa. Verifiquequehayaunafuentedegasydeelectricidadapropiadayqueelpisoesténivelado.Asegúresedeque
lasparedesosuperficiesalrededordelaestufaseanresistentesalcalorgeneradoporésta.
La siguiente ilustración le indicará la separación mínima que debe existir. Verifique que las superficies de contacto sean sólidas y niveladas. Ajuste los dos
tornillosniveladorestraserosconunallaveparaasegurarseunamayorestabilidaddelaestufa.
“A” La separación mínima entre la plantilla de la estufa y la parte
inferior de un armario de metal o de madera no protegida debe ser de
75 cm. Si la parte inferior del armario esta protegida ( *), la separación
mínima puede se de 60 cm.
“B”= Esta dimensión dependerá del ancho de su modelo : 51 cm si es
una estufa de 20 pulgadas o 76 cm si es una estufa de 30 pulgadas.
=
* Paraproteger la parte inferior de unarmario se debecolocar unalámina
de aglomerado retardador de llama de no menos de 6.5 cm de espesor,
una lámina o chapa de acero #28, una lámina de acero inoxidable de 0.5
mmdeespesorounaláminadealuminiode0.6mmdeespesor.
UBICACION
91.5
2.5
VISTA
FRONTAL
Altura mínima
de los gabinetes
acadaladode
la estufa
33
54.5
Profundidad máxima
de gabinetes sobre
la estufa.
VISTA
LATERAL
A
B+5
46
B
Dimensiones dadas en cm.
ADVERTENCIA Para reducir el riesgo de incendios evite colocar armarios sobre la estufa ya que el sobrecalentamiento de las
superficiesinferioresdelarmariopuedeproducirllama.
Ademas se previenen quemaduras, ocacionadas al tratar de alcanzar objetos que se encuentren sobre estos
armarios.
Otra forma de reducir este riesgo es instalando una campana extractora de grasas por debajo del armario. La
mismadebesobresaliralmenos13cmdelborde.
Tambienreduceelriezgodealcanzarobjetossobreellayproducirquemaduras.
CONEXION
Estacocinaestáequipadaconuncabledeconexióndedosotreslíneas;para110voltioso220voltiosrespectivamente.
Verifiqueenlaetiquetaubicadaenlaparteposteriordelproductoelvoltajeylacorrientenominal(amperaje).
ADVERTENCIA Si su cocina debe funcionar a 110 voltios y la conecta a 220 voltios, le causará graves daños al equipo y
perderá su garantía.
Si su cocina debe funcionar a 220 voltios y la conecta a 110 voltios, su rendimiento bajará
considerablemente.
Instrucciones para la Instalación
4
.
Algunos de nuestros modelos tienen luz en el horno. Para encender la luz del horno se deberá accionar el interruptor ubicado en el panel de
mandos.
1. Desconecte la cocina del tomacorriente.
2. Utilice un guante de cuero como protección contra una posible ruptura del bombillo.
3. Reemplace el bombillo por otro con las mismas condiciones de voltaje y potencia.
Algunosdenuestrosmodelosestánequipadosconunindicadorluminosoparalaplantilla,elcualseencenderácuandoelmismoestésiendoutilizado.
INTERRUPTOR LUZ DEL HORNO
INDICADOR LUMINOSO PARA LA PLANTILLA
Para reemplazar el bombillo del horno:
Elamperajetotalregistradoenlaetiquetadeterminalascaracterísticasdeloscablesdeconducciónparalaconexión;segúnseindicaenlasiguientetabla.
AMPERAJE CABLE DE COBRE
30-50
51-70
THHN AWG #8
THHN AWG #6
IMPORTANTE Existeriesgodeincendioodescargaeléctricasiseutilizancablesconcaracterísticasincorrectas.
Además:
Es necesario instalar un interruptor automático del circuito (circuit breaker) o una caja de fusibles en la instalación de la cocina.
El cable de tierra debe tener las mismas características de los cables de conexión.
Asegúrese de que los fusibles en la instalación tengan la capacidad requerida para el amperaje de su cocina.
Para un mayor detalle consulte el diagrama eléctrico ubicado en la parte posterior de su equipo.
Reconozca cual perilla controla cada disco.
Gire la perilla del disco seleccionado. La misma puede girar en ambas direcciones, sin embargo; se recomienda empezar con la temperatura más alta
del disco y después bajar a la posición deseada para finalizar el proceso de cocción.
Laposición1oMINIMAcorrespondealatemperaturamásbaja.
La posición 6 o MAXIMA corresponde a la temperatura más alta para cocimiento rápido.
Las primeras posiciones se utilizan para cocinar a fuego lento y/o para mantener los alimentos calientes.
Las últimas posiciones son para cocimiento rápido.
La perilla no necesariamente debe estar en una posición particular, utilice las posiciones existentes como guía.
El tamaño y tipo del recipiente utilizado puede influir en la posición requerida para
cocinar sus alimentos.
Para obtener un cocimiento más eficiente, apague el disco antes de terminar de cocinar. El calor
residual acumulado le permitirá completar el proceso de cocimiento y ahorrar energía.
PRECAUCION Nocoloqueobjetosinflamablescercaosobrelaplantillacuandolacocinaestáenuso.
Estosobjetospodríanderretirseoalzarllama.
NOTA
USO DEL HORNO:
Ubique las parrillas del horno en la posición deseada estando el horno frío. Remueva todos los utensilios de la parrilla antes de reubicarla. Tenga
precaución si debe reposicionar la parrilla mientras el horno está en uso. Para esto utilice guantes de cocina y sujete la parrilla con ambas manos. No
permita que los guantes entren en contacto con las resistencias o con las paredes del horno.
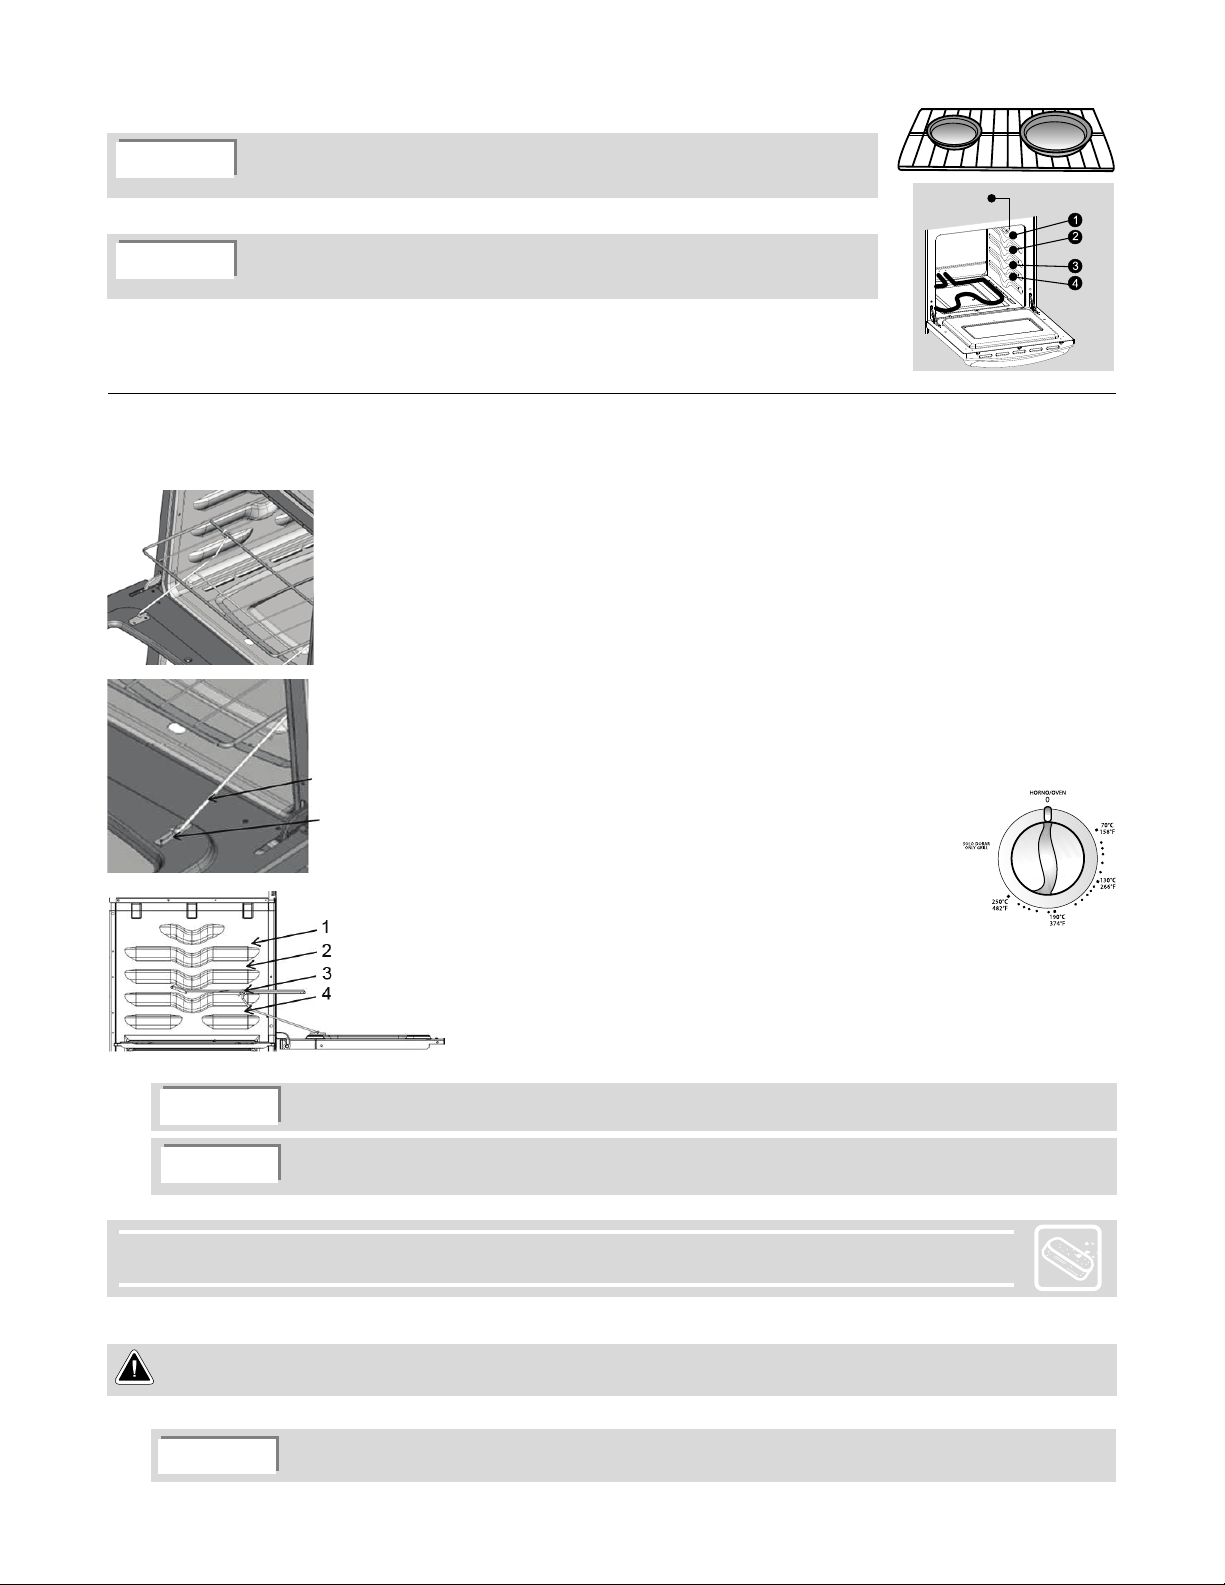
Posiciones recomendadas para la parrilla del horno
Alimentos Posiciones
de parrilla
Dorados
Galletas, queques, pasteles, bizcochos, panecillos, etc.
Asados, cortes de carne y aves, pasteles congelados, espumas, pan, etc.
1
2o3
3o4
Para remover,
Para reubicarla,
jale la parrilla hacia adelante hasta los frenos. Levante el frente y deslícela hacia afuera.
coloque la parrilla en los soportes guía de las paredes del horno. Incline el frente de la parrilla hacia arriba y deslícela hacia atrás.
Asegúrese de ubicar los alimentos en el centro de la parrilla para permitir una circulación
adecuadadelairecalientedentrodelhorno.
Utilice la bandeja del horno cuando hornee alimentos con grasa para evitar que la misma llegue hasta la resistencia inferior del horno.
IMPORTANTE Para obtener mejores resultados de horneo deje de 5 a 10 cm alrededor de los recipientes y asegúrese de que no se
toquen entre sí, no toquen la puerta, los lados y el respaldo del horno. El aire caliente debe circular de manera uniforme
alrededordeellos.
5
Funcionamiento
USO DE LA PLANTILLA:
NOTA
Antes de utilizar por primera vez los discos de su cocina, caliéntelos en la posición máxima durante
cinco minutos sin recipientes encima, para que la capa protectora que traen de fábrica se endurezca y
el disco tenga mayor resistencia y durabilidad.
Utensilios inapropiados
Con el fondo curvo
o deformado.
Más pequeños que
el diámetro del quemador. Que se vuelquen
por el peso de sus asas. Más grandes que
el diámetro del quemador.
2- No permita que las ollas o sus agarraderas
toquen las partes plásticas de la cocina
Para evitar estos incovenientes siga las siguientes instrucciones:
1- Seleccione de manera adecuada los utencilios de manera que estos sean de acuerdo con el tamaño del disco
PRECAUCION
Los cobertores plásticos que se encuentran en los extremos del respaldo de su cocina pueden dañarse si tienen
contacto con recipientes calientes.

6
En algunas ocaciones se recomienda
precalentar el horno antes de su uso para
obtener mejores resultados.
Los tiempos de cocimiento y las
temperaturas requeridas para hornear
pueden variar ligeramente con respecto a su
cocina anterior.
Dependiendo del tipo de cocina que usted adquirió, para utilizar el
horno debe considerar lo siguiente:
1. Si su cocina es de tres discos, la perilla del horno tiene cuatro
posiciones de temperatura para hornear:
MÁXIMO: El horno alcanza la temperatura máxima utilizando la
resistencia inferior y la superior al mismo tiempo.
MEDIO: El horno alcanza una temperatura media utilizando la
resistencia inferior y la superior al mismo tiempo.
HORNEAR: El horno alcanza la temperatura máxima utilizando
únicamente la resistencia inferior.
DORAR: El horno alcanza la temperatura máxima utilizando
únicamente la resistencia superior.
2. Si su cocina es de cuatro discos, la perilla del horno tiene un
termostato que le permite seleccionar la temperatura para
hornear los alimentos:
Gire la perilla siguiendo el sentido de las manecillas del reloj hasta
la temperatura deseada.
Para dorar los alimentos, continúe girando la perilla del horno hasta
la posición de SOLO DORAR. En esta posición se conectará la
resistencia superior a una temperatura fija y se desconectará
automáticamente la resistencia inferior.
Limpie cualquier derrame o mancha de manera inmediata. Una limpieza constante le reducirá luego el tiempo requerido para limpiezas mayores.
Asegúrese de desconectar su cocina antes de limpiarla. Sea precavido si la misma se encuentra caliente. Si utiliza una
esponja o tela húmeda para limpiar derrames, evite quemarse por el vapor que pueda producirse.
LIMPIEZA GENERAL:
Cuidados y limpieza de su estufa
IMPORTANTE
• No utilice limpiadores abrasivos, mallas metálicas, mallas de fibra sintética y otros que puedan dañar el acabado de
las superficies.
ADVERTENCIA
IMPORTANTE
• No utilice un termómetro para medir la tempertarura del horno, abrir constantemente la puerta del horno puede causar
lecturas incorrectas.
• Apague el horno unos minutos antes de retirar los alimentos para aprovechar el calor residual.
NOTA
Cuando utilice el horno por primera vez, es posible que perciba un olor extraño; el mismo desaparecerá con el
uso.
NOTA
Esta característica le permitirá el
funcionamiento de una resistencia a la vez
para hornear o para dorar, nunca de las dos
al mismo tiempo.
Parrilla autodeslizable (algunos modelos)
Nota: La parrilla autodeslizable no
debe usarse con el mecanismo de
gancho en las posiciones 1, 2 y 4.
1. La parrilla debe estar correctamente
descansada sobre las costillas laterales
del horno (posición 3).
2. Los ganchos deben estar ensamblados
a los soportes de las puertas.
Para su correcto funcionamiento, asegúrese de que la parrilla
autodeslizable se encuentre correctamente instalada siguiendo estos 2
pasos:
Gancho
Soporte
Utilice la bandeja del horno cuando hornee alimentos con grasa para evitar que la misma llegue hasta la
resistencia inferior del horno.
Frenos de
las parrillas
Posición de
las rejas
IMPORTANTE
En ciertas ocasiones el vidrio de la puerta puede empañarse a causa de la humedad
existente en el ambiente en el que se encuentra instalada la cocina.
Esta condición no es perjudicial y su estado es temporal variando su duración de uno a
cuatro minutos a partir del momento en que el horno es encendido.

7
Antes de limpiar el panel de control, gire las perillas hasta la posición de APAGADO y retírelas
tirando con fuerza de cada una de ellas. Limpie utilizando agua jabonosa caliente y una toalla.
Elimine los residuos y seque cuidadosamente. El exceso de agua en y alrededor de los controles
puede causarle daños a la estufa. Asegúrese de eliminar totalmente los limpiadores para evitar la
formación de manchas azuladas que con el tiempo se hacen difíciles de limpiar. Para reposicionar
las perillas, haga coincidir el lado plano en la cavidad de la perilla con la parte plana del vástago del
control. Después sólo presione la perilla hacia adentro.
Superficies porcelanizadas
Parrillas de la plantilla
Bandeja del horno
Contrapuerta
Otras partes del cuerpo de la
estufa
No utilice limpiadores abrasivos, mallas metálicas o cualquier otro producto pulidor que pueda
dañar la superficie.
Para eliminar las manchas utilice limpiadores y pulidores para superficies de acero inoxidable. Si se
utilizan detergentes líquidos, enjuague y seque con una toalla de tela suave.
Para eliminar manchas de agua dura (manchas de color blanco), utilice vinagre.
Superficies de acero inoxidable
(algunos modelos)
Parrillas del horno Retire las parrillas del horno antes de limpiarlas. Utilice un limpiador abrasivo suave. Enjuágue con
agua limpia y seque.
LIMPIEZA DE LA ENCIMERA:
Modelos de discos sellados
Si su cocina es de discos sellados, límpielos con un paño humedecido con agua tibia mezclada con detergente suave. Una vez
realizada esta operación, debe secarlos para ello caliente cada uno hasta que la humedad desaparezca por completo.
Si algún disco no es usado en forma periódica, es necesario que se le aplique una capa delgada de aceite vegetal sobre su
superficie para evitar que se oxiden.
Seque los recipientes antes de colocarlos sobre los discos para evitar que estos se agrieten por causa del choque
térmico.
ADVERTENCIA
Modelos de discos en espiral
LIMPIEZADELHORNO:
Asegúrese de que el horno esté frío y que todas las perillas estén en posición deAPAGADO.
Limpie las superficies del horno con una esponja o tela humedecida con agua tibia y un detergente líquido.
Asegúrese de que los soportes de la bisagra estén totalmente enganchados antes de soltar las horquillas del gancho de las
palancas de la bisagra.
La limpieza del horno es mucho más fácil si se retira la puerta. Siga las siguientes instrucciones.
Si su cocina es de discos espirales, no debe limpiarlos sumergiéndolos en agua. Las manchas generalmente se eliminan cuando
se calientan.
Para remover y limpiar las cazuelas de los discos, primero debe empujar levemente el disco contra el conector (bloque de
color negro), luego lo debe levantar para liberarlo de la cazuela y finalmente lo debe jalar hacia afuera del conector. Una vez
retirado el disco podrá remover la cazuela.
Para reubicar la cazuela y el disco, primero debe alinear el conector con el agujero lateral de la cazuela, luego debe insertar las
terminales del disco dentro del conector, empujándolos con fuerza y tratando de mantener la espiral nivelada con la cocina.
Finalmente presione el disco hacia abajo para que se apoye sobre la cazuela.
MONTAJE Y DESMONTAJE DE LA PUERTA DEL HORNO:
Retire la puerta del horno
1. Antes de retirar la puerta de la estufa, libere los ganchos que
arrastran la parrilla del horno de sus soportes, jalándolos firmemente
hacia afuera de la estufa.
2. Una vez abierta la puerta, levante con cuidado ambos seguros de la
bisagra hasta el tope.
Limpie las manchas, con un cepillo de cerdas suaves y detergente líquido. Remueva con una toalla
húmeda hasta eliminar los residuos y seque. De ser necesario, repita el procedimiento. Asegúrese
de eliminar totalmente los residuos de limpiadores para evitar que se dañe la porcelana durante el
calentamiento. No utilice limpiadores para horno en "spray".
Superficies porcelanizadas
Parrillas de la plantilla
Bandeja del horno
Contrapuerta
Otras partes del cuerpo de la estufa
Para limpieza general, utilice agua jabonosa tibia y una toalla.
Para manchas difíciles y de grasa, aplique detergente líquido directamente sobre la mancha.
Déjelo reposar sobre ella de 30 a 60 minutos. Remueva con una tela humeda y seque.
Laterales de la estufa y perillas
plásticas
Cómo limpiarlasSuperficies
8
CUANDO TENGA LA PUERTA AFUERA, POR NINGÚN MOTIVO ZAFE LOS SEGUROS YA QUE EL BRAZO
PRINCIPAL REGRESARÍA HACIA LA PUERTA CON MUCHA FUERZA.
ADVERTENCIA
Montaje de la puerta
3. Levante la puerta como si fuera a cerrarla, hasta que sienta que se
detiene por los topes levantados.
4. Levante la puerta sujetándola aproximadamente por la mitad, como si
fuera a cerrarla y jálela hacia afuera teniendo cuidado de que los
seguros no se desenganchen.
1. Introduzca la puerta en un ángulo aproximado de 45° hasta que sienta que topa con el marco de la estufa.
2. Baje la puerta como si estuviera abriéndola por completo y con cuidado desenganche los seguros.
3. Cierre la puerta completamente y escuchará un leve clic, esto le indica que la puerta se ha montado correctamente.
IMPORTANTE
Si el horno de su cocina tiene Sistema de Limpieza Continua, no será necesario que limpie las paredes laterales y el
techo del horno, dado que este sistema actúa cada vez que se utilice el horno. El sistema de limpieza continua va
quemando los residuos de grasa y las reduce a polvo, el cual puede ser recogido con una tela húmeda.
La resistencia inferior puede ser levantada ligeramente para propósitos de limpieza.
Seque las superficies con una tela seca o toalla de papel.
La puerta del horno es pesada. Por seguridad, colóquela acostada sobre una superficie plana con la cara interna de la
puerta hacia abajo mientras limpia el horno y no coloque ningún objeto sobre ella.
PRECAUCIÓN

9
Instalación del copete
1. Desempaque el copete localizado en la parte superior de la estufa.
2. Coloque el copete sobre la cubierta y cerciórese de que los orificios de ambas piezas, coincidan para que asiente bien el copete
(ver fotografía 1).
3. Coloque los 2 tornillos cabeza de gota en la cara inferior del copete y en la cara inferior de la cubierta, apriete bien con las tuercas
(ver fotografía 1). Use pinzas.
4. Coloque los refuerzos metálicos en posición (ver fotografía 2) y deslícelos hasta su ubicación final.
5. Coloque 1 tornillo de cruz por soporte en la parte superior del copete (Ver fotografía 2).
6. Colocar 2 tornillos de cabeza de gota para cada soporte, en la cara inferior del copete y en la cara inferior de la cubierta (Ver
fotografía 2), apriete bien con las tuercas. Use pinzas.
FOTOGRAFÍA 2
FOTOGRAFÍA 1

10
Se puede seleccionar entre mostrar el temporizador (Timer) o la hora del día. En cualquier caso el timer emitirá una señal audible al finalizar el
periodo seleccionado para indicar que el tiempo se cumplió.
USO DEL TIMER Y RELOJ DIGITAL (EN ALGUNOS MODELOS)
Cómo mostrar el reloj cuando el timer esta activo.
Presione el botón HORA cuando el timer esté en operación; la pantalla digital cambiará para mostrar el reloj, sin embargo el timer continuará en
descenso y emitirá la señal audible cuando el tiempo se haya cumplido. Presione el botón TIMER nuevamente para cambiar a mostrar el timer.
Para cambiar o cancelar el Timer.
Cuando el timer esté activo (luz LED encendida), utilice los botones "+" o "-" para modificar el tiempo restante, o presione el botón TIMER para
cancelar la función.
El conteo del timer va de forma descendente. Se escuchará una señal cuando falte un minuto para terminar el conteo. Después de esta señal, la
pantalla digital empezará a contar en segundos. Cuando el tiempo se cumpla, una señal final se escuchará. Presione el botón TIMER para detener
dicha señal.
1. Presione el botón TIMER para entrar al modo de edición.
2. Presione y sostenga el botón "+" o "-" y el tiempo cambiará de 5 en 5 minutos a la vez. Para cambiar el
tiempo de minuto en minuto, presione el botón sin sostener.
3. Una vez que ha definido el tiempo, presione el botón TIMER para iniciar el conteo.
Para activar el Timer
Para poner la hora del día.
NOTA: La primera vez que conecte la unidad o después de una falla en la electricidad, la pantalla digital del Reloj/Timer encenderá
intermitentemente, presione el botón HORA para activarlo.
1. Presione el botón de HORA.
2. Utilice los botones "+" o "-" para determinar el tiempo. Presione y mantenga sostenido el botón para
cambiar de 10 en 10 minutos a la vez. Para cambiar al tiempo de minuto en minuto, presione el botón sin
sostener.
3. Presione el botón de HORA para iniciar el reloj.
11
Solucionando problemas comunes
PROBLEMA
IMPORTANTE
Tome en cuenta que una visita por servicio de reparación le será cobrada si el problema no es causado por un error de
fabricación por defecto en los materiales, aunque su cocina esté en período de garantía.
Antes de llamar por un servicio de reparación, revise la siguiente lista. Esta incluye problemas comunes que no son provocados por errores durante
la fabricación ni por defectos de los materiales de su cocina. Un simple ajuste realizado por usted mismo podría ahorrarle tiempo y dinero.
POSIBLE CAUSA / SOLUCIÓN
• Se han acumulado restos de alimentos sobre el fondo del horno o la resistencia.
• Limpie los derrames existentes, espere a que el horno se enfríe antes de realizar esta operación.
La cocina no funciona • Asegúrese de que el cable de acometida eléctrica esté conectado correctamente a la toma de
corriente.
• Verifique si hay tensión o voltaje en la toma de corriente.
• El cableado de la casa no está completo o no es el adecuado.
• Consulte con un técnico calificado.
La luz del horno no funciona • Asegúrese de que el bombillo esté bien ajustado. Reemplácelo de ser necesario.
• El interruptor está en la posición 0, colóquelo en posición 1.
Los discos calientan demasido o no lo
suficiente
• Las perillas no se ajustaron en la posición de calentamiento adecuada.
• Uso de utensilios deformados o de poco peso. Utilice sólo utensilios de fondo plano, balanceados y
de peso mediano o más pesados con diámetro adecuado al disco.
Los resultados al hornear no son los
deseados.
Asegúrese de ubicar la parilla en la posición adecuada. Centre los alimentos en la misma de manera
que se permita una adecuada circulación del aire alrededor de los utensilios. Si se requiere,
precaliente el horno antes de colocar sus alimentos. Trate de seguir las recomendaciones de
temperatura y tiempo de horneo indicados en las recetas.
Se forman llamas dentro del horno o
sale humo a través de las ranuras
LAS ESPECIFICACIONES Y CARACTERISTICAS DEL PRODUCTO DESCRITAS O ILUSTRADAS EN ESTA GUIA DE
USUARIO ESTAN SUJETAS A CAMBIOS SIN PREVIO AVISO

12

Parts and features
Installation instructions
Operation
Care and cleaning
Important information for your safety
Good News
Solving common issues
Electric StoveElectric Stove
User`s Guide
Read and keep these instructions. This guide contains useful information.
14
14
16
16
17
18
23

¡Congratulations!
Read this document carefully before using your stove; it includes useful information that will allow you obtain the best advantage of this
equipment. Follow the advice on installation, use and care of your stove as well as warning for better safety. Keep these instructions for
future reference.
You have purchased a high quality advanced technology product. Our commitment is to offer you the best service as your
satisfactionisournumberonepriority.
Good News
NOTE
Keep your stove puchase invoice. This document must be presented in case of repair service.
The invoice date establishes the period of guarantee.
The instructions in this manual might not cover all the possible conditions and situations that may occur.
Common sense and caution must be applied during the installation, operation and maintenance of this
and any other household appliance.
IMPORTANT
Important information for your safety
DURING THE INSTALLATION
14
WARNING If the information in this manual is not appropriately followed, fire or electric circuit might cause damages to
the property, physical harm or even death.
Remove all packing material before using the stove. Separate the cardboard and the PSE (expanded polystyrene) and deliver them to recycling
companiestopreventthesepartsfromturningintosolidgarbagethataffecttheenvironment.Neverallowthatchildrenplaywithpacking materials.
Make sure your stove is appropriately installed and connected to ground by a qualified technician and in accordance with your country electric code
requirements.
When using any device that produces heat, you should follow these safety cautions:
CAUTION Contact a certified technitian.
Risk of electric shock.
The chassis is grounded through a bridge to the neutral line. If the
local electrical code does not permit grounding the chassis by
the neutral line, remove the grounding bridge and use according
to local electrical code, a separate line to ground the chassis
through the ground screw.
GROUNDING CONNECTION
Switching from 3-conductor to 4-conductor power-supply cord. Remove the grounding bridge. Connect the live
lines on each side of the connector block, the neutral line in the center of the conector block and connect the
fourth conductor (ground) to the chassis through the ground screw.
Incaseofemergency,knowhowtodisconnecttheenergyfromthecircuitbreakerorthefusiblebox.
Do not repair or replace any part of your stove unless specifically recommended in this manual. Any other repair must be made only by a qualified
techniciantoreduceriskofdamagetotheequipment.
Don'tmodifyoralterstoveconstructioneliminatinglevellegs,panels,cablecoverageoranyotherpartoftheproduct.
Toeliminateneedofreachingarticlesoverthestove(thatmightcauseburn)avoidinstallingcabinetsoverthestove.
Removeyourstoveovendoorifitisgoingtobestored.
1.
DURING THE USE
IMPORTANT Don't forget that yours is a domestic use stove. Its use in industrial or commercial activities will reduce your
product useful life significantly.
3
CONDUCTOR 4
CONDUCTOR
CONECTOR
BLOCK
GROUNDING
BRIDGE

Stay close to your stove while cooking. Many accidents occur when the cook leaves the place.
WARNING Standing, leaning or sitting on the open door of the oven door or the stove drawer might cause turning over
thus causing you serious physical harm or damage to the product.
Don't store flammable material in the oven or near the plate: paper objects, plastic, clothes and aerosol
cans might cause explosions, fire and damages to the property. Keep these materials out of the disks area
and oven resistances.
Don't let children climb over or play around the stove. Don't leave children alone and / or without
vigilance in the area this equipment operates. Children should never seat, lean nor get close to the
stove while in use or when recently used and hot. Ignoring this warning might lead to serious accidents
over which the manufacturing company has no liability under no circumstance
CAUTION During and after its use don't touch or let flammable material touch the stove surface until they are cool
Under certain conditions, they might overheat and cause burns. The surfaces over the disks and oven
resistances might be hot though they show a dark colour. Surfaces around these areas might heat enough
to cause burn.
.
Do not heat canned food without opening. Excess of pressure might cause explosion, damages and burns.
Don't use water or flour to extinguish fire due to grease. Suffocate fire with a lid or sodium bicarbonate, a dry chemical or an appropriate
fire extinguisher.
Watch grease closely when heating. Grease might cause fire if overheated.
Keep plate and oven clean. Accumulation of grease might cause fire production.
Excessive residue of cleaning and aerosols might produce fire and cause damages and / or injuries.
Use short or tight sleeves when cooking. Keep your apron tight around your body.
Install a smoke detector in your home. Check it every month to make sure it's working and replace batteries as needed.
Put the utensils handle away from the stove edges. An accidental hit to the handle might cause leakage and produce painful burns.
Don't put the handle over the area of the remaining disks as it might overheat. Avoid risk of burns and flammable materials burning.
If you are using the oven and need to open its door, stand beside the stove and let hot air or vapour go before removing food inside the
oven.
The use of protecting covers or aluminium paper to cover the bottom of the oven or any other part of the stove creates risk of electric
shock, fire or short circuit. Use aluminium paper only for baking if it is used as food cover.
Don't touch the oven light bulb with a damp cloth when the light bulb is hot. It might cause the bulb breaking and physical injuries.
Disconnect the stove before replacing the bulb.
(It applies only for models with these features).
Call the Fire Department immediately. The 911 Emergency Service is available in many communities.
When fire is due to grease, suffocate flame covering the container or the area with a lid. Turn off the stove. Don't take the lid away until
it is cold.
If fire starts in the oven, turn of the oven and close its door to extinguish any fire inside.
Keep an appropriate fire extinguisher near your kitchen, and make sure you know how to use it.
If fire appears in your stove:
15
Inappropriate utensils
Utensils with curved or
warped bottoms.
Utensils smaller than
burner diameter
Utensils that may tip due
to heavy handlesr.
Utensils larger than
burner diameter
2- Never allow pots or their handles to
touch range plastic parts
To avoid these problems, please follow these instructions:
Select pots and pans properly so that their size fits the size of the burner1-
CAUTION
Plastic covers at the ends of your range back panel may be affected if they come into contact
With hot containers.

16
Parts and features
This manual covers different stove models. Your stove might not include some parts and features detailed as follows:
COIL ELEMENTS/HOT PLATES
OVEN LIGHT SWITCH
(SOMEMODELS)
OVEN SAFETY LIGHT (30" MODELS)
GENERAL SAFETY LIGHT (20" MODELS)
OVEN KNOB
COOKTOP
COOKTOP INDICATOR LIGHT (30"
MODELS)
CONTROL PANEL
LOWER DRAWER (SOME MODELS)
Installation Instructions
Make sure your stove is appropriately installed and connected to ground by a qualified technician.
To reduce risk of fire, avoid placing kitchen furniture over the stove as its inferior surfaces' overheating might cause flame.
Another way to reduce this risk is by installing a grease extractor under the kitchen furniture. This extractor should overhang
at least 13 cms. out of the border.
WARNING
Review the stove location. Verify if there is an appropriate power source and the floor is well levelled. Make sure the walls or surfaces around the
stove are resistant to the heat produced by the stove.
The following diagram shows the minimum required separation. Check that contact
surfaces are solid and levelled. Adjust the two rear leveller screws with a key to
secure higher stability of the stove.
"A" = The minimum separation between the stove plate and the metal or non
protected wood kitchen furniture inferior part should be 75 cms. The minimum
separation between the stove plate and the protected kitchen furniture inferior
part must be 60 cms.
"B" = This dimension will depend on the model width: 51 cms. if this is a 20
inches stove or 76 cms. if it is a 30 inches stove.
To protect the inferior part of a kitchen furniture, a fire retarding briquette sheet no
less than 6.5 cms. thick must be placed or a #28 steel sheet, a 0.5 mm thick
stainless steel sheet or a 0.6 mm. thick aluminium sheet.
LOCATION
Make sure the oven is turned off and cold before replacing the oven light bulb.
CAUTION
OVEN SAFETY LIGHT
Some of our models are equipped with a luminous indicator for the Cook Top that turns on when the oven is in use.
GENERAL SAFETY LIGHT
Some of our models are equipped with a general luminous indicator that will turn on when some disk or the oven are working.
OVEN SAFETY LIGHT
Some of our models are equipped with a luminous indicator for the oven that turns on when the oven is in use.
Replacing the oven light bulb:
1. Disconnect the stove from the plug.
2. Use a leather glove as a protection against possible light bulb breaking.
3. Replace the light bulb by a new one with the same voltage and power conditions.
OVEN LIGHT SWITCH
Some of our models are equipped with an oven light. To turn the oven light on, the switch in the control panel must be turned on.
ELECTRONIC CLOCK/TIMER (SOME MODELS)
IMPORTANT There is risk of fire or electric discharge if improper cables are used.
Besides:
Acircuitbreakerorafusibleboxmustbeincludedinthestoveinstallation.
Thegroundcablemusthavethesamecharacteristicsofconnectioncables.
Makesurefusibleshavetherequiredcapacityforyourstoveamperage.
For more details please review the electric diagram in the rear side of your equipment
Operation
Recognize which knob controls each disk.
Turn the selected disk knob that can turn in both directions. However, it is recommended to start with the disk highest temperature and then
reduce it to the desired position to finish the cooking process.
Position 1 or MINIMUM corresponds to the lowest temperature.
Position 6 or MAXIMUM corresponds to the highest temperature for fast cooking.
The first positions are used for low heat cooking and / or to maintain food warm.
The last positions are used for fast cooking.
USE OF THE PLATE:
NOTE Before using the stove disks for the first time, heat them in the maximum position for five minutes
with no containers on, so that the protecting layer hardens and gives each disk more resistance and
durability.
The size and type of container might affect the position required for cooking.
To obtain a more efficient cooking, turn off the disk before you finish cooking. The accumulated
residual heat will allow you complete the cooking process and save energy.
CAUTION Don't put flammable objects near or over the plate when using the stove. These objects might melt or cause
flame.
NOTE
USE OF OVEN:
Put the oven grills in the desired position when the oven is cold. Remove all utensils on the grill before replacing it. Be careful if the grill must be re
positioned while using the oven. For this purpose, use kitchen gloves and fasten grill with both hands. Don't allow gloves contact resistances or
the oven walls.
Oven grill recommended positions
Food Grill
positions
Grill
Cookies, cakes, pastries, biscuits, bread rolls, etc.
Roast meat, meat and poultry cuts, frozen pies, bread, etc.
1
2o
r3
3or4
To remove it,
To replace it,
pull the knob ahead to the brakes. Lift the front and slide it out.
put the grill in the oven walls guide supports. Lean up the grill front and slide it back.
17
Thetotalamperageregisteredinthestickerdeterminescharacteristicsofconductioncablesforconnection,asshowninthefollowingchart:
CONNECTION
Thisstoveisequippedwithatwoorthreelineconnectioncablefor110voltsor220voltsrespectively.
Checkvoltageandnominalpower(amperage)intherearsticker.
WARNING If your stove must work with 110 volts and you connect it to 220 volts, it will cause serious damages to
your equipment and will lose the guarantee.
If your stove must work 220 volts and it is connected to 110 volts, efficiency decreases
considerably.
AMPERAGE COPPER CABLE
30-50 THHN AWG #8
THHN AWG #6
51-70
18
In some situations it is recommended to
reheat the oven before using, for better
results.
Cooking times and temperature required for
baking may vary slightly with respect to your
last stove.
Depending on the type of kitchen you purchased, take these
instructions into account:
1. If your stove has three disks, the oven knob has four temperature
positions for baking:
MAXIMUM: The oven reaches maximum temperature using the
inferior resistance and the superior resistance simultaneously.
MEDIUM: The oven reaches medium temperature using the inferior
resistance and the superior resistance simultaneously.
BAKING: The oven reaches maximum temperature using only the
inferior resistance.
GRILLING: The oven reaches maximum temperature using only
the superior resistance.
2. If your stove has four disks, the oven knob thermostat allows
selecting the temperature for baking:
Turn the knob clockwise to the desired temperature.
To grill food, continue turning the oven knob until the position ONLY
GRILL. In this position, the upper resistance will connect to a fix
temperature and will disconnect the inferior resistance
automatically.
Clean any leakage or stain immediately. Constant cleaning will reduce time required for higher cleaning.
Make sure you disconnect your stove before cleaning. Be careful if it is hot.
If you use a sponge or damp cloth to clean leakage avoid burning due to the vapor it might produce.
GENERAL CLEANING:
Care and cleaning of your stove
WARNING
• Don't use a thermometer to measure oven temperature, as constant door opening might cause wrong readings.
• Turn off the oven for some minutes before taking the food out to take advantage of the residual heat.
NOTE
When using the oven for the first time, you'll possibly perceive a strange smell which will disappear with the
oven use.
Gliding rack (on some models)
Note: The gliding rack should not be
used with the hook mechanism on
positions 1, 2 or 4.
1. The gliding rack should be correctly
seated on the lateral ribs of the oven
cavity (position 3).
2. Hooks should engage the door supports.
In order to obtain a proper operation, make sure the gliding rack is correctly
installed by following these 2 steps:
Hook
Support
Make sure food is placed in the middle of the grill to allow an adequate circulation of hot air inside the oven.
Oven Rack
Stops
Position of
oven rack
IMPORTANT
In order to obtain better results, leave 5 to 10 cms. around the containers and make sure
they are not touching each other, the door, the sides or the oven back. The hot air must
circulate around them uniformly.
Use the oven tray when baking greasy food to avoid grease reaches the oven internal resistance.
IMPORTANT
Sometimes the glass in oven door could steam up, caused by the environment moisture
around the range (stove).This condition is not harmful and it is temporary state. It could
happen from one to four minutes after the oven is on.
IMPORTANT
Don't use abrasive cleaners, metal netting, synthetic fiber netting or other materials that might damage the surface
finishing.
IMPORTANT

19
CLEANING THE COOKTOP:
Porcelain surfaces
Cooktop grates
Oven tray
Internal door
Other parts of stove body
Clean stains with a soft bristle brush and liquid soap. Remove with damp cloth, dry with cloth and brush
again with bar soap. Rinse and dry. Remove all cleaning residues to avoid porcelain damage at heating.
Don't use aerosol oven cleaners.
Before cleaning the control panel, turn the knobs to the TURN OFF position and pull hard each knob,
remove residues and dry. Clean the control panel with damp cloth and warm soap water. Make sure you
extract the water excess in the cloth before drying the panel, especially when drying around the controls.
The water excess in and around the controls might cause stove damage. To relocate the knobs, make the
flat side of the knob cavity coincide with the control rod flat side. Then, just press the knob inside.
Note: Remove the cleaner residues completely to avoid porcelain damage during heating.
Stainless Surfaces
(some models)
Do not use abrasive cleaners, metallic meshes or any other product polisher that could damage the
surface. To eliminate spots use cleaners and polishers for surfaces for stainless steel. If liquid detergents
are use, rinse and dry with a towel of soft cloth.
To eliminate spots of hard water (white spots), use vinegar.
Oven Racks The oven racks must be taken away for cleaning. Use a soft abrasive cleaner, rinse with clean water and
dry.
Sealed disks' model:
If your stove has sealed disks, clean them with damp cloth and warm water with soft soap. Then dry heating each disk until humidity disappears
completely.
If a disk is not periodically used, a vegetable oil thin layer must be applied on the surface to avoid oxidation.
Dry containers before placing over disks to avoid cracking due to thermal shock.
WARNING
Spiral disks' models
OVEN CLEANING:
Make sure the oven is cool and that all the knobs are in the OFF position.
Clean the surfaces of the oven with a sponge or cloth dampened with warm water and a liquid detergent solution.
Make sure that the hinge brackets are fully engaged before releasing the forks of the hook of the hinge levers.
Oven cleaning is much easier if the door is removed. Follow these instructions.
MOUNTING AND REMOVING THE OVEN DOOR
Remove the oven door
1. Before removing the door from the stove, release the hooks that drag
the oven rack from their supports, pulling them firmly outside the
range.
2. Once the door is open, carefully lift both locks from the hinge until they
stop.
If your stove has spiral disks, they shouldn't be submerged in water for cleaning. In general terms, stains are removed when
heating.
To remove and clean the disks' pan, push the disk softly against the connector (black block), then lift it to release from the
pan and pull outside the connector. Once the disk is released you can move the pan.
To relocate the pan and the disk, first align the connector with the pan lateral hole, then insert the disk terminals inside the connector
pushing hardly and trying to keep the spiral levelled with the stove. Finally, press the disk downwards to support it on the pan.
Stove lateral panels and
plastic knobs
For general cleaning, use warm soap water and a cloth.
For difficult and grease stains, apply liquid soap directly on the stain. Let it rest from 30 to 60 minutes,
remove with damp cloth and dry.
How to clean themSurfaces

20
WHEN HAVING THE DOOR OUTSIDE THE STOVE, DO NOT RELEASE THE LOCKS FOR ANY REASON AS THE MAIN
ARM WILL SNAP BACK AGAINST THE DOOR.
WARNING
Mounting the door
3. Lift the door as if you were going to close it, until you feel that it stops
due to the raised bumps.
4. Lift the door holding it by the middle, as if you were going to close it
and pull it outside making sure the locks are not released.
1. Insert the door at an approximate angle of 45° until you feel that it comes in contact with the frame of the range.
2. Lower the door as if you were going to open it completely, and carefully unhook the locks.
3. Fully close the door. You will hear a slight click indicating that the door is correctly mounted.
IMPORTANT
If your stove oven has the Continuous Cleaning System, the oven lateral walls and ceiling shouldn't be cleaned, because
this system works each time you use the oven.
The continuous cleaning system burns the grease residues which become dust that can be easily collected with damp
cloth.
The inferior element can be lifted for cleaning.
Dry the surfaces with dry cloth or paper towel.
The oven door is heavy. For your safety, lay it down with the internal face downwards while cleaning the oven, and don't
place any objects on it.
CAUTION
Table of contents
Languages:
Popular Stove manuals by other brands


TONWERK
TONWERK T-Art eco2 Installation instruction

Cast Tec
Cast Tec POLARIS INSET ECO Installation and operating instructions

Palazzetti
Palazzetti ECOFIRE series Use and maintenance

Brinkmann
Brinkmann TWO BURNER STAINLESS STEEL PROPANE STOVE owner's manual

Moretti Design
Moretti Design TURBO ELEGANCE CLEAN GLASS A 9 DEDICATED MANUAL

Jøtul
Jøtul F 500 Oslo Installation and operating instructions

Bio Bronpi
Bio Bronpi ELSA Y PAULA Installation, operating and servicing instructions

Thelin
Thelin PARLOUR How-to

Vermont Castings
Vermont Castings ACSB ACSM Installation instructions and homeowner's manual

Henley
Henley BLASKET Installation and operating instructions

Dimplex
Dimplex Westcott 5 WST5SE user guide

Kooper
Kooper 5914189 manual