SEVIC VISION LIBERTY COMPACT 11 User manual

VISION LIBERTY COMPACT 11
- Instruction Manual
SV101170
V20080701

1
TABLEOF CONTENTS
Introduction
2
Main Features
2
Safety
Precautions
3
Caution and Warnings
4
Location
of
Controls
5-7
Unit
5
Remote Control
6
Connections
8-9
Connecting Power
8
Connecting Headphones
8
Connecting to TV
9
Disc Operations
10-15
Start playback from menu
10
Pause during playback
10
Stop
playback
10
Fast forward and backward
11
Playing JPEG files
11
Playing MP3 files
12
Locating
a
Specific
Title,
Chapter
or
Track
12
Locating
a Title using TITLE menu
13
Repeat playing
13
Zoom
function
14
Subtitle
function
14
Multi-angle function
15
Analogue
TV
16-17
System and Preset Menus
16
Digital TV (DVB-T)
18-24
First Time Installation
18
DVB
menu
19
Basic Operations
24
USB/SD Operations
25
AV
IN Operations
25
DVD
Setup
26-27
Language
Setup
26
Custom
Setup
27
System
setting
28-30
Language
Setup
28
Display
Setup
29
Preference
29
Specifications
31
Rechargeable
Battery
use
31
Troubleshooting
32
Warranty Terms and Conditions
33

2
Introduction
Thank youfor choosing our portable device.The mainfeatures include a 7"
Wide Screen LCD monitor and a DVD/DVB-T/TV. The unit applies thelatest
state of art electronics and is designed for use at home,incar,in hotels,
offices. The unit is constructed to provide years of reliable,trouble-free
service and its compactsize allow taking it with youanywhere and it is
designed for quick and easy installation. Please read the entire instruction
manual supplied with this product prior to using. Please keep this manual
for later use.
The Package contents:
Compact 7” LCD Monitor with DVD player 1
Remote Control with battery 1
AC/DC PowerAdapter 1
Cigarette LighterAdapter 1
Audio/Video cable 1
Earphone 1
Portable Antenna 1
Carry Bag 1
Instruction Manual 1
If any item is damaged or missing, please contact your dealer
immediately.
Keep the packaging materials; you may need them to transport your
player in the future.
Note:
Changes or modifications made to thisequipment, not approved by us or parties
authorized by us will avoid all manufacture warranties.
Main Features
High definition colour7” 16/9 TFT LCD screen
Compatible disc: DVD, VCD, SVCD, CD, MP3, MPEG4.
Built-in rechargeable Lithiumpolymer battery
Built-in anti shock system (DVD-3s, CD-6s and MP3-25s)
Built-in TV Tuner (Analogue and Digital)
Built-in stereo speaker (2x1W)
PAL/NTSC system
Multi-language OSD
Full function remote control
SD/MMC Card reader (up to 2GB) and USB connection (1.1)
AV IN/OUT function

Safety Precautions
Please read the Manual carefully before using this player, and keep it for
any further consultation.
Warning: To
dangerous
volt
Caution: To re
important oper
maintenance inst
Warning: To aler
danger to listen
at
level.
alert the
user
about
age on
the spot.
mind
the
userof
ating and
ructions attached
t the user about
excessive audio
Warning:In orderto prevent the risk of fire or electric shock,do not expose
the machine to rain or humidity, and do not open the case due to
the high-voltage of interior accessories. Repairing work mustbe
done byspecialized personnel.
Caution: This DVD player contains a laser system.
Please note that hazardous radiation leakage may be
caused if the control buttons, adjust buttons or operation
process are used.
Do not open the case of the player toavoid direct laser
radiation. The visiblelaser light will come out when the
case is open or the binding mechanismis removed. Do not
stare at the laser beam.
Warning:Many problems may occur when this machine is
modified or refitted without authorization.
3

4
Caution and Warnings
1. Placement
To prevent fireor electric shock,do not exposethis appliance torain or
moisture. Do notplace the seton an unstablecart, stand, tripod,
bracket or table toprevent it fromfalling. Keep theunit away from
strong magnets, heat sources, directsunlight and excessive dust.If
the unitis brought directly from a coldto a warmlocation, moisture
maycondense inside theunit, wait for about one hour before
operating the unit,or remove thedisc and leave the unitturned on until
the moisture evaporates.
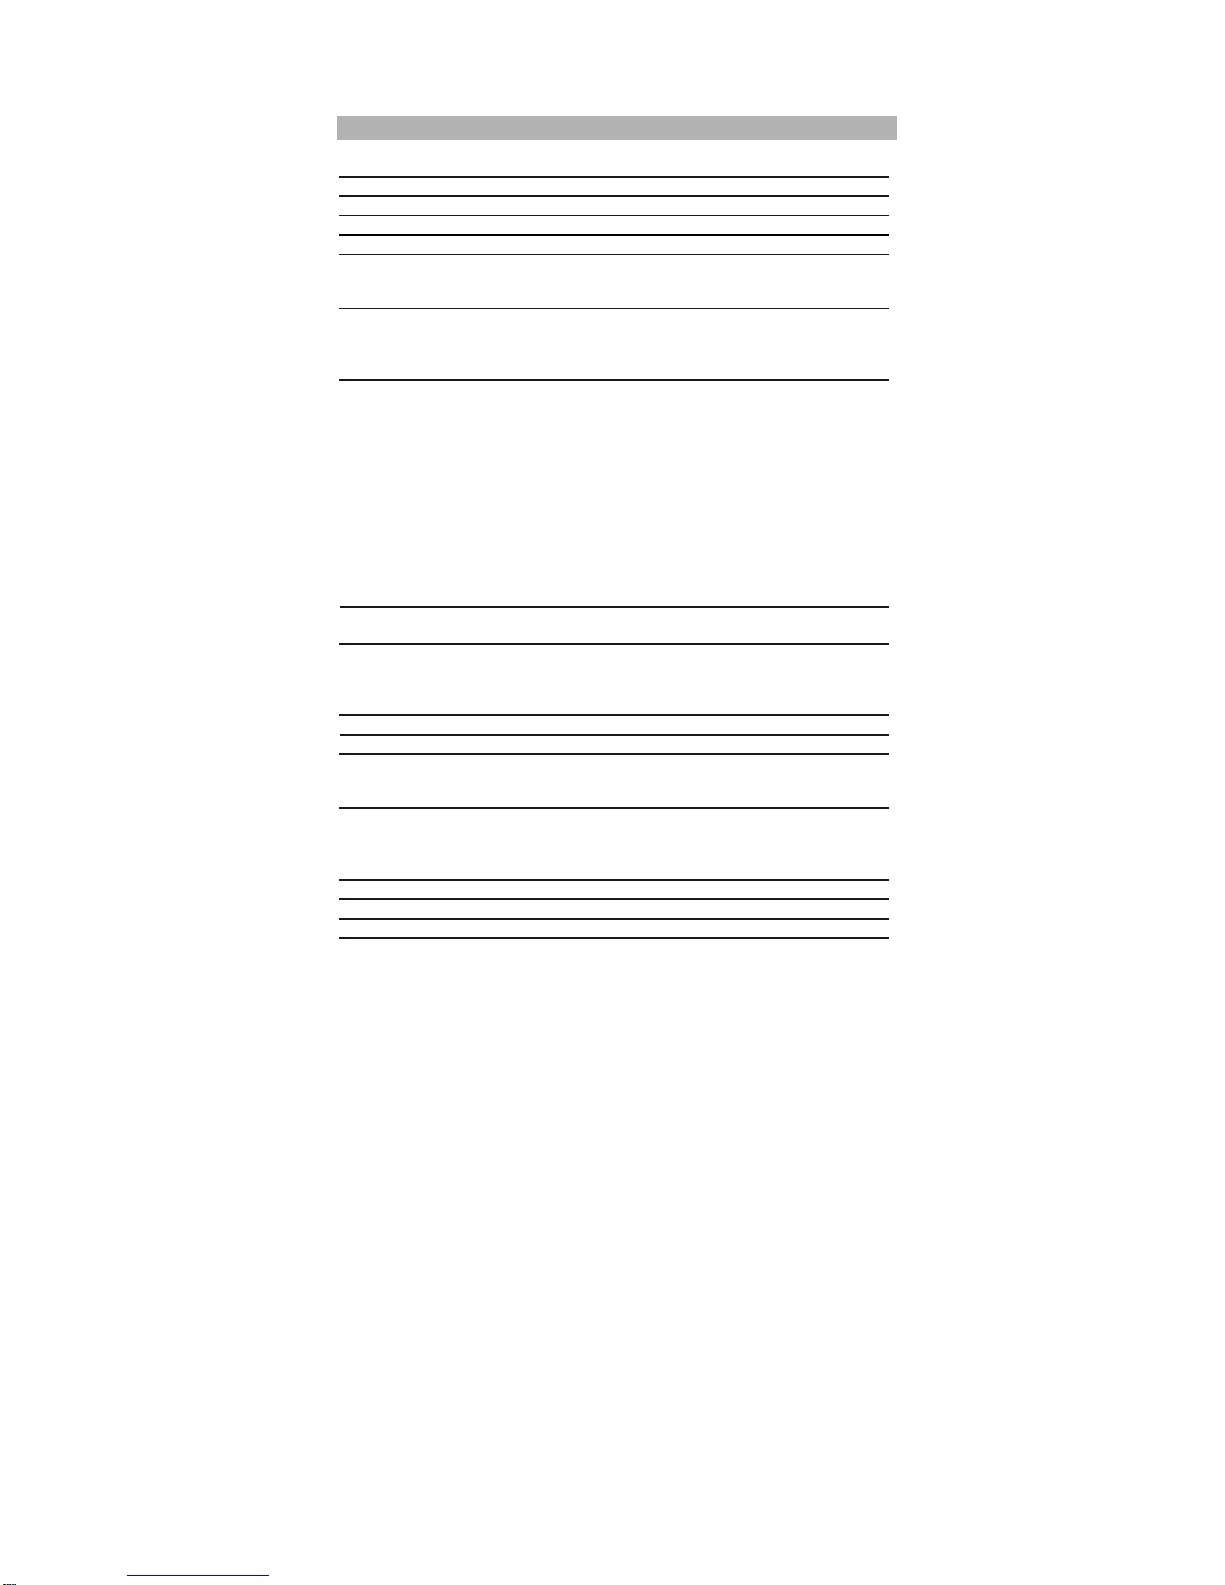
2. Installation
Ensure that the unit is installed in accordance with the instructions
and illustrations provided in this manual.
3. Caution
Do not push objects into theunit through openings;do not spill or
spray liquid on or inthe system (thismay result ina fire or electric
shock). Donot place anythingheavy on theunit. To ensure proper
ventilation and properoperation, never coveror block theslots and
openings with acloth or othermaterial. Keep theunit away froman
open flame such asfire, candle etc.It is hazardousto replace the
battery incorrectly.Replace the batteryonly with thesame or
equivalenttype, in order to protectthe environment, pleasedispose
the batteryproperly.Do not use theunit in temperature higher than
35°C (95°F).
4. Disassemble
Do not attempt to disassemble the cabinet. There is a risk of electric
shock and/or exposure to Laser Radiation. Contact qualified service
personnel if yoursystem needs repair.
5. Cleaning Unit
When cleaning, makesure the systemis unplugged from the power
source. Do not useliquid cleaners oraerosol cleaners. Usea cloth
lightly dampened with waterfor cleaning theexterior of thesystem
only.
6. Support SDCard and USB

Location of Controls
Unit
17
1. ANT IN 2. USB port
3. LCD switch button 4. MODE button
5. MENU button 6. SETUP button
7. PLAY/PAUSE button (XII)
8. Next - Down T/ Previous -Up S
9. F.FW - Right X/ F.RW - Left W
10. OPEN button 11. Earphone Jack
12. Volume Knob 13. AV IN/OUT Jack
14. Power ON/OFF switch 15. SD/MMC Slot
16. DC Power IN 17. OK button
5

Location of Controls
Remote Control
1. EPG/OSD Button
2. MODE (To select thesource)
3. Number Buttons (0-9)
4. Previous/Next button(Togo to
previous/next chapter or scene
during playing)
5. SETUP (To go toor exit setup
menu)
6. ENTER (To confirm)
7. Fast forward/backwardbutton
(To scan forward / backward at
2,4,8,16 or 32 times)
8. EXIT/ZOOM(To zoom in/outthe
image during the playback)
9. Play/pause
10. Stop (press once tostop
playback, then press XII to
resumeplayback from the point
where youstopped; press stop
button twice tostop playback
completely)
11. TV/MUSIC/REPEAT
12. PIC
13. FAVORITE PR / TITLE
14. MEMORY/MENU (To enter orexit
root menu)
15. SUBTITLE (Toselect subtitle
language)
16. Teletext/Angle(Tochange
viewing anglewhen playing disc
withmulti-angle)
17. GUIDE/SLOW
18. MUTE(To mute the sound)
19. AUDIO(Toselect audio
language)
20. SLEEP/PG DN (Page Down)
21. INFO/PG UP (Page Up)
6

Location of Controls
Remote Control
Please put thebattery into theremote control asper illustration below
7
.
When using remotecontrol, make sure the
infrared window ispointed to infrared
receiving window of themachine. The
distance between machine and remote
control must bewithin 3 metres. Please refer
to the following illustration
Note:
1. Avoid falling off or place near damp environment.
2. Avoid infrared receiving window of the unit being under direct sunlight.
3. Use a new battery to replace old one if the remotecontrol does not work.
CR2025 CR2025

Connections
Connecting Power
1. Powering the system indoors
Plug one endof theAC to DC adapter into
theDC input jack on the sideof the main
unit, then plug the other end into the AC
power receptacle.
2. Powering the system in a car
Plug one endof the cigarette
lighter adapter into the DC input jack
on the unit, then plug the other end
into the cigarette lightersocket
3. Press thepower button on the right
of the panel to turn ON the player.
Note:
- Car cigarette lighter adapter can't be used to recharge the battery.
- Car cigarette lighter adapter is available to use only when the car power supply is9-
12V (max allowed is 15V).
Connecting headphones
1. Connect the headphones.
Headphones with a 3.5 mm stereo plug can be connected.
2. Adjust the volume by turning the volumecontrol on the side of the
unit.
A pleine puissance, l’écoute prolongée des écouteurs
peut endommager l’oreille de l’utilisateur.
Excessive loud usage of headphones could damage the user hearing.
Übermässiger Gebrauch der Kopfhörer bei lauter
Lautstärke könnte schädlich sein fürs Gehör.
8

Connections
Connecting toTV
Please use AV cableto connect the machine toTV and AMPLIFIER. Make
sure it is connected correctly.
9

Disc Operations
Start Playback from the menu
1. PressTITLE/MENU to access the menu
screen.
2. Press S/ T/ W/ X(cursor keys) or the
numerical keys (will only work on certain
discs) to select the desired title.
3. PressENTER or PLAY button.
The unit will start playback from the selected
title.
Pause duringplayback
Press PLAY/PAUSE button during playback to
pause the playback.
When paused,pressthe PLAY orENTER button to
resume normal playback.
Stop Playback
Press STOP button during playback to stop the
playback. Then press PLAY/PAUSE button to
resume the playback.
If you press the STOP button twice, it won’t be
possible to resume the playback.
10

Disc Operations
Fast forwardand Fast backward
11
Youcan playback adisc at 2x,4x, 8x, 16x
or 32x the normal speed.
Press button to play fast backward the
disc.
Press button to play fast forward the
disc.
The playback speed changes each time
you press the or buttons (as shown
below).
ENTER
STOP
Note:
This function is not possible onsome DVD discs or during certain sections of
playback.
Playing JPEG files
1. Load yourJPEG disc.
2. Select afolder or a picture contained on the
disc, a menu will appear on the screen.
Press T/Stoselect a folder and press ENT
to view folder contents. ER
To go back to previous menu page,use W
button.
4. Start playback
Press T/Stochoose the picture you want to
enjoy. Press PLAY to playback the pictures.
5. Press Wbutton to rotate the picture 90
degrees anticlockwise. Press Xbutton to
rotate the picture 90 degrees clockwise.
6. Press "STOP" to browsethe JPG file,"SLIDE SHOW" "MENU"will
display on thescreen.
7. When browsingthe picture, press"STOP" andthumbnail size picture
will be displayed.Youcan select thepicture you desire by using the
W/X/S/T/ENTER buttons.
8. Press ANGLE button to selectdifferent displaymode. Eg: fromtop to
bottom; from leftside to right side; from right top to left bottom, etc.
There are15 display modes to select.
9. Select playback mode.
You can use the REPEAT button to select one playback mode,
repeat one(continually repeat thecurrent picture) or repeat all
(repeat all pictures).

Disc Operations
Playing MP3 files
MP3 is aformat for storing digital audio.An audio CD-qualitysong is
compressed into theMP3 format with very little loss of audio qualitywhile
taking up much less disc space. CD-R /RWdiscs that have been encoded
in MP3 format are compatible with this system.
When a MP3disc is inserted into the unit,the menu screen appears
automatically.Youcan use themenu screen to select your desired folders
and songs or the system plays the songs in the order they were recorded.
1. Press the Sor Tbutton tochoose a folder from the folder list on theleft
side of thescreen.
2. Press ENTER to select the highlighted folder. The songsavailable under
the folder will be listed.
3. Use Sor Tbutton to choose a song from the list. Press ENTER to start
playback of the highlighted song.
Locating specific Title, Chapter or Track
DVD DISCS ARE NORMALLY DIVIDED INTO TITLES WHICH ARE
SUB-DIVIDED INTO CHAPTERS.
CD DISCS ARE DIVIDED INTOTRACKS.
12

Disc Operations
Locating a TITLE using title menu.
Youcan locate a specific title using the title menu function, if the DVD
video disc contains a title menu.
1. Press theTITLE button.
The title menu will be shown
2. Use the cursor keys to select the title you
want.
Youcan also directly locate a specific title
by pressing its assigned number with the
numerical keys (thismay only function on
certain discs)
3. Press the ENTER button.
The DVD player will start playback from
chapter 1 of the selected title.
You can also use skip buttons to select a
desired chapter or track:
Press or button repeatedly until the required Chapter/Title/Track
is shown.
Repeat playing
THIS DVD VIDEO PLAYER ALLOWS YOU TO PLAY BACK
A SPECIFIC TITLE, CHAPTER,TRACK OR SEGMENT REPEATEDLY.
(TITLE REPEAT,CHAPTER/TRACK REPEAT)
REPEATATITLE, CHAPTEROR DISC
During normal playback,press the REPEAT button. The repeat mode
changes, each time you press the REPEAT button (as shownbelow).
When playing discof DVD, MPEG4, SVCD, VCD, CD orMP3 usercan repeat
playing of chapter, title or the wholedisc.
For DVD disc,press repeat buttonto repeat playing Chapter,press it again
to repeat playing Title; press itthird time torepeat playing the whole disc;
Pressit again to cancel repeatfunction.
13
Repeat
Repeat
Repeat
Resume
the currentchapter.
the currenttitle.
the whole disc
normal playback.

Disc Operations
Zoom Function
This DVD video player allows you to zoom into a picture as well as the
zoom point.
Press ZOOM during normal playback or slow -motion.
The player magnifiesin the center of the picture.
Press cursor keys during zoom mode to move the picture.
Press the ZOOMbutton repeatedly tocycle
through theavailable magnification levels (as
shown below).
Subtitle Function
This player can display subtitles that have been recorded on the DVD. To
cycle through the available subtitle languages press the SUBTITLE button
repeatedly.
14

Disc Operations
Multi-Angle Function
THIS DVD VIDEO PLAYER ALLOWS YOU TO SELECT FROM
SEVERAL DIFFERENTANGLES (disc dependant).
Selecting the cameraangle
If the DVD video disc is recorded with multiple angles, you have the option
to change the camera angle for the scene you are watching.
Press the ANGLE button repeatedly during playback of a scene
recorded with multiple angles(when available).
Youmay only press the ANGLE button when the angle icon is
flashing on the screen.
Each time you press theANGLE button, theangle will change
Note:
The angle function will not work on DVD video discs that do not contain scenes recorded with
multiple angles.
15

Analogue TV Operations
When the unit is operated for the first time or if you press the MODE button,
the below screen is displayed.
Use Up/Down cursors to select ATV and press OK button to confirm. Make
sure the antenna is connected.
Note:
Thismachine has a memory function. It will auto save the last mode.
i.e.: If the last mode was set toAV IN,the unit will enter into AVmode when
restarted.
System and Preset Menus
Press SETUPbutton to enter below menus (System and Preset menus)
Use the UP/DOWN buttons to select a menu item, then press the right
button to confirm your choice.
AUTO SEARCH
Use this item to search automatically the available channels.
Move Up/Down to highlight AUTO-SEARCH andconfirm by right button.
Unit will start auto-searchfrom the current channel and will return to
current channel uponsearch completed.
PressSETUP button to stop auto-search.
SEARCH
Use this item to search manually the available channels.
Move Up/Down to highlight SEARCH andconfirm by right or left buttons.
Unit will start searching and will display new channel when found.
16

17
Analogue TV Operations
POSITION
Use this item to set your favourite channel to aspecific channel number
Move Up/Down to highlight POSITION. Then choose the number where
you want to store the current channel (by pressing left or right button).
Press the SETUP button to save the settings.
BAND
Use this item to change the searching band. You can switch between VHF Low
(VL), VHF High (VH) and UHF.
FINE
Use this item to adjust the current channel. It will improve sound or
picture quality if necessary.
SKIP
Use this item to skip channels which you don’t want. Select the useless
channel (using POSITION item) and set SKIP to ON (using right button).

Digital TV Operations (DVB-T)
When the unit is operated for the first time or if you press the MODE
button, the below screen is displayed.
Use T/Scursors to select DVB and press OK button to confirm.
Make sure the antenna is connected.
First Time Installation
At the first time operation, the
screen will display First Time
Installation page. It willguide user
to complete the initial setup of the
DVB system.
1. Choose YES and then press
ENTER button. Thesystem will
operate the initial setup.
2. Input regional information of
user,including the country, OSD
language andTime zone.DVB will
automatically scan channels
through the information.
3. Choose 'Yes', the system will
automatically scan the channels.
4. The system will directly return
into DVB mode and play the last
channel found.
18

Digital TV Operations (DVB-T)
DVB Menu
In playing mode,press SETUPbutton, the unit will enter into the Main
menu. To enter into DVB Setup page, select DVB Menu and press ENTER
to confirm.
PROGRAM LIST
TV Program
This optionallows user to edit the
program list and set programs into
three types, including Favourite
program, Move the program and
Delete.All programs available to
watch are on the list. The three
items (Favor, Move& Del)are used
to set programs.
19
This manual suits for next models
1
Table of contents
Other SEVIC Portable DVD Player manuals