Seville Classics GloGlobe User manual
1
Instruction Manual
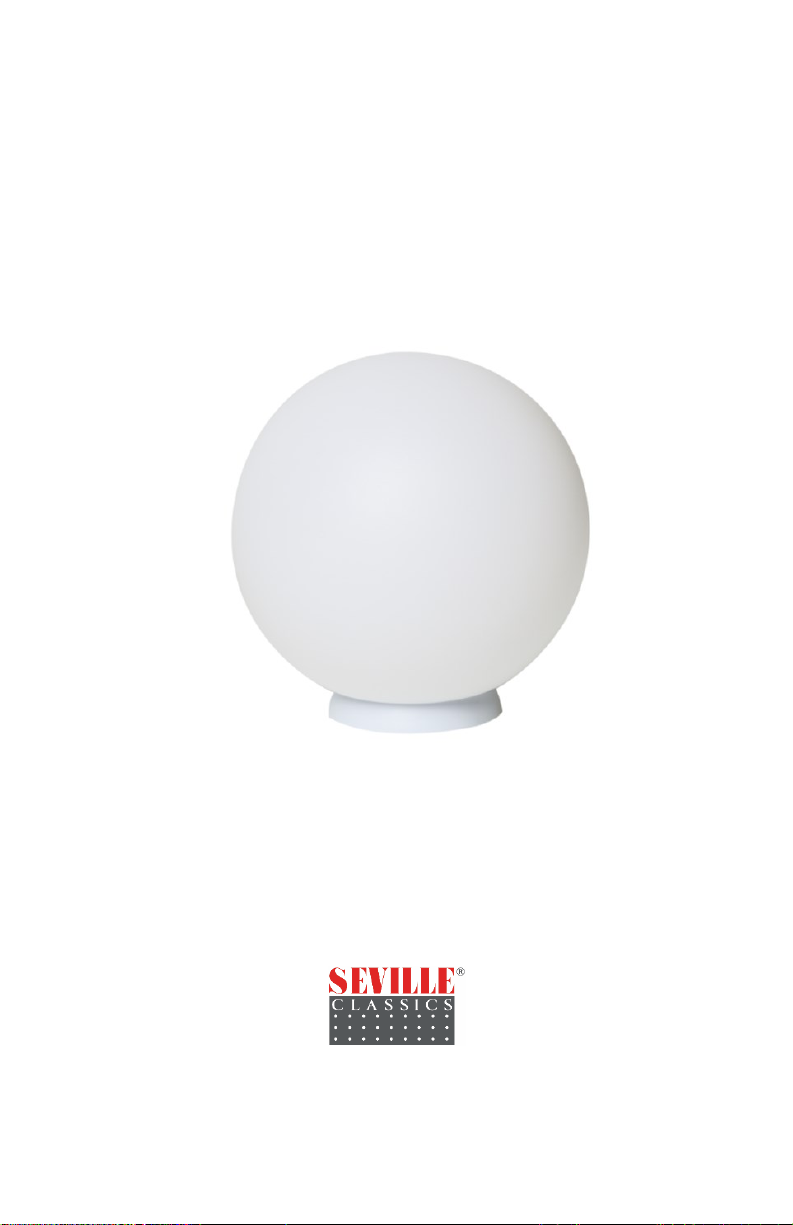
GloGlobe® Wireless Rechargeable Floatable Light
ITM. / ART. 322713
M# EHF10231
IMPORTANT: RETAIN FOR FUTURE REFERENCE. READ CAREFULLY.
Customer Service (North America):
Tel 1.310.533.3800 | Tel 1.800.323.5565
(English and Spanish)
Fax 1.310.533.3899
Monday through Friday 9:00 am - 4:30 pm
(Pacific Time)
English: support@sevilleclassics.com
Seville Classics, Inc.
Torrance, CA 90501 USA
www.sevilleclassics.com
©2020 Seville Classics, Inc.
201021
1
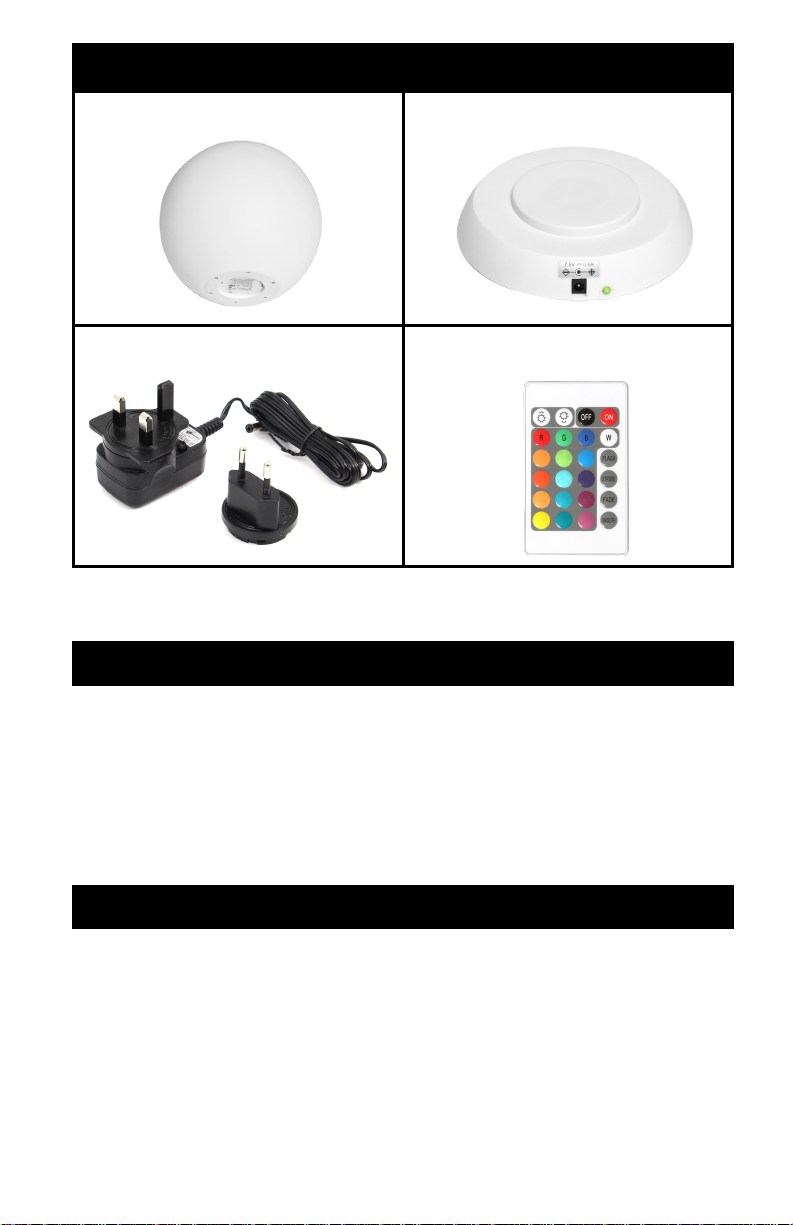
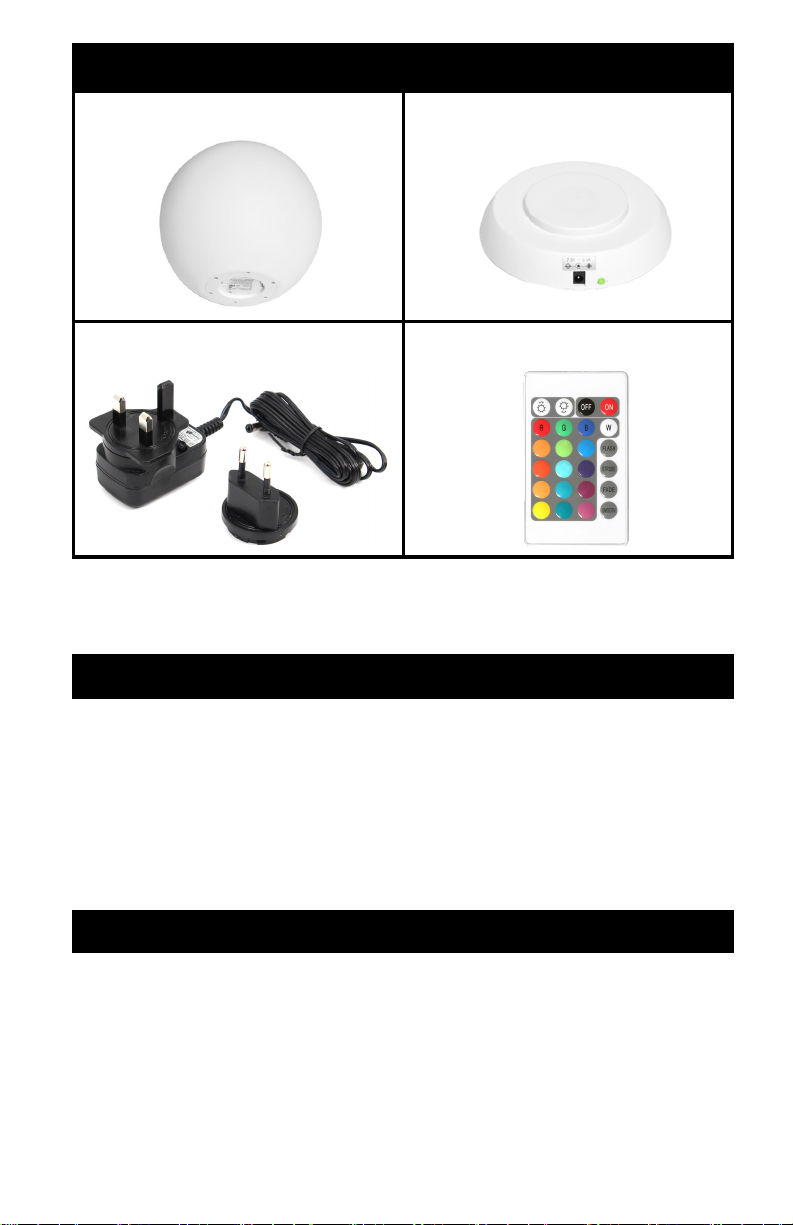
A. GloGlobe®B. Charging Base (1)
C. Adapter (1) D. Remote Control (1)
Parts List
Unpack and remove all parts from the box. If there are missing or
broken parts, please contact our CUSTOMER SERVICE.
Features
8 - 12 hours of single-color operation
16 LED color options (with dimmer)
IPX7 Waterproof Rating
4 Modes (flash/strobe/fade/smooth)
24-key remote control
Stainless-steel hanger
Wireless rechargeable lithium-ion battery
Specifications
Adapter: Input 100-240V 50/60Hz, Output 7.5 V-0.6 A
12 RGB + 6 White LEDs
Rechargeable lithium-ion battery 3.7V 2000mAh
Charging time: 7 to 9 hours
8 to 12 hours of operation
IR remote control range: 13 feet (4 meters)

2
Warnings
This is not a toy, keep out of the reach of children.
Keep this product away from chemicals, or high heat.
Regarding the adapter (Part C) and charging base (Part B):
Only use the adapter and charging base to charge the bat-
tery of the GloGlobe® (Part A).
The adapter and charging base should not be used out-
doors, or exposed to rain, humidity, liquids or heat.
Keep the adapter and charging base out reach of children.
Disconnect the adapter from power when not in use.
Never attempt to open the adapter or the charging base.
Keep the remote control away from water, liquids and heat.
Do not put the GloGlobe® on the water if damage/crack is found.
Never throw the GloGlobe® into the pool.
Place the product onto the water gently.
Take the GloGlobe® out of the pool when not in use.
Never jump, sit, or stand on the product.
CAUTION: To avoid the risk of electric shock or a damaged product,
wipe the light till dry before charging.
For long lasting care and maintenance of built-in GloGlobe® battery,
please charge and operate in the following conditions:
GloGlobe® Charging Temperature: 32-113 °F (0-45 °C).
Charging the GloGlobe® at a very low temperature will lower the capacity
and reduce cycle life of the battery.
GloGlobe® Use/Storage Temperature: 14-113 °F (-10-45 °C)
Keeping the battery charged protects circuits when stored for longer than
three months.
GloGlobe® Lithium-ion Battery Care

3
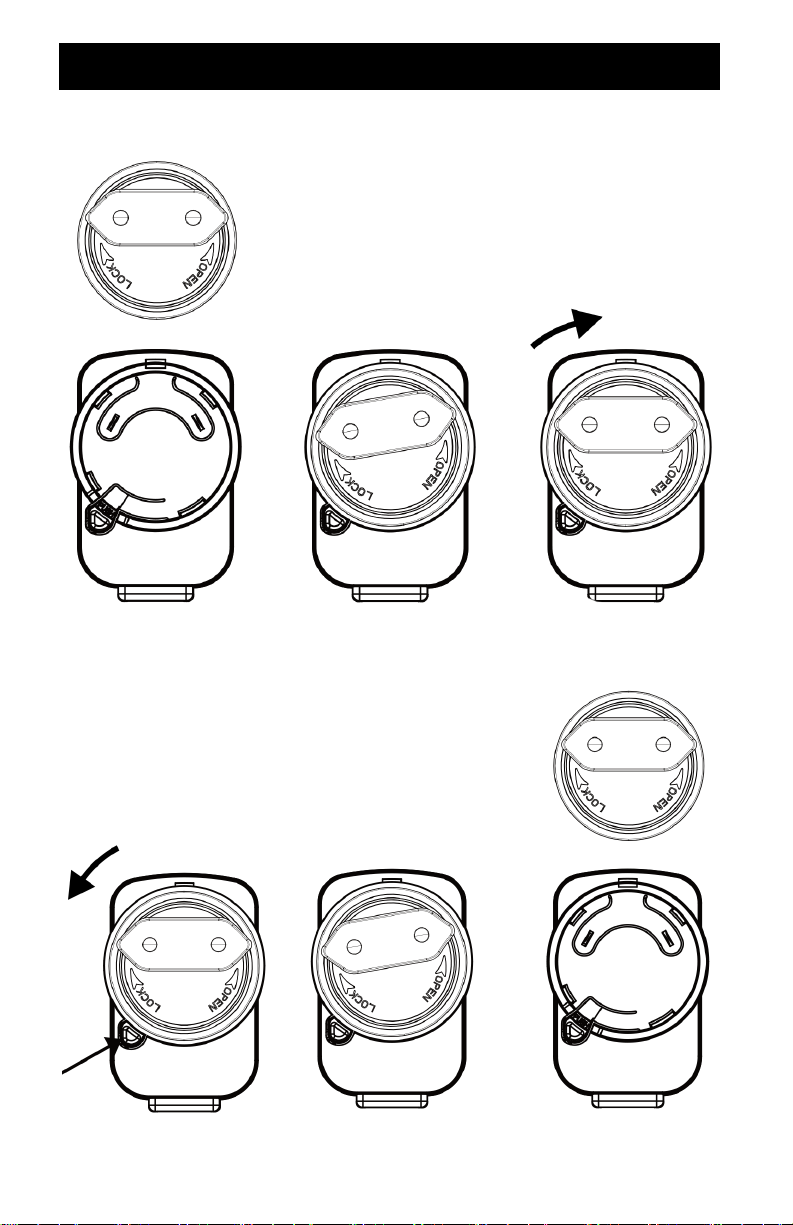
EU Plug
Attaching adapter:
Removing adapter:

4
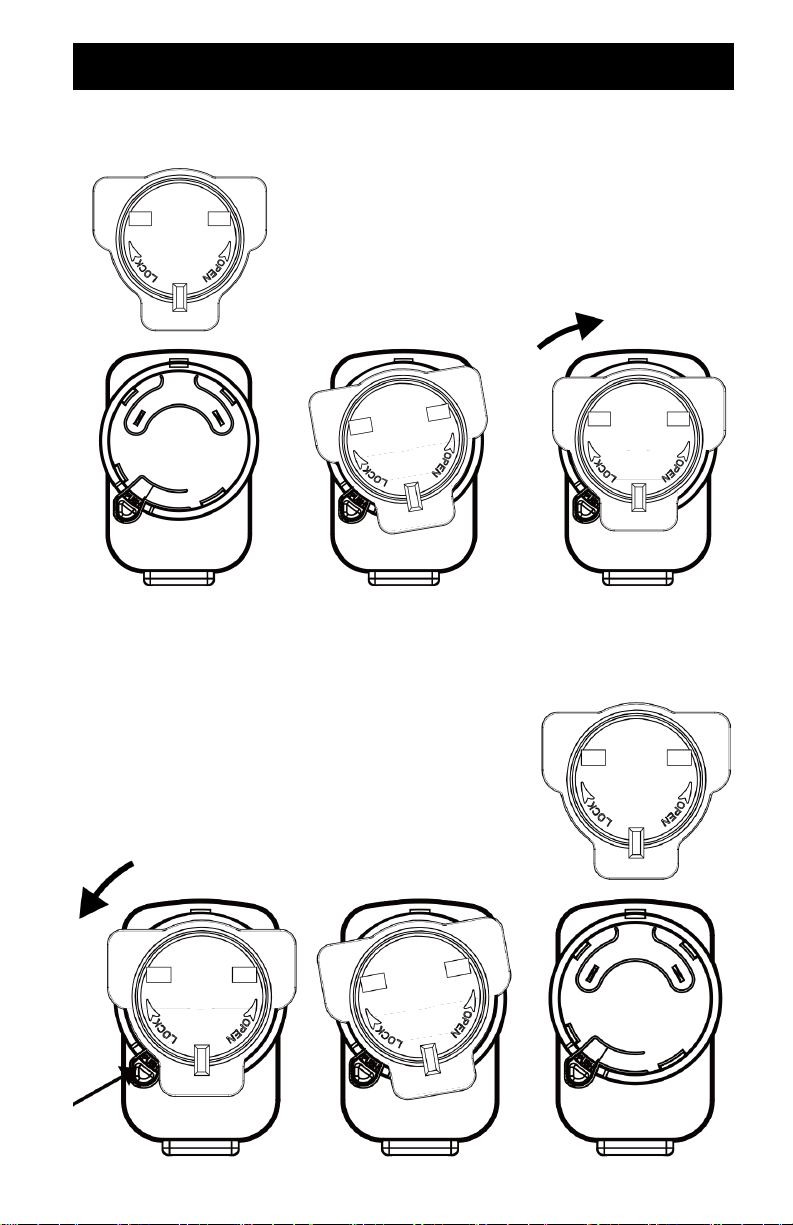
UK Plug
Attaching adapter:
Removing adapter:
5
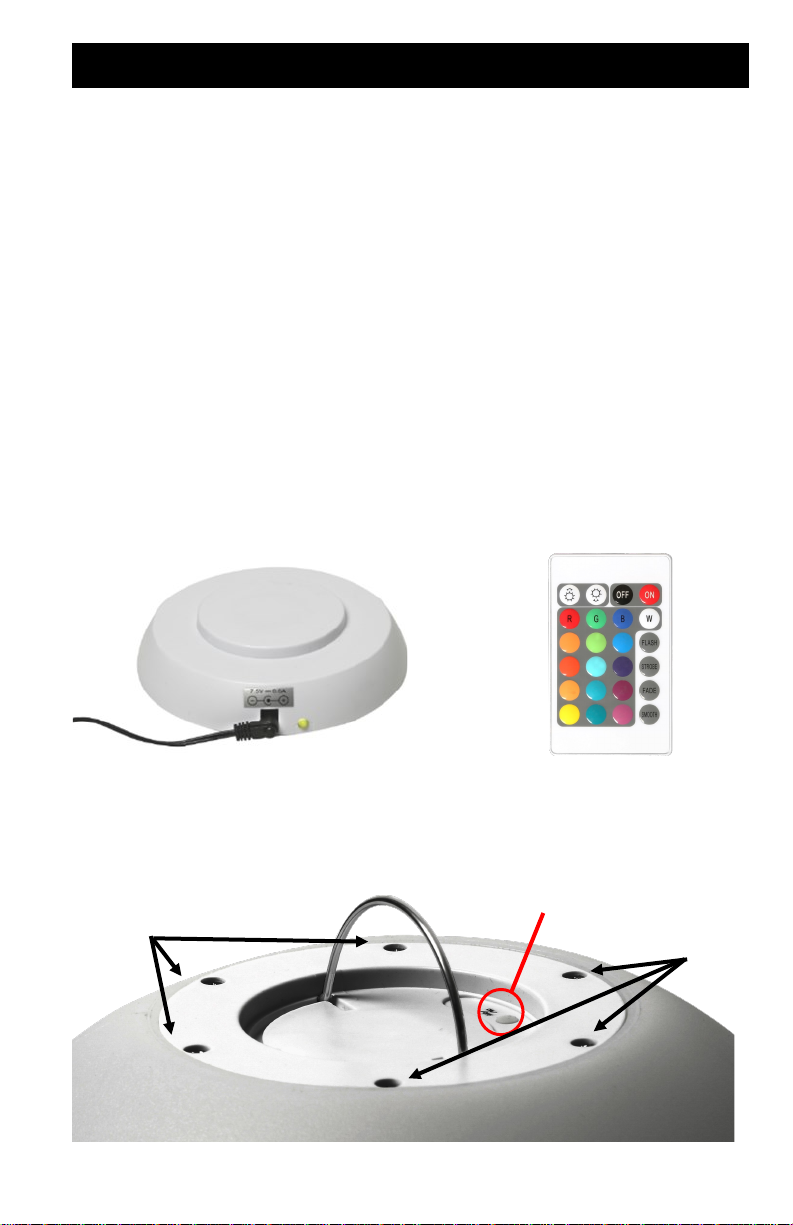
Charging Instructions
Please ensure GloGlobe® is fully charged before first use.
Place the charging base on a dry and level surface.
Use a clean and dry cloth to clean the surface of the charging base
and the bottom of the GloGlobe®.
Insert the adapter in the socket on the side of the charging base
(PHOTO 1).
Connect the adapter to the electrical outlet.
Indicator light on charging base will turn green when connected.
Place the GloGlobe® on the base. The indicator light will turn red
while charging.
The indicator light will turn green when the battery is fully charged.
After charging, disconnect the adapter from the outlet and remove
the GloGlobe® from the charging base.
LED module
Hanger On/O/Mode
Buon
Screws
PHOTO 2PHOTO 1
PHOTO 3
Screws

6
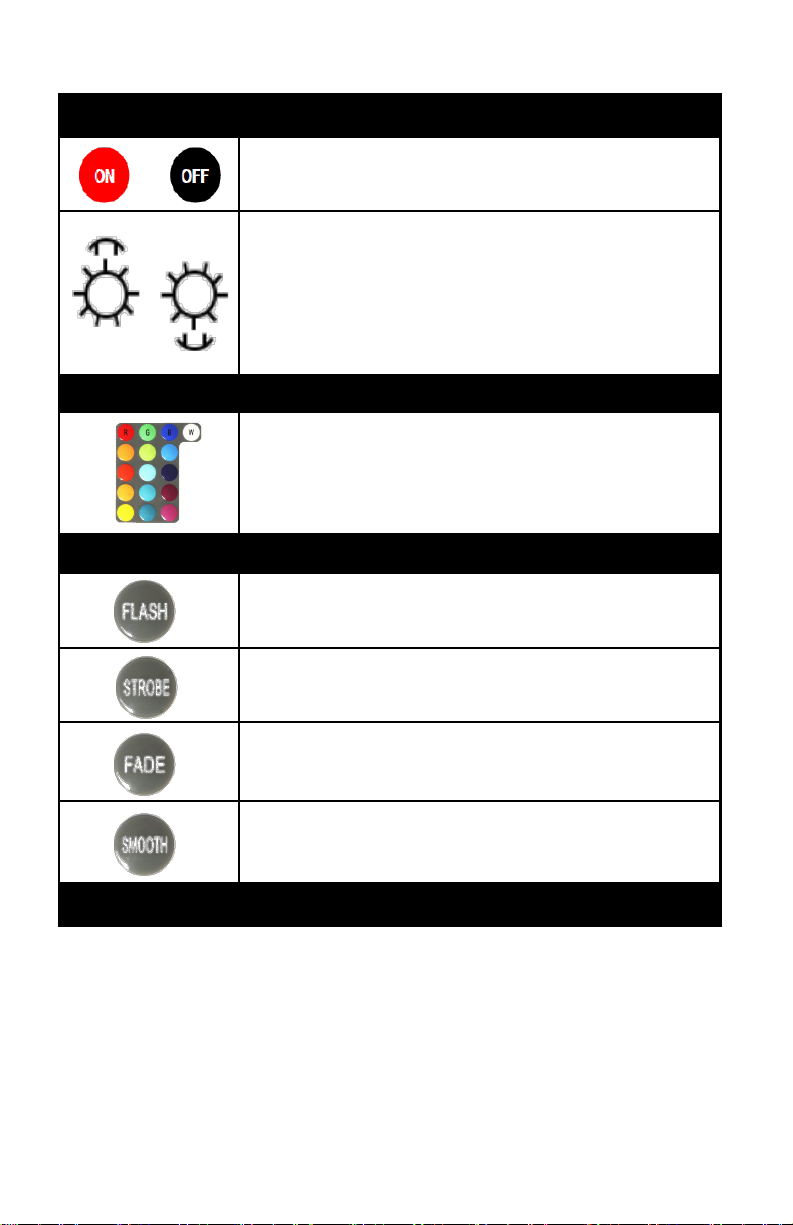
Turn GloGlobe® On/Off
Brighten/Increase Speed - Increases the brightness of
the light in single color mode or increases speed of color
change in multi-color mode
Dim/Reduce Speed - Reduces the brightness of the light
in single color mode or reduces speed of color change in
multi-color mode.
Single Color Mode
Choose from 16 solid colors, including white.
Multi-Color Modes
FLASH – Colors flash red, green, and blue.
STROBE – 7 colors flash.
FADE – Colors fade from one to the next through all 16
colors. This mode will have the shortest run time.
SMOOTH – Colors slowly transition through red, green,
and blue. This mode will have the longest run time.
Manual Operation
To operate GloGlobe® without remote control, press and hold the
On/Off/Mode button (PHOTO 3) for 3 seconds to turn on.
Press and hold for 3 seconds to turn off.
When GloGlobe® is first turned on by remote control, it will default
to the last setting used. When turned on by On/Off/Mode button, it
will default to FADE option. Push On/Off/Mode button to cycle
through the 4 modes (flash/strobe/fade/smooth).
Use stainless-steel hanger to hang GloGlobe® (PHOTO 3).
Remote Control Instructions
Note: Before using the remote control for the first time, remove the
plastic sheet from the battery cover and discard.
7
Troubleshooting
Problem Solution
Remote
control is not
functioning.
The small plastic sheet on battery cover remote control
was not removed. Remove it to activate the remote.
The battery of the remote control is dead. Remove it and
replace with a new one. Note the polarity of the battery
on the cover and direction when installing the new
battery in the remote control.
Water is
inside of
GloGlobe™.
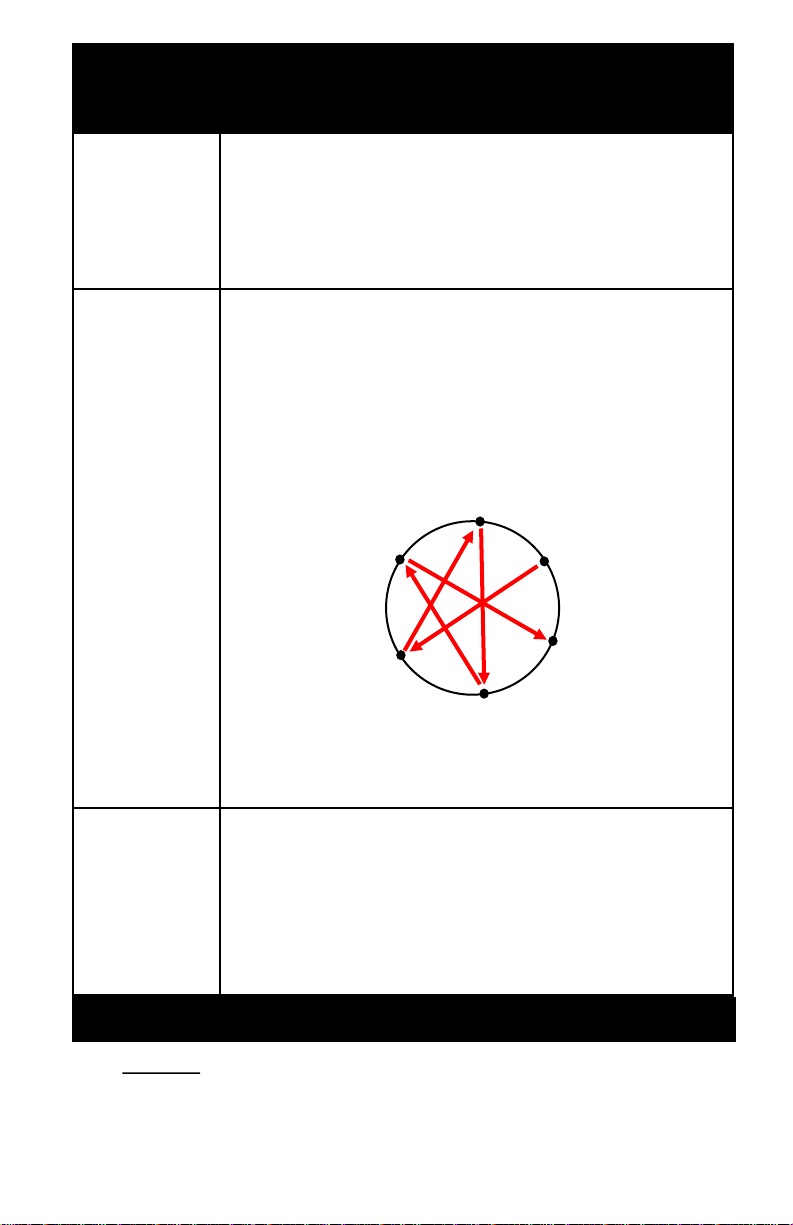
Carefully remove all screws and washers (PHOTO 3).
Set aside in a safe place.
Remove LED module (PHOTO 3) from outer housing.
DO NOT OPEN LED module.
Drain all water from outer housing. Wipe inside of
GloGlobe® and outside of LED module dry with cloth.
When reinstalling LED module, tighten the screw
opposite the last one tightened in a criss-cross pattern.
Do not fully tighten screws until all are partially installed.
Screws should be tightened with a maximum torque of
2.65 lbs./1.2 kgs.
GloGlobe™
turns off too
quickly.
Reduce brightness. Operation time depends on the
setting being used. Full brightness will cause operation
time to decrease.
Fully charge GloGlobe® before using. Indicator light will
turn green when GloGlobe® is fully charged.
Operation time slowly degrades with each use which is
standard for lithium-ion batteries.
Maintenance and Care
DO NOT fully submerge into water.
Always turn off after each use.
Store indoors when not in use.
Store out of the reach of children.
Clean with soap and water.
1
6
5
4
2
3
8
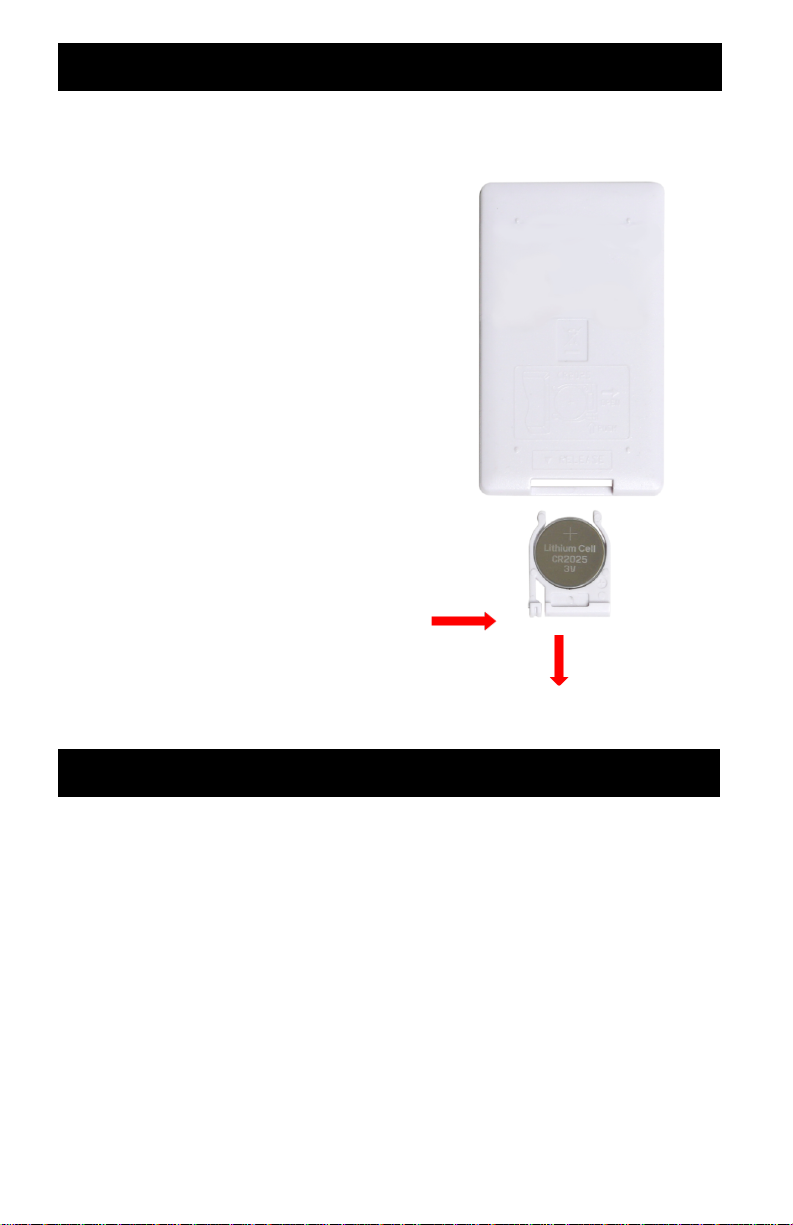
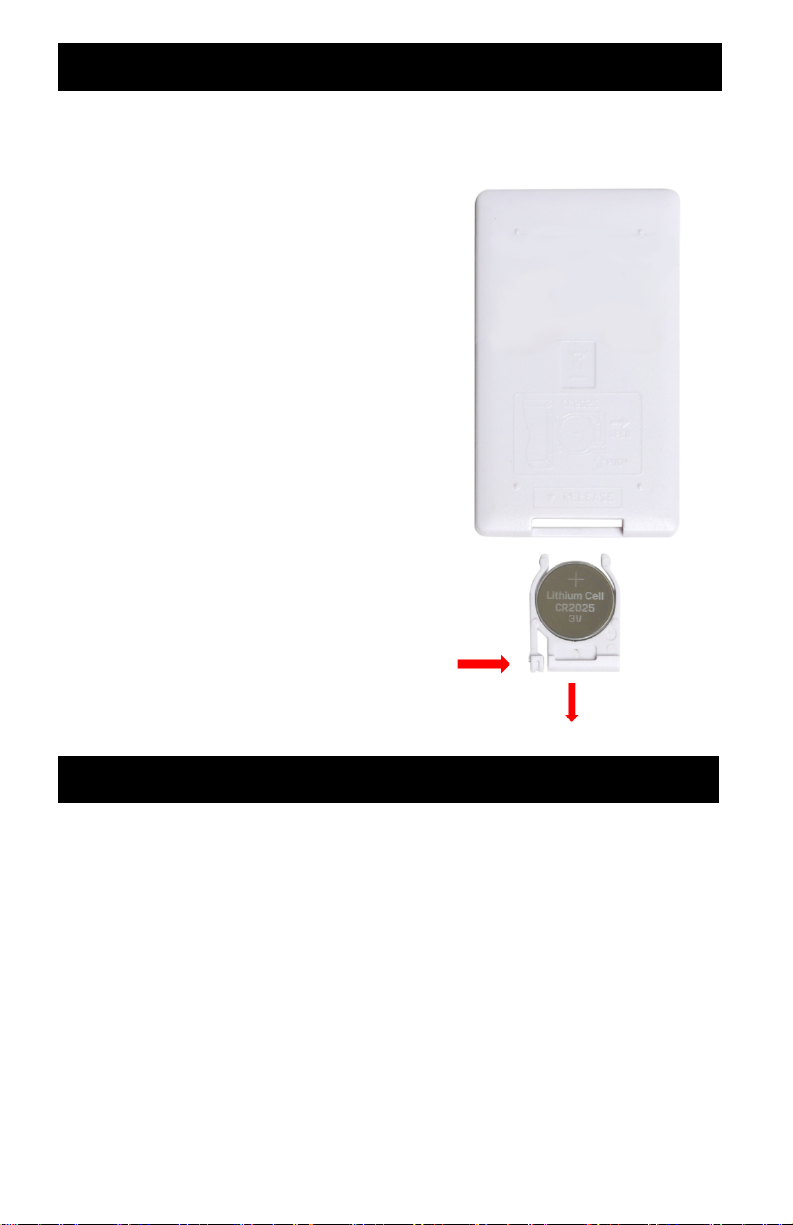
Remote Control Battery Replacement
If the remote control doesn't
activate the light, replace battery
(CR2025).
Press the tab on the side of
battery cover and slide it out of
the remote control.
Exchange the battery.
Pay attention to the polarity
shown on the battery cover to
ensure proper operation.
Remote control requires a
single CR2025 button battery
for operation (included).
It is recommended that the
batteries be removed should
the remote not be in use for an
extended time.
Install the 1-piece button
battery shown.
PUSH
TAB
IN
Remote Control Battery Warning
This product contains a button battery.
If swallowed, it could cause severe injury or death in just 2 hours.
Seek medical attention immediately.
Clean battery contacts and those of the devices prior to
battery installation if product is left unused for a long time.
Dispose of used button batteries immediately and safely.
Button batteries can still be dangerous.
Tell others about the risk associated with button batteries and how
to keep their children safe.
Make sure that the battery is inserted correctly to avoid a
short-circuit.
PULL OUT
to RELEASE
Back of Remote

9
KEEP BATTERIES OUT OF REACH OF CHILDREN
This product contains a button battery.
If swallowed, it could cause severe injury or
death in just 2 hours. Seek medical attention
immediately.
Swallowing may lead to serious injury in as
little as 2 hours or death, due to chemical
burns and potential perforation of the
esophagus.
If you suspect your child has swallowed or inserted a button
battery, immediately seek urgent medical assistance.
Examine devices and make sure the battery compartment is
correctly secured, e.g. that the screw or other mechanical fastener
is tightened. Do not use if compartment is not secure.
Dispose of use button batteries immediately and safely.
Flat batteries can still be dangerous.
Tell others about the risk associated with button batteries and how
to keep their children safe. Clean the battery contacts and also
those of the devices prior to battery installation if product is left
unused for a long time.
The equipment generates, uses, and can radiate radio frequency
energy, and if not installed and used in accordance with the
instructions, may cause harmful interference to radio or television
reception, which can be determined by turning the equipment off and
on. The user is encouraged to try to correct the interference by one or
more of the following measures:
Reorient or relocate the receiving antenna.
Increase the separation between the equipment and the receiver.
Connect the equipment into an outlet on a circuit different from that
to which the receiver is connected.
Consult the dealer or experience radio/tv technician for help.
WARNING: Changed or modifications to this unit not expressly
approved by the party responsible for compliance could void the user
authority to operate the equipment.

10
Instrucción Manual
GloGlobeMR Luz Flotante Recargable Inalámbrica
ITM. / ART. 322713
M# EHF10231
IMPORTANTE: CONSERVAR PARA FUTURAS REFERENCIAS.
LEA CUIDADOSAMENTE.
Servicio al Cliente (América del Norte):
Tel. 1.310.533.3800 | Tel. 1.800.323.5565 (En E.U.A.) (Inglés y Español)
Facsímil: 1.310.533.3899
Lunes a Viernes, de 9:00 am a 4:30 pm (Horario del Pacífico)
Inglés: support@sevilleclassics.com
Seville Classics, Inc.
Torrance, CA 90501 USA
www.sevilleclassics.com
©2020 Seville Classics, Inc.
11
A. GloGlobeMR (1) B. Base de Carga (1)
C. Adaptador (1) D. Control Remoto (1)
Lista de partes
Desempaque y retire todas las piezas de la caja.
En caso de haber piezas faltantes o rotas, comuníquese con nuestro
SERVICIO AL CLIENTE.
Especificaciones
8 horas a 12 horas de operación de un solo color.
16 opciones de color LED (con regulador de intensidad)
Clasificación de resistencia al agua IPX7.
4 modalidades (destello / intermitente / desvanecimiento gradual /
tenue).
Control remoto de 24 botones.
Gancho de acero inoxidable.
Batería recargable e inalámbrica de iones de litio.
Características
Adaptador: Entrada: 100-240 V 50 Hz / 60 Hz;
Salida: 7.5 V a 0.6 A.
12 luces LED RGB.
Batería recargable de iones de litio, 3.7 V 2000 mAh.
Tiempo de carga: 7 horas a 9 horas.
8 horas a 12 horas de operación
Alcance del control remoto IR: 13 pies (4 metros).

12
Advertencia
Esto no es un juguete, manténgalo fuera del alcance de los niños.
Mantenga este producto alejado de productos químicos o de
temperaturas elevadas.
Referente el adaptador (Parte C) y la base de carga (Parte B):
Use el adaptador solamente para cargar la batería del
GloGlobeMR (Parte A).
El adaptador y la base de carga no se deben de utilizar al
aire libre ni exponer a la lluvia, humedad, líquidos o calor.
Mantenga el adaptador y la base de carga fuera del
alcance de los niños.
Desconecte el adaptador de la corriente eléctrica cuando
no esté en uso.
Nunca intente abrir el adaptador o la base de carga.
Mantenga el control remoto alejado del agua,
líquidos y calor.
No ponga el GloGlobeMR en el agua si está dañando / encuentra
alguna quebradura.
Nunca arroje GloGlobeMR en la piscina. Coloque el producto sobre
el agua con cuidado.
Sacar el GloGlobeMR fuera de la piscina cuando no lo esté usando.
Nunca salter, sentar o parar sobre el producto.
PRECAUCIÓN: Para evitar el riesgo de descarga eléctrica o un
producto dañado, limpie la luz hasta que se seque antes de cargar.
Para un cuidado y mantenimiento duraderos de la batería GloGlobe®
incorporada, cargue y opere en las siguientes condiciones:
Temperatura GloGlobe® durante la carga: 0-45 °C (32-113 °F)
Cargar el GloGlobe® a una temperatura muy baja reducirá la capacidad y
reducirá la vida útil de la batería.
Temperatura de uso / almacenamiento GloGlobe®: -10-45 °C
(14-113 °F)
Mantener la batería cargada protege los circuitos cuando se almacenan
durante más de tres meses.
Cuidado de la batería de iones de litio GloGlobe®
13
Cable de alimentación
Adaptador de conexión:
Quitar el adaptador:
14
Cable de alimentación UK
Adaptador de conexión:
Quitar el adaptador:

15
Instrucciones de Carga
Favor de asegurarse que el GloGlobeMR está completamente
cargado antes de su primer uso. Seguir los pasos a continuación:
Coloque la base de carga en una superficie seca y nivelada.
Use un paño limpio y seco para limpiar la superficie de la base de
carga y la parte inferior del GloGlobeMR.
Inserte el adaptador en la entrada a un costado de la base de
carga (IMAGEN 1).
Conecte el adaptador al tomacorriente.
El indicador de luz en la base de carga prenderá en verde cuando
se conecte correctamente.
Coloque el GloGlobeMR en la base. Comenzará a cargarse y el
indicador de luz prenderá en rojo.
El indicador de luz cambiará a verde cuando la batería esté
completamente cargada.
Después de cargar, desconecte el adaptador del tomacorriente y
retire el GloGlobeMR de la base de carga.
módulo LED
Gancho Encendido/Apagado/
Modo
Tornillos
PHOTO 2
PHOTO 1
PHOTO 3
Tornillos
16
Encender/Apagar el GloGlobeMR
Brillo/Aumentar la velocidad: intensifique el brillo de la
luz en la modalidad de un solo color, o bien aumente la
velocidad del cambio de color en la modalidad multicolor.
Atenuar la luz/Disminuir la velocidad: Atenuar el brillo de
la luz en la modalidad de un solo color o disminuir la
velocidad del cambio de color en la modalidad multicolor.
Single Color Mode
Elegir entre 16 colores sólidos, incluyendo el blanco.
Multi-Color Modes
FLASH – Los colores parpadean en rojo, verde y azul.
STROBE – 7 colores de luz intermitente.
FADE – Los colores se cambiarán de uno a otro a través
de los 16 colores. Este modo tendrá el menor tiempo de
ejecución.
SMOOTH – Los colores cambian lentamente en rojo,
verde y azul. Este modo tendrá el mayor tiempo de
ejecución
Manual de Funcionamiento
Para funcionar GloGlobeMR sin control remoto, presione y mantenga
presionado del botón Encendido/Apagado/Modo (PHOTO 3) durante 3
segundos para encender. Mantenga presionado durante 3 segundos
para apagar.
Cuando encienda el GloGlobeMR por primera vez, se establecerá de forma
predeterminada en su última configuración utilizada. Cuando se activa con
el botón de Encendido / Apagado / Modo, la opción FADE estará predeter-
minada. Presione el botón de Encendido/Apagado/Modo para recorrer las
4 modalidades (destello / intermitente / desvanecimiento gradual / tenue).
Usar el gancho de acero inoxidable para colgar el GloGlobeMR (PHOTO 3).
Funcionamiento del Control Remoto
Nota: Antes de usar el control remoto por primera vez, rere la lámina de
plásco de la tapa de la batería y deséchela.

17
Solución del Problema
Problema Solución
El control
remoto no está
funcionando
No se retiró la pequeña lámina de plástico de la tapa del
control remoto; retírela para activar el control.
La batería del control remoto está agotada. Retírela y
reemplácela por una nueva. Preste atención a la tapa de
la batería, la cual indica la polaridad y posición que
deberá tener la batería cuando instale la batería nueva
en el control remoto.
Agua adentro
del GloGlobeMR
Retire con cuidado todos los tornillos y arandelas
(PHOTO 3). Póngalos a un lado en un lugar seguro.
Retire el módulo LED (PHOTO 3) de la caja exterior.
NO ABRA EL módulo LED.
Drene toda el agua de la caja exterior. Limpie el interior
del GloGlobeMR y el exterior del módulo LED con un
paño limpio.
Al reinstalar el módulo LED, apriete el tornillo opuesto al
ultime apretado en un patrón entrecruzado. No apriete
completamente los tornillos hasta que todos estén
parcialmente instalados.
Los tornillos deben de ser apretados con un máximo de
torsión de 2.65 libras / 1.2 kg
El tiempo de
ejecución de
GloGlobeMR no
es el esperado
Reduce el brillo. El tiempo de funcionamiento depende
de la configuración utilizada. El brillo completo hará
disminuir el tiempo de funcionamiento.
Cargar completamente el GloGlobeMR antes de usar.
Se produce una carga completa cuando la luz en la
base de carga cambie de rojo a verde.
El tiempo de funcionamiento se degrada lentamente con
cada uso, que es estándar para las baterías de iones
de litio.
Mantenimientos y Cuidados
NO sumergir completamente en el agua.
Siempre apagar después de cada uso.
Almacenar en interiores cuando no esté en uso.
Almacenar fuera del alcance de los niños.
Limpiar con jabón y agua.
1
6
5
4
2
3
18
Reemplazo de la Batería del Control Remoto
Si el control remoto no activara la
luz, reemplace la batería (CR2025).
Presione el compartimento al
costado de la tapa de la batería
y deslícelo hacia afuera.
Remplace la batería prestando
atención a la polaridad que se
indica en la tapa.
El control remoto funciona con
batería de botón (CR2025) de
1-pieza.
Se recomienda retirar las
baterías si el control remoto no
se usa durante un tiempo
prolongado.
Inserte la batería de botón de 1
pieza como se muestra.
Advertencia para el la Batería del Control Remoto
Este producto contiene una pila de botón tipo reloj. Si se ingiere,
podría causar lesiones graves o la muerte en solo 2 horas.
Busque atención médica de inmediato.
Limpie los contactos de la batería y los de los dispositivos antes de
la instalación de la batería si el producto no se usa durante mucho
tiempo.
Deseche las baterías de botón usadas de forma inmediata y se-
gura. Las baterías de botón aún pueden ser peligrosas.
Informe a otros sobre el riesgo asociado con las baterías de botón
y cómo mantener seguros a sus hijos.
Asegúrese de que la batería esté insertada correctamente para
evitar un cortocircuito.
PRESIONAR Y JALAR para LIBERAR
SACAR PARA LIBERAR
Parte Trasera del Control
Remoto

19
MANTENGA LAS BATERÍAS FUERA DEL ALCANCE DE LOS NIÑOS
Para evitar el riesgo de descarga eléctrica o
un producto dañado, limpie la luz hasta que se
seque antes de cargar. Este producto contiene
una pila de botón tipo reloj.
Si se ingiere, podría causar lesiones graves o
la muerte en solo 2 horas. Busque atención
médica de inmediato.
Si sospecha que su hijo se ha tragado o introducido una batería de
botón, busque asistencia médica urgente.
Examine los dispositivos y asegúrese de que el compartimento de
la batería esté correctamente asegurado, por ejemplo, que el tornil-
lo u otro cierre mecánico esté apretado.
No lo use si el compartimento no está asegurado.
Deseche el uso de pilas de botón de forma inmediata y segura.
Las baterías agotadas pueden ser peligrosas.Cuénteles a otros
sobre el riesgo asociado con las pilas de botón y cómo mantener
sus niños seguros.
Limpie los contactos de la batería y también los de los dispositivos
antes de la instalación de la batería si el producto no se usa
durante mucho tiempo.
Este equipo genera, utiliza y puede emitir energía de radiofrecuencia,
si no se instala y es utilizada como se señala en las instrucciones,
puede causar interferencias perjudiciales en la recepción de radio o
televisión, lo cual puede determinarse al encender y al apagar
el equipo. Se recomienda al usuario intentar corregir la interferencia
llevando a cabo una o más de las siguientes medidas:
Reoriente o reubique la antena receptora.
Aumente la separación entre el equipo y el receptor.
Conecte el equipo a un tomacorriente en un circuito diferente al
que esté conectado el receptor.
Consulte con el distribuidor o con un técnico especializado en radio /
televisión para obtener ayuda.
This manual suits for next models
1
Table of contents
Languages:
Popular Outdoor Light manuals by other brands


EINHELL
EINHELL BT-CL 18 Li Original operating instructions

Hommie
Hommie NL01W user manual

EuroLite
EuroLite MULTIFLOOD PRO IP RGBW Wash MK2 user manual

Lake Lite
Lake Lite SOLAR PAGODA LITE LL-SPL-PAGODA-X manual

Saxby Lighting
Saxby Lighting Bayswater 40045 instruction manual

SunSetter
SunSetter LED Light System Installation