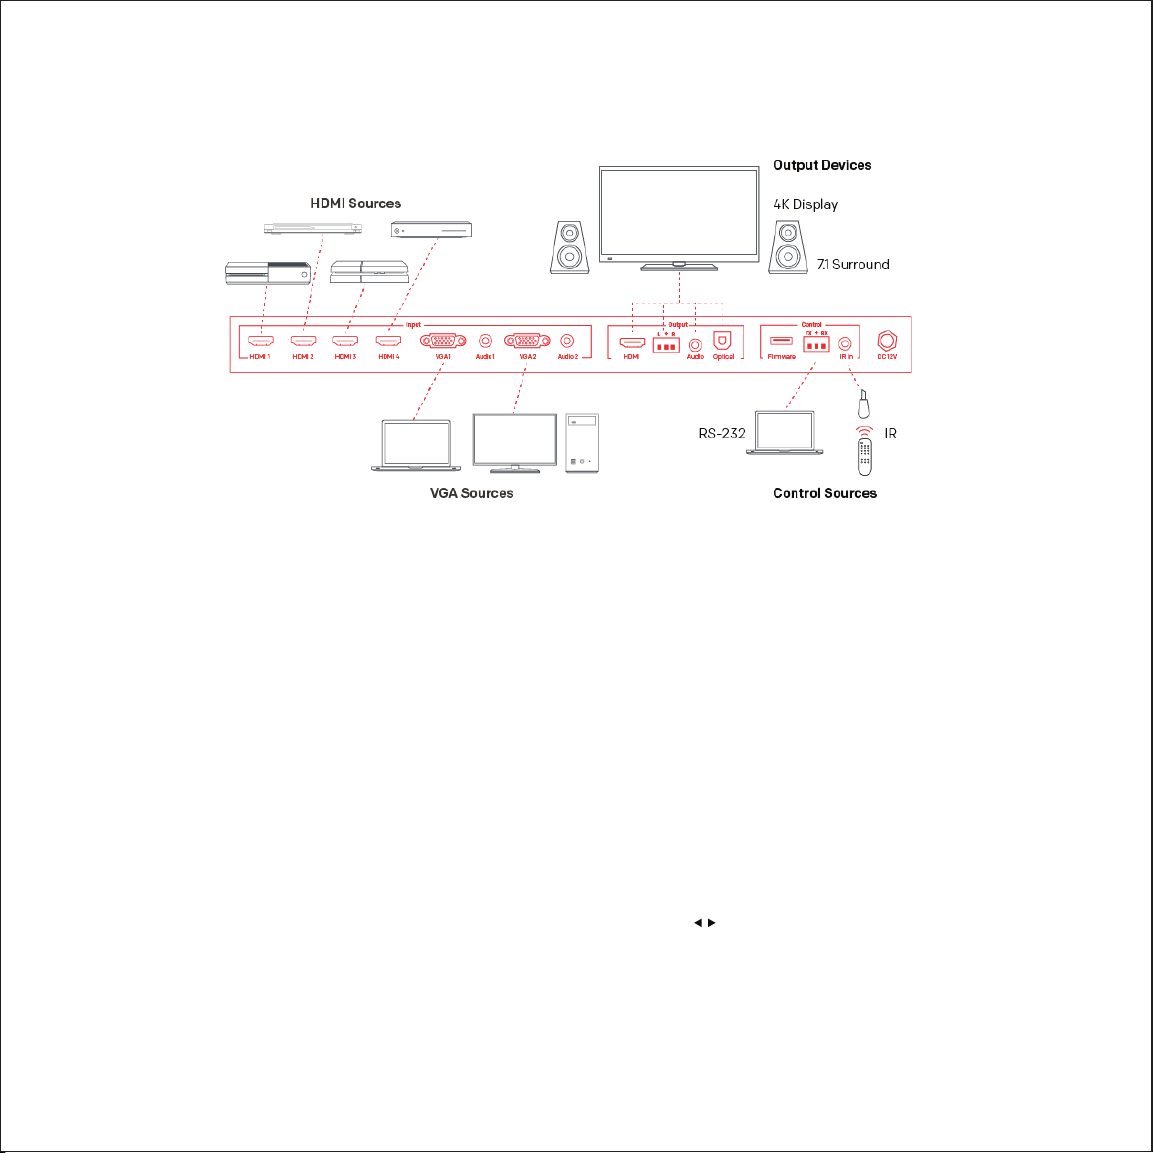
Sewell Rivule 6x1 User manual

Rivule6x1
Scaler Switcher
Great for any conference room, church service,
or entertainment center, the Rivule 6x1 Scaler
Switcher brings any one of up to six devices to
your display. The 6x1 switch boasts scaling features
that allow you to also change between multiple
resolutions as well as convert from VGA to HDMI.
The Rivule 6x1 also supports both optical and
stereo audio breakout.

Need Help?
Phone
Email
Chat
800. 709. 1345
support@sewelldirect.com
sewelldirect.com/support
Live support available Monday
through Friday 9AM-8PM EST
If you have anything less than a 5-star experience,
please let us be the first to know and we’ll make it right!
sewelldirect.com/support

Introduction
The Rivule 6x1 Scaler Switcher is a compact 6x1 Switch with 6 video inputs
(4 HDMI, 2 VGA), 2 auxiliary audio inputs, 1 HDMI output and 3 audio outputs
(1 direct speaker connection, 1 3.5mm stereo audio, 1 optical audio).
It switches between HDMI and VGA signals and outputs a single HDMI
signal.The unit also allows upscaling/downscaling and supports resolution
adjustment (see panel layout in section 2.1). It has HDMI pass-through and
provides comprehensive resolution capacities up to 1080p 3D. The unit
also supports RS232&IR control and EDID management.

Box Contents
- 1 x Rivule 6x1 Scaler Switcher
- 2 x Mounting ears (optional)
- 4 x Mounting Screws (optional)
- 4 x Rubber feet (optional)
- 1 x Power adapter (DC 5V 3A)
- 2 x 3-pin Terminal blocks (pitch:3.81mm)
- 1 x IR Receiver
- 1 x IR Remote
- 1 x Quick start guide
Features
- Control -- via Front panel buttons, RS232 commands and IR Remote
- Switch – 4 HDMI and 2 VGA input to 1 HDMI output
- Scale – VGA to HDMI output, Output resolutions: 1920x1200,1920x1080,
1360x768,1280x800,1024x768,1280x720
- Supports HDMI 1.4, 4K@30Hz & 1080P 3D, HDCP1.4 compliant.
- Transmit signal up to 15m.
- Supports EDID management
- Choose between Auto-switching or Manual-switching
- Supports audio & video output management via OUTPUT BLACK button.
- Supports online software upgrading
- Compact design for easy operation
- Power-off memory

Front Panel Layout
No.
Name
Description
1Power LED
Indicates Power status
•
Green when system is working
•
Red when on standby
2
Input Indicators Green indicates current output selection
3
Auto-switching LED Remains green when in auto switching mode.
4 OutputResolution
LED
Green indicates current output resolution
5 Source/Auto
Switching Mode
•
Source selection button: switches
between inputs.
•Switching mode selection button: Press
and hold for 3 seconds to switch
between manual and auto switching
mode.
6 Resolution/Firmware
Update
•Manual resolutionswitching button for
VGA input: Select between1920 1200,
1920 1080, 1360 768, 1280 800,
1024 768, 1280 720.
(Default resolution:
1920 1080)
•Press and hold for 7 seconds to enter
Firmware update mode. All LEDs will
blink when the system is loading the
Firmware.
.
7 OUTPUT BLACK
Press to Blackout Audio and Video output. All
LEDs will turn off except for the power LED.

Rear Panel Layout
No.
Name
Description
1 Inputs
HDMI: 4 HDMI inputs (embedded HDMI audio
format: PCM).
VGA: 2 VGA inputs
Audio: 2 3.5mm stereo audio inputs
2 Outputs
1 HDMI output
3.5mm Audio: Stereo audio output.
1 Optical Audio output
3 Control
Type-A USB port for updating firmware.
RS232 Input
IR IN: 3.5 mm IR input.
4 DC 5V Connect to a DC 5V 3A power adapter.
3P Audio: Dual-Mono analog audio ouput port.

Quick Instructions
•Connect HDMI, VGA, and Audio sources to their respective inputs.
•Connect the Rivule 6x1 to an HDMI display via the HDMI output.
•Connect audio amplifiers to audio outputs
•Plug the DC 5V 3A power adapter into the power input.
•For IR Remote Control Use, Plug in the IR receiver to the IR in port on the rear
panel.
Auto-switching:
In this mode, selecting an input source via the front panel buttons ( ) will not work,
however, using RS232 command and the IR remote will still allow you to select an input.
When you remove an input from the switcher, it will automatically select the first input
availablein order from HDMI 1 -4 or VGA 1 -2.
Connection Diagram

Basic Settings
Connect the Rivule to a computer with RS232 control software.
Set the parameters for the COM number, buad rate, data bit, stop bit
and the parity bit correctly.
Monitoring area,
indicates whether the
command sent works.
Command Sending area

RS232 Control
Baud rate: 9600 Data bit: 8 Stop bit: 1 Parity bit: none
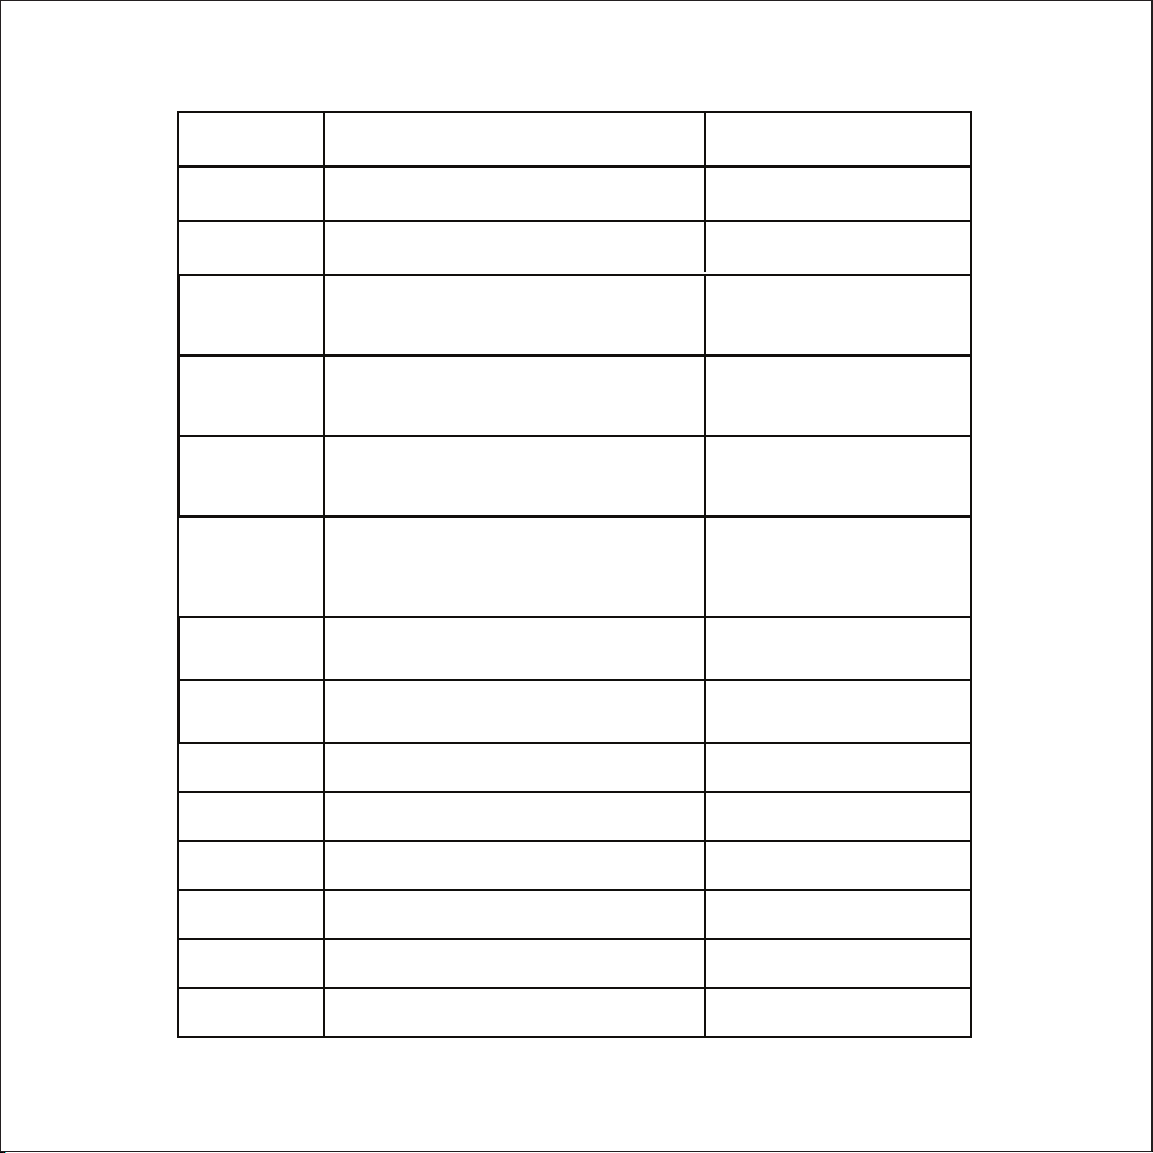
Command Function Feedback Example
Switch Commands
50701% Switch to HDMI 1 Input Switch to HDMI 1
50702% Switch to HDMI 2 Input Switch to HDMI 2
50703% Switch to HDMI 3 Input Switch to HDMI 3
50704% Switch to HDMI 4 Input Switch to HDMI 4
50705% Switch to VGA 1 input Switch toVGA 1
50706% Switch to VGA 2 input Switch to VGA 2
50785% Enable auto-switching Auto Switching
50786% Disable auto-switching Manual Switching
50619% Change the resolution to 1360 X 768 Resolution: 136
50626% Change the resolution to 1024 X 768 XGA Resolution: 1024 X 768
50627% Change the resolution to 1280 X 720 720P Resolution: 1280 X 720
50628% Change the resolution to 1280 X 800 WXGA Resolution: 1280 X 800
50629% Change the resolution to 1920 X 1080 1080P Resolution: 1920 X 1080
50604% Lock the front panel buttons Front Panel Lock
50605% Unlock the front panel buttons Front Panel Unlock
502xx% Set the brightness to xx (xx ranges from 0 to
99 for VGA input Brightness: xx
50620% Change the resolution to 1920 x 1200 WUXGA Resolution: 1920 x 1200
0 x 768
Resolution Select Commands for VGA Input
Setup Commands

Setup Commands Cont.
503xx% Set the contrast to xx (xx ranges from 0 to 99)
for VGA input Contrast: xx
504xx% Set the saturation to xx (xx ranges from 0 to 99)
for VGA input Saturation: xx
505xx% Set the sharpness to xx (xx ranges from 0 to 99)
for VGA input Sharpness: xx
50607% Adjust the color temperature for VGA input
Color Temperature: xx
(xx=Cool/ Medium/ Warm/
User.)
50608% Set the aspect ratio for VGA input Aspect Ratio: xx
(xx= 16:9/ 4:3/ auto/)
50614% Set the picture mode for VGA input
50615% Set SM audio mode to VGA input
Sound Mode: xx (xx=
standard/ music/ movie/
sports/ user)
Picture Mode: xx (xx=
dynamic/ standard/ mild/ user)
50648% Enable HDMI embedded audio output Embedded Audio Output:
enable
50649% Disable HDMI embedded audio output Embedded Audio Output:
disable
50606% Auto-Adjust the input parameter for (VGA only) VGA Input Auto
50699% Check the system version Version Vx.x.x.
50697% Exit Standby mode Wake up!
50797% Enter Standby mode Go to standby!
50617% Reset to factory defaults Factory Reset
50698% Software update

Setup Commands Cont.
50707% Change the horizontal polarity to the opposite,
1 means positive polarity, 0 means negative
polarity
Hpolarity: 0/1
50708% Change the vertical polarity to the opposite, 1
means positive polarity, 0 mean negative
polarity
Vpolarity: 0/1
50772% Set the EDID of all input ports:
bypass mode EDID: bypass mode
50773% Set the EDID of all input ports:
1080P&PCM 2ch EDID: 1080P&PCM 2ch
50774% Set the EDID of all input ports:
1080P&5.1ch EDID: 1080P&5.1ch
50775% Set the EDID of all input ports:
1080P 3D&5.1ch EDID:1080P3d&5.1ch
50769% Read the EDID file (the file must be named
EDID. bin) to the flash from U flash disk
50776% Set the EDID of all input ports:
1080i&PCM 2ch EDID: 1080i&PCM 2ch
50777% Set the EDID of all input ports: 4k&PCM
2ch EDID: 4K&PCM 2ch
50787% Set the EDID of all input ports: user EDID: user
50653% Switch off audio & video output Output black: enable
50654% Switch on audio & video output Output black: disable
Switch to VGA2

Inquire Commands
50631% Check the input source Input: xx
50632% Check the output resolution Resolution: xx
50633% Check the image mode Picture Mode: xx
50634% Check the audio mode Sound Mode: xx
50635% Check the image aspect ratio Aspect Ratio: xx
50636% Check the brightness Brightness: xx
50637% Check the contrast Contrast: xx
50638% Check the saturation Saturation: xx
50639% Check sharpness Sharpness: xx
50640% Check the color temperature Color Temperature: xx
50652% Check Digital audio output status Embedded Audio Output:
enable/ disable
50655% Check video & audio output status Black screen Disable/
Black screen Enable
50709% Check the present resolution & polarity
1920x1080
Hpolarity: 1
Vpolarity: 0
50754% Check the panel locked status Front Panel Lock/ Unlock
50778% Inquire EDID s EDID: xx

50670% Move the image to left Output Position Adjust X xx
50671% Move the image to right Output Position Adjust X xx
50672% Move the image up Output Position Adjust Y xx
50673% Move the image down Output Position Adjust Y xx
50674% Stretch left from left side (increase image width) Output Width Adjust xx
50675% Pull right from left side (decrese image width) Output Width Adjust xx
50678% Enable screen output adjusting Enter Output Position Adjust
50679% Disable screen output adjusting Exit Output Position Adjust
50676% Stretch upwards from top side (increase image
height) Output Height Adjust xx
50677% Stretch downwards from top side (decrease
image height) Output Height Adjust xx
Adjustment Commands for VGA input

Troubleshooting & Maintenance
Problems Causes Solutions
Power LED doesn’t
work/ No response
No output image on display
when switching
Failed connection of power
cord
Faulty Power adapter
Loss of connection
Replace power adapter
Make sure the power cord is
connected properly
Make sure all cables are
connected properly
Cannot control the device
through RS232 port
Wrong RS232
communication parameters
Broken RS232 port
Type in correct RS232
communication parameters
Replace/repair RS232 Port
Cannot control the device
Bad Batteries
Broken IR Remote
Replace batteries
Send the remote in for
replacement
Beyond the effective range
of the IR signal or not
pointing at the IR receiver
Adjust the distance and angle
and point directly at the IR
receiver.
Output image with
snowflake or ghost
Bad cable
Cable length exceeding 15
meters
Replace with new, properly
spec’d cable
Replace with shorter cable
Cannot control the device
via front panel buttons
Front panel buttons are
locked
Send command 50605% to
unlock it
Cannot select source via
SOURCE/AUTO buttons
Device in auto-switching
mode
Press and hold auto switching
button for 3 seconds to exit
auto switching mode

Safety
FCC Statement
Please read all instructions carefully before using the device.
- Unpack the equipment carefully and save the original box and packing material for possible future
shipment.
- Follow basic safety precautions to reduce the risk of fire, electical shock and injury.
- Do not dismantle the housing or modify the module in any way. It may result in electrical shock or burn.
- Using equipment or parts not meeting the products specifications may cause damage, deterioration or
malfunction.
- Refer all servicing to qualified service peronnel at Sewell Direct.
- To prevent fire or shock hazard, do not expose the unit to rain, moisture or install this product near water.
- Do not use liquid or aerosol cleaners to clean this unit. Always unplug the power to the device before
cleaning.
- Unplug the power cord when left unused for a long period of time.
- Information on disposal for scrapped devices: please do not burn or mix with general household waste.
- This device complies with Part 15 of the FCC Rules. Operation is subject to the following two
conditions: (1) this device may not cause harmful interference, and (2) this device must accept
any interference received, including interference that may cause undesired operation.
Table of contents
Popular Switch manuals by other brands

Acnodes
Acnodes KVS1602 user manual

Feelworld
Feelworld LIVEPRO L1 user manual

Banner
Banner SI-RF Series installation manual

Hall Research Technologies
Hall Research Technologies UHBX-SW3 quick start guide

Emerson
Emerson AVENTICS PM1 operating instructions

Hella
Hella 4724 Operation and installation instructions