Shani Darden FACIAL SCULPTING WAND User manual
Each kit includes a tube of
Chaque kit contient un tube de
Hydra Prep Gel (30ml | 1 oz)
manufactured for | fabriqué pour
Shani Darden Skincare,Inc.
Beverly Hills, CA 90210 US
+1 (424) 295-7139
www.shanidarden.com
Made in Germany
NOVAFON GmbH, Daimlerstr. 13, 71384 Weinstadt, Germany
0200062_V01


“My signature facials always include a 10-minute local vibration
treatment: gentle waves penetrate into the skin and stimulate the
facial muscles for a rmer, more contoured appearance. The best
part? Visible results can be achieved after just four 10-minute
sessions. The Facial Sculpting Wand brings those benets home,
minimizing the appearance of forehead lines, jowls, under-eye
sagging and other signs of aging. Add the Precision Ball Attach-
ment to target crow’s feet,smile lines and eyebrow furrows — and
prepare for compliments.”

32
EN
TABLE OF CONTENTS
1. PREFACE PAGE 2
1.1. INTENDED USE
2. PRODUCT DESCRIPTION PAGE 3
2.1. WHAT’S INCLUDED
2.2. HOW IT WORKS
2.3. ATTACHMENTS
2.3.1. Disc Attachment
2.3.2. Precision Ball Attachment
2.4 HYDRA PREP GEL
3. HOW TO USE PAGE 3
3.1. FIRST USE
3.2. ADJUSTING THE INTENSITY
3.3. CHARGING
3.4. ATTACHMENTS
4. TREATMENTS PAGE 5
4.1 PREPARATION
4.2 NECK TO JAWLINE TREATMENT
4.3 CHEEK TO JAWLINE TREATMENT
4.4 FOREHEAD TREATMENTS
4.5 LIP TREATMENT
4.6 NASOLABIAL LINES TREATMENT
4.7 EYE TREATMENT
4.8 FINISH
5. WHEN TO AVOID USE PAGE 14
6. TECHNICAL SPECIFICATIONS PAGE 14
6.1. SYMBOLS USED
6.2. TECHNICAL SPECIFICATIONS
7. SAFETY INSTRUCTIONS PAGE 15
7.1. WARNINGS
7.2 OTHER PRECAUTIONS
8. MAINTENANCE AND REPAIR PAGE 18
8.1. CLEANING AND DISINFECTION
8.2. TROUBLESHOOTING
8.3. DISPOSAL
9. WARRANTY PAGE 18
10. REPAIRS PAGE 19
1. PREFACE
Please read the following instructions carefully to ensure that you
get the most out of your Wand and enjoy using it safely for years
to come.
1.1. INTENDED USE
The Shani Darden Facial Sculpting Wand ™ is intended for cos-
metic use. It stimulates the facial muscles for a rmer, more con-
toured appearance.
2. PRODUCT DESCRIPTION
2.1. WHAT’S INCLUDED
Each kit includes a Shani Darden Facial Sculpting Wand ™, a Disc
Attachment, a Precision Ball Attachment, a tube of Hydra Prep Gel
(30ml | 1 oz), a power plug, a USB-C charging cable and instruc-
tions for use.
2.2. HOW IT WORKS
The Wand transmits acoustic sound waves up to 6cm (2.4in) below
the skin’s surface, providing deep muscle stimulation that can’t
be achieved through manual massage. This action targets crow’s
feet, eyebrow furrows and nasolabial lines at their origin under the
skin’s surface, rather than on a supercial level. The vibrations
also have a circulation-stimulating effect, improving skin’s oxygen
uptake and helping counteract premature skin aging. Skin appears
rmer, more contoured and radiant with regular use.
2.3. ATTACHMENTS
The Wand is equipped with two interchangeable attachments: a
Disc Attachment and a Precision Ball Attachment.
2.3.1. Disc Attachment
The Disc Attachment is best for treating larger areas of the face,
including the forehead, jowls and neck.
2.3.2. Precision Ball Attachment
The Precision Ball Attachment is particularly suitable for target-
ing crow’s feet around the eyes and nasolabial lines around the
mouth.
2.4 HYDRA PREP GEL
A 30ml | 1 oz tube of Hydra Prep Gel is included in each kit. Ap-
plying a thin layer of Hydra Prep Gel to the treatment area prior to
use will allow the Wand to glide easily over the skin. Reapply as
needed. Massage any excess Hydra Prep Gel into skin after treat-
ment is complete.
3. HOW TO USE
3.1. FIRST USE
Before your rst treatment, be sure to fully charge your Shani
Darden Facial Sculpting Wand ™ (section 3.3). Switch on the Wand
by pressing the On/Off button once. The Wand starts at a frequen-
cy of 100 Hz ( ) by default. Pressing the button again decreases
the frequency to 50 Hz ( ). The current frequency selection is in-
dicated on the LED display (frequencies). Press the button a third
time to switch off the Wand.
3.2. ADJUSTING THE INTENSITY
Adjust the intensity of the Wand’s vibration by pressing the In-
tensity Setting button repeatedly. You can choose between three

54
EN
intensity levels: light ( ), medium ( ) and strong ( ). The in-
tensity level is indicated by the LED display (Intensity). The Wand
always starts at the lowest intensity level ( ). We recommend
starting with a low intensity and gradually increasing it according
to your goals and personal comfort.
NOTE: For best results, operate the Wand without applying excess
pressure to the skin.
3.3. CHARGING
To charge your Wand, only use the included power adapter and
USB-C cable. Connect the cable to the Wand and then to the pow-
er adapter suitable for your power connection. Then, plug into
a socket. The Wand is charging when the Charge Display (LED)
lights up. For best results, charge the Wand until the Charge
Display (LED) no longer ashes. This indicates the Wand is fully
charged and ready for use.
DO NOT USE THE WAND WHILE CHARGING.
If the Charge Display (LED) starts ashing rapidly, you can con-
tinue using your Wand for another 10 minutes on the current in-
tensity level. The Wand will automatically switch off when out of
battery.
3.4. ATTACHMENTS
Attachments can easily be detached by turning them a quarter
turn and pulling them gently off the Wand. To attach, simply align
the attachment seamlessly with the brackets of the Wand and
click the attachment onto the Wand. Use the magnets to guide the
attachment into the correct position. Before starting your treat-
ment,make sure that the respective attachment is engaged in the
intended nal position. Please refer to the drawing on page 21
for the correct position of each attachment on the Wand. Before
changing the attachment make sure the Wand is turned off.
4. TREATMENTS
It’s easy to integrate the Shani Darden Facial Sculpting Wand ™ into
your routine. The Disc Attachment is perfect for at areas such as
the forehead, cheeks and neck. The Precision Ball Attachment is
more suitable for sensitive and smaller areas, such as the eye area
and lips. Visit www.shanidarden.com for instructional videos and
more tips on incorporating your Wand into your skin care regimen.
PRO TIPS:
TIMING: Treat each area for 2-5 minutes. For safety reasons, DO
NOT USE the Wand for more than 10 minutes at one time. DO NOT
USE more than 3 times a day. After 10 minutes of continuous use,
turn the Wand off for at least 15 minutes to prevent overheating.
Treatments should feel pleasant and relaxing at all times. Stop
the treatment or change the position of the Wand if the treatment
feels painful or uncomfortable.
PRESSURE: Guide the Wand over the skin using the force of the
Wand’s own weight. Avoid applying additional pressure as this
will reduce the vibration and desired effect.
SPEED: Maintain a slow, rhythmic motion. Keep movements con-
tinuous and repetitive.
MOTIONS: Each treatment uses a variation of gliding and circular
motions.
4.1 PREPARATION
STEP 1: Cleanse the entire face (including the neck area) to re-
move any makeup or impurities. For best results, use a gentle
cleanser such as Shani Darden Cleansing Serum. Rinse with tepid
water. Pat dry.
STEP 2: Using your ngertips or a brush, apply an even amount of
Hydra Prep Gel in a thin layer on one side of the face and/or neck,
depending on the desired treatment. Gel should be visible on the
skin to allow for an easy glide.
STEP 3: Begin by securing the desired attachment to the Shani
Darden Facial Sculpting Wand ™. Turn on the Wand by pressing the
On/Off button( ). This automatically sets the vibration frequency
to 100 Hz (Level I)—a soothing, continuous massage. If desired,
switch to a stimulating, tapping 50 Hz (Level II) massage. To lower
frequency to 50 Hz, press power button ( ) again until top & bottom
lights are illuminated.
STEP 4: Adjust the Wand’s vibration intensity level as desired by
pressing the Intensity Setting button( ) located above the On/Off
button. We recommend starting with a low intensity and gradually
increasing intensity according to your goals and personal comfort.
#3
#1
#2
#1 #2
#3
#4
76
EN
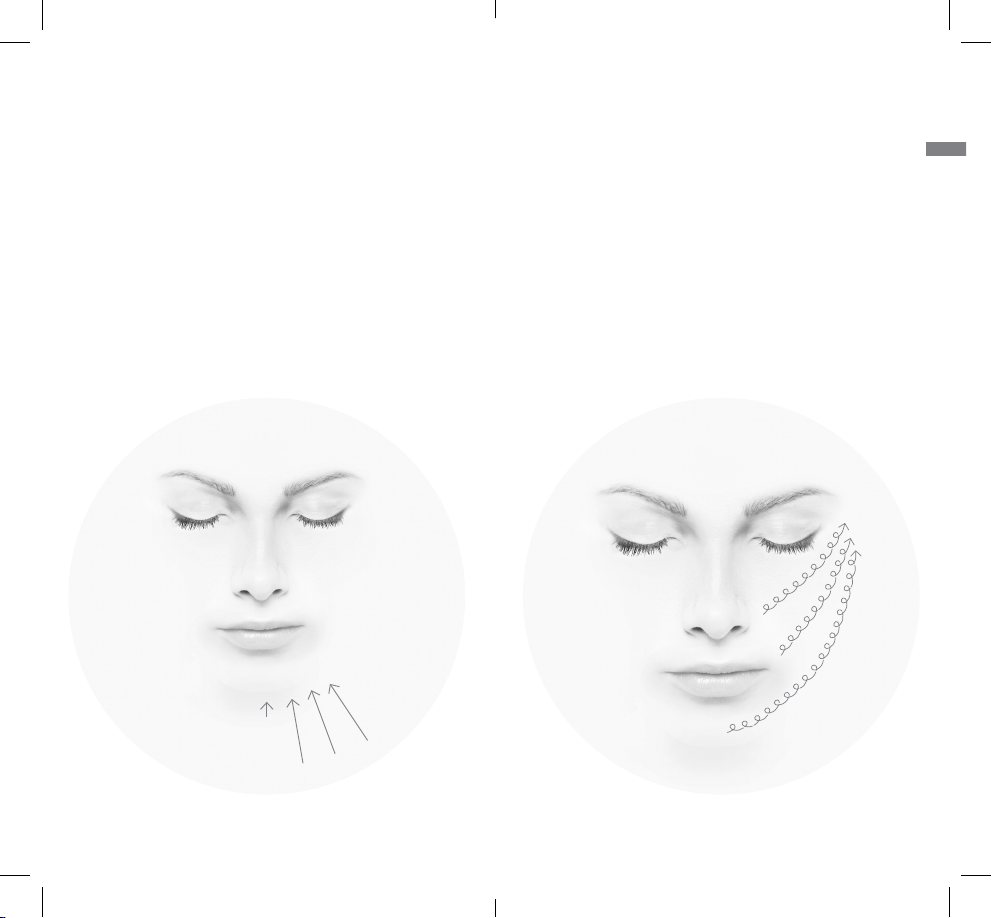
4.2 NECK TO JAWLINE TREATMENT
1. On the left side of the neck, next to the trachea, place the Disc
Attachment just above collarbone (Position 1) and glide up-
ward, from collarbone to the jawline.
2. Place the Disc Attachment at base of neck, above the center
of the collarbone (Position 2), and repeat upward motion from
base of neck up to jawline.
3. On the left side of the neck, place the Disc Attachment just
above collarbone (Position 3) and glide upward, from collar-
bone to the earlobe.
4. Place Disc underneath chin, just above trachea (Position 4)
and glide upward to just underneath the chin. Avoid applying
directly on the larynx and trachea.
5. Repeat each movement 3 times.
6. Repeat steps 1-5 on right side of the neck. Upon completion,
proceed to the Cheek and Jawline treatment or another treat-
ment area of your choice.
4.3 CHEEK AND JAWLINE TREATMENT
1. On the left side,place Disc Attachment at the center of the chin
(Position 1) and slowly glide toward the ear using small circular
motions.
2. Place Disc Attachment at the corner of the mouth (Position 2)
and slowly glide towards ear in small circular motions, under-
neath the cheekbone, to lift and sculpt cheekbone.
3. Place Disc at side of nose (Position 3) and slowly glide on top of
the cheekbone toward hairline in small circular motions.
4. Repeat each movement 3 times.
5. Repeat Steps 1 - 4 on the right side of the face. Upon comple-
tion, proceed to the Forehead Treatments or another treatment
area of your choice.

#1 #2 #3 #1 #2 #3
98
EN
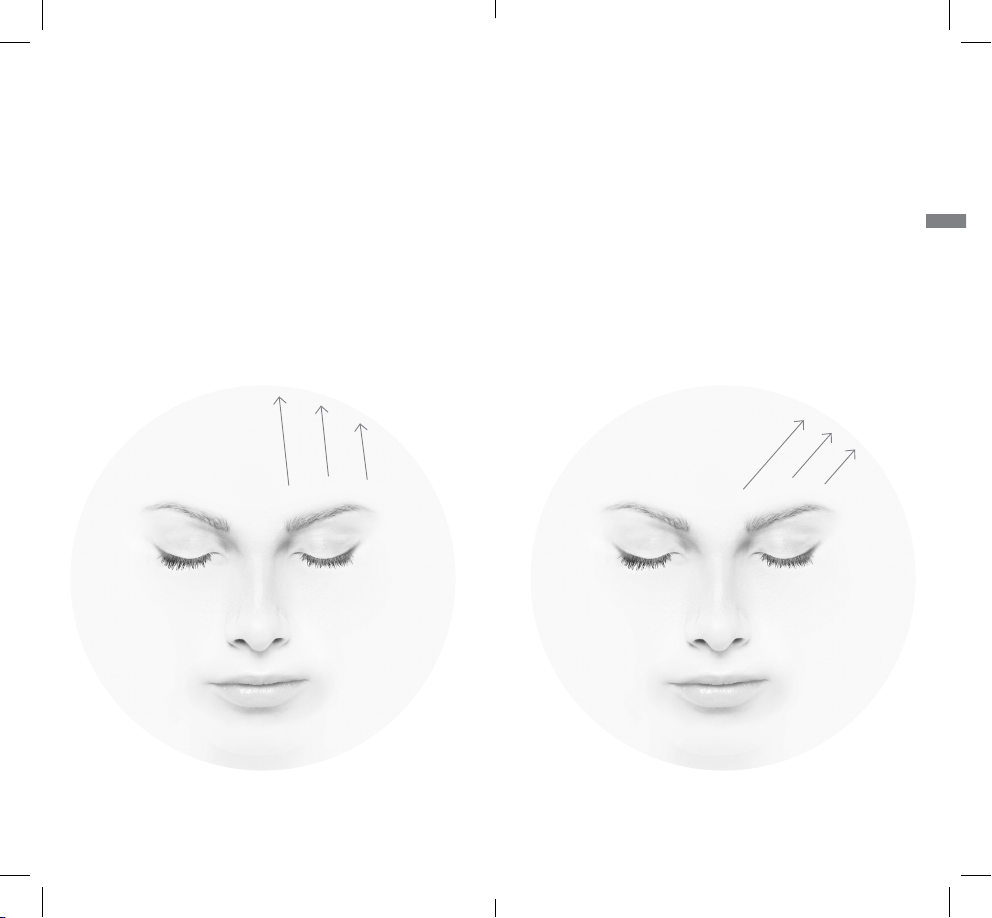
4.4 FOREHEAD TREATMENTS
Forehead Treatment – Upward Movements
1. On the left side, place Disc Attachment just above the thick of
your brow (Position 1), and glide slowly upward, towards hair-
line.
2. Place Disc Attachment just above the arch of the brow
(Position 2) and glide slowly upward, towards hairline.
3. Place Disc Attachment just above the thin of the brow
(Position 3) and glide slowly upward, towards hairline.
4. Repeat each movement 3 times.
5. Repeat steps 1-4 on the right side of the forehead. Upon com-
pletion, proceed to the Diagonal Movements Forehead Treat-
ment or another treatment area of your choice.
Forehead Treatment – Diagonal Movements
1. On the left side, place Disc Attachment just above the thick of
your brow (Position 1), and glide upward diagonally, towards
hairline.
2. Place Disc Attachment just above the arch of the brow
(Position 2) and glide upward diagonally, towards hairline.
3. Place Disc Attachment just above the thin of the brow
(Position 3) and glide upward diagonally, towards hairline.
4. Repeat each movement 3 times.
5. Repeat steps 1-4 on the right side of the forehead. Upon com-
pletion, proceed to the Lip Treatment or another.

#1
1110
EN
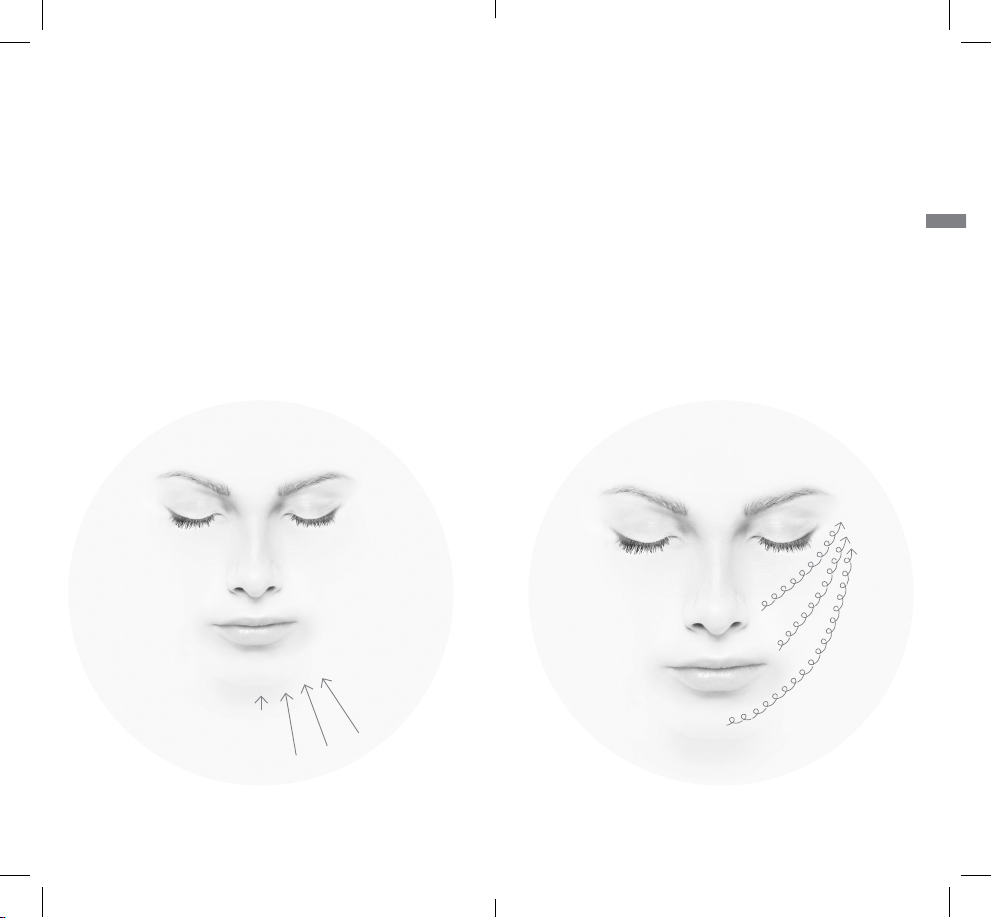
4.5 LIP TREATMENT
1. Place Precision Ball Attachment between the upper lip and the
nose (Position 1). Glide in a horizontal line from left to right side.
2. Repeat this movement 3 times.
3. Place Precision Ball Attachment between upper lip and the
nose. (Position 2) Move in circular motion from left to right side.
4. Repeat this movement 3 times. Upon completion, proceed to
Nasolabial Lines Treatment or another treatment area of your
choice.
4.6 NASOLABIAL LINES TREATMENT
1. Place Precision Ball Attachment at the corner of the mouth at
the bottom of the Nasolabial line (Position 1) and glide upward
to smooth out the Nasolabial lines (laugh lines).
2. Repeat this movement 3 times.
3. Repeat steps 1-2 for right side of face. Upon completion, pro-
ceed to Eye Treatment or another treatment area of your choice.
#1
#2

#1
#2
1312
EN
4.7 EYE TREATMENT
1. Using the Precision Ball Attachment, place device underneath
left eye at the inner corner of the eye (Position 1), and glide
slowly outward,towards outer corner of eye, following the orbit-
al bone. Make sure not to directly hit the eyeball.
2. Place device underneath the brow above the eye, at the inner
corner near bridge of nose (Position 2) and glide outward, while
lifting.
3. Repeat each movement 3 times.
4. Repeat steps 1-3 for right eye.
4.8 FINISH
Upon completion, turn power off ( ) and wipe down the Wand us-
ing a clean, damp cloth and mild soap or water. As a general rule,
DO NOT USE cleaning solutions containing alcohols, including
isopropanol,ethanol and acetone,nor any cleaning solutions con-
taining chlorine; any of these could cause damage to the Wand
and accessories.
IMPORTANT: DO NOT SUBMERGE THE WAND INTO WATER OR
OTHER LIQUIDS FOR CLEANING!
Using your ngertips, massage any excess Hydra Prep Gel into
your skin.

1514
EN
5. WHEN TO AVOID USE
DO NOT USE the Shani Darden Facial Sculpting Wand ™ if the treat-
ment area contains open wounds, eczema or acute inammation.
DO NOT USE the Wand if you have any pre-existing conditions
such as:
· Current episodes of epilepsy
· Pregnancy
· Heart pacemakers
· Arteriosclerosis (in the body region being treated)
· Thromboses (in the body region being treated)
· Brain pacemakers
· Cardiac arrhythmia
· Tumors
· Acute episodes of inammatory diseases
· Implants (in the body region being treated)
Dental implants should be rmly anchored before using the Wand.
Please note that in rare cases the following SIDE EFFECTS may
occur:
· Pain/unpleasant sensation in the treatment area
· Nausea / dizziness
· Skin irritation
· Reexive / involuntary muscle contractions
Please discontinue the treatment immediately if you experience
any of these side effects. If symptoms persist, please consult a
doctor.
Please note that slight reddening and warming of the skin is not a
cause for concern. This is a desired effect of the vibration caused
by increased blood ow.
6. TECHNICAL SPECIFICATIONS
6.1. SYMBOLS USED
Alternating current (AC)
Direct current (DC)
Wand with protection class II according to EN 61140
Hertz
Short-term operation
Milliampere-hour
Amp
Volt
Local laws might require you to dispose of this wand at spe-
cialized facilities or collection points only. Please follow your
local laws regarding disposal of electronic wands.
Displays the serial number of the manufacturer so that a spe-
cic wand can be identied
Temperature limit: Refers to the temperature limits to which
the wand can be safely exposed.
Refer to the instructions
Refer to the instructions
Use indoors only
General warning symbols
Intensity setting in 3 stages
Frequency setting, 100 Hz / 50 Hz / OFF
6.2. TECHNICAL SPECIFICATIONS
· Operating conditions: 41°F (5 °C) to 86°F (30 °C); 15% to 93%
relative humidity, non-condensing; 700 hPa to 1060 hPa air
pressure
· Storage/transport: 23°F (-5°C) to 104°F (40°C); up to 93% rela-
tive humidity, noncondensing; 500 hPa to 1060 hPa air pressure
· Operating mode: Short time duty 20/15 min
· Operating noise: Maximum 70 dBA
· Power plug charger SK3
· Input power: AC 100–240 V, 50–60 Hz, 300 mA
· Output power: DC 5 V, 2 A
· Charging cable USB-A to USB-C, length: Approx. 3ft (1 m)
· Battery: Lithium-ion battery. Capacity 2400 mAh. Voltage 3.7 V
· Service life: 800 charging cycles. A battery charge guarantees at
least 6 treatment units at 20 minutes for a new battery
· IP22 protection class, which states: Protected against access
with a nger. Protected against water dripping at an angle (when
using the USB cover caps, not included in standard scope of de-
livery).
· Manufacturer: NOVAFON GmbH, Daimlerstraße 13, 71384 Wein-
stadt, Germany
7. SAFETY INSTRUCTIONS
Before starting to use the Shani Darden Facial Sculpting Wand ™,
please read the user manual carefully and strictly follow all safety
instructions.
7.1. WARNINGS
When using an electrical appliance, basic precautions should al-
ways be followed to reduce the risk of burns, res, electric shock,
possible severe injury and possible death to the user or other
people. These precautions include the following:
WARNING: DO NOT USE the Wand during charging.
WARNING: Always store the Wand in a dry and clean location.
WARNING: Before connecting the power plug to the main pow-
er source,check that the main voltage corresponds to the voltage
specication on the power plug. Connect the Wand only to a pow-
er outlet that delivers the correct voltage.
WARNING: To charge the Wand, use only the charging cable
and power supply included in the package. Use the correct con-

1716
EN
nection plug, if applicable.
WARNING: Always unplug the Wand from the electrical outlet
after charging and before cleaning.
WARNING: Do not bring the Wand and charging accessories
(adapter, charging cable) into contact with hot surfaces (e.g.
heater, hotplate, etc.). The housing of the Wand or adapter
or the insulation of the cable could be damaged.
WARNING: Never use the Wand when bathing or showering, nor
in oxygen-enriched or explosive environments.
WARNING: Never place the Wand in water or other liquids.
WARNING: Do not reach for a Wand that has fallen into water,
especially when the charging cable is connected to a power out-
let. Unplug immediately.
WARNING: Do not place or store the Wand where it can fall or
be pulled into a tub, pool or sink.
WARNING: Protect the Wand and power plug from drop impact
and shocks.
WARNING: Do not modify the Wand.
WARNING: The Shani Darden Facial Sculpting Wand may only
be used with original Shani Darden accessories.Accessories from
other manufacturers can impair the function and performance of
Shani Darden Wands. This also applies to the power adapter and
charging cables.
WARNING: DO NOT USE the Wand and either discard or return
to your dealer for examination if any of the following conditions
occur:
- if the Wand fails to work correctly.
- if the Wand is damaged, e.g. after having been dropped
- if the Wand was immersed in water or other liquids
- if the Wand exhibits other safety-related problems, such as
emitting smoke, unusual or excessive heat etc.
WARNING: DO NOT USE the power adapter or charging cable if
any of the following conditions occur:
- in the event of visible to the power adapter, charging cable (e.g.
after dropping)
- if the power adapter or charging cable has been exposed to ex-
treme moisture
- if liquid has penetrated the Wand, power plug or cable.
WARNING: Never leave the Wand unattended when it is turned
on. Disconnect the Wand from the power supply at night.
WARNING: Do not place the Wand on ammable surfaces when
charging.
WARNING: Do not operate where aerosol (spray) products are
being used, in other explosive atmospheres or where oxygen is
being administered.
WARNING: During use, only hold the handle of the Wand. Do not
hold the Wand by the Disc or Precision Ball Attachments.
WARNING: Never drop or insert any foreign object into any
opening on the Wand.
WARNING: Wireless communication devices (e.g. WiFi stations,
mobile phones, cordless phones and their base stations) may in-
terfere with the vibration of the Wand and should be kept at a min-
imum distance of 2 feet (0.5 m) away during use. This also applies
to cables and power plugs.
WARNING: Careful supervision is necessary when used on or by
children, immobile or disabled individuals. This Wand should only
be used by those ages 18 and up who have read the instructions
and are competent to use it safely.
WARNING: DO NOT USE the Wand on sleeping or unconscious
individuals.
WARNING: Keep the Wand out of reach of children when not
in use.
WARNING: Small parts (e.g. cover caps) could come loose and
be swallowed. There is a risk of choking or suffocation.
WARNING: Keep children away from packaging materials. There
is a risk of suffocation.
WARNING: Do not squeeze or pinch any part of your body, es-
pecially your ngers, between the Disc/ Precision Ball Attachment
and the Wand.
WARNING: DO NOT USE in the genital area. This Wand is not
intended as an intimate pleasure toy.
WARNING: DO NOT USE the Wand outdoors or in wet or damp
areas.
WARNING: Never operate the power plug in environments with
high humidity or in the presence of moisture. Please note that
moisture is, for example, also generated by nebulizers.
WARNING: Do not operate under blankets, pillows, towels,
clothing, or anyplace else where ventilation is limited. The Wand
could overheat and thus cause re, electric shock or other injuries
to people.
WARNING: Use the Wand only for its intended use as described
in this manual.
WARNING: Avoid contact with mucous surfaces or the eyes.
7.2 OTHER PRECAUTIONS
NOTE: Use your initial treatment to understand how your body re-
sponds to vibrations. If you experience any discomfort, dizziness
or nausea, stop using the Wand immediately and consult your
physician.
NOTE: DO NOT USE the Wand if any of the contraindications de-
scribed in Section 5 apply to you.
NOTE: DO NOT USE the Wand for more than 20 minutes at once.
Leave it to cool down for at least 15 minutes before restarting.
NOTE: ww more than 3 times a day on a single person.
NOTE: Make sure to secure the attachments fully onto the Wand
and keep them on during treatment.
NOTE: Make sure that no substances, such as liquids or creams,
enter the Wand or the power plug.
NOTE: To prevent damage, make sure that the Wand resting on a
stable surface during the charging process.

1918
EN
NOTE: Protect the Wand against dust, lint and other particles, as
these substances may cause the Wand to fail.
NOTE: To prevent premature wear, only store the Wand in a dry
and clean place that is protected against UV light (incl. sunlight).
NOTE: Use only non-alcoholic cleaning supplies. Alcohol can dam-
age or discolor the surface of the Wand and the attachments.
8. MAINTENANCE AND REPAIR
8.1. CLEANING AND DISINFECTION
Do not clean the Shani Darden Facial Sculpting Wand ™ during
charging. Disconnect the Wand from the power supply when
cleaning. To clean the Wand and attachments, wipe down using a
clean damp cloth with fresh mild soap or water. As a general rule,
DO NOT USE cleaning solutions containing alcohols, including
isopropanol, ethanol or acetone for cleaning; any of these could
cause damage to the Wand and accessories. If necessary, dry off
with a soft cloth. Do not clean the USB port.
8.2. TROUBLESHOOTING
If there are any problems with the Wand, please contact our cus-
yourself to repair malfunctions. If you attempt to repair the Wand
yourself, you will void the warranty.
8.3. DISPOSAL
Please observe the national and local legal regulations and guide-
lines when disposing of the Wand. Never dispose with common
household waste. For environmentally sound disposal, dispose at
a designated collection point for electrical and electronic equip-
ment.
9. WARRANTY
From the date of delivery, we grant a warranty of 2 years for is-
sues resulting from material or production defects. Warranty cov-
erage is subject to proof-of-purchase presentation. The battery,
charging cable and power plug are guaranteed for 6 months.
Excluded from the warranty:
- Damage due to improper use and misuse such as dropping, or
neglect in safety precaution
- Accidental damage
- Repairs done by a third party
- Normal wear and tear and consumption (also valid for accesso-
ries)
- Damage or appearance of the product
- Modications, misuse, involved in an accident or natural disaster
- Damage to cord or attachments pieces
For warranty claims, please contact Shani Darden Skin Care. Any
damage caused by failure to use the product in accordance with
its intended use or resulting from accidental, improper or unrea-
sonable use or maintenance is not covered by the warranty. Such
damage is the sole responsibility of the user. Failure to comply
with this instruction manual will void the warranty. No responsi-
bility is assumed for incidental or consequential damages of any
type or for the use of unauthorized attachments. Some states
may not allow such limitation, so it may not apply to you. No other
written express warranty is given. Any implied warranty including
any warranty of merchantability which may arise from purchase
or use is limited to the period provided in the express warranty
(24 months from date and proof of purchase from Shani Darden
Skin Care).
10. REPAIRS
The Shani Darden Facial Sculpting Wand ™ may only be repaired
by the manufacturer. Please do not send in your defective Wand
without being asked, but rather clarify the damage and repair
costs with Shani Darden Skin Care Customer Service rst. Repair
could be more expensive than a new Wand. If the repair is no lon-
ger nancially feasible within the 24-month warranty period, the
manufacturer offers a replacement unit.
This manual can also be viewed as a PDF le at
www.shanidarden.com.

21
FR
20
Intensity display
Multi-function button
Top Intensity setting in
3 stages
Bottom Frequency
setting
100 Hz / 50 Hz / OFF
Frequency display
1 light( ): 100 Hz
2 lights( ): 50 Hz
Correct position of the
attachment on the Wand
Battery/ charging display
USB charging port
«Mes soins du visage comprennent toujours un traitement local
de 10minutes par vibration : des ondes douces pénètrent dans
la peau et stimulent les muscles du visage, lui donnant ainsi une
apparence plus ferme et plus galbée. Le meilleur: des résultats
déjà visibles après quatre sessions de 10 minutes. Le Wand Vi-
sage vous permet de proter de ces bienfaits chez vous: il réduit
l’apparence des lignes frontales, des bajoues, des poches sous
les yeux et des autres signes de vieillissement. L’Embout à Bille de
Précision cible les pattes d’oie, les rides du sourire et les sillons
entre les sourcils. Préparez-vous à faire des envieuses.»

2322
FR
TABLE DES MATIÈRES
1. PRÉFACE PAGE 22
1.1. UTILISATION PRÉVUE
2. DESCRIPTION DU PRODUIT PAGE 23
2.1. CE QUE COMPREND CE KIT
2.2. FONCTIONNEMENT DU WAND
2.3. EMBOUTS
2.3.1. Embout de Plaque
2.3.2. Embout à Bille de Précision
2.4 GEL HYDRA PREP
3. COMMENT UTILISER LE WAND PAGE 23
3.1. PREMIÈRE UTILISATION
3.2. RÉGLAGE DE L’INTENSITÉ
3.3. CHARGEMENT
3.4. EMBOUTS
4. SOINS PAGE 24
4.1 PRÉPARATION
4.2 SOIN DU COU À LA MÂCHOIRE
4.3 SOIN DE LA JOUE À LA MÂCHOIRE
4.4 SOINS DU FRONT
4.5 SOIN DES LÈVRES
4.6 SOIN D DU SILLON NASOGÉNIEN
4.7 SOIN DES YEUX
4.8 APRÈS UTILISATION
5. QUAND ÉVITER D’UTILISER LE WAND PAGE 33
6. CARACTÉRISTIQUES TECHNIQUES PAGE 34
6.1. SYMBOLES UTILISÉS
6.2. CARACTÉRISTIQUES TECHNIQUES
7. CONSIGNES DE SÉCURITÉ PAGE 35
7.1. AVERTISSEMENTS
7.2 AUTRES PRÉCAUTIONS
8. ENTRETIEN ET RÉPARATION PAGE 38
8.1. NETTOYAGE ET DÉSINFECTION
8.2. DÉPANNAGE
8.3. ÉLIMINATION
9. GARANTIE PAGE 38
10. RÉPARATIONS PAGE 39
1. PRÉFACE
Veuillez lire attentivement les instructions suivantes an d’utiliser
votre Wand au mieux et en toute sécurité pendant de nombreuses
années.
1.1. UTILISATION PRÉVUE
Le Shani Darden Facial Sculpting Wand ™ est destiné à un usage
cosmétique. Il stimule les muscles du visage pour lui donner une
apparence plus ferme et plus galbée.
2. DESCRIPTION DU PRODUIT
2.1. CE QUE COMPREND CE KIT
Chaque kit contient un Shani Darden Facial Sculpting Wand ™, un
Embout de Plaque, un Embout à Bille de Précision, un tube de Gel
Hydra Prep (30ml | 1oz), une che d’alimentation, un câble de
chargement USB-C et un mode d’emploi.
2.2. FONCTIONNEMENT DU WAND
Le Wand transmet des ondes sonores acoustiques allant jusqu’à
6 cm (2.4in) sous la surface de la peau, ce qui permet une sti-
mulation musculaire profonde qui ne peut être obtenue avec un
massage manuel. Cette action cible les pattes d’oie, les sillons
entre les sourcils et les rides du sillon nasogénien à leur origine
sous la surface de la peau, plutôt qu’à un niveau superciel. Les
vibrations ont également un effet stimulant sur la circulation,
améliorant l’absorption d’oxygène par la peau et permettant de
lutter contre son vieillissement prématuré. Avec une utilisation ré-
gulière, la peau semble plus ferme, plus galbée et plus éclatante.
2.3. EMBOUTS
Le Wand est équipé de deux embouts interchangeables: un Em-
bout de Plaque et un Embout à Bille de Précision
2.3.1. Embout de Plaque
L’Embout de Plaque est le plus adapté pour traiter les grandes
zones du visage, y compris le front, les bajoues et le cou.
2.3.2. Embout à Bille de Précision
L’Embout à Bille de Précision est particulièrement adapté pour ci-
bler les pattes d’oie présentes autour des yeux, ainsi que les ride
du sillon nasogénien autour de la bouche.
2.4 GEL HYDRA PREP
Un tube de Gel Hydra Prep de 30ml | 1oz est inclus dans chaque
kit. L’application d’une ne couche de Gel Hydra Prep sur la zone à
traiter avant l’utilisation permettra au Wand de glisser facilement
sur la peau. Réappliquez si nécessaire. Massez tout excès de Gel
Hydra Prep pour le faire pénétrer une fois le soin terminé.
3. COMMENT UTILISER LE WAND
3.1. PREMIÈRE UTILISATION
Avant de procéder à votre premier soin, assurez-vous
d’avoir complètement chargé le Shani Darden Facial
Sculpting Wand ™ (section 3.3). Allumez le Wand en appuyant une
fois sur le bouton Marche/Arrêt. Le Wand démarre avec une fré-
quence de 100Hz ( ) par défaut. Appuyer une nouvelle fois sur le
bouton diminue la fréquence de 50Hz ( ). La sélection actuelle de
la fréquence s’afche sur l’écran LED (fréquences). Appuyez sur
le bouton une troisième fois pour éteindre le Wand.

2524
FR
3.2. RÉGLAGE DE L’INTENSITÉ
Ajustez l’intensité de vibration du Wand en appuyant plusieurs
fois sur le bouton de réglage de l’intensité. Vous pouvez choisir
entre trois niveaux d’intensité : léger ( ), moyen ( ) et fort ( ).
Le niveau d’intensité est indiqué sur l’écran LED (Intensité). Le
Wand commence toujours au niveau d’intensité le plus bas ( ).
Nous vous recommandons de commencer avec une intensité
faible et de augmenter progressivement en fonction de vos ob-
jectifs et de votre confort personnel.
REMARQUE : Pour de meilleurs résultats, utilisez le Wand sans
exercer une trop grande pression sur la peau.
3.3. CHARGEMENT
Pour charger votre Wand, utilisez uniquement l’adaptateur
électrique et le câble USB-C. Connectez le câble au Wand puis
à l’adaptateur électrique adapté à votre raccordement élec-
trique. Puis branchez-le dans une prise électrique. Le Wand est
en charge lorsque l’indicateur de charge (LED) s’allume. Pour de
meilleurs résultats, chargez le Wand jusqu’à ce que l’indicateur
de charge (LED) ne clignote plus. Cela indique que le Wand est
complètement chargé et prêt à être utilisé.
NE PAS UTILISER LE WAND LORSQU’IL EST EN CHARGE.
Si l’indicateur de charge (LED) commence à clignoter rapidement,
vous pouvez encore utiliser votre Wand pendant 10 minutes au
niveau d’intensité actuel. Le Wand s’éteindra automatiquement
lorsque la batterie sera vide.
3.4. EMBOUTS
Les embouts peuvent être facilement retirés en les tournant d’un
quart de tour et en les sortant doucement du Wand. Pour mettre
un embout en place, il suft de l’aligner avec les crochets du
Wand et de clipser l’embout dans le Wand. Utilisez les aimants
pour guider la xation dans la bonne position. Avant de commen-
cer votre soin, assurez-vous que l’embout respectif se trouve
bien dans la position nale prévue. Veuillez vous référer au dessin
de la page 40 pour connaître la position correcte de chaque
embout sur le Wand. Assurez-vous que le Wand est éteint avant
de changer les embouts.
4. SOINS
Intégrer le Shani Darden Facial Sculpting Wand ™ dans votre rou-
tine beauté est très facile. L’Embout de Plaque est parfait pour
les zones plates telles que le front, les joues et le cou. L’Embout à
Bille de Précision est plus adapté aux zones plus petites et sen-
sibles, telles que le contour des yeux et des lèvres. Vous trouverez
sur www.shanidarden.com des vidéos pour plus d’informations
ou davantage de conseils sur comment intégrer votre Wand dans
votre routine beauté.
CONSEILS DE PRO:
FRÉQUENCE D’UTILISATION : Traitez chaque zone pendant
deux à cinq minutes. Pour des raisons de sécurité, N’UTILISEZ
PAS le Wand pendant plus de 10 minutes par session. N’UTI-
LISEZ PAS le Wand plus de trois fois par jour. Après 10 minutes
d’utilisation continue, éteignez le Wand pendant au moins
15 minutes an d’éviter toute surchauffe. Les soins doivent
être agréables et vous détendre à chaque instant. Arrêtez
le soin ou changez la position du Wand si le soin est douloureux
ou inconfortable.
PRESSION: Guidez le Wand sur la peau en utilisant le propre poids
du Wand. Évitez d’appliquer une pression supplémentaire: cela
réduirait les vibrations et l’effet désiré.
VITESSE: Conservez un mouvement lent et rythmé. Vos mouve-
ments doivent être continus et répétitif.
MOUVEMENTS: Chaque soin utilise une variation de glissement et
de mouvements circulaires.
4.1 PRÉPARATION
ÉTAPE 1 : Nettoyez l’ensemble du visage (y compris la zone du
cou) an de retirer toute trace de maquillage ou toute impureté.
Pour de meilleurs résultats, utilisez un nettoyant doux tel que le
Sérum nettoyant Shani Darden. Rincez à l’eau tiède. Séchez en
tapotant.
ÉTAPE 2 : Avec le bout de vos doigts ou à l’aide d’un pinceau, ap-
pliquez une quantité uniforme de Gel Hydra Prep en ne couche
sur un côté du visage et/ou du cou, selon le soin souhaité. Le gel
doit être visible sur la peau pour permettre au Wand de bien glis-
ser.
ÉTAPE 3: Commencez par xer correctement l’embout souhaité
sur le Shani Darden Facial Sculpting Wand ™. Allumez le Wand en
appuyant sur le bouton Marche/Arrêt ( ). Cette action dénit auto-
matiquement la fréquence de vibration sur 100Hz (Niveau I), pour
un massage apaisant et continu. Si vous le souhaitez, passez à un
massage stimulant par tapotements avec la fréquence de 50Hz
(niveau II) . Pour abaisser la fréquence à 50 Hz, appuyez à nou-
veau sur le bouton d’alimentation ( ) jusqu’à ce que les lumières
du haut et du bas soient allumées.
ÉTAPE 4 : Ajustez l’intensité de vibration du Wand au niveau sou-
haité en appuyant sur le bouton de réglage de l’intensité ( ) situé
au-dessus du bouton Marche/Arrêt. Nous vous recommandons de
commencer avec une intensité faible et d’augmenter progressi-
vement en fonction de vos objectifs et de votre confort personnel.
#3
#1
#2
#1 #2
#3
#4
2726
FR
4.2 SOIN DU COU À LA MÂCHOIRE
1. Sur le côté gauche du cou, à côté de la trachée, placez l’Embout
de Plaque juste au-dessus de la clavicule (Position 1) et faites-
le glisser vers le haut, depuis la clavicule jusqu’à la mâchoire.
2. Placez l’Embout de Plaque à la base du cou, au-dessus du
centre de la clavicule (Position 2), et répétez le mouvement
ascendant depuis la base du cou jusqu’à la mâchoire.
3. Sur le côté gauche du cou, placez l’Embout de Plaque juste
au-dessus de la clavicule (Position 3) et faites-le glisser vers le
haut, de la clavicule au lobe de l’oreille.
4. Placez l’embout sous le menton, juste au-dessus de la trachée
(Position 4) et faites-le glisser vers le haut jusque sous le men-
ton. Évitez une application directe sur le larynx et la trachée.
5. Répétez chaque mouvement trois fois.
6. Répétez les étapes 1 à 5 sur le côté droit du cou. Une fois le soin
terminé, passez au soin des joues et de la mâchoire ou à une
autre zone de soin de votre choix.
4.3 SOIN DE LA JOUE ET DE LA MÂCHOIRE
1. Sur le côté gauche, placez l’Embout de Plaque au centre du
menton (Position 1) et faites-le glisser lentement vers l’oreille
en effectuant de petits mouvements circulaires.
2. Placez l’Embout de Plaque au coin de la bouche (Position 2) et
faites-le glisser lentement vers l’oreille en effectuant de petits
mouvements circulaires, sous la pommette, pour soulever et
sculpter la pommette.
3. Placez la plaque sur le côté du nez (Position 3) et faites-la
glisser lentement sur le dessus de la pommette jusqu’à la nais-
sance des cheveux en effectuant de petits mouvements circu-
laires.
4. Répétez chaque mouvement trois fois.
5. Répétez les étapes 1 à 4 sur le côté droit du visage. Une fois le
soin terminé, passez au soin du front ou à une autre zone de
soin de votre choix.
#1 #2 #3 #1 #2 #3
2928
FR
4.4 SOINS DU FRONT
Soin du front - Mouvements vers le haut
1. Sur le côte gauche, placez l’Embout de Plaque juste au-dessus
de l’épaisseur du sourcil (Position 1) et faites-le lentement glis-
ser vers le haut en direction de la naissance des cheveux.
2. Placez l’Embout de Plaque juste au-dessus de l’arc du sourcil
(Position 2) et faites-le lentement glisser vers le haut en direc-
tion de la naissance des cheveux.
3. Placez l’Embout de Plaque juste au-dessus de la partie ne du
sourcil (Position 3) et faites-le glisser lentement en direction
de la naissance des cheveux.
4. Répétez chaque mouvement trois fois.
5. Répétez les étapes 1 à 4 sur le côté droit du front. Une fois le
soin terminé, passez au soin du front en mouvements diago-
naux ou à une autre zone de soin de votre choix.
Soin du front - Mouvements diagonaux
1. Sur le côte gauche, placez l’Embout de Plaque juste au-dessus
de l’épaisseur du sourcil (Position 1) et faites-le glisser vers le
haut et en diagonale en direction de la naissance des cheveux.
2. Placez l’Embout de Plaque juste au-dessus de l’arc du sourcil
(Position 2) et faites-le glisser vers le haut et en diagonale en
direction de la naissance des cheveux.
3. Placez l’Embout de Plaque juste au-dessus de la partie ne du
sourcil (Position 3) et faites-le glisser vers le haut et en diago-
nale en direction de la naissance des cheveux.
4. Répétez chaque mouvement trois fois.
5. Répétez les étapes 1 à 4 sur le côté droit du front. Une fois le
soin terminé, passez au soin des lèvres ou à un autre soin.

#1
#1
#2
3130
FR
4.5 SOIN DES LÈVRES
1. Placez l’Embout à Bille de Précision entre la lèvre supérieure et
le nez (Position 1). Faites-le glisser horizontalement depuis le
côté gauche vers le côté droit.
2. Répétez chaque mouvement trois fois.
3. Placez l’Embout à Bille de Précision entre la lèvre supérieure
et le nez. (Position 2) Déplacez-le en mouvements circulaires
depuis le côté gauche jusqu’au côté droit.
4. Répétez chaque mouvement trois fois. Une fois le soin terminé,
passez au soin du sillon nasogénien ou à une autre zone de
soin de votre choix.
4.6 SOIN DU SILLON NASOGÉNIEN
1. Placez l’Embout à Bille de Précision au coin de la bouche, au
bas du sillon nasogénien (Position 1) et faites-le glisser vers le
haut pour lisser le sillon nasogénien (lignes du sourire).
2. Répétez chaque mouvement trois fois.
3. Répétez les étapes 1 à 2 sur le côté droit du visage. Une fois le
soin terminé, passez au soin du contour des yeux ou à une autre
zone de soin de votre choix.

#1
#2
3332
FR
4.7 SOIN DU CONTOUR DES YEUX
1. Avec l’Embout à Bille de Précision, placez l’appareil sous l’œil
gauche, au coin intérieur de l’œil (Position 1), et faites-le glis-
ser lentement vers l’extérieur, vers le coin extérieur de l’œil, en
suivant l’os de l’orbite. Assurez-vous de ne pas toucher direc-
tement le globe oculaire.
2. Placez l’appareil sous le sourcil au-dessus de l’œil, au coin in-
térieur près de l’arête du nez (Position 2) et glissez vers l’ex-
térieur, tout en liftant.
3. Répétez chaque mouvement trois fois.
4. Répétez les étapes 1 à 3 pour l’œil droit.
4.8 APRÈS UTILISATION
Une fois le soin terminé, éteignez l’appareil ( ) et essuyez le Wand
avec un chiffon propre et humide et du savon doux ou de l’eau. En
règle générale, N’UTILISEZ PAS de solutions nettoyantes conte-
nant de l’alcool, y compris l’isopropanol, l’éthanol et l’acétone,
ni aucune solution nettoyante contenant du chlore ; ces produits
pourraient endommager le Wand et ses accessoires.
IMPORTANT: N’IMMERGEZ PAS LE Wand DANS L’EAU OU D’AUTRES
LIQUIDES POUR LE NETTOYER !
Avec vos doigts, massez tout excès de Gel Hydra Prep pour le faire
pénétrer dans votre peau.
5. QUAND ÉVITER D’UTILISER LE WAND
N’UTILISEZ PAS le Shani Darden Facial Sculpting Wand ™ si la
zone à traiter comporte des plaies ouvertes, de l’eczéma ou une
inammation aigüe.
N’UTILISEZ PAS le Wand si vous avez des antécédents médicaux
tels que:
· Épisodes actuels d’épilepsie
· Grossesse
· Stimulateur cardiaque
· Artériosclérose (dans la région du corps concernée par les
soins)
· Thromboses (dans la région du corps concernée par les soins)
· Stimulateur électrique cérébral
· Arythmie cardiaque
· Tumeurs
· Épisodes aigus de maladies inammatoires
· Implants (dans la région du corps concernée par les soins)
Les implants dentaires doivent être fermement implantés avant
d’utiliser le Wand.
Veuillez noter que dans de rares cas, les EFFETS SECONDAIRES
suivants peuvent survenir :
· Douleur / sensation désagréable dans la zone traitée
· Nausée / étourdissement
· Irritation cutanée
· Contractions des muscles réexes / involontaires
Veuillez interrompre le traitement immédiatement si vous ressen-
tez l’un de ces effets secondaires. Si les symptômes persistent,
veuillez consulter un médecin.
Veuillez noter qu’un léger rougissement et un échauffement de la
peau n’est pas un motif d’inquiétude.C’est un effet souhaité de la
vibration, provoqué par l’augmentation du ux sanguin.

3534
FR
6. CARACTÉRISTIQUES TECHNIQUES
6.1. SYMBOLES UTILISÉS
Courant alternatif (CA)
Courant continu (CC)
Wand avec classe de protection II conformément à la norme
EN 61140
Hertz
Fonctionnement à court terme
Milliampère-heure
Amp
Volt
La législation locale peut vous obliger à éliminer ce Wand
dans des installations spécialisées ou dans des points de
collecte uniquement. Veuillez respecter la législation locale
relative à l’élimination des appareils électroniques.
Afche le numéro de série du fabricant an qu’un Wand spé-
cique puisse être identié
Limite de température : Désigne les limites de température
auxquelles le Wand peut être exposé en toute sécurité.
Voir les instructions
Voir les instructions
Utilisation en intérieur uniquement
Symboles généraux d’avertissement
Réglage de l’intensité sur trois niveaux
Réglage de la fréquence, 100Hz / 50Hz / ARRÊT
6.2. CARACTÉRISTIQUES TECHNIQUES
· Conditions de fonctionnement: 41°F (5°C) à 86°F (30°C) ; 15%
à 93% d’humidité relative, sans condensation ; pression atmos-
phérique de 700 hPa à 1060 hPa
· Stockage / transport: 23°F (-5°C) à 104°F (40°C) ; jusqu’à 93%
d’humidité relative, sans condensation ; pression atmosphé-
rique de 500 hPa à 1060 hPa
· Mode de fonctionnement : Fonctionnement de courte durée
20 / 15 min
· Bruit en fonctionnement: Maximum 70 dBA
· Chargeur de la prise d’alimentation SK3
· Puissance d’entrée: CA 100–240 V, 50–60 Hz, 300 mA
· Puissance de sortie: CC 5 V, 2 A
· Câble de chargement USB-A à USB-C, longueur: env. 3ft (1m)
· Batterie: batterie lithium-ion. Capacité 2400mAh. Tension 3,7V
· Durée de vie: 800cycles de charge. Une charge de batterie ga-
rantit au moins six unités de traitement de 20minutes pour une
nouvelle batterie.
· Indice de protection IP22, qui garantit: Une protection contre
l’accès avec un doigt. Une protection contre les gouttes d’eau
qui coulent en biais (en cas d’utilisation des capuchons USB,
non inclus dans la livraison standard).
· Fabricant: NOVAFON GmbH, Daimlerstraße 13, 71384 Weinstadt,
Allemagne
7. CONSIGNES DE SÉCURITÉ
Avant de commencer à utiliser le Shani Darden Facial Sculpting
Wand ™, veuillez lire attentivement le mode d’emploi et respecter
strictement toutes les consignes de sécurité.
7.1. AVERTISSEMENTS
Lors de l’utilisation d’un appareil électrique, des précautions de
base doivent toujours être prises an de réduire les risques de
brûlures, d’incendie, de choc électrique, de blessures graves et
de décès éventuels pour l’utilisateur ou d’autres personnes. Ces
précautions comprennent les suivantes:
AVERTISSEMENT : N’UTILISEZ PAS le Wand lorsqu’il est en
charge.
AVERTISSEMENT : Rangez toujours le Wand dans un endroit
sec et propre.
AVERTISSEMENT: Avant de brancher la che d’alimentation à
la source d’alimentation principale, vériez que la tension princi-
pale correspond à la spécication inscrite sur la che d’alimenta-
tion. Branchez le Wand uniquement à une prise électrique déli-
vrant la tension adaptée.
AVERTISSEMENT: Pour charger le Wand, utilisez uniquement
le câble de charge et l’alimentation électrique inclus dans la li-
vraison. Si cela s’applique, utilisez la che de connexion adaptée.
AVERTISSEMENT : Débranchez toujours le Wand de la prise
électrique après l’avoir chargé et avant de le nettoyer.
AVERTISSEMENT: Ne mettez pas le Wand et les accessoires
de chargement (adaptateur, câble de chargement) en contact
avec des surfaces chaudes (par exemple, chauffage, plaque de
cuisson, etc.). Cela pourrait endommager le boîtier du Wand ou
de l’adaptateur
ou l’isolation du câble.
AVERTISSEMENT: N’utilisez jamais le Wand lors d’un bain ou
d’une douche, ni dans un environnement enrichi en oxygène ou
explosif.
AVERTISSEMENT: Ne placez jamais le Wand dans l’eau ou dans
d’autres liquides.
AVERTISSEMENT: N’essayez pas d’atteindre un Wand qui est
tombé dans l’eau, surtout si le câble de chargement est relié à une
prise de courant. Débranchez-le immédiatement.
AVERTISSEMENT : Ne placez pas ou ne rangez pas le Wand
dans un endroit où il peut tomber ou être tiré dans une baignoire,
une piscine ou un évier.
AVERTISSEMENT: Protégez le Wand et la che d’alimentation
des chutes et des coups.
AVERTISSEMENT: Ne modiez pas le Wand.
AVERTISSEMENT: Le Wand Visage ne peut être utilisé qu’avec
les accessoires originaux Shani Darden. Les accessoires d’autres
fabricants peuvent nuire au fonctionnement et aux performances
des Wands Shani Darden. Cela s’applique également à l’adapta-
teur électrique et aux câbles de chargement.
Table of contents
Languages:
Popular Personal Care Product manuals by other brands

Silvercrest
Silvercrest SHE 3 C3 operating instructions

Silk'n
Silk'n sensepil AS101028A Instructions for use

cliMATE
cliMATE CLI-AD-LED Installation & operating instructions

Silvercrest
Silvercrest SWWS 240 A1 operating instructions

Silk'n
Silk'n Lipo H5001 user manual

Concept2
Concept2 BV1010 operating manual


BaByliss PRO
BaByliss PRO NANO TITANIUM BNTHB250A quick start guide

Akces-Med
Akces-Med BodyMap user manual

Sunfire
Sunfire Platinum PRO48X quick start guide

Thuasne
Thuasne Cemen manual

Snore Reliever Company
Snore Reliever Company VitalSleep instruction manual

Healinhouse
Healinhouse HEALMAT 210400 instruction manual