Shanling M8 User manual

快速入门指南
Quick Start Guide


安全指示
简体中文
4. 使用时不要让产品摔落,或与硬物摩擦撞击,否则会导致播放
器表面磨花,电池脱落,数据丢失或其它硬件损坏,不要剧烈
震动或撞击,防止不正确使用而损伤本产品。
6. 不要使用化学剂或清洁剂清洁本产品,这样会损伤产品表面和
腐蚀喷漆。
3. 充电时机器有轻微发热,属正常现象。
5. 请调节适当音量欣赏音乐,以免损伤您的听觉和音响系统,在
插入耳机前,请先将音量调小,不要长时间使用耳机。
7. 本产品在格式化或上传/下载过程中不要突然断开连接,否则可
能导致程序出错。
8. USB只用于数据传输或者充电,请尽量避免边充电边使用。
9. 当长期没有使用产品时,需要对产品定期充电,以保证电池寿
命。
10. 电池更换不当会有爆炸危险,只能用同类型或等效类型的电池。
11. 电池不得暴露在诸如日照、火烤或类似过热环境中。
13. 请在山灵官网-产品中心-M8产品页面下载固件升级程序,
照升级说明操作。
并按
执行标准: GB8898-2011; GB/T13837-2012
12. 使用电源适配器,应购买获得CCC认证并满足标准要求。
1. 不可自行开启本机进行维修、拆卸或改造。
2. 请不要在特别热、冷、多尘或潮湿的环境中使用本产品,
要放在有液体的地方。
也不

环保支持
产品中有害物质的名称和含量
零部件名称
PCBA
金属部件
塑胶部件
充电线
显示屏
有害物质
铅
(Pb)
汞
(Hg)
镉
(Cd)
六价铬
(Cr,VI)
多溴联苯
(PBB)
多溴二苯醚
( )PBDE
电池
本表格依据SJ/T 11364的规定编制。
○:表示该有毒有害物质在该部件所有均质材料中的含量不超过在
GB/T 26572标准规定的限量要求。
X:表示该有害物质至少在该部件的某一均质材料中的含量超出
GB/T 26572标准规定的限量要求。
本表中标有"X的所有部件都符合欧盟RoHS 2.0法规要求。"
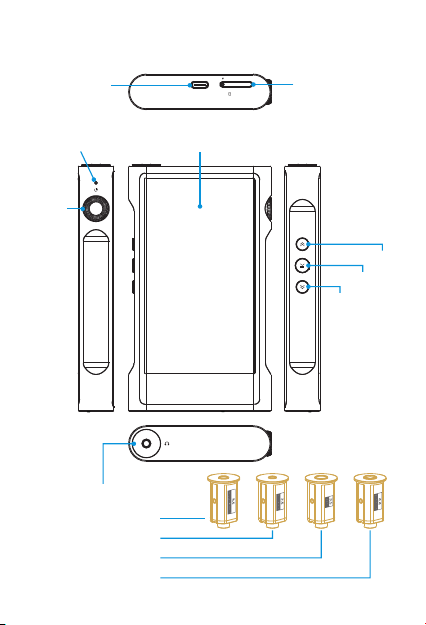
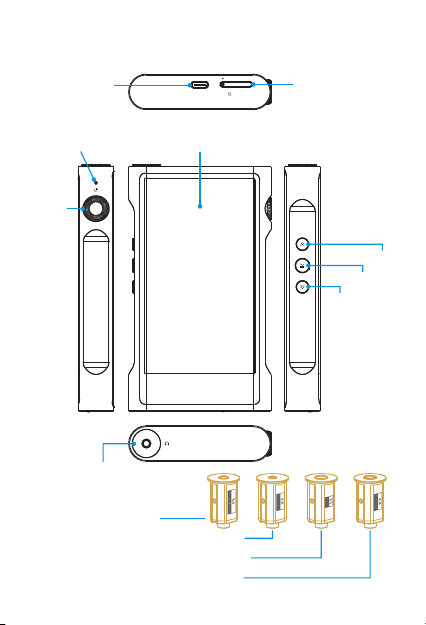
USB/D AC mic roSD
部件名称
Type-C USB
数据接口
Micro SD卡插口
状态指示灯 5.0英寸触摸屏 ( x )1080 1920
3.5mm耳机/线路输出
4.4mm平衡耳机输出
2.5mm平衡耳机输出
3.5 PRO平衡耳机输出
可更换耳机座模块
音量控制旋钮
电源/锁屏键
播放/暂停键
上一曲选择键
下一曲选择键
示意图
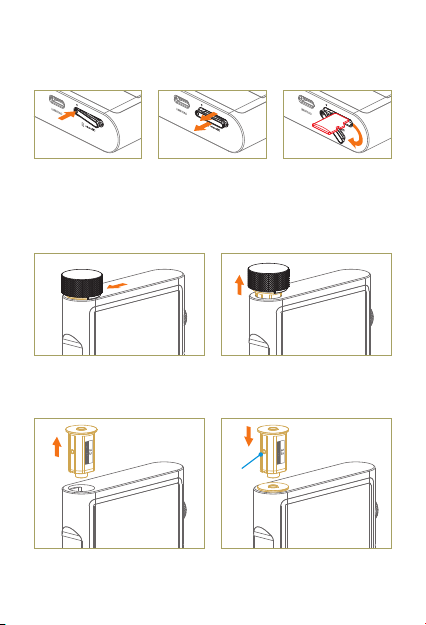
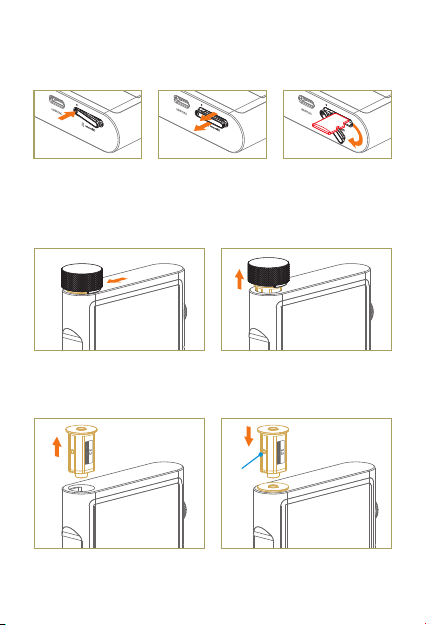
Micro SD卡盖取出
1. 按压左边指示位
置,右边翘起。
2. 卡盖尽量保持水
平往外拉出。
3. 卡盖往下转动即
可取装Micro SD
卡。
耳机座模块取出及安装
1. 按图方向将起插器扣住耳机
座模块前后扣位。
2. 向上拔出5mm左右即可,并
移除起插器。
3. 直接取出即可。 4. 安装耳机座模块,按方向对
准孔位直接按压到位即可。
钢珠朝左侧

1. 上一曲 : 短按为选择上一曲并播放。在播放状态下,长按为
快退功能。
3. 播放及暂停键 : 为播放或暂停功能。短按
上一曲/下一曲/播放及暂停
2. 下一曲 : 短按为选择下一曲并播放。在播放状态下,长按为
快进功能。
1. 手势模式
返回上一级: 从屏幕左侧边缘向右滑或右侧边缘向左滑。
返回桌面: 从屏幕下方向上滑。
多任务管理: 从屏幕下方向上滑并停留。
2. 悬浮球模式
返回上一级: 在屏幕上单击悬浮 。球
返回桌面: 在屏幕上长按 。悬浮球
多任务管理: 在屏幕上双击悬浮球。
导航键(设置 - 通用 - 导航键)
: 返回上一级。
。: 返回桌面
。: 多任务管理
3. 虚拟键模式
操作及接口说明
开机/关机/锁屏
1. 开机: 长按电源键保持2秒,状态指示灯点亮并进入开机界面。
3. 锁屏: 在开机状态下,短按电源键进入锁屏状态,显示屏自动关
闭,再按一次恢复唤醒状态,显示屏点亮。
2. 关机: 长按 2秒,显示屏显示 关机 窗口,
击"关机"关闭机器。
电源键 " "和"重启"选择 点

固件升级
1. 进行固件升级时请确保机器的电量充足,以免升级失败。
2. 升级过程中请不要操作机器。
打开 功能并连接到可用网络,即可自动检测是否有新版本固
件更新。若未检测到新版本,可前往"技术支持 - 固件升级 - 在线
升级",点击"检查更新"进行手动检测更新。
WiFi
OTA在线升级
2.
选择相应的固件点击升级。
前往"技术支持 - 固件升级 - 本地升级",进入存放固件的路径并
1.
新固件拷贝到机器"内置存储"或"TF卡"上,建议升级文件放
在根目录下。
请在山灵官网 - 产品中心 - M8产品页面下载固件升级程序,将
置
Micro SD卡升级
Micro SD卡插口
1. 插标准 卡,最大支持2TB容量。Micro SD
2. 揭开 卡盖后将 卡按指示方向装入卡槽并轻
按下即可,再次按下即可将卡取出。
Micro SD Micro SD 轻
顺时针方向旋转旋钮为增加音量,逆时针方向旋转为减小音量。
音量控制
充 电
本机支持QC3.0快充及普通USB充电器,连接USB线充电时显示
屏显示电池充电图标及电量,状态指示灯红色常亮,充满时指示
灯熄灭。
随机附件
快速入门指南:1份
保修卡:1份
USB A转Type-C线:1根
2.5mm平衡耳机座模块:1个
3.5 PRO平衡耳机座模块:1个
4.4mm平衡耳机座模块:1个
耳机座取插器:1个
配件收纳盒:1个
前保护膜:2张
1. 推荐使用DC5V 2A适配器,使用适配器电压过高可能会损坏机器。
常见问题
机器使用出现故障或死机时,请长按"电源键 约12秒强制关机,
3.
强制关机后若要开机,再次长按"电源键"约12秒。
"
耳机有杂音,耳机输出接口有可能接触不牢靠,请重新拔插复位。
4.
无法输出,请尝试使用原装或合适的音频连接线,并确保输出
5.
常。
正
2. 无法开机时,有可能电池电量过低或耗尽,请充电后再开机。

Security Instructions
4. Prevent device from falling, friction, or crashing against hard objects
during use, otherwise surface scratch, battery disconnection, data
loss or other hardware damages will be caused. Please also avoid
violent vibration or impact.
3. This device might get warm during charging.
5. Please enjoy the music in a proper volume to avoid impairing your
hearing and damaging the sound system. Before plugging your
headphones into the device, please firstly turn down the volume.
6. Don't clean this device with chemicals or detergents, otherwise its
surface and top coating may be damaged.
7. Don't disconnect this device during formatting or transferring files.
otherwise, a program error may occur.
8. The USB port is only for data transmission or charging. Please try to
avoid using this device when it is charging.
9. When this device is not in use, please charge it regularly to guarantee
battery life.
10. Please replace the battery only with ones of the same type as the
original ones, as improper replacement will bring the risk of explosion.
11. Never expose battery to sunlight, fire or other extremely hot
circumstances.
12. Please download update file from our official site ,
and update accordingly to the instruction.
www.shanling.com
ENGLISH
1. Don't repair disassemble or modify the device without permission. ,
2. Please don't use this device in extremely hot, cold, dusty or humid
circumstances. Avoid any exposure to liquids.

USB/D AC mic roSD
Names of Parts
Type-C USB
data port
Micro SD card slot
Status indicator 5.0 inch touch screen (1080x1920)
Interchangeable Headphone
Socket Module
2.5mm Balanced Headphone output
3.5mm Headphone/Line output
4.4mm Balanced Headphone output
3.5 PRO Balanced Headphone output
Next selection button
Play/Pause button
Previous selection button
Power/Lock button
Volume control wheel

Schematic Diagram
Accessing Micro SD Card
1. Push on the left
corner and the card
cover will pop out.
2. Slowly pull the cover
out.
3. Twist the cover out
of the way to access
the Micro SD card.
Headphone Socket Module Installation
1. Slide the extractor on top of the
module, with hooks facing front
and back of the player.
2. Pull the extractor upwards, until
the module protrudes 5mm from
the player.
3. Remove the extractor and pull
out the whole module.
4. To install the module, align it with
the opening and slowly push it in
into its place.
Towards left

Power ON / OFF / Screen Locking
Operation Instructions
1. Power on: press and hold power button for 2 seconds, status indicator
lights up and device turns on.
2. Power off: press and hold the power button for 2 seconds. The display
shows the "Power Off" and "Restart" selection windows. Click on
"Power Off" to shut down the device.
3. Screen lock: while the device is powered on, short press power button
to lock screen and turn off display. Press power button again to
unlock device.
Previous / Next / Play & Pause
Navigation mode (Settings - General - Navigation mode)
: Return to the previous.
: Back to the main screen.
: Multitasking.
1. Gesture mode
Return to the previous: slide to the right from the left edge of the
screen or slide to the left from the right edge of the screen.
Back to the main screen: slide up from the bottom of the screen.
Multitasking: slide up from the bottom of the screen and keep your
finger touching screen.
2. Floating box mode
Return to the previous: click the floating ball on the screen.
Back to the desktop: press and hold the floating ball on the screen.
Multitasking: double click on the floating ball on the screen.
3. Virtual buttons mode
1. Previous : Short press to jump to previous song or to beginning of
current song. Long press for fast rewind in currently playing song.

Volume Control
Turn the wheel clockwise to increase the volume, turn the wheel
counterclockwise to decrease the volume.
2. Next : Short press to jump to next song. Long press to fast forward in
currently playing song.
3. Play & pause buttons : short press to play or pause playback.
Charging
Supports QC3.0 fast charge and standard USB charging. When the USB
cable is connected, display shows battery charging icon and power
level. The status indicator lights up red while charging, it turns off when
battery is full.
2. Open the card cover, insert the card into the card
slot in the indicated direction and press it gently until it locks inside.
Press again to remove the card.
Micro SD Micro SD
Micro SD Card Port
1. The port is only for the standard card and supports a
capacity up to 2TB.
Micro SD
Firmware Update
1. When updating the firmware, please make sure that M8 is fully charged.
2. Do not do operate the player during the update process.
Over-the-Air Update
While connected to local Wi-Fi network, device will automatically check
for new firmware update. To check for new firmware manually, go to
menu "Technical Support - Firmware Update - Online Update" and click
on "Check for Update".
Micro SD Card Update
1. Please download firmware update from Shanling's official website.
Copy latest firmware file into root directory of Micro SD card.
2. Go to "Technical Support - Firmware Update - Local Update", choose
the path to firmware file and click update.
Common Problems
1. It is recommended to use DC5V 2A adapter. Using the adapter with
higher voltage may damage M8.
2. Unable to start M8, it may be caused by low power or exhausted
battery, please recharge and then start up again.
3. In the case of system freezing or crashing, please press and hold the
Power button for 12 seconds to force a shutdown. To power on after
forced shutdown, press and hold the Power button for 12 seconds.
4. If there is noise from headphones, headphone's output interface may
not be connected correctly, please try to insert it again.
5. When there is no sound, try to use different pair of headphones or
different cable and make sure the system volume is set correctly.
Quick start guide: 1
Warranty card: 1
2.5mm Balanced Headphone Socket Module: 1
3.5 PRO Balanced Headphone Socket Module: 1
4.4mm Balanced Headphone Socket Module: 1
Headphone Socket Module Extractor: 1
Accessory storage box: 1
Front protective film: 2
Attached Accessories
USB A to Type-C cable: 1

Qualcomm aptX is a product of Qualcomm Technologies, Inc. and/or its
subsidiaries.
Qualcomm is a trademark of Qualcomm Incorporated, registered in the
United States and other countries. aptX is a trademark of Qualcomm
Technologies International, Ltd., registered in the United States and
other countries.
MQA (Master Quality Authenticated) is an award-winning British
technology that delivers the sound of the original master recording. The
master MQA file is fully authenticated and is small enough to stream or
download.
The M8 includes MQA technology, which enables you to play back MQA
audio files and streams, delivering the sound of the original master
recording. The M8 LED glows green or blue to indicate that the unit is
decoding and playing an MQA stream or file, and denotes provenance to
ensure that the sound is identical to that of the source material. It glows
blue to indicate it is playing an MQA Studio file, which has either been
approved in the studio by the artist/producer or has been verified by the
copyright owner.
Visit mqa.co.uk for more information.
MQA and the Sound Wave Device are registered trade marks of MQA
Limited © 2016

安全にご使用いただくために
3. 本機は充電中にある程度熱を発しますが極端に熱くならない限り正
常です。
4. 精密機器となりますので激しい振動や衝撃を与えないようご注意く
ださい。
5. お客様の聴力を守るため、また本機や接続機器の故障を防ぐために
適切な音量で音楽をお楽しみください。本機にイヤホンを接続する
前にボリュームを下げてください。
6. 本機の表面やコーティングが破損する恐れがありますので薬品や洗
剤を使用しての清掃は行わないでください。
7. プログラムエラーが発生する恐れがありますのでMicroSDカード
のフォーマット中や本機のシステムアップデート中にデバイス、
MicroSDカードの抜き差しを行わないでください。
8. USBポートはデータの送信または充電に使用します。充電の際には
本機を使用せず充電のみを行ってください。
9. 本機を長期間に渡りご使用いただかない場合にもバッテリー保護の
ため定期的に充電を行うようにしてください。
10. 規格外のバッテリーへの交換は爆発等の危険があるため絶 に行
わないでください。
対
11. バッテリーを炎の中へ投入、直射日光が当たる場所や高温環境で
の放置は危険ですので絶対に行わないでください。
12. から最新の をダウンロ
ードしてアップデート行ってください。
http://www.shanling.com ファームウェア
1. デバイスを修理、分解、改造しないでください。
2. このデバイスを極端に暑い、寒い、ほこりの多い、または湿気の多
い環境で使用しないでください。液体にさらさないでください。
技術証明
M8上技術認証データを提供しています。 >
" > "技術証明" で確認できます。
" " " " > "設定 端末情報 法的
情報
日本語
USB/D AC mic roSD
各部の名称
Type-C USB
ポート
MicroSDカ
ードスロット
ステータスイ
ンジケーター 5.0インチタッチスクリーン( 0×1920)108
3.5mmヘッドホン/ラ
インアウトジャック
2.5mmバランスヘッドホンジャック
4.4mmバランスヘッドホンジャック
3.5 PROバランスヘッドホンジャック
交換式ヘッドホンソ
ケットモジュール
電源/ロックボタン
ボリュームコントロールホイール
曲送りボタン
再生/停止ボタン
曲戻しボタン
図解
MicroSDカードへのアクセス
1. 左角の部分を押し
てください。カバ
ーが露出します。
2. カバーを手前に引
いてください。
3. カバーを捻り、
MicroSDカードに
アクセスできます。
ヘッドホンソケットモジュールの交換
1. 下部のフックをモジュールのレ
ールに引っ掛けるようスライド
させ、取り外し器を取り付けま
す。
2. 取り外し器を上に引っ張り、モ
ジュールを5㎜ほど本体から引
き抜いてください。
3. 取り外し器をモジュールから取
り外し、手でモジュールを本体
から完全に引き抜いてください。
4. モジュールを取り付けるには、
差込口にモジュールの向きを合
わせて手で押し込んでください。
左へ向ける

操作方法
電源のオン/オフとスクリーンロック
1. 電源オン: 電源ボタンを二秒間押し続けると、 ステータスイン
ジケーターが点灯し、デバイスの電源がオンになります。
2. 電源オフ: 電源ボタンを二秒間押し続けると、ディスプレイに
「電源オフ」と「再起動」の選択画面が表示されます。「電源
オフ」を選択すると、デバイスはシャットダウンされます。
3. 画面ロック: デバイスの電源がオンの状態で電源ボタンを短時
間押すと、画面がロックされディスプレイは消灯します。こ
の状態で再度電源ボタンを短時間押すと、ロック状態は解除
されます。
ナビゲーション設定 ナビゲーション設定(設定 - 一般 - )
前に戻る: 画面の右端から左にスライドまたは左端から右に
イド。
スラ
メイン画面に戻る: 画面の下部から上にスライド。
マルチタスク: 画面の下部から上にスライドし、指をディス
イから離さないようにします。
プレ
前に戻る: 画面上のフローティングボタンをクリックします。
メイン画面に戻る: 画面上のフローティングボタンを押し続
す。
けま
マルチタスク: 画面上のフローティングボタンをダブルクリ
します。
ック
1. ジェスチャーモード
2. フローティングボタンモード
: 前に戻る。
: 。メイン画面に戻る
: 。マルチタスク
3. 仮想キーナビゲーションモード
Table of contents
Other Shanling MP3 Player manuals


