Goji G4GMP3B12 User manual

4GB MP3 Player
Instruction Manual
G4GMP3B12 / G4GMP3R12 / G4GMP3L12
G4GMP3B12_IB_RC_130108_Zell.indd 1 8/1/13 5:21 PM

Contents
Unpacking.............................................................................................................................3
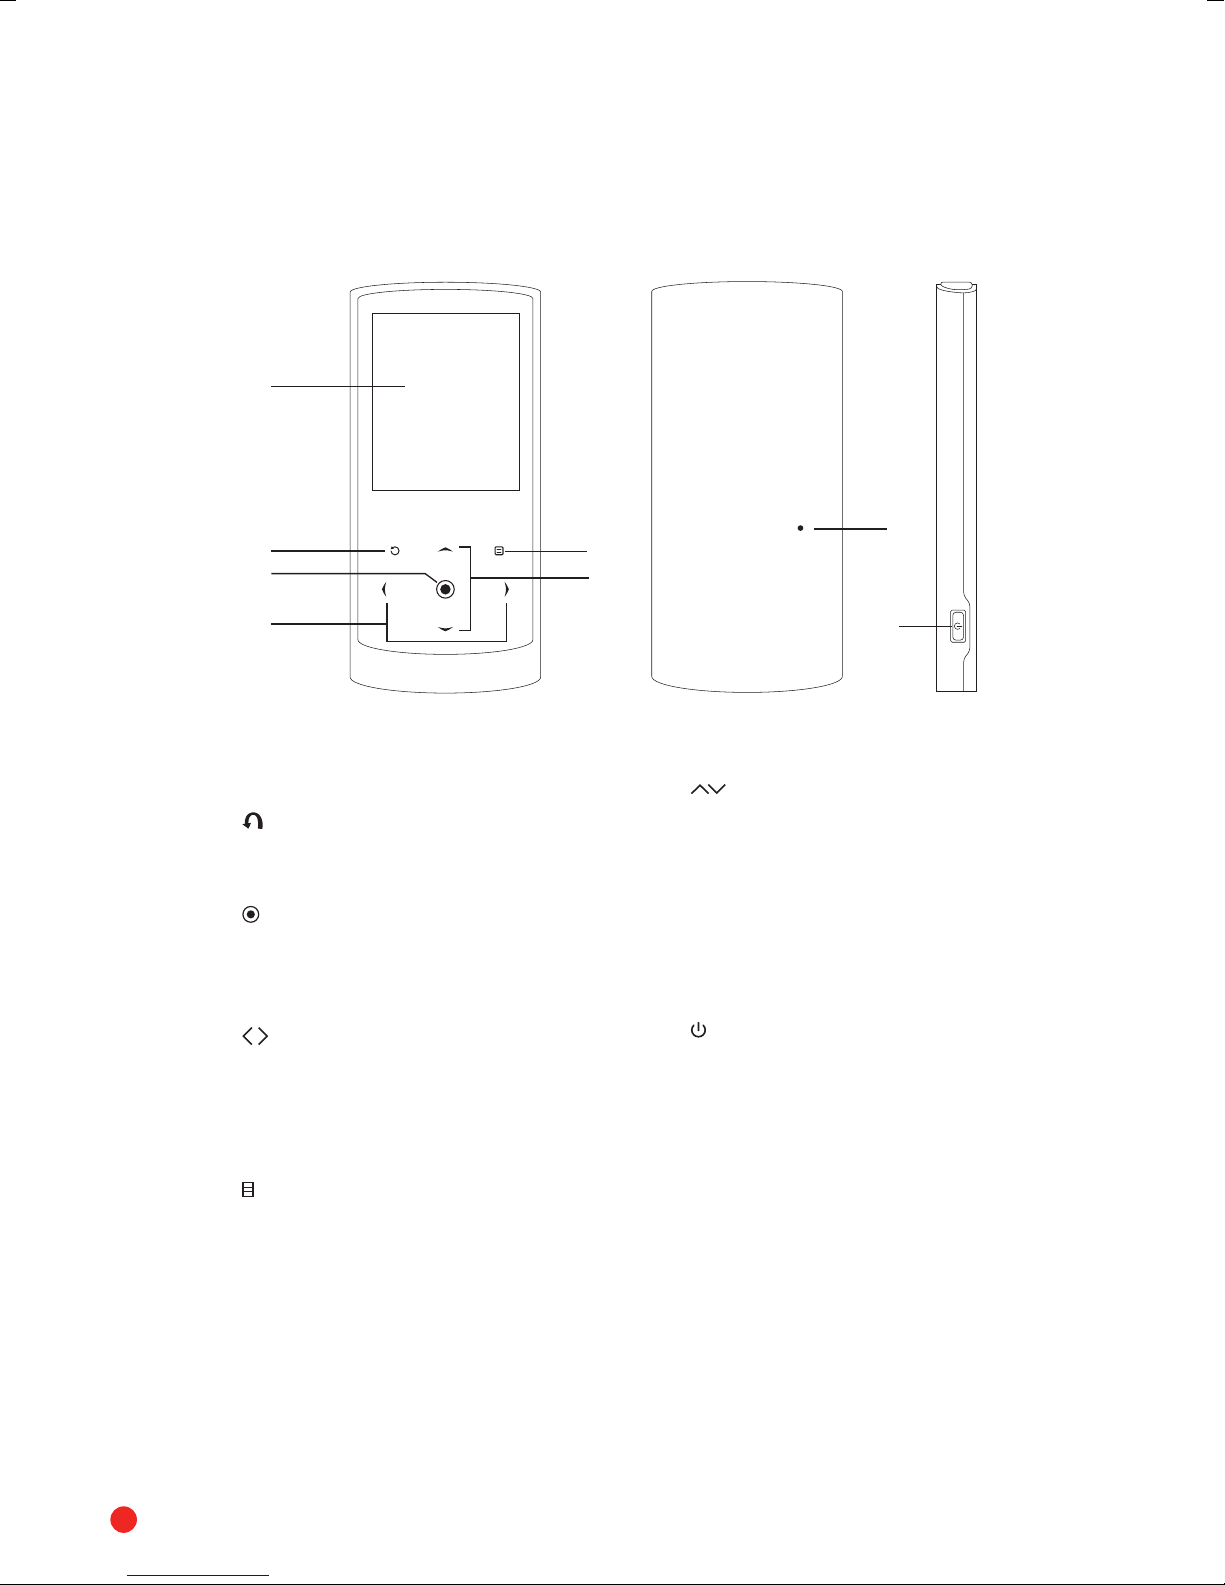
Product Overview.................................................................................................................4
Front, Back & Side View..............................................................................................................................4
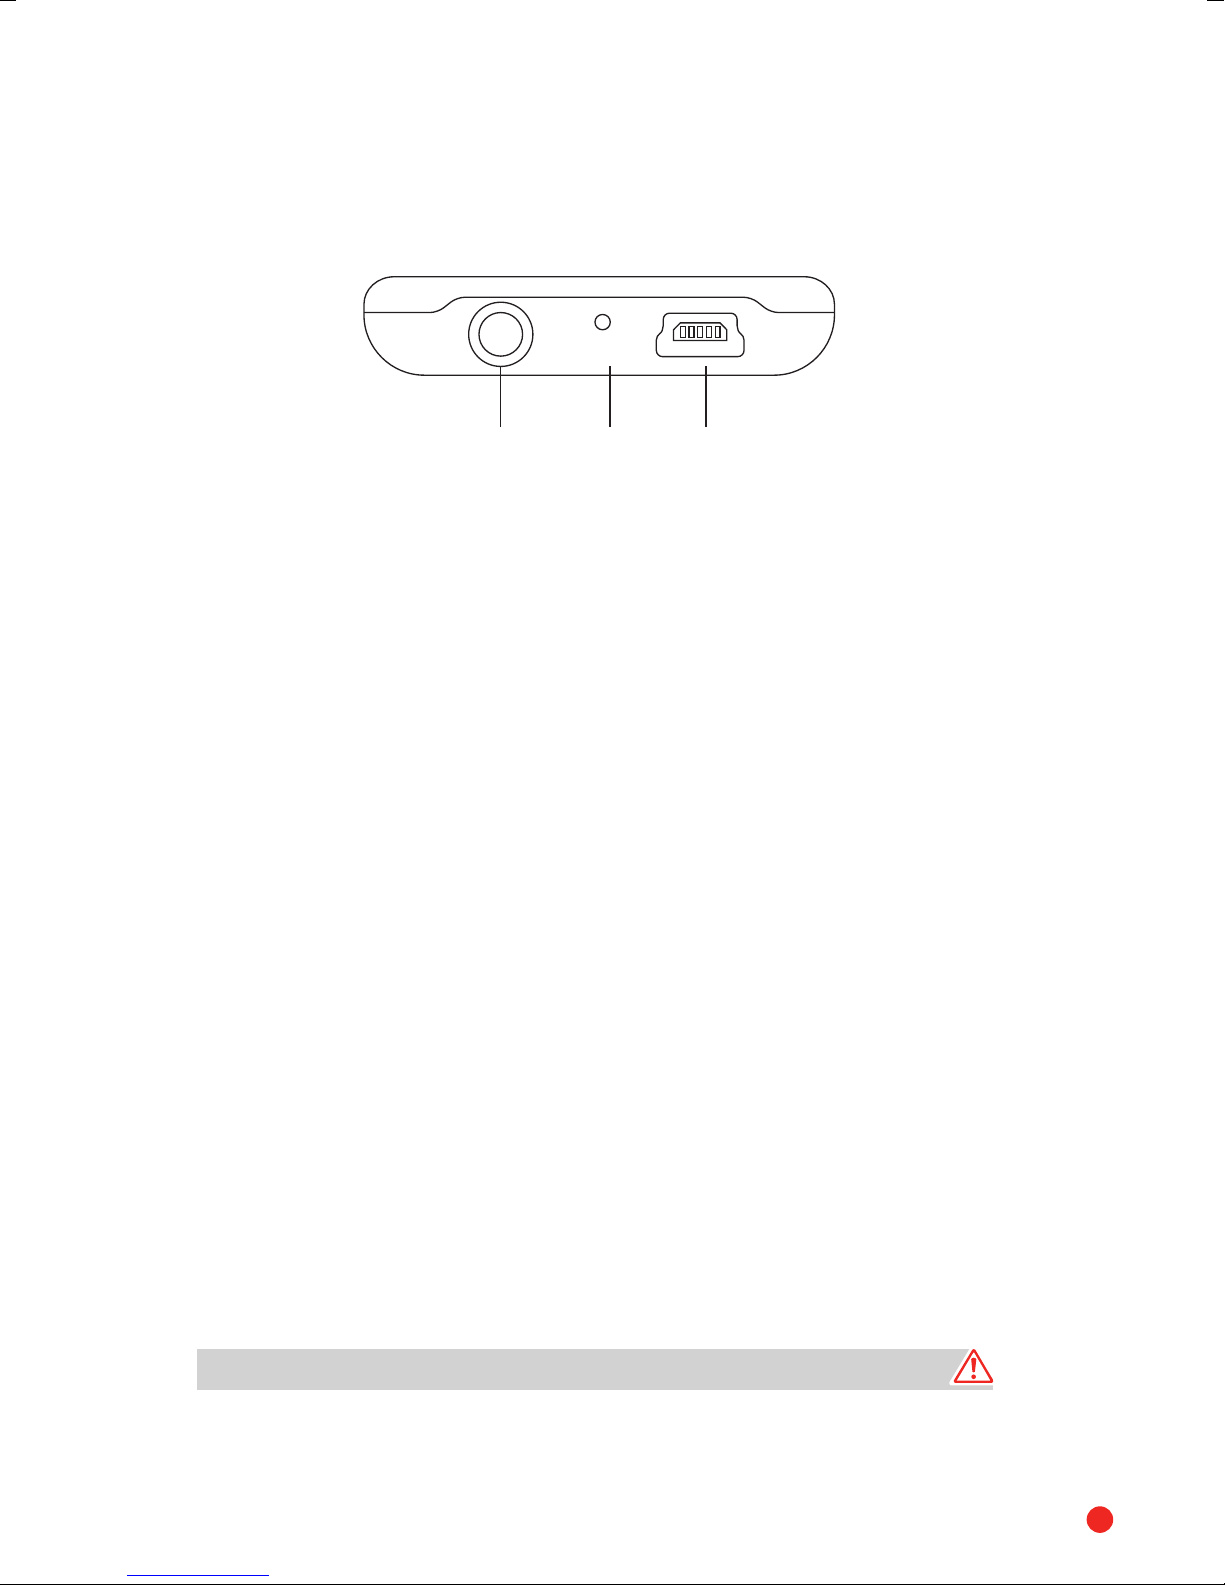
Bottom View...................................................................................................................................................5
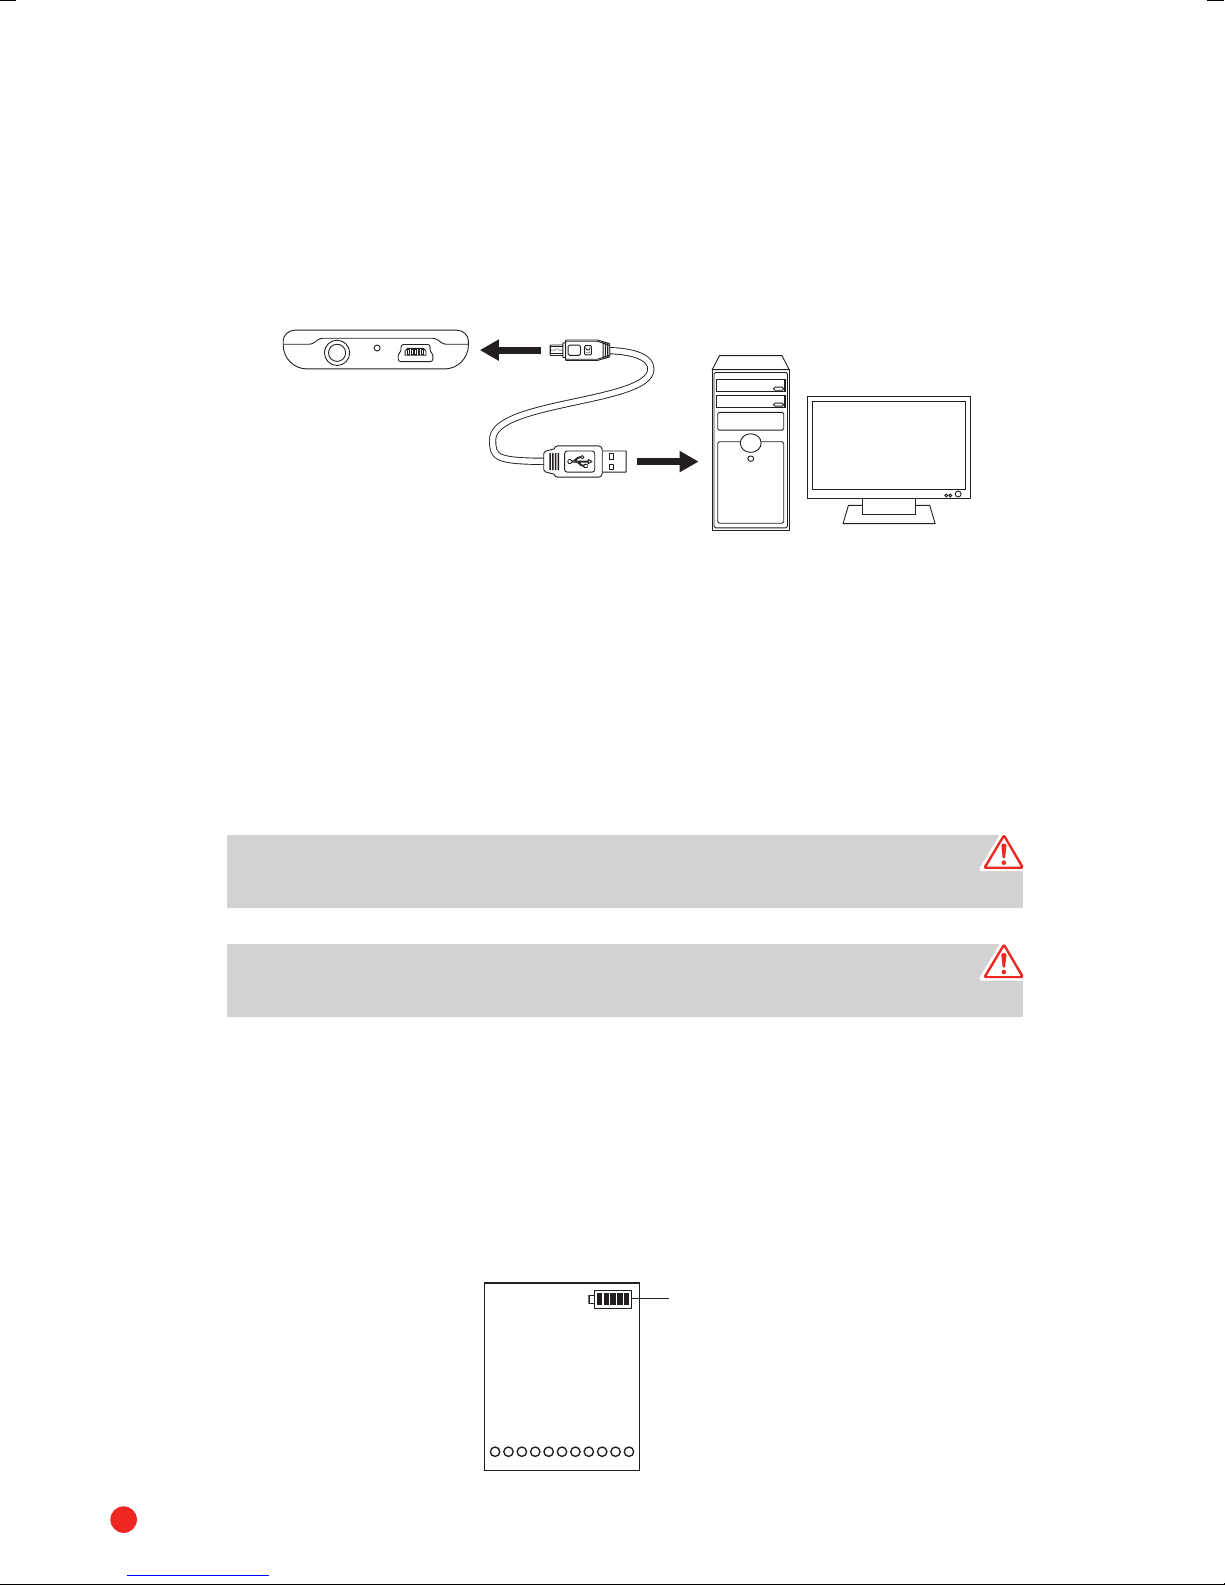
Connecting to a Computer...................................................................................................5
System Requirements.................................................................................................................................5
Installing Software for Windows 98SE..................................................................................................5
Connecting the MP3 Player and Copying Files from a Computer to the MP3 Player..........6
Charging the MP3 Player...........................................................................................................................6
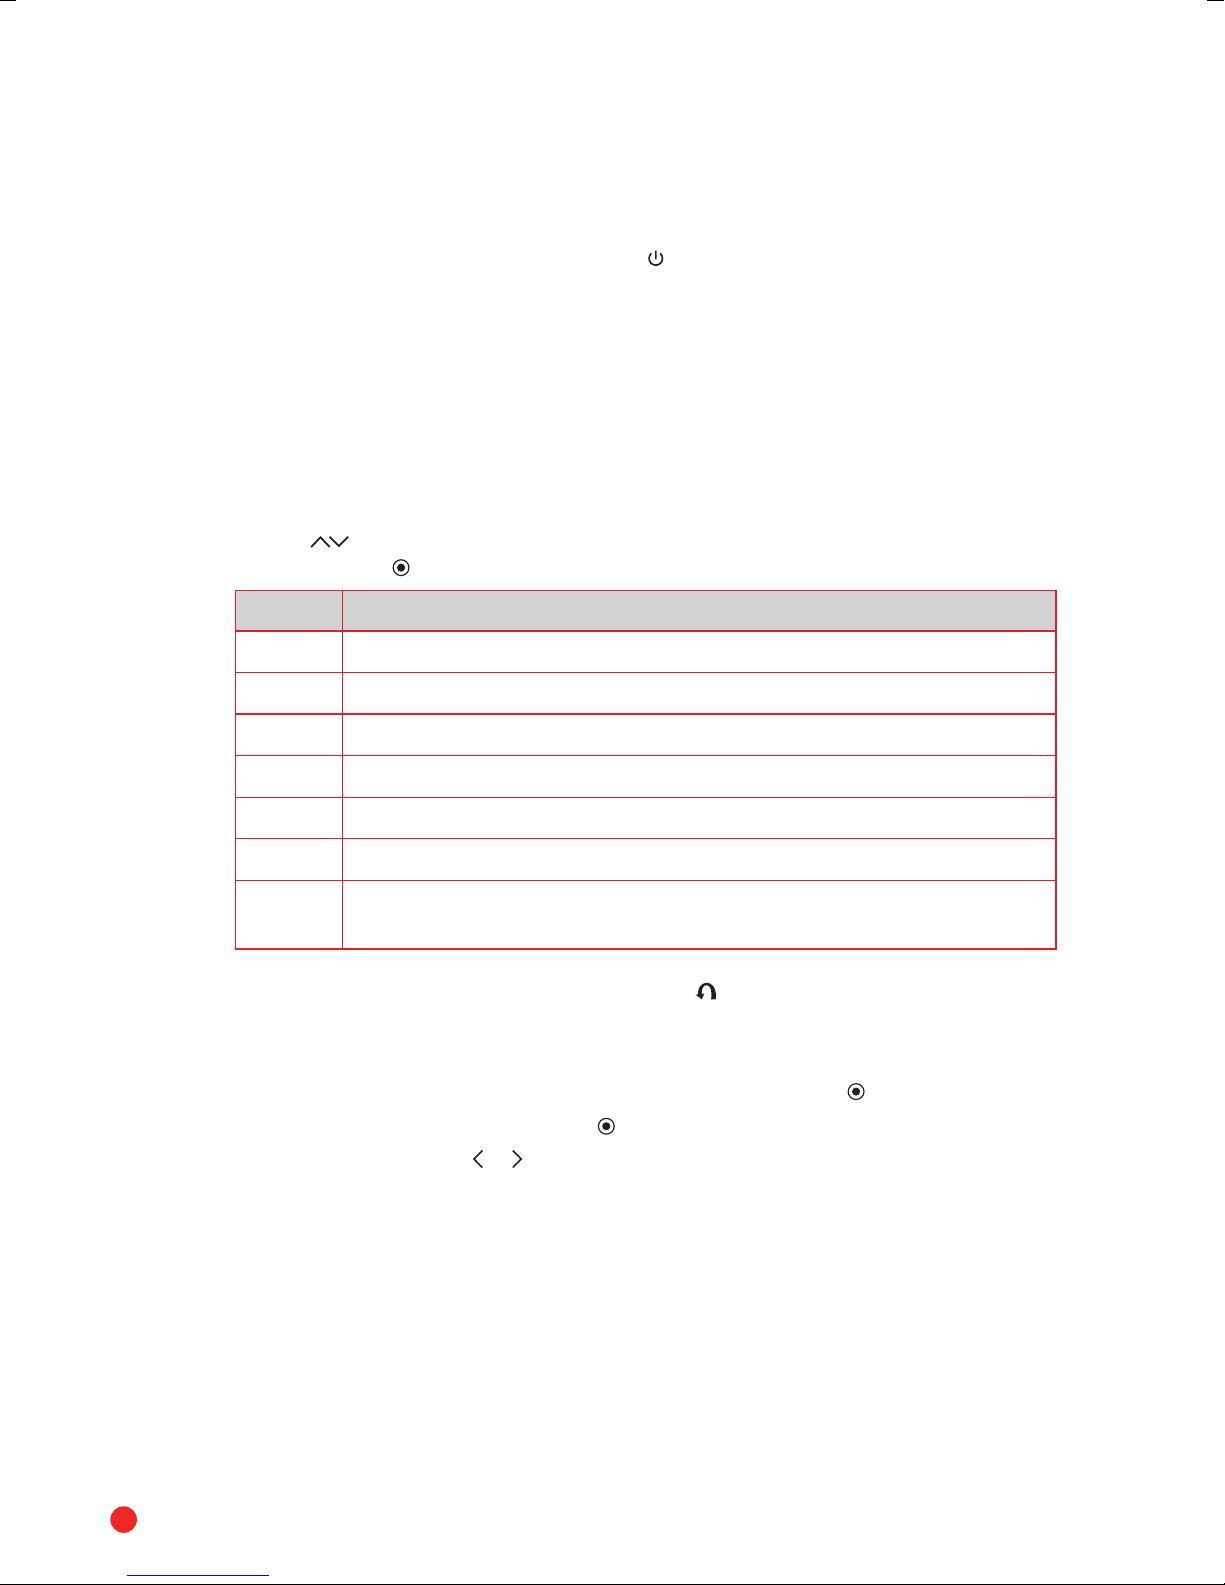
Battery Level ..................................................................................................................................................7
Using Earphones...........................................................................................................................................7
General Operation................................................................................................................8
Turning On/O..............................................................................................................................................8
Selecting Functions.....................................................................................................................................8
Selecting Music Functions ........................................................................................................................8
Adjusting the Volume.................................................................................................................................9
To Start/Pause/Resume Playback...........................................................................................................9
Skipping to the Previous/Next Track.....................................................................................................9
Fast Reverse / Fast Forward ......................................................................................................................9
Lyrics Display..................................................................................................................................................9
Music Sub-menu........................................................................................................................................ 10
Locking & Unlocking Buttons ............................................................................................................... 10
Resetting the Player ................................................................................................................................. 10
Watching A Video...................................................................................................................................... 11
Viewing Photos .......................................................................................................................................... 11
E-Book ........................................................................................................................................................... 12
Voice Recording......................................................................................................................................... 13
Browser: Managing Files......................................................................................................................... 14
Setup.............................................................................................................................................................. 14
Converting Videos to AMV Format ..................................................................................................... 16
Maintenance .......................................................................................................................18
Cleaning the Unit ...................................................................................................................................... 18
Hints and Tips .....................................................................................................................18
Specications......................................................................................................................19
Safety Warnings..................................................................................................................20
G4GMP3B12_IB_RC_130108_Zell.indd 2 8/1/13 5:21 PM

3
Unpacking
Remove all packaging from the unit. Retain the packaging. If you dispose of it please do so
according to local regulations.
The following items are included:
The Main Unit USB Cable
Earphones Instruction Manual CD
Thank you for purchasing your new Goji MP3 Player.
We recommend that you spend some time reading this instruction manual in order that you fully
understand all the operational features it oered. You will also nd some hints and tips to help
you resolve any issues.
Read all the safety instructions carefully before use and keep this instruction manual for
future reference.
If items are missing or damaged, please contact Partmaster (UK only).
Tel: 0844 800 3456 for assistance.
G4GMP3B12_IB_RC_130108_Zell.indd 3 8/1/13 5:21 PM

4
Product Overview
Front, Back & Side View
1
2
3
48
7
5
6
1. LED Display
2. Button
• Press to return to the previous
screen.
3. Button
• Press to conrm selection on the
menu screen.
• Press to start/pause playback.
4. Buttons
• Press to skip to the previous or next
track.
• Press and hold to fast reverse/
forward the current track.
5. Button
• Press to access the set-up/options
menu for each function.
6. Buttons
• Press to navigate through the
menus.
• Press to increase/decrease the
volume, during playback.
7. RESET hole
Press and hold to reset to the default
factory settings.
8. Button
• Press and hold to turn the unit
on/o.
RESET
G4GMP3B12_IB_RC_130108_Zell.indd 4 8/1/13 5:21 PM

5
Connecting to a Computer
System Requirements
Your computer system must meet the following minimum requirements:
• Pentium 200MHz or above
• Microsoft Windows® 98SE / 2000 / ME / XP / Vista® / 7
• 120MB of available hard disk space
• USB port x 1 (Should support USB 1.1 and 2.0)
• CD-ROM drive
Installing Software for Windows 98SE
If your computer is running Windows® ME/2000/XP/Vista®/7, no driver is required.
If the device is not compatible with your computer system, you must install the driver
provided on the CD before connecting the player to your computer.
1. Insert the CD into the CD-ROM drive.
2. Double-click on the “USB Disk Win98 Driver Version xxx.exe”le in the CD to start the
installation process.
3. Follow the instructions from the pop-up windows to complete the installation.
4. Restart the computer.
Make sure the player is not connected to the computer while installing the driver.
1. Earphones Socket
2. Built-in mic
3. Mini USB Connector
Bottom View
1 2 3
MIC
G4GMP3B12_IB_RC_130108_Zell.indd 5 8/1/13 5:21 PM

6
Connecting the MP3 Player and Copying Files from a Computer
to the MP3 Player
Files can be transferred directly to the MP3 player by using the USB cable (included).
1. Make sure your computer is turned on before you connect the MP3 player.
2. Connect the mini plug of the USB cable to the mini USB port on the player, and plug the
other end into a free USB port on your computer.
MIC
3. The computer will auto-detect “New hardware”. If you are using Windows® 98E, the
computer will begin driver installation (see the“Installing Software for Windows® 98E”
section for details). Wait for the system to nish the installation. When it has nished,
“Removable Disk”will be seen in “My Computer”.
4. Select the targeted le(s) on your computer and simply drag and drop into“Removable
Disk”.
5. To disconnect the MP3 player from the computer, double click the “Safely Remove
Hardware“ icon on the task bar. Click “USB Mass Storage Device“, and then click“OK“.
You can now unplug the MP3 player safely.
Please do not disconnect the MP3 player from the computer during le transfer as this
may cause the le transfer process and MP3 player to malfunction.
Turn o the MP3 player after unplugging from the computer or when not in use,
otherwise it will continue to be switched on, causing rapid loss of battery power.
Charging the MP3 Player
Your MP3 player has an internal non-removable battery. The battery is charged
automatically whenever the MP3 player is connected to a computer.
If you charge the MP3 player while loading les to the MP3 player, recharging the battery
may take more time.
When connected, the MP3 player will display the following:
MP3 player is
charging
G4GMP3B12_IB_RC_130108_Zell.indd 6 8/1/13 5:21 PM

7
Battery Level
The LCD will display the battery level:
Level
Full
3/4 Full
1/2Full
Low
Empty
Using Earphones
Turn down the volume before connecting the earphones. Slowly raise the volume with the
earphones on until you reach your desired volume.
MIC
Long-term exposure to loud music may cause hearing damage. It is best to avoid
extreme volume when using earphones, especially for extended periods of time.
• After the product has been charging for 4 hours, the fully charged indicator will be
displayed for a short period of time, however if left on charge the battery display may
revert back to charging mode to keep the battery topped up.
• Fully charge the MP3 player for approx. 8 hours before you use it for the rst time or
when you haven’t used it for a long period of time.
• Do not overcharge the battery as this may shorten its life.
• The MP3 player cannot be used while charging or loading les.
• Disconnect the USB cable from the computer after fully charging the MP3 player.
• Fully disconnect the MP3 player and its USB cable from the computer whenever the
computer is turned o.
When the volume is increased to level 20, an icon“ ”will show on the display, warning
you about the risk of loud music. You cannot increase the volume. To continue increasing
the volume, press the button.
G4GMP3B12_IB_RC_130108_Zell.indd 7 8/1/13 5:21 PM

8
General Operation
Turning On/Off
• Make sure the battery power level is sucient and the earphones are connected.
• To turn on the MP3 Player, press and hold the button. The LED screen will show an
animation. After a moment,“Goji”will appear before the player defaults to the Music /
function option.
• Select the desired mode, e.g.“Music”. (Files stored in the root directory are played rst
from the list). The song’s name will scroll across the LED display during playback.
Selecting Functions
1. After turning on the MP3 player, the display will show the the Music function
automatically.
2. Use the buttons to select Music, Video, Photo, E-Book, Voice, Browser and
Setup. Press the button to conrm selection.
Mode Description
Music Play tracks.
Video Play movies.
Photo View images.
E-Book Read digital books in TXT format.
Voice Record voice/sound.
Browser View and manage folders and individual tracks.
Setup Customize the MP3 players settings:
Power, Language, Display during, Record Setting, System Tools, Hold time.
3. To return to the previous screen/menu, press the button.
Selecting Music Functions
1. Select the music function from the device’s main menu. Press the button to conrm.
2. Select a track and play by pressing the button.
3. Press and hold either the or button to fast reverse or fast forward the current track.
Release to return to normal playback
G4GMP3B12_IB_RC_130108_Zell.indd 8 8/1/13 5:21 PM

9
4. Press button to select the music function’s sub-menu.
Function Description
Repeat Normal (playback), Repeat One (current track), Repeat folder
(repeat all tracks in the selected folder), Repeat All (all tracks
regardless of folder), Random, Intro (play rst 10 seconds of
each track).
Equaliser Natural, Rock, Pop, Classic, Soft, Jazz, 3D
File Browse View all folders and day individual tracks
5. Press button to select an option. To conrm your selection, press button.
6. To return to the previous screen, press the button.
7. To return to the main functions menu, press the button.
Adjusting the Volume
• Press buttons to adjust the volume during playback.
To Start/Pause/Resume Playback
• Press the button to start playback.
• During playback, press the button to pause. “ ”will show on the display.
• To resume playback, press the button again.
Skipping to the Previous/Next Track
• Press and immediately release the buttons to skip back to the previous track or
forward to the next track.
Fast Reverse / Fast Forward
• Press and hold the buttons to skip backwards or forwards on the current track.
• To resume playback, release the buttons.
Lyrics Display
This player supports lyrics display while playing music. Only lyrics in LRC format can be
displayed.
To add lyrics to the music:
1. Download the corresponding lyrics using the extension“.lrc” from a digital source.
2. Rename the lyrics le as [music le name].lrc. Ensure the lyrics le name is the same as
the music le name.
3. Copy both les into the same folder on the player.
4. The lyrics will be displayed during music playback.
G4GMP3B12_IB_RC_130108_Zell.indd 9 8/1/13 5:21 PM

10
Music Sub-menu
1. Press button in the Music function.
2. Use to select the desired option. Press to conrm.
Locking & Unlocking Buttons
• This function prevents accidental pressing of the buttons while using the unit on the
move.
• There are two methods to locking the buttons:
– Set a timer in the Set-up menu, the buttons will automatically lock after the set time.
– Press and hold the button.
Locking Buttons 1
1. Press return to the Main munu.
2. Select SETUP using then press .
3. Use to select HOLD TIME. Select the desired time: 10 seconds 30 seconds
1 minute 3 minutes 5 minutes Close.
4. Press to conrm the time. You will automatically be returned to the previous screen.
5. This function will take eect during playback. “Keys Locked!”will show on the display.
Locking Buttons 2
Press and hold for 3 seconds.
Unlocking Buttons
1. During playback, to unlock the buttons, press and hold .
2. “Keys unlocked!”will show on the display.
Resetting the Player
If the player malfunctions, use the end of a metal wire, e.g. the end of a straightened paper
clip, and push it gently but rmly into the RESET hole to restart the player.
G4GMP3B12_IB_RC_130108_Zell.indd 10 8/1/13 5:21 PM

11
Watching A Video
1. Press to access the main functions menu if necessary.
2. Use to select VIDEO and press to conrm. A video list will appear.
3. Press to select folder or video.
4. Press to open the folder and to select a video.
5. Press to play the selected video.
6. Press to pause during playback.
7. Press to access the video function’s sub-menu:
Normal Play all tracks in order once.
Repeat One Repeat the current or selected track(s).
Folder Play all tracks in the current folder in order once.
Repeat folder Repeat all tracks in the current folder.
Repeat all Repeat all tracks, regardless of folder.
Random Play all tracks in the Player at random.
Intro Briey view track(s).
8. Press button to return to the main functions menu.
This unit supports only AMV le formats. Please see“Converting Videos to AMV Format”
for details.
Viewing Photos
Step Press Action
1. Return to main functions menu if necessary.
2. Select PHOTO.
3. Conrm selection.
4. Select folder or individual image.
5. Conrm selection.
6. Flip through photos one by one.
7. Start slideshow from current photo.
8. Stop slideshow.
9. Return to previous screen.
This unit supports JPEG/BMP/GIF format.
G4GMP3B12_IB_RC_130108_Zell.indd 11 8/1/13 5:21 PM

12
E-Book
E-Book Reading
Step Press Action
1. Return to main functions menu if necessary.
2. Select E-BOOK.
3. Conrm selection.
4. Select folder or individual image.
5. Conrm selection.
6. While reading, move a page up or down.
7. Press and hold Fast browse through pages.
8. Moves down a page every 6 seconds.
9. Access sub-menu: Bookmark select Bookmark delete
Bookmark add Exit.
This unit supports e-books in TXT format only. Convert all other formats to TXT before
copying to the unit.
Saving & Loading Bookmarks
To continue reading from a certain point, add a bookmark while reading.
Step Press Action
1. While reading, access the E-Book sub-menu.
2. Select BOOKMARK ADD.
3. Conrm selection.
To select a bookmark, while reading:
Step Press Action
1. While reading, access the E-Book sub-menu.
2. Select BOOKMARK SELECT.
3. Conrm selection.
4. Select a bookmark.
5. Conrm selection.
G4GMP3B12_IB_RC_130108_Zell.indd 12 8/1/13 5:21 PM

13
To delete a bookmark, while reading:
Step Press Action
1. While reading, access the E-Book sub-menu.
2. Select BOOKMARK DELETE.
3. Conrm selection.
4. Select a bookmark to delete.
5. Conrm selection.
6. Select YES or No.
7. Conrm selection.
Voice Recording
Step Press Action
1. , , Return to main functions menu if necessary, then select VOICE and
conrm.
2. Access the sub-menu.
3. Select RECORD.
4. Conrm selection, recording begins immediately.
5. Pause and resume recording.
6. Save and return to VOICE menu.
This unit supports only WAV format for voice recordings.
Voice Playback
Step Press Action
1. , , Return to main functions menu if necessary, then select VOICE and
conrm.
2. Access the sub-menu for each voice track.
3. Select voice track to playback.
4. Conrm selection, the player will automatically begin playback.
Press again to pause.
If “Format Error!”appears, press and hold . You will be returned to the main functions
menu. Re-select VOICE and operate as normal..
G4GMP3B12_IB_RC_130108_Zell.indd 13 8/1/13 5:21 PM

14
Voice Recording/Playback Sub-menu
Press to access the sub-menu:
Function Action / Description
Repeat Mode Normal (playback), Repeat One (current track), Folder (play all
tracks in folder once), Repeat folder (repeat all tracks in the
selected folder), Repeat All (all tracks regardless of folder), Random,
Intro (play rst 10 seconds of each track).
File Browse Select and play individual recorded voice tracks.
Record Record voice track.
Browser: Managing Files
Step Press Action
1. Return to main functions menu if necessary.
2. Select BROWSER.
3. Conrm selection.
4. Select folder or le manage.
5. Delete le: YES or NO.
6. Select YES or NO.
7. Conrm selection.
8. Cancel action and return to previous screen.
9. Immediately playback selected track/le.
Deleted tracks, videos, e-books, recordings & les cannot be restored; they must be
replaced anew.
Setup
• The player allows customisation of various functions:
Step Press Action
1. Return to main functions menu if necessary.
2. Select SETUP.
3. Conrm selection.
• After accessing the desired function, use to select a sub-function, and press to
conrm selection, unless otherwise stated.
G4GMP3B12_IB_RC_130108_Zell.indd 14 8/1/13 5:21 PM

15
Function Details Press Action / Description
Power Auto O Enter selection; choose
from 15 mimutes 30
mimutes 60 mimutes
90 mimutes > 120
mimutes Close;
conrm selection.
Always On
(This function determines if the
Auto O function is actived or
deactivated.)
Enter selection; choose
from NO YES; conrm
selection.
Language English Deutsch Italiano
Françaises Español
Português Nederlands
Český Magyar > Język Polski
Limba Română PyccKHŇ
bI Slovak Türkçe
Enter selection; choose
desired language and
conrm selection.
Display
Setting
Brightness Enter function; choose
from LOW MEDIUM
HIGH MAXIMUM;
conrm selection.
Backlight (duration) Enter function; choose
from 15 seconds 30
seconds 1 mimute
Close; conrm
selection.
Record
Setting Long Time Normal Quality
High Quality
Enter function; choose
desired voice recording
quality level; conrm
selection.
System
Tools
Delete Enter function; choose
desired folder or le;
conrm selection (press
, then , or to
cancel and return to
previous screen).
Format Enter function; conrm
YES or NO ( to cancel).
Reset Resets all settings to
default.
System Info Enter function to
view software version
information.
Return to previous
screen.
• Deleted folders & les can not be restored; they must be replaced a new.
• Formatting erases all folders and les; these cannot be restored. Back up important les
before formatting.
G4GMP3B12_IB_RC_130108_Zell.indd 15 8/1/13 5:21 PM

16
Converting Videos to AMV Format
This MP3 unit supports only AMV format videos. Convert all other formats to AMV before
copying the les to the unit, you need to install the conversion programme:
1. Insert the provided CD into the CD-ROM driver of your computer. The conversion
programme will run automatically.
If it does not, follow the steps below:
a. Open the CD folder in“My Computer”or equivalent.
b. Double-click Setup.exe.
2. Follow the on-screen prompts exactly as directed.
3. Click“Close” to ensure the installation is complete. An icon will be created on your
desktop or in your Start Menu.
To convert AVI, WMV, MPEG1, MPEG 2, SWF, Quick Time, RealMedia and other movie les to
AMV, follow the steps below:
1. In your Start Menu bar, or on your desktop, click or double-click “Media Player
Utilities”.
2. Select “AMV/AVI Convert Tool”. The following screen should pop up:
3. Click the“Input File” to browse for the movie you want to convert to AMV format.
Note that you can select more than 1 movie.
G4GMP3B12_IB_RC_130108_Zell.indd 16 8/1/13 5:21 PM

17
4. The selected le(s) for conversion will be displayed in the table at the bottom of the
Conversion Programme screen:
5. The default folder for saving converted video les will be in your C:\ directory. To
change this, click“Output File” to browse for the folder where you want to save your
converted video les. Click “OK”to conrm.
6. In the Select column on the left, check the boxes for the le(s) you are certain you want
to convert to AMV.
7. To start the conversion process, click the button.
• Ensure your computer has the necessary software to open the video les you want to
convert, e.g., QuickTime for QuickTime videos.
• This unit does not fully support Flash video (SWF) formats
• When converting a large screen resolution video le to AMV, ensure the resolution,
128 x 160 is selected.
• When converting screen resolution video les that are smaller than, or the same size as
128 x 160, the conversion tool will show“picture transformer is normal”.
• When converting a small screen resolution video le to a larger screen resolution, the
original resolution will be kept.
G4GMP3B12_IB_RC_130108_Zell.indd 17 8/1/13 5:21 PM

18
Hints and Tips
If a problem does occur, it may often be due to something very minor. The following table
contains various tips.
Issue Possible Cause / Solution
No power • The battery may be exhausted. Connect the USB cable and plug
into the USB port of a computer which is turned on.
Files cannot be
downloaded
• Check if the driver is installed correctly on the computer.
• Check the connection between the MP3 player and computer.
No sound from the
earphones
• Check that the volume is turned up to a suitable level.
• Check the connection between the earphones and MP3 player
is not loose.
• Check if the music le format is supported by the MP3 player.
The buttons do not
work
• The buttons may be locked. Press and hold until “Buttons
unlocked!”is displayed.
Cannot record
voice track(s)
• Check that memory is sucient; erase or transfer les to another
storage source.
• Check that battery is sucient. Recharge.
Text displays
abnormally
• Language selection maybe incorrect; select the correct display
language.
• Unsupported le format. Convert le to supported format and
re-copy to the player
The MP3 player
does not function
properly
• Use the end of a paper clip to press the RESET hole to reset the
MP3 player. Press and hold to turn it on again.
Maintenance
Cleaning the Unit
Ensure the USB cable is fully disconnected from the unit and computer before cleaning.
• To clean the unit, wipe the case with a slightly moist, lint-free cloth.
• Do not use any cleaning uids containing alcohol, ammonia or abrasives.
• Do not spray an aerosol at or near the unit.
G4GMP3B12_IB_RC_130108_Zell.indd 18 8/1/13 5:21 PM

19
Specifications
Model G4GMP3B12 / G4GMP3R12 / G4GMP3L12
USB Version 1.1, 2.0
Audio Format MP3 / WMA / WAV
MP3 bit Rate 8~320Kbps
WMA bit rate 5Kbps-384Kbps
S/N rate 80dB (30K lter)
Dynamic range ≥80dB (1kHz)
Distortion <0.2%
Battery 170mAh, up to 12 hours playback for music and 3 hours for video
EQ Natural, Rock, POP, Classic, Soft, Jazz, 3D
Size 41 mm (W) x 8.4 mm (D) x 82 mm (H)
Weight 30g
Frequency response 20Hz~20kHz
Dynamic current <18mA
Power o current <0.3mA
Storage condition Humidity <90%, -20~60°C
Working condition Humidity <85%, -0~45°C
Power out 2x1mW (32 ohm load)
Power supply DC 5V 80mA (through USB port)
We continually strive to improve our products. Specications and features may change
without prior notice.
G4GMP3B12_IB_RC_130108_Zell.indd 19 8/1/13 5:21 PM

20
Safety Warnings
• Retain the manual. If you pass the unit
onto a third party make sure to include this
manual.
Damage
• Please inspect the unit for damage after
unpacking.
• Do not continue to operate the unit if you
are in any doubt about it working normally,
or if it is damaged in any way - switch o
and consult your dealer.
Temperature
• Avoid extreme degrees of temperature,
either hot or cold. Place the unit well away
from heat sources such as radiators or gas/
electric res.
• Avoid exposure to direct sunlight and other
sources of heat.
Naked Flames
• Never place any type of candle or naked
ame on the top of or near the unit.
Moisture
• Do not expose this unit to rain, moisture,
dripping or splashing.
• If you spill any liquid into the unit, it can
cause serious damage. Switch it o and
consult your dealer.
Interference
• Do not place the unit on or near appliances
which may cause electromagnetic
interference.
• If you do, it may adversely aect the
working of the unit, and cause a distorted
picture or sound.
Earphones
• For trac safety, do not use
earphones while driving or
cycling.
• Listening to loud sounds
for prolonged periods of time may
permanently damage your hearing.
• Before putting on earphones, turn the
volume down then put the earphones on
and slowly increase the volume until you
reach a comfortable listening level.
Batteries
• Please dispose of the battery correctly by
following the guidance in this manual.
Service
• Do not open any xed covers. The unit
does not contain any user-serviceable
parts. Please leave all maintenance work to
qualied personnel.
Maintenance
• Ensure to switch o the unit before
cleaning.
• Do not use any type of abrasive pad or
abrasive cleaning solutions as these may
damage the unit’s surface.
• Do not use liquids to clean the unit.
G4GMP3B12_IB_RC_130108_Zell.indd 20 8/1/13 5:21 PM
This manual suits for next models
2
Table of contents