SHARK JAW TOYS MAKO JET User manual

2gRC Radio Control Batteries
2gRC Radio Control Batteries
1. Insert eight (8) AA (Double A) batteries (not included) into the transmitter while taking careful note of proper
polarity clearly marked in the transmitter’s battery compartment.
2. Turn switch on to ensure the batteries have been installed correctly. When this is confirmed, turn radio off.
Charging the Aircraft Battery
Battery Capacity: 11.1 V, 1,000 mAh, Lithium Polymer
Typical Charge Time: One hour
1. Read the warnings and directions very carefully.
2. Following the guidelines, connect the battery pack to the charger.
3. The charger light turns from red to green when battery is fully charged.
NOTE: The lithium polymer battery included with this plane can be
recharged 30-40 times. Thereafter it should be disposed of safely.
11
Throttle Stick
Attack Button (Thrust Boost)
Power LED
Antenna
Attack Button Engaged LED
Dual Rate Switch
Speaker
Elevon Stick
Aileron Trim
Elevator Trim
Neck Strap Hook
Power Switch
Throttle Trim
Internal Wing
Elevon Control Surface
Duct
Outboard Vertical Stabilizer
Coanda
Ducted Fan Unit
Battery Compartment
High-Impact Nose
2
1
3
4
6
7
5
8
9
10
12
11
13
15
15
16
18
19
21
20
17
14
14
1
2
3
5
4
6
7
8
10
9
11
12
13
14
15
16
17
19
18
20
21

SAFETY NOTES
To help ensure a safe charge every time, you MUST read the following safety instructions and warnings before
handling, charging or using the Li-Po battery pack. Lithium Polymer batteries are significantly more volatile than the
alkaline, Ni-Cd or Ni-MH batteries used in RC applications. Mishandling of Li-Po batteries can result in fire. By
handling, charging or using the included Li-Po battery, you assume all risks associated with lithium batteries.
If you cannot comply with the safe handling of Polymer cells, then do not use them.
If you do not understand the characteristics of Polymer cells or assemblies, then do not use them.
SAFE CHARGING
•Lithium Polymer cells have very strict charging requirements. Always charge Lithium Polymer cells or packs with
recommended PCM (Protective Control Module) or great damage may occur.
•Always use chargers specifically approved for Lithium Polymer cells or packs.
•Always test your charger to assure it is functioning properly.
•Always charge your Lithium Polymer cells or packs outdoors and in a fire-proof container.
•Always store Lithium Polymer cells or packs in a fire-proof container.
•Always have sand or dry fire extinguisher handy in the event of fire.
•Always keep any battery out of the reach of children.
•Always handle Lithium Polymer cells and packs with great care.
•Always purchase a factory-authorized built pack instead of building your own.
•Always observe the correct polarity when connecting cells or packs to charger or application.
•Always seek medical attention if electrolyte gets in your eyes (flush with cold water immediately).
•Always scrub with soap and water if electrolyte comes in contact with your skin.
•Never charge Lithium Polymer cells or packs unattended.
•Never charge Lithium Polymer beyond factory specifications.
•Never charge Lithium Polymer in your car, home or garage or where other physical damage can occur.
•Never charge Lithium Polymer while in the application, as the hot pack may ignite certain materials.
•Never charge Lithium Polymer on flammable materials such as wood, foam or plastic.
•Never extinguish a Lithium Polymer fire with water.
•Never disassemble a Lithium Polymer cell or pack (see “Damaged” notes below).
•Never short circuit Lithium Polymer cells or packs.
•Never use a Lithium Polymer cell or pack that has been damaged (see “Damaged” notes below).
•Never put loose cells with uncovered terminals in your pocket, purse, bag, desk drawer, etc.
•Never keep cells or packs in temperatures that exceed 60C/140F.
•Never exceed the factory’s maximum allowed discharge rates.
•Never combine different cell sizes or capacities together in the same pack.
DAMAGED CELLS OR PACKS
In the event your cells or packs were involved in a crash:
•Totally inspect the cells, wire leads and connections for possible short circuit. If there is any doubt, completely cut all
wires from the cells and pack. If any cells are dented or deformed, do not use the pack again, ever. Follow disposal
notes below.
DISPOSAL OF CELLS OR PACKS
•Discharge all cells individually to recommended cut-off voltage of 3.0 volts per cell.
•Caution! Cells may be warm or hot as usual during this discharge process. After cooling, puncture small hole in cells and
immerse in salt water for several hours. Apply tape over one terminal and dispose of in trash.

W
ARNIN
G
WARNING
Motor Test
Motor Test
1. Move the throttle slider 2to the OFF position.
2. Turn on transmitter.
3. Remove battery compartment cover (hatch) 21 from bottom of fuselage.
4. Plug the aircraft battery into the socket in the battery compartment.
5. Secure battery inside of battery compartment and secure hatch to fuselage.
Elevon Test
Keep everything clear of the ducted fan intakes and propeller blades located on top and
bottom near mid-fuselage before beginning the control test, in the event you accidentally turn on the motor.
Your MAKO Jet is equipped with two sets of elevons located on the upper and lower trailing edges of both aft (rear)
airfoils, providing excellent directional control. To test the elevons and be certain that they function properly, follow
the steps listed below:
1. Turn on the transmitter. PIC-5
2. Install and plug in a fully charged aircraft battery. With the stick 2at neutral and trim levers centered, 16 the
elevons should be in the neutral position, aligned straight with the trailing edges of both aft airfoils. If this is
not the case, gradually move the trim levers until the back tips of the elevons align straight with the trailing
edges of the airfoils.
3. Hold the aircraft with wings level so that you have a centered, straight-on view of the tail.
4. Move the elevon stick 8on the transmitter fully to the right until it stops. The elevons should be pointing
upward on the right side and downward on the left side.
5. Move the elevon stick fully to the left until it stops. The elevons should be pointing upward on the left side and
downward on the right side.
6.
Move the elevon stick fully to the back until it stops. The elevons should be pointing upward equally on both sides.
7.
Move the elevon stick fully to the front until it stops. The elevons should be pointing downward equally on both sides.
8. If you detect any problems with the control surfaces responding to the transmitter inputs during the test, do not
fly your MAKO Jet. Call Shark Jaw Product Support staff at 888-492-8697.
Dual-Rate Flight Control 6
The transmitter has a switch located on the top that allows the operator to change the amount of“throw,” or travel, of
the elevon surfaces. This affects the rate at which steering maneuvers can be made.
The switch is pre-set in the factory at the NOVICE mode position. The NOVICE rate setting should be used when first
learning to fly the MAKO Jet and while becoming more familiar with properly controlling the aircraft.
For more advanced pilots, the EXPERT rate setting can be used to increase the amount of control surface deflection
for faster turn, climb, and dive rates. The EXPERT setting is used for more extreme flight control and extreme
aerobatic maneuvering.
IMPORTANT: Keep in mind that it is easier to crash the aircraft when using the EXPERT rate setting. Only use the
EXPERT rate setting when you have gained enough confidence in your abilities to consistently maintain control of
the aircraft in all possible attitudes.
NOTE: You may switch flight modes during flight, but it is important to remember that this should be done only at
high altitudes, above 50 feet.
2
1
20
1
8
6
15
PIC 3
PIC 5
PIC 5

Your First Flight
Your First Flight
Choose a Large, Open Grassy Field
To ensure safe flying, you should select a large, open grassy field that is free of obstructions for at least
500 feet in all directions from the spot you choose to stand while piloting your aircraft. PIC-3
The MAKO Jet is capable of reaching speeds up to 80 MPH and can quickly go out of radio range
without your undivided attention. The maximum range of the radio transmitter is 900 feet, but
it is important to always remain alert and keep the MAKO Jet well within radio range by
ensuring it does not exceed a distance over 500 feet away from you in any direction. This
will give you added time to safely steer the aircraft toward your ground position should
the battery be nearing the end of its charge. PIC-3
NOTE:
As the battery charge gets weaker, the range of control operability is
diminished proportionally.
IMPORTANT:
Make certain that you do not fly near bystanders, trees,
buildings, automobiles, telephone wires, animals or any other object that
can interfere with flight or obstruct your view of the aircraft. Always
maintain a clear line of sight with the MAKO Jet throughout each flight.
Choose Calm Days When Learning to Fly
For your initial flights, please choose calm days. Your best choice for
optimum performance and safety is to fly on completely still days
with no wind at all. A mild, steady breeze that maintains stable
direction is acceptable.
How to Check Wind Conditions:
1.
Determine the direction of the wind by tying a ribbon onto
the transmitter antenna 5 or simply release a few grass
clippings from above your head and observe how the wind
blows them. Take note of the direction of the wind.
PIC-2
2. If the ribbon or grass clippings are blown or
scattered about in different directions, making it
difficult to determine a particular wind direction, the
wind may be too gusty or changeable and you
should wait until conditions settle and the wind
direction can be positively determined.
Wind Velocity and the Advanced
MAKO Jet Capabilities
The unique MAKO Jet design and airfoil
arrangement provides exceptionally good
stability and ease of pilot control during flight.
The MAKO Jet is also capable of flying in
considerably higher wind speeds compared to
conventionally designed aircraft of its same
size, weight, and thrust classification.
Amazingly, the MAKO Jet has been successfully
flight tested in wind speeds in excess of 40
knots and can recover more easily from
crosswind gusts than less stable designs.
3
PIC 3
PIC 4
PIC 2
PIC 1
500 ft.
PIC 1
PIC 1
PIC 2
4
30 yards

W
A
RNIN
G
WARNING
NOTE: Unless you are a thoroughly experienced and highly skilled pilot, we DO NOT recommend that you attempt to
fly the MAKO Jet on windy days, despite its impressive capabilities to slice through winds that would typically
ground other conventional aircraft.
Flying in excessive wind speeds will accelerate consumption of battery charge, shorten flight time and
presents a much greater challenge to launching and maintaining proper flight control.
Range Test
Two people are required to perform the range test; one person to hold the plane and the
other to apply input to the radio transmitter.
The person holding the airplane must at
all times be certain that the propeller
5
does not contact
any part of their body or clothing. Long hair should be tied,
pinned back or tucked under a cap to prevent the hair from
accidentally entering the ducted fan intakes and becoming
entangled in the propeller.
1. Be sure the throttle
1
is in the OFF position. PIC 3
2.
Keeping the transmitter antenna down, turn the transmitter ON.
PIC 5 Plug the aircraft battery into the socket inside the battery
compartment and secure the hatch cover to the fuselage. PIC 6
3.
The person holding the transmitter should walk a
minimum of 30 paces away from the person holding
the plane.
PIC 4
4. Move the controls on the transmitter smoothly to see if
there is any interference. While the transmitter controls
are moved, the other person observes the airplane’s
elevon control surfaces
15
to make sure they
operate correctly. Do not turn on the throttle! PIC 7
5. Walk back, then check throttle while the aircraft is
held firmly. When the throttle is advanced, the
propeller
19
should immediately spin.
6.
While the throttle is running, move the controls
again to ensure there is no interference between
the running motor and the control surfaces.
7.
Afterburner Attack Button
2
Test this
special feature by pressing the button located
on the top of transmitter. You will feel
immediate extra thrust that will help you
perform amazing aerobatics as you gain
experience as a pilot.
8. Now you are ready to fly. If any interference
occurs during the test, first try a different
location (park, field) before calling for a
replacement. Be advised that some areas
will have unavoidable interference due
to hospitals, CB antennas, TV stations,
radio stations and similar sources of
radio transmissions.
Range Test
4
Bottom view
PIC 5
PIC 6
PIC 7
PIC 3
PIC 6
PIC 5
PIC 4
PIC 7
1
15
19
2
19
Launching The Mako Jet
Launching the MAKO Jet
1. Make sure that the aircraft battery is fully charged and the hatch cover is securely fastened.
PIC 6
2. Be certain the throttle
1
is in the OFF position before turning on the transmitter.
3. Turn on the transmitter and check the dual-mode toggle switch.
6
REMINDER: When first learning to fly, you should select the NOVICE position, with the
switch pointing to the back of the transmitter. The EXPERT setting, with the switch
pointed to the front, should only be used by experienced RC pilots.
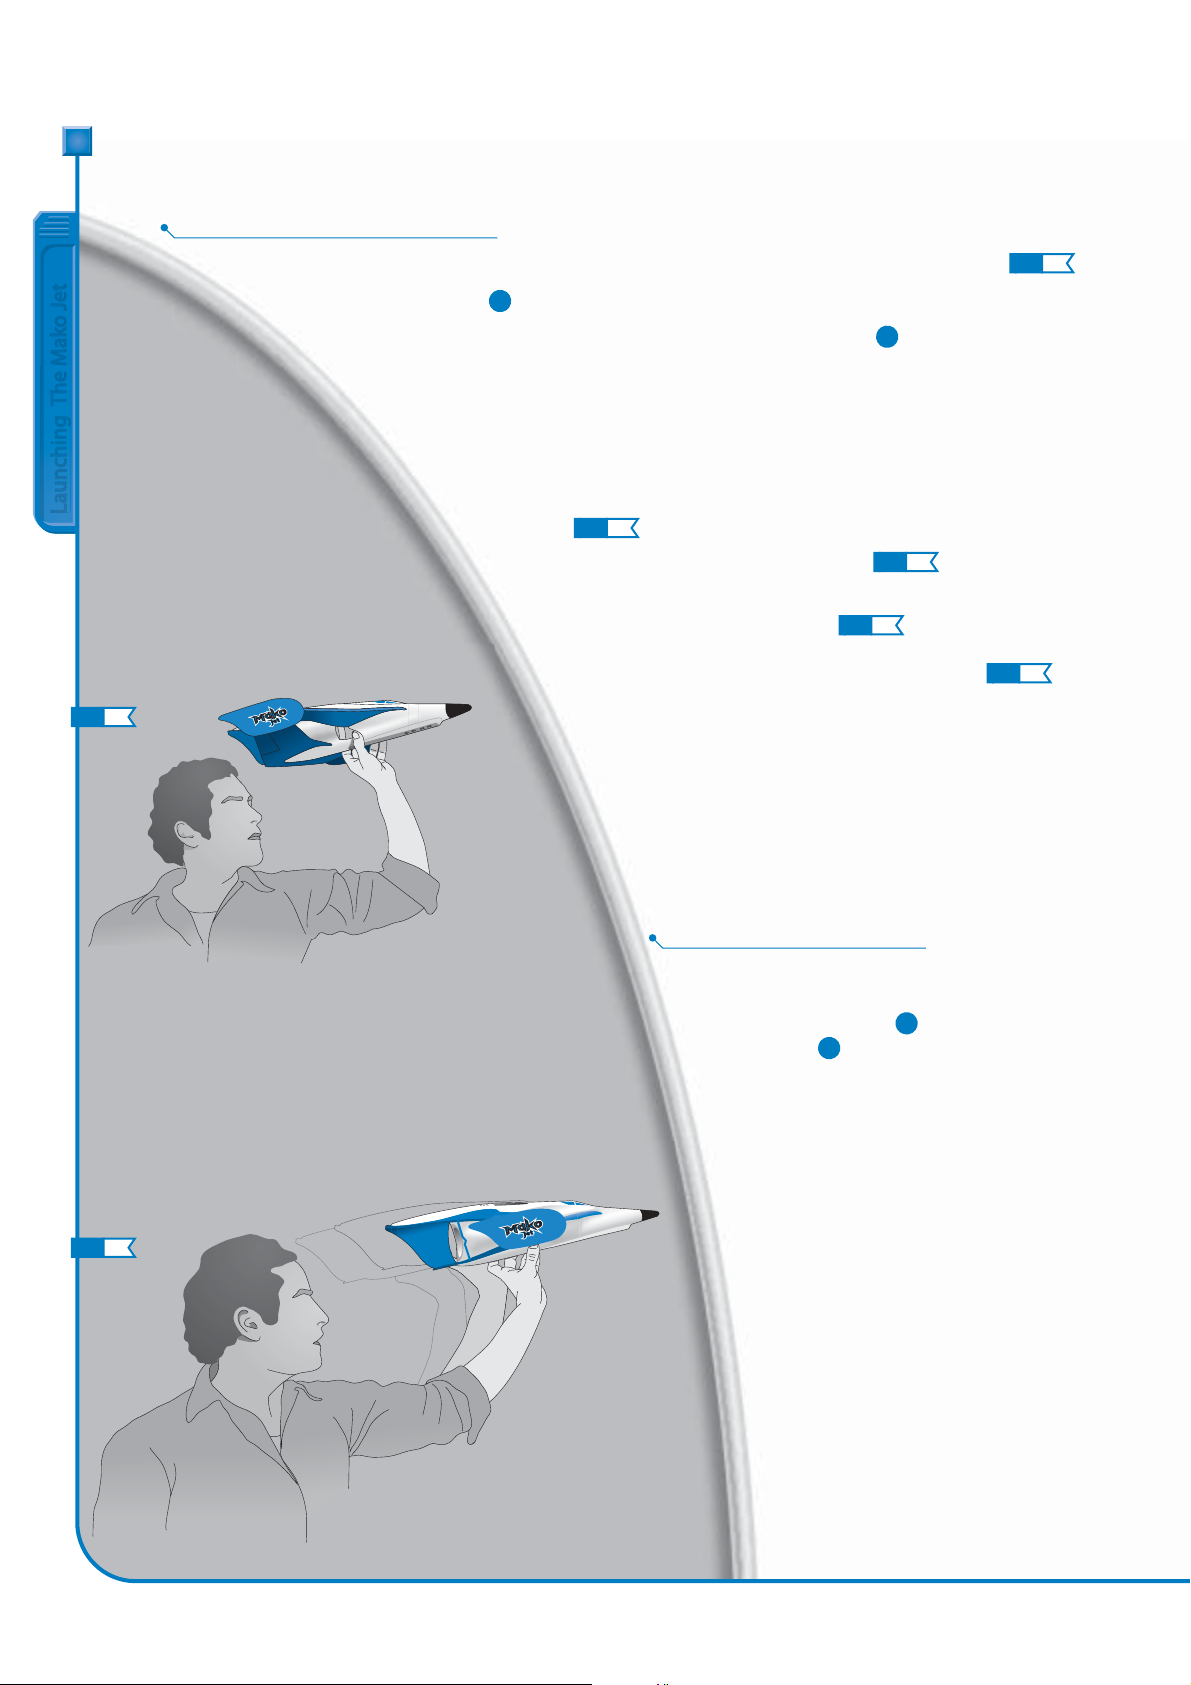
4. Grasp the bottom of the fuselage between the lower ducted fan intakes and the
leading edge of the lower wing while ensuring that no part of your body is near
the ducted fan intakes and propeller blades. Be sure the plane feels balanced in a
firm grasp.
PIC 8
5. Be sure the throttle position is set to OFF,
PIC 3
but continue to maintain
finger contact with the throttle slider during launch.
6. Hold the plane above your head.
PIC 8
Aim the airplane directly into
the wind with wings level, while making sure that all parts of your body
are clear of the airplane during launch and release.
PIC 9
7. Advance to full throttle and lightly toss aircraft into headwind.
8. Continue to steer directly into the wind, giving small up elevator
(back on the stick) inputs to the transmitter until you have
reached an altitude of approximately 100 feet.
9. At or above 100 feet, it is safe to steer in the desired direction
and to make throttle adjustments to maintain altitude and
speed. You may also make trim adjustments.
Flying the MAKO Jet
1. Once flying at safe altitude, it is important to quickly
check and adjust trim settings to maintain level flight
with the elevon stick
8
in the neutral position and
the throttle
1
set for normal cruise speed at
slightly above the half-way mark on the throttle
slider. It is easier to make trim adjustments while the
plane is facing into the wind.
2. Do not let the plane get too far away from you.
Remember, the safe range is 900 feet. The farther
away the plane is from your ground position, the
harder it is to determine both the plane’s altitude
and its orientation.
3. Keep the plane upwind of your ground
position to prevent it from being carried
away by the wind. Should you begin to lose
power unexpectedly, the plane will be much
easier to recover if it is blown toward your
position rather than away.
5
PIC 8
PIC 9
PIC 6
PIC 3
PIC 8
PIC 9
PIC 8
1
6
8
1

Making Sharp Turns And Throttle Input
4. Flying in too much wind is the greatest cause of crashes, as well as accidentally flying out of transmitter range. Keep
your attention focused on the plane at all times. Remain constantly aware of its range from your ground position.
Again, avoid flying on windy days to help prevent mishaps.
5. Try to fly smoothly when adjusting all transmitter flight controls. Avoid jerky control inputs.
Climbing too quickly with up elevator and insufficient power may cause the wings to stall and
force the airplane into a nosedive. Give small inputs to the elevons to maintain controlled
flight, particularly when correcting problems with the airplane’s pitch. Overcorrections
may cause pilot confusion, loss of plane orientation, and may possibly lead to loss of
control or crashes.
Making Sharp Turns and Throttle Input
Steer or roll the airplane in the desired direction (left or right on elevon stick) 8
while pulling back on the stick to give the airplane more up elevator. This will
turn the airplane more rapidly and allow for sharper turns to be made. The
airplane is also more responsive in sharper turns if you give it additional
throttle.
PIC 10 PIC 11
Remember, when gliding without power, your
control inputs will have less effect on aircraft steering. Practice
maintaining balance between throttle settings and stick movements
during various steering maneuvers.
Throttle, Altitude and Stall Recovery
1. The throttle control is proportional, which allows you to finely
adjust power settings to the desired level.
2. Apply more power to climb.
3. Reduce power to descend.
4. Always give yourself and your MAKO Jet plenty of time
and distance from the ground to recover from a
possible stall by maintaining enough altitude for a
safe recovery. To properly recover from a stall, it is
necessary that you build enough airspeed in a
nose-down, dive attitude before applying small
increments of up elevator to regain level flight.
Giving too much up elevator input before
gathering enough speed can induce another stall
and shorten the time and distance for safe
recovery, possibly resulting in a crash.
5. As you gain more flight experience, it is good
to practice recovering from stalls only at
altitudes above 200 feet so that you will
become more familiar with the amount of
time and distance required to properly
recover from possible stall emergencies
occurring at lower altitudes. Get to know
the limits of your aircraft, as well as the
limits of your flying skills.
6
PIC 10
PIC 11
PIC 10 PIC 11
Sharp LEFT turn
Sharp RIGHT turn
8
Landing Your Mako Jet
W
ARNIN
G
WARNING
7
Landing Your MAKO Jet
After approximately 8-10 minutes of flying, you may begin to notice that your MAKO Jet is not climbing
well when full throttle is applied. This is the LOW VOLTAGE CUTOFF FEATURE – the circuit board
automatically reduces power setting to 30% to remind you to land while you still have enough
battery power to maneuver.
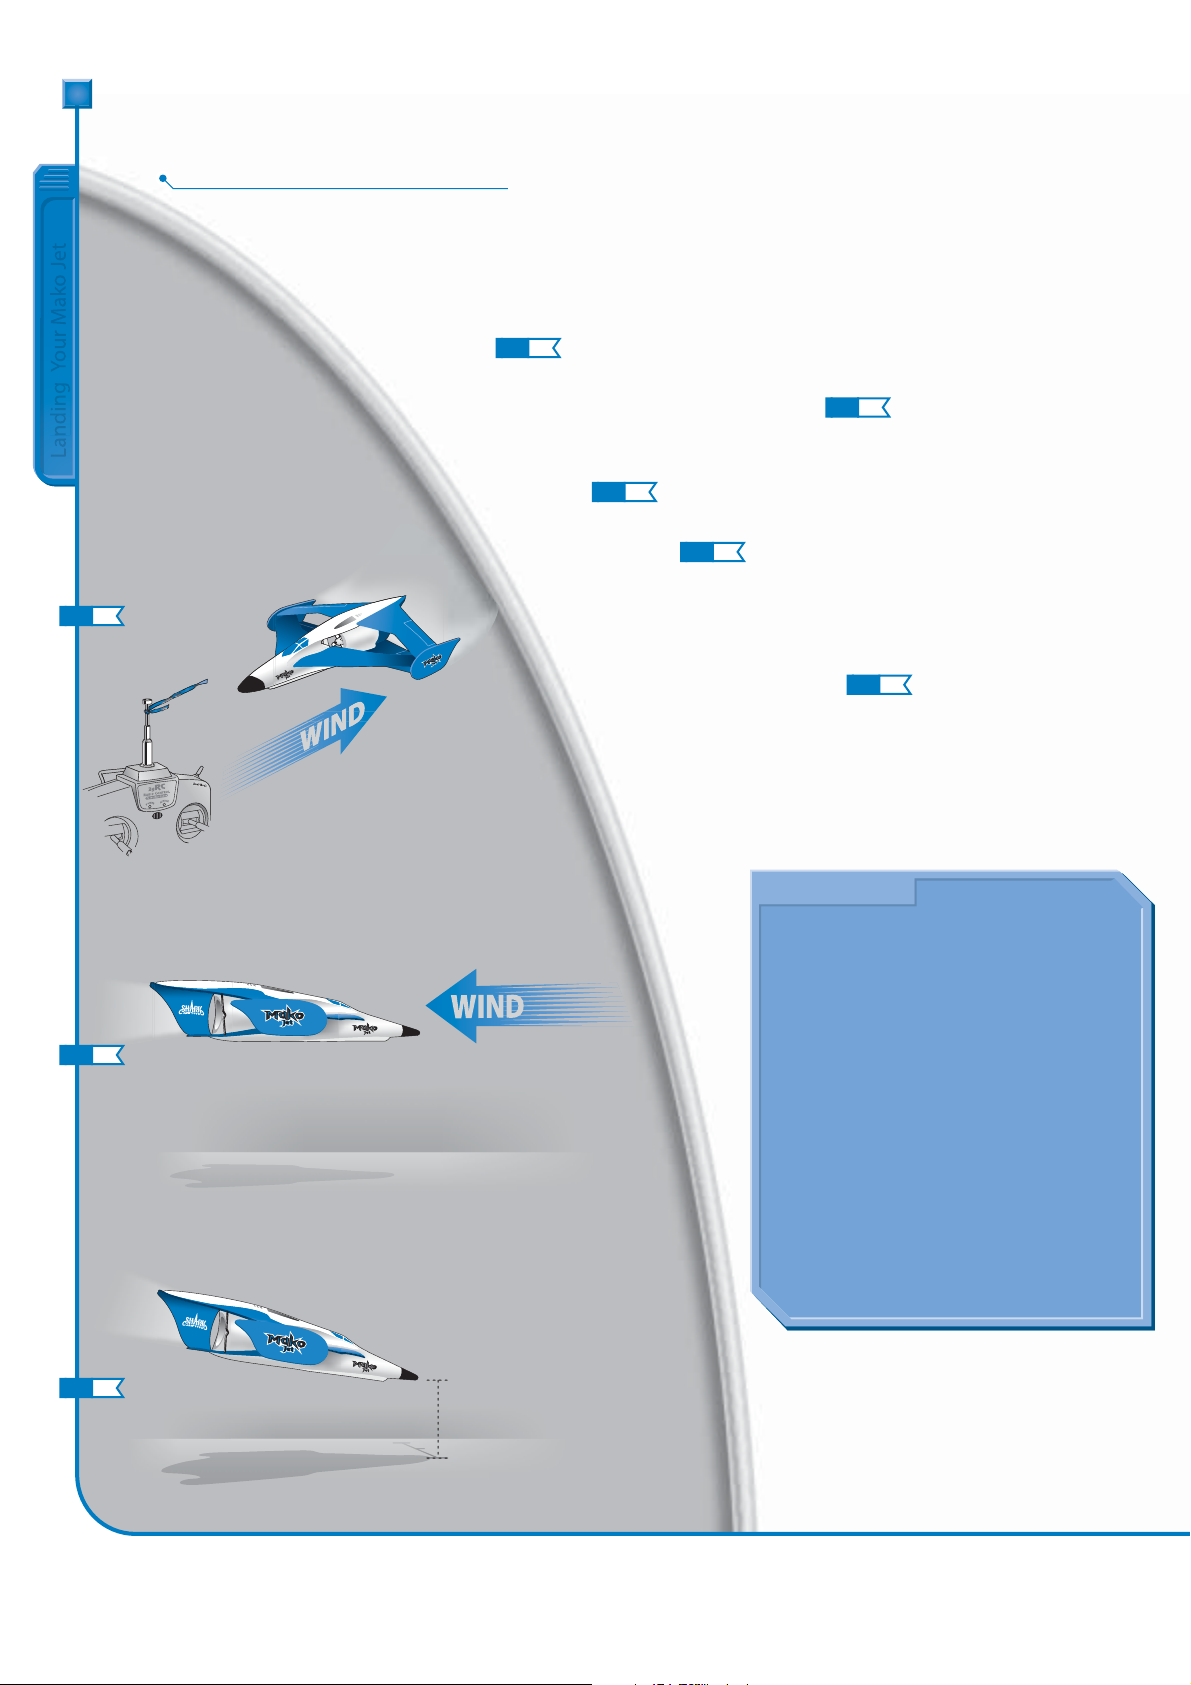
1. Aim the MAKO Jet directly into the wind as you steer it toward your desired
landing zone.
PIC 12
2. Reduce the throttle gradually to 30% and descend to about 10 feet above the ground
with the nose still aimed straight into the wind.
PIC 13
3. Reduce throttle to 15% until the airplane descends on a gradual glide slope
angled slightly toward the ground while keeping the wings level with
the horizon.
PIC 14
4. Just before the airplane makes contact with the ground, shut
OFF the throttle
PIC 3
and allow your plane to settle smoothly to
a soft landing.
5. As you gain more experience with landing, you may want to try
“flaring” your MAKO Jet by giving the stick a little up elevator input
just before contact with the ground. Flaring will rapidly slow the
craft and help soften landings.
PIC 15
NOTE: Turning the motor OFF before landings will prevent
debris from being sucked into the intakes and help keep
the blades free of damage. Carefully examine the intakes
and propeller blades after every landing to ensure that
they are free of debris and that no damage such as chips
or cracks in the blades has occurred.
NEVER attempt to
turn the motor on if your post- or pre-
flight inspections detect missing pieces,
chips or cracks in the ducted fan blades,
as doing so may expose you to bodily
injury. The ducted fan blades are
carefully balanced for smooth
operation and if you detect unusual
vibrations coming from the aircraft,
land it immediately and perform an
inspection, paying particular attention
to the ducted fan propeller blades.
Always stay clear of the blades.
DO NOT attempt to catch the
MAKO Jet in flight, as this may lead
to possible injury.
REMEMBER: Safety should always remain
your first consideration and primary focus
at all times.
PIC 12
PIC 13
PIC 14
PIC 12
PIC 13
PIC 14
PIC 16
PIC 3
10 feet

Aerobatic Tips
8
Aerobatic Maneuvers and the Dual-Rate Settings
Your MAKO Jet aircraft is fully capable of performing spectacular aerobatic stunts without requiring physical
modifications or adjustments to the control linkages.
All linkages are pre-set at the factory and should not be altered. The dual-mode control switch
6
located on the back of the transmitter can be set on NOVICE or EXPERT during flight to
increase or decrease the amount of deflection or “throw” of the control surfaces, commonly
known as elevons.
15
As discussed in the “Launch” section, we recommend that the EXPERT control rate setting
be used only by experienced pilots because the speed of roll and pitch movements are
significantly accelerated, making it much easier to crash the airplane. You will have
less time to determine the attitude of the aircraft, as well as less time to recover
from emergencies when using the EXPERT rate setting.
NOTE: As mentioned, it is best to seek the guidance of an experienced RC
pilot during your first few flights, and this is even more important when
learning to perform aerobatic stunts with your MAKO Jet.
Aerobatic Tips
1. Climb to approximately 200 feet altitude before attempting
aerobatic maneuvers.
2. Before attempting a loop, apply full power or in a steep climb
engage the “Afterburner Attack Button”
2
to ensure that
you have enough speed to complete the loop.
3. Before attempting a roll, position the nose of the aircraft
slightly upwards to overcome the loss of altitude that will
normally occur during a roll maneuver.
PIC 16
4. Be sure you apply power both into and out of turns, to
keep airspeed up and air flowing over the wings to
maintain control.
5. If you decide to try inverted flight (upside down), be
sure the power is near or at full throttle, and apply
down elevator to achieve level flight.
6. Be sure you have the dual-mode switch set to
EXPERT mode when attempting aerobatic
maneuvers. This will allow you to over-control
the airplane to achieve aerobatic flight.
PIC 17
7. Before aerobatic flight, be sure you understand
and know the color difference between the
top and bottom of the jet; this is crucial to
recovering stable flight.
PIC 15
PIC 16
PIC 17
PIC 16
PIC 17
15
2
6

Troubleshooting
Damage Repair
In the event your MAKO Jet suffers crash damage,“Foam-Safe”CA or epoxy can be used to make
minor repairs.
Fractured or sheared foam parts will bond together nicely if the two parts to be joined are not
badly distorted by excessive stretching or buckling of the foam near or on the damaged area.
Troubleshooting
9
Problem Solution
Your MAKO Jet is turning toward one direction
or another.
Check your trim tabs and be sure that the control
surface is neutral to the wing.
1
Your MAKO Jet is "chattering" when you turn it on. Ensure you are in a designated flying area and that
nobody else nearby is on the same frequency. It is very
easy to crash other craft if they are within range of you
and on the same frequency.
2
Your MAKO Jet is pitching up or down rapidly. Be sure that the balance of the aircraft has not
changed. All MAKO Jets are pre-balanced from the
factory to ensure proper center of gravity.
3
Your MAKO Jet is not flying for as long as it once was. Your MAKO Jet is supplied with a lithium polymer
battery that can develop a “memory.” Be sure the
battery is close to fully discharged before attempting
to recharge it. This is called "cycling the battery" and is
done to help extend battery life.
4
Your MAKO Jet is getting interference toward the end
of the flight.
Make sure your transmitter batteries are charged at all
times. Dead batteries can cause you to crash your
airplane or possibly hurt somebody who may be
nearby. Change the batteries after every five (5) flights.
5
Your MAKO Jet motor will not turn. Visually check to ensure that all wires are connected to
the correct spots. If you see a loose wire, contact
Shark Jaw Toys for further details.
6
The servo is not working. Contact Shark Jaw Toys for further details.
7

Warranty
10
Warranty and Follow-Up Procedures
WARRANTY: Shark Jaw Toys guarantees this product to be free of defects in material and workmanship.
If you detect defects during the very first preflight testing (see Range Test, p. 4), please call our Product Support
staff toll-free at 888-492-8697.
If you are directed by our staff to return the airplane, you will be provided with an RA (Return Authorization) number and
an address to ship it to. Please follow these steps:
1. Unplug the battery from the airplane.
2. Pack the complete MAKO Jet (all components in the original box) and place in a sturdy shipping carton
for protection.
3. Include your complete name and address information inside the carton, as well as clearly writing it on the outer
label/return address area. Include detailed information explaining the nature of the problem(s) encountered.
4. Please date your correspondence and be sure your complete name, address and daytime phone number appear
on this enclosure. Please include your original dated sales receipt.
If, after inspecting the product, we determine it to be defective, we will repair or replace it at our discretion.
22.375 in
20.25 in
3.5 in
5.125 in
FCC NOTE:
THE MANUFACTURER IS NOT RESPONSIBLE FOR ANY RADIO OR TV INTERFERENCE CAUSED BY UNAUTHORIZED MODIFICATIONS TO THIS EQUIPMENT.
SUCH MODIFICATIONS COULD VOID THE USER’S AUTHORITY TO OPERATE THE EQUIPMENT.)

Shark Jaw Toys
P.O. Box 851325
Yukon, Oklahoma 73085-1325
1-888-492-8697
1-405-946-7800
1-405-946-7849
www.sharkjawtoys.com
© 2005 Shark Jaw Toys
MAKO is a trademark of Shark Jaw Toys
SKY SPORT

At Shark Jaw Toys, we’re committed to breaking through the barriers of traditional aircraft
design and providing you with revolutionary flight performance – and the explosive action
of the MAKO Jet is no exception.
To ensure safe and successful piloting, we recommend that you thoroughly read all of the
MAKO JET INSTRUCTION MANUAL before flying your aircraft.
Your MAKO Jet comes complete with everything you need to “Attack the Sky.” There is
nothing to assemble. You will only need to charge the battery and do a preflight
inspection before takeoff.
Your 2gRC radio control system gives you precision control and stunning aerobatic
capabilities. Importantly, if you are not familiar with flying radio-controlled aircraft, we
recommend you seek the guidance of an experienced radio control pilot during your
beginning flights.
PLEASE NOTE: Crash damage is not covered under the warranty.
The Academy of Model Aeronautics welcomes you to the exciting world of Radio Control
(RC) model aviation. As the world's largest sport aviation organization, we invite you to visit
our website and see the tremendous variety of aircraft and events that are open to you,
along with a wealth of helpful information and tips. We also hope you will consider
becoming a member of the AMA and join the thousands of enthusiasts with access to our
club-supported flying sites all over the country.
Just go to www.modelaircraft.org and click on the “Join The AMA Now!" tab.
Academy of Model Aeronautics
5161 East Memorial Drive
Muncie, IN 47302-9252
Phone 800 - 435 - 9262
Fax 765 -741- 0057
Like No Other
Jet-Powered Experience
Get Ready For A
Table of contents


