Sharp CE-AG06 User manual

CE-AG06
DIGITAL CAMERA CARD
DIGITALKAMERA-KARTE
OPERATION MANUAL
BEDIENUNGSANLEITUNG
• Introduction ................................................ 2
• Key Features ............................................. 3
• Notice ........................................................ 4
• Names and Functions of Parts .................. 6
• Installing and Removing
the Digital Camera Card . 7
• Taking Pictures .......................................... 9
• Specifications .......................................... 14
• Troubleshooting ....................................... 15
page Seite
• Vorwort ...................................................... 2
• Hauptmerkmale ......................................... 3
• Zur Beachtung ........................................... 3
• Bezeichnung und Funktion der Teile ......... 6
• Einsetzen und Herausnehmen
der Digitalkamera-Karte . 7
• Fotografieren ............................................. 9
• Technische Daten .................................... 14
• Fehlersuche ............................................. 15
CE-AG06表紙 02.1.12, 1:02 PMPage 1 AdobePageMaker6.5J/PPC

In U.S.A.:
Declaration of Conformity
Digital Camera Card: CE-AG06
This device complies with Part 15 of the FCC Rules.
Operation is subject to the following two conditions: (1)
This device may not cause harmful interference, and
(2) this device must accept any interference received,
including interference that may cause undesired
operation.
Responsible Party:
SHARP ELECTRONICS CORPORATION
Sharp Plaza, Mahwah, New Jersey 07430
TEL: 1-800-BE-SHARP
Tested To Comply With FCC Standards
FOR HOME OR OFFICE USE
WARNING - FCC Regulations state that any
unauthorized changes or modifications to this equipment
not expressly approved by the manufacturer could void
the userís authority to operate this equipment.
Note: This equipment has been tested and found to
comply with the limits for a Class B digital device,
pursuant to Part 15 of the FCC Rules.
These limits are designed to provide reasonable
protection against harmful interference in a residential
installation. This equipment generates, uses, and can
radiate radio frequency energy and, if not installed and
used in accordance with the instructions, may cause
harmful interference to radio communications.
However, there is no guarantee that interference will
not occur in a particular installation. If this equipment
does cause harmful interference to radio or television
reception, which can be determined by turning the
equipment off and on, the user is encouraged to try to
correct the interference by one or more of the following
measures:
– Reorient or relocate the receiving antenna.
– Increase the separation between the equipment and
receiver.
– Connect the equipment into an outlet on a circuit
different from that to which the receiver is connected.
– Consult the dealer or an experienced radio / TV
technician for help.
CE-AG06表紙 02.1.12, 1:02 PMPage 2 AdobePageMaker6.5J/PPC

1
CONTENTS
Introduction .................................................... 2
Key Features .................................................. 3
Notice ............................................................. 4
Names and Functions of Parts ....................... 6
Installing and Removing the
Digital Camera Card .7
Installing the card in the main unit ........... 7
Removing the card from the main unit ..... 8
Taking Pictures ............................................... 9
Basic flow of photography ........................ 9
Adjusting the rotation and orientation
of the lens unit . 10
Adjusting the focus ................................. 11
Tips on taking pictures ........................... 11
Dew condensation ................................. 12
Preventing blurry pictures ...................... 12
Infrared-emitting subjects ....................... 12
Taking pictures in a room under
fluorescent light . 12
Customer care ....................................... 13
Specifications ............................................... 14
Troubleshooting ........................................... 15
Thank you very much for choosing the SHARP
digital camera card CE-AG06.
Please read this operation manual carefully to
use the product properly. After reading, keep the
manual in a safe place for later reference.
Disclaimer
• Except as validated by the products liability law,
we do not assume any responsibility for
damages to your or third parties caused by
improper handling of the product or any of its
accessories or by their operational failures, as
well as by their use.
• This product, with its accessories inclusive, is
subject to change without notice.
ENGLISH
CE-AG06本文(E) 02.1.12, 1:03 PMPage 1 AdobePageMaker6.5J/PPC

2
Introduction
This product (digital camera card CE-AG06) can
be used as a digital camera when inserted in a
CF card slot, as in the SL-5500.
Software installed in the main unit allows you to
transmit pictures taken with this product as e-
mail attachments. For more information, refer to
the operation manual of the main unit.
This product can be inserted in the following
models:
Supported models:
SL-5500/SL-5000 (as of January 2002)
*Using this product with the SL-5000 requires
updating the software installed in it.
URL: http://developer.sharpsec.com
Instructions in manual focus on handling the
product, inserting it into the main unit, such as
the SL-5500 (hereafter simply called "main unit")
and removing it, and taking pictures.
For how to use the picture data that has been
recorded, refer to the operation manual of the
main unit.
Notice
• This product cannot be used with models other
than those listed at left (as of January 2002).
• Having this product inserted in a notebook
computer or the like can result in failure.
• The copyright law provides that pictures you took
with this product cannot be used without prior
permission of the copyright holders, except for
personal entertainment purposes.
Please remember that that taking pictures of live
performance, presentation, exhibits, etc. may be
restricted even though they are used for
personal entertainment purposes.
• Before taking any precious pictures, test-shoot
them to make sure they are saved properly.
CE-AG06本文(E) 02.1.12, 1:03 PMPage 2 AdobePageMaker6.5J/PPC

3
Key Features
• The CE-AG06, when inserted into the main unit,
offers you a joy of photography instantly.
Image sensor:
CMOS Image sensor with 350,000 pixels
Maximum image resolution:
480 ×640 dots (VGA)
• Using the main unit zoom feature lets you zoom
in on your subject to a magnification of about
two.
• The close-up feature keeps you as close to your
subject as about 6 cm.
• The pictures you took can be saved to the
memory of the main unit or to an SD memory
card in the JPEG format.
Memo:JPEG is a format of image compression
for color stills.
• The rotary lens mechanism allows you to
capture your self-portraits.
• The digital camera card monitors through the
LCD screen of the main unit.
CE-AG06本文(E) 02.1.12, 1:03 PMPage 3 AdobePageMaker6.5J/PPC

4
Notice
When using this product, please fully observe
these handling precautions to prevent failures
and other troubles.
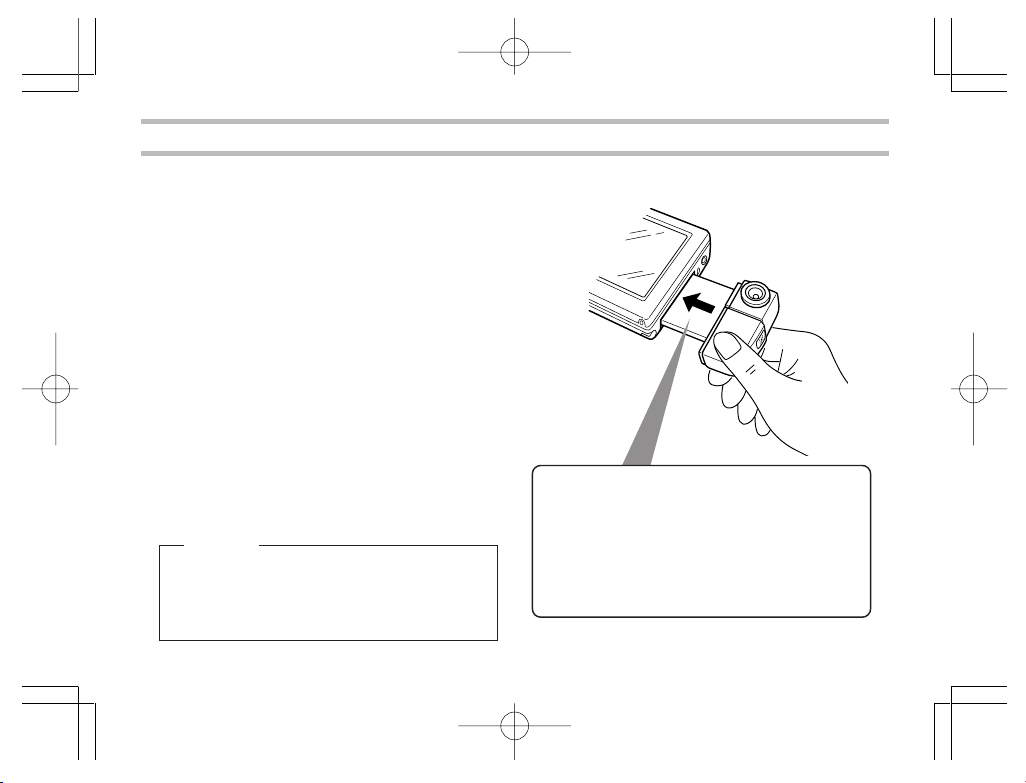
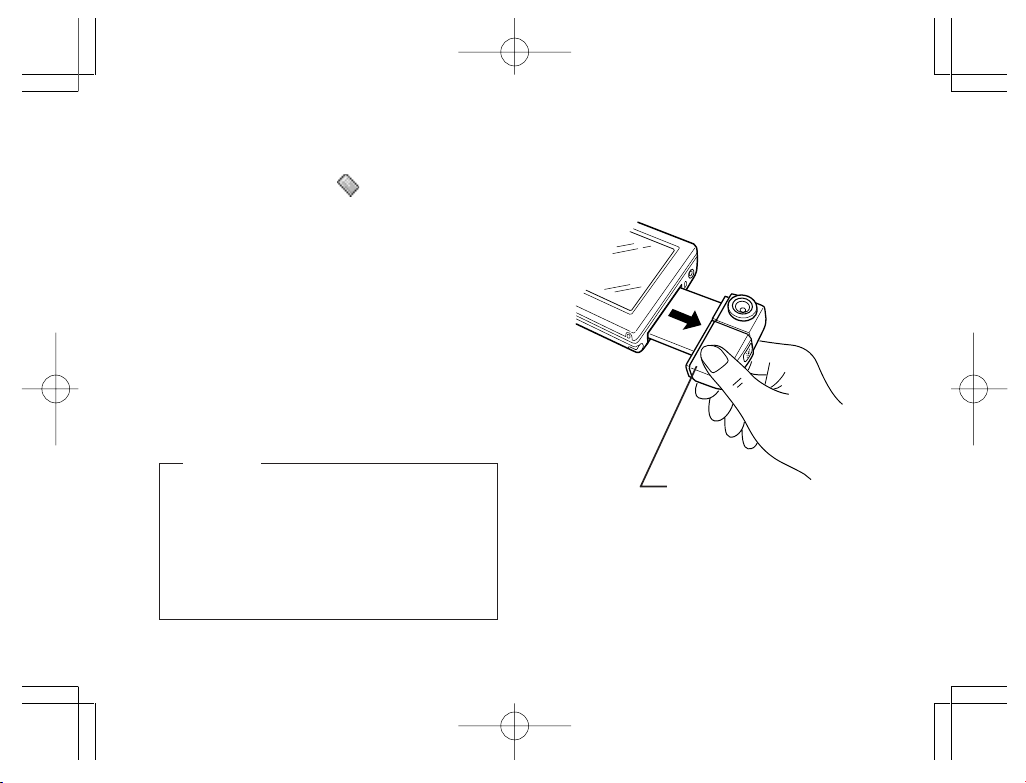
• When carrying the main unit or leaving it out of
service, remove the product from it and insert
the included CF card slot Protection card in its
place. Keep the product removed carefully to
safeguard against undue pressure.
• Do not swing or carry the main unit with this
product inserted in it by holding the main unit
or product alone. The main unit or product may
work loose, resulting in damage. Undue force
applied to the product may impair the rotary
lens mechanism or connection terminal of the
product.
• Do not push or pull the product strongly while it
is inserted in the main unit. Damage to the
product or the main unit may result.
• Before inserting the product into the main unit,
remove the Display protection cover from the
main unit.
• Never remove the product or manipulate the
battery replacement switch of the main unit
while an image is being stored. These actions
may corrupt the picture data.
• Do not place the product in an unstable place.
It may fail under strong pressure or impact.
• Do not place the product on a rickety table or
in an unstable place. The precision device may
fall, resulting in failure under impact.
• Do not use the product in places where its use
is either restricted or prohibited, as in aircraft
in which it may interfere with the flight. Accidents
may result.
• The time the LCD screen takes to get its
brightness stabilized varies depending on the
ambient temperature. Wait for a while until the
brightness gets stabilized.
• Do not aim the lens at the sun. Color distortion
or seizure may result.
• Be careful when using the product not to apply
force to the digital camera cable. Undue force
applied to the product may impair the
connection terminal and other parts of the main
CE-AG06本文(E) 02.1.12, 1:03 PMPage 4 AdobePageMaker6.5J/PPC

5
unit. Avoid also applying undue force from the
rotary lens mechanism.
• Do not touch the lens with a pointed object or
bare hands. The lens may be flawed or stained.
If the lens gets dirty, lightly wipe it with a cotton
swab or any other soft material.
• Do not leave the product in a place exposed to
direct sunlight, in a car, near a heater, or in any
other place that may become hot. Such location
can be a source of failure.
• Avoid using or leaving the product in a dusty or
damp place. Such location can be a source of
failure.
• Do not put the product in a back pocket of your
pants or in a breast pocket. Undue force applied
to the product may result in damage.
• The product is not of waterproof construction.
Avoid using or storing the product where it may
be splashed with water or other liquids.
Rainwater, water splashes, juice, coffee, steam,
and sweat can also be possible sources of
failure.
• Do not drop or give a strong shock to the
product. Failures, such as the loss of focus and
inability to insert the product into the main unit,
may result.
• Never touch the connection terminal. The
product may be disabled under electrostatic
influences. Also, never allow foreign matter
inside the product to avoid possible failures.
• Avoid using the product for applications
requiring more critical reliability than general
equipment.
• Although the CMOS Image sensor is made of
advanced precision technology, some pixels
may look constantly bright or dark spots.
• The card unit may get somewhat heated after
extended periods of service, but this is not a
failure.
CE-AG06本文(E) 02.1.12, 1:03 PMPage 5 AdobePageMaker6.5J/PPC

6
Names and Functions of Parts
Focus dial
Turn the dial to focus on your
subject to shoot (see page 11).
Lens
Lens unit
The lens unit rotates. Rotate
it to aim at you subject to
shoot (see page 10).
Shutter release button
Press to take a picture and save the
picture data.
Card unit
CE-AG06本文(E) 02.1.12, 1:03 PMPage 6 AdobePageMaker6.5J/PPC

7
Installing and Removing the Digital Camera Card
Installing the card in the main unit
1.Remove the Display protection cover from the
main unit.
2.Turn the main unit on.
3.If a card is already inserted in the CF card
slot of the main unit, remove it.
• Refer to the operation manual of the main
unit when removing cards.
4.Insert this product (CE-AG06) fully straight
into the CF card slot of the main unit.
Caution
Having this product inserted in a notebook
computer or the like can result in failure. Never
insert the product in other than the models
specified by us.
• The stylus supplied with the main unit cannot
be detached once the product is inserted into
it. Have the stylus detached beforehand as
needed.
• Insert the product into the main unit with the
"SHARP CE-AG06 DIGITAL CAMERA"
making face up.
CE-AG06本文(E) 02.1.12, 1:03 PMPage 7 AdobePageMaker6.5J/PPC

8
Removing the card from the main unit
1.Exit all applications running on the main unit.
2.Tap the CF card icon ( ) in the lower right
corner of the LCD screen to see a popup
menu. Then, tap "Eject card" on this menu.
• The CF card icon disappears.
3.With the main unit turned on, remove the
product from it by pulling it straight.
4.Insert the CF card slot Protection card into
the CF card slot of the main unit.
Caution
• Do not remove the product from the main unit
by holding its lens unit.
Pulling the lens can result in a fracture or
otherwise in damage or failure.
• When not using the product, remove it from
the main unit and attach the Display
protection cover in its place.
Hold around this
area
CE-AG06本文(E) 02.1.12, 1:03 PMPage 8 AdobePageMaker6.5J/PPC

9
Taking Pictures
Basic flow of photography
1.Insert the product into the main unit (see page
7).
2.Launch the Camera Application from the main
unit (refer to the documentation that comes
with the Camera Application).
A digital camera screen (or the LCD screen
in which your subject is imaged) is displayed.
3.Set the destination to which to save the picture
data, the picture size (resolution) and other
relevant picture characteristics from the main
unit and check that the picture counter does
not equal 0.
4.Turn the lens unit or the focus dial to optimize
the image of your subject appearing on the
LCD screen of the main unit (see pages 10
and 11).
5.Press the shutter release button.
The picture data you shot is saved.
Caution
• Be careful not to block the lens with your fingers
or other objects when taking pictures.
• You cannot take pictures while image data
saving is in progress.
Memo
• For instructions on operating the main unit and
viewing and using saved picture data, refer to
the operation manual of the main unit.
• Pictures you shot are saved compressed in the
JPEG data. When JPEG picture data plays, it
may look somewhat coarser than in the actual
image viewed in step 4.
CE-AG06本文(E) 02.1.12, 1:03 PMPage 9 AdobePageMaker6.5J/PPC

10
Adjusting the rotation and
orientation of the lens unit
The lens unit rotates. Holding the main unit, aim
the lens unit at your subject for adjustment.
Lens unit
(Figure A)
(Figure B)
Caution
Do not turn the lens unit past its range of rotation,
which spans about 180°from the position shown
in Figure A to that in Figure B.
• Do not force the lens unit to rotate.
• You can orient the lens unit at yourself to
capture your self-portraits.
CE-AG06本文(E) 02.1.12, 1:03 PMPage 10 AdobePageMaker6.5J/PPC

11
Adjusting the focus
Turn the focus dial to optimize the image of your
subject appearing on the LCD screen of the main
unit.
Focusdial
Tips on taking pictures
• If you take a picture in a dark environment, its
image may look coarse, but this is not a failure.
• When you press the shutter release button, the
image you shot stays still on the LCD screen
for a while until its save is completed, when
the screen is restored, allowing you take the
next picture.
• If you sway the main unit up and down or to left
and right, the display may look jerky as if a video
is fed frame by frame, but this is not a failure.
• Aiming the lens at the CRT tube of a TV receiver
or the display monitor of a computer will display
horizontal streaks on the LCD screen. Similar
streaks will also appear in the image you shot,
but this is not a failure.
• Close-up images may look distorted in their
peripheral area like a barrel due to the
characteristics of the lens, but this is not a
failure.
• Particularly bright parts of a subject, such as
the filament of an incandescent lamp, may look
dark, but this is not a failure.
• If you shoot a moving subject, it may look
distorted in form, but this is not a failure.
Caution
Do not force the dial to turn. Turning the dial past
its range of rotation can result in failure.
Memo
Take close-up pictures (about 6 cm apart) with
the focus dial turned to the ( ) mark. Check the
LCD screen of the main unit to make sure that
your subject is in focus.
CE-AG06本文(E) 02.1.12, 1:03 PMPage 11 AdobePageMaker6.5J/PPC

12
Dew condensation
If this product is quickly moved from a cold place
into a warm place, the temperature difference will
cause dew to condense inside and outside the
product. Generally, allow the product to stand for
about 1 hour at the ambient temperature before
use.
Preventing blurry pictures
Moving the main unit when you press the shutter
release button to take a picture could give a blurry
image to the picture. In picture taking in a dimly
lit place, the shutter speed will slow down. Hold
the main unit steady so your subject imaged on
the LCD screen won’t move.
Infrared-emitting subjects
If you shoot a source of infrared rays, such as a
stove, the picture may look inappropriately col-
ored, but the image you shot has been saved
exactly in the color as you saw it on the LCD
screen of the main unit.
Taking pictures in a room under
fluorescent light
If you use this product in a room under fluores-
cent light, subtle changes in brightness or hue,
or horizontal streaks in varying shades of light
contrast may appear in the picture. This phenom-
enon is the result of the product sensing a subtle,
human-insensible flickering of the fluorescent
light depending on the timing of photography.
When shooting a subject, check the image and
hue of its image on the LCD screen. Enhanced
shot clarity will benefit from using a commercial
video light.
CE-AG06本文(E) 02.1.12, 1:03 PMPage 12 AdobePageMaker6.5J/PPC

13
Customer care
• To the main unit and the lens unit, lightly wipe
with a clean, soft dry cloth, such as a cotton
swab.
• Never use organic solvents, such as thinner or
benzine, and wet cloths for cleaning. Use of
these materials may degenerate or discolor the
main unit and the lens unit.
• When leaving the product out of service for
extended periods of time, remove it from the
main unit and store it to protect the lens (see
page 8).
Caution
When the product has been removed from the
main unit, do not touch the card terminal. Static
electricity may cause the product to fail.
CE-AG06本文(E) 02.1.12, 1:03 PMPage 13 AdobePageMaker6.5J/PPC

14
Model CE-AG06 Product name Digital camera card
Image sensor 1/4-type primary color RGB filter CMOS Image sensor with 350,000 (effective
310,000) square pixels
Lens Monofocus lens F3.4 f=3.85 mm (equivalent to 40 mm on a 35 mm camera)
Shutter speed Automatic (1/10 to 1/15,750 second)
Focus mode Manual
Focus range Approx. 6 cm to infinity
Exposure control Electronic shutter
White balance Automatic
Monitor Subjects (images) are displayed on the main unit screen.
Picture storage Internal memory or SD memory card of the main unit.
Recording format JPEG
Image resolution VGA (480 ×640 dots), HVGA (480 ×320 dots), QVGA (240 ×320 dots),
1/8 VGA (240 ×160 dots), 1/16 VGA (120 ×160 dots)
I/O interface
Compact card type
Power Supplied from the main unit
Operating temperature
0 to 40°C (32 to 104°F), 35 to 85%RH
and humidity
Dimensions 24.5 mm (W) ×55.4 mm (D) ×14 mm (H) (excluding projections)
0.64” (W) ×2.18” (D) ×0.55” (H)
Weight Approx. 25 g (0.88 oz)
Accessory Operation manual (this book)
Specifications
CE-AG06本文(E) 02.1.12, 1:03 PMPage 14 AdobePageMaker6.5J/PPC

15
Troubleshooting
If you are experiencing difficulties with the camera card, check the following table for possible solu-
tions before requesting repair services:
Problem Cause and solution
Nothing appears on
the LCD screen (the
LCD screen looks
black or green).
The LCD screen
turned whitish.
The product shuts off
unexpectedly.
• The product may not be connected properly. Check that it is fully inserted in the
CF card slot of the main unit.
• Check that the battery (rechargeable) loaded in the main unit are not weak or
depleted.
Low or depleted battery loaded in the main unit can disable the product from
working correctly.
• Dew condensation can make the LCD screen looks whitish, detracting from its
visibility. Leave the main unit off for about1 hour and turn it on again, making sure
that fogging has been removed before use.
• Check that it is fully inserted in the CF card slot of the main unit.
• Check that the battery (rechargeable) loaded in the main unit are not weak or
depleted.
Low or depleted battery loaded in the main unit can disable the product from
working correctly.
CE-AG06本文(E) 02.1.12, 1:03 PMPage 15 AdobePageMaker6.5J/PPC

16
Problem Cause and solution
Picture is not clear.
Cannot take a picture.
• Check that the lens is not dirty. If the lens gets dirty, clean it with a cotton swab or
any other soft material.
• Check that the focus is adjusted correctly. Turn the focus dial for adjustment (see
page 11).
• Haven’t you photograph any source of infrared emission? When a source of
infrared emission is shot, its colors may not look right.
• When you photograph a brightly shining object, horizontal lines will appear in the
resultant picture. This is caused by high contrast against the background and is
not a failure.
• When you photograph with an AC adapter, noises from external sources, such
as input power, may cause small shiny spots to appear on the LCD screen, but
this is not a failure.
• Check that the main unit has enough memory to photograph. Delete unnecessary
data or transfer it to the SD memory card to make more memory space available
in the main unit.
CE-AG06本文(E) 02.1.12, 1:03 PMPage 16 AdobePageMaker6.5J/PPC

17
MEMO
CE-AG06本文(E) 02.1.12, 1:03 PMPage 17 AdobePageMaker6.5J/PPC

18
MEMO
CE-AG06本文(E) 02.1.12, 1:03 PMPage 18 AdobePageMaker6.5J/PPC
Table of contents
Languages:
Other Sharp Camera Accessories manuals