Sharp AQUOS 2T-C45AD1X User manual

1 2
Printed in Malaysia
TINS-H108WJZZ
18P07-MA-NF
Dear SHARP customer
Thank you for your purchase of the SHARP LCD colour TV product. To ensure safety and many
years of trouble-free operation of your product, please read the Important Safety Precautions
carefully before using this product.
Important Safety Precautions
• Stand base must be attached to prevent the TV set from falling down and cause injuries.
• Cleaning — Unplug the AC cord from the AC outlet before cleaning the product. Use a soft damp cloth to clean the
product. Do not use liquid cleaners, aerosol cleaners or chemical cloth to clean it, as such materials may damage the
product.
• Water and moisture — Do not use the product near water, such as bathtub, washbasin, kitchen sink, laundry tub,
swimming pool and in a wet basement.
• Do not place vases or any other water-filled containers on this product.
The water may spill onto the product causing fire or electric shock.
• Stand — Do not place the product on an unstable cart, stand, tripod or table. Doing so can cause the product to fall,
resulting in serious personal injuries as well as damage to the product. Use only a cart, stand, tripod, bracket or table
recommended by the manufacturer or sold with the product. When mounting the product on a wall, be sure to follow the
manufacturer’s instructions. Use only the mounting hardware recommended by the manufacturer.
• When relocating the product placed on a cart, it must be moved with utmost care. Sudden stops, excessive force and
uneven floor surface can cause the product to fall from the cart.
• Ventilation — The vents and other openings in the cabinet are designed for ventilation. Do not cover or block these vents
and openings since insufficient ventilation can cause overheating and/or shorten the life of the product. Do not place the
product on a bed, sofa, rug or other similar surface, since they can block ventilation openings. This product is not designed
for built-in installation; do not place the product in an enclosed place such as a bookcase or rack, unless proper ventilation
is provided or the manufacturer’s instructions are followed.
• The LCD panel used in this product is made of glass. Therefore, it can break when the product is struck forcefully or with a
sharp object. If the LCD panel is broken, be careful not to be injured by broken glass.
• Heat sources — Keep the product away from heat sources such as radiators, heaters, stoves and other heat-generating
products (including amplifiers).
• To prevent fire, never place any type of candle or naked flames on the top or near the TV set.
• To prevent fire or shock hazard, do not place the AC power cord under the TV set or other heavy items.
• Do not place heavy objects on this product or stand on it. Doing so could cause injury if the product overturns. Take
special care near children and pets.
• The LCD panel is a very high technology product with 2,073,600 pixels, giving you fine picture details.
Due to the very large number of pixels, occasionally a few non-active pixels may appear on the screen as a fixed point of
blue, green or red.
This is within product specifications and does not constitute a fault.
• Precautions when transporting the TV
When transporting the TV, never carry it by holding or otherwise putting pressure onto the display. Be sure to always carry
the TV by two people holding it with two hands — one hand on each side of the TV.
• Do not display a still picture for a long time, as this could cause an afterimage to remain.
• Install the product on the place where the AC cord can be unplugged easily from the AC outlet or from the AC INPUT
terminal on the rear of the product.
• If a television is not positioned in a sufficiently stable location, it can be potentially hazardous due to falling. Many injuries,
particularly to children, can be avoided by taking simple precautions such as:
• Using cabinets or stands recommended by the manufacturer of the television.
• Only using furniture that can safely support the television.
• Ensuring the television is not overhanging the edge of the supporting furniture.
• Not placing the television on tall furniture (for example, cupboards or bookcases) without anchoring both the furniture
and the television to a suitable support.
• Not standing the televisions on cloth or other materials placed between the television and supporting furniture.
• Educating children about the dangers of climbing on furniture to reach the television or its controls.
• Do not install the TV in a location in which it will be subject to water drops such as underneath an air conditioning unit or in
the vicinity of a humidifier.
• Water drops falling onto the TV and water entering inside it may result in fire, electric shock, or malfunctions.
• We recommend that you install the TV at least 1m away from the outlet of an air conditioner.
2T-C45AD1X
LED BACKLIGHT TV
OPERATION MANUAL
Supplied accessories
Remote control unit “AAA” size battery (g2) Operation manual
Stand unit
Stand base with letter “R”
Stand assembly Screws (g4)
Stand base with letter “L”
Contents
Page
Supplied accessories...........................1
Dear SHARP customer.........................2
Important Safety Precautions .............2
Trademarks...........................................3
Attaching the stand ..............................3
Antenna connection .............................4
Connecting external devices...............4
Remote control unit .............................6
Part names ............................................7
Turning the TV on/off ...........................8
Initial auto installation..........................9
Checking Signal information ...............9
Auto installation....................................9
Programme setup...............................10
Selecting a preset AV mode ..............11
Menu operation...................................12
Picture menu.......................................12
Page
Audio menu .........................................13
ECO menu ...........................................13
Setup menu.........................................13
Option menu .......................................17
Programme Guide ..............................18
Info.......................................................18
ATV/DTV/RADIO buttons ...................18
Switching the analogue audio
format ..................................................19
EPG ......................................................19
SUPER ECO mode..............................20
Colour adjustment and still image....20
Teletext function.................................20
USB Media Player...............................21
Appendix .............................................24
Specifications .....................................25
2T-C45AD1X_H108_EN.indd 12T-C45AD1X_H108_EN.indd 1 6/26/2018 9:55:25 AM6/26/2018 9:55:25 AM

3 4
Trademarks
• The terms HDMI and HDMI High-Definition Multimedia Interface, and the HDMI Logo are trademarks or registered
trademarks of HDMI Licensing Administrator, Inc. in the United States and other countries.
• Manufactured under license from Dolby Laboratories. Dolby, Dolby Audio, and the double-D symbol are trademarks of
Dolby Laboratories.
• ANY USE OF THIS PRODUCT IN ANY MANNER OTHER THAN PERSONAL USE THAT COMPLIES WITH THE MPEG-2
STANDARD FOR ENCODING VIDEO INFORMATION FOR PACKAGED MEDIA IS EXPRESSLY PROHIBITED WITHOUT
A LICENSE UNDER APPLICABLE PATENTS IN THE MPEG-2 PATENT PORTFOLIO, WHICH LICENSE IS AVAILABLE
FROM MPEG LA, LLC, 6312 S. Fiddlers Green Circle, Suite 400 E, Greenwood Village, Colorado 80111 U.S.A.
• THIS PRODUCT IS LICENSED UNDER THE VC-1 PATENT PORTFOLIO LICENSE FOR THE PERSONAL AND NON-
COMMERCIAL USE OF A CONSUMER TO (i) ENCODE VIDEO IN COMPLIANCE WITH THE VC-1 STANDARD (“VC-
1 VIDEO”) AND/OR (ii) DECODE VC-1 VIDEO THAT WAS ENCODED BY A CONSUMER ENGAGED IN A PERSONAL
AND NON-COMMERCIAL ACTIVITY AND/OR WAS OBTAINED FROM A VIDEO PROVIDER LICENSED TO PROVIDE
VC-1 VIDEO. NO LICENSE IS GRANTED OR SHALL BE IMPLIED FOR ANY OTHER USE. ADDITIONAL INFORMATION
MAY BE OBTAINED FROM MPEG LA, L.L.C.
SEE HTTP://WWW.MPEGLA.COM
• THIS PRODUCT IS LICENSED UNDER THE AVC PATENT PORTFOLIO LICENSE FOR THE PERSONAL USE OF
A CONSUMER OR OTHER USES IN WHICH IT DOES NOT RECEIVE REMUNERATION TO (i) ENCODE VIDEO IN
COMPLIANCE WITH THE AVC STANDARD (“AVC VIDEO”) AND/OR (ii) DECODE AVC VIDEO THAT WAS ENCODED
BY A CONSUMER ENGAGED IN A PERSONAL ACTIVITY AND/OR WAS OBTAINED FROM A VIDEO PROVIDER
LICENSED TO PROVIDE AVC VIDEO. NO LICENSE IS GRANTED OR SHALL BE IMPLIED FOR ANY OTHER USE.
ADDITIONAL INFORMATION MAY BE OBTAINED FROM MPEG LA, L.L.C.
SEE HTTP://WWW.MPEGLA.COM
• THIS PRODUCT IS LICENSED UNDER THE MPEG-4 VISUAL PATENT PORTFOLIO LICENSE FOR THE PERSONAL
AND NON-COMMERCIAL USE OF A CONSUMER FOR (i) ENCODING VIDEO IN COMPLIANCE WITH THE MPEG-4
VISUAL STANDARD (“MPEG-4 VIDEO”) AND/OR (ii) DECODING MPEG-4 VIDEO THAT WAS ENCODED BY A
CONSUMER ENGAGED IN A PERSONAL AND NON-COMMERCIAL ACTIVITY AND/OR WAS OBTAINED FROM A
VIDEO PROVIDER LICENSED BY MPEG LA TO PROVIDE MPEG-4 VIDEO. NO LICENSE IS GRANTED OR SHALL
BE IMPLIED FOR ANY OTHER USE. ADDITIONAL INFORMATION INCLUDING THAT RELATING TO PROMOTIONAL,
INTERNAL AND COMMERCIAL USES AND LICENSING MAY BE OBTAINED FROM MPEG LA, L.L.C.
SEE HTTP://WWW.MPEGLA.COM
Attaching the stand
• Before attaching (or detaching) the stand, unplug the AC cord from the AC outlet.
• Before performing work spread cushioning over the base area to lay the TV on. This will prevent it from
being damaged.
1Confirm the screws supplied with the TV.
Screws (4)
Soft cushion
Stand base with letter “L” Stand base with letter “R”
2Insert the stand assembly into the
openings on the bottom of the TV. (1)
3Insert and tighten the screws into the
holes on the rear of the TV. (2)
NOTE
• To detach the stand, perform the steps in reverse order.
• Do not attach or detach the stand without holding it. Doing so can cause the stand to fall, resulting in serious personal
injuries as well as damage to the stand.
Antenna connection
Connect antenna cable to the antenna terminal
If your outdoor antenna uses a 75-ohm coaxial
cable with a standard DIN45325 plug
(IEC 169-2), plug it into the antenna jack at the
rear of the set.
CAUTION
• TO PREVENT RISK OF ELECTRIC SHOCK, DO NOT TOUCH UN-INSULATED PARTS OF ANY CABLES WITH
THE AC CORD CONNECTED.
NOTE
• Place the TV close to the AC outlet, and keep the power plug within reach.
Connecting external devices
You can connect many types of external equipment to your TV, like a VCR, game console, camcorder, DVD
player, Digital TV STB (Set Top Box) and PC. To view external source images, select the input source from
INPUT on the remote control unit or INPUT on the TV.
CAUTION
• To protect all equipment, always turn off the TV before connecting to a VCR, game console, camcorder, DVD player, Digital
TV STB (Set Top Box), PC or other external equipment.
• Refer to the relevant operation manual (VCR, DVD player, etc.) carefully before making connections.
Connecting a VCR, game console or camcorder
A VCR, game console, camcorder and some other audiovisual equipment can be conveniently connected
using the INPUT 3 terminal.
When using composite cable (commercially available)
VCR/Game console/
Camcorder
>PS<
PG024WJ
2T-C45AD1X_H108_EN.indd 22T-C45AD1X_H108_EN.indd 2 6/26/2018 9:55:25 AM6/26/2018 9:55:25 AM

5 6
Remote control unit
DISPLAY
ATV/DTV
EPG
HDMI
AD/MPX
GUIDE INFO RADIO
1
2
5
7
8
9
11
6
3
4
12
SUPER
ECO
13
14
15
16
17
18
10 19
20
21
9 a/b/c/d(Cursor)
Select a desired item on the setting screen.
ENTER
Execute a command.
10 ATV/DTV
Press to access analogue and digital TV mode. (See page 18.)
11 Colour (Red/Green/Yellow/Blue)
The coloured buttons are correspondingly used to select the
coloured items on the screen.
TELETEXT mode: Select a page. (See page 20.)
12 SUPER ECO
Reduce backlight brightness to save power consumption.
(See page 20.)
13 COLOUR ADJ. (FREEZE)
Freeze a motion picture on the screen and adjust the colour
tone of the still image. (See page 20.)
14 PHOTO
Display your pictures directly on the TV screen. (See page 21.)
15 INPUT (INPUT SOURCE)
Select an input source.
16 CHr/CHs
TV input mode: Select the channel.
(CHr) Increase the channel number.
(CHs) Decrease the channel number.
TELETEXT mode: Select a page. (See page 20.)
17 MENU
Display the menu screen.
18 AD/MPX
Select the sound multiplex mode and audio description.
19 RETURN
MENU mode: Return to the previous menu screen.
20 m(TELETEXT), k(Reveal hidden for TELETEXT),
3(Hold), [(SUBTITLE for TELETEXT)
Use for TELETEXT mode. (See page 20.)
21 EPG
DTV mode: To display EPG (Electronic Programme Guide)
screen. (See page 19.)
GUIDE
DTV mode: Display the programme channel list. (See page 18.)
INFO
DTV mode: Display the programme information. (See page 18.)
RADIO
Press to access RADIO mode. (See page 18.)
1 POWER (STANDBY/ON)
To switch the power on and off. (See page 8.)
2 SLEEP
Set the Sleep timer.
0 hr. 30 min. 1 hr. 00 min.
2 hr. 30 min.
1 hr. 30 min.
2 hr. 00 min.
Off
3 HDMI
Select the HDMI input mode.
4 0 – 9
Set the channel.
TELETEXT mode: Set the page. (See page 20.)
5 A(Flashback)
Press
Ato return to the previous selected channel
or external input mode.
6 DISPLAY
Display the channel or input information.
7 VOLk/VOLl
Set the volume.
(VOLk) Increase the volume.
(VOLl) Decrease the volume.
8 e(Mute)
Press
esMutes sound.
Press
eagain sRestores sound.
Mute will be cancelled after 30 minutes. However,
the TV will not suddenly output loud sound as the
volume level will be set to 0 automatically. Increase
the volume level by pressing VOLk.
Connecting external devices (Continued)
Connecting a DVD player/Digital TV STB (Set Top Box)
You can use the HDMI 1 (HDMI/ARC)/HDMI 2 (HDMI) or INPUT 3 terminals when connecting to a DVD
player/Digital TV STB (Set Top Box) and other audiovisual equipment.
When using HDMI-certified cable (commercially available)
>PS<
PG024WJ
DVD player/Digital TV STB
(Set Top Box)
Connecting a PC
You can use the HDMI 1 (HDMI/ARC)/HDMI 2 (HDMI) terminal when connecting to a PC.
PC
Connecting a USB device
Connect a USB device to the TV.
CAUTION
• Do not disconnect a USB device from the TV while transferring files, when a screen is in “USB” mode.
2T-C45AD1X_H108_EN.indd 32T-C45AD1X_H108_EN.indd 3 6/26/2018 9:55:26 AM6/26/2018 9:55:26 AM

7 8
Remote control unit (Continued)
Inserting the batteries
Before using the TV for the first time, insert two “AAA” size batteries (supplied). When the batteries become
depleted and the remote control fails to operate, replace the batteries with new “AAA” size batteries.
1Open the battery cover. 2Insert the two supplied “AAA” size
batteries.
3Close the battery cover.
• Place batteries with their terminals corresponding to
the (e) and (f) indications in the battery compartment.
CAUTION
• Batteries (battery pack or batteries installed) shall not be exposed to excessive heat such as sunshine, fire or the like.
Part names
TV (Front)
POWER indicator
Light off Power off.
Lighted (Red) The TV is in standby mode.
Lighted (Blue) The TV is on.
Remote control sensor / POWER indicator
Part names (Continued)
TV (Rear)
>PS<
PG024WJ
1
2
3
4
5
67
8
1 USB terminal*
2 SERVICE ONLY terminal**
3 /AUDIO OUT (L/R) terminal
4 HDMI 2 (HDMI) terminal
5 HDMI 1 (HDMI/ARC) terminal
6 INPUT 3 terminals
7 Antenna input terminal
8 JOG-KEY
JOG-KEY Functions Description
(Single Press) On/Off (No OSD display)
(Long Press) Sub-menu display on TV screen
rCH UP / r button
sCH DOWN / s button
+VOL UP / button
–VOL DOWN / button
* USB terminal use for USB media player. (See page 21.)
** Usually do not connect anything to this terminal as it reserved only for service personnel.
• The illustrations and on-screen displays in this operation manual are for explanation purposes and may vary slightly from
the actual operations.
• Some features differ depending on the selected country.
Turning the TV on/off
Turning on/off the power Standby mode
• To turn on the power
Press (JOG-KEY) on the TV. (After a few seconds, an
image appears with sound.)
• To turn off the power
Switch it off by pressing (JOG-KEY) on the TV.
• To standby mode
If the TV is switched on, you can switch it to standby by
pressing POWER on the remote control.
• Switching on from standby
From standby, press POWER on the remote control.
NOTE
• If you are not going to use this TV for a long period of time, be sure to remove the AC cord from the AC outlet.
• Minor power is consumed when the unit is in standby mode.
2T-C45AD1X_H108_EN.indd 42T-C45AD1X_H108_EN.indd 4 6/26/2018 9:55:26 AM6/26/2018 9:55:26 AM

9 10
Initial auto installation
When the TV powers on for the first time after
purchase, the initial auto installation wizard appears.
Follow the menu and make the necessary settings
one after another.
1Press (JOG-KEY) on the TV.
• The initial auto installation wizard appears.
2Press a/bto select your country channels
listed on the screen, and then press ENTER.
Press a/bto select the desired language, and
then press ENTER.
Press a/bto select “HOME” or “STORE”, and
then press ENTER.
HOME:
• “STANDARD” will be the default value for the
“AV mode” setting.
STORE:
• “DYNAMIC (FIXED)” will be the default value
for the “AV mode” setting. If the “AV mode” is
changed, the TV will automatically switch back to
“DYNAMIC (FIXED)” when there is no further change
to TV setting for 30 minutes.
• The confirmation screen appears only when selecting
“STORE”. Press a/bto select “Yes” or “No”.
• To change the STORE mode to HOME mode, please
refer to page 16 to reset the unit.
* Press a/bto select “DTV”, “ATV” or
“DTV + ATV”, and then press ENTER.
• Auto installation will be executed.
• You do not need to do anything during the auto
search.
• If you select “Others” country, some of DTV channel
may not tune properly.
Checking Signal information
If you install a DVB-T/DVB-T2 antenna for the first
time or relocate it, you should adjust the alignment
of the antenna to receive a good reception while
checking the antenna setup screen.
1Press MENU and the MENU screen displays.
2Press c/dto select “Programme setup”.
3Press a/bto select “Digital setting”, and then
press ENTER.
4Press a/bto select “Signal information”, and
then press ENTER.
• The “Signal information” screen will appear.
Auto installation
You can run auto installation again, even after setting
up the preset channels.
1Press MENU and the MENU screen displays.
2Press c/dto select “Programme setup”.
3Press a/bto select “Auto installation”, and
then press ENTER.
If you have already set the password, enter it
here.
• See page 13 for setting a password.
4Press a/bto select your country channels
listed on the screen, and then press ENTER.
Press a/bto select the desired language, and
then press ENTER.
* Press a/bto select “DTV”, “ATV” or
“DTV + ATV”, and then press ENTER.
You do not need to do anything during the auto
search. Press MENU to exit.
*
NOTE
• In the setting of some country, selecting of “DTV”, “ATV”
or “DTV + ATV” may not be shown.
• A region or service selection screen may display depending
on the country settings or cable providers selections.
Follow the screen prompts to make the selections.
Programme setup
Digital setting
You can reconfigure DTV services settings
automatically or manually.
1Press MENU and the MENU screen displays.
2Press c/dto select “Programme setup”.
3Press a/bto select “Digital setting”, and
then press ENTER. If you have already set the
password, enter it here.
• See page 13 for setting a password.
4Press a/bto select the desired menu item,
and then press ENTER.
HAuto search
Use this menu to add new services automatically
after auto installation has been completed.
NOTE
• A region or service selection screen may display depending
on the country settings or cable providers selections.
Follow the screen prompts to make the selections.
HManual search
Add new services within a specified frequency band.
• Press c/dto select the frequency and then press
ENTER.
Analogue setting
You can reconfigure the TV channel settings
automatically or manually using Auto search or
Manual adjust.
HAuto search
You can also automatically search by performing
the procedure below. This is the same function as
programme auto search in auto installation.
1Press MENU and the MENU screen displays.
2Press c/dto select “Programme setup”.
3Press a/bto select “Analogue setting”, and
then press ENTER. If you have already set the
password, enter it here.
• See page 13 for setting a password.
4Press a/bto select “Auto search”, and then
press ENTER.
You do not need to do anything during the auto
search. Press MENU to exit.
HManual adjust
You can set some channel items manually.
1Repeat steps 1 to 3 in Auto search.
2Press a/bto select “Manual adjust”, and then
press ENTER.
3Press a/bto select your desired item, and
then press c/dto adjust the settings.
Item Description
Storage to
[1~99]
Save programme to your desired channel
number. Press Rto save.
Sound
system
Select the optimum sound system
(Broadcasting system) to receive.
(B/G, I, D/K, M)
Colour
system
Select the optimum colour system to
receive. (PAL, NTSC, SECAM)
Current CH Select the channel you want to edit.
• Selected channel will be automatically
reflected in the background.
Search Start searching from current channel.
• Instead of pressing c/dto adjust the
frequency, you can set by directly entering
the frequency number of the channel with
0 — 9.
Press Rto save.
Fine-tune Tune the frequency of the stored channel
to your desired position.
• Adjust while checking the background
picture as a reference.
Press Rto save.
NOTE
• The frequency shown below the On-Screen Display shows
the real-time frequency of the displayed channel.
2T-C45AD1X_H108_EN.indd 52T-C45AD1X_H108_EN.indd 5 6/26/2018 9:55:27 AM6/26/2018 9:55:27 AM

11 12
Menu operation
Programme setup
Auto installation
Analogue setting
Programme edit
Programme setup
Select
Digital setting
1Press MENU and the MENU screen displays.
2Press c/dto select the desired menu.
(Programme setup, Picture, Audio, ECO, Setup,
Option)
3Press a/bto select the desired menu item.
Press ENTER to proceed if necessary.
4Press a/bor c/dto select the desired item
or adjust the item to the desired level. Press
ENTER if necessary.
5Press RETURN as necessary to return to
the previous MENU. Press MENU to exit the
MENU.
Picture menu
HPicture adjust
Adjustment items
Selected item cbutton dbutton
Backlight The screen dims The screen brightens
Contrast For less contrast For more contrast
Brightness For less
brightness
For more brightness
Colour For less colour
intensity
For more colour
intensity
Tint Skin tones
become reddish
Skin tones become
greenish
Sharpness For less
sharpness
For more sharpness
NOTE
• “Picture adjust” cannot be changed during “DYNAMIC
(FIXED)” mode.
• For resetting all “Picture adjust” items to factory preset
values, press a/bto select “Reset”, press ENTER, press
a/bto select “Yes”, and then press ENTER.
HDNR (Digital Noise Reduction)
Reduces noise on screen and produces a clearer
video image. (Auto, High, Low, Off)
HWide mode
You can manually select the size of a picture
appeared on your screen.
Selectable picture size varies with the type of signal
received.
Press a/bwhile the wide mode menu displays on
the screen.
• As you toggle down the options, each mode is immediately
reflected on the TV.
Selected item Description
Normal Keeps the original aspect ratio in a full
screen display.
Zoom 14:9 For 14:9 letterbox pictures. A thin side
bar appears on each side, and you may
also see bars on the top and bottom
with some programmes.
Panorama In this mode the picture is progressively
stretched toward each side of the
screen.
Full For 16:9 squeeze pictures.
Cinema 16:9 For 16:9 letterbox pictures. Bars may
appear on the top and bottom with
some programmes.
Cinema 14:9
For 14:9 letterbox pictures. Bars may
appear on the top and bottom with some
programmes.
Dot by Dot
Displays an image with the same number
of pixels on the screen.
Underscan Display with an Underscan image only
when receiving a 720p signal.
Display
with the High-Definition image adjusted
optimally. Noise may appear on the edge
of the screen with some programmes.
Just scan
Keeps the original aspect ratio and
enlarges the picture as much as possible.
Auto
Keeps the original aspect ratio based on
source information and enlarge the picture
as much as possible.
NOTE
• Some picture sizes may not be displayable depending on
the input signal.
• “Auto” and “Just scan” can be selected only during video
playback in “Movie mode” of USB Media Player.
Programme setup (Continued)
Programme edit
Use this menu to set up a channel individually.
1Repeat steps 1 to 2 in Auto search.
2Press a/bto select “Programme edit”, and
then press ENTER.
3Press a/bto select the channel you want
to edit, and then press 1to 5on the remote
control if necessary or press RETURN to exit.
• As you toggle down the channels, each channel is
immediately reflected in the background when you
press ENTER.
1(Erase programme)
Channels can be erased individually.
Press 1to erase the selected channel.
2(Label)
You can change channel names individually.
Maximum 5 alphanumerics can be input.
Press 2to start labelling.
Press a/b/c/dto select a character, and
then press
2
again or ENTER to save.
3(Sort)
Channel positions can be sorted freely.
Press 3to select the channel you want to move.
Press a/bto move it to the desired position,
and then press
3 again or ENTER
to save.
4(Skip)
Channels with “Skip” set to “On” are passed
over when using CHr/seven if selected
while watching the image from the TV.
Press 4to skip the selected channel.
Press 4again to cancel the skip.
5(Lock)
You can block the viewing of any selected
channel.
Password must be set first to allow “ ” to
function.
• See page 13 for setting a password.
Press 5to lock the selected channel.
Press 5again to unlock the locked channel.
Selecting a preset AV mode
“AV mode” gives you several viewing options to
choose from to best match the system environment,
which can vary due to factors like room-brightness,
type of programme watched or the type of image
input from external equipment.
1Press MENU and the MENU screen displays.
2Press c/dto select “Picture” and “Audio”.
3Press a/bto select “AV mode”, and then
press ENTER.
Selected item Description
STANDARD For a highly defined image in a
normally bright room.
MOVIE For a movie.
PC For PC (Available only when inputting
an HDMI).
DYNAMIC For a clear-cut image emphasising
high contrast for sports viewing.
DYNAMIC
(FIXED)
Changes the image and sound
settings to the factory preset values.
No adjustments are allowed.
COMFORT
MODE
Reduce the blue light of the TV.
SUPER ECO Reduce backlight brightness to save
power consumption.
NOTE
• You can select a different AV mode item for each input
mode. (For example, select STANDARD for TV input and
DYNAMIC for VIDEO input.)
2T-C45AD1X_H108_EN.indd 62T-C45AD1X_H108_EN.indd 6 6/26/2018 9:55:27 AM6/26/2018 9:55:27 AM

13 14
Setup menu (Continued)
Clearing the password
Allows you to clear your password.
1Repeat steps 1 to 3 in Setting a password.
2Press a/bto select “Clear password”.
3Press c/dto select “Yes”, and then press
ENTER.
Parental rating (DTV input mode only)
This function allows TV channels to be restricted.
It prevents children from watching violent or sexual
scenes that may be considered inappropriate.
1Repeat steps 1 to 3 in Setting a password.
2Press a/bto select “Parental rating”, and then
press ENTER.
3Press a/bto select your desired rating, and
then press ENTER.
Selected item Description
Off Cancel the blocking.
Age xx years
Select desired age to block.
(Example) If age 14 is selected,
programmes rated for ages of 15 or
more are blocked.
HChild Screen Timer
This function allows you to set a screen viewing time
limit. When counter reach the time you already set, it
will display a warning/information screen.
(Off, 1 Hour, 2 Hours, 3 Hours)
NOTE
• This warning/information screen will keep display at the
center until user turn off the TV and “Child Screen Timer”
will automatically set to “Off”.
• Once “Child Screen Timer” is selected, “COMFORT
MODE” is automatically turned “On”.
HHDMI auto view (HDMI input mode only)
Selected item Description
Enable/
Disable
Set whether or not to use the Auto
Selection of WIDE MODE based on
signal recognition received from the
HDMI signal.
HLink operation
Using the HDMI CEC (Consumer Electronics Control)
protocol, with Link operation you can interactively
operate compatible system equipment (e.g. DVD),
by connecting the link operation-compatible devices
with HDMI-certified cables to the TV.
Link operation allows you to operate the HDMI-
connected equipment and the TV by using a single
remote control unit. (On, Off)
HAudio return channel
If this function is set to “Auto”, the TV can send
audio data for video content shown on the TV
to a connected audio device with just one ARC-
compatible cable. Using this function eliminates the
need to use a separate digital or analogue audio
cable. (Auto, Off)
Connection for using “Audio return channel”
You need to use ARC-compatible cables/devices
and connect to the HDMI 1 terminal to activate this
function.
NOTE
• The ARC (Audio Return Channel) function works only when
using the HDMI 1 terminal.
• When you use an audio system compatible with the ARC
function of the TV, you do not need to connect an optical
audio cable to the TV. However you need to make sure
“Speaker selection” is “On”.
HAuto wide (DTV input mode only)
The “Auto wide” allows the TV to switch automatically
among the different picture size. (On, Off)
NOTE
• Use “Wide mode” if an image does not switch to the
appropriate picture size. When the broadcast signal
contains no aspect ratio information, the function will not
work even if enabled.
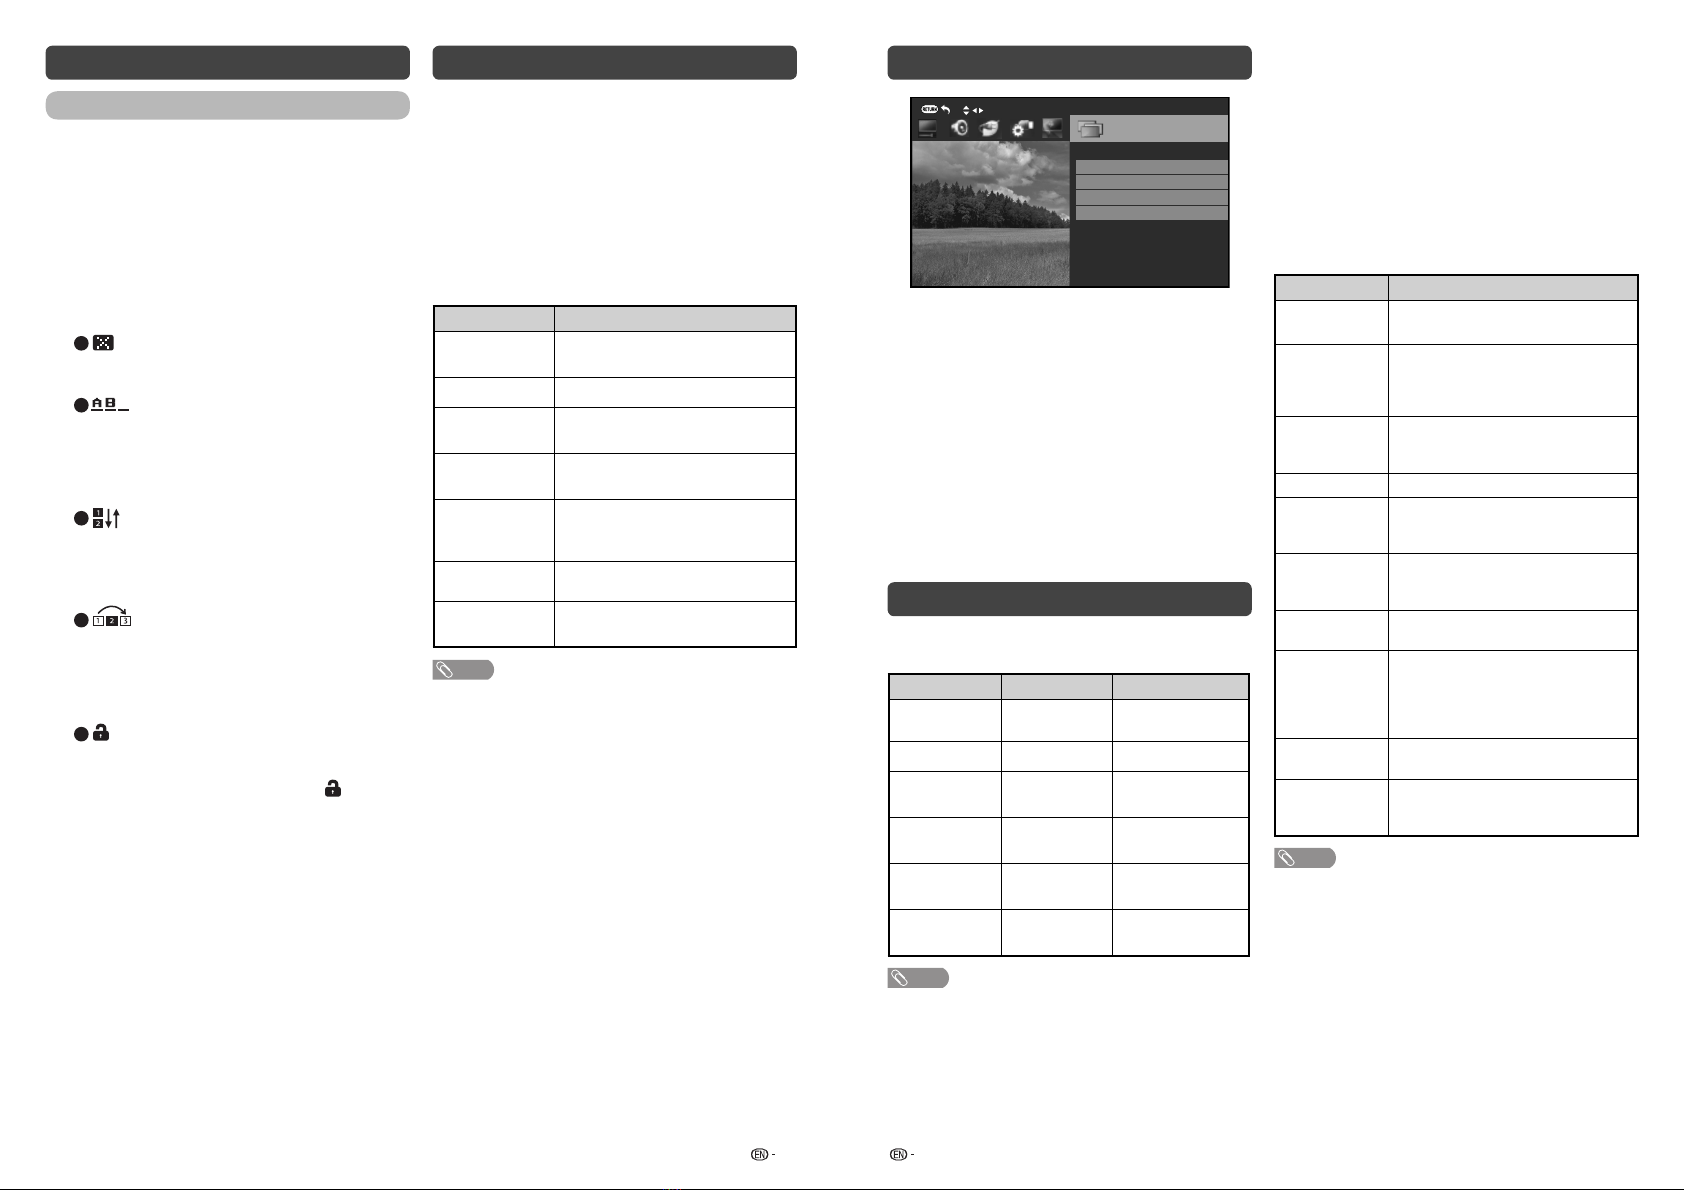
H4:3 mode (DTV input mode only)
The 4:3 mode allows you to select between “Full”
and “Normal”.
Selected item Description
Full Wide image without side bars.
Normal Normal range keeping 4:3 or 16:9
aspect ratio.
4:3 screen types
4:3 mode “Full” 4:3 mode “Normal”
Picture menu (Continued)
HEagle View*
“Eagle View” technology produces a sharp picture
from the original moving picture. (On, Off)
HAquoMotion Lite*
“AquoMotion Lite” technology provides superior
solutions for display picture quality removing motion
blur. (Advanced, High, Off)
*
NOTE
• This effect is greater on fast moving images.
• This function will have no effect in the following cases.
1)The type of signal received is a PC signal.
2)An OSD is being displayed.
3)Teletext is activated.
• If images appear blurred or flickering, set to “Off”.
Audio menu
HSound adjust
Selected item cbutton dbutton
Treble For weaker treble For stronger
treble
Bass For weaker bass For stronger
bass
Balance Decrease audio from
the right speaker
Decrease audio
from the left
speaker
HSurround
When you set to “On”, you can enjoy surround
sound, the same as if you were in a movie theatre.
(On, Off)
HBass enhancer
This function allows you to enjoy bass-enhanced
sound.
Selected item Description
On Bass enhancer function is on.
Off Outputs the normal sound.
NOTE
• For resetting all “Sound adjust” items to the factory preset
values, press a/bto select “Reset”, press ENTER, press
a/bto select “Yes”, and then press ENTER.
ECO menu
HNo signal off
You can set the TV to automatically power off in
about 15 minutes after the TV goes into a state of
receiving no programme signals. (Enable, Disable)
• Five minutes before the power shuts down, the remaining
time displays every minute.
NOTE
• When a TV programme finishes, and the TV receives signal
input, this function may not operate.
HNo operation off
You can set the TV to automatically power off when
no TV operation is performed for more than 3 hours.
(30 min., 3 hr., Disable)
• Five minutes before the power shuts down, the remaining
time displays every minute.
Setup menu
HChild lock (ATV and DTV input mode only)
Allows you to use a password to protect certain
settings from being accidentally changed.
Setting a password
1Repeat steps 1 and 2 in Menu operation.
2Press a/bto select “Child lock”, and then
press ENTER.
3If you have already set the password, enter it
here.
4Press a/bto select “Change password”, and
then press ENTER.
5Enter the 4-digit number as a password using
0 – 9.
6Enter the same 4-digit number as in step 5 to
confirm.
NOTE
• To view a locked channel, you must enter a password.
When you select a locked channel, “Child lock has been
activated” is displayed.
• Press ENTER to display the password input window.
2T-C45AD1X_H108_EN.indd 72T-C45AD1X_H108_EN.indd 7 6/26/2018 9:55:27 AM6/26/2018 9:55:27 AM

15 16
Setup menu (Continued)
Switching subtitle languages (DVB Subtitle)
Each time you press [on the remote control,
the subtitle switches when the broadcast contains
subtitle information.
Set “Hearing impaired” to “On”
(Hearing impaired) 1st language
2nd language
Off ••••••••
Set “Hearing impaired” to “Off”
1st language 2nd language
(Hearing impaired)
Off ••••
NOTE
• This function is valid only if broadcaster is transmitting
multilingual subtitles.
Time zone
This function enables you to select your local time
zone.
1Press MENU and the MENU screen displays.
2Press c/dto select “Setup”.
3Press a/bto select “Digital setup”, and then
press ENTER.
4Press a/bto select “Time zone”, and then
press ENTER.
5Press c/dto select the desired time zone.
NOTE
• This function lets you select the right time zone in case the
time displayed in the EPG does not match the local time of
your area.
• Time zone differ depending on the selected country.
HTime Setting
This function can display the time, data on screen
and channel’s timetable with updated time info.
1Press MENU and the MENU screen displays.
2Press c/dto select “Setup”.
3Press a/bto select “Time Setting”, and then
press ENTER.
4Press a/bto select the desired menu item,
and then press ENTER.
Setup menu (Continued)
HQuick start
When this function is activated, you can reduce
the TV’s start-up time or even let the TV in standby
mode start displaying images and so on via the
connected equipment on the network. (Off, On).
NOTE
• Setting “Quick start” to “On” consumes more power.
HLanguage
Select from among 11 languages: English, Simplified
Chinese, Arabic, French, Portuguese, Russian,
Persian, Thai, Vietnamese, Indonesia and Malay.
HText language
Select from among 5 kinds of language: West
Europe, East Europe, Cyrillic, Arabic and Farsi.
NOTE
• Teletext can display only when it is sent by a network. Not
used to convert between languages.
HDigital setup
Selecting the language
Set up to two preferred multi audio languages to
display if the audio languages are available.
1Press MENU and the MENU screen displays.
2Press c/dto select “Setup”.
3Press a/bto select “Digital setup”, and then
press ENTER.
4Press a/bto select “Digital audio language”,
and then press ENTER.
5Press a/bto select “1st language” or “2nd
language”.
6Press c/dto select the desired language.
NOTE
• If audio for the selected languages is not included in
a received broadcast, audio will not be output for that
language.
Audio description (DTV input mode only)
This function allows you to adjust volume output of
audio description if the TV receives a signal including
audio description.
1Press MENU and the MENU screen displays.
2Press c/dto select “Setup”.
3Press a/bto select “Digital setup”, and then
press ENTER.
4Press a/bto select “Audio description”, and
then press ENTER.
5Press c/dto select the volume.
Switching the multi audio languages
Each time you press AD/MPX on the remote control,
the audio language switches.
1st audio language 1st audio language
+AD (if available)
2nd audio language
+AD (if available) 2nd audio language
••••
NOTE
• This function is valid only if broadcaster is transmitting
audio description.
Displaying subtitles for the hearing impaired
You can display subtitles for the hearing impaired in
the Teletext broadcast if the subtitle languages are
available.
1Press MENU and the MENU screen displays.
2Press c/dto select “Setup”.
3Press a/bto select “Digital setup”, and then
press ENTER.
4Press a/bto select “Subtitle”, and then press
ENTER.
5Press a/bto select “1st language” or “2nd
language”.
6Press c/dto select the desired language.
NOTE
• If subtitles for the selected language are not included in
a received broadcast, subtitles will not be shown for that
language.
Time adjustment
This function allows you to set the clock manually.
NOTE
• If you select “On” in “Auto synchronization” the TV will try
to get the time for the broadcast. It will only be selectable
when “Auto synchronization” is set to “Off”.
• “Time zone” enables you to select your local time zone.
It will only be selectable when “Auto synchronization” is set
to “On”.
Time display
This function allows you to display the clock time in
the lower-right corner of the screen.
Selected item Description
Off Hides the clock time.
On Displays the clock time.
HIdentification
You can check the current version of the software on
the screen.
HReset
If complex adjustments are made and the settings
cannot be restored to normal, you can reset the
settings to the factory preset values.
NOTE
• If you execute “Reset”, all the settings such as “Picture”,
“Audio” and “Programme setup” will be reset to the factory
preset values.
2T-C45AD1X_H108_EN.indd 82T-C45AD1X_H108_EN.indd 8 6/26/2018 9:55:27 AM6/26/2018 9:55:27 AM

17 18
ATV/DTV/RADIO buttons
Use the following buttons on the remote control to
operate the menu.
ATV/DTV: Press to switch between ATV and DTV
mode. After switching from ATV or DTV, radio or
external input mode to ATV and DTV mode, the TV
jumps to the most recently viewed ATV and DTV
channel.
RADIO: Press to switch from DTV to radio mode.
The TV will jumps to the most recently tuned radio
channel.
When you watch the TV for the first time
When the TV powers on for the first time after
purchase, perform the auto installation.
ATV (Analogue TV)
You can run the auto installation to set channels
automatically.
1To watch the analogue TV, select “ATV” from
“Auto installation” in Programme setup menu.
(See page 9.)
2After setting the channels, you can select a
channel using CHr/sor 0–9on the remote
control unit. (See page 6.)
DTV (Digital TV)
When the TV accesses to DTV mode for the first
time, you need to run the auto search. To scan all
available services in your area, follow the procedures
below.
1To watch the DTV broadcasts, select “DTV”
from “Auto installation” in Programmme setup
menu. (See page 9.)
2After setting the channels, you can select a
channel using CHr/sor 0–9on the remote
control unit. (See page 6.)
Option menu
HAudio output select
You can select which device is used for outputting
audio.
Option Description
Headphone Output audio through headphones.
Audio out Output audio through an A/V receiver or
surround audio controller.
NOTE
• If you select “Headphone” when a cable is inserted in the
AUDIO output terminal, the TV speakers are muted and all
Audio menu items cannot be adjusted.
• If you select “Audio out”, sound via the AUDIO output
terminal is not adjustable and constantly outputs.
Regarding the headphone jack
• Use headphones with a stereo mini plug ( 3.5 mm).
• Be sure to unplug headphones from the jack when they
are not in use.
Volume display when headphones are plugged in
30
CAUTION
• AUDIO output terminal is also used for headphones.
Reduce the volume before using headphones.
Overwhelming sound may damage your hearing.
HAuto volume
Different sound sources, fairly often do not have the
same volume level, for example the changing from
movie to the advertisements. Auto volume solves this
problem and equalises the volume levels. (On, Off)
HDigital audio output
This function allows you to select your favourite
audio output system. (PCM, Auto, Off)
HSpeaker selection
You can choose to listen to the external amplifier
audio only. (On, Off)
NOTE
• This function only available when “Link operation” is set to
“On”.
• You need to use CEC compatible amplifier to control
external speaker volume.
HAudio only
When listening to music from a music programme,
you can set the display off and enjoy audio only.
Selected item Description
On Audio is output without screen image.
Off Both screen images and audio are
output.
NOTE
• When you make operations that change the picture on the
TV such as by changing the input source, the “Audio only”
function is set to “Off”.
HColour system
You can change the colour system to one that is
compatible with the image on the screen. (Auto,
PAL, SECAM, NTSC 3.58, NTSC 4.43, PAL-60)
NOTE
• If “Auto” is selected, colour system for each channel is
automatically set. If an image does not display clearly,
select another colour system (e.g. PAL, NTSC 4.43).
• “Colour system” is selectable only when inputting a
composite signal.
HDemo (store mode only)
When “Store mode” is set to “On”, after all the
settings are completed, the Feature demo screen is
displayed if there is no operation for 30 seconds.
HSystem data
USB data transfer
This function allows you to update the TV to the
latest software using a USB device. You must
update the software through the USB terminal.
Software update (OAD)
• This function is for automatically download the
data for the version update software over digital
broadcasts when the “OAD setup” is set to “On”.
• To download, follow the instructions when the
download message appears during a digital
broadcast.
• Once the software upgrade is done, the TV will
automatically go to standby state with Red LED.
OAD scan
• This function is for manually download the data for
the version update software over digital broadcasts.
CAUTION
• Do not disconnect the AC cord when the software
upgrade is in progress, as this may cause the
upgrade to fail. If problem arises ask a qualified
service personnel before the software upgrade
period expires.
Programme Guide
You can check the current channel list of DTV/ATV
respectively.
1Press GUIDE to display the programme
channel list.
2Press a/bto select your desired programme,
and then press ENTER.
3Press RETURN or GUIDE to exit.
Info
While watching DTV you can check the extended
programme information on the screen using INFO
on the remote control.
General INFO screen
• Station name
• Title
• Date
• Time for the current programme
• Video system
• Audio system
• Parental rating
NOTE
• If there is more information, pressing a/ballows you to
go to the next page or return to the previous page.
• You can cancel this info by pressing INFO.
2T-C45AD1X_H108_EN.indd 92T-C45AD1X_H108_EN.indd 9 6/26/2018 9:55:27 AM6/26/2018 9:55:27 AM

19 20
Teletext function
What is Teletext?
Teletext broadcasts pages of information and
entertainment to specially equipped television sets.
News, weather reports, sports information, stock
exchange prices and programme previews are
among the many services available.
Turning on and off Teletext
1Select a TV channel or external input source
providing the Teletext programme.
2Press mto display the Teletext.
3Each time you press m, the screen switches
as shown below.
TELETEXT
TELETEXT
NOTE
• If you select a programme with no Teletext signal,
“No Teletext available.” is displayed.
• The same message displays during other modes if
no Teletext signal is available.
Button functions
Buttons Description
CH (r/s)Increase or decrease the page number.
Colour (Red/
Green/
Yellow/Blue)
You can select a group or block of
pages displayed in the coloured brackets
at the bottom of the screen by pressing
the corresponding Colour (Red/Green/
Yellow/Blue) on the remote control
unit.
0 – 9 Directly select any page from 100 to 899
by using 0 – 9.
k(Reveal
hidden for
TELETEXT)
To reveal hidden information such as an
answer to a quiz.
3(Hold) To stop updating Teletext pages
automatically or release the hold mode.
[(Subtitle
for
TELETEXT)
Display the subtitle during Teletext page.
• Subtitle will not be displayed when the
service does not contain subtitle information.
NOTE
• Teletext can display only when it is sent by a network. Not
used to convert between languages.
EPG (Continued)
Cancelling the reminder timer setting
1Press EPG.
2Press Yto display the reminder schedule list.
3Press a/bto select a programme you want to
cancel.
4Press Rto delete a programme from reminder
list.
5Press RETURN or EPG to exit.
SUPER ECO mode
This function enables you to reduce the backlight
brightness in order to decrease the power
consumption and increase the backlight life span as
shown in the following table.
Selected item Description
SUPER ECO
ON
Reduces the backlight brightness.
SUPER ECO
OFF
Normal setting of backlight brightness.
SUPER ECO status will be displayed on the channel
information window.
Colour adjustment and still image
Allows you to adjust the colour tone of a still image.
1Press COLOUR ADJ. (FREEZE), the moving
image will be captured and colour adjustment
screen displays.
2Press a/b/c/dto adjust the colour to your
desired setting.
Button Description
aWhite with greenish tone.
bWhite with reddish tone.
cWhite with bluish tone.
dWhite with yellowish tone.
RReveal/hide the setting screen.
GSet adjustment to last user setting.
BClose the setting screen and unfreeze
image.
ENTER Save/exit setting.
NOTE
• The colour adjustment screen and still image will
automatically goes out after 30 minutes.
• Freeze/Colour adjustment function does not work in USB
Photo/Movie playback. It works for HDMI and composite.
EPG
What is an EPG?
An “EPG (Electronic Programme Guide)” is a
programme schedule, which is displayed on the TV
screen. The EPG is broadcasted together with DTV.
The TV screen shows the EPG when the viewer
presses EPG on the remote control, provided that
the TV is receiving the digital broadcasting signal.
The EPG enables you to search for a programme, do
timer view the programme schedule in detail.
Basic Operation
HDisplay the EPG screen
1 Press EPG.
2 Press ato select PROGRAMME GUIDE/TIME.
3 Press c/dto select the desired channel/time
span.
HClose the EPG screen
4 Press EPG again or RETURN to exit.
Reminder timer setting
You can schedule a reminder for future programmes.
Channel will automatically change on time as
scheduled.
1Press EPG.
2Press a/bto select the programme you want
to watch.
3Press Bto set reminder time.
4Press ENTER to save reminder timer.
• “Timer save success” will display.
NOTE
• “Timer overlay” will display if same time is set twice.
• “Timer past” will display if past time is set.
5Press ENTER to display the reminder schedule
list.
6Press RETURN or EPG to exit.
Viewing the reminder schedule list
1Press EPG.
2Press Yto display the reminder schedule list.
3Press a/bto display next or previous screen.
4Press RETURN or EPG to exit.
Switching the analogue audio format
You can switch between multiple audio modes
when watching a multiple audio or stereo broadcast
programme.
In the NICAM TV broadcasts
When receiving a stereo signal
Each time you press AD/MPX, the mode switches
between NICAM STEREO and MONO.
Stereo mode
MONONICAM STEREO
When receiving a bilingual signal
Each time you press AD/MPX, the mode switches
among NICAM CH A, NICAM CH B, NICAM CH AB
and MONO.
Bilingual mode
NICAM CH A
MONO
NICAM CH B
NICAM CH AB
When receiving a monaural signal
Each time you press AD/MPX, the mode switches
between NICAM MONO and MONO.
Monaural mode
NICAM MONO MONO
In the TV mode of A2 TV broadcasts
When receiving a stereo signal
Each time you press AD/MPX, the mode switches
between STEREO and MONO.
Stereo mode
STEREO MONO
When receiving a bilingual signal
Each time you press AD/MPX, the mode switches
among CH A, CH B and CH AB.
Bilingual mode
CH A CH B
CH AB
When receiving a monaural signal
When you press AD/MPX, “MONO” displays.
Monaural mode
MONO
2T-C45AD1X_H108_EN.indd 102T-C45AD1X_H108_EN.indd 10 6/26/2018 9:55:28 AM6/26/2018 9:55:28 AM

21 22
PHOTO slideshow
C:\Photo 1/2
Back
Fireworks.jpg
Switzerland.jpg Japan-hokkaid.. Island.jpgSki Action.jpg
WxH:
1300 X 822
Size:
789 KBytes
Date:
2011 / 08 / 04
Time:
10 : 12 :12
Ski Action.jpg
When you press PHOTO, the TV screen will
automatically play the photo slideshow.
• If there is no USB drive, the TV will switch to Selecting
modes screen.
• Photo slideshows will autoplay only for the photos located
on the top layer of USB drive. To enable autoplay for
photos located in a subfolder, you need to manually select
the subfolder, and then press PHOTO.
You can select the duration for each photo to
display, and also the duration for the slideshow to
play.
Duration for photos to display
1 minute10 seconds5 seconds3 seconds
Duration for slideshow to play
Continuous3 hour1 hour
• The TV will automatically power off after the
selected playtime ends.
NOTE
• Background music will autoplay during a slideshow only if
the music file is located in the same folder with the photo
files.
• If you want to stop the photo slideshows, press RETURN
to exit.
USB Media Player (Continued)
Control panel for photo/music/movie mode operations
• Press Bto display the control panel below.
Button/menu Description Photo Music Movie
ENTER
When selecting a folder icon: Enter this
directory.
When selecting a thumbnail: Play the selected
file.
Play/Pause.
Rewind. Each time you press rewind, the speed
will change (2x, 4x, 8x, 16x). –
Fast-forward. Each time you press fast-forward,
the speed will change (2x, 4x, 8x, 16x). –
Play the previous file.
Play the next file.
RETURN/
Stop playback and return to the list of files.
Loop. Each time you press ENTER,
the mode will switch between
Repeat NoneRepeat AllRepeat 1
Play/cancel the background music. ––
Mute. Press ENTER to toggle between mute
and unmute. ––
Two loop. Press ENTER to set the current
playback time starting point. Press ENTER to
set the loop end of the current playing time and
start loop playback. Press ENTER button to
cancel the loop.
––
Show playlists. Select a file from the playlists to
start playback.
Display information about the file.
Slow-forward.
Each time you press slow-forward, the speed
will change.
––
Single frame-forward.
Each time you press ENTER, the picture will
change to the next still picture.
––
Set time for music/movie playback. –
Rotate clockwise 90º. ––
Rotate counterclockwise 90º. ––
Zoom in an image. Select to display larger
image size. –
Zoom out an image. Select to display smaller
image size. –
Pan image up, down, left or right after you
zoom in. Press ENTER to exit. –
Select playback length of a slideshow. ––
Select photo display interval. ––
Wide mode.
You can manually select the size of a picture
appeared on your screen.
––
NOTE
• Files in folder which are not related to a selected mode cannot be accessed.
• “Unsupported file” alert will pops up for a selected file of invalid format.
USB Media Player
HSelecting modes
Photo mode Music mode Movie mode
USB
1Press INPUT to select the “USB” mode.
2Press c/dto select “Photo mode”, “Music
mode” or “Movie mode”, and then press
ENTER.
3Press c/dto select your USB directory, and
then press ENTER.
4Press a/b/c/dto select the desired folder,
and then press ENTER.
NOTE
• “Wide mode” is fixed during “Photo mode” and “Music
mode”.
• Depending on the USB device, the TV may not be able to
recognise the contained data.
• A file name with more than 10 characters may not be
displayed all (depending on the character set).
• Files in USB 1.1 devices may not be played properly.
• Operation using USB hubs is not guaranteed.
• The compatibility of USB HDDs may not be guaranteed.
• USB only support device up to DC5V 1.5A.
2T-C45AD1X_H108_EN.indd 112T-C45AD1X_H108_EN.indd 11 6/26/2018 9:55:28 AM6/26/2018 9:55:28 AM

23 24
USB Media Player (Continued)
List of files compatible with USB mode
USB device/File system USB Memory / FAT/FAT32 / NTFS**
Photo file format JPEG (.jpg)/PNG/BMP
Music file format (Files may not be
playable depending on the bitrate)
MP3 (.mp3) Bitrate: 32 k, 40 k, 48 k, 56 k, 64 k, 80 k, 96 k, 112 k, 128 k,
160 k, 192 k, 224 k, 256 k, 320 kbps
Sampling frequency: 32 k, 44.1 k, 48 kHz
Video file format
File extension Container Video Audio
*.avi AVI
H.264
MPEG4
Motion Jpeg
Dolby Digital Plus
LPCM
ADPCM
Dolby Digital
*.mkv MKV H.264
MPEG4
Dolby Digital Plus
MPEG
Dolby Digital
*.mp4
*.mov MP4 H.264
MPEG4
Dolby Digital Plus
MPEG
Dolby Digital
*.vob MPEG2 – PS MPEG2 LPCM
Dolby Digital
*.mpg/*.mpeg MPG
MPEG
MPEG2
MPEG1
LPCM
MPEG
Dolby Digital
*.ts/*.trp/*.tp TS H.264
MPEG2
Dolby Digital Plus
LPCM
MPEG
Dolby Digital
** Not guarantee for all devices.
Appendix
Troubleshooting
The problems described below are not always caused by malfunctions. Check the TV again before having the
TV serviced.
Problem Possible Solution
• No power. • Check if you pressed POWER on the remote control unit. (See page 8.)
If the indicator on the TV lights up red, press POWER.
• Is the AC cord disconnected?
• Has the power been turned on? (See page 8.)
• Unit cannot be
operated.
• External influences such as lightning, static electricity, etc., may cause improper operation. In
this case, operate the unit after first turning the power off the TV or unplugging the AC cord
and re-plugging it in after 1 or 2 minutes.
• Remote control unit
does not operate.
• Is battery inserted with polarity (e, f) aligned? (See page 7.)
• Is battery worn out? (Replace with new battery.)
• Are you using it under strong or fluorescent lighting?
• Is a fluorescent light shining on the remote control sensor?
• Picture is cut off. • Are screen mode adjustments such as picture size made correctly? (See page 12.)
• Strange colour, light
colour, or dark, or colour
misalignment.
• Adjust the picture tone. (See page 12.)
• Is the room too bright? The picture may look dark in a room that is too bright.
• Check the colour system setting. (See pages 10 and 17.)
• Check the HDMI auto view setting. (See page 14.)
• Power is suddenly
turned off.
• The unit’s internal temperature has increased.
Remove any objects blocking the vent or clean.
• Check the ECO setting. (See page 13.)
• Is the sleep timer set? (See page 6.)
• No picture. • Is the connection to external equipment correct? (See pages 4 and 5.)
• Is the correct input selected?
• Is the “Picture adjust” correct? (See page 12.)
• Is the antenna connected properly? (See page 4.)
• Is “On” selected in “Audio only”? (See page 17.)
• No sound. • Is the volume too low? (See page 6.)
• Make sure that headphones are not connected.
• The TV sometimes
makes a cracking
sound.
• This is not a malfunction. This happens when the cabinet slightly expands and contracts
according to changes in temperature. This does not affect the TV’s performance.
Cautions regarding use in high and low temperature environments
• When the unit is used in a low temperature space (e.g. room, office), the picture may leave trails or appear slightly
delayed. This is not a malfunction, and the unit will recover when the temperature returns to normal.
• Do not leave the unit in a hot or cold location. Also, do not leave the unit in a location exposed to direct sunlight or near
a heater, as this may cause the cabinet to deform and the LCD panel to malfunction.
Storage temperature: f20°C to e60°C.
Clearing the password
If you forget the password, clear the password using the following procedure.
1Press MENU to display the MENU screen, and then press c/dto select “Setup”.
2Press a/bto select “Child lock”, and then press ENTER and the password input screen display.
3If you enter “3001” using 0 – 9, the “Child lock” setting menu will be displayed.
4Enter the 4-digit number as a password using 0 – 9. The new password is now set.
2T-C45AD1X_H108_EN.indd 122T-C45AD1X_H108_EN.indd 12 6/26/2018 9:55:28 AM6/26/2018 9:55:28 AM

25
Specifications
Item Model 2T-C45AD1X
LCD panel 113 cm
Resolution 2,073,600 pixels (1920 g1080)
Video colour system PAL/SECAM/NTSC 3.58/NTSC 4.43/PAL 60
TV function TV-standard Analogue PAL: B/G, D/K, I SECAM: B/G, D/K, K/K1NTSC: M
Digital DVB-T2
Receiving
channel
VHF/UHF 44.25—863.25 MHz
CATV S1—S41 ch (including Hyperband)
TV-tuning system Auto Preset 99 ch
STEREO/BILINGUAL NICAM: B/G, I, D/K A2 stereo: B/G MTS: M
Viewing angles H : 178º V : 178º
Audio amplifier/Speakers
10 W g2 / 5 g9 cm 2pcs
Terminals Antenna input UHF/VHF 75 qDIN type
SERVICE ONLY 3.5 mm jack
HDMI 1 (HDMI/ARC) HDMI input
HDMI 2 (HDMI) HDMI input
INPUT 3 VIDEO in, AUDIO in
AUDIO OUT AUDIO out, Headphone ( 3.5 mm stereo)
USB USB (DC5V 1.5A output)
OSD language English/Simplified Chinese/Arabic/French/Portuguese/Russian/Persian/
Thai/Vietnamese/Indonesia/Malay
Power requirement AC 110 — 240 V, 50/60 Hz
Power consumption 100 W (0.5 W Standby)
Dimensions without stand 1014 (W) g581 (H) g64 (D) mm
with stand 1014 (W) g622 (H) g230 (D) mm
Weight without stand (with stand) 9.0 kg (9.5 kg)
Operating temperature 0°C — 40°C
• As a part of policy of continuous improvement, SHARP reserves the right to make design and specification changes for
product improvement without prior notice. The performance specification figures indicated are nominal values of production
units. There may be some deviations from these values in individual units.
• Specification may differ depending on the selected country.
CAUTION
• Installing the Liquid Crystal Television requires special skill that should only be performed by qualified service personnel.
Customers should not attempt to do the work themselves. SHARP bears no responsibility for improper mounting or
mounting that results in accident or injury.
• Carefully read the instructions that come with the bracket before beginning work.
2T-C45AD1X_H108_EN.indd 132T-C45AD1X_H108_EN.indd 13 6/26/2018 9:55:28 AM6/26/2018 9:55:28 AM
Table of contents
Other Sharp LED TV manuals

Sharp
Sharp LC-32LE260M User manual

Sharp
Sharp LC-40LB480U User manual

Sharp
Sharp LC-60C6500U User manual

Sharp
Sharp LC-50LE275X Installation manual

Sharp
Sharp LC-32CFF5221E User manual

Sharp
Sharp LC-55CUG8052K User manual

Sharp
Sharp LC-65CUG8052K User manual

Sharp
Sharp LC-19LE510E User manual

Sharp
Sharp 32FE2E User manual

Sharp
Sharp 70DN5 User manual

Sharp
Sharp 43BJ5 User manual

Sharp
Sharp AQUOS 4T-C60AL1X Manual

Sharp
Sharp LC-32CHE5111K User manual

Sharp
Sharp AQUOS 4T-C65FV1U Manual

Sharp
Sharp LC-43CUG8461KS User manual

Sharp
Sharp 32EA2K Technical manual

Sharp
Sharp LC-24CFG6131KM User manual

Sharp
Sharp Aquos LC-40LU630E User manual

Sharp
Sharp 4T-C70DK1X User manual

Sharp
Sharp Aquos LC-70LE951X User manual