Sharp R224HW Use and care manual

R224HW
Microwave Oven
OPERATION MANUAL WITH COOKING GUIDE
Read all instructions carefully before using the oven.


1
FOR LOCATION ENQUIRIES WITHIN
AUSTRALIA
REGARDING YOUR LOCAL
SHARP APPROVED SERVICE CENTRE
VISIT OUR WEBSITE AT
www.sharp.net.au
OR CALL SHARP CUSTOMER CARE
1300 135 022
SHARP CORPORATION OF AUSTRALIA PTY LTD
(LOCAL CALL COST APPLY WITHIN AUSTRALIA)
FOR LOCATION ENQUIRIES WITHIN
NEW ZEALAND
REGARDING YOUR LOCAL
SHARP CORPORATION OF NEW ZEALAND LIMITED
VISIT OUR WEBSITE AT
SHARP CUSTOMER SERVICES
TELEPHONE: 09 573 0111
FACSIMILE: 09 573 0113
SHARP APPROVED SERVICE CENTRE
www.sharp.net.nz
CONTACT YOUR SELLING DEALER/RETAILER
OR CALL
IMPORTANT NOTICE: This warranty applies only to products sold in Australia & New Zealand
Congratulations on Your Purchase!
This Sharp product is warranted against faults in material and manufacture for the period as
stated in the table below.
If service is required during the warranty period, please contact your nearest Sharp Approved
Service Centre. These repairs would be carried out at no charge to the owner, subject to the
conditions specified herein.
This warranty does not extend to defects or injuries caused by or resulting from causes not
attributable to faulty parts or the manufacture of the product, including but not limited to, defect
or injury caused by or resulting from misuse, abuse, neglect, lack of maintenance, accidental
damage, improper voltage, liquid spillage, vermin infestation, software, or any alterations made
to the product which are not authorised by Sharp.
Please retain your sales documentation, as this should be produced to validate a warranty claim.
This warranty is in addition to and in no way limits, varies or excludes any implied rights and
remedies under any relevant legislation in the country of sale.
WARRANTY PERIODS
Home Theatre Projector 12 months
Audio/Home Theatre 12 months
Microwave Oven 12 months
Steam Oven 12 months
Refrigerator 24 months
DVD/Blu-ray 12 months
Air Conditioner 60 months
Portable Air Conditioner 12 months
LCD Television 36 months
Air Purifier 12 months
SHARP CORPORATION OF
AUSTRALIA PTY. L IMITED
ABN 40 003 039 405
SHARP CORPORATION OF
NEW ZEALAND LIMITED
59 Hugo Johnston Drive
Penrose, Auckland
WARRANTY
Consumer Electronic Products
Australian customers: Our goods come with guarantees that cannot be excluded under the
Australian Consumer Law. You are entitled to a replacement or refund for a major failure and
for compensation for any other reasonably foreseeable loss or damage. You are also entitled
to have the goods repaired or replaced if the goods fail to be of acceptable quality and the
failure does not amount to a major failure. The criteria of a major failure is defined in the
Australian Consumer Law. Should you require any assistance with a major failure
please contact Sharp Customer Care.
This warranty does not cover transportation to and from the Sharp Approved Service Centre.
Goods presented for repair may be replaced by refurbished goods of the same type rather than
being repaired. Refurbished parts may be used to repair the goods. The repair of your goods
may result in the loss of user generated data, please ensure that you have saved this data
elsewhere prior to repair.
(excluding lamps and air filters)
2 JULIUS AVENUE,
NORTH RYDE NSW 2113

GB-2
SPECIFICATIONS
CONTENTS
INFORMATION ON PROPER DISPOSAL ...................................................................................................................................... 1
CONTENTS ........................................................................................................................................................................................... 2
SPECIFICATIONS ................................................................................................................................................................................ 2
OVEN AND ACCESSORIES ..............................................................................................................................................................3
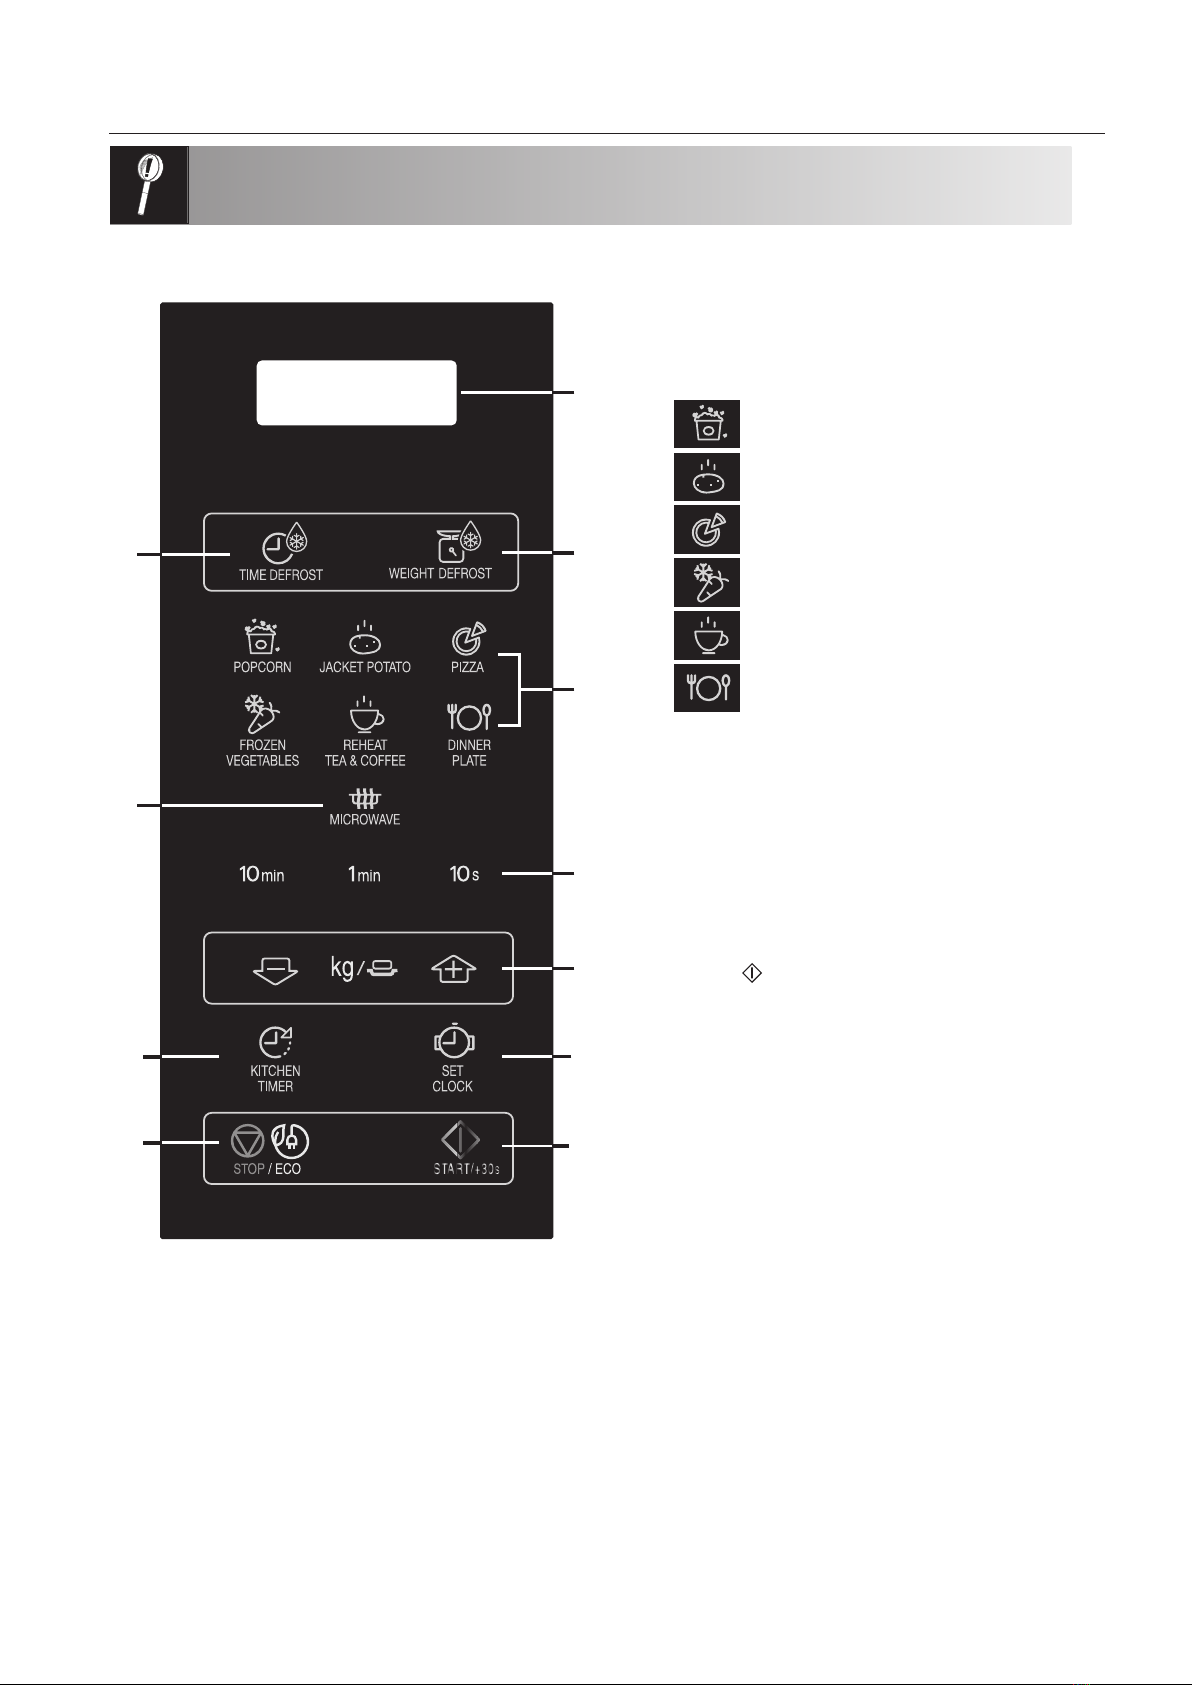
CONTROL PANEL ...............................................................................................................................................................................4
IMPORTANT SAFETY INSTRUCTIONS ..................................................................................................................................... 5-15
INSTALLATION .................................................................................................................................................................................. 16
BEFORE OPERATION ...................................................................................................................................................................... 1
SETTING THE CLOCK.......................................................................................................................................................................18
MICROWAVE POWER LEVEL ........................................................................................................................................................18
MANUAL OPERATION .................................................................................................................................................................... 19
MICROWAVE COOKING .................................................................................................................................................................19
OTHER CONVENIENT FUNCTIONS ............................................................................................................................................20
TIME DEFROST AND WEIGHT DEFROST OPERATION ..........................................................................................................21
AUTO MENU OPERATION .............................................................................................................................................................21
AUTO MENU CHART .......................................................................................................................................................................22
SUITABLE OVENWARE ....................................................................................................................................................................23
CARE AND CLEANING .................................................................................................................................................................... 4
Operation manual
Model name: R-242 R-342
AC Line Voltage : 230 V, 50 Hz single phase : 230 V, 50 Hz single phase
Distribution line fuse/circuit breaker : 10 A : 10 A
AC Power required: Microwave : 1270 W : 1450 W
Output power: Microwave : 800 W : 900 W
O Mode (Energy Save Mode) : less than 1.0 W : less than 1.0 W
Microwave Frequency : 2450 MHz* : 2450 MHz*
Outside Dimensions (W) x (H) x (D) mm : 439,5 x 257,8 x 358,5 : 513,0 x 306,2 x 429,5
Cavity Dimensions (W) x (H) x (D)** mm : 306,0 x 208,2 x 306,6 : 330,0 x 208,0 x 369,0
Oven Capacity : 20 litres** : 25 litres**
Turntable : ø 255 mm : ø 315 mm
Weight : approx. 10,90 kg : approx. 14,85 kg
Oven lamp : 25 W/240 V : 25 W/240 V
* This Product fulls the requirement of the European standard EN55011.
In conformity with this standard, this product is classied as group 2 class B equipment.
Group 2 means that the equipment intentionally generates radio-frequency energy in the form of electromagnetic
radiation for the heat treatment of food.
Class B equipment means that the equipment is suitable to be used in domestic establishments.
** Internal capacity is calculated by measuring maximum width, depth and height. Actual capacity for holding food is
less.
AS PART OF A POLICY OF CONTINUOUS IMPROVEMENT, WE RESERVE THE RIGHT TO ALTER DESIGN AND
SPECIFICATIONS WITHOUT NOTICE.
2
7
EN-2EN-2
Model name: EM923A2CQ-P00E00
ACLineVoltage : 230 V,50 Hz single phase
Distribution linefuse/circuitbreaker:10 A
ACPower required:Microwave:1450 W
Outputpower:Microwave:900 W
Standby : < 1,0W
Energy SaveMode:< 0,5W
MicrowaveFrequency : 2450 MHz*
OutsideDimensions(W)x(H)x(D)mm :485 x405 x293
Cavity Dimensions(W)x(H)x(D)** mm :3
Oven Capacity : 23 litres**
Turntable:ø270 mm
Weight:approx.
Oven lamp :25 W
13.54 kg
14 X 347 X
221

IMPORTANT SAFETY INSTRUCTIONS
IMPORTANT SAFETY INSTRUCTIONS : READ CAREFULLY AND KEEP FOR FUTURE REFERENCE.
1. This oven is designed to be used on a benchtop, on a shelf or built-in with a Sharp built-in kit (not
available in all countries). We do not recommend installing the oven under the benchtop or any other
appliances. The appliance must not be placed in a cupboard. See page 5 for the installation.
Place or mount the oven so that the bottom of the oven is 85 cm or more above the floor.
2. Ensure there is a minimum of free space above the oven of 15 cm. See page 5 for the other
necessary spaces.
3. This appliance is intended to be used in household and similar applications such as:
• staff kitchen areas in shops, offices and other working environments;
• farm houses;
• by clients in hotels, motels and other residential environments;
• bed and breakfast type environments
It is not suitable for commercial or laboratory use.
4. The microwave oven is intended for heating food and beverages. Drying of food or clothing and
heating of warming pads, therapeutic devices (eg. wheat bags), slippers, sponges, damp cloth and
similar may lead to risk of injury, ignition or fire.
5. This appliance is not intended for use by persons (including children) with reduced physical, sensory
or mental capabilities, or lack of experience and knowledge, unless they have been given supervision
or instruction concerning use of the appliance by a person responsible for their safety.
6. Children should be supervised to ensure that they do not play with the appliance.
7. WARNING: Only allow children to use the oven without supervision when adequate instructions have
been given so that the child is able to use the oven in a safe way and understands the hazards of
improper use.
8. WARNING: If the door or door seals are damaged, the oven must not be operated until it has been
repaired by an authorised SHARP service agent or microwave technician.
9. WARNING: Never adjust, repair or modify the oven yourself. It is hazardous for anyone other than an
authorised SHARP service agent or microwave technician to carry out any service or repair operation
which involves the removal of a cover which gives protection against exposure to microwave energy.
10. If the power supply cord of this appliance is damaged, it must be replaced by a service centre
approved by SHARP in order to avoid a hazard.
11. WARNING: Liquids and other foods must not be heated in sealed containers since they are liable to
explode.
12. Microwave heating of beverages can result in delayed eruptive boiling, therefore care must be taken
when handling the container.
13. Eggs in their shell and whole hard-boiled eggs should not be heated on microwave modes since they
may explode, even after microwave heating has ended. To cook or reheat eggs which have not been
scrambled or mixed, pierce the yolks and the whites, or the eggs may explode. Shell and slice hard
boiled eggs before reheating them in the microwave oven.
14. Utensils should be checked to ensure that they are suitable for use in the oven. See Page 2. Use
only microwave safe containers and utensils on microwave modes.
15. Metallic containers for food and beverages are not allowed during microwave modes.
16. The contents of feeding bottles and baby food jars must be stirred or shaken and the temperature
checked before consumption, in order to avoid burns.
17. When heating food in plastic or paper containers, keep an eye on the oven due to the possibility of
ignition.
18. If smoke is observed, switch off or unplug the appliance and keep the door closed in order to stifle
any flames.
19. The oven should be cleaned regularly and any food deposits removed.
20. Cleaning and user maintenance shall not be performed by children without supervision.
21. Failure to maintain the oven in a clean condition could lead to deterioration of the surface that could
adversely affect the life of the appliance and possibly result in a hazardous situation.
22. The appliance must not be cleaned with a steam cleaner.
23. See instructions for cleaning door seals, cavities and adjacent parts on page 19.
24. Handle with care when removing items from the oven so that the turntable does not displace.
2

Other warnings
1. To reduce the risk of fire in the oven cavity:
a. Do not overcook food.
b. Remove wire twist-ties from paper or plastic bags before placing bag in the oven.
c. Do not heat oil or fat for deep frying. The temperature of the oil cannot be controlled.
2. To reduce the risk of an explosion or delayed eruptive boiling, care should be taken when handling the
container. Your oven is capable of heating food and beverages very quickly with microwaves, therefore it
is very important that you select the appropriate cooking time and power level for the type and quantity
of food to be heated. If you are unsure of the cooking time and power level required, begin with low cooking
times and power levels until the food is sufficiently heated evenly throughout.
Additionally:
a. Do not place sealed containers in the oven. Baby bottles fitted with a screw cap or teat are considered
to be sealed containers.
b. Do not use excessive amounts of time.
c. When boiling liquids in the oven, use a wide-mouthed container.
d. Stand at least for 20 seconds at the end of cooking to avoid delayed eruptive boiling of liquids.
e. Stir the liquid before and during cooking. Use extreme care when handling the container or inserting
a spoon or other utensil into the container.
3. Never operate the oven whilst any object is caught or jammed between the door and the oven.
4. Handle with care when removing items from the oven so that the utensil, your clothes or accessories do
not touch the latches.
5. Never poke an object, particularly a metal object, through a grille or between the door and the oven while
the oven is operating.
6. Never tamper with or deactivate the door safety latches.
7. Always use oven gloves to prevent burns when handling utensils that are in contact with hot food. Enough
heat from the food can transfer through utensils to cause skin burns.
8. If the oven lamp fails please consult your dealer or a qualified service technician trained by SHARP.
9. Avoid steam burns by directing steam away from the face and hands. Slowly lift the furthest edge of a dish’s
cover including microwave plastic wrap etc., and carefully open popcorn and oven cooking bags away
from the face.
10. Make sure that the power supply cord is undamaged, and that it does not run under the oven or over any
hot surfaces or sharp edges.
11. To prevent the turntable from breaking:
a. Before cleaning the turntable with water, leave the turntable to cool.
b. Do not place anything hot on a cold turntable.
c. Do not place anything cold on a hot turntable.
12. Do not place anything on the outer cabinet.
13. Do not store food or any other items inside the oven.
14. Make sure the utensil does not touch the interior walls during cooking.
.
This product should not be disposed of in a general waste bin as it contains materials that
which is good for the environment.
If you are in doubt about the correct disposal method, contact your local council.
Information on Disposal
should be recycled,
3
extremely hot if utensil stops rotating.
15. Ensure handles of utensils do not touch walls when turntables rotate. Take care as handles may become

* Puncture egg yolks and whites and
oysters before cooking to prevent
"explosion".
* Pierce skins of potatoes, apples,
squash, hot dogs, sausages and
oysters so that steam escapes.
* Use specially bagged popcorn for the
microwave oven.
* Listen while popping corn for the
popping to slow to 1-2 seconds.
* Transfer baby food to small dish and
heat carefully, stirring often. Check for
suitable temperature to prevent burns.
* Remove the screw cap and teat
before warming baby bottles. After
warming shake thoroughly. Check for
suitable temperature.
* Food with filling should be cut after
heating, to release steam and avoid
burns.
* Use a deep microwave safe glass
bowl when cooking liquids or cereals
to prevent boiling over.
*For boiling or cooking liquids see
IMPORTANT SAFETY
INSTRUCTIONS on page 2 to prevent
explosion and delayed eruptive boiling.
* Remove food from can.
* Cook for the recommended time.
(These foods have high sugar and/or
fat contents.)
* Use a microwave proof roasting rack
to collect drained juices.
* Check the utensils are suitable for
MICROWAVE cooking before you use
them.
* Use to shield food to prevent over
cooking.
* Watch for sparking. Reduce foil or
keep clear of cavity walls.
* Place a suitable insulator such as a
microwave and heat proof dinner plate
between the turntable and the
browning dish.
*
Cook eggs in shells. This can cause the
egg to "explode", which may damage
the oven or cause injury to yourself.
* Cook hard/soft boiled eggs.
* Overcook oysters.
* Dry nuts or seeds in shells.
* Pop popcorn in regular brown bags or
microwave safe glass bowls.
* Exceed maximum time on popcorn
package.
* Heat disposable bottles.
* Overheat baby bottles.
Only heat until warm.
* Heat bottles with teats on.
* Heat baby food in original jars.
* Heat or cook in closed glass jars or air
tight containers.
* Deep fry fat.
*Heat or dry wood, herbs, wet papers,
clothes or flowers.
*Operate the oven without a load (i.e. an
absorbing material such as food or wa-
ter) in the oven cavity.
*Heat for longer than recommended
time. See REHEATING-FOOD CHART
on page .
* Heat or cook food while in cans.
* Overcook as they may catch fire.
*Place meat directly on the turntable for
cooking.
* Use metal utensils for MICROWAVE
cooking. Metal reflects microwave
energy and may cause an electrical
discharge known as arcing.
* Use too much.
* Shield food close to cavity walls.
Sparking can damage the cavity.
* Exceed the preheating time recom-
mended by the manufacturer. Exces-
sive preheating can cause the glass
turntable to shatter and/or damage
internal parts of the oven.
SPECIAL NOTES AND WARNINGS
DO DON’T
Eggs, fruits,
nuts, seeds,
vegetables,
sausages and
oysters
Popcorn
Baby food
General
Liquids
(Beverages)
Canned foods
Sausage rolls,
pudding
Meats
Utensils
Aluminium foil
Browning dish
pies, Christmas
4

OVEN DIAGRAM
1. Door open button
2. Oven lamp
3. Door hinges
4. Door safety latches
5. See through door
6. Door seals and sealing surfaces
7. Coupling
8. Waveguide cover (Do not remove)
9. Control panel (See page 6)
10. LED Display
11. Ventilation openings
12. Power supply cord
13. Turntable
14. Roller stay
INSTALLATION INSTRUCTIONS
1. Remove all packing materials from the oven cavity, (do not remove the waveguide cover), and the feature
sticker from the outside of the door, if there is one. Check the unit for any damage, such as a misaligned door,
damaged door seals around the door or dents inside the oven cavity or on the door. If there is any damage,
please do not operate the oven until it has been checked by a SERVICE CENTRE APPROVED BY SHARP
and repaired, if necessary.
2. Accessories provided
1) Turntable 2) Roller stay 3) Operation manual and Cook book
3. Place the roller stay in the coupling on the oven floor, then place the turntable on to the roller stay, ensuring
it is located firmly. Refer to OVEN DIAGRAM below. NEVER operate the oven without the roller stay and
turntable.
4. This oven is designed to be used on a benchtop, on a shelf or built-in (not available in all countries). The
appliance must not be placed in acupboard. It should not be installed in any area where heat and steam are
generated, for example, next to a conventional oven unit. The oven should be installed so as not to block
ventilation openings. When the oven is mounted on a kitchen benchtop, allow a space of at least 15cm on the
top, 10cm on both sides and 5cm at the rear of the oven for adequate air circulation. When installing on a shelf,
the minimum dimension of the shelf should be 720mm(W) x 465mm(H) x 460mm(D).
Do not build-in the appliance under the benchtop or any other appliances.
If the oven is to be positioned near a conventional oven, ensure that adequate space is allowed, and a suitable
heat shield is incorporated between the two to prevent damage to the oven .
WARNING: The electrical outlet must be readily accessible so that the unit can be unplugged easily in
an emergency.
5. Neither the manufacturer nor the distributors can accept any liability for damage to the machine or
personal injury for failure to observe the correct electrical connecting procedure.
The A.C. voltage must be single phase 230 – 240V, 50Hz.
6. This appliance must be earthed.
7. Operate the oven from a general purpose domestic outlet.
If a generator is used, do not operate the oven with non-sinusoidal outputs.
1
2
3
45
6
7
84
9
:
A
C
D
B
15. Oven Cavity
16. Outer cabinet
5

EN
GB-3
ENGLISH
OVEN AND ACCESSORIES
OVEN
1. Door
2. Door hinges
3. Oven lamp
4. Waveguide cover (DO NOT REMOVE)
5. Control panel
6. Coupling
7. Door latches
8. Oven cavity
9. Door seals and sealing surfaces
10. Door safety latches
11. Ventilation openings
12. Outer cabinet
13. Power supply cord
14. Door opening button
ACCESSORIES:
Check to make sure the following accessories are
provided:
(15) Turntable (16) Turntable support (17) Coupling
Place the turntable support in the centre of the oven
floor so that it can freely rotate around the coupling.
Then place the turntable on to the turntable support
so that it locates firmly into the coupling.
To avoid turntable damage, ensure dishes and con-
tainers are lifted clear of the turntable rim when
removing them from the oven.
NOTE: When you order accessories, please mention
two items: part name and model name
NOTES:
• The waveguide cover is fragile. Care should be taken when cleaning inside the oven to ensure that it is not
damaged.
• Always operate the oven with the turntable and turntable support fitted correctly. This promotes thorough,
even cooking. A badly fitted turntable may rattle, may not rotate properly and could cause damage to the
oven.
• All food and containers of food are always placed on the turntable for cooking.
• The turntable rotates clockwise or anti-clockwise. The rotary direction may change each time you start the
oven. This does not affect cooking performance.
13
12
11
10 89 647
12 3
5
14
Hub (inside)
15. Turntable
(glass)
17. Coupling 16. Turntable
support
EN-3EN-3
13
12
11
10 89 6 47
12 3
5
14

GB-4
1
2
4
5
9
7
1011
6
3
8
CONTROL PANEL
1.DIGITAL DISPLAY
2. Weight Defrost key
3. TIME DEFROST key
4.AUTO MENU keys
5.TIME keys
6. MICROWAVE POWER LEVEL key:
Press to select microwave power level.
7. WEIGHT/PORTION keys (up and down)
8. KITCHEN TIMER key
Press to use as a minute timer, or to
programme standing time.
9. CLOCK SET key
10. START/ +1min key
11. STOP key
Popcorn
Jacket Potato
Pizza
Frozen Vegetables
Beverage
Dinner Plate
EN-4EN-4
Reheat Tea & Coee
2
4
5
7
9
10
1
3
6
8
11
30s
STOP/ECO key

GB-18
MICROWAVE POWER LEVEL
SETTING THE CLOCK
Your oven has a 24 hour clock mode.
1. Press the CLOCK SET key once and “00:00”will ash.
2. Press the time keys and enter the current time. Enter the hours by pressing the NJO key and enter the
minutes by pressing the 1 NJO and 10 T keys.
3. Press the CLOCK SET key to nish clock setting.
NOTES:
• If the clock is set, when cooking is complete, the display will show the correct time of day. If the clock has not
• To check the time of day during a cooking process, press CLOCK SET key and the LED will display the time of
day for 2-3 seconds. This does not aect the cooking process.
•
•
Power Level Press the MICROWAVE
POWER LEVEL key
Display
(Percentage)
• Your oven has 11 power levels, as shown.
•
•
•
5PDIBOHFUIFQPXFSMFWFMGPSDPPLJOH
QSFTTUIF.*$308"7&108&3-&7&-LFZ
VOUJMUIFEJTQMBZJOEJDBUFTUIFEFTJSFEMFWFM
4FUVQUIFEFTJSFEDPPLJOHUJNFCZ
QSFTTJOH5*.&LFZT Press theSTART key to
start the oven.
To check the power level during
cooking,press the MICROWAVE POWER
LEVEL key. As long as your finger is pressing
the MICRO-WAVE POWER LEVEL key the
power level will be displayed. The oven
continues to countdown although the
display will show thepower level.
If “0P” is selected, the oven will work with fan
for no power. You can use this level to UP
SFNPWFBOZPEPVST.
HIGH x1 100P
x2 90P
MEDIUM HIGH x3 80P
x4 70P
MEDIUM x5 60P
x6 50P
MEDIUM LOW
(DEFROST)
x7 40P
x8 30P
LOW x9 20P
x10 10P
x11 0P
Generally the following recommendations apply:
100P/ 90P- (HIGH) used for fast cooking or reheating
e.g. for casseroles, hot beverages, vegetables etc.
80P/ 70P- (MEDIUM HIGH) used for longer cooking of dense
foods such as roast joints, meat loaf and plated meals, also for
sensitive dishes such as sponge cakes. At this reduced setting,
the food will cook evenly without over cooking at the sides.
60P/ 50P- (MEDIUM) for dense foods which require a
long cooking time when cooked conventionally, e.g.
beef casserole, it is advisable to use this power setting
to ensure the meat will be tender.
40P/ 30P- (MEDIUM LOW) to defrost, select this power
setting, to ensure that the dish defrosts evenly.
This setting is also ideal for simmering rice, pasta,
dumplings and cooking egg custard.
20P/ 10P- (LOW) For gentle defrosting, e.g. DSFBN
HBUFBVYPS pastry.
8IJMFJOUIFDMPDLTFUUJOHNPEF, if the STOP key is pressed or if there is no operation within 1 minute, the
oven will go back to the former setting.
If the electrical power supply to your microwave oven is interrupted, the display will intermittently show “0:00” after
the power is reinstated. If this occurs during cooking, the programme will be erased. The time of day will also be erased.
been set, the display will only show“0:00”when cooking is complete.
EN-18EN-18

EN
GB-19
ENGLISH
MICROWAVE COOKING
MANUAL OPERATION
Opening the door:
To open the oven door, pull the door opening handle.
Starting the oven:
Prepare and place food in a suitable container onto the turntable or place directly onto the
turntable. Close the door and press the START/+T key after selecting the desired cook-ing
mode.
Once the cooking programme has been set and the START/+T key is not pressed in 1
minute, the setting will be cancelled.
The START/+T key must be pressed to continue cooking if the door is opened during
cooking. 5IFBVEJCMFTJHOBMXJMMTPVOEPODFXIFOUIFCVUUPOJTQSFTTFEJOUIFDPSSFDUNBOOFS
Use the STOP key to:
Your oven can be programmed for up 99 minutes 50 seconds (99.50).
MANUAL COOKING/ MANUAL DEFROSTING
• Enter the cooking time and use microwave power levels 100P to 10P to cook or defrost (refer to page &/18).
• Stir or turn the food, where possible, 2 - 3 times during cooking.
• After cooking, cover the food and leave to stand, where recommended.
• After defrosting, cover the food in foil and leave to stand until thoroughly defrosted.
Example:
To cook 2 minutes and 30 seconds on 70% microwave power.
1.Input the power level by pressing
the MICROWAVE POWER LEVEL
key 4 times for 70 P.
x4
2.Enter the cooking time by
pressing the 1 NJO key
twice and then the 10 T key
3 times.
3.Press the START/ T key to start
the timer.
(The display will count down through
the set cooking/defrosting time.)
NOTE:
• When the oven starts, the oven lamp will light and the turntable will rotate clockwise or anticlockwise.
• If the door is opened during cooking/defrosting to stir or turn over food, the cooking time on the display
stops automatically. The cooking/ defrosting time starts to count down again when the door is closed and
the START key is pressed.
• When cooking/defrosting is complete, open the door or press STOP key and the time of day will reappear on
the display, if the clock has been set.
• If you wish to know the power level during cooking, press the MICROWAVE POWER LEVEL key. As long as
your finger is QSFTTJOH the MICROWAVE POWER LEVEL key, the power level will be displayed.
IIMPORTANT:
• Close the door after cooking / defrosting. Please note that the light will remain on when the door is open,
this is for safety reason to remind you to close the door.
• If you cook food for more than the standard time (see chart below) using the same cooking mode, the
oven’s safety mechanisms automatically activate. The microwave power level will be reduced
Cooking Mode Standard time
Microwave 100 P 30 minutes
Grill cooking
99 mins 50 sec for R-742
Mix grill cooking 99 mins 50 sec
Intermittent operation,temperature
controlled for R-642
Erase a mistake during programming.
Stop the oven temporarily during cooking.
Cancel a programme during cooking, press the STOP key twice.
To set and to cancel the child lock (refer to page &/21).
EN-19EN-19
Cooking Mode Standard time
Microwave100 P 30 minutes
To open theoven door,press door openingbutton.

GB-20
OTHER CONVENIENT FUNCTIONS
1. SEQUENCE COOKING
This function allows you to cook using up to 2 di e rent s tages w hich c an i nclude m anual cooking t ime a nd
mode and /or time defrost as well as weight defrost function. Once programmed there is no need to interfere
with the cooking operation as the oven will automatically move onto the next stage. The audible signal will
sound once after the first stage.*GEFGSPTUJOHJTSFRVJSFEUIJTTIPVMEBMXBZTCFUIFGJSTUTUBHF
Note: Auto menu cannot be set as one of the multiple sequences.
Example: If you want to defrost the food for 5 minutes, then to cook with 80P microwave power for 7
minutes. The steps are as follows:
Press the TIME DEFROST key once, in the LED display will appear dEF2.
Enter the cooking time by pressing the 1 NJO key 5 times.
Input the power level (80P) by pressing the MICROWAVE POWER LEVEL key 3 times.
Enter the cooking time by pressing the 1 NJO key 7 times.
Press theSTART/ T key once to start cooking.
2.+T FUNCTION ("VUPTUBSU)
The START/+T key allows you to operate the two following functions:
B Direct start
You can directly start cooking on 100 P microwave power level for TFDPOE by pressing the +T key.
C Extend the cooking time
You can extend the cooking time during manual cooking, time defrost and auto menu operation for
multiples of TFDPOE if the START/+T key is pressed while the oven is in operation. During the weight
defrost, the cooking time cannot be increased by pressing START/+T key.
NOTE: The cooking time may be extended to a maximum of 99 minutes 50 seconds.
3. KITCHEN TIMER FUNCTION :
You can use the kitchen timer for timing where microwave cooking is not involved for example to time boiled
eggs cooked on conventional hob or to monitor the standing time for cooked/defrosted food.
Example:
To set the timer for 5 minutes.
1.Press the KITCHEN
TIMER key once.
Enter the desired
time by pressing the
1 NJO key 5 times.
Press theSTART/
+T key to start
the timer.
Check the display.
(The display will count down
through the set cooking/
defrosting time.)
When the timer time arrives, the audible signal will sound 5 times and the LED will display then time of day.
You can enter any time up to 99 minutes 50 seconds. To cancel the KITCHEN TIMER whilst counting down, sim-
ply press the STOP key.
NOTE: The KITCHEN TIMER function cannot be used whilst cooking.
4. CHILD LOCK:
Use to prevent unsupervised operation of the oven by little children.
a. To set the CHILD LOCK:
Press and hold the STOP key for 3 seconds until a long a beep sound. The display will show:
b. To cancel the CHILD LOCK:
Press and hold the STOP key for 3 seconds until a long beep sound.
EN-20EN-20
5. ECO MODE:
In standby mode, press the“ECO”button once, theLED display will be oand microwaveoven enter
to ECO mode, anyoperation can lighttheLED display again,and themicrowaveoven will return to
standby mode.

EN
GB-21
ENGLISH
AUTO MENU OPERATION
TIME DEFROST AND WEIGHT DEFROST OPERATION
1. TIME DEFROST
This function quickly defrosts food while enabling you to choose a suitable defrost period, depending on the
food type. Follow the example below for details on how to operate this function. The time range is 0:10 – 99:50.
Example: To defrost the food for 10 minutes.
1.Select the menu required by pressing the TIME
DEFROST key once.
x1, the display will show: dEF2
2.Enter the cooking time by
pressing the 10 NJO key once.
Press the START/
+T key to start
defrosting.
Notes for Time Defrost:
• After cooking the audible signal will sounds ve times and the LED will display then time of day, if the clock
• The preset microwave power level is 30P and can not be changed.
2.WEIGHT DEFROST
The microwave oven is pre-programmed with a time and power level so that the following food is defrosted
easily: Pork, beef and chicken. The weight range for this food is from 0.1kg – 2kg in 0.1kg steps.
Follow the example below for details on how to operate these functions.
Example : To defrost a Meat joint weighing 1.2kg using WEIGHT DEFROST.
Place the meat in a fMBU dish or microwave oven defrost rack on the turntable.
1.Select the menu required by pressing
the WEIGHT DEFROST key once.
x1,
the display will show: dEF1
2.Enter the weight by pressing the
WEIGHT/PORTION keys until the desired
weight is displayed.
display:
Press the START/
+T key to start
cooking.
(The display will count
down through
defrosting time)
Frozen foods are defrosted from -18°C.
NOTES FOR WEIGHT DEFROST:
• Before freezing foods, ensure food is fresh and of good quality.
• Food weight should be rounded up to the nearest 0.1kg, for example, 0.65kg to 0.7kg.
• If necessary, shield small areas of meat or poultry with at pieces of aluminium foil. This will prevent the ar-
eas from becoming warm during defrosting. Ensure the foil does not touch the oven walls.
The AUTO MENU keys automatically work out the correct cooking mode and cooking of the foods (details on
page GB-4 and GB-22). Follow the example below for details on how to operate this function.
Example: To cook two jacket potatoes (0.46kg) by using the AUTO MENU function.
1.
Select the required menu by pressing
the Jacket Potato key once.
x1,
the display will show: 1
2.Press WEIGHT/PORTION UP/DOWN
keys or continue to press the Jacket
Potato key to choose the required
number of potatoes (up to 3).
x1, display: 2
Press the START/
+T key to start
cooking.
(The display will count
down through cooking
time)
NOTES:
• The weight or quantity of the food can be input by pressing the WEIGHT/PORTION UP/DOWN keys until the
desired weight/quantity is displayed. Enter the weight of the food only. Do not include the weight of the con-
tainer.
• For food weighing more or less than the weights/quantities given in the AUTO MENU chart on page GB- 2 cook
by manual operation.
has been set. If the clock has not been set, the display will only show “0:00” when cooking is complete.
1.2
2
EN-21EN-21

GB-22
AUTO MENU CHART
Auto Menu WEIGHT/ PORTION / UTENSILS Procedure
Popcorn 0.05kg, 0.1kg Place the popcorn bag directly on the turntable
(Please see the note below: ‘Important Information
About Microwave Popcorn Feature’)
Jacket Potato 1, 2, 3 potatoes (pieces)
1 potato = approx. 0.23kg
(initial temp. 20° C)
Please use potatoes with a similar size of approx. 230g.
Pierce each potato in several places and place towards
the edge of the turntable. Turn over and re-arrange
halfway through cooking. Stand for 3 - 5 minutes
before serving.
Pizza 0.1kg, 0.2kg, 0.4kg
(initial temp 5°C)
Plate
Place the Pizza on a plate in the centre of the turntable.
Do not cover.
Frozen vegetable
e.g. Brussel sprouts,
green beans, peas,
mixed vegetables,
broccoli
(initial temp -18°C)
Bowl and lid
Place vegetables in a suitable container. Add 1tbsp of
water per 100g of vegetables, cover the dish and place
on the turntable. Stir halfway through cooking and
after cooking.
3FIFBU5FB$PGGFF
(120ml/ cup)
1, 2, 3
(initial temp. 5° C)
Cup
Place the cup(s) on the turntable and stir after heating.
Dinner Plate 0.25kg, 0.35kg, 0.5kg
(initial temp. 5° C)
Plate
Place the plate in the centre of the turntable. Do not
cover. Stir after cooking.
Notes:
• The nal temperature will vary according to the initial food temperature. Check food is piping hot after cook-
ing. If necessary, you can extend the cooking manually.
• The results when using auto cook depend on variances such as the shape and size of the food and your
personal preference as regards cooking results. If you are not satised with the programmed result, please
adjust the cooking time to match your requirement.
Important Information about Microwave Popcorn Feature:
1. When selecting 0.1kg grams of popcorn, it is suggested
that you fold down a triangle on each corner of the bag
before cooking.
Refer to the picture at right.
2. If/When the popcorn bag expands and no longer rotates
properly, please press STOP key once and open the oven
door and adjust the bag position to ensure even cook-
ing.
0.15kg, 0.35kg, 0.5kg
EN-22EN-22

EN
GB-23
ENGLISH
SUITABLE OVENWARE
To cook/defrost food in a microwave oven, the microwave energy must be able to pass through the container to
penetrate the food. Therefore it is important to choose suitable cookware.
Round/oval dishes are preferable to square/oblong ones, as the food in the corners tends to overcook. A variety
of cookware can be used as listed below.
Cookware Microwave
Safe
Comments
Aluminium foil
Foil Containers
܃/ ܇Small pieces of aluminium foil can be used to shield food from
overheating. Keep foil at least 2cm from the oven walls, as arcing
may occur.
Foil containers are not recommended unless specied by the man-
ufacturer, e.g. Microfoil ®, follow instructions carefully.
Browning dishes ܃Always follow the manufacturers instructions.
Do not exceed heating times given. Be very careful as these dishes
become very hot.
China and ceramics ܃/ ܇Porcelain, pottery, glazed earthenware and bone china are usually
suitable, except for those with metallic decoration.
Glassware e.g. Pyrex ® ܃Care should be taken if using ne glassware as it can break or crack
if heated suddenly.
Metal ܇It is not recommended to use metal cookware as it will arc, which
can lead to re.
Plastic/Polystyrene e.g fast
food containers
܃Care must be taken as some containers warp, melt or discolour at
high temperatures.
Cling lm ܃It should not touch the food and must be pierced to let the steam
escape.
Freezer/Roasting bags ܃Must be pierced to let steam escape. Ensure bags are suitable for
microwave use.
Paper - Plates, cups and
kitchen paper
܃Do not use plastic or metal ties, as they may melt or catch re due
to the metal ‘arcing’.
Straw and wooden
Containers
܃Only use for warming or to absorb moisture.
Care must be taken as overheating may cause re.
Recycled paper and
newspaper
܇Always attend the oven when using these materials as overheating
may cause re.
May contain extracts of metal which will cause ‘arcing’and may lead
to re.
WARNING:
When heating food in plastic or paper containers, monitor the oven due to the possibility of
ignition.
EN-23EN-23

CARE AND CLEANING
CLEAN THE OVEN AT REGULAR INTERVALS - Keep the oven clean and remove any food deposits, or it
could lead to deterioration of the surface. This could adversely affect the life of the appliance and possibly result
in a hazardous situation.
Exterior:
The outside may be cleaned with mild soap and warm water, wipe clean with a damp cloth. Avoid the use of
harsh abrasive cleaners. Keep the ventilation openings free of dust.
Door:
Wipe the door and window on both sides, the door seals and adjacent parts frequently with a damp cloth to
remove any spills or spatters. Do not use abrasive cleaners.
Touch Control Panel:
Wipe the panel with a slightly dampened cloth with water only.
Do not scrub or use any sort of chemical cleaners. Avoid the use of excess water.
Interior walls:
To clean the interior surfaces, wipe with a soft cloth and warm water. After use wipe the waveguide cover
in the oven with a soft damp cloth to remove any food splashes. Built-up splashes may overheat and begin
to smoke or catch fire. Do not remove the waveguide cover. DO NOT USE A COMMERCIAL OVEN
CLEANER, ABRASIVE OR HARSH CLEANERS AND SCOURING PADS ON ANY PART OF YOUR
MICROWAVE OVEN. NEVER SPRAY OVEN CLEANERS DIRECTLY ONTO ANY PART OF YOUR OVEN.
Avoid using excess water. After cleaning the oven, ensure any water is removed with a soft cloth.
Turntable/Roller Stay:
Wash with mild soapy water and dry thoroughly.
SERVICE CALL CHECK
Please check the following before calling for service:
1. Does the display light up? YES _______ NO _______
2. When the door is opened, does the oven lamp come on? YES _______ NO _______
3. Place one cup of water (approx. 250 ml) in a glass measure in the oven and close the door securely. Oven
lamp should go off if door is closed properly. Press the pad once.
A. Does the oven lamp come on? YES _______ NO _______
B. Does the cooling fan work? YES _______ NO _______
(Put your hand over the rear ventilation openings.)
C. Does the turntable rotate? YES _______ NO _______
(The turntable can rotate clockwise or counterclockwise. This is quite normal.)
D. After one minute, did an audible signal sound and COOK
indicator go off? YES _______ NO _______
E. Is the water inside the oven hot? YES _______ NO _______
If “NO” is the answer to any of the above questions, please check your wall socket and the fuse in your meter box.
If both the wall socket and the fuse are functioning properly, CONTACT YOUR NEAREST SERVICE CENTRE
APPROVED BY SHARP.
SPECIFICATIONS
AC Line Voltage: Single phase 230–240V, 50Hz
1.9 kW
Output Power: 1.2 kW* (IEC test procedure)
Microwave Frequency: 2450 MHz (Class B/Group 2)**
Outside Dimensions: 520mm(W) x 315mm(H) x 410mm(D)
Cooking Uniformity: Turntable (ø315mm tray) system
Weight: Approx. 12 kg
* When tested in accordance with AS/NZS 2895.1.2007
** This is the classification of ISM (Industrial, Scientific and Medical) equipment described in the International
Standard CISPR11.
START/+30SEC.
21
AC Power Requirement:
Input (Steady):
Input (Initial):
1. W3 k
1.9 kW
In high/medium high power, output power will be controlled to avoid electrical overheating.

SHARP CORPORATION OF NEW ZEALAND
59 Hugo Johnston Drive, Penrose
Auckland, 1061
www.sharp.net.nz
Table of contents
Other Sharp Microwave Oven manuals

Sharp
Sharp R-248D Instruction Manual

Sharp
Sharp R-4A54 User manual

Sharp
Sharp R-630DKA User manual

Sharp
Sharp R-242 User manual

Sharp
Sharp Carousel R1514TY User manual

Sharp
Sharp R-653M User manual

Sharp
Sharp R-752M Instruction Manual

Sharp
Sharp R-202EK User manual

Sharp
Sharp R-21LCF - Oven Microwave 1000 W User manual

Sharp
Sharp R-430EK User manual

Sharp
Sharp R-8260 User manual

Sharp
Sharp YB-S4202AE User manual

Sharp
Sharp Carousel RK56S27 User manual

Sharp
Sharp R-420LK User manual

Sharp
Sharp R-5A12 User manual

Sharp
Sharp YCMS01E-B User manual

Sharp
Sharp CAROUSEL R-530E Use and care manual

Sharp
Sharp R-750MR(W) User manual

Sharp
Sharp R-350A User manual

Sharp
Sharp R-1880LST User manual