Sharp SJ-FJ810V User manual

SJ-FJ810V
REFRIGERATOR-FREEZER
OPERATION MANUAL . . . . . . . . . . . . . . . . . . . 4
FRIGORIFICO-CONGELADOR
MANUAL DE MANEJO. . . . . . . . . . . . . . . . . . . 16
FRIGORIFERO-FREEZER
MANUALE DI ISTRUZIONI. . . . . . . . . . . . . . . . 28
REFRIGERATEUR-CONGELATEUR
MODE D’EMPLOI . . . . . . . . . . . . . . . . . . . . . . 40
FRIGORÍFICO-CONGELADOR
FUNCIONAMENTO MANUAL . . . . . . . . . . . . . 52
ΨΥΓΕΙΟ - ΚΑΤΑΨΥΚΤΗΣ
ΕΓΧΕΙΡΙΔΙΟ ΛΕΙΤΟΥΡΓΙΑΣ . . . . . . . . . . . . . . . 64
KÜHLSCHRANK MIT TIEFKÜHLFACH
BEDIENUNGSANLEITUNG . . . . . . . . . . . . . . . 76
KOELKAST-VRIEZER
GEBRUIKSAANWIJZING. . . . . . . . . . . . . . . . . 88
CHŁODZIARKO - ZAMRAŻARKA
INSTRUKCJA OBSŁUGI . . . . . . . . . . . . . . . . 100
HŰTŐSZEKRÉNY-FAGYASZTÓ
HASZNÁLATI UTASÍTÁS . . . . . . . . . . . . . . . . 112
FRIGIDER-CONGELATOR
MANUAL DE UTILIZARE . . . . . . . . . . . . . . . 124
CHLADNIČKA-MRAZÁK
NÁVOD K OBSLUZE . . . . . . . . . . . . . . . . . . . 136
CHLADNIČKA-MRAZNIČKA
NÁVOD NA OBSLUHU . . . . . . . . . . . . . . . . . 148
ŠALDYTUVAS - ŠALDIKLIS
EKSPLOATAVIMO INSTRUKCIJA .. . . . . . . . 160
LEDUSSKAPIS – SALDĒTĀJKAMERA
ROKASGRĀMATA . . . . . . . . . . . . . . . . . . . . . 172
KÜLMIK-SÜGAVKÜLMIK
KASUTUSJUHEND . . . . . . . . . . . . . . . . . . . . 184
HLADILNIK-ZAMRZOVALNIK
PRIROČNIK Z NAVODILI ZA DELOVANJE. . 196
ХОЛОДИЛЬНИК-МОРОЗИЛЬНИК
ІНСТРУКЦІЯ ЗЕКСПЛУАТАЦІЇ . . . . . . . . . . . 208
ХЛАДИЛНИК – ФРИЗЕР
РЪКОВОДСТВО ЗА РАБОТА. . . . . . . . . . . . 220
(B484)W1.indb1(B484)W1.indb1 2013/10/1110:48:382013/10/1110:48:38

2
CONTENTS
WARNING• ................................................................ 4
CAUTION• ................................................................. 4
INSTALLATION• ........................................................ 5
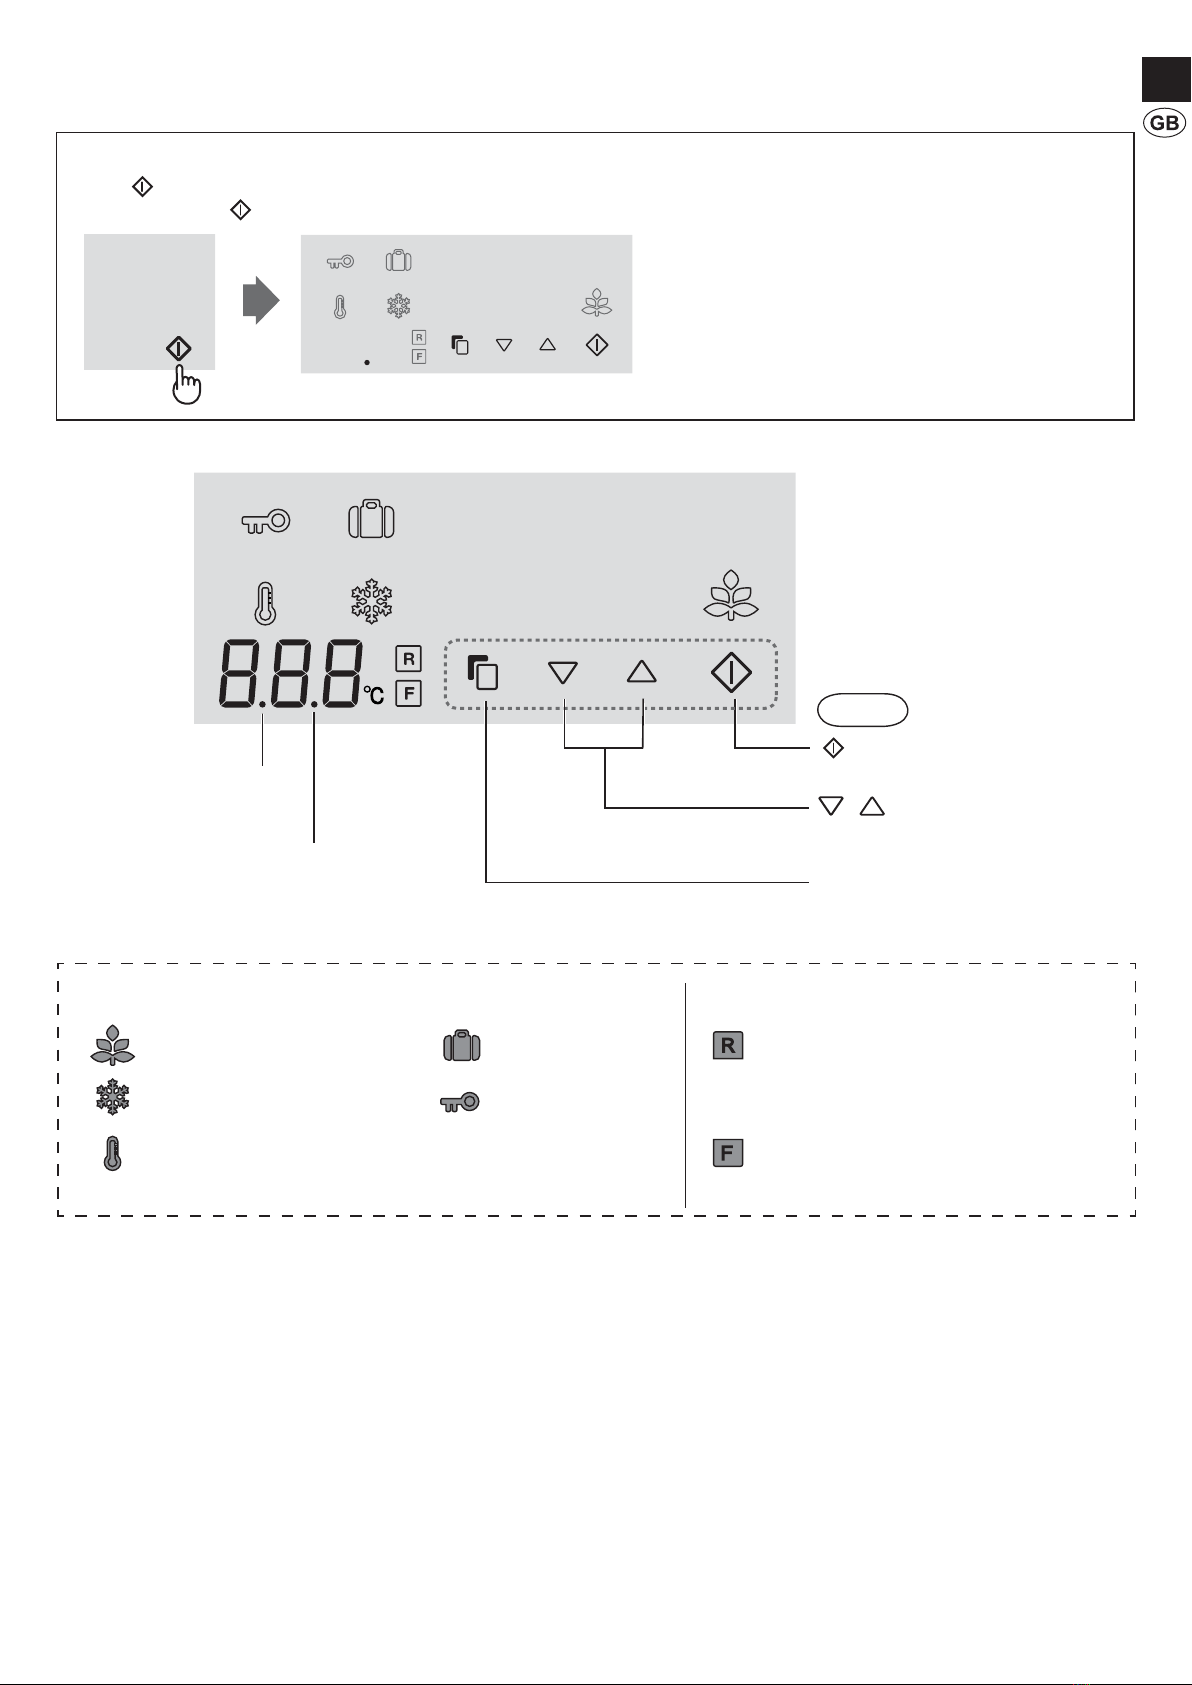
INDICATOR OF TEMPERATURE• ............................ 5
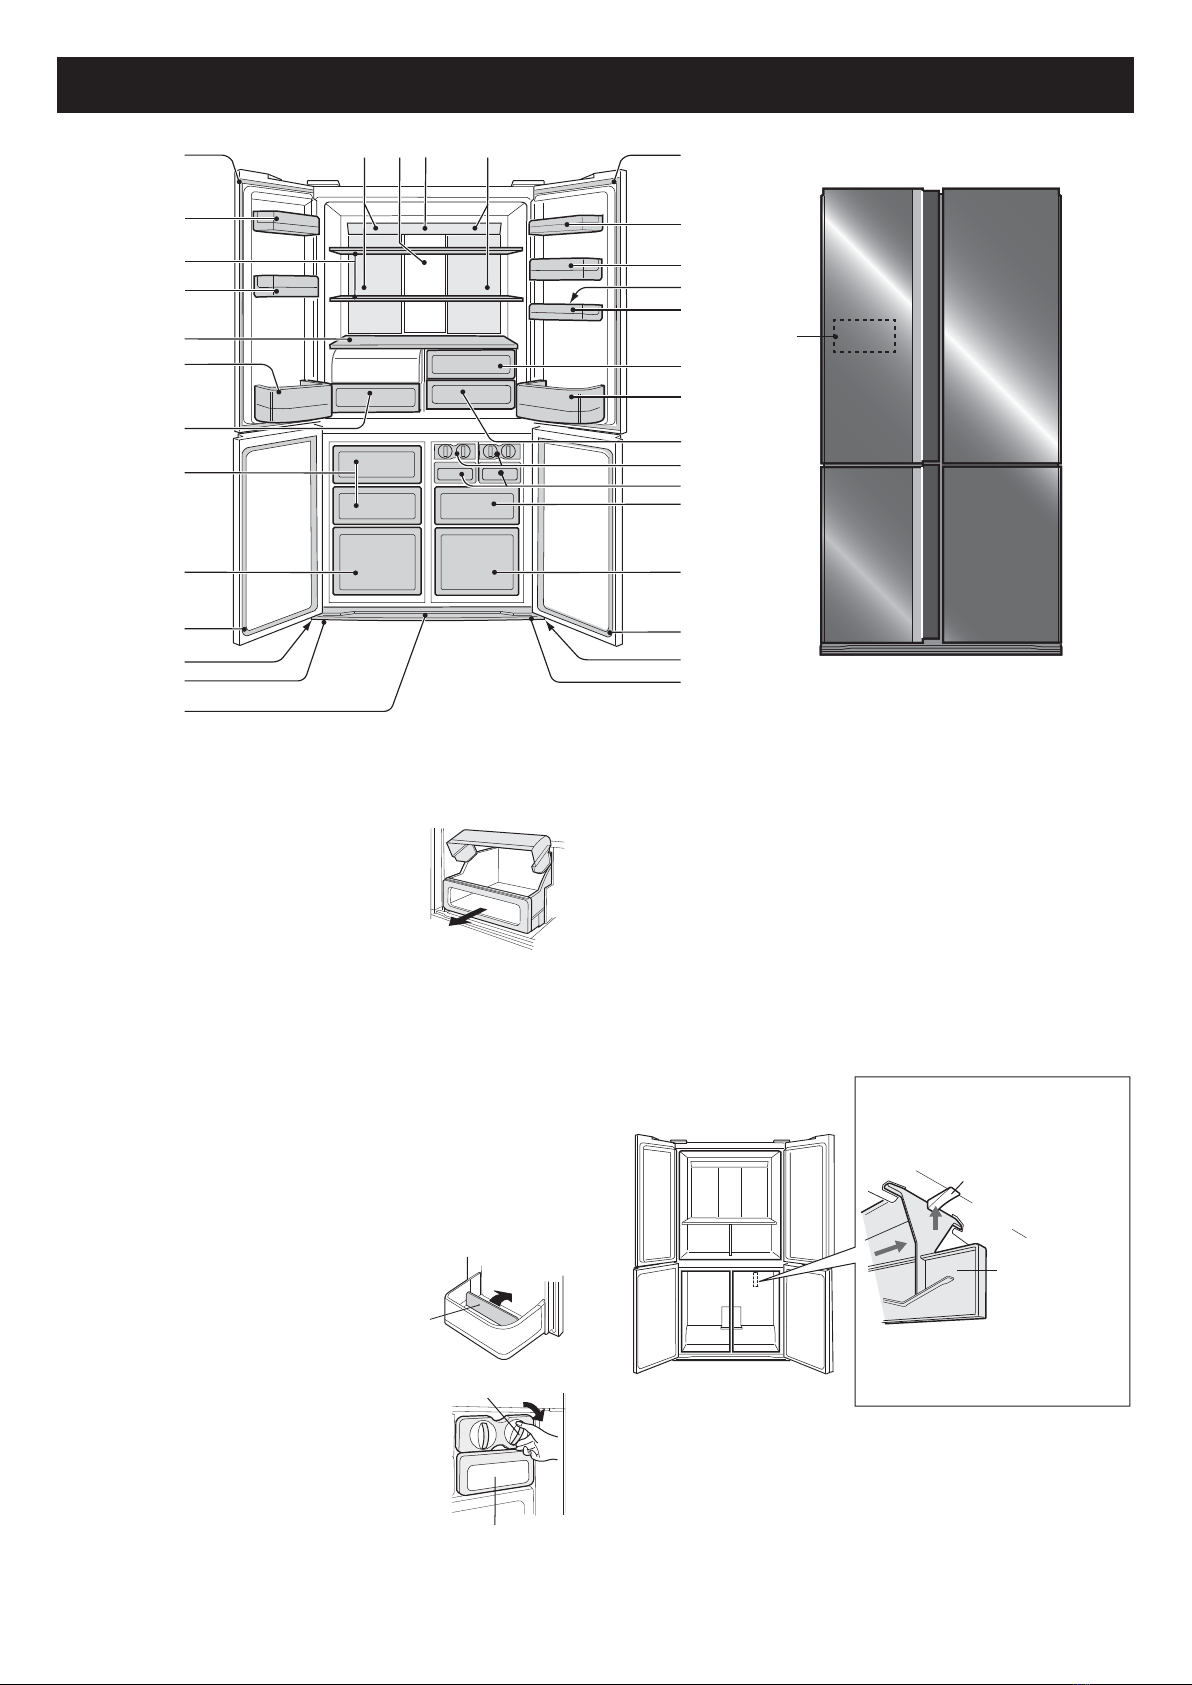
DESCRIPTION• ......................................................... 6
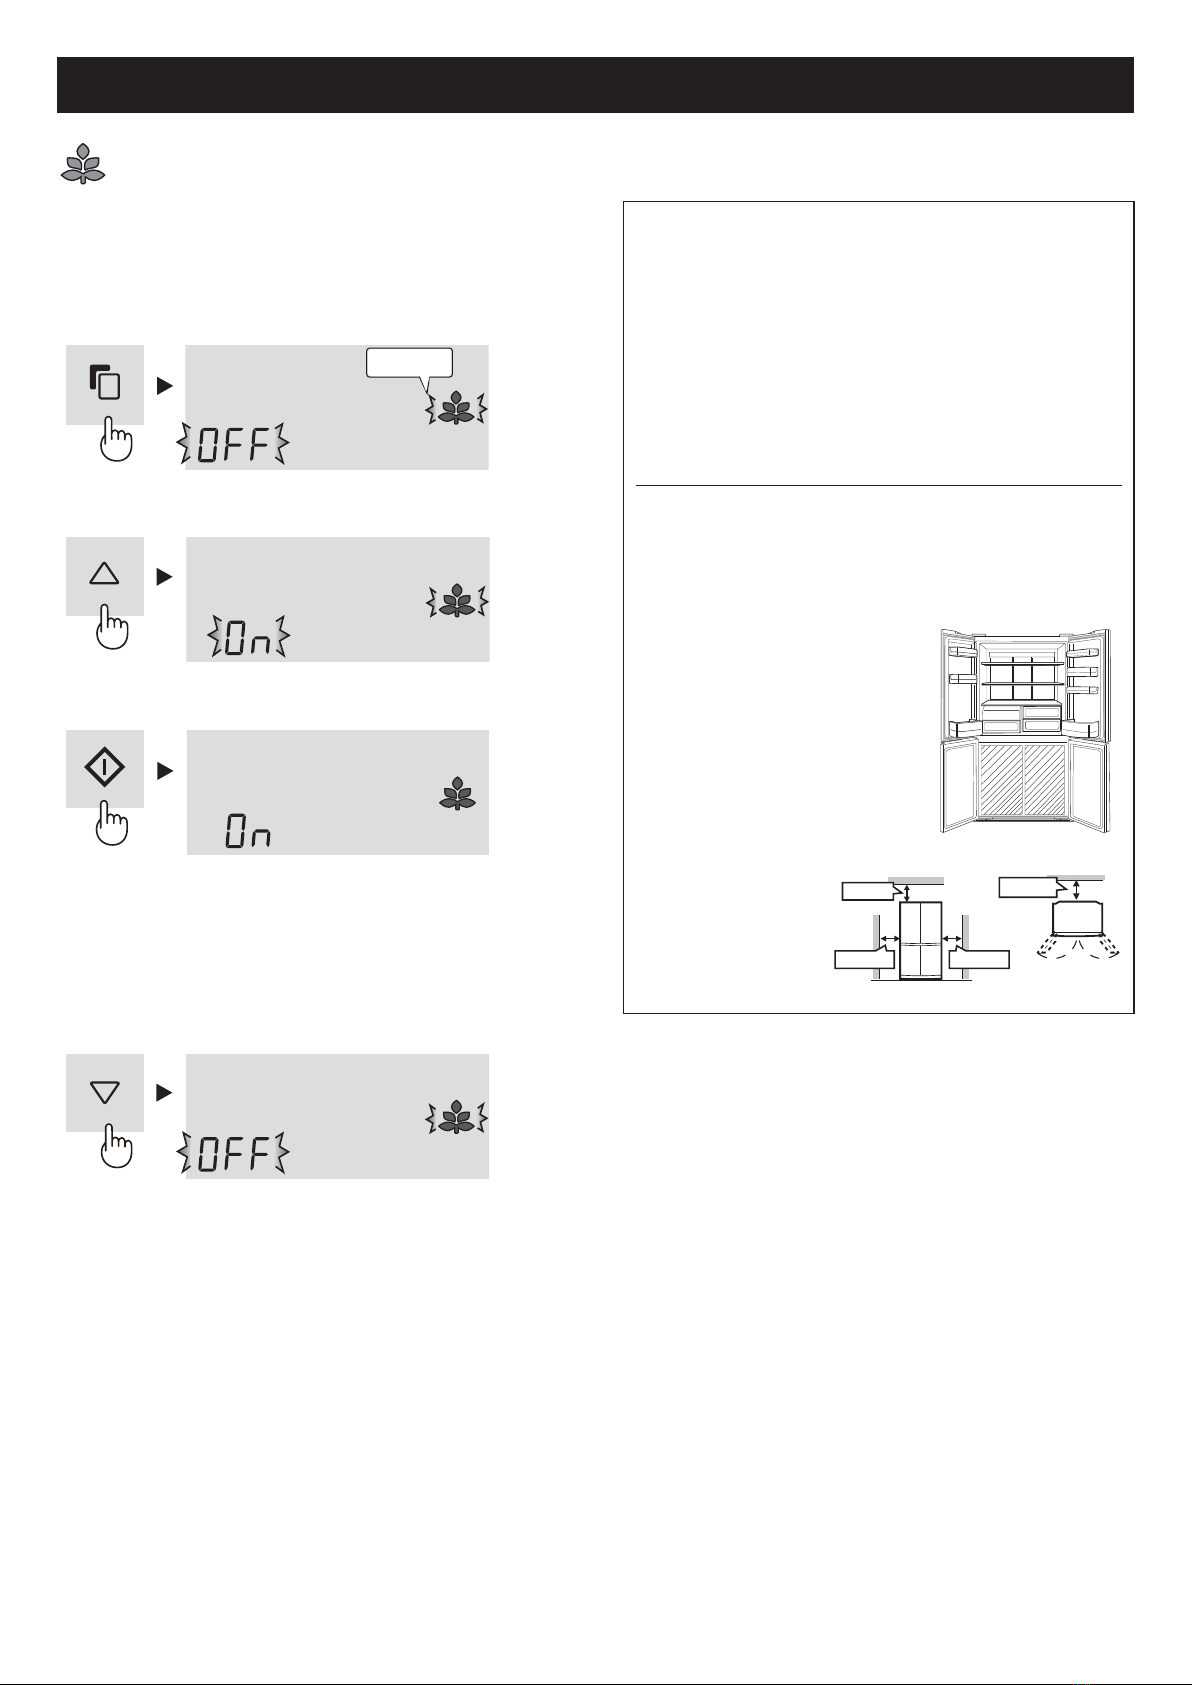
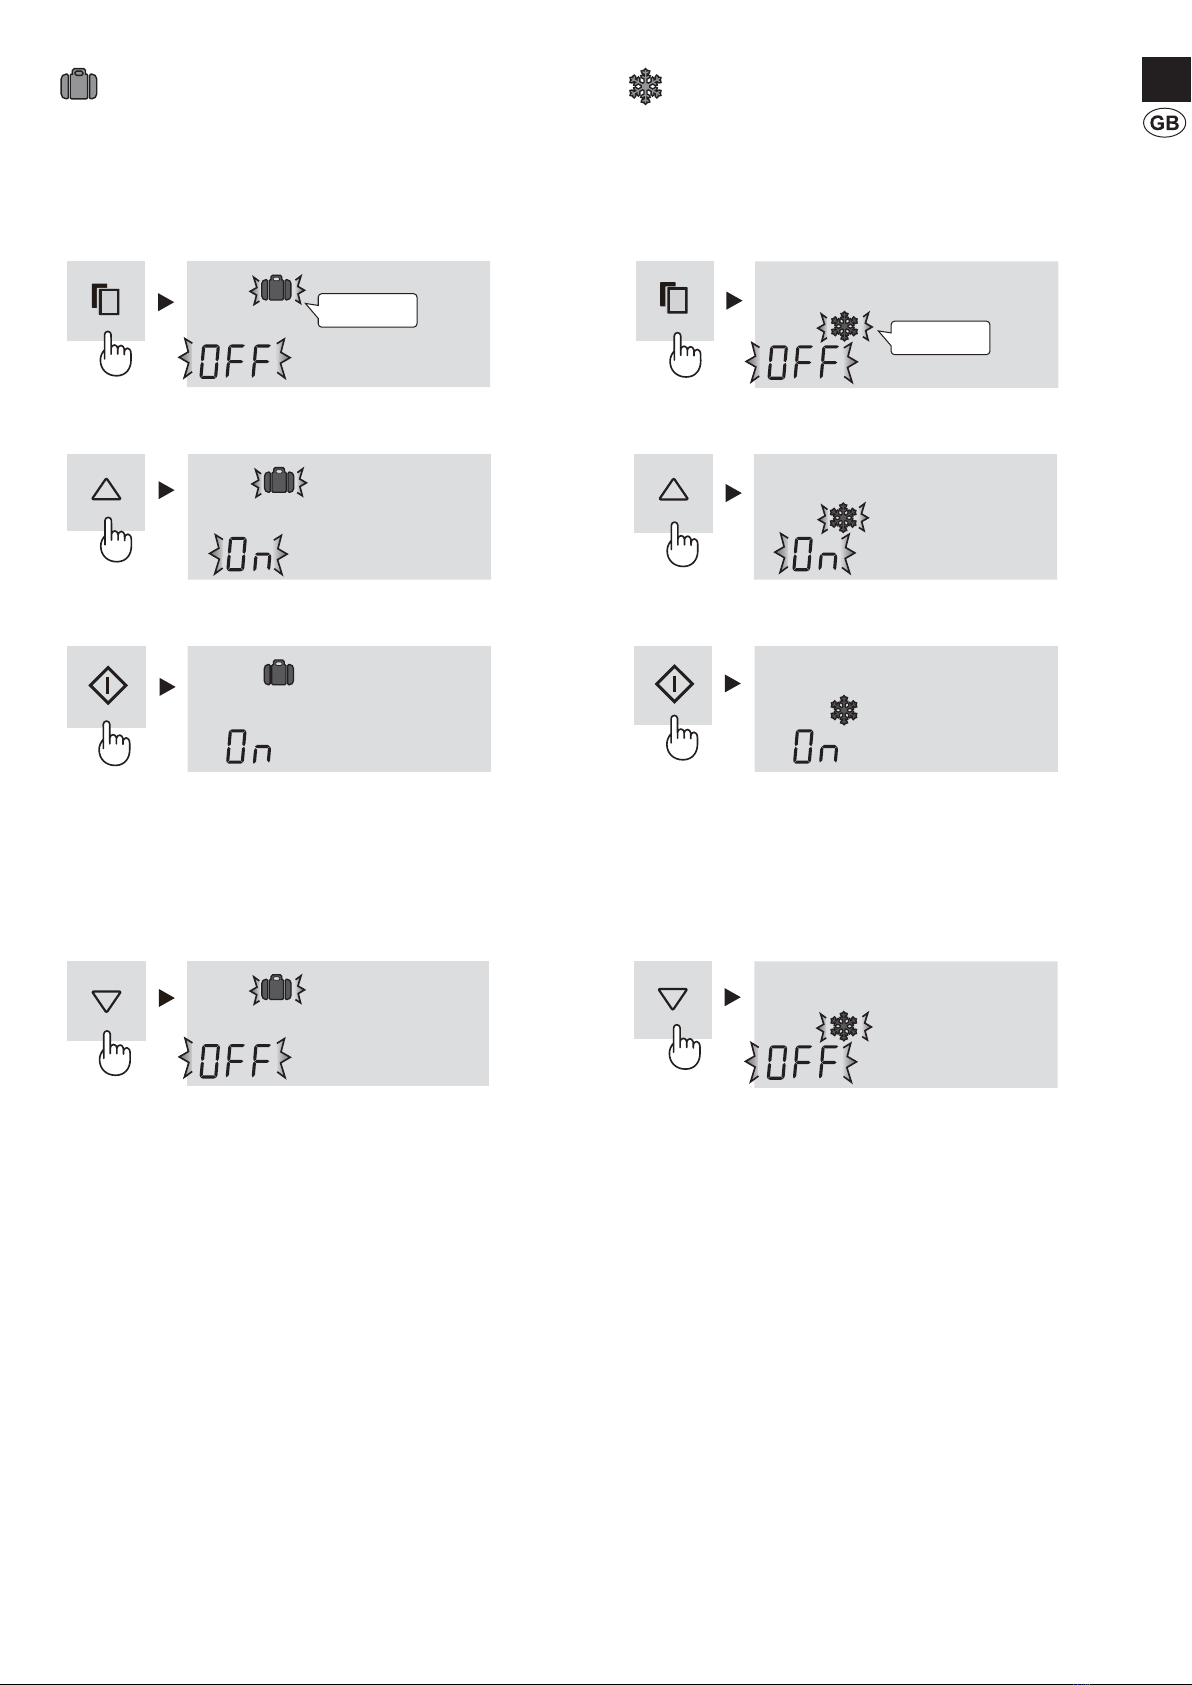
OPERATION• ............................................................ 8
STORING FOOD• .................................................... 13
CARE AND CLEANING• .......................................... 14
BEFORE YOU CALL FOR SERVICE• ..................... 15
CONTENIDO
ADVERTENCIA• ...................................................... 16
PRECAUCION• ........................................................ 16
INSTALACION• ........................................................ 17
INDICADOR DE TEMPERATURA• ......................... 17
DESCRIPCION• ....................................................... 18
FUNCIONAMIENTO• ............................................... 20
PARA ALMACENAR LOS ALIMENTOS• ................ 25
CUIDADOS Y LIMPIEZA• ........................................ 26
ANTES DE LLAMAR AL SERVICIO TECNICO• ..... 27
SOMMARIO
AVVERTENZE• ........................................................ 28
ATTENZIONE• ......................................................... 28
INSTALLAZIONE• .................................................... 29
INDICATORE DELLA TEMPERATURA• ................ 29
DESCRIZIONE• ....................................................... 30
COMANDI• ............................................................... 32
CONSERVAZIONE DEGLI ALIMENTI• ................... 37
MANUTENZIONE E PULIZIA• ................................. 38
PRIMA DI CHIAMARE IL SERVIZIO DI ASSISTENZA•
.. 39
TABLE DES MATIERES
AVERTISSEMENT• ................................................. 40
ATTENTION• ........................................................... 40
INSTALLATION• ...................................................... 41
INDICATEUR DE TEMPÉRATURE• ....................... 41
DESCRIPTION• ....................................................... 42
UTILISATION• ......................................................... 44
CONSERVATION DES ALIMENTS• ....................... 49
ENTRETIEN ET NETTOYAGE• .............................. 50
AVANT D’APPELER LE SERVICE APRES-VENTE•
...... 51
ÍNDICE
AVISO• ..................................................................... 52
CUIDADO• ............................................................... 52
INSTALAÇÃO• ......................................................... 53
INDICADOR DE TEMPERATURA• ......................... 53
DESCRIÇÃO• .......................................................... 54
FUNCIONAMENTO• ................................................ 56
CONSERVAÇÃO DE ALIMENTOS• ........................ 61
CUIDADOS E LIMPEZA• ......................................... 62
ANTES DE CHAMAR PELO SERVIÇO DE• ASSISTÊNCIA TÉCNICA....................................... 63
ΠΕΡΙΕΧΟΜΕΝΑ
ΠΡΟΣΟΧΗ• .............................................................. 64
ΠΡΟΦΥΛΑΚΤΙΚΑ ΜΕΤΡΑ• ...................................... 64
ΕΓΚΑΤΑΣΤΑΣΗ• ...................................................... 65
ΈΝΔΕΙΞΗ ΘΕΡΜΟΚΡΑΣΙΑΣ• .................................. 65
ΠΕΡΙΓΡΑΦΗ• ........................................................... 66
ΛΕΙΤΟΥΡΓΙΑ• ........................................................... 68
ΔΙΑΤΗΡΗΣΗ ΤΡΟΦΙΜΩΝ• ....................................... 73
ΣΥΝΤΗΡΗΣΗ ΚΑΙ ΠΕΡΙΠΟΙΗΣΗ• ............................ 74
ΠΡΙΝ ΖΗΤΗΣΕΤΕ ΤΟ ΣΕΡΒΙΣ• ................................ 75
INHALT
VORSICHT• ............................................................. 76
ACHTUNG• .............................................................. 76
AUFSTELLEN• ........................................................ 77
TEMPERATURANZEIGE• ....................................... 77
BESCHREIBUNG• ................................................... 78
BEDIENUNG• .......................................................... 80
AUFBEWAHRUNG VON LEBENSMITTELN• ......... 85
PFLEGE UND REINIGUNG• ................................... 86
BEVOR SIE DEN SHARP-SERVICE KONTAKTIEREN• .......
87
INHOUDSOPGAVE
WAARSCHUWING• ................................................. 88
LET OP• ................................................................... 88
INSTALLATIE• ......................................................... 89
TEMPERATUURINDICATOR• ................................ 89
BESCHRIJVING• ..................................................... 90
GEBRUIK• ............................................................... 92
OPBERGEN VAN VOEDSEL• ................................. 97
ONDERHOUD EN SCHOONMAKEN• .................... 98
ALVORENS VOOR REPARATIE TE BELLEN• ....... 99
SPIS TREŚCI
OSTRZEŻENIE• .................................................... 100
ŚRODKI OSTROŻNOŚCI• .................................... 100
INSTALACJA• ........................................................ 101
WSKAŹNIK TEMPERATURY• ............................... 101
OPIS CZĘŚCI• ....................................................... 102
OBSŁUGA• ............................................................ 104
PRZECHOWYWANIE ŻYWNOŚCI• ...................... 109
CZYSZCZENIE LODÓWKI• ................................... 110
ZANIM WEZWIESZ SERWIS• ............................... 111
TARTALOMJEGYZÉK
FIGYELMEZTETÉS• .............................................. 112
VIGYÁZAT• ............................................................ 112
ÜZEMBE HELYEZÉS• ........................................... 113
HŐMÉRSÉKLETJELZŐ• ....................................... 113
LEÍRÁS• ................................................................. 114
MŰKÖDTETÉS• ..................................................... 116
ÉLELMISZER-TÁROLÁS• ..................................... 121
KARBANTARTÁS ÉS TISZTÍTÁS• ........................ 122
MIELŐTT SZERVIZHEZ FORDULNA• .................. 123
(B484)W1.indb2(B484)W1.indb2 2013/10/1110:49:452013/10/1110:49:45

3
CUPRINS
AVERTISMENTE• .................................................. 124
PRECAUŢII• .......................................................... 124
INSTALARE• .......................................................... 125
INDICATOR DE TEMPERATURĂ• ........................ 125
DESCRIERE• ......................................................... 126
FUNCŢIONAREA• ................................................. 128
PĂSTRAREA ALIMENTELOR• ............................. 133
ÎNGRIJIRE ŞI CURĂŢARE• ................................... 134
ÎNAINTE DE A CHEMA SERVICIUL DE DEPANARE•
.. 135
OBSAH
BEZPEČNOSTNÍ POKYNY• .................................. 136
UPOZORNĚNÍ• ...................................................... 136
INSTALACE• .......................................................... 137
INDIKÁTOR TEPLOTY• ......................................... 137
POPIS• ................................................................... 138
OBSLUHA• ............................................................ 140
ULOŽENÍ POTRAVIN• ........................................... 145
PÉČE A ČIŠTĚNÍ• ................................................. 146
NEŽ ZAVOLÁTE OPRAVÁŘE• .............................. 147
OBSAH
UPOZORNENIE• ................................................... 148
POZOR• ................................................................. 148
INŠTALÁCIA• ......................................................... 149
INDIKÁTOR TEPLOTY• ......................................... 149
POPIS• ................................................................... 150
PREVÁDZKA• ........................................................ 152
SKLADOVANIE POTRAVÍN• ................................. 157
STAROSTLIVOSŤA ČISTENIE• ........................... 158
SKÔR NEŽ ZAVOLÁTE DO SERVISU• ................ 159
TURINYS
ĮSPĖJIMAS• ........................................................... 160
ATSARGUMO PRIEMONĖS• ................................ 160
INSTALIAVIMAS• .................................................. 161
TEMPERATŪROS INDIKATORIUS• ..................... 161
APRAŠYMAS• ....................................................... 162
APTARNAVIMAS• ................................................. 164
MAISTO LAIKYMAS• ............................................. 169
PRIEŽIŪRA IR VALYMAS• .................................... 170
PRIEŠ SKAMBINANT ĮAPTARNAVIMO SKYRIŲ•
.. 171
SATURS
BRĪDINĀJUMS• ..................................................... 172
UZMANĪBU• ........................................................... 172
UZSTĀDĪŠANA• .................................................... 173
TEMPERATŪRAS INDIKATORS• ......................... 173
APRAKSTS• .......................................................... 174
DARBĪBA• .............................................................. 176
PĀRTIKAS UZGLABĀŠANA• ................................ 181
KOPŠANA UN TĪRĪŠANA• .................................... 182
PIRMS ZVANĪT APKALPES DIENESTAM• ........... 183
SISUKORD
ETTEVAATUST• .................................................... 184
TÄHELEPANU• ...................................................... 184
PAIGALDAMINE• ................................................... 185
TEMPERATUURINÄIDIK• ..................................... 185
KIRJELDUS• .......................................................... 186
TÖÖTAMINE• ........................................................ 188
TOIDUAINETE HOIDMINE• .................................. 193
HOOLDUS JA PUHASTAMINE• ............................ 194
ENNE MEHAANIKU KUTSUMIST• ....................... 195
VSEBINA
OPOZORILO• ........................................................ 196
PREVIDNOST• ...................................................... 196
NAMESTITEV• ....................................................... 197
INDIKATOR TEMPERATURE• .............................. 197
OPIS• ..................................................................... 198
DELOVANJE• ........................................................ 200
SHRANJEVANJE HRANE• .................................... 205
VZDRŽEVANJE IN ČIŠČENJE• ............................ 206
PREDEN POKLIČETE SERVISNO SLUŽBO• ...... 207
ЗМІСТ
ОБЕРЕЖНО!• ........................................................ 208
УВАГА• .................................................................. 208
ВСТАНОВЛЕННЯ• ................................................ 209
ІНДИКАТОР ТЕМПЕРАТУРИ• ............................. 209
ОПИС• ................................................................... 210
ЕКСПЛУАТАЦІЯ• .................................................. 212
ЗБЕРІГАННЯ ПРОДУКТІВ• .................................. 217
ДОГЛЯД ІПРИБИРАННЯ• ................................... 218
ПЕРЕД ТИМ ЯК ЗАТЕЛЕФОНУВАТИ ДО•
СЕРВІСНОГО ЦЕНТРУ ...................................... 219
СЪДЪРЖАНИЕ
ПРЕДУПРЕЖДЕНИЕ• .......................................... 220
ВНИМАНИЕ• ......................................................... 220
МОНТАЖ• ............................................................. 221
ТЕМПЕРАТУРЕН ИНДИКАТОР• ......................... 221
ОПИСАНИЕ• ......................................................... 222
РАБОТА• ............................................................... 224
СЪХРАНЕНИЕ НА ХРАНИ• ................................. 229
ГРИЖИ ИПОЧИСТВАНЕ• ................................... 230
ПРЕДИ ДА ПОВИКАТЕ ТЕХНИК• ........................ 231
(B484)W1.indb3(B484)W1.indb3 2013/10/1110:49:462013/10/1110:49:46

4
Household use only
Thank you very much for buying this SHARP product. Before using your SHARP refrigerator, please read
this operation manual to ensure that you gain the maximum benefit from it.
This refrigerator is for household only, with ambient temperature between +5°C and +43°C.• The refrigerator should not be subjected to temperatures of -10°C or below for a long period of time.
WARNING CAUTION
This refrigerator contains flammable refrigerant (R600a:■isobutane) and insulation blowing gas (cyclopentane).
Observe the following rules to prevent ignition and explosion.
The refrigeration system behind and inside the refrigerator• contains refrigerant. Do not allow any sharp objects to come
into contact with the refrigeration system.
Do not use mechanical devices or other means to• accelerate the defrosting process. (This refrigerator has
adopted automatic defrosting system.)
Do not use electric appliances inside the refrigerator.• Use only the specified parts for the refrigerator compartment• light.
Do not block the openings on the circumference of the• refrigerator.
Do not use flammable sprays, such as spray paint near the• refrigerator. It may cause explosion or fire.
If the refrigeration system should get punctured, do not• touch the wall outlet and do not use open flames. Open
the window and air out the room. Then ask a service agent
approved by SHARP for servicing.
This refrigerator should be disposed appropriately. Take the• refrigerator to a recycling plant for flammable refrigerant
and insulation blowing gases.
Do not store highly volatile and flammable materials such as■ether, petrol, propane gas, aerosol cans, adhesive agents
and pure alcohol etc.
These materials are liable to explode.
Dust deposited on the power plug may cause fire. Wipe it off■carefully.
Do not attempt to change or modify this refrigerator. This may■result in fire, electric shock or injury.
Ensure that the refrigerator presents no danger to children■while being stored for disposal. (e.g. remove the magnetic
door seals to prevent child entrapment.)
Do not touch the compressor unit or its peripheral parts, as■they become extremely hot during operation and the metal
edges may cause injury.
Do not touch foods or metal containers in the freezer■compartment with your wet hands. This may cause frostbite.
Do not use an extension cord or adapter plug.■
Do not place bottled and canned drinks in the freezer as they■may crack when frozen.
Make sure that the power cord has not been damaged during■installation or moving. If the power plug or cord is loose, do
not insert the power plug. There is a risk of electric shock or
fire.
Disconnect from the mains electricity supply by removing the■mains plug from the electricity supply socket. Do not remove
by pulling the mains lead. This may cause electric shock or
fire.
In case of gas leak, ventilate the area by opening a window,■etc. Do not touch the refrigerator or the power outlet.
Do not place objects containing liquid or unsteady objects on■top of refrigerator.
IMPORTANT
■
Should the flexible supply cord be damaged, it must be
replaced by service agent approved by SHARP as a
special cord is required.
■
This appliance can be used by children aged from 8
years and above and persons with reduced physical,
sensory or mental capabilities or lack of experience
and knowledge if they have been given supervision or
instruction concerning use of the appliance in a safe
way and understand the hazards involved. Children
shall not play with the appliance. Cleaning and user
maintenance shall not be made by children without
supervision.
Information on Disposal for Users (private households)
1. In the European Union
Attention: If you want to dispose of this equipment, please do not use the ordinary dust bin!
Used electrical and electronic equipment must be treated separately and in accordance with
legislation that requires proper treatment, recovery and recycling of used electrical and electronic
equipment.
Following the implementation by member states private households within the EU states may return
their used electrical and electronic equipment to designated collection facilities free of charge*.
In some countries* your local retailer may also take back your old product free of charge if you
purchase a similar new one.
*) Please contact your local authority for further details.
If your used electrical or electronic equipment has batteries or accumulators, please dispose of
these separately beforehand according to local requirements.
By disposing of this product correctly you will help ensure that the waste undergoes the necessary
treatment, recovery and recycling and thus prevent potential negative effects on the environment
and human health which could otherwise arise due to inappropriate waste handling.
2. In other Countries outside the EU
If you wish to discard this product, please contact your local authorities and ask for the correct
method of disposal.
For Switzerland: Used electrical or electronic equipment can be returned free of charge to the
dealer, even if you don't purchase a new product. Further collection facilities are listed on the
homepage of www.swico.ch or www.sens.ch.
Attention:
Your product is marked
with this symbol.
It means that used
electrical and electronic
products should not
be mixed with general
household waste.
There is a separate
collection system for these
products.
(B484)W1.indb4(B484)W1.indb4 2013/10/1110:49:472013/10/1110:49:47

5
WARNING
Do not install the refrigerator in a damp or wet location as■this may cause damage to the insulation and a leakage.
Condensation may also build on the outer cabinet and
cause rust.
1Keep adequate ventilation space around the refrigerator.
The figure shows the minimum• required space for installing the
refrigerator. The measurement
condition of power
consumption is conducted
under a different space
dimension.
By keeping greater space,• the refrigerator may be operated
under a less amount of power
consumption.
If using the refrigerator in the smaller space dimension• than the below figure, it may cause the temperature rise
in the unit, loud noise and failure.
The space between the rear of the refrigerator and the• wall should be 60mm or more and less than 75mm.
If the space is wider than 75mm, you may get injured by
touching compressor and its peripheral parts which are
extremely hot during the operation.
2Use the two front adjustable feet, to ensure that the
refrigerator is positioned firmly and flat on the floor.
Before using your refrigerator
Clean the inside parts with a cloth soaked in warm water.
If soapy water is used, wipe it off thoroughly with water.
INSTALLATION
3When right and left doors are not properly aligned, adjust
using the adjustable feet.
NOTE
Position your refrigerator so that the plug is accessible.• Keep your refrigerator out of direct sunlight.• Do not place next to heat generating appliance.• Do not place directly on the ground. Provide suitable stand.• To insert the power plug when the door is opened, door alarm• sounds but it is not abnormal. This sound stops when closing the
door.
When the left door is
raised. When the right door
is raised.
Lower the foot
at right side. Lower the foot
at left side.
(Until the adjustable foot on the
other side is slightly off-ground.)
4Remove the 4 screws of the cabinet lower part, and then set
the foot cover (supplied inside the refrigerator compartment)
with removed 4 screws.
Screw
(4 screws) Screw
Foot cover
Free standing type
This refrigerator is provided with an indicator of temperature in the refrigerator compartment to allow you to control the average
temperature in the coldest zone.
Coldest zone
The symbol indicates the coldest zone in the
refrigerator compartment.
(The door pocket positioned at the same height isn't
the coldest zone.)
Checking the temperature in the coldest zone
You can carry out regular checks to ensure the temperature
in the coldest zone is correct and, if necessary, adjust the
refrigerator temp. control.
To maintain a correct temperature inside the appliance, check
that the indicator of temperature is always BLUE.
If the indicator of temperature turns WHITE, the temperature
is too high; in this case, increase the refrigerator temp. control
setting and wait for 6 hours before checking the indicator of
temperature again.
NOTE
The internal temperature of the refrigerator depends on various• factors such as the ambient temperature of the room, the amount
of food stored and the frequency of door opening.
When fresh food has been introduced or the door has been left• open for some time, it is normal for the indicator of temperature to
turn WHITE.
BLUE WHITE
Correct setting Temperature too high,
adjust the refrigerator temp.
control.
Symbol
INDICATOR OF TEMPERATURE
90mm
or more
60mm
or more 60mm
or more
Adjustable foot
1180 mm
1500 mm
Overall space
required in use
(B484)W1.indb5(B484)W1.indb5 2013/10/1110:49:482013/10/1110:49:48

6
Door pockets1. (3 pcs.)
Refrigerator shelves2. (2 pcs.)
Shelf3.
Bottle pocket (left)4.
Vegetable crisper5.
The cover of the Vegetable crisper
opens as the case is pulled.
Freezer cases (small)6. (3 pcs.)
Freezer cases (large)7. (2 pcs.)
Casters8. (4 pcs.)
Adjustable feet9. (2 pcs.)
Foot cover10.
Hybrid cooling panel11.
The panel is cooled from the rear, thus indirectly cools
the refrigerator compartment. In this way, food is
refrigerated gently, without exposing to the cold air flow.
Light12.
Utility pockets13. (2 pcs.)
Egg holder14.
Fruit case15.
Bottle pocket (right)16.
To store large-size bottles, move the
partition all the way back.
Fresh case17.
Ice cube maker18. (2 pcs.)
Do not over fill the tray;• otherwise the ice cubes will be joined
together when frozen.
When the ice cubes are made,• turn the lever clockwise to empty the
ice into the Ice storage box.
Partition
DESCRIPTION
21
15
16
5
20 20
20 20
22
7 7
6
1
2
1
3
4
6
88
99
10
1112 12
13
1
14
13
17
18
19
Lever
Ice storage box
Ice storage box19. (2 pcs.)
To prevent damage to the Ice storage box, do not make ice
in the Ice storage box or pour oil into it.
Magnetic door seals20. (4 pcs.)
Touch control panel21.
Deodorizing unit
Deodorizing catalyst is installed on the routes of cold air.
No operation and cleaning are required.
More food can be stored by taking out the
internal accessories with duly cooling.
How to remove
To remove the partition, pull it to
the front with pushing the claw.
Partition
Push
How to set
Insert the four projections into
the upper parts.
Claw
(B484)W1.indb6(B484)W1.indb6 2013/10/1110:49:492013/10/1110:49:49

7
Touch control panel
To operate, touch the keys with your bare hand.
To light the control panel
Press (Enter) key.
Normally, only the (Enter) key is displayed.
The panel will light and show the current setting.• After setting the features, when there is no operation• for 1 minute, the display will automatically return to the
standby display.
Thus if there is no operation for another 1 minute, the
display will be turned off.
<Standby display>
(Enter) key
Finalize the setting.
/ key
Press to select feature ON/OFF or
temperature setting.
Select key
Press to select feature icon and door
alarm signal.
Sound OFF indication
This indication shows
sound “OFF”.
Door alarm indication
This indication shows door
alarm “ON”.
Feature icons Icons of features in operation are colored. Controlling temperature icons
Energy saving Vacation mode Refrigerator compartment
Express Freezing Child lock
Temperature increase sign Freezer compartment
At the time of re-power distribution
When there is a power failure during the operation of Express• freezing, the operation will stop.
The other settings will show similarly as before having the• power failure.
Keys
Every time you open the door
The control panel will light up to show the current setting.
Operation is not accepted while the refrigerator door is open.•
(B484)W1.indb7(B484)W1.indb7 2013/10/1110:49:512013/10/1110:49:51

8
OPERATION
Energy Saving
Use this feature when you want to switch the appliance to
energy-saving operation.
To start operation
1Select “Energy saving” icon.
(The icon is green.)
2Select “ON”.
3Finalize the setting.
To cancel operation
It is the same method as starting operation.
Select “OFF” in step 2.
NOTE
While this feature is operating, the inside temperature of the• refrigerator and freezer compartment will be higher than the preset
temperature by about 1°C(refrigerator) and about 2°C(freezer).
This is the guide under the condition of the preset temperature
3°C(refrigerator) and -18°C(freezer). The display of preset
temperature will not be changed.
The efficiency of power saving depends on the usage environment• (controlling temperature, ambient temperature, frequency of
opening or closing the door, amount of food).
Cancel this feature when you feel the beverages are not cooled• enough or ice making takes time.
Tips for saving energy
Keep the ventilation space as much as possible around■the refrigerator.
Keep your refrigerator out of direct sunlight, and do not■place next to heat generating appliance.
Open your refrigerator door as briefly as possible.■
Hot foods should be cooled before storing.■
Place the food evenly on the shelves to allow the cooling■air to circulate efficiently.
The amount of power consumption of this model is
measured according to the international standard
of the refrigerator performance under the following
conditions.
All accessories in the freezer• compartment are taken out as
indicated on the figure.
Space dimensions.•
300mm
90mm
300mm
60mm
Flashing
(B484)W1.indb8(B484)W1.indb8 2013/10/1110:49:532013/10/1110:49:53

9
Vacation mode
Use this feature when going on a trip or leaving the house for a
long time.
To start operation
1Select “Vacation mode” icon.
2Select “ON”.
3Finalize the setting.
To cancel operation
It is the same method as starting operation.
Select “OFF” in step 2.
NOTE
The temperature inside the refrigerator compartment will be• adjusted to about 10°C.
Food storage period in the refrigerator compartment becomes• approx.1/2-1/3 of normal operation. Please utilize only when there
is no perishable food.
Temperature of refrigerator compartment cannot be modified.• (“10°C” is indicated on the display.)
Express Freezing
High-quality frozen foods can be made using this feature and is
convenient for home-freezing.
To start operation
1Select “Express freezing” icon.
2Select “ON”.
3Finalize the setting.
To cancel operation
It is the same method as starting operation.
Select “OFF” in step 2.
NOTE
Express Freezing ends automatically in about 2 hours.• (The icon will disappear.)
Large foods cannot be frozen in a single operation.• Express Freezing may require more than 2 hours in the case• operation overlaps with defrosting as operation is started after
defrosting is completed.
Avoid opening the door as much as possible during operation of• this feature.
Flashing
Flashing
(B484)W1.indb9(B484)W1.indb9 2013/10/1110:49:542013/10/1110:49:54

10
Child Lock
Key operation of the control panel will be locked. Use this
feature to prevent the panel from being used unintentionally by
children or someone.
To start operation
1Select “Child lock” icon.
2Select “ON”.
3Finalize the setting.
To cancel operation
It is the same method as starting operation.
Select “OFF” in step 2.
Temperature Increase sign
While this feature is operating, it will indicate the rise of inside
temperature caused by power failure or some other malfunction.
To start operation
1Select “Temperature increase sign” icon.
(The icon is orange.)
2Select “ON”.
3Finalize the setting.
Indication of temperature increase
If the inside temperature becomes as follows, temperature• increase will be indicated.
Refrigerator : more than 10°C
Freezer: more than -10°C
Check the quality of food before you eat.•
Indication
Icons will blink.•
How to cancel the indicator blink
Press the key while the icons are blinking.
To cancel operation
It is the same method as starting operation.
Select “OFF” in step 2.
Flashing Flashing
Blink slowly
(B484)W1.indb10(B484)W1.indb10 2013/10/1110:49:552013/10/1110:49:55

11
Advanced Setting of Freezer / Refrigerator compartment
The temperature of freezer compartment and refrigerator compartment can be adjusted in steps of 0.5 °C by following steps 1to 3
below.
Refrigerator compartment
Select
1. icon.
Press
2. key continuously for 3 seconds or more.
The current preset temperature on the display will be changed to 3.0 °C.
(The display will be indicated like right figure.)
Adjust the temperature in the same way as steps
3. 2to 3above.
Follow steps 1to 2again if you want to adjust the temperature in steps of 1°C.
Freezer compartment
Select
1. icon.
Press
2. key continuously for 3 seconds or more.
The current preset temperature on the display will be changed to -18.0 °C.
(The display will be indicated alternately like right figure.)
Adjust the temperature in the same way as steps
3. 2to 3above.
Follow steps 1to 2again if you want to adjust the temperature in steps of 1°C.
Controlling Temperature
The refrigerator controls its temperature automatically. However, if needed, adjust the temperature as follows.
Refrigerator compartment
Adjustable between 0°C and 6°C in steps of 1°C.
1Select icon.
The display shows the current preset temperature.
2Set the temperature.
[ : increase, : decrease ]
3Finalize the setting.
Freezer compartment
Adjustable between -13°C and -21°C in steps of 1°C.
1Select icon.
The display shows the current preset temperature.
2Set the temperature.
[ : increase, : decrease ]
3Finalize the setting.
Beep beep beep
Flashing Flashing
Beep beep beep
(B484)W1.indb11(B484)W1.indb11 2013/10/1110:49:572013/10/1110:49:57

12
Door Alarm
At first, door alarm is set “ON”.• When the refrigerator door is left open, the door alarm will• sound.
The door alarm will sound in 1 minute after opening the door• and again after 1 minute (once in each case).
If the door is left open for approx. 3 minutes, the alarm will• sound continuously.
To cancel operation
1Select the door alarm indication like the below figure.
2Select “OFF”.
3Finalize the setting.
To start operation
It is the same method as canceling operation.
Select “ON” in step 2.
At standby display
The indication will disappear.
Door alarm indication
It shows Door alarm “ON”.
At standby display
Sound ON/OFF
At first, the sound is set “ON”.• Use this feature when you want to switch the sound of key• operation to “ON” or “OFF”.
To set sound “OFF”
Press the key and key simultaneously and continuously
for 3 seconds or more.
To set sound “ON”
Press the key and key simultaneously and continuously
for 3 seconds or more again.
It shows the sound “OFF”.
The indication will disappear.
Lighting ON/OFF
Use this feature when you want to switch the lighting of• control panel when opening the door to “ON” or “OFF”.
To set “OFF”
Press the key and key simultaneously and continuously
for 3 seconds or more.
The display will be turned off.
To set “ON”
Press the key and key simultaneously and continuously
for 3 seconds or more again.
Beep beep beep
Beep
Flashing
Beep beep beep
Beep beep beep
(B484)W1.indb12(B484)W1.indb12 2013/10/1110:50:002013/10/1110:50:00

13
STORING FOOD
IN
OUT
Refrigeration reduces the rate of food spoilage.
To maximize the shelf life of perishable food products, ensure
that the food is of the freshest possible quality.
The following is a general guide to help promote longer food
storage.
Fruit / Vegetables
To minimize moisture loss, fruit and vegetables should be
loosely enclosed in a plastic material e.g. wrap, bags (do not
seal) and place in the vegetable crisper or the fruit case.
If you store a lot of vegetables, dew may form. This has no
effect on the operation or the performance. Use a dry cloth to
remove the dew.
Dairy Products & Eggs
Most dairy products have a use by date on the outer packaging• which informs the recommended temperature and shelf life of
the product.
Eggs should be stored in the Egg holder.•
Meats / Fish / Poultry
Place on a plate or dish and cover with paper or plastic wrap.• For larger cuts of meat, fish, or poultry, place to the rear of the• shelves.
Ensure all cooked food is wrapped securely or placed in an• airtight container.
NOTE
Evenly place the food on the shelves to allow• the cooling air to circulate efficiently.
Hot foods should be cooled before storing.• Storing hot foods increases the temperature
in the unit and increases the risk of food
spoilage.
Do not block the outlet and inlet of the cool• air circulating circuit with foods or containers;
otherwise the foods will not be evenly cooled
throughout the refrigerator.
Keep the door securely closed.•
Do not place food directly in front of cold air
outlet. This may lead to the food freezing.
For best freezing
Quality of foods should be fresh.• Freeze small quantities of food at a time to freeze them• quickly.
Food should be properly sealed, sealed tightly or covered.• Evenly place the food in the freezer.• Label bags or containers to keep an inventory of freezing food.•
Vegetables are improper●in this case. They may be
frozen.
Fruits Dairy products
Small foods
Eggs etc.
Bottles etc.
(Big size)
Meat, Fish, Poultry etc.
Vegetables
Small foods
Juice etc.
Bottles etc.
Frozen foods
(Small size)
Frozen foods
(Big size)
(B484)W1.indb13(B484)W1.indb13 2013/10/1110:50:022013/10/1110:50:02

14
WARNING
Unplug the refrigerator first to prevent electric shock.■Do not splash water directly on the outer cabinet or the■interior. This may lead to rusting and deterioration of the
electrical insulation.
IMPORTANT
To prevent cracking on inside surfaces and plastic
components, follow these tips.
Wipe any food oils adhered to plastic components.• Some household chemicals may cause damage, so use only• diluted washing-up liquid (soapy water).
If undiluted detergent is used or soapy water is not wiped off• thoroughly, cracking of plastic parts can result.
1Remove the accessories e.g. shelves from the cabinet and
door. Wash them in warm soapy dishwashing water; rinse
in clean water and dry.
2Clean the inside with a cloth soaked in warm soapy
dishwashing water. Then, use cold water to wipe off soapy
water.
3Wipe the exterior with a soft cloth each time it is soiled.
4Clean the Magnetic door seal with a toothbrush and warm
soapy dishwashing water.
5Wipe the control panel with the dry cloth.
NOTE
To prevent damage to your refrigerator, do not use heavy duty• cleansers or solvents (lacquer, paint, polishing powder, benzine,
boiled water, etc.).
If the power supply is disconnected, please wait for at least• 5 minutes before re-connecting power.
The glass shelves weigh approximately 3 kg each. Hold firmly• when removing from the cabinet or carrying.
Do not drop objects inside the refrigerator or strike the inner wall.• This may cause the inner surface to crack.
Defrosting
Defrosting is fully automatic due to a unique energy saving
system.
When the compartment light is blown
Contact the service agent approved by SHARP to request a
replacement compartment light. The compartment light is not to
be removed other than by qualified service personnel.
When transporting
Wipe up water in the evaporating pan. Before wiping up the• water, wait more than 1 hour after pulling out the plug because
refrigeration cycle equipment is extremely hot.
(The evaporating pan is located on the rear of the product.)
The casters allow the refrigerator to• move back and forth.
Carry the refrigerator by holding the handles located on the• rear and bottom.
Switching off your refrigerator
If you switch your refrigerator off when you are going away
for an extended period, remove all food, clean the interior
thoroughly. Remove the power cord plug from the power socket
and leave all doors open.
CARE AND CLEANING
Casters
Evaporating pan
(B484)W1.indb14(B484)W1.indb14 2013/10/1110:50:032013/10/1110:50:03

15
Before you call for service, check the following points.
Problem Solution
The outside of the cabinet is hot
when touched. It is normal. The hot pipe is in the cabinet in order to prevent dew generation.
When there is refrigerator noise. It is normal for the refrigerator to produce the following sounds.
Loud noise produced by the compressor when operation starts• --- Sound becomes quieter after a while.
Loud noise produced once a day by the compressor• --- Operating sound produced immediately after automatic defrost operation.
Sound of flowing fluid (gurgling sound, fizzing sound)• --- Sound of refrigerant flowing in pipes (sound may become louder from time to time).
Cracking or crunching sound, squeaking sound• --- Sound produced by expansion and contraction of inner walls and internal parts during
cooling.
Frosting or dew generation occurs
inside or outside the refrigerator. This may occur in one of the following cases. Use a wet cloth for wiping frost and a dry
cloth for wiping dew.
When the ambient humidity is high.• When the door is frequently opened and closed.• When foods containing plenty of moisture is stored. (Wrapping is required.)•
Foods in the refrigerator
compartment freeze. Is the refrigerator operated for a long time with refrigerator temp. control set at 0°C?• Is the refrigerator operated for a long time with freezer temp. control set at -21°C?• Low ambient temperatures may cause placed foods to freeze even if the refrigerator temp.• control is set to 6°C.
It smells in the compartment. Wrapping is required for the foods with strong smell.• Deodorizing unit cannot remove all of the smell.•
The control panel does not
work. This may occur in one of the following cases.
The panel or your finger is soiled with dripping, oil and etc.• When you touch the panel with gloved hand, adhesive bandage on your finger, nail or• objects.
Sticker or tape is affixed on the keys.• Touch position is slightly off from the keys.• Operate time is not enough for the keys to work.•
IF YOU STILL REQUIRE SERVICE
Refer to your nearest service agent approved by SHARP.
BEFORE YOU CALL FOR SERVICE
(B484)W1.indb15(B484)W1.indb15 2013/10/1110:50:032013/10/1110:50:03

16
Sólo para uso
doméstico
Le agradecemos la compra de este producto SHARP. Antes de utilizar su frigorífico SHARP, es recomendable que
lea este manual de funcionamiento para asegurarse de que obtiene las máximas ventajas de su nuevo frigorífico.
Este frigorífico es exclusivamente de uso doméstico, con una temperatura ambiente entre +5 °C y +43 °C.• El frigorífico no debe someterse a temperaturas de -10 °C o inferiores durante períodos prolongados.
ADVERTENCIA PRECAUCION
Este frigorífico contiene refrigerante inflamable (R600a:■isobutano) y gas explosivo de aislamiento (ciclo pentano).
Siga las siguientes reglas para evitar la ignición y explosión.
El sistema de refrigeración trasero e interior del frigorífico• contiene refrigerante. No permita que ningún objeto
puntiagudo toque el sistema de refrigeración.
No utilice dispositivos mecánicos u otros medios con el fin• de acelerar el proceso de descongelacion. (Este frigorífico
posee un sistema de descongelacion automático)
No utilice dispositivos eléctricos dentro del frigorífico.• Utilice sólo las piezas especificadas para la luz del• compartimiento del frigorífico.
No bloquee las aperturas alrededor del frigorífico.• No use atomizadores inflamables, como por ejemplo la• pintura en aerosol cerca del frigorífico. Podría ocasionar
explosiones o incendios.
Si se perfora el sistema de refrigeración, no toque el• enchufe de pared y no utilice llamas. Abra la ventana y
ventile la habitación. Luego pida el servicio de un agente de
servicio aprobado por SHARP.
Se debería deshechar de este frigorífico de forma• apropiada. Lleve el frigorífico a una planta de reciclaje para
refrigerantes inflamables y gases explosivos de aislamiento.
No guarde materiales altamente volátiles e inflamables como■por ejemplo, éter, gasolina, gas propano, atomizadores en
aerosol, sustancias adhesivas y alcohol puro, etc. Estos
materiales pueden ocasionar explosiones.
La acumulación de polvo en el enchufe de la red puede■provocar incendios. Límpielo con cuidado.
No modifique este frigorífico. Unicamente podrán desmontarlo■o repararlo técnicos autorizados, ya que de lo contrario
podrían producirse descargas eléctricas, incendio o daños
personales.
Asegúrese de que el frigorífico no represente ningún peligro■para los niños al ser almacenado para su desecho. (por
ejemplo, quite el cierre magnético de la puerta para prevenir
que queden atrapados los niños)
No toque la unidad del compresor o sus piezas periféricas ya■que pueden volverse muy calientes durante el funcionamiento
y los bordes de metal pueden provocar heridas.
No toque los alimentos o recipientes de metal del■compartimiento congelador con las manos mojadas. Esto
puede causar congelamiento.
No utilice un cable de extensión o una clavija adaptadora.■
No coloque las bebidas enbotelladas o enlatadas en el■congelador ya que podrían explotar al congelarse.
Asegúrese de que el cable de alimentación no se haya■dañado durante la instalación o el movimiento. Si la clavija
o el cable se encuentran deteriorados, no inserte la clavija.
Existe el riesgo de descargas eléctricas o incendios.
Cuando sapue el enchufe, no coja, no el cable, sino el■enchufe. Tirar del cable puede causar descargas eléctrica o
incendios.
En caso de que haya fugas de gas, ventile el área abriendo
■una ventana, por ejemplo. No toque el frigorífico ni el enchufe
del mismo.
No coloque contenederos de líquidos u objetos inestables en■la parte superior del frigorífico.
IMPORTANTE
■
Si el cable de corriente flexible se daña, debe ser
reemplazado por un agente de servicio aprobado por
SHARP debido a que se necesita un cable especial.
■
Este aparato puede ser utilizado por niños a partir de 8
años de edad y por personas con capacidades físicas,
sensoriales o mentales reducidas, o que no tengan
experiencia y capacitación siempre y cuando hayan
recibido supervisión o la formación relativa al uso del
aparato de una manera segura y hayan entendido
los riesgos existentes. No permita que los niños
jueguen con el aparato. La limpieza y el mantenimiento
del usuario no deben ser realizados por niños sin
supervisión.
Información sobre eliminación para usuarios particulares
1. En la Unión Europea
Atención: Si quiere desechar este equipo, ¡por favor no utilice el cubo de la basura habitual!
Los equipos eléctricos y electrónicos usados deberían tratarse por separado de acuerdo con la
legislación que requiere un tratamiento, una recuperación y un reciclaje adecuados de los equipos
eléctricos y electrónicos usados.
Tras la puesta en práctica por parte de los estados miembros, los hogares de particulares dentro
de los estados de la Unión Europea pueden devolver sus equipos eléctricos y electrónicos a los
centros de recogida designados sin coste alguno *. En algunos países* es posible que también
su vendedor local se lleve su viejo producto sin coste alguno si tiene previsto comprar uno nuevo
similar.
*) Por favor, póngase en contacto con su autoridad local para obtener más detalles.
Si sus equipos eléctricos o electrónicos usados tienen pilas o acumuladores, por favor deséchelos
por separado con antelación según los requisitos locales.
Al desechar este producto correctamente, ayudará a asegurar que los residuos reciban el
tratamiento, la recuperación y el reciclaje necesarios, previniendo de esta forma posibles efectos
negativos en el medio ambiente y la salud humana que de otra forma podrían producirse debido a
una manipulación de residuos inapropiada.
2. En otros países fuera de la Unión Europea
Si desea desechar este producto, por favor póngase en contacto con las autoridades locales y
pregunte por el método de eliminación correcto.
Para Suiza: Los equipos eléctricos o electrónicos pueden devolverse al vendedor sin coste alguno,
incluso si no compra ningún nuevo producto. Se puede encontrar una lista de otros centros de
recogida en la página principal de www.swico.ch o www.sens.ch.
Atención:
Su producto está
marcado con este
símbolo. Significa que
los productos eléctricos
y electrónicos usados no
deberían mezclarse con
los residuos domésticos
generales. Existe un
sistema de recogida
independiente para estos
productos.
(B484)W1.indb16(B484)W1.indb16 2013/10/1110:50:042013/10/1110:50:04

17
ADVERTENCIA
No instale el frigorífico en un sitio húmedo o mojado ya■que puede deteriorarse el aislante y se pueden producir
fugas. Además se puede formar condensación en el
exterior del frigorífico y ocasionar corrosión.
1Mantenga un espacio de ventilación adecuado alrededor
del frigorífico.
La figura muestra el espacio• mínimo requerido para la
instalación del frigorífico. Las
condiciones de medición
de consumo de energía
se realizan bajo
dimensiones diferentes
de espacio.
Al conservar mayor espacio,• el frigorífico podría operar con
menos cantidad de consumo de
energía.
Si utiliza el frigorífico en una superficie de tamaño inferior• al mostrado por la siguiente figura, podría ocasionar
un aumento de la temperatura de la unidad, ruidos de
operación altos y fallos.
El espacio entre la parte trasera del frigorífico y la pared• deberá ser de 60 mm o más y menor de 75 mm. Si el
espacio es más amplio que 75 mm, podría sufrir lesiones
al tocar el compresor y sus partes periféricas, que están
extremadamente calientes, durante el funcionamiento.
2Use los dos pies ajustables frontales, para asegurarse de
que el frigorífico quede posicionado firmemente y nivelado
sobre el suelo.
Antes de utilizar el frigorífico
Limpie las partes del interior con un paño humedecido en agua
tibia. Si emplea agua con jabón, frótelo bien con agua para que
no queden residuos de jabón.
INSTALACION
60mm60mm
90mm
3Cuando la puerta derecha y la izquierda no están debidamente
alineadas, ajústelas utilizando los pies ajustables.
NOTAS
Coloque el frigorífico de modo que el enchufe sea accesible.• Mantenga el frigorífico alejado de la luz solar directa.• No lo coloque junto a aparatos generadores de calor.• No coloque directamente en el suelo. Coloque un soporte• adecuado.
Al introducir el enchufe de toma de corriente cuando la puerta• está abierta, suena la alarma de la puerta pero esto es normal.
La alarma se detiene al cerrar la puerta.
Pie ajustable
Cuando la puerta
izquierda está elevada. Cuando la puerta
derecha está elevada.
Baje el pie
de la parte
derecha.
Baje el pie
de la parte
izquierda.
(Hasta que el pie ajustable del otro lado
quede ligeramente por encima del suelo.)
4Quite los 4 tornillos de la parte inferior del frigorífico y luego
coloque la cubierta de protección inferior (situada dentro
del compartimiento congelador) con los 4 tornillos.
Tornillo
(4 tornillos) Tornillo
Cubierta de
protección inferior
Tipo no encastrablé
Este frigorífico está equipado con un indicador de temperatura en el compartimiento del frigorífico que permite controlar la temperatura
media en la zona más fría.
Zona más fría
El símbolo indica la zona más fría en el compartimiento
del frigorífico. (El compartimiento de la puerta colocada
a la misma altura no es la zona más fría).
Comprobación de la temperatura en la zona
más fría
Puede llevar a cabo comprobaciones regulares para asegurar
que la temperatura en la zona más fría es la correcta, en caso
necesario, ajuste el control de temperatura del frigorífico.
Para mantener la temperatura correcta dentro del
electrodoméstico, compruebe que el indicador de temperatura
esté siempre AZUL. Si el indicador de temperatura se vuelve
BLANCO, la temperatura es demasiado alta; en este caso, aumente
el ajuste del control de la temperatura del frigorífico y espere 6
horas antes de controlar el indicador de temperatura de nuevo.
NOTAS
La temperatura interna del frigorífico-congelador depende• de varios factores tales como la temperatura ambiente de la
habitación, la cantidad de alimentos almacenados y la frecuencia
con la que se abre la puerta.
Cuando se introduzcan alimentos frescos o cuando se haya• dejado la puerta abierta durante un tiempo, es normal que el
indicador de temperatura se vuelva BLANCO.
AZUL BLANCO
Ajuste correcto Temperatura demasiado
alta, ajuste el control de
temperatura del frigorífico.
Símbolo
INDICADOR DE TEMPERATURA
o máso más
o más
1180 mm
1500 mm
Espacio total
requerido en uso
(B484)W1.indb17(B484)W1.indb17 2013/10/1110:50:042013/10/1110:50:04

18
Compartimientos de la puerta1. (3 pzas.)
Estanterías del frigorífico2. (2 pzas.)
Estante3.
Compartimiento para botellas (izquierdo)4.
Gaveta para Vegetales5. La tapa de la gaveta para vegetales se
abre al tirar del compartimiento.
Cajones del congelador (pequeño)6.
(3 pzas.)
Cajones del congelador (grande)7.
(2 pzas.)
Ruedecillas8. (4 pzas.)
Pies ajustables9. (2 pzas.)
Cubierta de protección inferior10.
Panel de enfriamiento híbrido11. El panel se enfría por la parte de atrás, enfriando así
de forma indirecta el compartimiento refrigerador. De
esta forma, los alimentos se congelan suavemente, sin
exponerlos a la corriente de aire frío.
Luz12.
Compartmiento de usos múltiples13. (2 pzas.)
Huevera14.
Compartimiento de la fruta15.
Compartimiento para botellas (derecho)16. Para meter botellas de tamaño grande,
mueva la pieza divisoria completamente
hacia atrás.
Compartimiento de frescos17.
Dispositivo para hacer cubitos18. de hielo (2 pzas.)
No llene excesivamente la bandeja;• de lo contrario los cubitos de hielo
quedarían pegados al congelarse.
Cuando estén hechos los cubitos,• gire la palanca en el sentido horario
para vaciarlos en el compartimento de
almacenamiento del hielo.
Compartimento de almacenamiento del hielo19.
(2 pzas.)
Para evitar daños en el compartimento de almacenamiento
del hielo, no haga hielo en él ni vierta aceite en él.
Cierres magnéticos de la puerta20. (4 pzas.)
Panel de control táctil21.
Unidad de desodorizacion
El catalizador de desodorización es instalado en las rutas del
aire frío. No se requiere operación o limpieza.
Se podrán almacenar más alimentos
sacando los accesorios internos con la
debida refrigeración.
Pieza divisoria
DESCRIPCION
21
15
16
5
20 20
20 20
22
7 7
6
1
2
1
3
4
6
88
99
10
1112 12
13
1
14
13
17
18
19
Palanca
Compartimento de
almacenamiento del hielo
Cómo extraerla
Para extraer la pieza divisoria, tire
de ella hacia el frente apretando el
agarrador.
Pieza divisoria
Empuje
Cómo colocarla
Inserte los cuatro salientes en
las partes superiores.
Agarrador
(B484)W1.indb18(B484)W1.indb18 2013/10/1110:50:052013/10/1110:50:05

19
Panel de control táctil
Para ponerlo en funcionamiento, toque las teclas directamente con la mano.
Para iluminar el panel de control
Presione la tecla (Intro).
Normalmente, sólo la tecla (Intro) será visualizada.
El panel se iluminará y mostrará el ajuste actual.• Tras ajustar las funciones, si no se realiza ninguna• operación durante 1 minuto, la pantalla volverá
automáticamente a la visualización en modo de espera.
<Visualización modo de espera>
Tecla (Intro)
Finaliza el ajuste.
Tecla /
Presiónelo para seleccionar la función
ACTIVACIÓN/DESACTIVACIÓN o el
ajuste de la temperatura.
Tecla de selección
Presiónelo para seleccionar el icono de
función y la señal de la alarma de la puerta.
Indicador de DESACTIVACIÓN
de sonido
Este indicador muestra que se
ha “DESACTIVADO” el sonido.
Indicador de alarma de puerta
Este indicador muestra que está
“ACTIVADA” la alarma de la puerta.
Iconos de funciones Los iconos de las características en
funcionamiento están coloreados.
Iconos de control de la
temperatura
Ahorro de energía Modo vacaciones Compartimiento frigorífico
Congelado rápido Bloqueo para niños Compartimiento congelador
Señal de incremento de temperatura
En el momento de redistribución de
corriente
Cuando se produce un fallo de alimentación durante la• operación de congelado rápido, la operación se detendrá.
El resto de ajustes se mostrarán de manera similar a antes de• suceder la interrupción de suministro eléctrico.
Teclas
Cada vez que se abra la puerta
El panel de control se iluminará para mostrar el ajuste actual.
La operación no se aceptará mientras la puerta del frigorífico• esté abierta.
(B484)W1.indb19(B484)W1.indb19 2013/10/1110:50:062013/10/1110:50:06

20
FUNCIONAMIENTO
Ahorro de energía
Use esta función cuando desee cambiar el aparato al
funcionamiento de ahorro de energía.
Para comenzar la operación
1Seleccione el icono de “Ahorro de energía”.
(El icono es verde)
2Seleccione “ACTIVAR”.
3Finaliza el ajuste.
Para cancelar la operación
Es el mismo método cuando inicia el funcionamiento.
Seleccione “OFF” en el paso 2.
NOTAS
Mientras está función esté activada, la temperatura interior del• frigorífico y del compartimento congelador estará alrededor
de 1 °C (frigorífico) y 2 °C (congelador) por encima de la
temperatura preestablecida. Esta es la guía bajo la condición
de tener la temperatura preestablecida a 3 °C (frigorífico) y -18
°C (congelador). La pantalla de temperatura preestablecida no
cambiará.
La eficiencia del ahorro de energía depende del entorno de uso• (temperatura ambiental, frecuencia con la que se abre o cierra la
puerta, cantidad de alimentos).
Cancele esta función cuando sienta que las bebidas no se enfrían• lo suficiente o cuando tarda más tiempo en producir hielo.
Sugerencias para ahorrar energía
Mantenga un espacio de ventilación adecuado alrededor■del frigorífico.
Mantenga el frigorífico alejado de la luz solar directa y no■lo coloque junto a aparatos generadores de calor.
Abra la puerta del frigorífico el menor tiempo posible.■
Los alimentos calientes deben enfriarse antes de■colocarlos en el frigorífico.
Coloque de manera uniforme la comida en los estantes■para permitir que el aire frío circule eficientemente.
La cantidad de consumo de energía de este modelo
ha sido medida en conformidad con el estándar
internacional de funcionamiento del frigorífico bajo las
siguientes condiciones.
Todos los accesorios en el• compartimento congelador se
extraen como se indica en la figura.
Dimensiones del espacio.•
300mm
90mm
300mm
60mm
Parpadeando
(B484)W1.indb20(B484)W1.indb20 2013/10/1110:50:082013/10/1110:50:08
Table of contents
Languages:
Other Sharp Refrigerator manuals

Sharp
Sharp SJ-TD641S User manual

Sharp
Sharp SJ-BA09DTXWF-EN User manual

Sharp
Sharp SJ-F77 User manual

Sharp
Sharp SJ-BA31IEWGE-EU User manual

Sharp
Sharp SJ-F320V User manual

Sharp
Sharp SJ-P600M User manual

Sharp
Sharp SJ-FS676V User manual

Sharp
Sharp SJ-EK19P User manual

Sharp
Sharp SJ-FBB04DTXLE-EU User manual

Sharp
Sharp SJ-EX645P User manual

Sharp
Sharp SJ-25P User manual

Sharp
Sharp SJ-F602SP User manual

Sharp
Sharp SJ-BA31IHXI2-EN User manual

Sharp
Sharp SJ-XG640M User manual

Sharp
Sharp SJ-BA05IMXJ2-EU User manual

Sharp
Sharp SJ-T1332M0I-EU User manual

Sharp
Sharp SJ-351N User manual

Sharp
Sharp SJ-XE624F User manual

Sharp
Sharp SJ-B1297M1I-EN User manual

Sharp
Sharp SJ-PT441R User manual