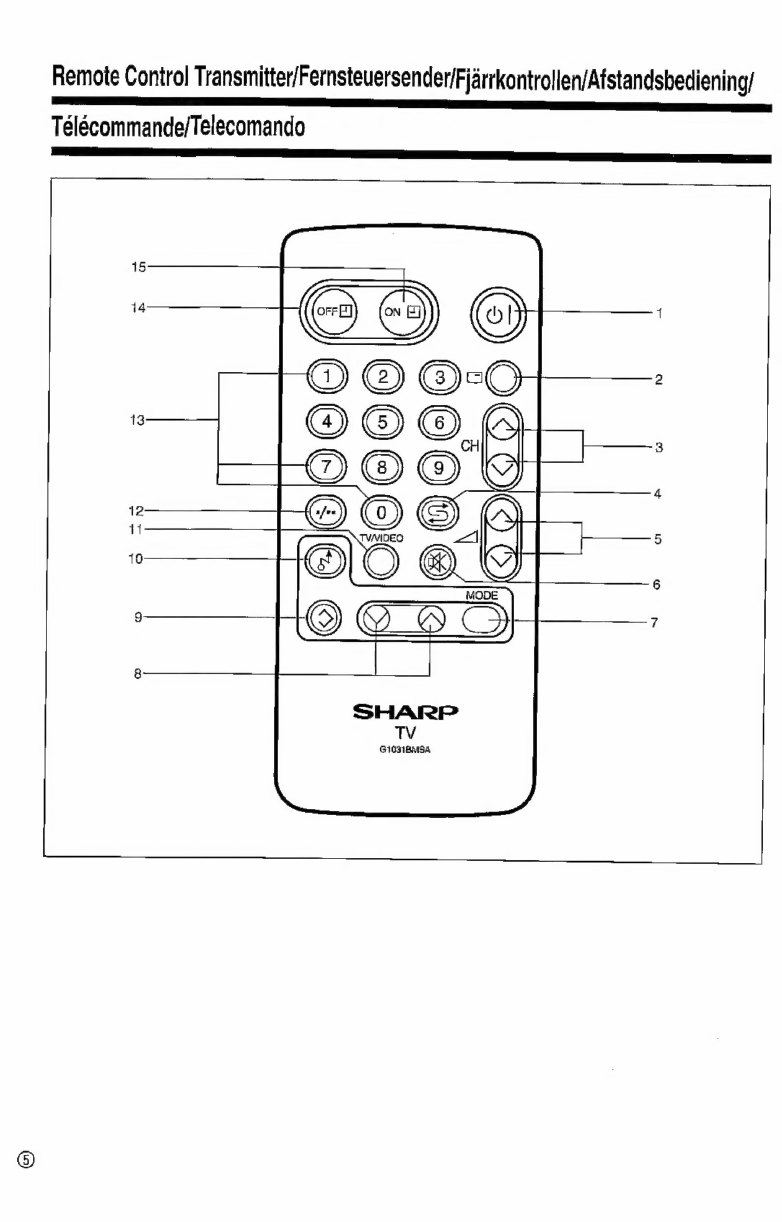
Sharp DV-3750S User manual

——<————
—————
|
[
I
Hl
hu
|
walt
li
SHARP
COLOUR
TELEVISION
GHARP
FARBFEMNSEMGERAT
SHARP
FARGTELEVISION
SHARE
KLEURENTELEVISIE
TELEVISEUR
COULEUR
SHARP
TELEVISORE
A
COLORI
SHARP
OPERATION
MANUAL
BEDIENUNGSANLEITUNG
BRUKSANVISNING
GEBRUIKSAANWIJZING
MODE
D'EMPLO!
MANUALE
Dt
ISTRUZIONI
Waayk
4
Model/Mocell/Modell/IModel/Modéle/Modetlo
Be,
eames
ee,
ae
J
Y
tage
FE
OVIAS
ne
J
.
f
a):
WY,

Dear
SHARP
Customer:
“SHARP”
consumer
electronic
products
have
established
a
worldwide
reputation
for
unsurpassed
quality
and
precision
manufacturing
techniques
since
1924,
when
the
famous
SHARP
trademark
first
appeared
on
a
radio
receiver.
Your
new
SHARP
Colour
TV
uses
the
very
latest
electronic
circuitry
and
engineering
advancements
for
the
best
possible
performance.
Given
proper
care,
your
new
TV
will
provide
many
years
of
entertainment
for
the
entire
family.
Please
read
the
following
instructions
before
operating
this
set.
Verehrter
SHARP-Kunde!
Seit
1924,
als
das
Warenzeichen
SHARP
zum
ersten
Mai
einen
Rundfunkempfanger
zierte,
haben
“SHARP”-Gerate
der
Unterhaltungselektronik
sich
weltweit
einen
guten
Ruf
fir
untbertroffene
Qualitat
und
genauesie
Herstellungsver
fahrung
erworben.
Ihr
neuer
SHARP
Farbfernseher
wurde
mit
den
modernsten
eiektronischen
Bauteilen
nach
modernsten
Verfahren
hergestellt,
un
die
gréBtmdgliche
Leistung
zu
erbringen.
Bei
richtiger
Behandlung
wird
er
Ihrer
Familie
Uber
viele
Jahre
hinweg
Enispannung
und
Unierhaltung
bieten.
Bevor
Sie
Ihren
Fernseher
anschlieGBen
und
einschalten,
sollten
Sie
jedoch
auf
jeden
Fall
diese
Anleitung
durchlesen.
Baste
SHARP-kund
Sedan
1924,
da
det
numera
sa
valkanda
varumarket
SHARP
fér
férsta
gangen
férekom
pa
en
radiomottagare,
har
SHARP
:s
elektroniska
produkter
fér
hemmet
skapat
sig
ett
varldsomfattande
namn
fér
sin
odvertraffade
kvalitet
och
sin
precisionstillverkning.
Din
nya
farg-TV
fran
SHARP
utnyttjar
de
senasie
elktroniska
kretsarna
och.
De
nyaste
tekniska
rénen
fér
att
ge
basta
mojliga
atergivning.
Vid
korrekt.
Behandling
kommer
Din
nya
TV
ait
ge
manga
ars
underhallning
for
hela
familjen.
Vi
ber
Dig
lassa
denna
bruksanvisning
innan
Du
bérjar
anvanda
apparaten.
Geachte
SHARP
klant
De
elktronische
“SHARP”
verbruiks-
goederen
hebben
sinds
1924,
toen
het
beroemde
SHARP
handelsmerk
voor
het
eerst
op
een
radio
verscheen,
over
de
heie
wereld
een
ongeévenaarde
reputatie
opgebouwd
wat
betreft
kwaliteit
en
precisie
fabricage
technieken.
Uw
nieuwe
SHARP
kleuren
TV
gebruikt
de
modernste
electronische
schakel-
systemen
en
de
allernieuwste
techniek
voor
optimale
prestaties.
Met
het
juiste
onderhoud,
geeft
uw
nieuwe
TV
jarenlang
kijkplezier
voor
het
hele
gezin.
Voor
u
het
toestel
in
gebruik
neemt
de
volgende
aanwijingen
doorlezen.
Cher
client
SHARP:
Les
produits
de
consommation
élec-
troniques
“SHARP”
se
soni
taillés
depuis
1924
une
réputation
mondiale
de
qualité
et
de
fabrication
de
précision
inégalées,
avec
l'apparition
de
cette
célébre
marque
sur
un
récepteur
de
radio.
Votre
nouveau
téléviseur
couleur
SHARP
fait
appel
aux
derniers
perfectionnements
en
matiére
de
circuits
électroniques
et
de
technique
pour
vous
offrir
les
meilleures
performances
possibles.
S’il
recoit
des
soins
adéquats,
il
assurera
de
longues
années
de
distraction
a
toute
la
famille.
Veuillez
lire
les
instructions
suivantes
avant
dutiliser
ce
poste.
Alla
Gentile
Clientela,
Fin
dal
1924,
anno
in
cui
apparve
per
la
prima
volta
il
famoso
marchio
SHARP
vantano
un’alta
reputazione
a
livello
mondiale
per
la
precisione
e
ta
qualita
insuperata
della
fabbricazione.
Questo
nuovo
televisore
a
colori
SHARP
dispone
di
avanzatissimi
circuiti
elettronici
@
ritrovati
tecnici
che
offrono
prestazioni
della
massima
qualita.
Se
utilizzato
con
la
dovuta
cura,
il
vostro
nuovo
televisore
allietera
tutta
la
famiglia
per
molti anni.
Prima
di
mettere
in
funzione
il
televisore,
leggere
le
sequenti
instruzioni.

Controls
&
Terminals/Regler
und
Anschliisse/Kontroller
och
Kontakter/
Bedieningsorganen
en
aansluitingen/Commandes
et
prises/Comandi
e
connettori
Front
t.
Main
power
ON/OFF
switch
2.
Red/green/orange
power
and
On-Timer
indicator
3.
Program
selector
(UP)
4.
Program
selector
(DOWN)
5.
Volume
button
(UP)
6.
Volume
button
(DOWN)
7.
Remote
control
sensor
A
uf
der
Vorderseite
.
Netzschalter
.
RovGrin/Orange-Betriebs-
und
Einschalt-Timer-
Anzeige
.
Kanaiwahl
(Auf)
.
_Kanalwah!
(Ab)
.
Lautstarkeregler
(Auf)
.
Lautstarkeregler
(Ab)
.
Fernsiteuerempfanger
.
Strémbrytare
.
Stromstallare
med
3-fargad
(réd/grén/orange)
LED-indikator
och
tillslagsindikator
.
Programvaljare
(UPP)
.
Programvaljare
(NER)
.
Valymknapp
(UPP)
.
Volymknapp
(NER)
1
2
3
4
5
6
7
Kontroller
och
kontakier
1
2
3
4
5
6
7.
Avkannare
for
fjarrkontrollen
Voorzijde
.
Hoofdschakelaar
aan/uit
-
Rood/groen/oranje
indikatielampje
voor
de
bedrijfsspanning
en
aanschakeltimer
.
Kanaalkiezer
(OMHOOG)
.
Kanaalkiezer
(OMLAAG)
.
Volumeknop
(OMHOOG)
.
Volumeknop
(OMLAAG)
.
Sensor
van
afstandsbediening
P
NOMA
wa
vant
.
Commutateur
de
marche/arrat
.
Voyant
d’alimentation
rouge/orange/vert
et
de
minuterie
de
mise
sous
tension
.
Sélecteur
de
canaux
(HAUT)
.
Sélecteur
de
canaux
(BAS)
.
Bouton
de
volume
(HAUT)
.
Bouton
de
volume
(BAS)
.
Capteur
de
télécommande
avanti
.
Interruttore
generale
acceso/spento
.
Indicatore
di
alimentazione
fosso/verde/arancione
e
indicatore
On-timer
.
Seleitore
canale
(+)
.
Selettore
canale
(-)
.
Pulsante
volume
(+)
.
Pulsante
volume
(-)
.
Sensore
telecomando
NOORW
MAG
NoOomnw
wa

10
ibd
EITC
PTV
I
TEL
VN
HTT
Rear
8.
21-pin
Euro-SCART
9,
Antenna
terminal
10.
Antenna
mounting
hole
11.
Rod
antenna
(mono-pole)
CAUTION
Make
sure
that
the
main
power
is
switched
off
when
going
out.
Auf
der
Ritckseite
8.
21-poliger
Euro-SCART-AnschluB
9.
Antennenbuchse
10.
Einsteckéffnung
ftir
Antenne
11.
Stabantenne
(Mono-Pol)
VORSICHT
Unbendingt
den
Netzschalter
aus-
schalten,
bevor
Sie
die
Wohnung
verlassen.
Bak
8,
21-vagskabel
Euro-Scart
9,
Antennkontakt
10.
Antennfaste
11.
Teleskopantenn
VARNING
Se
till
att
natstré6mmen
ar
avstangd
nar
Du
gar
ut.
Achterzijde
8.
21-pen
Euro-SCART
9.
Antenne
aansluiting
10.
Antennebevestigingsgat
11.
Staafantenne
(mono-poo!)
OPGEPAST
Schakel
uw
onivanger
uit
als
u
weggaat.
Arriére
8.
Euro-SCART
21
points
9,
Prise
dantenne
10.
Orifice
de
montage
de
lantenne
11.
Anlenne
(monopolaire)
ATTENTION
Assurez-vous
que
l'alimentation
du
secteur
est
coupée
en
sortant.
Retro
8.
Euro-SCART
a
21
piedini
9,
Presa
antena
10.
Asola
per
inserire
l'antenna
11.
Asta
dell'antenna
(monatubo)
ATTENZIONE
Prima
di
uscire
di
casa,
accertare
che
linterruttore
generale
sia
spento.

Remote
Control
Transmitter/Fernsteuersender/Fjarrkontrollen/Afstandsbediening/
Télécommande/Telecomando
T
Gi031BMSA

Remote
Control
Transmitter
NOORONM
>
a:
10.
11.
12.
13.
14.
15.
_
Power
on/off
button
.
Channel/Timer
call
button
_
Channel
up
(
A
)/down
(
V
)
buttons
.
Flashback
button
.
Volume
adjusiment
buttons
.
Sound
mute
button
_
Mode
select
button
(contrast,
colour,
brightness,
picture
tone)
.
Contrast,
colour
brightness
and
picture
tone
adjusiment
buttons.
Auto-search,
manual
and
fine
tuning
Preset
button
Skip
button
Tv/Video
Selection
Singie/Double
entry
selector
Channel
select
butions
Off-timer
bution
On-timer
button
Fjarrkontrollen
“I
G)
OF
fF
GO
ND
.
Stromstallare
.
Kanal/timerkontrolitangent
.
Kanalvaljartangenter
(A)
(V
)
.
Kanaibytartangent
.
Liudnivatangenter
.
Ljudavstangningstangent
_
Funktionsvaljare
(kontrast,
farg,
ljusstyrka,
fargton)
.
Tangenter
far
reglering
av
kontrast,
farg,
ljusstyrka
och
fargton
Auto-sékning,
manuell
och
fin
avstamning
.
Férinstalining
.
Overhoppning
.
TV/Video-iangent
.
Singel/dubbellangent
.
Kanalvaljartangenter
..
Franslagstangent
.
Tillslagstangent
Félécommande
1.
.
Touche
de
rappel
de
canal/minuterie
NOON
Touche
de
marche/arrét
Touches
de
canal
(croissant/décroissant)
.
Touche
de
retour
arriere
.
Touches
de
régiage
du
volume
.
Touche
de
sourdine
.
Sélecteur
de
mode
(contraste,
couleur,
lurninosité,
tonaliié
de
l'image)
.
Touches
de
réglage
contraste,
couleur,
juminosité
et
tonalité
de
l'image,
recherche
automatique,
réglage
manuel
et
réglage
fin
,
Preregolazione
10.
11;
12;
13.
14.
15.
Salto
canale
Sélecteur
téléviseur/vidéo
Sélecteur
simple/double
entrée
Touches
de
sélection
de
canal
Touche
de
minuterie
de
mise
hors
tension
Touche
de
minuterie
de
mise
sous
tension
Fernsteuersender
ab
on
~)
om
.
Neizschalter
_
Kanal/Timerabruf-Taste
.
Kanalwahtiasten
Auf
(A
)/Ab
(V
)
.
Zurtickschaltungs-Taste
.
Einstelltasten
flr
Lautstarke
.
Tonabschalttaste
.
Betriebsarl-Wahltaste
(Kontrast,
Farbe,
Helligieit,
Bildschérie)
.
Einstetliasten
far
Kontrast,
Farbe,
Helligkeit
und
Bildscharfe
Automatischer
Suchlaur,
von
Hand
und
Feincinsteliung
.
Vorvahitaste
.
.
Taste
«Skip»
.
TV/Video
Wahischalter
.
Taste
zur
Wahl
von
einstelliger/zweistelliger
Eingabe
.
Kanalwahitasten
.
Ausschall-Timer-Taste
.
Einschalt-Timer-Taste
Afstandsbediening
1.
.
Toets
voor
oproepen
9.
10,
AT:
‘12:
13.
14.
15.
Aan/uit-toets
kanaainummer/imertijd
.
Kanaalkeuzetoetsen
omhoog
(
A
)/omlaag
(Vv)
2
3
4,
Flashbackioets
5.
6
7
8
Volumetoeisen
.
Geluidsonderdrukkingstoets
.
Funktiekeuzetoetsen
(konirast,
kleur,
helderheid,
beeldscherpte)
.
Regeltoetsen
voor
kontrast,
kleur,
helderheid
en
beeldscherpte.
Automatische
afzoeker,
hadbediening
en
fijnafstemmer
Voorkeuzetoets
Oversla
toets
TV/Video-keuzetoets
Enkel/dubbelcijferig-loets
Cijfertoetsen
voor
kanaalkeuze
Uitschakeltimertoets
(OFF)
Aanschakeitimertoets
(ON)
Telecomando
1.
Acceso/spento
2.
Tasio
canale/richiamo
ora
“SO
OB
.
Tasti
canale
Up
(/\}
Down
(V
)
.
Tasto
di
flashback
.
Tasti
reqolazione
volume
.
Tasto
di
silenziamento
.
Tasti
per
regolare
conirasto,
colore,
luminositaé
e
tono
del'immagine
,
Tasto
per
selezionare
il
modo
(contrasto,
colore,
tuminosita
e
tono
del'immagine)
.
Preregolazione
.
Salio
canale
.
Selettore
TV/Video
.
Seleliore
input
a
una/due
cifre
.
Tasti
di
selezione
det
canali
,
Timer
spegnimento
.
Tasto
On-timer

Installing
the
Batteries
—
Remove
the
cover
and
insert
two
“AA”
or
“UM-3"
1.5V
batteries
as
illustrated.
Notes:
1.
The
infrared
remote
control
requires
3
volts
for
operation.
If
power
js
insufficient
for
operation,
replace
the
baiteries.
2.
Position
the
positive
and
negative
terminais
of
the
batteries
as
indicated.
If
you
use
batteries
other
than
those
specified,
the
remote
control
may
not
operate.
Einsetzen
der
Batterien
—
Den
Deckeil
vom
Batteriefach
abnehmen
und
zwei
1,5V
Baiterien
des
Typs
“AA”
oder
“UM-3”
wie
in
der
Abbildung
gezeigt
einsetzen.
Hinweis:
1.
Die
Infrarot-Fernsteuerung
bendtigt
3V
fir
den
Betrieb.
Wenn
die
Batterien
zu
schwach
geworden
sind,
miissen
sie
ersetzt
werden.
2.
Auf
richtige
Lage
des
Plus—
und
Minuspols
der
Batterien
achten.
Wenn
andere
als
die
angegebenen
Batterien
verwendet
werden,
kann
es
sein,
da
die
Fernsteuerung
nicht
funktioniert.

Isattning
av
batterier
—
Tag
borl
locket
och
satt
ii
tva
1,5V
baiterier
av
typ
“AA”
eller
UM-3
typ
enligt
bilden.
OBS:
1.
Den
infraréda
fjarrkontrolien
anvander
3V.
Om
den
inte
fungerar,
kan
batterierna
behéva
bytas.
2.
Se
till
atl
batterierna
kommer
at
ratt
hall.
Om
Du
anvander
andra
batterier
an
de
har
angivna,
kan
det
handa
ati
fjarrkontrollen
inte
fungerar.
Aanbrengen
van
de
batterijen
-
Verwijder
het
klepje
en
breng
twee
“AA®
of
“UM-
3°
1,5V
batterijen
aan
zoals
in
de
afbeeldingen
le
Zien
15.
N.B.:
1.
De
infrarode
afstandsbendiening
werkt
op
3
volt.
Bij
onvoldoende
vermogen
de
batterijen
vervarigen.
2.
Let
op
de
correcte
plaatsing
van
de
positieve
en
negatieve
pool.
Als
u
andere
dan
de
voorgeschreven
battertjen
gebruikt
kan
de
afstandsbediening
niet
werken.
Pose
des
piles
—
Otez
le
couvercle
et
introduire
deux
piles
de
1,5V
“AA”
on
“UM-3"
comme
indique.
Remarques:
4,
La
iélécommande
4
infrarouge
nécessite
3
volts
pour
fonctionner.
Si
l'alimentation
est
insuffisanie,
remplacez
les
piles.
2.
Placez
les
extrémités
positives
et
negatives
correctement.
Si
vous
employez
des
piles
différentes
des
types
indiqués,
|’appareil
risque
de
ne
pas
fonctionner.
Installazione
batterie
—
Togliere
i!
coperchio
e
introdurre
due
batterie
“AA
o
“UIM-3”
da
1,5V,
come
illustrato,
Note:
1.
ll
telecomando
a
raggi
infrarossi
funziona
ad
una
tensione
di
3V.
Se
la
tensione
6
insufficiente,
sostituire
le
batterie.
2.
Orientare
correltamente
i
poli
delle
batterie.
Se
si
utilizzano
batterie
diverse
da
quelle
raccomandate,
il
telecomando
potrebbe
non
funzionare.

Operation
of
Controls
@-@
Power
source
and
TV
system.
This
TV
set
can
be
operated
on
AC
220V~240V
SOHz.
It
is
designed
exclusively
for
PAL
B/G
broadcast
system.
@
-@®
Blue
back
off
timer.
If
noise
appears
in
TV
mode,
the
screen
turns
biue.
The
blue
back
off-
timer
is
then
engaged
and
will
automatically
switch
the
set
to
standby
made
in
15
minutes.
@
Red/green/orange
power
and
On-Timer
indicator
When
the
main
power
on/off
button
{
Ol)
at
the
front
of
the
set
is
pressed,
the
TV
set
will
be
in
standby
with
the
LED
indicator
illuminated
red.
Then,
when
the
power
on/off
button
on
the
remote
control
or
any
frontal
button
(Channel
UP/DOWN,
Volume
UP/DOWN)
of
the
TV
set
is
pressed,
LED
indicator
will
turn
green
and
a
picture
wiil
appear
on
the
screen.
The
channel
programme
number
is
also
displayed
in
the
upper
right
corner
of
the
screen.
Press
the
power
on/off
button
(1)
on
the
remote
control
to
return
the
set
to
standby
mode
(LED
indicator
wiil
be
illuminated
red,
and
also
when
the
On-Timer
is
set,
the
LED
indicator
will
be
illuminated
orange.
See
How
to
Set
the
On-Timer
on
page
12.)
Red/green/orange
power
and
On-Timer
indicator
MAAN
NYCHIN
Note:
If
the
main
power
on/off
button
on
the
TV
is
pressed
{set
to
on),
even
the
set
has
been
turned
off
previously
with
the
remote
control
unit’s
power
on/off
button,
the
TV
will
remain
in
the
standby
mode,
and
no
picture
will
appear.
Therefore,
to
make
the
picture
appear
on the
screen,
press
the
power
on/off
button
(<5!)
on
the
remote
control
or
any
frontal
button
(Channel
UP/DOWN,
Volume
UP/DOWN).
@
Sound
volume
V
4
A
The
volume
can
be
adjusted
by
pressing
a
volume
button
on
the
set
or
on
the
remote
control.
Press
the
Volume
Up
(
A.)
button
to
increase
the
volume
and
the
Volume
Down
(\/)
buiton
to
decrease
the
volume.
The
volume
level!
is
indicated
by
the
number
of
rectangles,
“fl...”
displayed
after
the
“<1”
in
the
upper
part
of
the
screen.
(Only
the
mark
“41
.....”
is
displayed
when
there
is
no
sound.)

@
-
@
ThisTV
set
has
39
norma!
Channels
and
one
special
channel
“VCR”
for
Tuning
your
Video
Cassette
Recorder
through
the
antenna
Terminal.
Press
the
“0”
button
if
you
want
to
select
VCR
channel.
(See
noie
on
page
14).
@)
-
©
Channel
Selection
VCH
A
The
channel!
number
is
displayed
on
the
screen
when
the
Channel
selector
Up
(
/\)
button
or
Down
(
V
)
button
is
pressed
on
the
set
or
on
the
remote
control.
When
the
Channel
(/\.)
button
is
pressed,
the
channel
number
wil!
change
as
follows:
1.2.3...38.39.
VCR.1.2...
Each
time
the
Channel
(
V
)
button
is
pressed,
the
channel
number
will
change
as
follows:
39.38.37...,
2.1.VCR.39.38...
The
Channel
selector
buttons
on
the
remote
control
can
also
be
pressed
to
directly
select
the
desired
channel.
If
the
factory
preset
channel
frequencies
do
not
match
your
local
channel
frequencies,
refer
to
Presetting
the
Channels.
Programme
channels
that
are
in
Skip
mode
cannot
be
shown
be
these
buttons.
Use
the
numerical
buttons
to
show
said
programmes.
1 '
|
=
a
Channel
select
buttons
GOO
Notes:
(1)
The
selected
channel
number
will
appear
on
the
screen
for
about
5
seconds
before
it
disappears
and
the
TV
screen
returns
to
its
norma!
state.
(2)
When
the
Channel
selector
(/\)
or
(
V)
button
on
the
TV
or
on
the
remote
control
is
held
down,
the
channel
number
changes
about
once
per
second.
Release
the
Channel
(/\)
or
(
V
)
button
when
the
desired
channel
number
appears
on
the
screen.
(3)
When
selecting
the
channel
using
the
channel
Up
(/\),
Down
(
V
)
buttons
on
the
TV
set,
VCR
mode
is
positioned
as
follows:
1.2.3.
...
38.39.VCR.1.2.
...
oF
VCR.39.38.37.
...
2.1.VCR.39.38.
...
:
(ON
SCREEN)
®~-@
Full
Auto
Search
Tuning
1
Qe
Wye
y
J
ODE
Noite:
Most
channels
are
preset
at
the
factory.
To
avoid
unnecessary
resetting,
check
the
tuning
of
Channel
Band
Number
all
channels
beforehand.
indicator
§
<GREEN>
(Red)
—»
AUTO
.
Press
the
PRESET
>
button.
(The
On
Screen
Display
will
appear
as
shown
on
the
left.)
0
1
VHL
Meee
|
1
_
Press
the
MODE
Up
{/\)
button
or
DOWN
{(
V
)
VHL
MM
oe
|
button
on
your
Remote
Control.
Memory
TV
‘
_
The
TV
will
automatically
tune
itself
to
all
station
<tELLOW>
channels
from
1
to
39,
from
VHL
>
VHH
>
SEARCHING
<—
(Blue}
UHF.
VHL
:
VHE
low
band
VHH
:
VHF
big
band
UHF
:
UHF
band
SEARCHING

.
To
stop
Automatic
Tuning,
press
either
the
Mode
Up
(/\)
or
Mode
Down
(
V
)
button
of
the
Re-
mote
Control.
-
When
Full
Auto
Search
Tuning
is
completed,
then
“1”
(channel
no.
1)
will
be
displayed
on
the
screen
as
shown
to
the
left.
.
Pre-seiting
of
the
channels
using
Full
Auto
Search
Tuning
is
now
complete.
i
<GREEN>
This
TV
set
can
be
tuned
the
HYPERBAND
channels.
-®
Manual
Channel
Preset
.
Depending
on
the
channel
you
want
to
preset,
press
the
-/--
button
to
select
single/double
digit
entry.
2.
Select
the
channel
number
(1-39)
you
wish
to
stored
with
the
0-9
digit
button.
3.
Press
the
Preset
button
twice
to
enter
the
MANUAL
Channel
preset
mode.
4.
Press
the
MODE
button
several
times
to
select
the
Band.
9.
Press
the
MODE
up
{
A)
or
down
(
V)
button
to
search
for
the
nearest
TV
station.
SEARCHING
will
appear
on
the
screen.
The
SEARCHING
indicator
will
turm
MANUAL
when
a
TV
station
has
been
found.
6.
Repeat
steps
1,
2,
4
and
5
to
preset
the
other
channels.
7.
Press
the
Preset
button
again.
You're
now
in
the
Fine
Tuning
menu.
Press
the
buttons
(/\)
or
(V)
if
itis
necessary
a
fine
adjust.
8.
Press
the
Preset
button
return
to
normal
mode.
A
large,
green
channel
number
will
be
displayed.
(Or
yellow
if
the
channel
is
adjusted
with
the
fine
tuning
and
it
is
not
in
automatic
mode).
17
t
Channel
Number
CHANGE
BAND
VHL-—-VHH
feral
NOTE:
The
Blue
Back
Off
Timer
will
not
function
if
you
adjust
the
fine
tuning.
DOWN
UP
SEARCHING

TWANLEA
pil
|
2)
Oo@
VY
4
60
OC
008
DOO
\
6)-
©
Skipping
Channels
The
Channel
selector
button
(/\)
buiton
and
(V
)
button
on
the
set
and
remote
control
normally
cycle
through
all
the
channels,
1
through
39.
If
you
wish,
you
can
set
the
TV
so
that
only
selected
channels
are
tuned
in
while
other,
perhaps
empty
channels,
are
skipped.
‘ls
Select
a
channel
number
you
wish
to
skip
with
the
Channel!
selector
(/\)
or
(
V
)
button
on
the
TV
set
or
remote
control.
_
Press
the
Preset
buiton
of
the
Remote
Control.
Until
MANUAL
or
FINE.
.
Press
the
Skip
button.
The
displayed
channel
number
will
turn
from
green
to
red.
.
Press
the
Preset
button
until
return
to
normal
mode.
A
large
red
channel
number
will
be
displayed
on
the
screen.
.
Repeat
steps
1
through
4
if
you
wish
to
skip
other
channels.
Notes:
1)
If
you
select
the
channels
to
be
skipped
with
the
Channel
select
butions
on
the
remote
control,
the
channel
number
will
be
displayed
in
red.
2)
It
is
not
possible
to
set
Channel
Skip
during
Full
Aulo
Search
Tuning.
©
-@
Resetting
Skipped
Channels
si
Press
the
---
button
to
select
single/double
digit
entry.
.
Select
a
skipped
channel
number,
displayed
in
red,
with
the
0-9
digit
buttons.
.
Press
the
Preset
button
of
the
Remote
control
until
MANUAL
or
FINE.
.
Press
the
Skip
button
of
the
Remote
Control.
The
displayed
channel
number
will
turn
green,
and
the
channel!
will
no
longer
be
skipped.

5.
Press
the
Preset
buiton
until
return
to
normal
mode,
6.
Repeat
steps
1
through
5
for
any
other
channels
you
wish
to
stop
skipping.
GresieMsA
Notes:
(1)
The
TV
will
return
to
normal
mode
if
you
do
not
proceed
to
the
next
step
within
about
10
seconds
after
pressing
the
Preset
button.
If
it
does,
press
the
Preset
bution
again
to
execute
the
following
step.
When
the
received
broadcast
signal
is
weak,
the
picture
may
appear
in
black
and
white
only
or
you
may
not
be
able
to
preset
the
channel.
In
this
case,
please
check
the
antenna
or
consult
your
appliance
store.
©
Additional
picture
adjustments
(contrast,
colour,
brightness,
picture-tone)
1.
Press
the
Mode
button
on
the
remote
contro!
and
select
the
mode
you
wish
to
adjust.
ON
SCREEN
2.
Next
use
the
MODE
UP
(/\)
button
or
DOWN
(Contrast)
(
V
)
button
on
ihe
remote
control,
to
adjust
the
mode
as
you
prefer.
O
MN
- ©
~~
ee
wipe
le
Decrease
Increase
Up
(A\)
button
and
MODE
Button
down
{
V)}
button
on
{
Press
selected
item
the
remote
control
«A»
Button
(Colour)
CONTRAST
To
decrease
To
increase
Oo
contrast
conirast
MN
«©
©
~~
+
—_—
_—_
Decreasé
Increase
COLOGUR
For
less
For
more
@
colour
colour
{
Press
intensity
intensity
BRIGHTNESS
|
Forless
For
mare
2:
brightness brightness
(Brightness)
-O-
|...
PICTURE-
For
less
For
more
7”
=
eres
TONE
sharpness sharpness
Decrease
Increase
UF
[erase
The
display
will
disappear
after
about
10
seconds.
Adjust
the
mode
you
selected
with
the
Mode
button
within
this
time.
Picture-Tane
ro
Ce
——_
—_——
Decrease
Increase

—
©
VOL
SHARP
TV
GIOMBIATA
Q1031BMSA
NOTE:
How
to
tuning
the
VCR
through
the
Antenna
Terminal
The
VCR
must
be
tuned
in
the
VCR
channel
in
Manual
mode.
1:
Switch
on the
VCR,
insert
a
videocassette
and
press
play.
2.
Press
button
“0”
(OSD
will
show
VCR).
3.
A.
Press
the
Preset
button
return
to
normal
mode.
A
large,
green
channel
Repeat
steps
3,
4
and
5
(Manual
Channel
Preset)
until
tune
VCR
signal.
number
will
be
displayed.
(Or
yellow
if
the
channel
is
adjusted
with
the
fine

Operation
of
Infrared
Remote
Control
a
A
TV
channel
can
be
directly
selected
by
using
the
channel
select
buttons
on
your
Remote
Control
as
shown
below,
Channel
selection
using
the
select
buttons
Single/Double
entry
selector
-/-
This
button
selects
between
one
or
two
digit
channel
number
entry.
NOTE:
In
two-digit
mode,
buttons
4,
5,
6, 7,
8
and
9
are
not
operative
in
the
——
(tenths)
position.
——
Infrared
Remote
Control
Channel
select
buttons
Gi031BMSA

(7)
On/Off
Timer
Button
[3
When
the
time
you
have
set
using
the
On/Off
Timer
Button
has
elapsed
(anywhere
from
10
min.
to
12
hr.
50
min.),
the
set
will
automatically
either
turn
iiself
on
or
enter
standby
mode.
<How
to
Set
the
On
Timer>
1.
Press
the
On
Timer
button.
2.
The
previously
set
time
will
be
displayed
in
yellow
for
about
5
sec.
al
the
lower
right
of
your
screen.
(The
previously
set
time
is
stored
in
memory.)
.
If
your wish
to
reset
the
timer
to
the
previously
set
time,
then
setting
is
now
complete.
.
If
you
wish
to
set
the
timer
to
a
time
different
from
the
previously
set
time,
then
press
the
On
Timer
button
again
while
the
time
is
still
being
displayed
on
the
screen.
.
Each
time
you
press
the
button,
the
display
will
change
as
shown.
***
50.00
—
0.10
>
----—
12.50
—
0.00
eel
L_Prev.
6.
In
order
to
know
when
the
ON-TIMER
programming
has
been
run
properly,
when
the
TV
is
in
the
standby
mode,
the
LED
indicator
remain
iluminated
in
ORANGE.
GIGI
DRISA
Notes:
1.
If
the
previously
set
time
is
“0.00”,
or
if
you
are
setting
the
timer
for
the
first
time
since
buying
your
set,
begin
at
“0.00”.
.
If
the
Main
Power
is
turned
off
after
the
On
Timer
has
been
set,
the
On
Timer
will
be
On
Screen
Display
canceled.
(In
this
event,
the
On
Timer
.
If,
after
setting
the
On-Timer,
the
On-Timer
operates
after
9
hours)
button
is
pressed
again
while
the
set
is
turned
on,
then
the
timer
will
be
reset.
The
colour
of
LED
indicator
GREEN
—
ORANGE

<How
to
Use
the
Off
Timer>
1.
Press
the
Off
Timer
button.
2.
The
previously
set
time
will
be
displayed
in
red
for
about
5
sec,
at
the
lower
right
of
your
screen.
(The
previously
set
time
is
stored
in
memory.)
3.
If
your
wish
to
set
the
timer
to
the
previously
set
time,
then
setting
is
now
complete.
4.
If
you
wish
to
set
the
timer
to
a
time
different
from
the
previously
set
time,
then
press
the Off
Timer
button
again
while
the
time
is
still
being
displayed
on
the
screen.
5.
Each
time
you
press
the
bution,
the
display
will
change
as
shown.
***
—5
0.00
—
0.10
-
---—
12.50
—
0.00
(cancel)
t_
prey.
ee
ae
ape
ae
.
lf
the
previously
set
time
is
“0.00”,
or
if
you
are
setting
the
timer
for
the
first
time
since
buying
your
set,
begin
at
“0.00”.
2.
If
the
Main
Power
or
the
standby
ON/OFF
is
turned
off
after
the
Off
Timer
has
been
sei,
the
Off
Timer
will
be
canceled.
3.
If,
after
setting
the
Off
Timer,
the
Off
Timer
button
is
pressed
again
while
the
set
is
turned
on,
then
the
timer
will
be
reset.
OGso)
|.
OFF
4.
J
On
Screen
Display
(In
this
event,
the
Off
Timer
operates
after
4
hours)
Channel/Timer
Call
Button
©)
°
The
channe!
number
is
displayed
on
the
screen
by
pressing
the
Channel/Timer
call
button
on
the
remote
control
when
the
On-Timer
or
the
Off-
Timer
is
not
set.
Press
the
button
again
and
the
display
will
disappear.
¢
ff
the
Channel/Timer
call
button
is
pressed
while
the
On-Timer
or
the
Off-Timer
function
is
set,
the
time
remaining
on
the
On-Timer
or
the
Off-Timer
and
the
channel
number
will
be
displayed.
For
example,
a
display
of
OFF
0.23
indicates
that
the
TV
will
be
turned
off
after
23
minutes.
OFF
0.23

*
If
the
button
is
pressed
a
second
time,
the
Off-
Timer
and
the
channel
number
showed
will
disappear.
On
Screen
Display
(When
both
the
On-Timer
and
Off-Timer
are
sel)
1
ras
@)
Sound
Mute
Button
8K
@
Y
When
ihis
button
is
pressed,
the
sound
is
muted
and
the
mute
indicator
mark
“mK”,
is
displayed
on
the
jower
Jeft
of
the
screen.
Press
the
button
again
to
resiore
the
sound
level.
Flasback
Button
>
Pressing
this
button
selects
the
channel
that
was
tuned
immediately
before
the
one
being
watched.
For
example
if
channels
were
selected
in
the
order
of
Ch2, Ch3,
then
Ché6,
pressing
the
button
returns
tuning
to
Ch3.
Press
the
button
again
to
return
to
Ché.
GicaDIASA,
@)
TV/Video
Selector
When
you
pressed
the
TV/Video
selector,
ihe
set
is
switched
to
receive
the
Audio/Video
signals
through
the
A/V
terminals,
and
“SCART”
(Audio/Video
indicator)
will
be
displayed
for
about
5
seconds
in
the
upper
right
corner
of
the
screen.
When
the
TV/Video
selector
is
pressed
again,
the
set
is
switched
to
receive
on-air
TV
broadcasting,
and
ihe
channel
programme
number
will
be
displayed
for
about
5
seconds
in
the
upper
right
corner
of
the
screen.

21-pin
Euro-SCART
21-pin
Euro-SCART
Enjoy
the
stunning
visuals
of
a
VCR
or
a
vicleo
disk
by
connecting
them
to
this
unit
through
the
21-pin
Euro-SCART.
dient
UCLUbd
Me
ITT
TH
HTH
TTT
21-pin
Euro-SCART
Typical
connection
(VCR
and
TV)
through
the
21-pin
Euro-SCART.
Please
refer
to
the
operation
manual
of
your
VCR
for
deiails.
(ANTENNA)
Antenna
in
21-pin
Euro-SCART

ss
21-pin
Euro-SCART
BODE
eeee
BHEHHOBeee
1.
Audio
right
output
8.
Audio-video
contro!
15.
Red
input
2.
Audio
right
input
9,
Earth
for
green
16.
Red/Green/Blue
control
3.
Audio
left
output
10.
Not
used
17.
Earth
for
video
4,
Common
earth
for
audio
11.
Green
input
18.
Earth
for
Red/Green/Blue
5,
Earth
for
blue
12.
Not
used
control
6.
Audio
left
input
43.
Earth
for
red
19.
Video
output
7.
Blue
input
14.
Not
used
20.
Video
input
21,
Plug
shield
Typical
connection
through
21-pin
Euro-SCART
[
21-pin
Euro-SCART
---
Y
«
Videotext
*
Information
Network
.
; :
System
|
VCR
|
|
vison
|
Videodisc
(TV
telephone)
Other manuals for DV-3750S
2
Table of contents
Other Sharp TV manuals

Sharp
Sharp AQuas LC-46D62U User manual

Sharp
Sharp AQUOS LCDF0073 User manual

Sharp
Sharp 21JF2-SF User manual

Sharp
Sharp LC-65N5200U User manual

Sharp
Sharp XFlat 20F650 User manual

Sharp
Sharp ROKU LC-43LB371U User manual

Sharp
Sharp LC-40FI5242KF Technical manual

Sharp
Sharp 54DM-12FP User manual

Sharp
Sharp AQUOS LC-60EQ30U User manual

Sharp
Sharp CX34K3 User manual

Sharp
Sharp 51AT-15S User manual

Sharp
Sharp 21JF2-GA User manual

Sharp
Sharp CL20S10 User manual

Sharp
Sharp AQUOS LC-60LE550U User manual

Sharp
Sharp CX68LF5 User manual

Sharp
Sharp 190TW8FB User manual

Sharp
Sharp LC-19LE430E User manual

Sharp
Sharp LC-40LE820E User manual

Sharp
Sharp 21H-FG5RU User manual

Sharp
Sharp 25K-M100 User manual