Sharper Image EC-WS115 Instruction Manual

Instruction Manual and
Warranty Information EC-WS115
Internet Weather Station
With Wireless
5-Day Forecast
THE SHARPER IMAGE ® name and logo are registered trademarks.
Marketed and distributed by SI Products under license. ©The Sharper Image.
All rights reserved.
IB-ECWS115
The Sharper Image
Service Center
1.888.856.6781
8:30a.m. – 7:00p.m. (EST)
M – F
Mail To: The Sharper Image
Consumer Relations
Service Center Dept. 168
3000 Pontiac Trail
Commerce Township, MI
48390
e-mail:
cservice@siproducts.com
ONE YEAR LIMITED WARRANTY
SI PRODUCTS sells its products with the intent that they are free of defects in manufacture and
workmanship for a period of one year from the date of original purchase, except as noted below.
SI PRODUCTS warrants that its products will be free of defects in material and workmanship under
normal use and service. This warranty extends only to consumers and does not extend to Retailers.
To obtain warranty service on your SI PRODUCTS product, mail the product and your dated sales receipt
(as proof of purchase), postpaid, to the following address:
SI PRODUCTS Consumer Relations
Service Center Dept. 168
3000 Pontiac Trail
Commerce Township, MI 48390
No COD's will be accepted.
SI PRODUCTS does not authorize anyone, including, but not limited to, Retailers, the subsequent
consumer purchaser of the product from a Retailer or remote purchasers, to obligate SI PRODUCTS in any
way beyond the terms set forth herein. This warranty does not cover damage caused by misuse or abuse;
accident; the attachment of any unauthorized accessory; alteration to the product; improper installation;
unauthorized repairs or modifications; improper use of electrical/power supply; loss of power; dropped
product; malfunction or damage of an operating part from failure to provide manufacturer’s recommended
maintenance; transportation damage; theft; neglect; vandalism; or environmental conditions; loss of use
during the period the product is at a repair facility or otherwise awaiting parts or repair; or any other
conditions whatsoever that are beyond the control of SI PRODUCTS.
This warranty is effective only if the product is purchased and operated in the country in which the
product is purchased. A product that requires modifications or adoption to enable it to operate in any
other country than the country for which it was designed, manufactured, approved and/or authorized, or
repair of products damaged by these modifications is not covered under this warranty.
THE WARRANTY PROVIDED HEREIN SHALL BE THE SOLE AND EXCLUSIVE WARRANTY. THERE
SHALL BE NO OTHER WARRANTIES EXPRESS OR IMPLIED INCLUDING ANY IMPLIED WARRANTY OF
MERCHANTABILITY OR FITNESS OR ANY OTHER OBLIGATION ON THE PART OF THE COMPANY WITH
RESPECT TO PRODUCTS COVERED BY THIS WARRANTY. SI PRODUCTS SHALL HAVE NO LIABILITY FOR
ANY INCIDENTAL, CONSEQUENTIAL OR SPECIAL DAMAGES. IN NO EVENT SHALL THIS WARRANTY
REQUIRE MORE THAN THE REPAIR OR REPLACEMENT OF ANY PART OR PARTS WHICH ARE FOUND TO BE
DEFECTIVE WITHIN THE EFFECTIVE PERIOD OF THE WARRANTY.
NO REFUNDS WILL BE GIVEN. IF REPLACEMENT PARTS FOR DEFECTIVE MATERIALS ARE NOT AVAILABLE,
SI PRODUCTS RESERVES THE RIGHT TO MAKE PRODUCT SUBSTITUTIONS IN LIEU
OF REPAIR OR REPLACEMENT.
This warranty does not extend to the purchase of opened, used, repaired, repackaged and/or resealed
products, including but not limited to sale of such products on Internet auction sites and/or sales of such
products by surplus or bulk resellers. Any and all warranties or guarantees shall immediately cease and
terminate as to any products or parts thereof which are repaired, replaced, altered, or modified, without
the prior express and written consent of SI PRODUCTS.
This warranty provides you with specific legal rights. You may have additional rights which may vary from
state to state. Because of individual regulations, some of the above limitations and exclusions may not
apply to you. For more information regarding our product line in the USA,
please visit: www.siproducts.com

23
Begin each day with true confidence.
Thank you for purchasing The Sharper Image® Internet Weather Station Wireless Weather
Forecaster. This product, along with the entire The Sharper Image collection, connects
innovation with cutting-edge design to provide you with years of dependability and
enjoyment. The Internet Weather Station Wireless Weather Forecaster fully prepares you as
you embark on your daily adventures. Whether you need a 5-day forecast or a chance of
precipitation report for evening plans, you are ready for anything with absolute access to the
latest weather details at your fingertips.
IMPORTANT SAFEGUARDS:
WHEN USING ELECTRICAL PRODUCTS, ESPECIALLY WHEN CHILDREN ARE
PRESENT, BASIC SAFETY PRECAUTIONS SHOULD ALWAYS BE FOLLOWED,
INCLUDING THE FOLLOWING:
READ ALL INSTRUCTIONS BEFORE USING
DANGER
- To reduce the risk of electric shock:
•Alwaysunplugtheappliancefromtheelectricaloutletimmediatelyafterusing
and before cleaning.
•DONOTreachforanappliancethathasfallenintowater.Unplugitimmediately.
•DONOTusewhilebathingorintheshower.
•DONOTplaceorstoreappliancewhereitcanfallorbepulledintoatuborsink.
•DONOTplaceinordropintowaterorotherliquid.
•NEVERusepinsorothermetallicfastenerswiththisappliance.
•Keepdry-DONOToperateinawetormoistcondition.
WARNING
-To reduce the risk of burns, fire, electric
shock, fire or injury to persons:
•Anapplianceshouldneverbeleftunattendedwhenplugged
in. Unplug from outlet when not in use and before putting on
or taking off parts or attachments.
•Closesupervisionisnecessarywhenthisapplianceisused
by, on or near children, invalids or disabled persons.
•Usethisapplianceonlyforitsintendeduseasdescribed
in this manual. Do not use attachments not recommended
by The Sharper Image; specifically any attachments not
provided with the unit.
•NEVERoperatethisapplianceifithasadamagedcordor
plug, if it is not working properly, if it has been dropped or
damaged, or dropped into water. Return it to SI Products
Service Center for examination and repair.
•Keepcordawayfromheatedsurfaces.
•NEVERdroporinsertanyobjectintoanyopening.
•DONOToperatewhereaerosol(spray)productsarebeing
used or where oxygen is being administered.
•DONOToperateunderablanketorpillow.Excessiveheating
can occur and cause fire, electric shock or injury to persons.
•DONOTcarrythisappliancebythepowercordorusecord
as handle.
•Todisconnect,turnallcontrolstothe“off”position,then
remove plug from outlet.
•Thisapplianceisdesignedforpersonal,non-professionaluseonly.
•DONOTuseoutdoors.
SAVE THESE INSTRUCTIONS
Caution: All
servicing of
this product
must be
performed
by
authorized
SI Products
Service
Personnel
only.

PRODUCT SPECIFICATIONS:
What is needed from you:
Battery Precautions
•Useonlythesizeandtypeofbatteriesspecified.
•Wheninstallingbatteries,observeproper+/-polarity.Incorrectinstallationof
battery may cause damage to the unit.
•DONOTmixdifferenttypesofbatteriestogether(e.g.,alkalinewithcarbon-zinc
oroldbatterieswithnewones).
•Iftheunitisnotgoingtobeusedforalongperiodoftime,removebatteriesto
prevent damage due to possible battery leakage.
•DONOTdisposeofbatteriesinfire.Batteriesmayexplodeorleak.
5
4
Fig. 1
Software CompatiblewithWindows2000,XP-32bits&Vista-32
bits(Microsoft.NETFramework2.0required)
USB 1.1 or above
Transmission Range Up to a 300 ft. range within an open area.
Walls may reduce this range.
Clock Auto-synchronizedclockfromInternet–Quartzback-up
Power Unit
AC adapter for the Main Unit
Atotalof4(four)AABatteriesfortheMainUnit
Atotalof2(two)AAABatteriesfortheUSBtransmitter
Weather Data Source Forecas Ltd Updated automatically
every 6 hours

67
Internet Weather Station Wireless Overview
Receiving your 5-DAY Weather Forecast
The Internet Weather Station Wireless Weather Forecaster is powered by your home
Internetservice.Yourpersonalized5-dayforecastdataisuploadeddirectlyfromyour
PC and is automatically sent to the Main Unit wirelessly, via USB transmitter. Place
your Weather Forecaster in the convenience of your kitchen, bedroom, or wherever
within range to receive the latest weather details in your home.
Your complete forecast includes:
•WeatherForecast
•High&LowTemperature
•AverageHumidity
•ChanceofPrecipitation
•Rainfall
•MaximumUVIndex
•AverageWindSpeed&Direction
Internet Connection on your
Personal Computer
Digital 5-Day
Weather Forecast
USB Transmitter Main Unit (Receiver)
International coverage includes over 20,000 cities:
•Europe:Over9,200citiesselection
•NorthAmerica:Over10,900citiesselection
•AsiaPacific:Over300citiesselectioninJapan&Australia
Enjoy additional features such as:
•Auto-SynchronizedClockfromInternet
•Sunrise&SunsetTime
•Calendar,Weekday&SingleDailyAlarm
Getting Started
Hereisyourquickstartguideforbasicsetup:
1. Insert4(four)AAbatteriesintotheMainUnit.
2. Plug the included adapter into the DC input located on the left side of the
Main Unit.
3. Install2(two)AAAbatteriesintotheUSBtransmitter.
4. Connect the USB transmitter to your PC via USB port.
5. Flip the antenna into the vertical position.
Fig. 2

USB TRANSMITTER Button Name and Function
There is only one key on the USB Transmitter:
Installation
Wemakewirelesstechnologyeasytoinstall.Justfollowthestepsbelowforeach
of the two units:
TheMainUnit(Receiver)andtheUSBtransmitter(foryourhomecomputer).
Setting Up the MAIN UNIT (RECEIVER)
BATTERY INSTALLATION:
Slidetoopenbatterydoor,install4(four)AAbatteriesaccordingtothepolarity
indicated. Close battery door.
For Your Home Computer: USB TRANSMITTER &
PC PROGRAM Installation
BATTERY INSTALLATION & USB CONNECTION:
1. SlidetoopenbatterydooronthebottomoftheUSBtransmitter.Insert2(two)
AAA batteries according to the polarity indicated. Close the battery door.
2. Connect USB transmitter to your PC via any USB port.
3. Flip the antenna into vertical position.
MAIN UNIT Button Names and Functions
There is one key located on the top of the unit. This can be used for two reasons:
1. Press the SNOOZE/MODEbuttontotriggersnoozealarm.
2. Or press the SNOOZE/MODE button to choose between weather forecast
details such as:
-Hi/LoTemperature
-Rainfall/ChanceofPrecipitation
-MaximumUVIndex/AverageHumidity
-AverageWindDirection/AverageWindSpeed
- Auto-scroll display function
There are six multi-tasking keys located on the back of the unit:
Press Functions Hold 3 seconds
PC SEARCH Receive RF signal from
USB transmitter
CLOCK Readtime,day-of-week,sunrise/
sunset time
12/24Hour&
day/monthformat
ALARM Read alarm time;
enable/disablealarm Alarm time setting
WIND / 5
Select wind speed unit
1 step forward in setting Fast advance in setting
C/F / 6
SelectDegreeC/F
1 step backward in setting Fast backward in setting
RAIN SelectRainfallunit(mmorinch)
Press Functions Hold 3 seconds
TRANSMIT Transmit weather forecast data
andsynchronizewithMain
Unit(Receiver)
Turnon/offcontinuous
red LED indicator
9
8

PC Program Installation
NOTE: This section will ONLY step you through the software process and get
your PC set up to receive weather information from the internet. In the next
section a connection will be established to transmit this weather information to
the Main Unit.
1. Before installation, please ensure that:
- Your PC is connected to the Internet by browsing through a couple of
websites.
- YouareusingWindows2000,XP(32bit)orVista(32bit).
- The USB transmitter is connected properly to your PC through the USB port.
2. Insert CD into your CD ROM and double click INSTALL_2380.exe program
to start installation. If the installation program detects that Microsoft .NET
Framework 2.0 driver was not installed in your Windows beforehand, it will
prompt you to install the driver. Follow the instructions to install the driver and
complete the rest of the installation.
3. After installation is complete, run the program by double clicking the desktop
5-Day Forecast icon .
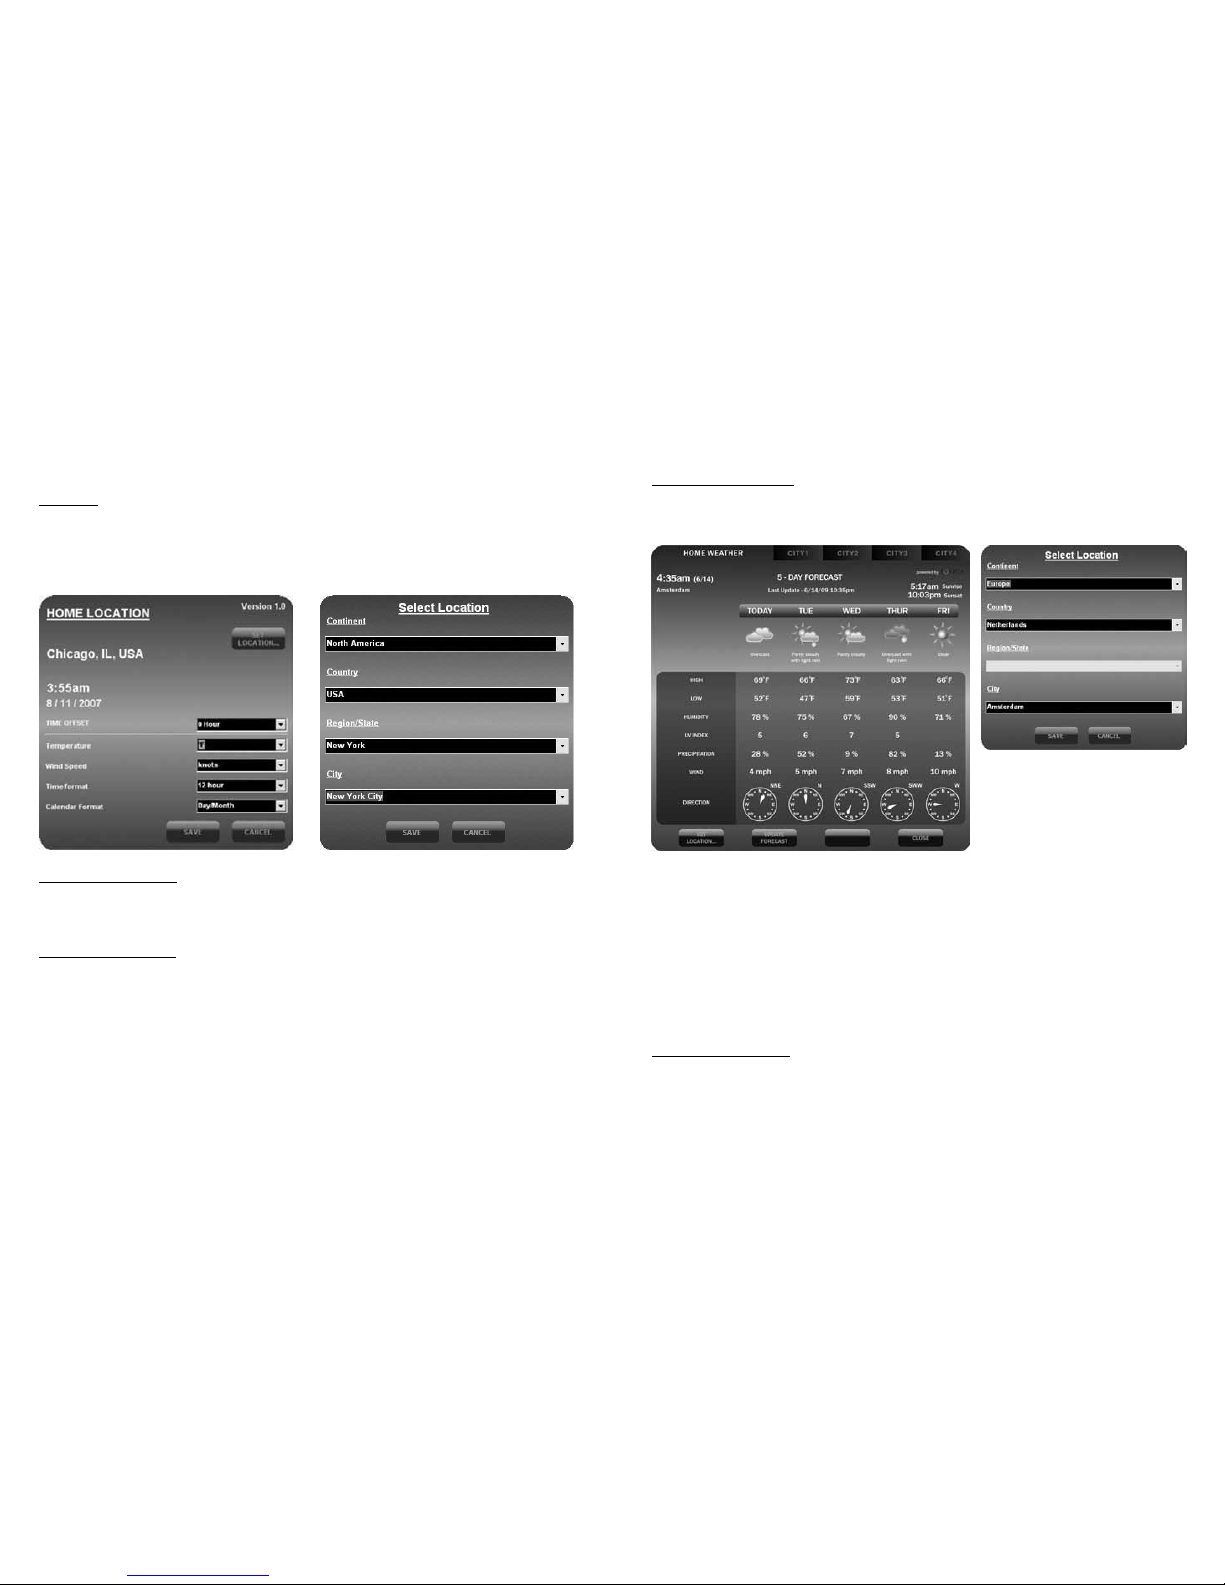
4. Click SETTING… in the HOME WEATHER display.
5. Click SET LOCATION to enter your home city location in the program.
6. After setting your home location, a 5-Day forecast of your home city will be
updated on your PC program automatically via the Internet. You may click
UPDATE FORECAST anytime to manually update the forecast display on
theprogram.OncetheRFconnectionisestablished(seenextsection)the
program will also update the forecast and send to the Main Unit automatically if
your PC is online or every time you turn on your PC.
NOTE: Pleaserefertothe“TROUBLESHOOTING”sectioninthebackofthis
booklet if you have a problem displaying 5-Day forecast information on your
PC program.
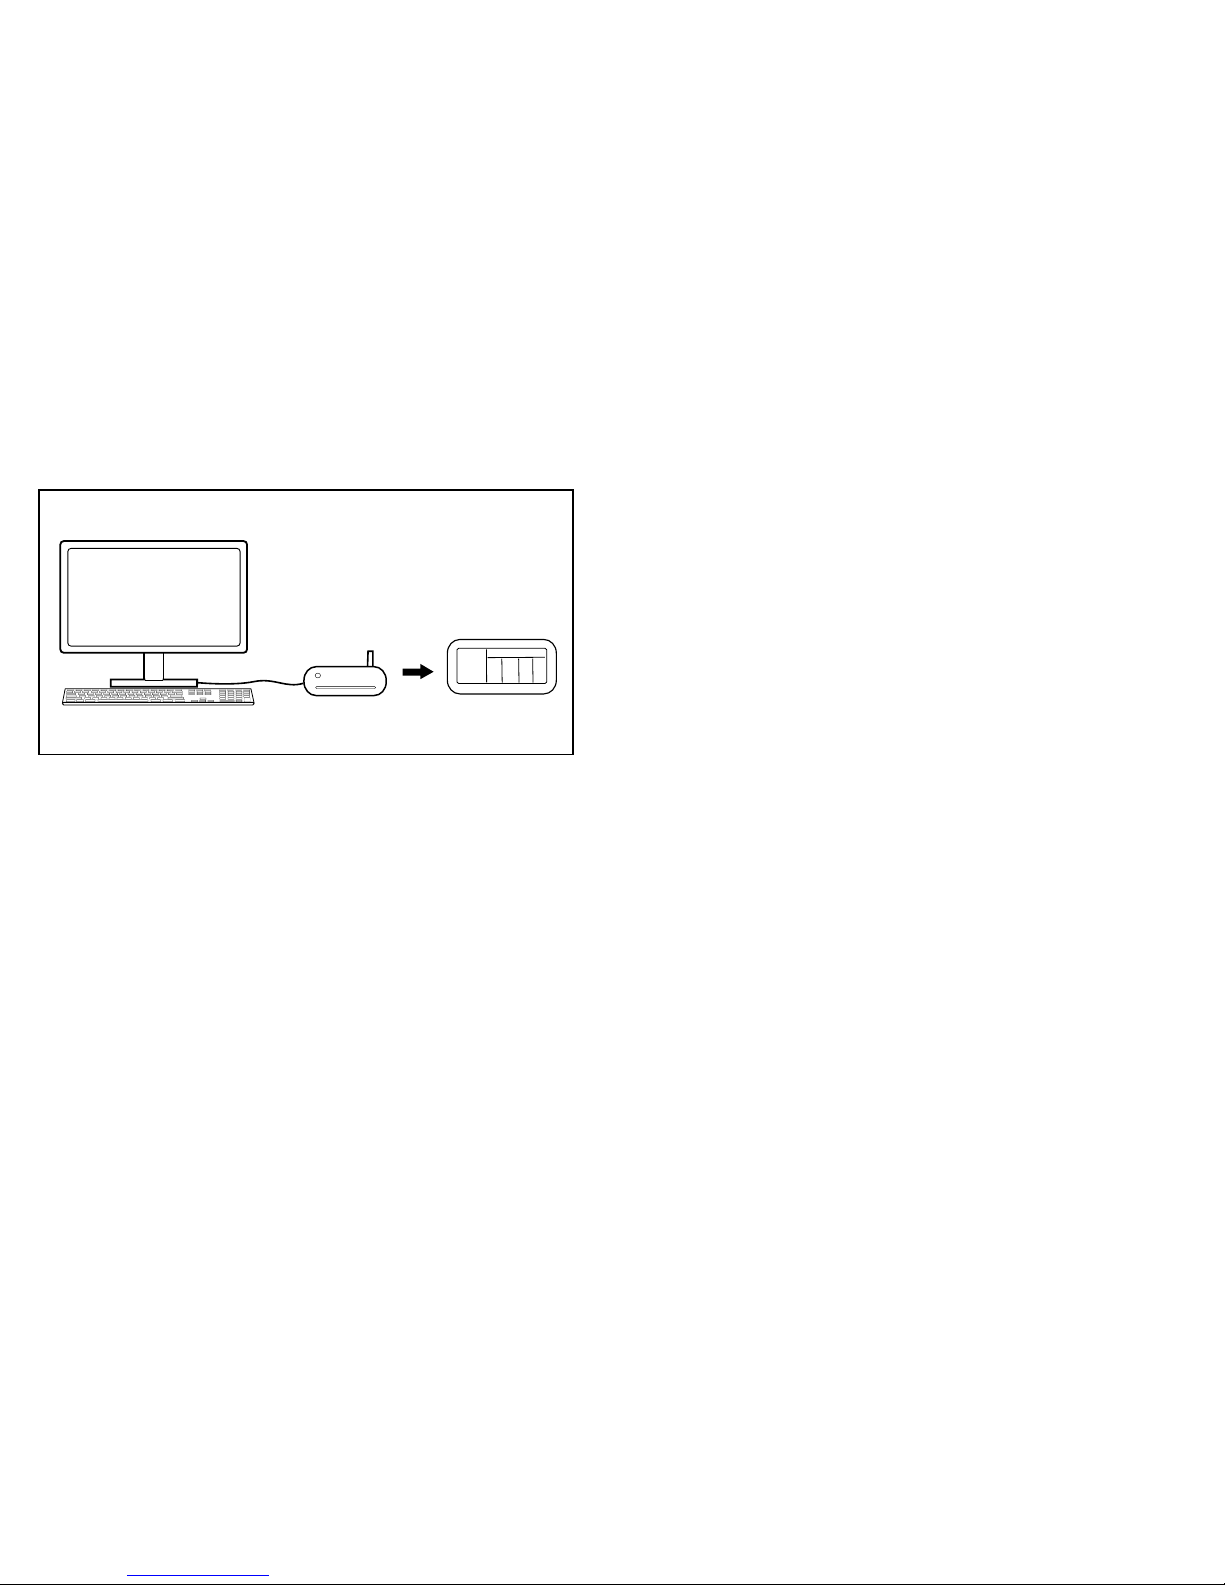
Establish RF Connection With Main Unit
1. Ensure that you have successfully received a 5-Day forecast on your PC
program(foryourhomecity)beforesettinguptheRFconnection.
2. Place the USB transmitter and Main Unit away from metal and any source of
interferencesuchasaPCmonitor,mobilephones,appliances,TV,etc.
3. Flip the antenna into vertical position.
4. Itisrecommendedtostartwithashortdistance(Example:Within2ft.)
between the two units for initial RF setup. Once the RF connection is
established, place the Main Unit within the effective transmission range from
the transmitter. Shorten the distance if necessary for best reception.
5. To search for RF signal from a new USB transmitter, press PC SEARCH
button located on the back of the Main Unit several times until the
RF icon flashes.
6. Press TRANSMIT button located on the bottom of the USB transmitter to
initiate transmission of RF weather data to the Main Unit.
7. Once the RF connection is established between the Main Unit and USB
transmitter, the RF icon will no longer flash. This indicates full strength
reception from the transmitter. In the first few minutes of the RF reception,
the Main Unit may be showing data on only one part of the screen, this is
normal. The rest of the screen display data will gradually appear within the
next 10-30 minutes.
NOTE:
- If you have waited over thirty minutes and have yet to see the rest of the
screen, shorten the distance between the USB transmitter and Main Unit,
check the battery levels and repeat the setup procedure above.
- If it continues to fail, try removing the USB connection and all batteries from
the USB transmitter. Reinstall the batteries and then reconnect the USB
connection again. Repeat above procedure to set up the RF connection.
Receiving 5-day Forecast Information
Automatic Forecast Update
1. After your PC is turned on or rebooted, the PC program will access the
Internet server for a weather forecast update and start sending data to the
Main Unit automatically.
2. If your PC is turned on all the time with Internet connection, weather forecast
will be updated periodically from the Internet and will be sent to the Main Unit
automatically.
11
10

MAIN UNIT Display
THE WEATHER FORECAST
Viewyourpersonal5-daylocalweatherforecastby28distincteasy-to-read
weather symbols.
View Weather Details on-Demand:
HIGH/LOWTEMPERATUREFORECAST
Press MODE repeatedly until HI & LO appears.
Press C/F button located on the back of the Main Unit to select ˚C or ˚F.
AVERAGEHUMIIDTYFORECAST
Press MODE repeatedly until RH% appears.
CHANCE OF PRECIPITATION FORECAST
Press MODE repeatedly until PRECIP% appears.
RAINFALL FORECAST
Press MODE repeatedly until RAIN appears.
Press RAINbuttonlocatedonthebackoftheMainUnittoselectrainfall“mm”or
“inch”unitofmeasurement.
MAXIMUMUVINDEXFORECAST
Press MODE repeatedly until UVI appears.
NOTE:YourUVIindexismeasuredin4-Dayforecastintervals.
UVI1to2 MaximumUVlevelislow.Lowdangerforsunexposure
for the average person.
UVI3to5 MaximumUVlevelismoderate.Moderateriskofharm
from unprotected sun exposure.
UVI6to7 MaximumUVlevelishigh.Highriskofharmfrom
unprotected sun exposure.
UVI8to10 MaximumUVlevelisveryhigh.Veryhighriskofharm
from unprotected sun exposure.
UVI11to15 MaximumUVlevelisextreme.Extremeriskofharmfrom
unprotected sun exposure.
13
12
Description Description
Clear Mostly cloudy with sleet showers
Partly cloudy Mostly cloudy with snow showers
Partly cloudy with light rain Mostly cloudy with thunderstorms
Partly cloudy with light sleet Overcast
Partly cloudy with light snow Overcast with light rain
Partly cloudy with showers Overcast with light sleet
Partly cloudy with sleet showers Overcast with light snow
Partly cloudy with snow showers Overcast with showers
Partly cloudy with thunderstorms Overcast with sleet showers
Mostly cloudy Overcast with snow showers
Mostly cloudy with light rain Overcast with rain
Mostly cloudy with light sleet Overcast with sleet
Mostly cloudy with light snow Overcast with snow
Mostly cloudy with showers Overcast with thunderstorms

AVERAGEWINDSPEED&WINDDIRECTIONFORECAST
Press MODE repeatedly until WIND appears. A total of 16 wind directions are
available: N for north, S for south, SW for south-west and so on.
Press5/ WIND toselectwindspeedunitofmeasurement:km/h,m/s,knotsormph.
RF RECEPTION STATUS
The icon shows the RF connection status between the Main Unit and the
USB transmitter.
(See“ESTABLISHRFCONNECTIONWITHMAINUINIT”sectiontoreconnect
theUSBtransmitter.)
RECEIVINGTHELASTESTUPDATEDFORECAST
Thetoplinedisplaysthelastupdatedweatherforecasttimeinmonth/dayhour-
minute display format. If your PC is not connected to the Internet for more than
10days,allforecastinformationwillshow“--“untilthePCisconnectedtothe
Internet again.
NETWORKTIME(Auto-synchronizedclock)
Foryourconvenience,theclockontheMainUnitissynchronizedtotheInternet
network time, automatically adjusted for optimum accuracy.
NOTE:
- If your PC is not connected to the Internet for a long period of time, the clock
display may not be accurate.
- Youmaysetthetimeoffset(+/-0.5,1,1.5or2hours)ofyourhomecityin
thePCprogramtoadjustDST&timezoneifnecessary(duetochangesin
plannedstart/enddatesfordaylightsavingstime,timeboundaries,etc)and
the time on your Main Unit will be updated accordingly.
Hold CLOCKbuttonontheMainUnittosetthe12/24hourformat,press5or
6to select and press CLOCKtoconfirm.The“M”&“D”iconswill flash, press
5or6toselectday/monthormonth/dayformatforthecalendar.Press
CLOCK button to confirm and exit.
SUNRISE/SUNSETTIME
Press CLOCK button repeatedly until the respective SUNRISE or SUNSET
appears to view the sunrise or sunset time in your home city.
ALARM TIME
• PressALARM button to view the alarm time, and AL will appear. Press
ALARM button again to enable and disable the alarm. A icon appears
when alarm is enabled. Press CLOCK button to return to time display.
• HoldALARM button for 3 seconds to enter alarm setting mode. Press5or
6to change the hour HH to the correct value. Press ALARM to change
to the minutes MM setting mode. Set the minutes using5or 6. Press
ALARM to confirm the settings. When alarm is going off, press ALARM to
stop alarm for one day or press MODE/SNOOZEtoactivatesnoozefunction.
• Snoozesoundsevery9minutesuntilALARM is pressed to stop alarm
for the day.
CALENDAR
Press CLOCK button repeatedly to show the day-of-the-week. Calendar can
bedisplayedinday/monthormonth/dayformat.Seesection“NETWORK
TIME”forsettings.
MainUnitissuccessfullysynchronizedtotheUSB
transmitter and is receiving weather data from USB
transmitter periodically.
Flashing indicates that it is in registration mode and is
searching for RF signal from USB transmitter.
Fail to receive RF signal from USB transmitter.
15
14

Low Battery Indication
An easy-to-read low battery indication symbol is featured on the Main Unit and
the USB transmitter. If necessary, simply replace batteries, and then follow the
setupprocedure“GETTINGSTARTED”inthebeginningofthisbooklet.
NOTE:
Justasyouestablishedtheconnectionforthefirsttimeduringoriginal
installation,youarerequiredtosetuptheRFconnectionbetweentheUSB
transmitterandMainUnitafterbatteryreplacement(Example:PressPC
SEARCH on the Main Unit, then press TRANSMIT button on the USB
transmitter).Pleasereferto“ESTABLISHRFCONNECTIONWITHMAINUNIT”
section for details.
USB Transmitter
Press PC SEARCH on the Main Unit and then press TRANSMIT on the USB
transmitter to enforce transmitting RF weather data and set up the RF connection
withtheMainUnit(See“FORYOURHOMECOMPUTER:USBTRANSMITTER&
PCPROGRAMINSTALLATION”sectiontosetuptheUSBtransmitter).
NOTE:
- Flip the antenna into vertical position for optimum transmission range.
- To run the PC program, ensure that your USB transmitter is connected
properly to the PC through a USB port.
- When weather data is transmitted from the USB transmitter, the red LED
light will flash.
PC Program View
After installation, a small toolbar icon of your PC program appears on
the lower right of the Window indicating your program is running and it will
automatically access 5-day forecast information periodically while your PC is
online. You may open the above PC program window by double clicking this
toolbar icon to view full details.
NOTE:Ifthetoolbaricondisappears(nothidden),yourPCprogramis
terminated and no longer has access to weather information from the Internet.
Simply restart the program again.
17
16
Low battery indicator symbol
Main Unit
USB transmitter

Home Weather
SETTING
Click SETTING…tosetyourhomelocationandunit/timeformat.ClickSET
LOCATION to set your home location. Click SAVE to save your setting and exit.
The forecast information will be updated on your PC program according to your
new home location and will be sent to your Main Unit automatically.
UPDATE FORECAST
Click UPDATE FORECAST to manually receive a 5-day forecast from the
Internet and display on the program.
SENDTORECEIVER
Click SEND TO RECEIVER to manually send the 5-day forecast data to the
Main Unit via the USB transmitter. It may take ten minutes to one hour to update
the entire 5-day forecast data onto the Main Unit.
SELECT LOCATIONS
The choice is all yours. Besides your home city, you have the freedom to preset
and monitor the weather forecast of up to 4 different cities on your PC program.
- Clicktabtoselect“CITY 1”,“CITY 2”,“CITY 3”or“CITY 4.”
- Click SET LOCATION to select the location.
- Click SAVE to save & exit the setting. The PC program will automatically
update the 5-day forecast of your selected cities from the Internet.
- To view the weather forecast of your preset city list, click on the
corresponding city number’s tab.
NOTE: The forecast information of city 1, 2, 3 & 4 is for your PC viewing and will
not be sent to your Main Unit.
UPDATE FORECAST
Click UPDATE FORECAST to manually receive a 5-day forecast from the
Internet of your selected city.
19
18

Troubleshooting
1. Computer:EnsurethatyouareusingWindows2000,XP(32bit)orVista
(32bit)andyourPCisconnectedtotheInternet.Trybrowsingthrougha
couple of websites to make sure. During the CD installation, if the program
detected that Microsoft .NET Framework 2.0 driver was not installed in your
Windows before, it will prompt you to install the driver. Follow the instruction
to install the driver and complete the rest of the installation.
2. Connection: Ensure that the USB transmitter is properly connected to the
USB port of your PC. Otherwise, you are unable to run the PC program and
access the 5-day forecast update from the Internet.
3. Batteries: Ensure all batteries in the Main Unit & USB transmitter are fine
and are in proper position. Replace batteries when the respective low
battery indicator appearsontheMainUnit(refertothe“LOWBATTERY
INDICATION”section).
4. Toolbar Icon: If the toolbar icon ofthePCprogramdisappears(nothidden)
on the lower right of your Window, your program is terminated and no longer
has access to the 5-day forecast from the Internet. Restart the program again.
5. Main Unit Screen: Within the first few minutes of the RF reception from
USB transmitter, it is normal for the Main Unit to only display data on just
one part of the screen. The rest of the screen will gradually appear within
the next 10 minutes or so. If you have waited over one hour without seeing
the rest of the screen, shorten the distance between the USB transmitter &
Main Unit and check the battery levels. Then repeat setup procedures in the
“ESTABLISHRFCONNECTIONWITHMAINUINIT”section.Ifitcontinues
to fail, try removing the USB connection and all batteries from the USB
transmitter. Reinstall the batteries and then reconnect the USB connection
again.Repeatthesetupprocedurein“ESTABLISHRFCONNECTIONWITH
MAINUINIT”section.
6. RF Indicator: If the RF indicator is showing full strength but one or more
of the next 3 days’ forecast is missing on the Main Unit & PC program, your
PC may have been offline for many days. Connect your PC to the Internet
again to receive the latest forecast update.
7. UV Index:IfallforecastinformationappearsexcepttheUVIndex,your
PC may have been offline for more than one day. Connect your PC to the
InternetagaintoreceivethelatestUVIforecastupdate.
8. Forecast Consistency: If the forecast reading of the PC program does
not match with the Main Unit. Press TRANSMIT on the USB transmitter to
re-transmitsignalagainandwaitfor10+minutes.
9. Time Consistency: If your time on the PC program & Main Unit is off by
half an hour or more, click SETTING… on the PC program and set the hour
offset until the proper time is set.
10. City Selection: If your city does not appear in the 20,000 city list, select the
one near your home location.
11. Data Slow Down: Heavy Internet traffic may slow down the response of the
server temporarily. Try again later if you wish to update the forecast manually
by the UPDATE FORECAST button.
21
20

FCC Wording:
This device complies with part 15 of the FCC Rules. Operation is subject to the
following two conditions:
(1)Thisdevicemaynotcauseharmfulinterference,and(2)thisdevicemust
accept any interference received, including interference that may cause
undesired operation.
NOTE:THEMANUFACTURERISNOTRESPONSIBLEFORANYRADIOORTV
INTERFERENCE CAUSED BY UNAUTHORIZED MODIFICATIONS TO THIS
EQUIPMENT.SUCHMODIFICATIONSCOULDVOIDTHEUSERAUTHORITY
TOOPERATETHEEQUIPMENT.
Maintenance
To Store
You may leave the unit on display, or you can store it in its box in a cool, dry place.
Remove batteries if you are planning for long term storage.
To Clean
Use only a soft dry cloth to clean the enclosure of the unit.
NEVERuseliquidsorabrasivecleanertoclean.
Modificationsnotauthorizedbythemanufacturermayvoiduserwarranty.
Note:Thisequipmenthasbeentestedandfoundtocomplywiththelimitsfor
a Class B digital device, pursuant to Part 15 of the FCC Rules. These limits are
designed to provide reasonable protection against harmful
interferenceinaresidentialinstallation.Thisequipmentgenerates,uses
andcanradiateradiofrequencyenergyand,ifnotinstalledandusedin
accordance with the instructions, may cause harmful interference to radio
communications. However, there is no guarantee that interference will not
occurinaparticularinstallation.Ifthisequipmentdoescauseharmful
interference to radio or television reception, which can be determined by
turningtheequipmentoffandon,theuserisencouragedtotrytocorrect
the interference by one or more of the following measures:
•Reorientorrelocatethereceivingantenna.
•Increasetheseparationbetweentheequipmentandreceiver.
•Connecttheequipmentintoanoutletonacircuitdifferentfromthattowhich
the receiver is connected.
•Consultthedealeroranexperiencedradio/TVtechnicianforhelp.
IC Wording:
ThisCategoryIequipmentreceiverdevicecomplieswithIndustryCanada
Standard RSS-Gen.
CedispositifdeéquipementrécepteurdecatégorieIrespectelanorme
CNR-Gen d'Industrie Canada.
23
22
Table of contents
Other Sharper Image Weather Station manuals