SHEKEL Healthweigh H611 User manual

SHEKEL SCALES (2008) LTD - Sales & Marketing: +972-4-662-9132
Ziporit Industrial Zone, Hamerkava 7 St. , P.O.B 880, Nof Hagalil, Israel
Email: info@shekelonline.com | www.shekelonline.com
AA0456-1 (11.10.21) Page 1 of 24
SERVICE MANUAL
Healthweigh®
H611/H610
Digital Baby Scales
Ziporit Industrial Zone, Hamerkava 7 St. , P.O.B 880, Nof Hagalil, Israel

SHEKEL SCALES (2008) LTD - Sales & Marketing: +972-4-662-9132
Ziporit Industrial Zone, Hamerkava 7 St. , P.O.B 880, Nof Hagalil, Israel
Email: info@shekelonline.com | www.shekelonline.com
AA0456-1 (11.10.21) Page 2 of 24
TABLE OF CONTENTS
CHAPTER 1 INTRODUCTION.............................................................................................. 4
CHAPTER 2 DIAGNOSIS....................................................................................................... 5
CHAPTER 3 REPAIR PROCEDURES................................................................................. 8
CHAPTER 4 TESTING AND CALIBRATION PROCEDURE.......................................... 18
CHAPTER 5 DRAWINGS AND PARTS LISTS................................................................. 19
This Service Bulletin should be kept together with the Operating Manual. The
Operating Manual should be referred to for dismantle and reassembly of the scales
when replacing parts.

SHEKEL SCALES (2008) LTD - Sales & Marketing: +972-4-662-9132
Ziporit Industrial Zone, Hamerkava 7 St. , P.O.B 880, Nof Hagalil, Israel
Email: info@shekelonline.com | www.shekelonline.com
AA0456-1 (11.10.21) Page 3 of 24
INTRODUCTION
This service manual contains the information needed to perform routine maintenance
and service on the Baby scales. This service manual is intended for exclusive use by
certified personnel. No responsibility can be taken if the manual is used by unauthorized
persons.
Chapter 1 Introduction –information about service facilities, tools, test equipment,
calibration masses and specifications.
Chapter 2 Diagnosis –a guide for troubleshooting problems and error code tables.
Chapter 3 Repair procedures –disassembly/assembly and replacement procedures.
Chapter 4 Testing –operational and performance tests.
Chapter 5 Drawings and Parts' lists –exploded view drawing and parts' list;
electronics and electrical drawings.
SERVICE FACILITIES
In order to perform service on Healthweigh® Baby scales the service area must meet the
following requirements:
•Should be temperature controlled and meet the specifications for temperature
environmental requirements.
•Vibration free area.
•Area must be clean and air must not contain excessive dust particles.
•Stable and level work surface.
•Work area must not be exposed to direct sunlight or radiating heat sources.

SHEKEL SCALES (2008) LTD - Sales & Marketing: +972-4-662-9132
Ziporit Industrial Zone, Hamerkava 7 St. , P.O.B 880, Nof Hagalil, Israel
Email: info@shekelonline.com | www.shekelonline.com
AA0456-1 (11.10.21) Page 4 of 24
CHAPTER 1 INTRODUCTION
TOOLS AND TEST EQUIPMENT REQUIRED
In order to service the Kern Baby scales, various tools and items are required in and are as
follows:
Special Tools and Test Equipment List
•Alternate voltage Power Adapter, #UE15WCP-090050SPA Cat No. 165009
•Healthweigh®User Manual
•Deadweights 100-160 kg
Standard Tools and Test Equipment List
•Standard technicians' electronic tools
•DVM
•Masses totaling up to 220kg are required
SPECIFICATIONS
Specifications for the Baby scales are listed below. After service the Healthweigh®Baby scales
must meet the specifications listed in the table. Prior to service it must be determined what
specifications are not met.
H611-00-1/2/4
Capacity & Graduation
12 kg x 5 g (26 lb x 0.2 oz)
H610-00-1/2/4
Capacity & Graduation
0 - 2 kg x 1 g (0 - 5 lb x 0.05 oz)
2 - 6 kg x 5 g (5 - 12lb x 0.1 oz)
6 - 15Kg x 5g (12 - 30lb x 0.2 oz)
Power Requirements
Adaptor 230VAC-9VDC-50Hz / 120VAC–9VDC–50Hz
Environmental
Operating temperatures: 10°C to 35°C/ 50°F to 95°F
Storage temperatures: 0°C to 50°C / 32°F to 122°F
Humidity: 85%

SHEKEL SCALES (2008) LTD - Sales & Marketing: +972-4-662-9132
Ziporit Industrial Zone, Hamerkava 7 St. , P.O.B 880, Nof Hagalil, Israel
Email: info@shekelonline.com | www.shekelonline.com
AA0456-1 (11.10.21) Page 5 of 24
CHAPTER 2 DIAGNOSIS
TROUBLESHOOTING
This section of the service manual specifies problems which can occur in the scales.
DIAGNOSTIC GUIDE
The diagnostic guide is designed to help locate the problem quickly and easily. First locate the
symptom, then review the probable cause and remedy. The probable causes are listed with the
most common cause first. If the first remedy does not fix the problem, proceed on to the next
remedy. Before attempting to repair the scales, read the manual thoroughly to familiarize
yourself with the components and operation of the scales. Do not carry out repair unless you
are authorized to do so and fully understand the method of operation of the scales.
Diagnosis
1. Isolate and identify the symptom.
2. Refer to the diagnostic guide and locate the symptom.
3. Follow the suggested remedies in the order they appear.
4. Perform the indicated checks, or see the appropriate section of the manula.
5. Repair or replace the defective section of the scales.
NOTE:
If more than one symptom is observed, it is necessary to approach one area at a time,
and also remember that the symptoms may be interrelated.
In the event that erratic or fluctuating weight readings are observed, it is necessary to
isolate the problem to either the mechanical or electronic area of the scales.
Conducting a repeatability test will easily identify whether the Load Cell is functioning
correctly or whether the problem is due to an electronic malfunction.

SHEKEL SCALES (2008) LTD - Sales & Marketing: +972-4-662-9132
Ziporit Industrial Zone, Hamerkava 7 St. , P.O.B 880, Nof Hagalil, Israel
Email: info@shekelonline.com | www.shekelonline.com
AA0456-1 (11.10.21) Page 6 of 24
CHAPTER 2 DIAGNOSIS
DIAGNOSTIC GUIDE
SYMPTOM
POSSIBLE CAUSE
CORRECTIVE ACTION
Scale does not turn on
when using rechargeable
battery
Dead battery
Connect scale to power source
Replace batteries
Scale does not turn on
Faulty electrical outlet
Use a different outlet
Bad power supply
Replace adaptor
The display shows “LO
Bat” message
The battery is low
Recharge the battery
according to instructions
Questionable weight or
the scale does not zero
External object interfering with the scale
Remove interfering object from
the scale
The display did not show ”0.0”kg/lb before
weighing
Remove baby, zero the scale
and begin weighing process
again
Scale is not placed on a stable surface
1. Make sure the scale is level
using the spirit level on the
platform and begin weighing
process again.
Scale is out of calibration
Check weight with known
weight value
The display shows “STOP”
The load on the scale exceeds the
capacity
Remove the excess weight
and use the scale according to
its limits
The display shows " ------"
message
The load on the scale exceeds the
capacity
Remove the excess weight
and use the scale according to
its limits
RS232 Not functioning
(when equipped with
RS232)
Improper Print Menu settings
Check all settings.
RS232 defective
Replace PCB

SHEKEL SCALES (2008) LTD - Sales & Marketing: +972-4-662-9132
Ziporit Industrial Zone, Hamerkava 7 St. , P.O.B 880, Nof Hagalil, Israel
Email: info@shekelonline.com | www.shekelonline.com
AA0456-1 (11.10.21) Page 7 of 24
ERROR CODES
ERROR NO.
DEFINITION
CHECK/REPLACE
Err 2
Low saturation state (Low A/D)
The load cell is not connected
properly. Check the cables,
and mechanical connection. If
the problem persists, replace
the set of load cells
Err 3
High saturation state (High A/D)
See Err 2
Err 6
Unstable weight. Cannot calibrate
Check the load cell's
mechanical surroundings and
see that nothing touches it
and that the cables are
properly welded
Err 7
Mathematical error; division by zero.
Cannot calculate calibration factor
Will show when trying to
calibrate with no calibration
weight.

SHEKEL SCALES (2008) LTD - Sales & Marketing: +972-4-662-9132
Ziporit Industrial Zone, Hamerkava 7 St. , P.O.B 880, Nof Hagalil, Israel
Email: info@shekelonline.com | www.shekelonline.com
AA0456-1 (11.10.21) Page 8 of 24
CHAPTER 3 REPAIR PROCEDURES
REPAIR PROCEDURES
This section of the manual contains assembly procedures. Please note that components inside
the scale are delicate and need to be handled with care. It is imperative that the Load Cell
should never be subjected to any excessive torque, stress or abrasion as damage may result.
1. Battery Replacement
1.1. Turn the baby scale base over and remove the cover by unscrewing two Philips M3X6
(401426) screws to expose the battery.
1.2. Disconnect the battery fastener from the battery housing and remove the empty battery.
1.3. Take a new 2.8AH 6V battery (414321). Remove the two shields at the end of the
battery connects and connect the battery cable (203291) according to the relevant
colors (red to red and blue to blue).
1.4. Take a rechargeable battery fastener (461822).

SHEKEL SCALES (2008) LTD - Sales & Marketing: +972-4-662-9132
Ziporit Industrial Zone, Hamerkava 7 St. , P.O.B 880, Nof Hagalil, Israel
Email: info@shekelonline.com | www.shekelonline.com
AA0456-1 (11.10.21) Page 9 of 24
1.5. Place a battery in the battery housing, located on the base and place the battery cable
into the relevant slot, shown in the image below.
1.6. Place the battery fastener over the battery and screw it into place using two Philips
screws M3X6 (401426).
1.7. Put the cover back in place and fasten by screwing in two Philips M3X6 (401426)
screws.
SHEKEL SCALES (2008) LTD - Sales & Marketing: +972-4-662-9132
Ziporit Industrial Zone, Hamerkava 7 St. , P.O.B 880, Nof Hagalil, Israel
Email: info@shekelonline.com | www.shekelonline.com
AA0456-1 (11.10.21) Page 10 of 24
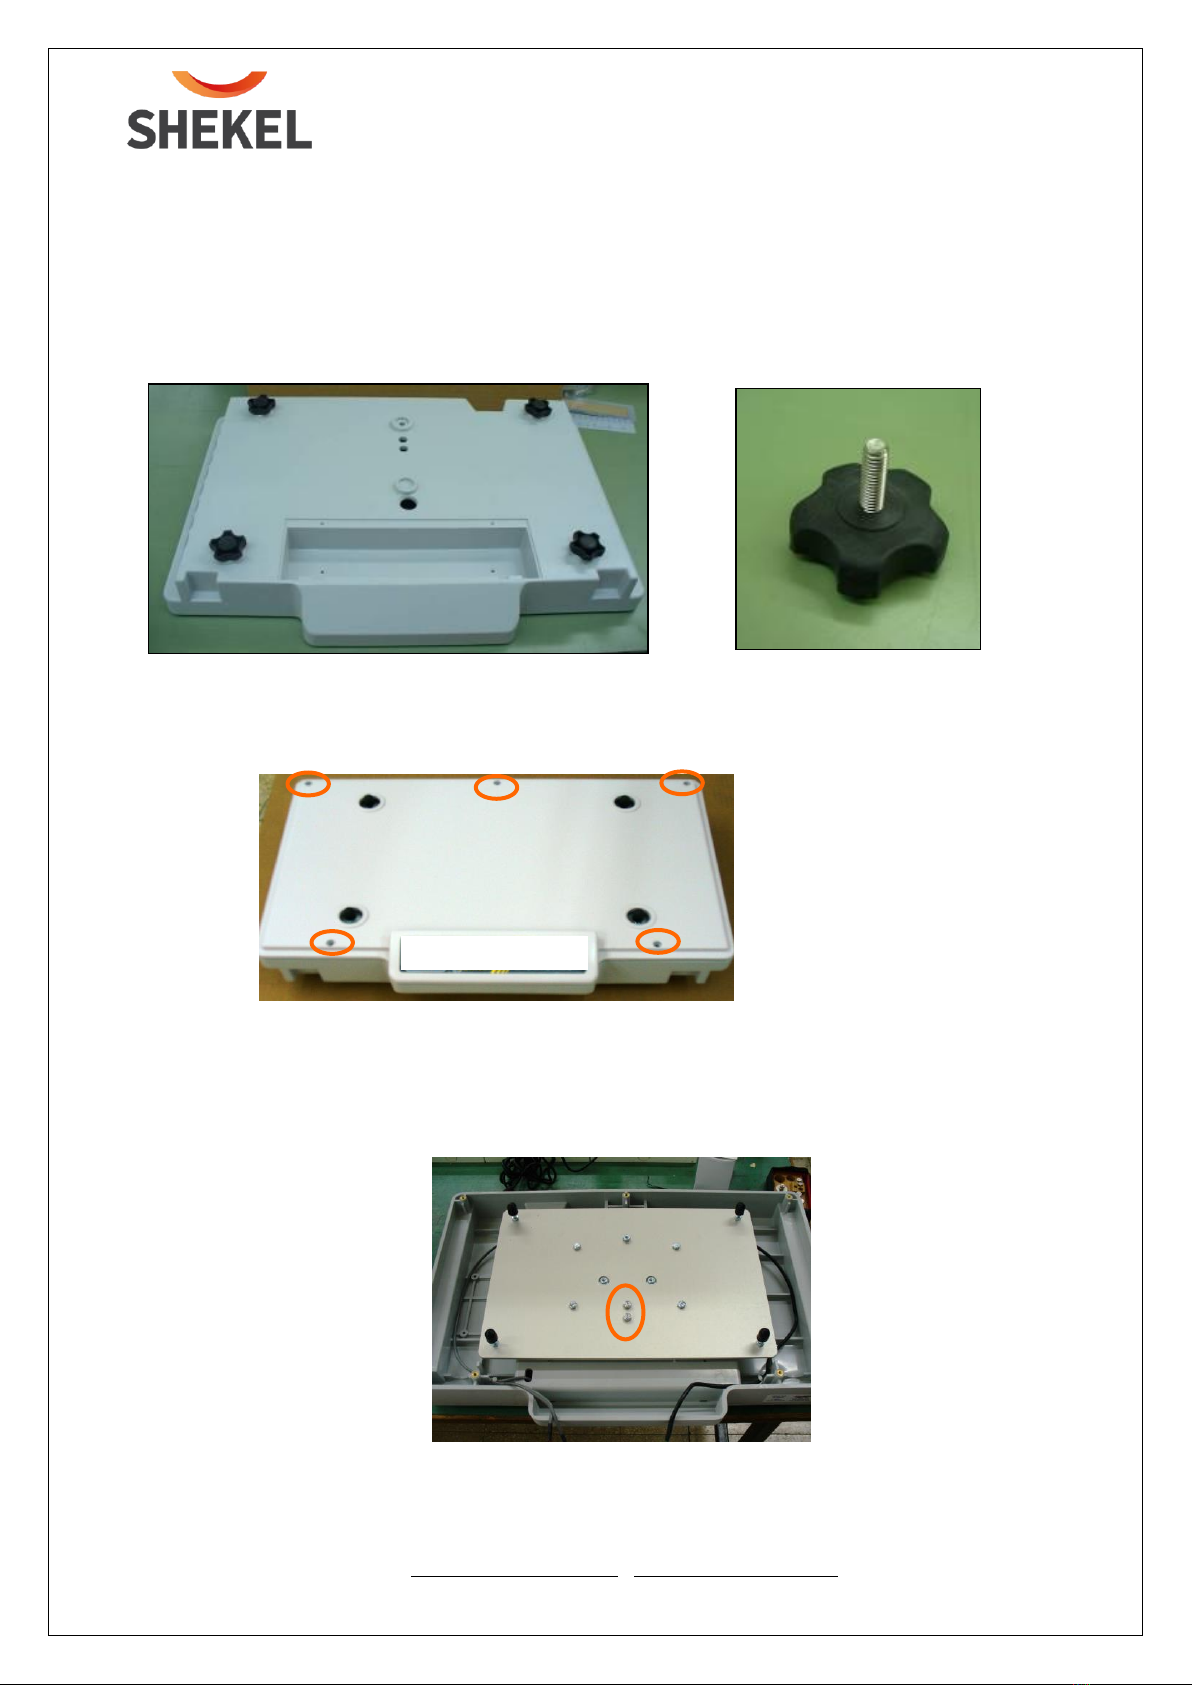
2. Replacing scale base legs
2.1. Turn the base over on to a flat surface.
2.2. Screw into the base 4 black rubber legs with stainless steel thread M6X17 (403005).
3. Load Cell Replacement
3.1. Remove the cover from the Baby Scale Base by unscrewing the five M5 X 10 screws.
3.2. Remove the cover carefully so as not to cause damage to the Load Cell, battery and or
power cables which are all situated underneath the indicator faceplate.
3.3. Disconnect the cables from the PCB.
3.4. Undo the two load cell screws and remove the metal tray from the base housing to
expose the load cell.

SHEKEL SCALES (2008) LTD - Sales & Marketing: +972-4-662-9132
Ziporit Industrial Zone, Hamerkava 7 St. , P.O.B 880, Nof Hagalil, Israel
Email: info@shekelonline.com | www.shekelonline.com
AA0456-1 (11.10.21) Page 11 of 24
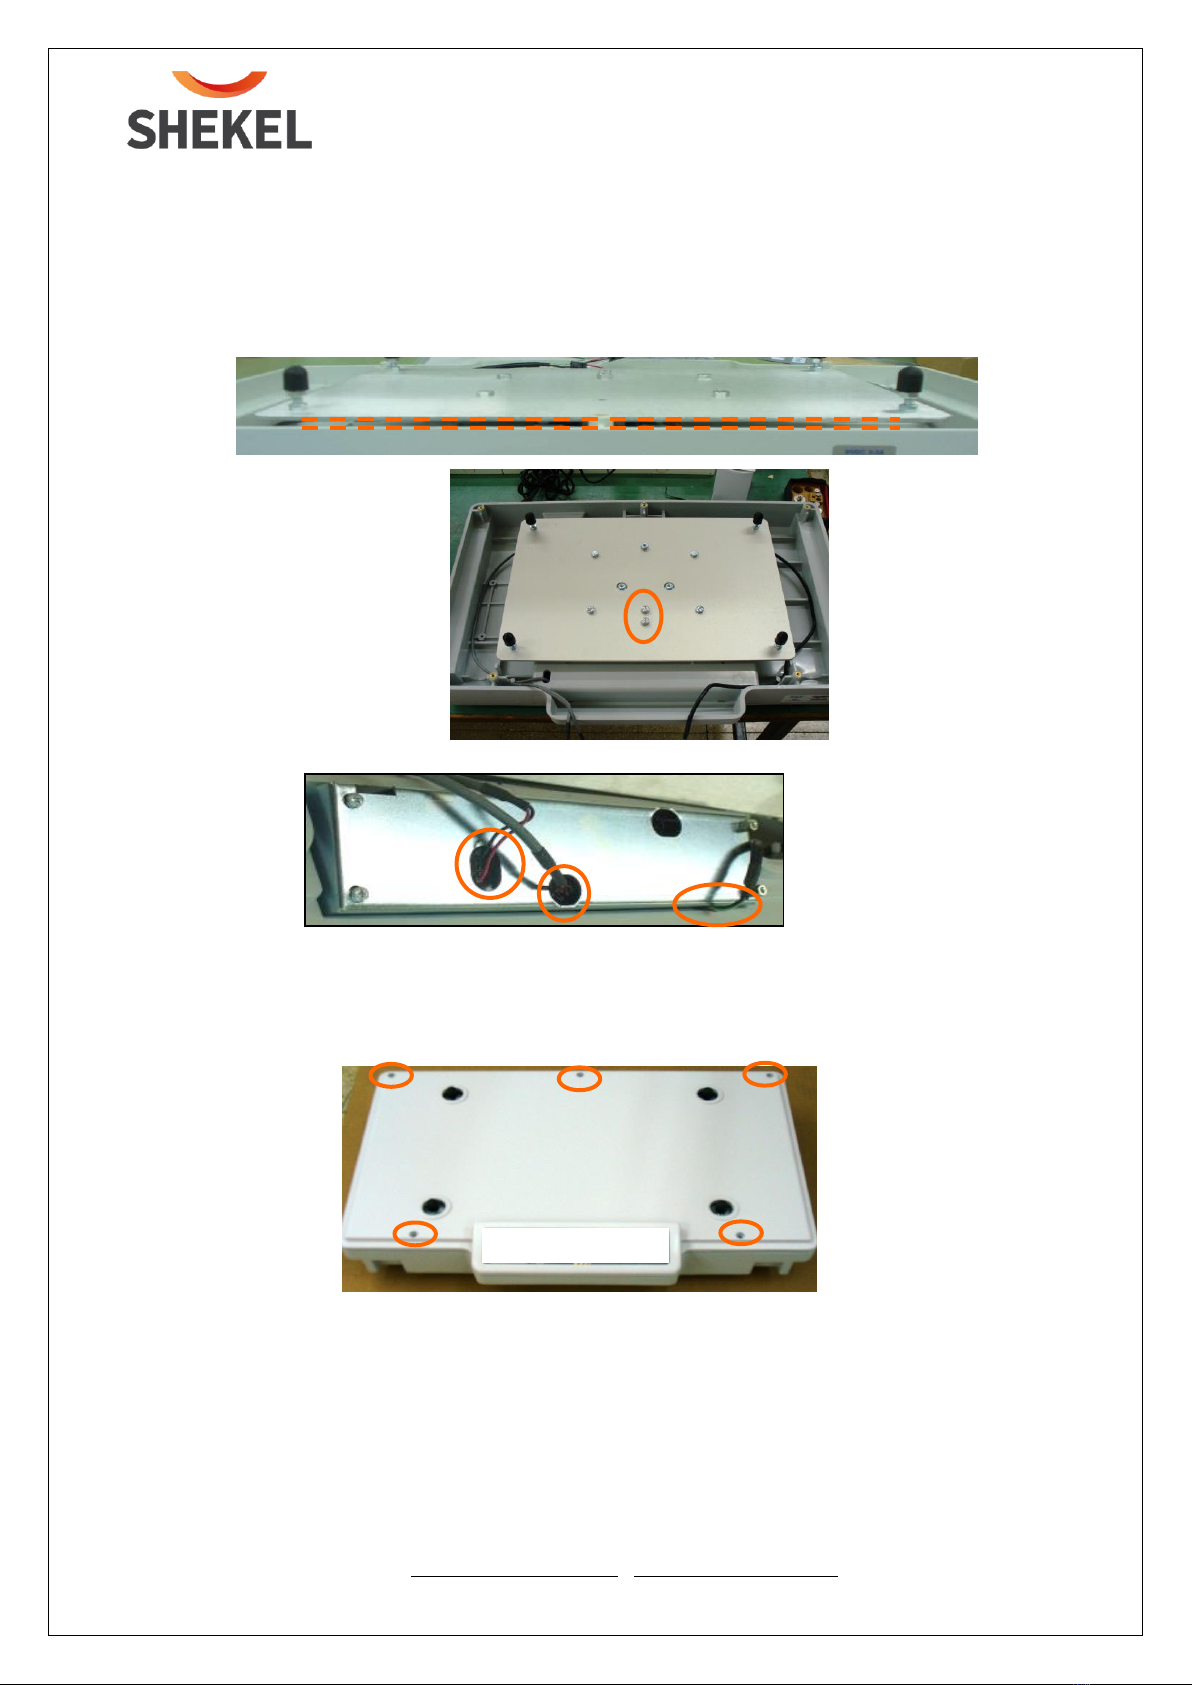
3.5. Undo the two hex load cell screws and remove the metal tray from the base housing to
expose the load cell.
3.6. Turn the base on its side and unscrew two allen screws M6X16 (400659) releasing two
washers M6 (404075) and the metal spacer of 2mm (590320)) from the lower Load Cell
housing, keep for reassembly.
3.7. Cut the cable fasteners which connect the load cell to the housing

SHEKEL SCALES (2008) LTD - Sales & Marketing: +972-4-662-9132
Ziporit Industrial Zone, Hamerkava 7 St. , P.O.B 880, Nof Hagalil, Israel
Email: info@shekelonline.com | www.shekelonline.com
AA0456-1 (11.10.21) Page 12 of 24
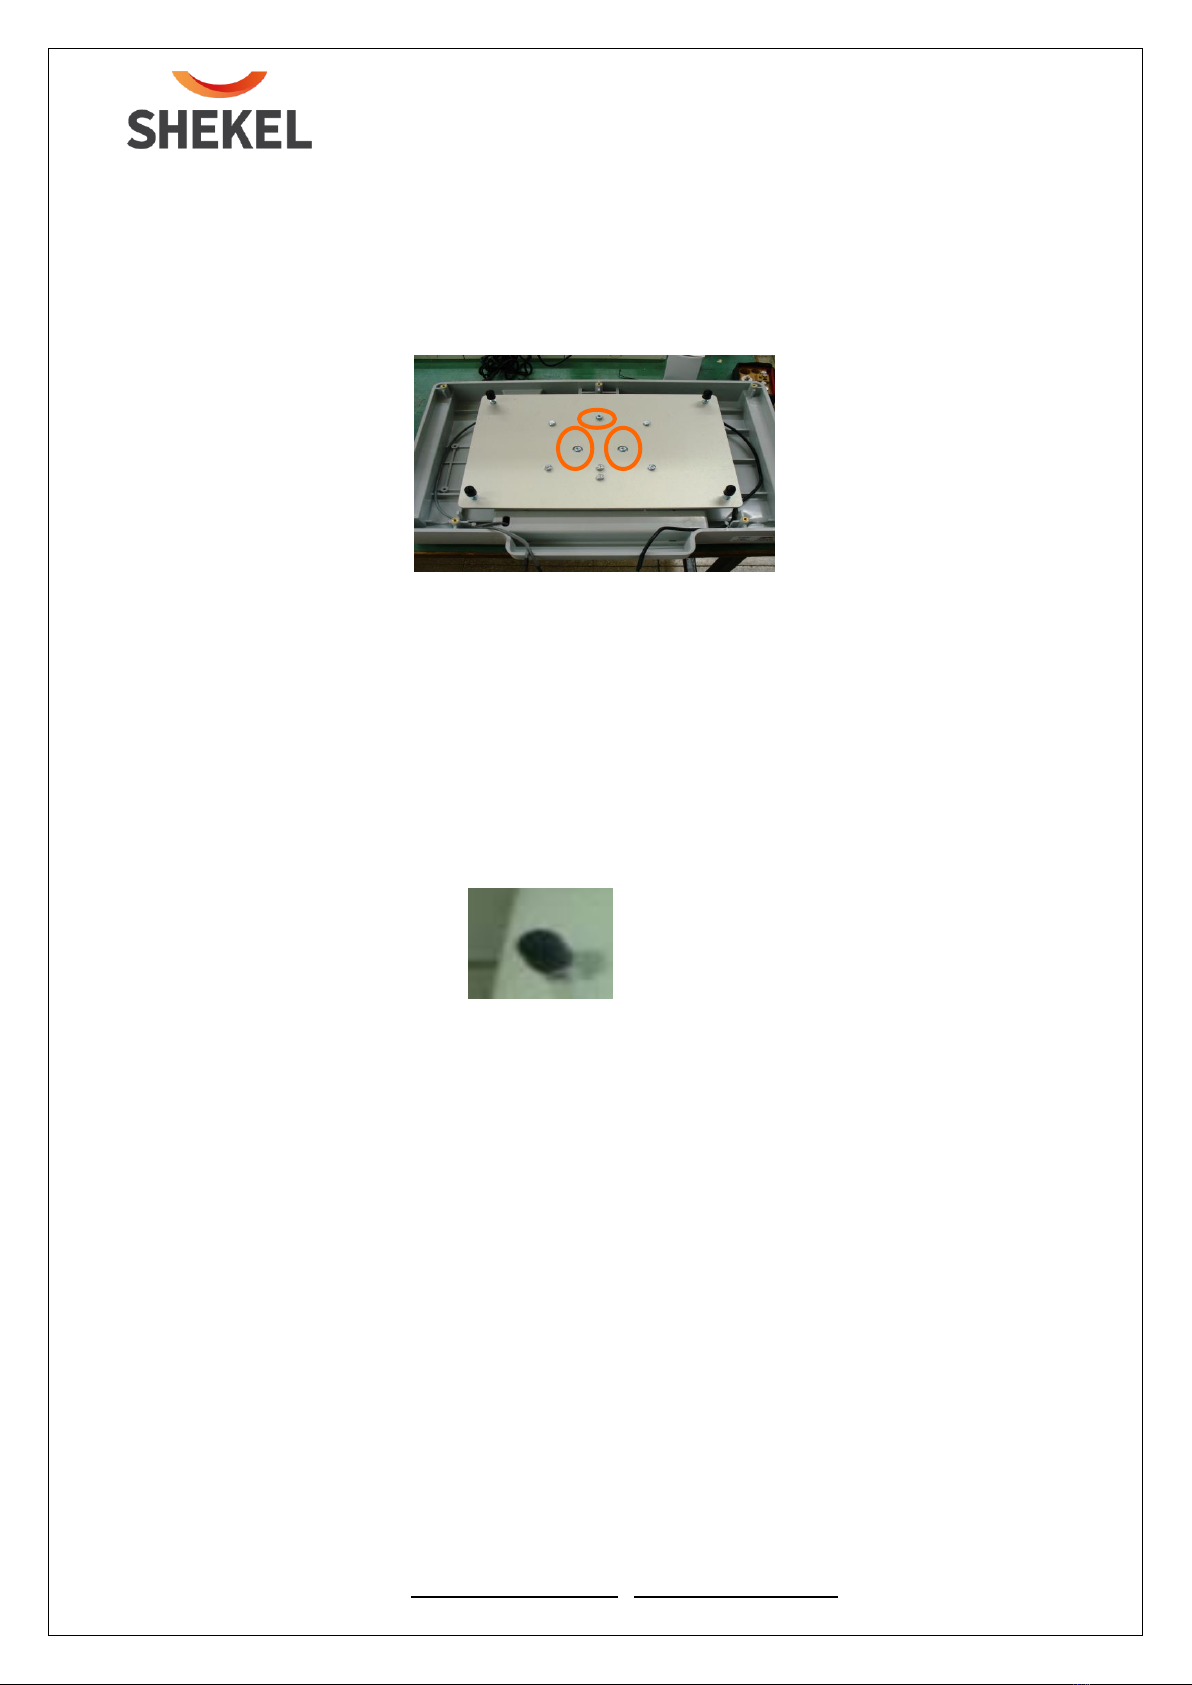
3.8. Place the new Load Cell into the housing and screw in using the screws used in the
previous stage, do not tighten the screws. Put back the metal spacer.
3.9. Ensure that the Load Cell is placed parallel to its housing and tighten the base Load cell
screws using a torque gauge at 13 NM.
3.10. Fasten plastic fasteners to attach the LC cable to the housing.
SHEKEL SCALES (2008) LTD - Sales & Marketing: +972-4-662-9132
Ziporit Industrial Zone, Hamerkava 7 St. , P.O.B 880, Nof Hagalil, Israel
Email: info@shekelonline.com | www.shekelonline.com
AA0456-1 (11.10.21) Page 13 of 24
3.11. Reassemble the metal tray. Ensure that the metal spacer is in place between the tray
and the load cell. Screw in the two hex screws with washers, tighten with torque gauge
at 13 NM. Ensure that the tray is parallel to the housing ribs.
3.12. Attach the LC, battery and power cable to the PCB through the RFI box.
3.13. Places back the plastic cover. Take care not to pinch the cables between the base and
the cover.
3.14. Screw in the five M5x10 screws and place back the plastic covers on to of them
3.15. Calibrate the scale with the load cell.
SHEKEL SCALES (2008) LTD - Sales & Marketing: +972-4-662-9132
Ziporit Industrial Zone, Hamerkava 7 St. , P.O.B 880, Nof Hagalil, Israel
Email: info@shekelonline.com | www.shekelonline.com
AA0456-1 (11.10.21) Page 14 of 24
4. PCB Replacement
4.1. Remove the cover from the Baby Scale Base by unscrewing the five M5 X 10 screws.
4.2. Remove the cover carefully so as not to cause damage to the Load Cell, battery and or
power cables which are all situated underneath the indicator faceplate.
4.3. Disconnect the cables from the PCB.
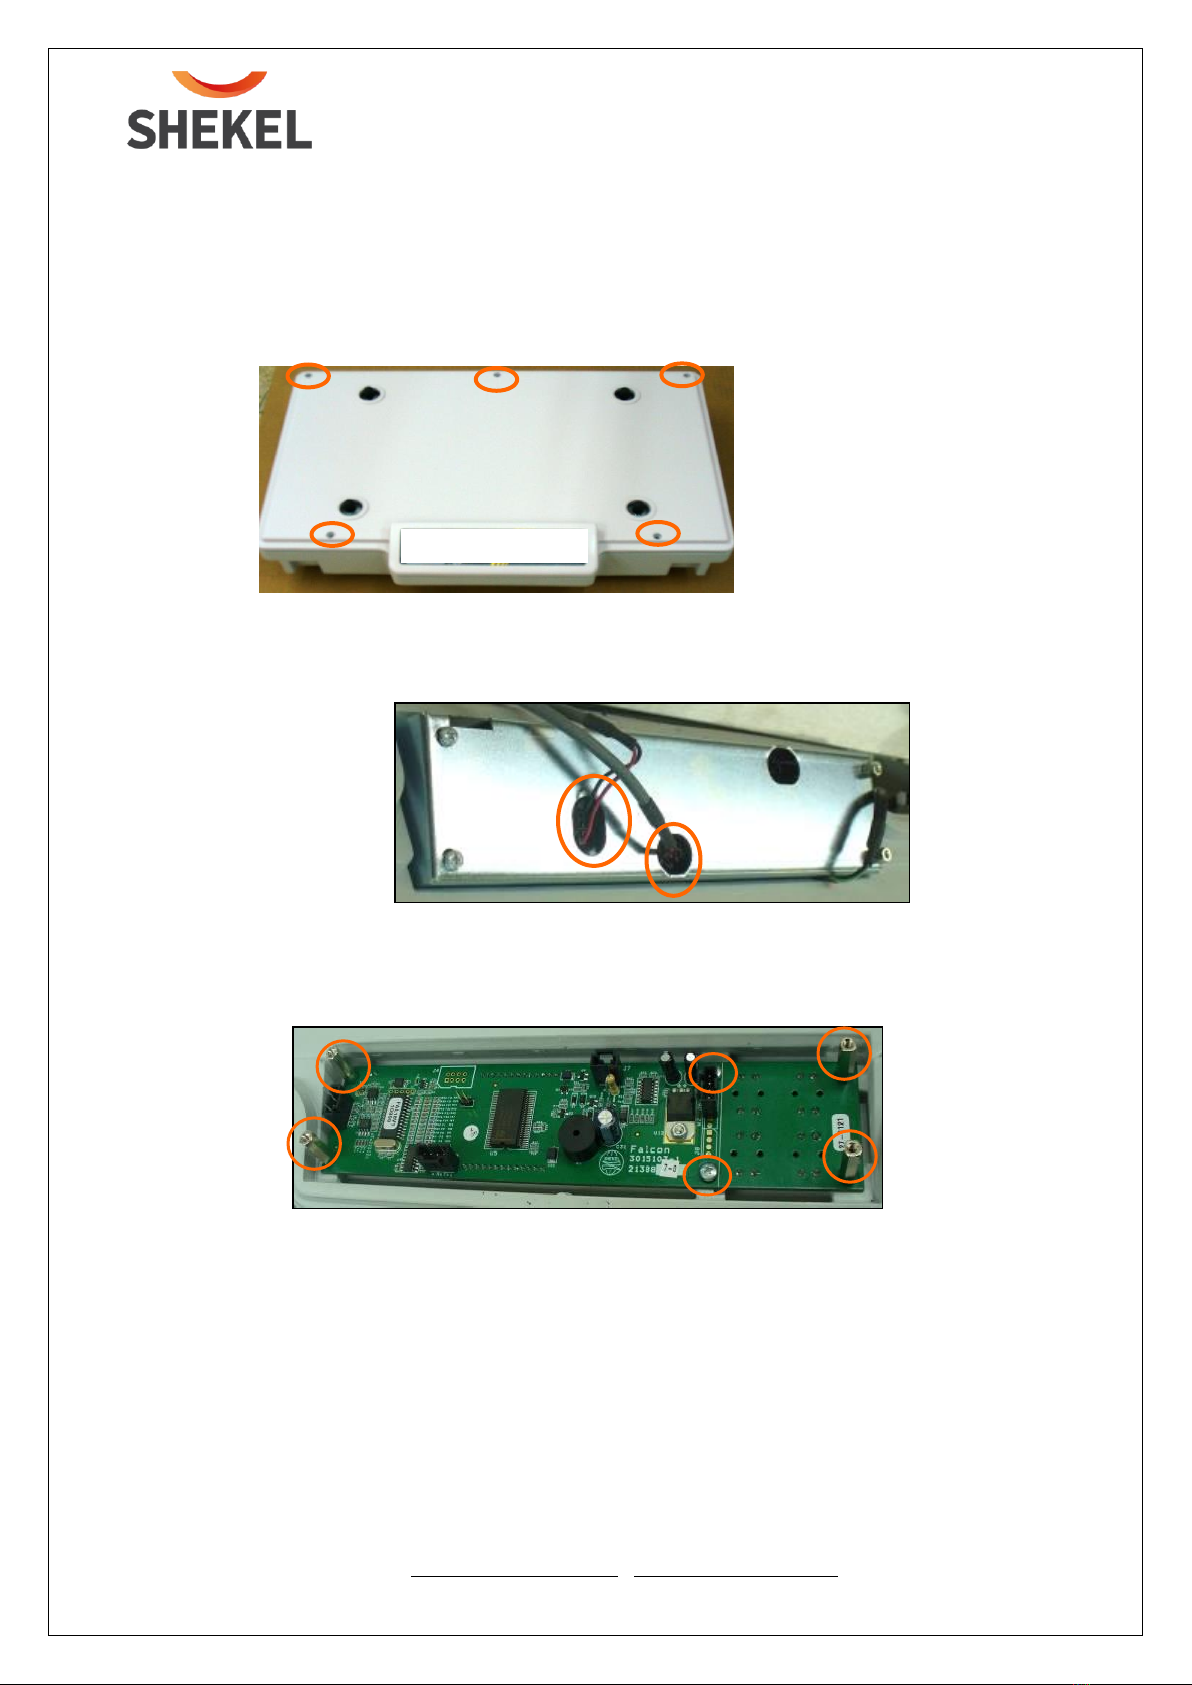
4.4. Remove the RFI box by opening the seal and unscrewing the screws.
4.5. Disconnect the load cell cable from the PCB.
4.6. Remove the damage PCB by unscrewing the six screws (four spacers and 2 philips)

SHEKEL SCALES (2008) LTD - Sales & Marketing: +972-4-662-9132
Ziporit Industrial Zone, Hamerkava 7 St. , P.O.B 880, Nof Hagalil, Israel
Email: info@shekelonline.com | www.shekelonline.com
AA0456-1 (11.10.21) Page 15 of 24
4.7. Take a FALCON board (213887) and screw into the board 4 spacer male female
M3X18 screws (404427), these screws are screwed into the four corners of the board
and two Phillips M3X6 screws (401426) as in the image are screwed in.
4.8. Reconnect the load cell cable to the PCB
4.9. Attach back the RFI to the PCB, Make sure the load cell cable is not pinch between the
RFI box and the PCB.
4.10. Reconnect the battery cable, Power cable to the PCB
4.11. Place back the cover and Screw back the five screws, places back the screws
cover
4.12. Place back the tray and calibrate the scale

SHEKEL SCALES (2008) LTD - Sales & Marketing: +972-4-662-9132
Ziporit Industrial Zone, Hamerkava 7 St. , P.O.B 880, Nof Hagalil, Israel
AA0456-1 (11.10.21)
Power Supleir
battery
load cell
5. Limiting screws alignment
Note –any replacement of the metal tray carrying the weight will be followed by
alignment of the limiting screws in the new assemble metal tray.
5.1. Follow steps 3.1 to 3.4 and remove the damage metal tray
5.2. Place and assemble the new metal tray (step 3.11).
5.3. Screw in two Alen screws M6X12 (400916), one in the top part of the base and the
other in the bottom, close with an M6 nut (403415)
5.4. Screw in two Alen screws M6X12 (400916), one in the top right of the base and the
other in the top left close with an M6 nut (403415)
The following steps are intended to ease the limiting screws alignment process
5.5. Take apart the PCB from its house ( steps 4.2-4.6) and reconnect to the battery
cable.
5.6. Turn the indicator on and calibrate the scales.
5.7. Go into Test mode on the software program.
5.8. Place dead weights of 15 kg on the side that is closed to the front of the scales, on the
board display 15 kg will appear, tightening the lower screw until 14 kg appears on the
indicator and close with a nut.
5.9. Place the 15 kg dead weight on the backhand side of the scales on the scale indicator
15kg will appear, tighten the upper screw until 14kg appears on the indicator and close
the nut.
SHEKEL SCALES (2008) LTD - Sales & Marketing: +972-4-662-9132
Ziporit Industrial Zone, Hamerkava 7 St. , P.O.B 880, Nof Hagalil, Israel
Email: info@shekelonline.com | www.shekelonline.com
AA0456-1 (11.10.21) Page 17 of 24
5.10. Repeat the procedure for the right limiting screw. Placing the weight on the far right
of the tray. Lock the right limiting screw for 14 kg
5.11. Repeat the procedure for the left limiting screw. Lock the left limiting screw for 14
kg.
5.12. Turn off the indicator.
5.13. Disconnect the battery cable.
5.14. Reassemble the PCB into it house, steps 4.7 till 4.12
6. replacing the Plastic tray holder
6.1. follow step 3.1 and 3.2 .
6.2. remove the damage tray leg and replace with a new one.
6.3. follow steps 3.13 and 3.14
End of chapter 3 –Repair Procedures

SHEKEL SCALES (2008) LTD - Sales & Marketing: +972-4-662-9132
Ziporit Industrial Zone, Hamerkava 7 St. , P.O.B 880, Nof Hagalil, Israel
Email: info@shekelonline.com | www.shekelonline.com
AA0456-1 (11.10.21) Page 18 of 24
CHAPTER 4 TESTING AND CALIBRATION PROCEDURE
Important: Scales with OIML Class III compliance have a seal to prevent any unauthorized
person performing calibration. Please note the Scales have been calibrated in accordance to
your local gravitational force. If the scales are moved into another geographical area please
check with your dealer if the same gravitational force applies.
To Calibrate Non Class III scales please refer to the table below. The calibration sequence is
conducted as follows:
The calibration procedure is performed using a known dead weight in either kg's or lbs
To turn on the scales > Press the On-Off key
Press the Reweigh and Zero keys simultaneously and hold
until the LCD displays LOAd = x.xxx kg
(the default is 5.000kg; 11.000lb)
This default value can be changed as follows:
Press on the Zero key until the right digit begins to roll up.
When it reaches the required value release the key.
By pressing twice on the Zero key the cursor will move over to the
left digit. Keep the Zero key depressed and the digit will roll up
until the required value is achieved.
Press the Reweigh key and the LCD will display CLEAr
Remove all weights (objects) from the weigh platform.
Press the Reweigh key and the LCD will display a hyphenated line
representing Zero calibration
Wait until PUT x.xxxkg (x.xxxlb) appears on the LCD display
Place the calibration weight equal to the value appearing on the
display on the weighing platform
Press the Reweigh button and release, the display will show CAL
and will conduct calibration calculation.
FACTOR = x.xxxxxx will appear on the LCD display
Press the Reweigh key and SAVE will appear on the LCD display
Press Reweigh again and dOnE will appear on the LCD display
Note: If Zero is pressed at this stage the calibration sequence is
completely cancelled
StArt appears on the LCD display and the scale returns to regular
weighing mode.
Remove the calibration weight from the scale and wait until the
0.000 Zero appears on the LCD.
Note: To cancel the sequence at any time during the calibration
process push on the Reweigh and Zero keys simultaneously
ON-OFF
+
REWEIGH
ZERO
LOAd
x.xxkg
x.xxxlb
ZERO
REWEIGH
H
CLEAr
REWEIGH
------------
PUT
5.000kg
11.000lb
Place calibration
weight on scale
REWEIGH
CAL
REWEIGH
SAVE
FACTOR
X.XXXXX
REWEIGH
dOnE
StArt
0.000
Remove weight
from the scale

SHEKEL SCALES (2008) LTD - Sales & Marketing: +972-4-662-9132
Ziporit Industrial Zone, Hamerkava 7 St. , P.O.B 880, Nof Hagalil, Israel
Email: info@shekelonline.com | www.shekelonline.com
AA0456-1 (11.10.21) Page 19 of 24
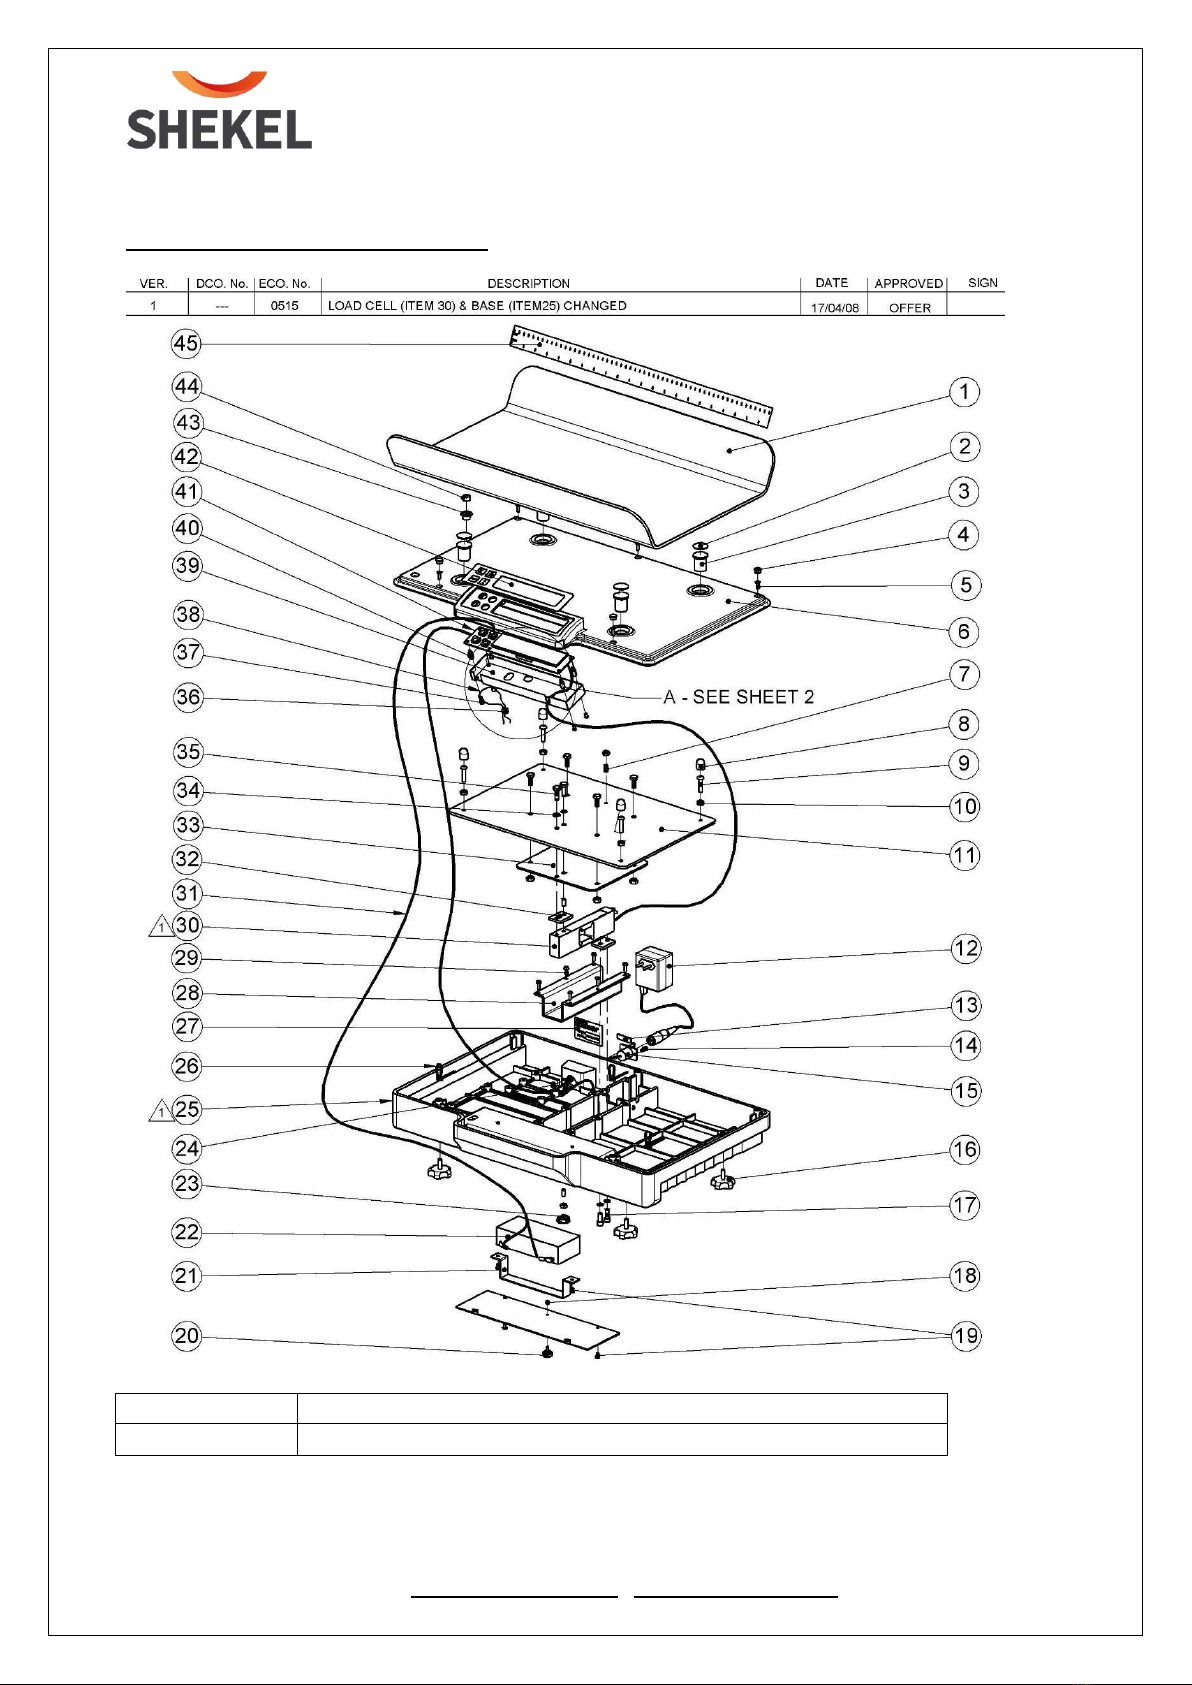
CHAPTER 5 DRAWINGS AND PARTS LISTS
This section of the service manual contains exploded view and parts lists. The exploded view
drawing is designed to identify the parts which can be serviced in the field
Note: In all cases where a part is replaced, the scale must be thoroughly checked after the
replacement is made. The scale must meet the parameters of all applicable specifications in
this manual.
SHEKEL SCALES (2008) LTD - Sales & Marketing: +972-4-662-9132
Ziporit Industrial Zone, Hamerkava 7 St. , P.O.B 880, Nof Hagalil, Israel
Email: info@shekelonline.com | www.shekelonline.com
AA0456-1 (11.10.21) Page 20 of 24
Exploded view of scale H611-00
DWG NO.
TITLE: DIGITAL BABY SCALE
BC3308 VER 1
MODEL NO: H611-00
This manual suits for next models
1
Table of contents
Other SHEKEL Scale manuals


