Shelley Hancock Skin Enhancer User manual

Skin Enhancer
Before using this tool, please read this manual carefully

Skin Enhancer Modalities:
The Skin Enhancer is a cleansing and rejuvenating facial device. It includes modes for deep
cleanse, product penetration, facial contouring and calming. It integrates nanocurrent (EMS),
heat, biomechanical vibration, LED in red, blue, and red and yellow combo plus cold for locking in
product, closing the pores, and calming the skin.
1. Ultrasonic Cleansing
Ultrasonic vibrations exfoliate the superficial scaly layers of the skin, reviving the skin tissue. When
water is exposed to ultrasound vibrations, the ultrasonic emission has a spectacular effect on the
water molecules, which become pulverized. This is called micronization.
2. EMS (electrical muscle stimulation/nanocurrent)
EMS or nanocurrent aids in reducing the signs of aging by utilizing a low level of electricity known
as microcurrent. These tiny microcurrent impulses trigger chemical reactions at a cellular level to
enhance the production of natural collagen and elastin, provide circulatory benefits and work directly
on the nerves and muscle fibers. The result is visible firming and smoothing of the skin. Although
nanocurrent is lighter than microcurrent it still is effective in restoring those messages from the
brain to tell the skin to rejuvenate.
It stimulates the muscles and drains lymph to achieve the effect
of lifting and toning. It helps tone facial muscles by replicating our own biological currents. Turn
intensity level of EMS up and down with a quick push on the on/off button.
3. Biomechanical Vibrations
Sends gentle vibrations (6000-7000 times per minute) that stimulate/exercise muscles through
contraction and relaxation. The effects are particularly beneficial for speeding up metabolism by
improving the supply of nutrients and oxygen to the tissue for smooth healthy skin. This is the
mode that I feel that really induces the toning! This sonic massage increases penetration and
absorption of products. Turn intensity level of vibration up and down using the “intensity” button.
4. Heat
Warm massage promotes absorption of products creating a smoother texture to the skin. 42°C
5. Red light
640nm-65Onm red light stimulates fiber cells, improves blood circulation, promotes proliferation of
collagen and elastin, it reduces fine lines and wrinkles and lessens pigmentation. It restores the
youthful vitality of the skin.
6. Blue light
460nm-470nm blue light Kills surface bacteria, anti-inflammatory and calms skin.
7. Orange light (combo red and yellow)
597nm-622nm Orange LED light has been shown to be effective in promoting blood circulation,
speeding up metabolism, replenishing cellular energy and strengthening muscles for toning.
8. Cooling
The cooling mode closes and tightens pores locking in moisture and nutrients. It is also a great
anti-inflammatory when skin is irritated. The cool comes from the inner silver plate. Please be sure
to wipe the sensors on the head of the unit after using other modes before turning on cooling. Any
product left on the sensors will inhibit the unit from getting cold.
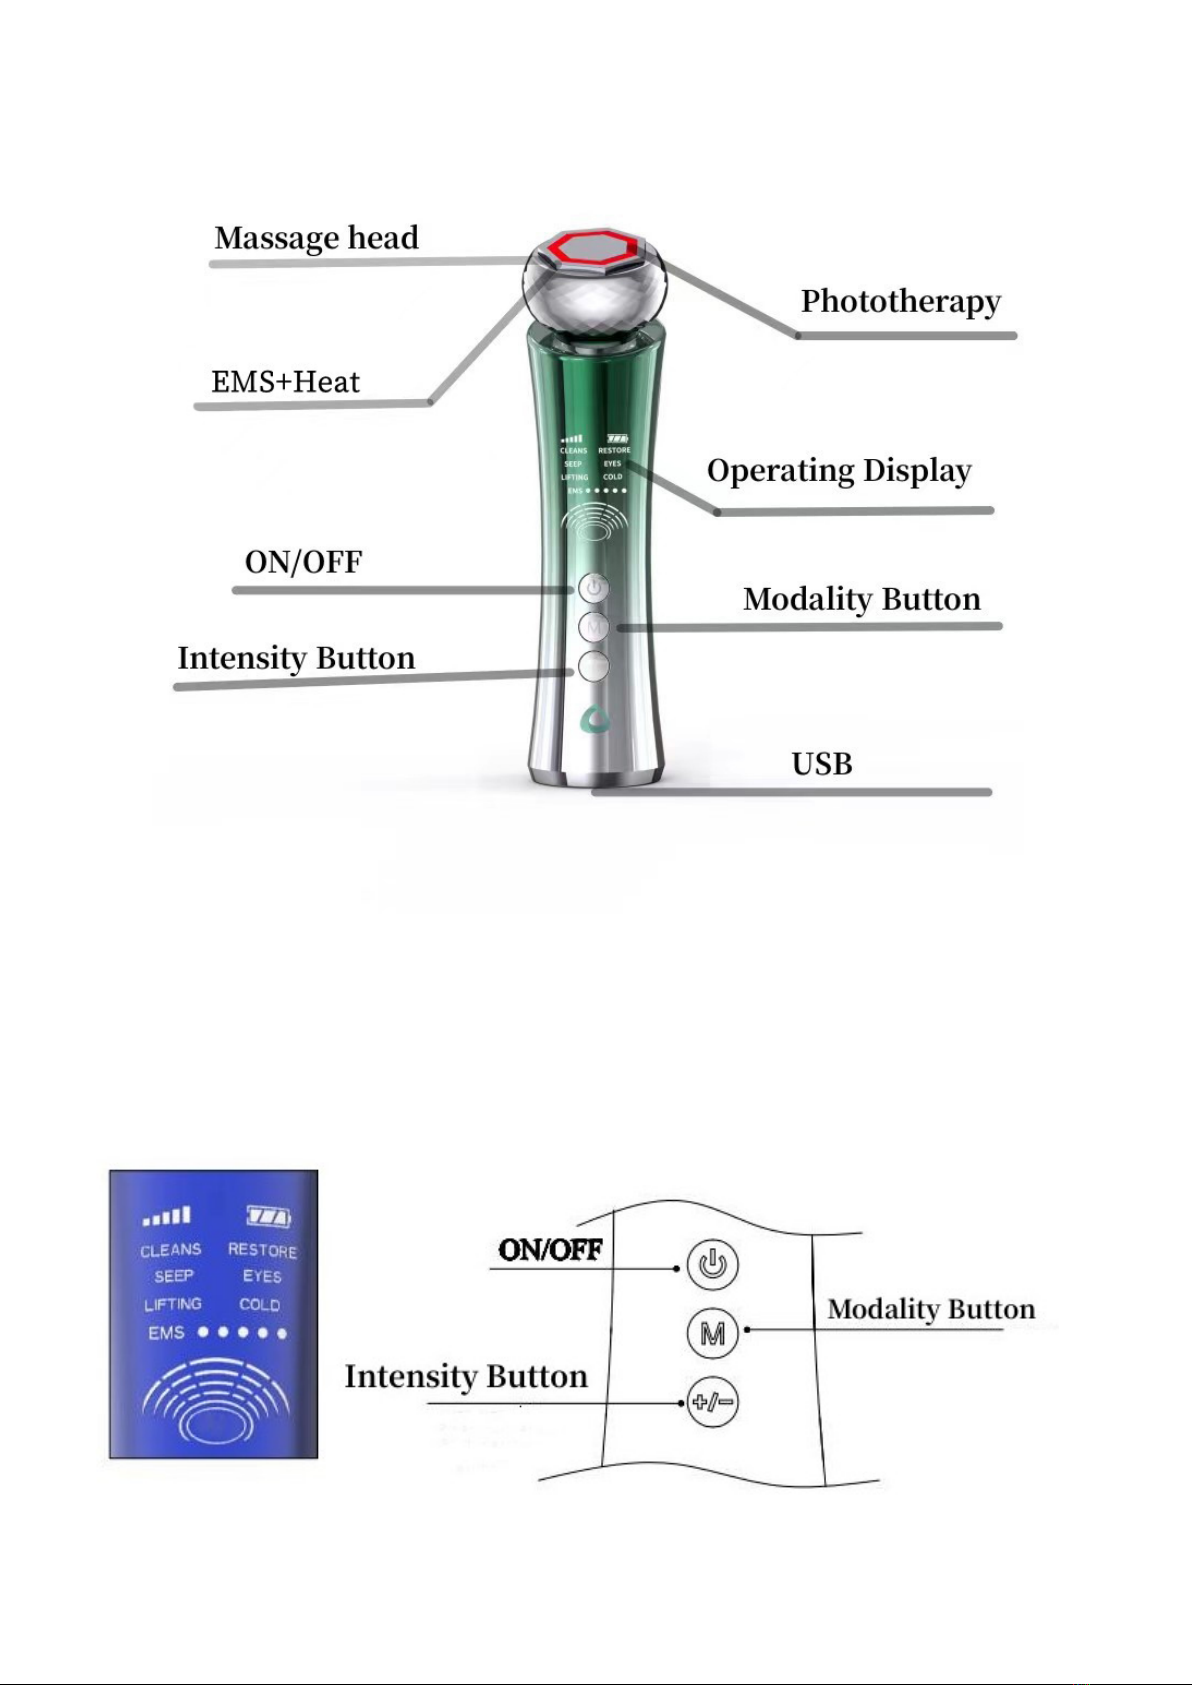
Display icons and key functions:
*Important Please Read*
*When the unit is turned off, press, and hold the power button for 2 seconds to turn the unit on.
The unit will begin in the ultrasonic cleansing, EMS, and vibration mode.
*When the power is already on, a short press to the mode button will switch to the next mode.
*When the unit is on, a short press on the + and - keys will adjust the intensity. It goes up to
level 5 When you press a 6th time it will go back to level one.
*All modes include vibration to stimulate muscles. This is a good thing!! You can change the level
of vibration with the “intensity” button. EMS will also show up in all modes. You can shut off EMS
or change the power level of the EMS to any mode by quickly pressing the on/off button. There are
5 levels of EMS. The sixth press will turn EMS off. A 7th press will turn it back on to level one.
*There needs to be product on the face for all modes except cold.
*When using this unit please be sure to place the head flat on the skin so the full surface area is
touching. There are sensors in the head and if the full surface area is not on the skin, the sensors
cannot do their job!
Explanation of Skin Enhancer Modes:
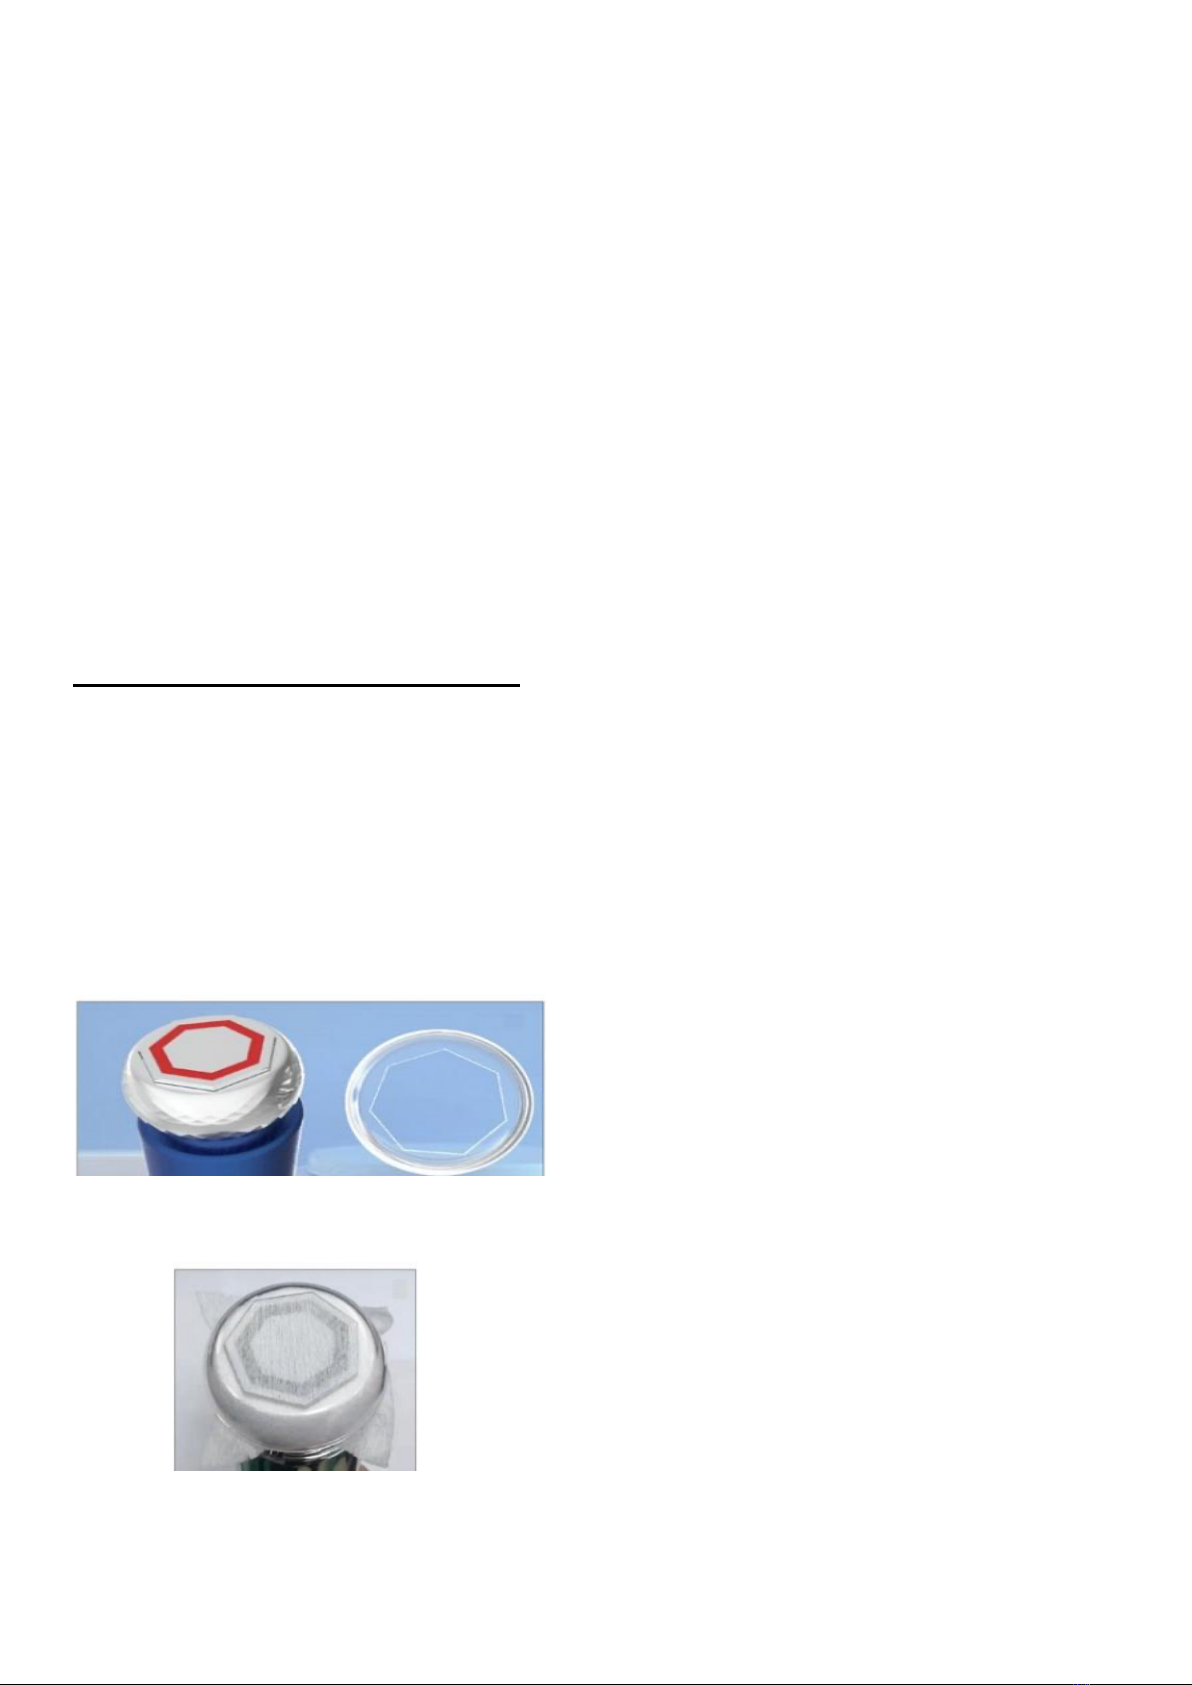
Ultrasonic Cleansing: You can use ultrasonic cleansing mode with or without a cotton pad.
1. Put a damp cotton pad on head of unit as shown below. Apply cleanser to face. Using circular
movements around the face for 2 to 3 minutes, this mode can effectively clean the dirt from the
pores making the skin translucent. Frequency of use: 2-3 times a week. Reduce to once a week
for sensitive skin.
2. Apply cleanser to face and use unit
without
cotton pad over the cleanser. Using circular
movements around the face for 2 to 3 minutes.
Remove the plastic ring on the Skin Enhancer head.
Place a cotton pad on the head and place plastic ring on top. If plastic ring is difficult to place over
on head, use a thinner cotton pad or gauze.

Seep: Apply toner to cotton round. Place on head of unit. Place plastic ring on top of gauze. Use
on face for 1 to 2 minutes. This allows for a deeper cleanse making sure that all makeup has been
removed. This mode includes EMS, biomechanical vibration, and red LED for rejuvenation.
Lift: This mode includes EMS, vibration, and heat. Press the “intensity” button for more heat.
Restore: This mode includes EMS, vibration, and LED. The is your nourishing mode for driving
product deeper into the skin. Great for dehydrated skin or if there is an ingredient you are wanting
to drive deeper into the skin (example: for pigmentation). You can use this with red, blue or
orange LED. Just press the mode button to change LED color.
Eye: Gentle pulses stimulate sensitive eye area. Use a light pressing technique around the eye.
Hold and press for two seconds, lift, and move to next area. Repeat.
Cold: This mode includes blue LED light for calming.
Skin Test Before Using
Please do a test before using the skin enhancer for the first time. You may do this in the cleansing
mode which comes on first when the unit is turned on. Turn the intensity level up to level 3. Apply
a cleanser to the inside of your forearm. Use the unit on top of the cleanser for 2 to 3 minutes.
Rinse cleanser off your arm. If you see any redness, please test again on other arm at a lower
intensity level.
Note: Please be sure to test in advance. If there are abnormal conditions such as rash, itching,
irritation, etc. on the test site, please stop the test immediately and discontinue use of this unit.
Note: Start all modes on the lowest intensity level. Once you determine you can handle that level
you may then move to the next level of intensity.
NOTE: Do not use the unit immediately after a strong acid peel or hair removal.
Contraindications
Pregnancy
breastfeeding
Pacemaker
Metal implants in face, dental implants
Open wounds
Recent plastic surgery or eye surgery (get Physician approval)
Atopic Dermatitis
Sensitive skin
Long-term use of steroids
Malignant tumors
Abnormal blood pressure
Currently receiving care for cancer (get Physician approval)
Cleaning After Use
Clean unit with damp soapy cloth. Wipe with a dry cloth.
Do not immerse unit in water.
Do not use in shower.
Carefully wipe removable plastic ring with damp soapy cloth.
Do not use corrosive solutions such as alcohol to clean your skin enhancer.

Charging
Do not use power cord other than the one supplied with the skin enhancer as this may cause a
malfunction. Be sure to charge the unit before using it. Please use plug supplied in your package.
The charging indicator will blink while the unit is charging. When the unit is completely charged
(approximately 2 hours) the blinking will stop.
There is a power indicator in the top left corner when the unit is turned on. This will indicate how
much power is left in the unit. Please do not leave the unit continually plugged in when not in use.
This can shorten the life of the unit. When not in use for long periods of time, please charge the
unit every 3 month. This will increase the longevity of the unit.
Product Specs:
1. Product Name Skin Enhancer
2. Product size: 189*40*60
3. Product net weight: 250g
4. Rated input: AC100V-240V,50/60Hz.
5. Output voltage/current: DC5V1.0A
6. Rated power: 3.5W
7. Rated voltage/rated capacity: 3.7V/1200mAH
8. Charging time: approximately 2 hours.
9. Intensity Levels: 5
10. EMS/Microcurrent power is 5mW, current is 0.3mA
11. Ultrasound frequency is 600KHZ
12. Vibration frequency is 5000rpm
Twice Weekly Treatment Use
Begin in ultrasonic cleansing mode with your cleanser. If you wear base makeup, we suggest you
do step two of the cleansing mode. Seep. (Refer to explanation of skin enhancer modes section).
Next choose Lift mode. Apply hydrating conductive product to half of your face. Using upward and
outward movements use the Skin Enhancer for 5 minutes (unit automatically turns off after 5
minutes). Now choose Restore mode and use it for 5 minutes. You may need to add a bit of water
on top of product already applied to face.
Apply product to the second half of your face and repeat.
If wanted: Use Eye mode for 60 to 90 seconds around each eye. This mode is also very good for
around the lips.
Do not remove product. Finish off your treatment in cold mode for 60 to 90 seconds. This will lock
in the moisture for more hydrated looking skin. Apply sunscreen if doing this in the morning.
5 Day Intensive Repair Treatment
Follow the above protocol for your 1st treatment. For the next 3 days do the same protocol except
without
cleansing mode. On day 5 do the same protocol but
include
cleansing mode once
again. You may do this 5-day intensive once a month instead of doing 2 treatments a week.
Table of contents
Popular Tools manuals by other brands

Batavia
Batavia BT-CDA001 operating instructions

ujk technology
ujk technology 506300 Original instructions

Clarke
Clarke Strong-Arm CFB600 Assembly instructions

VERTO
VERTO 65H110 instruction manual

EXTOL PREMIUM
EXTOL PREMIUM 8888110 Translation of the original user manual

DeWalt
DeWalt D25832 Original instructions


PICOTE
PICOTE SMART MIXER 2.0 Operation & safety manual

Eclipse Magnetics
Eclipse Magnetics Ultralift TP330 quick start guide

Bihui
Bihui Genesis BLFEVS Original instructions

Christie
Christie WCA4TM Operator's instruction manual

Desoutter
Desoutter EAD160-430 user manual

Mountz
Mountz RETW operating instructions