13
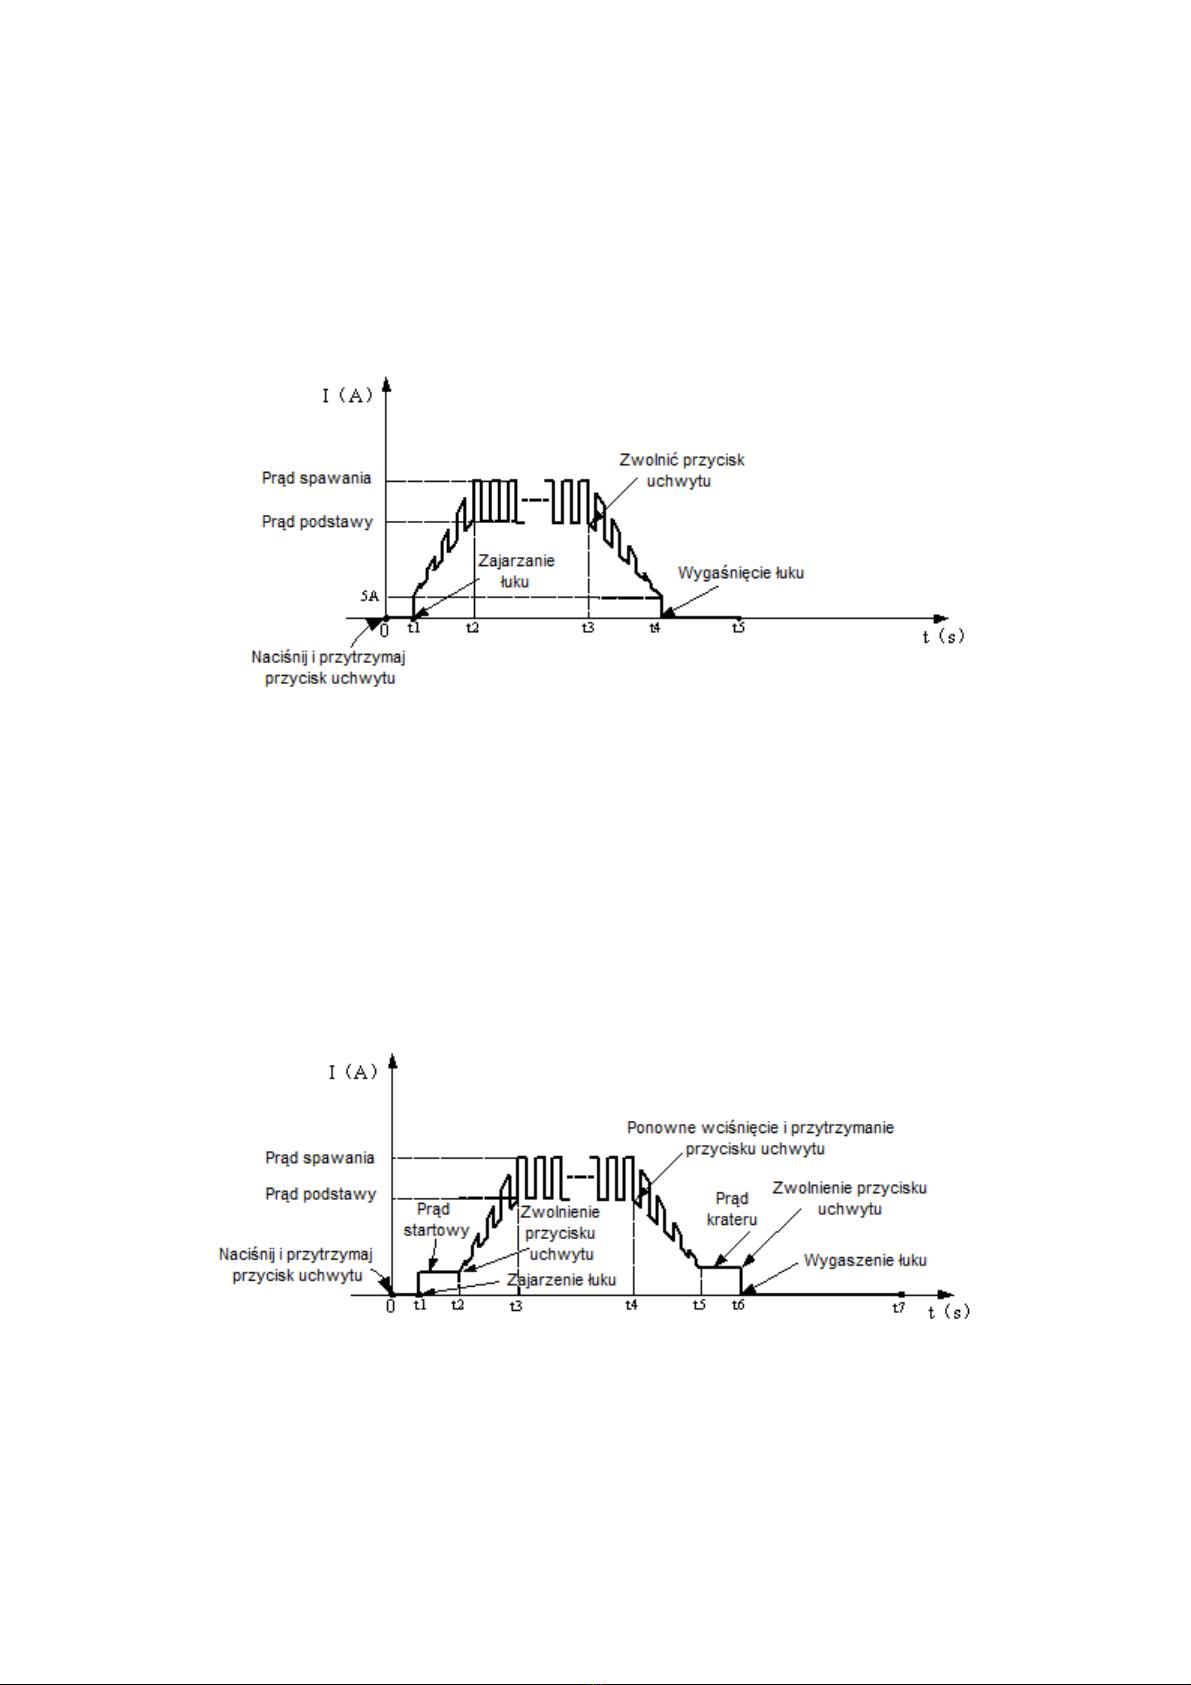
t4 :t4 : push rte d the handle. pr and welding current starts falling Æ the worth ś you pr and large crater. them ś l On and pulsator is connected, push rte d the handle. pr and welding current starts falling Æ the worth ś you pr and large crater. them ś l On and pulsator is connected, push rte d the handle. pr and welding current starts falling Æ the worth ś you pr and large crater. them ś l On and pulsator is connected, push rte d the handle. pr and welding current starts falling Æ the worth ś you pr and large crater. them ś l On and pulsator is connected, push rte d the handle. pr and welding current starts falling Æ the worth ś you pr and large crater. them ś l On and pulsator is connected, push rte d the handle. pr and welding current starts falling Æ the worth ś you pr and large crater. them ś l On and pulsator is connected, push rte d the handle. pr and welding current starts falling Æ the worth ś you pr and large crater. them ś l On and pulsator is connected, push rte d the handle. pr and welding current starts falling Æ the worth ś you pr and large crater. them ś l On and pulsator is connected, push rte d the handle. pr and welding current starts falling Æ the worth ś you pr and large crater. them ś l On and pulsator is connected, push rte d the handle. pr and welding current starts falling Æ the worth ś you pr and large crater. them ś l On and pulsator is connected, push rte d the handle. pr and welding current starts falling Æ the worth ś you pr and large crater. them ś l On and pulsator is connected, push rte d the handle. pr and welding current starts falling Æ the worth ś you pr and large crater. them ś l On and pulsator is connected, push rte d the handle. pr and welding current starts falling Æ the worth ś you pr and large crater. them ś l On and pulsator is connected, push rte d the handle. pr and welding current starts falling Æ the worth ś you pr and large crater. them ś l On and pulsator is connected, push rte d the handle. pr and welding current starts falling Æ the worth ś you pr and large crater. them ś l On and pulsator is connected,
drooping and cy pr and d is modulated; drooping and cy pr and d is modulated; drooping and cy pr and d is modulated; drooping and cy pr and d is modulated; drooping and cy pr and d is modulated;
t4 ~:t4 ~: t5 Fall time pr and du; Fall time pr and du; Fall time pr and du;
t5 ~:t5 ~: t6 pr and d crater; pr and d crater; pr and d crater;
t6 :t6 : release Æ the handle. Arc is extinguished, the shielding gas flows;release Æ the handle. Arc is extinguished, the shielding gas flows;release Æ the handle. Arc is extinguished, the shielding gas flows;
t7 :t7 : Solenoid valve closes the gas flow, complete ñ welding connection. Solenoid valve closes the gas flow, complete ñ welding connection. Solenoid valve closes the gas flow, complete ñ welding connection.
11. Before calling service,
In the event of a malfunction device and equipment, welding before sending to the site should with s check Æ letter ę basic failure and try Æ remove them In the event of a malfunction device and equipment, welding before sending to the site should with s check Æ letter ę basic failure and try Æ remove them In the event of a malfunction device and equipment, welding before sending to the site should with s check Æ letter ę basic failure and try Æ remove them In the event of a malfunction device and equipment, welding before sending to the site should with s check Æ letter ę basic failure and try Æ remove them In the event of a malfunction device and equipment, welding before sending to the site should with s check Æ letter ę basic failure and try Æ remove them In the event of a malfunction device and equipment, welding before sending to the site should with s check Æ letter ę basic failure and try Æ remove them In the event of a malfunction device and equipment, welding before sending to the site should with s check Æ letter ę basic failure and try Æ remove them In the event of a malfunction device and equipment, welding before sending to the site should with s check Æ letter ę basic failure and try Æ remove them In the event of a malfunction device and equipment, welding before sending to the site should with s check Æ letter ę basic failure and try Æ remove them In the event of a malfunction device and equipment, welding before sending to the site should with s check Æ letter ę basic failure and try Æ remove them In the event of a malfunction device and equipment, welding before sending to the site should with s check Æ letter ę basic failure and try Æ remove them
yourself rte d.yourself rte d.
Any repair device and devices can and would Æ made off and only after disconnecting and combined the power plug from the socket and lying. Attention! office and device Any repair device and devices can and would Æ made off and only after disconnecting and combined the power plug from the socket and lying. Attention! office and device Any repair device and devices can and would Æ made off and only after disconnecting and combined the power plug from the socket and lying. Attention! office and device Any repair device and devices can and would Æ made off and only after disconnecting and combined the power plug from the socket and lying. Attention! office and device Any repair device and devices can and would Æ made off and only after disconnecting and combined the power plug from the socket and lying. Attention! office and device Any repair device and devices can and would Æ made off and only after disconnecting and combined the power plug from the socket and lying. Attention! office and device Any repair device and devices can and would Æ made off and only after disconnecting and combined the power plug from the socket and lying. Attention! office and device Any repair device and devices can and would Æ made off and only after disconnecting and combined the power plug from the socket and lying. Attention! office and device Any repair device and devices can and would Æ made off and only after disconnecting and combined the power plug from the socket and lying. Attention! office and device Any repair device and devices can and would Æ made off and only after disconnecting and combined the power plug from the socket and lying. Attention! office and device Any repair device and devices can and would Æ made off and only after disconnecting and combined the power plug from the socket and lying. Attention! office and device Any repair device and devices can and would Æ made off and only after disconnecting and combined the power plug from the socket and lying. Attention! office and device Any repair device and devices can and would Æ made off and only after disconnecting and combined the power plug from the socket and lying. Attention! office and device Any repair device and devices can and would Æ made off and only after disconnecting and combined the power plug from the socket and lying. Attention! office and device Any repair device and devices can and would Æ made off and only after disconnecting and combined the power plug from the socket and lying. Attention! office and device
is not sealed and in with Users can with e pictures rte d housing ę welding in order to remove ę cutting minor breakdowns. symptomsis not sealed and in with Users can with e pictures rte d housing ę welding in order to remove ę cutting minor breakdowns. symptomsis not sealed and in with Users can with e pictures rte d housing ę welding in order to remove ę cutting minor breakdowns. symptomsis not sealed and in with Users can with e pictures rte d housing ę welding in order to remove ę cutting minor breakdowns. symptomsis not sealed and in with Users can with e pictures rte d housing ę welding in order to remove ę cutting minor breakdowns. symptomsis not sealed and in with Users can with e pictures rte d housing ę welding in order to remove ę cutting minor breakdowns. symptomsis not sealed and in with Users can with e pictures rte d housing ę welding in order to remove ę cutting minor breakdowns. symptomsis not sealed and in with Users can with e pictures rte d housing ę welding in order to remove ę cutting minor breakdowns. symptomsis not sealed and in with Users can with e pictures rte d housing ę welding in order to remove ę cutting minor breakdowns. symptomsis not sealed and in with Users can with e pictures rte d housing ę welding in order to remove ę cutting minor breakdowns. symptomsis not sealed and in with Users can with e pictures rte d housing ę welding in order to remove ę cutting minor breakdowns. symptoms
Methods for removing ę photos Methods for removing ę photos Methods for removing ę photos
The control panel and not months ś lit é, the The control panel and not months ś lit é, the The control panel and not months ś lit é, the The control panel and not months ś lit é, the The control panel and not months ś lit é, the The control panel and not months ś lit é, the The control panel and not months ś lit é, the
fan is not working, no voltage ę cut output ś processing fan is not working, no voltage ę cut output ś processing fan is not working, no voltage ę cut output ś processing fan is not working, no voltage ę cut output ś processing fan is not working, no voltage ę cut output ś processing
industry
1. Make sure Æ si é, or off and switch is in position with ON-up 1. Make sure Æ si é, or off and switch is in position with ON-up 1. Make sure Æ si é, or off and switch is in position with ON-up 1. Make sure Æ si é, or off and switch is in position with ON-up 1. Make sure Æ si é, or off and switch is in position with ON-up 1. Make sure Æ si é, or off and switch is in position with ON-up 1. Make sure Æ si é, or off and switch is in position with ON-up 1. Make sure Æ si é, or off and switch is in position with ON-up 1. Make sure Æ si é, or off and switch is in position with ON-up
2. Check Æ and voltage protection ę a network 2. Check Æ and voltage protection ę a network 2. Check Æ and voltage protection ę a network 2. Check Æ and voltage protection ę a network 2. Check Æ and voltage protection ę a network
3. Photo rte d housing ę and check Æ Temp and Starting all plugins 3. Photo rte d housing ę and check Æ Temp and Starting all plugins 3. Photo rte d housing ę and check Æ Temp and Starting all plugins 3. Photo rte d housing ę and check Æ Temp and Starting all plugins 3. Photo rte d housing ę and check Æ Temp and Starting all plugins 3. Photo rte d housing ę and check Æ Temp and Starting all plugins 3. Photo rte d housing ę and check Æ Temp and Starting all plugins 3. Photo rte d housing ę and check Æ Temp and Starting all plugins 3. Photo rte d housing ę and check Æ Temp and Starting all plugins
internal electrical and inside the office and equipment internal electrical and inside the office and equipment internal electrical and inside the office and equipment internal electrical and inside the office and equipment internal electrical and inside the office and equipment
The control panel and cy ś lit é,The control panel and cy ś lit é,The control panel and cy ś lit é,The control panel and cy ś lit é,The control panel and cy ś lit é,The control panel and cy ś lit é,
the fan is not working, no voltage ę cut the fan is not working, no voltage ę cut the fan is not working, no voltage ę cut
output ś partial. output ś partial. output ś partial.
1. Check æ, or devices and device is not connected and connected to the network 1. Check æ, or devices and device is not connected and connected to the network 1. Check æ, or devices and device is not connected and connected to the network 1. Check æ, or devices and device is not connected and connected to the network 1. Check æ, or devices and device is not connected and connected to the network 1. Check æ, or devices and device is not connected and connected to the network 1. Check æ, or devices and device is not connected and connected to the network
you with st voltage ę five. them ś If so, connect and whether Æ to 230V and owned and whether Æyou with st voltage ę five. them ś If so, connect and whether Æ to 230V and owned and whether Æyou with st voltage ę five. them ś If so, connect and whether Æ to 230V and owned and whether Æyou with st voltage ę five. them ś If so, connect and whether Æ to 230V and owned and whether Æyou with st voltage ę five. them ś If so, connect and whether Æ to 230V and owned and whether Æyou with st voltage ę five. them ś If so, connect and whether Æ to 230V and owned and whether Æyou with st voltage ę five. them ś If so, connect and whether Æ to 230V and owned and whether Æyou with st voltage ę five. them ś If so, connect and whether Æ to 230V and owned and whether Æyou with st voltage ę five. them ś If so, connect and whether Æ to 230V and owned and whether Æyou with st voltage ę five. them ś If so, connect and whether Æ to 230V and owned and whether Æyou with st voltage ę five. them ś If so, connect and whether Æ to 230V and owned and whether Æyou with st voltage ę five. them ś If so, connect and whether Æ to 230V and owned and whether Æyou with st voltage ę five. them ś If so, connect and whether Æ to 230V and owned and whether Æyou with st voltage ę five. them ś If so, connect and whether Æ to 230V and owned and whether Æ
again
2. Napi ę the power of and which it is unstable and causes incl and connection 2. Napi ę the power of and which it is unstable and causes incl and connection 2. Napi ę the power of and which it is unstable and causes incl and connection 2. Napi ę the power of and which it is unstable and causes incl and connection 2. Napi ę the power of and which it is unstable and causes incl and connection 2. Napi ę the power of and which it is unstable and causes incl and connection 2. Napi ę the power of and which it is unstable and causes incl and connection
overvoltage protection ę partial. off and whether Æ device and take 2-3 minutes and owned and whetherovervoltage protection ę partial. off and whether Æ device and take 2-3 minutes and owned and whetherovervoltage protection ę partial. off and whether Æ device and take 2-3 minutes and owned and whetherovervoltage protection ę partial. off and whether Æ device and take 2-3 minutes and owned and whetherovervoltage protection ę partial. off and whether Æ device and take 2-3 minutes and owned and whetherovervoltage protection ę partial. off and whether Æ device and take 2-3 minutes and owned and whetherovervoltage protection ę partial. off and whether Æ device and take 2-3 minutes and owned and whetherovervoltage protection ę partial. off and whether Æ device and take 2-3 minutes and owned and whetherovervoltage protection ę partial. off and whether Æ device and take 2-3 minutes and owned and whetherovervoltage protection ę partial. off and whether Æ device and take 2-3 minutes and owned and whetherovervoltage protection ę partial. off and whether Æ device and take 2-3 minutes and owned and whether
Æ again Æ again
3. On Short and connection and off and connection switch and switch 3. On Short and connection and off and connection switch and switch 3. On Short and connection and off and connection switch and switch 3. On Short and connection and off and connection switch and switch 3. On Short and connection and off and connection switch and switch 3. On Short and connection and off and connection switch and switch 3. On Short and connection and off and connection switch and switch
caused incl and overvoltage protection connection ę partial. off and whether Æ device and take caused incl and overvoltage protection connection ę partial. off and whether Æ device and take caused incl and overvoltage protection connection ę partial. off and whether Æ device and take caused incl and overvoltage protection connection ę partial. off and whether Æ device and take caused incl and overvoltage protection connection ę partial. off and whether Æ device and take caused incl and overvoltage protection connection ę partial. off and whether Æ device and take caused incl and overvoltage protection connection ę partial. off and whether Æ device and take caused incl and overvoltage protection connection ę partial. off and whether Æ device and take caused incl and overvoltage protection connection ę partial. off and whether Æ device and take caused incl and overvoltage protection connection ę partial. off and whether Æ device and take caused incl and overvoltage protection connection ę partial. off and whether Æ device and take
2-3 minutes and owned and whether Æ again 2-3 minutes and owned and whether Æ again 2-3 minutes and owned and whether Æ again 2-3 minutes and owned and whether Æ again 2-3 minutes and owned and whether Æ again
4. Nast and drank other damage requiring and ce-repair 4. Nast and drank other damage requiring and ce-repair 4. Nast and drank other damage requiring and ce-repair 4. Nast and drank other damage requiring and ce-repair 4. Nast and drank other damage requiring and ce-repair
authorized service
The control panel and cy ś lit é,The control panel and cy ś lit é,The control panel and cy ś lit é,The control panel and cy ś lit é,The control panel and cy ś lit é,The control panel and cy ś lit é,
fan works, problems with arc is started
1. Check Æ TIG, replace Æ part rts those operating them ś If s and1. Check Æ TIG, replace Æ part rts those operating them ś If s and1. Check Æ TIG, replace Æ part rts those operating them ś If s and1. Check Æ TIG, replace Æ part rts those operating them ś If s and1. Check Æ TIG, replace Æ part rts those operating them ś If s and1. Check Æ TIG, replace Æ part rts those operating them ś If s and1. Check Æ TIG, replace Æ part rts those operating them ś If s and1. Check Æ TIG, replace Æ part rts those operating them ś If s and1. Check Æ TIG, replace Æ part rts those operating them ś If s and1. Check Æ TIG, replace Æ part rts those operating them ś If s and
zu with used zu with used zu with used
The control panel and cy ś lit é,The control panel and cy ś lit é,The control panel and cy ś lit é,The control panel and cy ś lit é,The control panel and cy ś lit é,The control panel and cy ś lit é,
Fan is working, welding arc strikes not
1. Check Æ terminals and a correct and conductivity SC electric and1. Check Æ terminals and a correct and conductivity SC electric and1. Check Æ terminals and a correct and conductivity SC electric and1. Check Æ terminals and a correct and conductivity SC electric and1. Check Æ terminals and a correct and conductivity SC electric and1. Check Æ terminals and a correct and conductivity SC electric and1. Check Æ terminals and a correct and conductivity SC electric and1. Check Æ terminals and a correct and conductivity SC electric and
wire electrode and mass
2. Check Æ Temp and TIG torch connection to the office and equipment, return Æ2. Check Æ Temp and TIG torch connection to the office and equipment, return Æ2. Check Æ Temp and TIG torch connection to the office and equipment, return Æ2. Check Æ Temp and TIG torch connection to the office and equipment, return Æ2. Check Æ Temp and TIG torch connection to the office and equipment, return Æ2. Check Æ Temp and TIG torch connection to the office and equipment, return Æ2. Check Æ Temp and TIG torch connection to the office and equipment, return Æ2. Check Æ Temp and TIG torch connection to the office and equipment, return Æ
comments ę or pins in a nest with are not going and Deadlock broken or not and si are comments ę or pins in a nest with are not going and Deadlock broken or not and si are comments ę or pins in a nest with are not going and Deadlock broken or not and si are comments ę or pins in a nest with are not going and Deadlock broken or not and si are comments ę or pins in a nest with are not going and Deadlock broken or not and si are comments ę or pins in a nest with are not going and Deadlock broken or not and si are comments ę or pins in a nest with are not going and Deadlock broken or not and si are comments ę or pins in a nest with are not going and Deadlock broken or not and si are comments ę or pins in a nest with are not going and Deadlock broken or not and si are comments ę or pins in a nest with are not going and Deadlock broken or not and si are
present.
3. Rozkr ę these Æ r ę berths SC TIG torch and check Æ or switch and switch in 3. Rozkr ę these Æ r ę berths SC TIG torch and check Æ or switch and switch in 3. Rozkr ę these Æ r ę berths SC TIG torch and check Æ or switch and switch in 3. Rozkr ę these Æ r ę berths SC TIG torch and check Æ or switch and switch in 3. Rozkr ę these Æ r ę berths SC TIG torch and check Æ or switch and switch in 3. Rozkr ę these Æ r ę berths SC TIG torch and check Æ or switch and switch in 3. Rozkr ę these Æ r ę berths SC TIG torch and check Æ or switch and switch in 3. Rozkr ę these Æ r ę berths SC TIG torch and check Æ or switch and switch in 3. Rozkr ę these Æ r ę berths SC TIG torch and check Æ or switch and switch in 3. Rozkr ę these Æ r ę berths SC TIG torch and check Æ or switch and switch in 3. Rozkr ę these Æ r ę berths SC TIG torch and check Æ or switch and switch in 3. Rozkr ę these Æ r ę berths SC TIG torch and check Æ or switch and switch in 3. Rozkr ę these Æ r ę berths SC TIG torch and check Æ or switch and switch in
the handle is OK
The control panel and cy ś lit é,The control panel and cy ś lit é,The control panel and cy ś lit é,The control panel and cy ś lit é,The control panel and cy ś lit é,The control panel and cy ś lit é,
the fan is running, ś lit ęthe fan is running, ś lit ęthe fan is running, ś lit ęthe fan is running, ś lit ę
LED OC you ś display "Err"LED OC you ś display "Err"LED OC you ś display "Err"
1. office and device has been overheated. wait Æ few minutes. After1. office and device has been overheated. wait Æ few minutes. After1. office and device has been overheated. wait Æ few minutes. After1. office and device has been overheated. wait Æ few minutes. After1. office and device has been overheated. wait Æ few minutes. After
shuts off ś than ę five diodes to continue Æ welding. shuts off ś than ę five diodes to continue Æ welding. shuts off ś than ę five diodes to continue Æ welding. shuts off ś than ę five diodes to continue Æ welding. shuts off ś than ę five diodes to continue Æ welding. shuts off ś than ę five diodes to continue Æ welding. shuts off ś than ę five diodes to continue Æ welding.
unsatisfactory and as ca SCunsatisfactory and as ca SCunsatisfactory and as ca SCunsatisfactory and as ca SC
weld welding methods and MMA electrode weld welding methods and MMA electrode weld welding methods and MMA electrode
sticking out ę on the work piece sticking out ę on the work piece sticking out ę on the work piece
1. Check Æ diametrically SC Temp and connection cables 1. Check Æ diametrically SC Temp and connection cables 1. Check Æ diametrically SC Temp and connection cables 1. Check Æ diametrically SC Temp and connection cables 1. Check Æ diametrically SC Temp and connection cables 1. Check Æ diametrically SC Temp and connection cables 1. Check Æ diametrically SC Temp and connection cables
welding
2. Check Æ if the electrode is not wet. replace Æ electrode are present.2. Check Æ if the electrode is not wet. replace Æ electrode are present.2. Check Æ if the electrode is not wet. replace Æ electrode are present.2. Check Æ if the electrode is not wet. replace Æ electrode are present.2. Check Æ if the electrode is not wet. replace Æ electrode are present.2. Check Æ if the electrode is not wet. replace Æ electrode are present.
3. The welder is supplied with current from the generator and or dotwórczego 3. The welder is supplied with current from the generator and or dotwórczego 3. The welder is supplied with current from the generator and or dotwórczego
through a long extension with yet too small cable cross section. connect and whether Æ devicethrough a long extension with yet too small cable cross section. connect and whether Æ devicethrough a long extension with yet too small cable cross section. connect and whether Æ devicethrough a long extension with yet too small cable cross section. connect and whether Æ devicethrough a long extension with yet too small cable cross section. connect and whether Æ devicethrough a long extension with yet too small cable cross section. connect and whether Æ devicethrough a long extension with yet too small cable cross section. connect and whether Æ device
and device directly ś directly to the mains and more and device directly ś directly to the mains and more and device directly ś directly to the mains and more and device directly ś directly to the mains and more and device directly ś directly to the mains and more and device directly ś directly to the mains and more
unsatisfactory and as ca SCunsatisfactory and as ca SCunsatisfactory and as ca SCunsatisfactory and as ca SC
weld welding methods and TIG weld welding methods and TIG weld welding methods and TIG
1. Replace Æ part rts those supplies. change Æ electrode ę1. Replace Æ part rts those supplies. change Æ electrode ę1. Replace Æ part rts those supplies. change Æ electrode ę1. Replace Æ part rts those supplies. change Æ electrode ę1. Replace Æ part rts those supplies. change Æ electrode ę1. Replace Æ part rts those supplies. change Æ electrode ę1. Replace Æ part rts those supplies. change Æ electrode ę1. Replace Æ part rts those supplies. change Æ electrode ę
tungsten and or bottles ę gas materials you with st as ś these tungsten and or bottles ę gas materials you with st as ś these tungsten and or bottles ę gas materials you with st as ś these tungsten and or bottles ę gas materials you with st as ś these tungsten and or bottles ę gas materials you with st as ś these tungsten and or bottles ę gas materials you with st as ś these tungsten and or bottles ę gas materials you with st as ś these tungsten and or bottles ę gas materials you with st as ś these tungsten and or bottles ę gas materials you with st as ś these
2. Check Æ or shielding gas flows from the right and2. Check Æ or shielding gas flows from the right and2. Check Æ or shielding gas flows from the right and2. Check Æ or shielding gas flows from the right and
intensity ś these andintensity ś these andintensity ś these andintensity ś these and
3. Check Æ in until Implement and cy gas, improve Æ half and connection 3. Check Æ in until Implement and cy gas, improve Æ half and connection 3. Check Æ in until Implement and cy gas, improve Æ half and connection 3. Check Æ in until Implement and cy gas, improve Æ half and connection 3. Check Æ in until Implement and cy gas, improve Æ half and connection 3. Check Æ in until Implement and cy gas, improve Æ half and connection 3. Check Æ in until Implement and cy gas, improve Æ half and connection 3. Check Æ in until Implement and cy gas, improve Æ half and connection 3. Check Æ in until Implement and cy gas, improve Æ half and connection 3. Check Æ in until Implement and cy gas, improve Æ half and connection 3. Check Æ in until Implement and cy gas, improve Æ half and connection
in concentrations and the zł and pods and state szybkozł and whether in concentrations and the zł and pods and state szybkozł and whether in concentrations and the zł and pods and state szybkozł and whether in concentrations and the zł and pods and state szybkozł and whether in concentrations and the zł and pods and state szybkozł and whether in concentrations and the zł and pods and state szybkozł and whether in concentrations and the zł and pods and state szybkozł and whether
4. Check Æ przybutlowy reducer. 4. Check Æ przybutlowy reducer. 4. Check Æ przybutlowy reducer.