GF PSO 701 User manual

Instruction manual
GF Piping Systems
PSO 701
Butt Fusion Machine

All rights reserved,in particular the rights ofduplication and distributionas wellas translation. Duplication and
reproductioninany form (print,photocopy,microfilm or electronic)requirethe writtenpermissionofGeorgFischer
Omicron S.r.l..

Operatinginstructions PSO701 Table of contents
I
Table of contents
Page
1
About this manual
1
1.1 Warning notice
1
1.2 Other symbols and notices
2
1.3 Abbreviations
2
2
Safety instructions
3
2.1 Proper use
3
2.2 General safety measures
3
2.3 Working with safety in mind
3
2.4 Disposal
4
3
General
5
3.1 Introduction
5
3.2 Range of application
5
3.3 Copyright
5
4
Product design, equipment
6
4.1 Design
6
4.2 Standard equipment
7
5
Technical specifications
8
5.1 Characteristicdata
8
6
Transport and assembly
9
6.1 Packaging
9
6.2 Sensitivity
9
6.3 Intermediate storage
9
6.4 Scope ofdelivery
9
6.5 Assembly
10
7
Fusion preparation
11
7.1 General information
11
7.2 Preparations
11
8
Fusion
12
8.1 The basics of butt fusion
12
8.2 The fusion process
13
8.2.1 Preparing the fusion surfaces
13
8.2.2 Fusion process
15
8.3 Visual check ofweldingbead
17
8.4 Example
17
8.5 Fusion data
18
9
Maintenance
26
9.1 Replacement of worn parts
26
10
Customer Service
27

Operatinginstructions PSO701 1 About thismanual
1
1 About this manual
The warningnotices,symbolsand their meanings as used in this manual
are explained below to help you quickly understand the format of this
instruction manual and how to use the machine safely.
1.1 Warningnotice
Warningnoticesareused in thismanual to inform you of possible injuries
or damage to property. Please read them and always abide by these
warnings!
Symbol
Meaning
Warningsarealwaysstructuredin thesamemanner:
•Warning symbol
•Type and source of danger
•Possible consequences, explanationofdanger
•Prohibited (ifapplicable)(symbol: )
•Ways to prevent the danger(symbol: )
Danger
Imminent accute danger!
Failure to comply could result in death or extremely
serious injury.
Warning
Possible accute danger!
Failure to comply could result in serious injury.
Caution
Dangerous situation!
Failure
to comply could lead to injury or damage to
property.

1 About this manual OperatinginstructionsPSO701
2
1.2 Othersymbolsandnotices
Symbol
Meaning
Mandatory: you must observe this regulation.
1.
Call for action in a particular sequence. You must do
something here.
Single call for action. You must do something here.
Call for action under certain circumstances. You must do
something here if the condition beforehand has been
fulfilled.
1.3 Abbreviations
Abbr.
Meaning
PSO 701
Portable butt fusion machine d 40–160 mm
PE
High Density Polyethylen
PE
Polyethylen
PP
Polypropylen
PTFE
Polytetrafluorethylen
d
Pipe outer diameter
Important
Attention
This notice contains especially important information.

Operatinginstructions PSO701 2 Safety instructions
3
2 Safety instructions
The PSO 701 Butt Fusion Machine (hereinafter referred to as PSO 701) is
designed according to the latest standards of technology. Using it for
purposesotherthan thosedescribed in this manual may cause injury to
the operator or to others. It may also cause damage to the machine or
other equipment.
Any person in the company, who is involved in the assembly,
disassembly, reassembly, installation, operation or maintenance
(inspection, maintenance work, repair work) of the PSO 701, must have
read and understoodthecomplete instruction manual,andin particular
Section 1 on “Safety instructions”.
It is recommended that the user has this confirmed in writing.
Thus:
•The machine should only be used when in perfect workingorder.
•Always follow the safety instructions.
•Complete documentation should be kept in the vicinity of the
machine.
2.1 Proper use
The PSO 701 should be used exclusively for butt fusion.
2.2 Generalsafetymeasures
•Use only thematerialsanddimensionsspecified in thismanual. Other
materials may only be used after consulting Georg Fischer Omicron
after-sales service.
•Use only original GeorgFischer Omicron spare parts and equipment.
•Inspect the PSO 701 daily forvisiblesignsof damage or defects. Have
damage or defects repaired immediately.
•Any work on the electrical equipment may only be done by a
specialist.
2.3 Workingwith safetyin mind
“Make your contribution to safety in the workplace."
•Report any deviations from normal operation immediately to the
person in charge.
•Always keep safety in mind while working.
For yourown personal safety aswell asforthesafeand optimal handling
of the machine, the PSO 701 must be installed correctly.

2 Safety instructions OperatinginstructionsPSO701
4
Danger of cutting hands!
The planer blades are sharp!
Danger of cutting handson the planer disk.
Do not touch the rotating planer disk.
Danger of burning!
The heater is hot (220 °C)!
Danger of burning hands on the hot heater.
Do not touch the heater when on.
Use the handles on the heater.
2.4 Disposal
•Shavings should be disposed of properly.
Observe all the regulations, standardsand guidelines applicable in your
country.
Separate collection of electronic and electrical waste (from the
equipment) has to be ensured through appropriate systems
Note:
The here below symbol indicating separate collection for electrical and
electronic equipment according to 2002/96/CE WEEE directive (Waste
Electrical and Electronic Equipment).
Warning
Warning

Operatinginstructions PSO701 3 General
5
3 General
3.1 Introduction
This instruction manual was written for those persons responsible for the
operation and care of the PSO 701. It is expected and assumed that
such personshaveread,understoodandwill abide by the manual in its
entirety.
Only with theknowledge contained in thismanual canfaults on the PSO
701 be prevented and trouble-free operation be ensured. It is therefore
imperative that the responsible persons are familiar with this manual.
We recommend that this manual be read carefully prior to putting the
machine in operation, as we are not liable for any damage or
interruptions in operation resulting from failure to comply with this
manual.
Should problems nevertheless arise, please contact the nearest Georg
Fischer Omicron s.r.l representative.
This manual applies only to the PSO 701.
We reserve the right to make the technical changes necessary to
improvethe PSO701 which may result in deviations from the illustrations
and information contained in this manual.
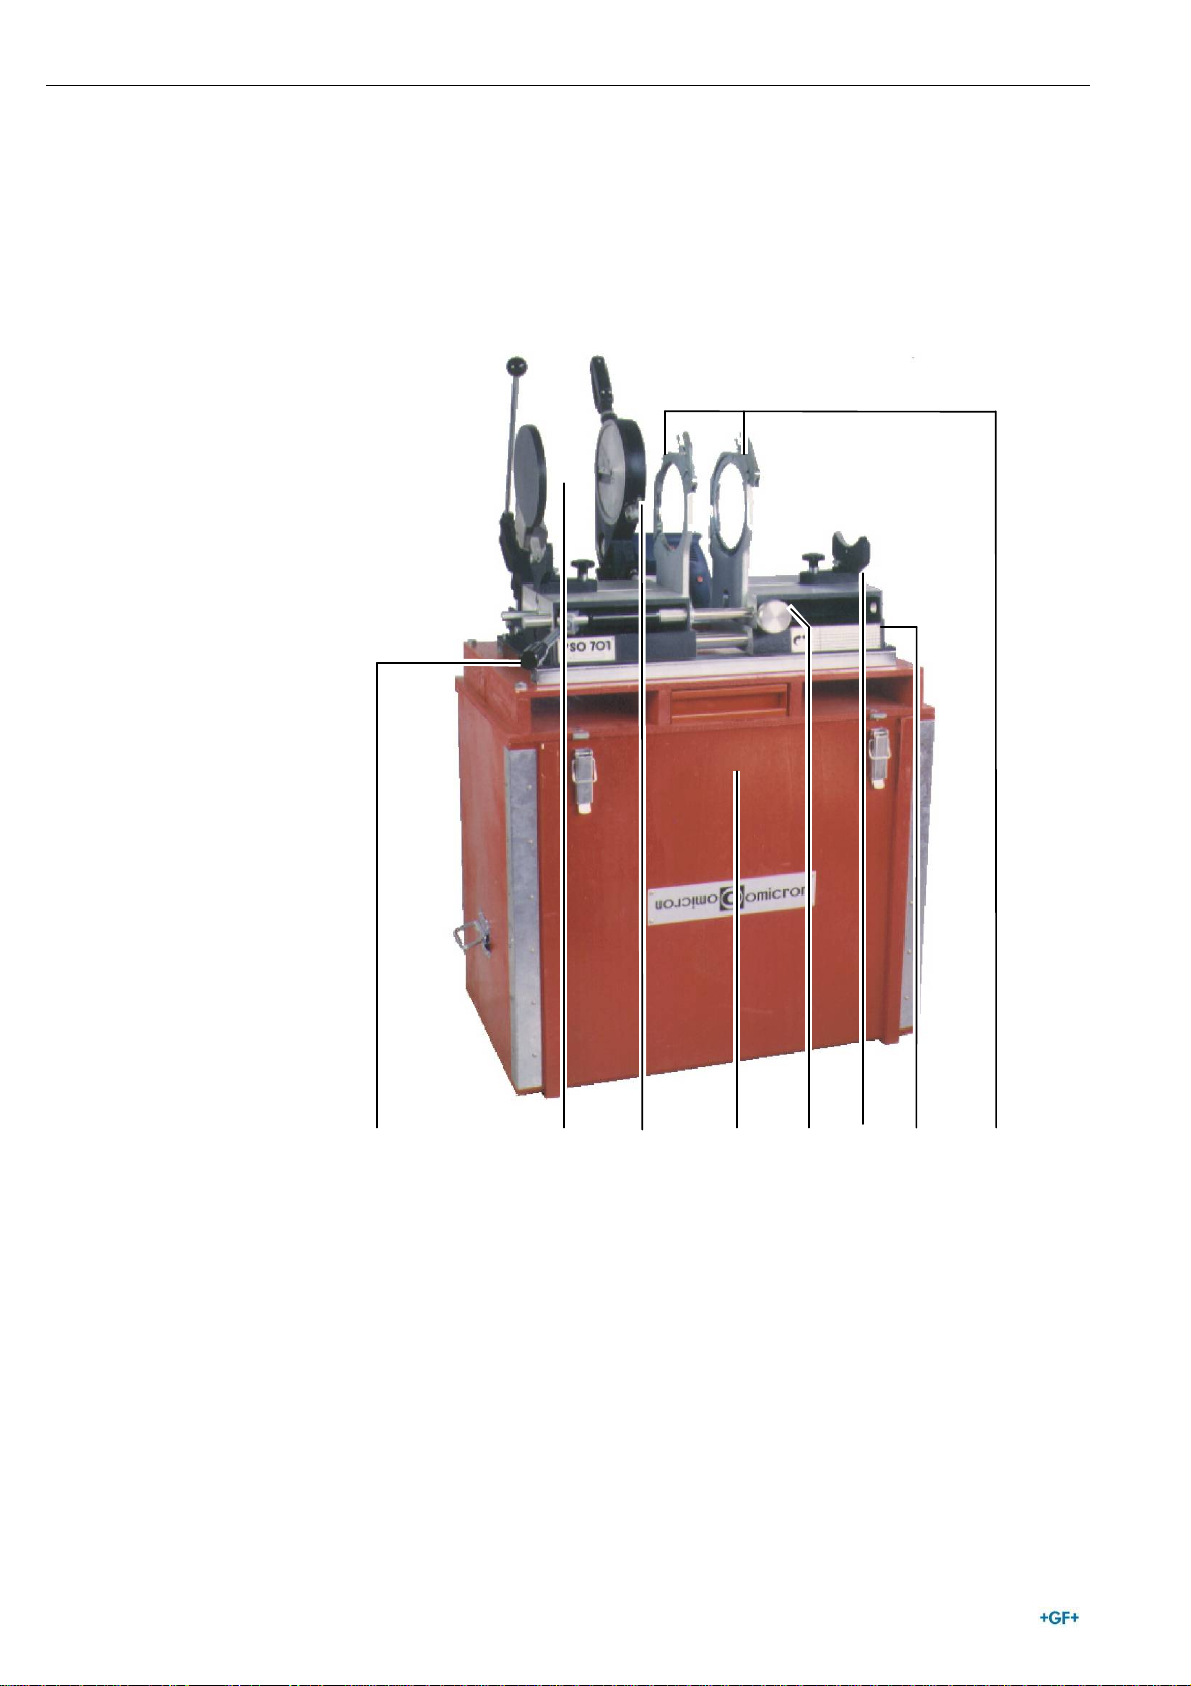
3.2 Range ofapplication
The PSO 701 is designed exclusively
•for the fusion of plastic pipes and fittings
in thedimension ranged 40–160 mm. Any otheruseisnot authorized. The
manufacturer cannot be held liable for damages resulting from
unauthorized use; the user bears sole responsibility.
3.3 Copyright
The copyright for this instruction manual is held by
Georg Fischer Omicron S.r.l..
This instruction manual is intended for assembly, operation and
maintenance personnel. No part of the technical regulations or
illustrations contained herein may be reproduced or distributed in any
form, used illicitly for competitive purposes or passed on to others.
GeorgFischer Omicron S.r.l
Via E. Fermi, 12 - 35030 Caselle di Selvazzano
Padova (Italy)
Telephone +39 049 8971411
Fax +39 049 8971410

4 Product design, equipment OperatinginstructionsPSO701
6
4 Product design, equipment
4.1 Design
1 Pressurelever
2 Heater
3 Planer
4 Woodencase
5 Slidestop
6 Pipe support
7 Basic machine
8 Clampingplatesleft/right
1
3
4
6
7 852

Operatinginstructions PSO701 4 Product design, equipment
7
4.2 Standardequipment
•Basic machine
–Compact and sturdy design
–Hardened, chrome plated guide shaft
–Wooden case – for transportation and protection of machine as
well as for erconomically correct working position
–Exact pressure adjustment via direct manual load transfer
•Planer
–Optimized cutting geometry for even and chatter – free planing
–Powerful electric motor, can be swiveled in and out, for single or
double – sided facing of pipe ends
•Heater
–Can be used as manual fusion device
–Thermostatic variable temperature control
–Non-stick PTFE -coated
•Additional standard equipment on the basic model
–V -shaped pipe supports d 40–140 mm for support of fittings
–Reduction clamping inserts 40–140 mm
–Sturdy base clampingplates, right andleft d 160 mmfor pipe/fitting
joints and 45° Y-fittings

5 Technical specifications OperatinginstructionsPSO701
8
5 Technical specifications
Electric planer
Drive/Power:
Voltage:
Electromotor 420 W
230 V/115 V
Heatingelement
Power:
Voltage:
800 W
230 V/115 V
Machine complete
Power:
Voltage:
1220 W
230 V/115 V
5.1 Characteristicdata
Machinedescription:
Plastic butt fusion machine
Machinetype
PSO 701
Machineno.
............
Weight ofmachinewith wooden case
and accessories
82.0 kg

Operatinginstructions PSO701 6 Transport and assembly
9
6 Transport and assembly
6.1 Packaging
A decisive factor in the choice of packaging isthe means of transport.
Normally, the machine and all the accessories are delivered in a
cardboard box on a pallet.
6.2 Sensitivity
Special care must be taken when transporting the PSO 701 in order to
prevent damage from impact or improper loading and unloading.
All movable parts must be fixed in place.
Transport insurance should be provided for according to the type and
duration of transport. Condensation due to large temperature
fluctuations and sharp jolts during shipment should be avoided.
Please handle the PSO 701 with care.
6.3 Intermediate storage
If the PSO 701 isnot used immediately upon delivery, the machine must
be stored in a safe place and properly covered.
6.4 Scopeofdelivery
The contents (number of transport crates, pallets, packages) and their
condition should be checked immediately upon receipt. Any damage
and/or missing parts should be noted right away on the bill of delivery
and reported to Georg Fischer Omicron s.r.l. without delay.

6 Transport and assembly OperatinginstructionsPSO701
10
6.5 Assembly
1. Unpack basic machine (7) and wooden case (4).
2. Set basic machine (7) on the wooden case (4) and fix the clamps
with the 2 star knop screws (9).
3. Assemble the pressure lever (1).
9 1
7
4

Operatinginstructions PSO701 7 Fusion preparation
11
7 Fusion preparation
7.1 Generalinformation
The fusion area should be protected against the influences of weather
(humidity,ambient temperature <+ 5 °C, extreme direct exposure to sun)
with such measures as pre-warmingthe fusion materials, tents, heating.
For optimal use ofthe PSO 701, operating personnel should be specially
trained by Georg Fischer Omicron s.r.l.. In-depth knowledge of the
machineand it´scomponentsandcompetenceruleout handling errors
thereby also preventing faulty fusion joints.
7.2 Preparations
1. Mount the heating element on the bracket.
2. To join pipesand/orfittingsd< 160 mm, the corresponding reduction
clamp inserts should be inserted andscrewed tightly tothe clamping
units. Assemble the correspondingpipe supports.
Check the voltage!
3. Connect the heater (2) and the planer (3) to the electric mains.
4. Set the correct fusing temperature at the heater (2) using the
temperature-control knob (10).
•Function of the control lamps:
–Red and green lamps are lit during heat-up. Once the fusing
temperature is reached, the green lamp will go out.
Before beginning with the first fusion, we recommend waiting approx. 10
minutes after the set fusion temperature has been reached to allow for
even heat distribution.
5. Check the fusion surfaces with a quick-indication temperature
measurement device for the set temperature.
Dangerof burning!
The heaterishot (220 °C)!
Dangerof burninghandson thehot heater.
Do not touch theheaterwhenon.
Use thehandles on the heater (4).
Caution
Suggestion
Warning
10

8 Fusion OperatinginstructionsPSO701
12
8 Fusion
8.1 Thebasicsofbutt fusion
For butt fusion with a heating element, the parts to be joined (pipe/pipe,
pipe/fitting or fitting/fitting) are heated to fusion temperature in the
fusion area and are fused under pressure without the use of additional
materials.
The heating element butt fusion joint must be done with a controllable
equalization pressure. See pressure/time tables, Chapter 8.5, from pg. 18.
Only the same type ofmaterials are to fuse.
The wall thicknessesin the fusion area need to be the same.
Correct
Incorrect
Onlythe same wall thicknessesin the fusion
area!
Equalization- and fusion pressure are identical. The heat soak pressure is
significant lower, but the contact between the pipe/fitting and the
heating element needs to be ensured.
Attention

Operatinginstructions PSO701 8 Fusion
13
8.2 Thefusionprocess
8.2.1 Preparingthe fusion surfaces
1. Clamp pipe/pipe, pipe/fitting or fitting/fitting in the clamping
elements. The pipe-/fitting ends to be joined should be clamped 1
cm prominent of the clamping element. Check the axial alignment.
If necessary a more favourable clamping condition could be reached,
by rotating the pipes/fittings or by changing the clamping force of the
clamping lever.
Adjustable roller supports or a floating suspension assist horizontal
movement of the pipes clamped in the slide.
2. Swing the planer (3) in.
Check the voltage!
3. Connect the planer (3) to the electric mains.
Danger of cutting hands!
Sharp planer blades!
Danger of injury to hands if the planer disk is touched.
Do not touch the rotating planer disk.
Caution
Warning
ca. 1
ca. 1

8 Fusion OperatinginstructionsPSO701
14
–
Black button andON-/OFF-switch simultaneosly pressed: Planer
motor runscontinuosly
4. Switch ONplaner motor.
Hold the planer with the right hand. Planer pressure which is too high
over a long period of time will damage the planer drive or motor.
5. Build up the planer pressure with the pressure lever (1). Plane the
facingsurfaceof pipes/fittingsuntil sharingsare turned out in ribbons
which are the same width as the pipe wall thickness.
To make surethe gap and the wall offset are in order, both sides must
always be planed!
6. Open th emachine switch OFF planer motor.
Swing the planer (3) out.
7. Close machine until pipes/fittings. Touch each other. Maximum
tolerance of the gap is 0.5 mm.
8. Check the alignment at the same time.
9. The wall offset on the outside may not exceed 10 % of the wall
thickness.
10.If it is larger, the pipe/fitting can be turned or the clamping force on
the clamping units can be changed to achieve a better clamping
position.
11.In this case, the fusion surfaces need to be remachined.
12.Remove shavings which have fallen into the pipe e.g with a brush.
Before each fusion, the fusion surfacesmust be cleaned with lint-free
paper and grease-free cleaner, e.g. trichloroethylene or industrial
alcohol (Tangit KS).
Never touch the surfaces with your hands after cleaning!
Caution
Attention
10%s
s
0.5mm

Operatinginstructions PSO701 8 Fusion
15
8.2.2 Fusion process
The PTFE coating of the heating element must be protected from
mechanical damage and/or dirt. Heating element (2) with demaged
PTFE -coveringhasto be replaced. Non-observance affects the quality
of the joining, see Chapter 9.1, from pg 26.
Danger of burning!
The heater is hot (220 °C)!
Danger of burning hands on the hot heater.
Do not touch the heater when on.
Use the handles on the heater (2).
For fusion parameters, see Chapter 8.5, from pg. 18.
Equalization (fusion bead created on both sides)
1. Swing heating element (2) into position.
2. By activating the pressure lever (1), the parts to be joined are moved
together. The pressure required for equalization can be found in the
respective tableschapter 8.5, from pg. 18. The equalization pressure is
displayed on the pressure scale on the slide.
Fix the pressure with the slide stop (6).
Equalization pressure = fusion pressure
Release(reduction of equalization pressure after formation of the fusion
bead)
1. When an even fusion bead has been formed along the entire
circumference of the pipe (according to column 1 of the fusion
tableschapter 8.5, from pg. 18) the equalization pressure is reduced
to the heating pressure.
Fix the pressure with the slide stop (5).
Do not openthe machine! Pipes have to keep contact with the heating
element.
2. Start timer with preset heat soak time.
Warning
Caution
5

8 Fusion OperatinginstructionsPSO701
16
Heat soak (of the fusion material)
For PE:
10 x wall thickness in mm
For PP:
Interpolate the intermediate values.
Change-over (removing the heating element (2))
The change-over time should be as short as possible.
When the heat soak has ended
Open the slide stop (5) and open the machine by activating the
pressure lever (1).
Immetiadely swing the heating element (2)out of the machine.
Joining (Fusion process)
Build up the fusion pressure (= equalization pressure) continuosly
during the fusion pressure build-up time.
Fix the pressure with the slide stop (5).
The surfaces to be joined are fused.
Cooling (the fusion joint)
The coolingtime must always be observed.The use of cooling agents is
not permitted during cooling.
Releasing (decreasing the fusion pressure to 0)
1. Keep the pressure lever (1) in your left hand.
2. Loose the slide stop (5) and decrease the fusion pressure with the
lever until 0.
Don´t open the machine!
3. Open the clamps and remove the fused pipes/fittings.
4. Open the machine.
All fusion joints must have cooledcompletelybefore the pressure test is
performed. This is generallythe case approx. 1 hour after the last fusion
operation.
Attention
Caution
Caution

Operatinginstructions PSO701 8 Fusion
17
8.3 Visualcheckof weldingbead
Immediately after removing the welded pipes/fittings visually check the
part for correct cultivated double bead and the k-value.
8.4 Example
Pipe/fitting
PE
Heater temperature
220 °C
Pipe outer diameter
50 mm
Wall thickness
4.5 mm
Pressure rating
SDR 11
Equalize
with a pressureof 10 kg until a bead height of1.0 mm
results (column 1)
Heat soak
for 46 sec with a pressure of 0.01 N/mm2(column 2)
Change-
over
within max. 5 sec(column 3)
Join
for max. 5 sec (column 4)
Cooling
for 4/7 min (column 5)
Ev en double
bead
k > 0
Table of contents
Languages:
Other GF Welding System manuals
Popular Welding System manuals by other brands

Victor
Victor 42 CUTMASTER Service manual

Clarke
Clarke weld MIG103NG Operation & maintenance instructions

Chicago Electric
Chicago Electric 61792 Owner's manual & safety instructions

Paton
Paton VDI 150 MINI manual

Sweiss
Sweiss SKYARC One FX Operator's manual

stayer
stayer Gama HILO MIG160Multi operating instructions

ESAB
ESAB Aristo Mig 5000i instruction manual

Air Liquide
Air Liquide Oerlikon CITOLINE 2500M Safety instruction for use and maintenance

Lincoln Electric
Lincoln Electric LF 52D Operator's manual

Leister
Leister SEAMTEK 900 AT operating instructions

HTP
HTP Pro Pulse 200 owner's manual

EINHELL
EINHELL CEN 151/2 operating instructions