14
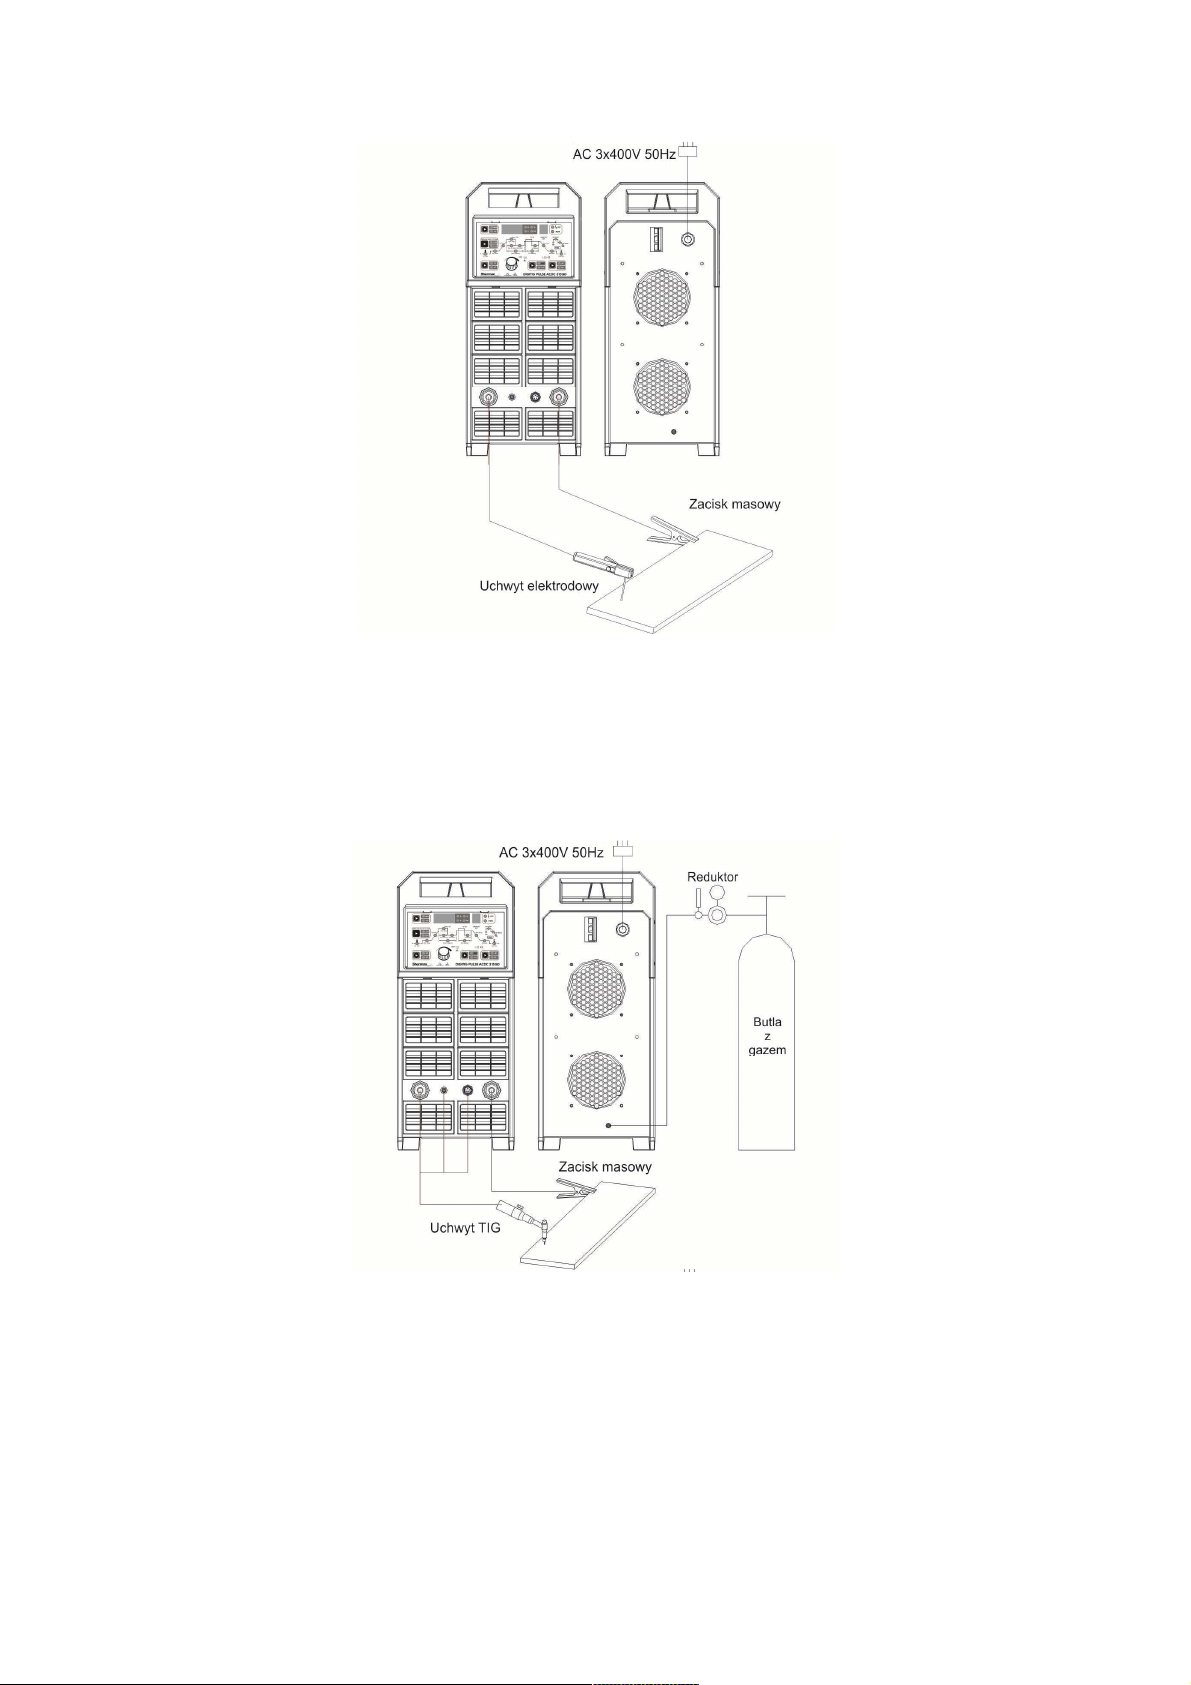
t5 :t5 : Solenoid valve closes the gas flow, complete ñ welding connection. Solenoid valve closes the gas flow, complete ñ welding connection. Solenoid valve closes the gas flow, complete ñ welding connection.
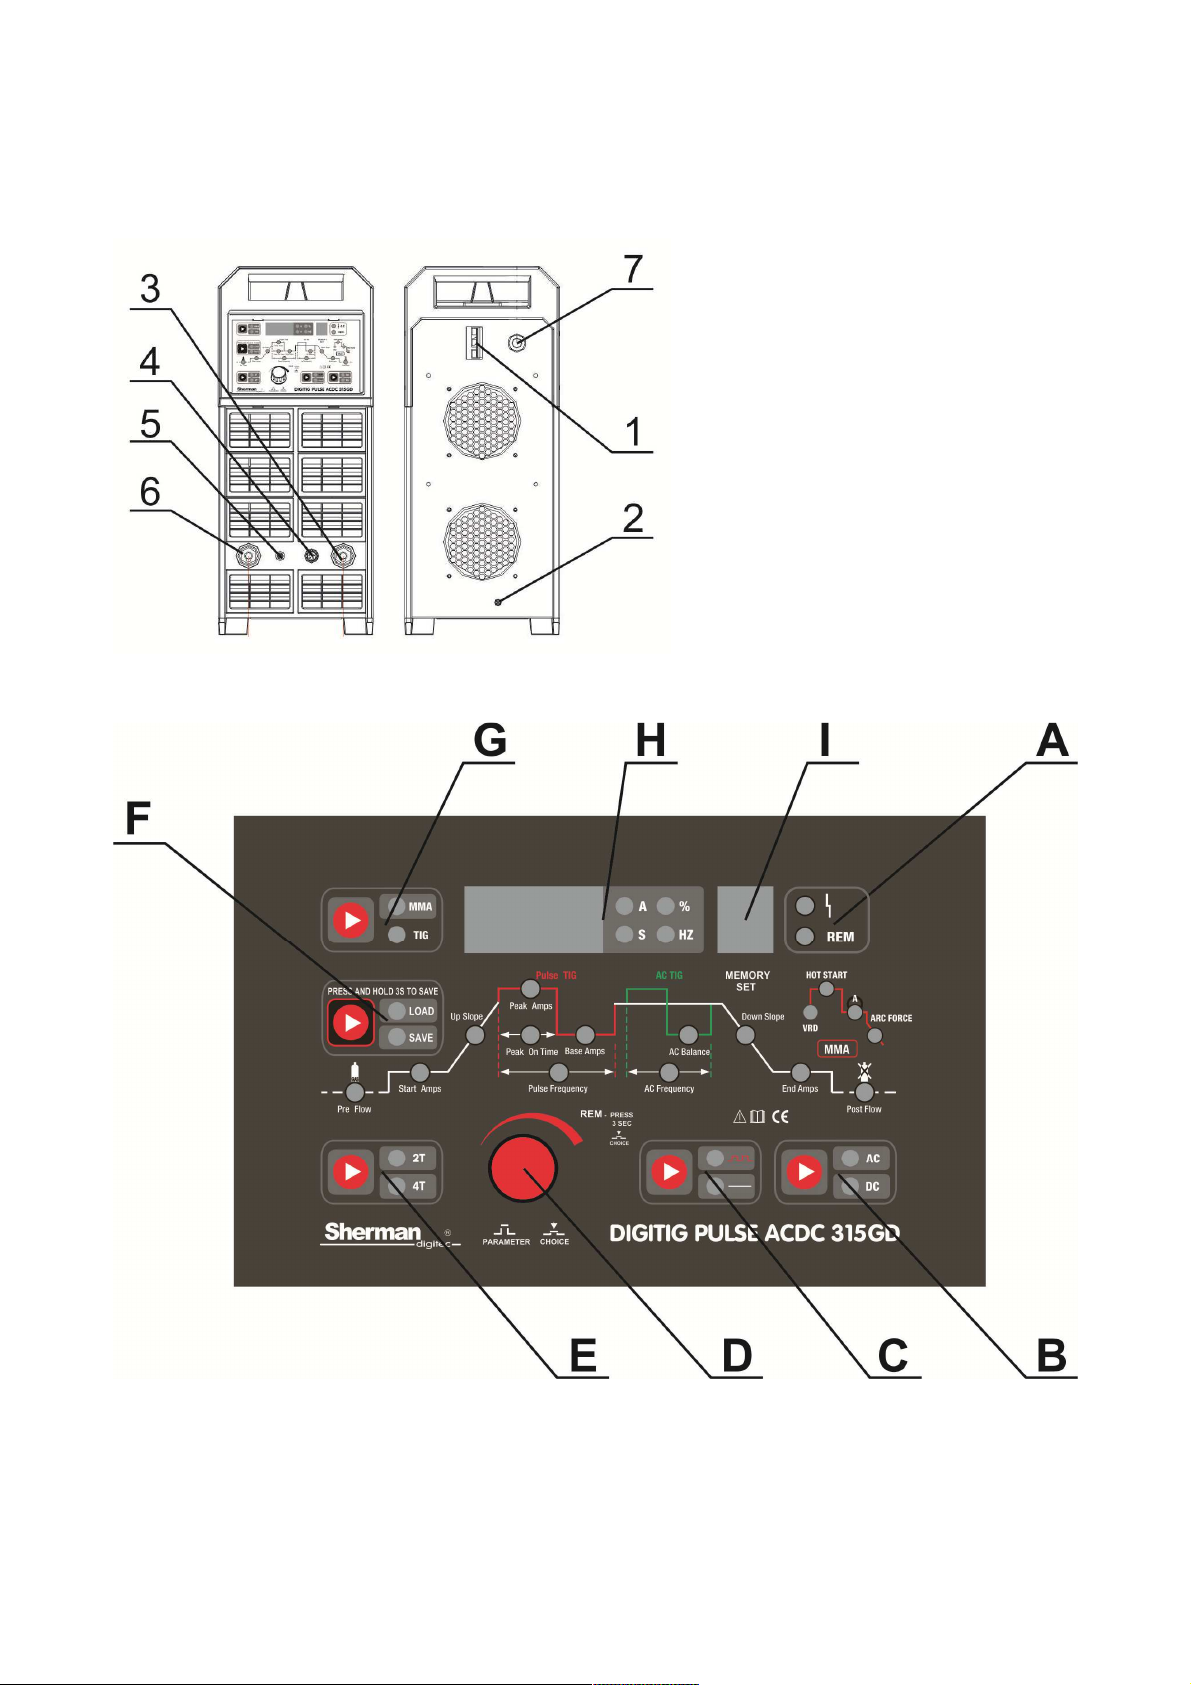
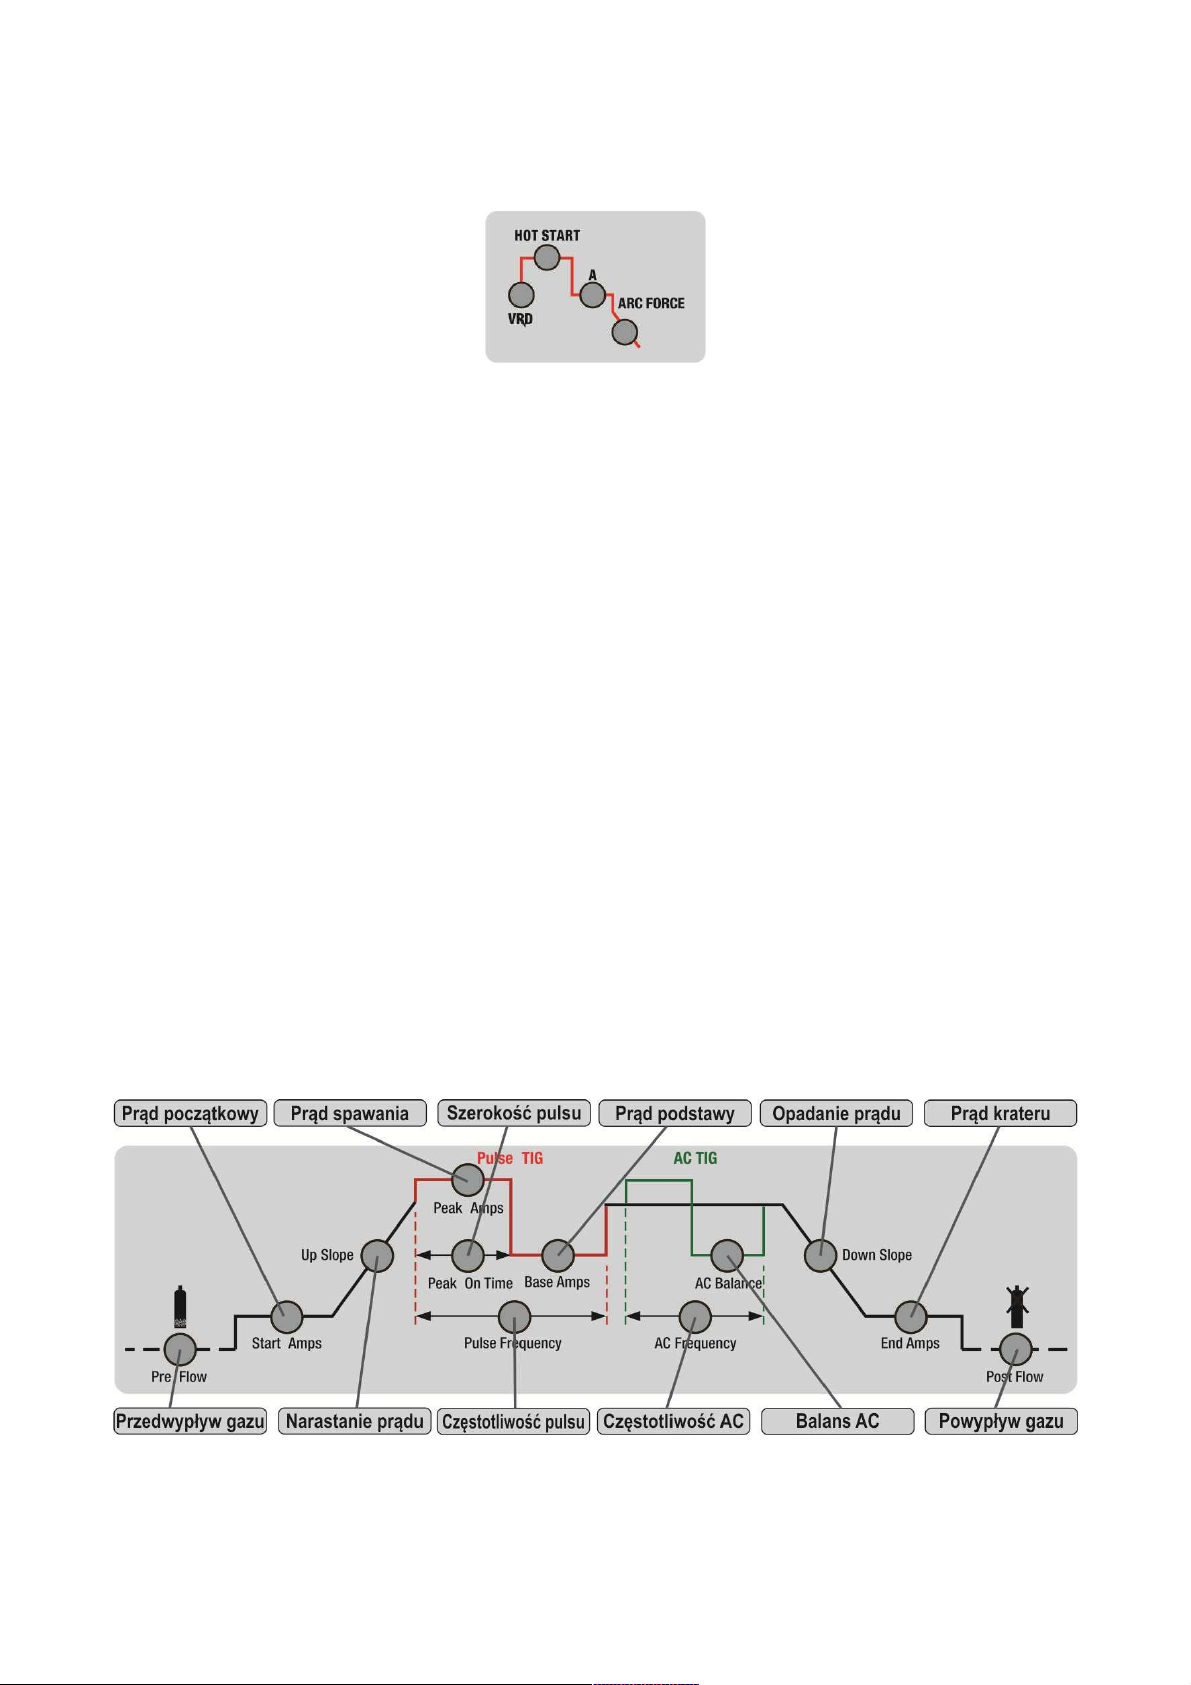
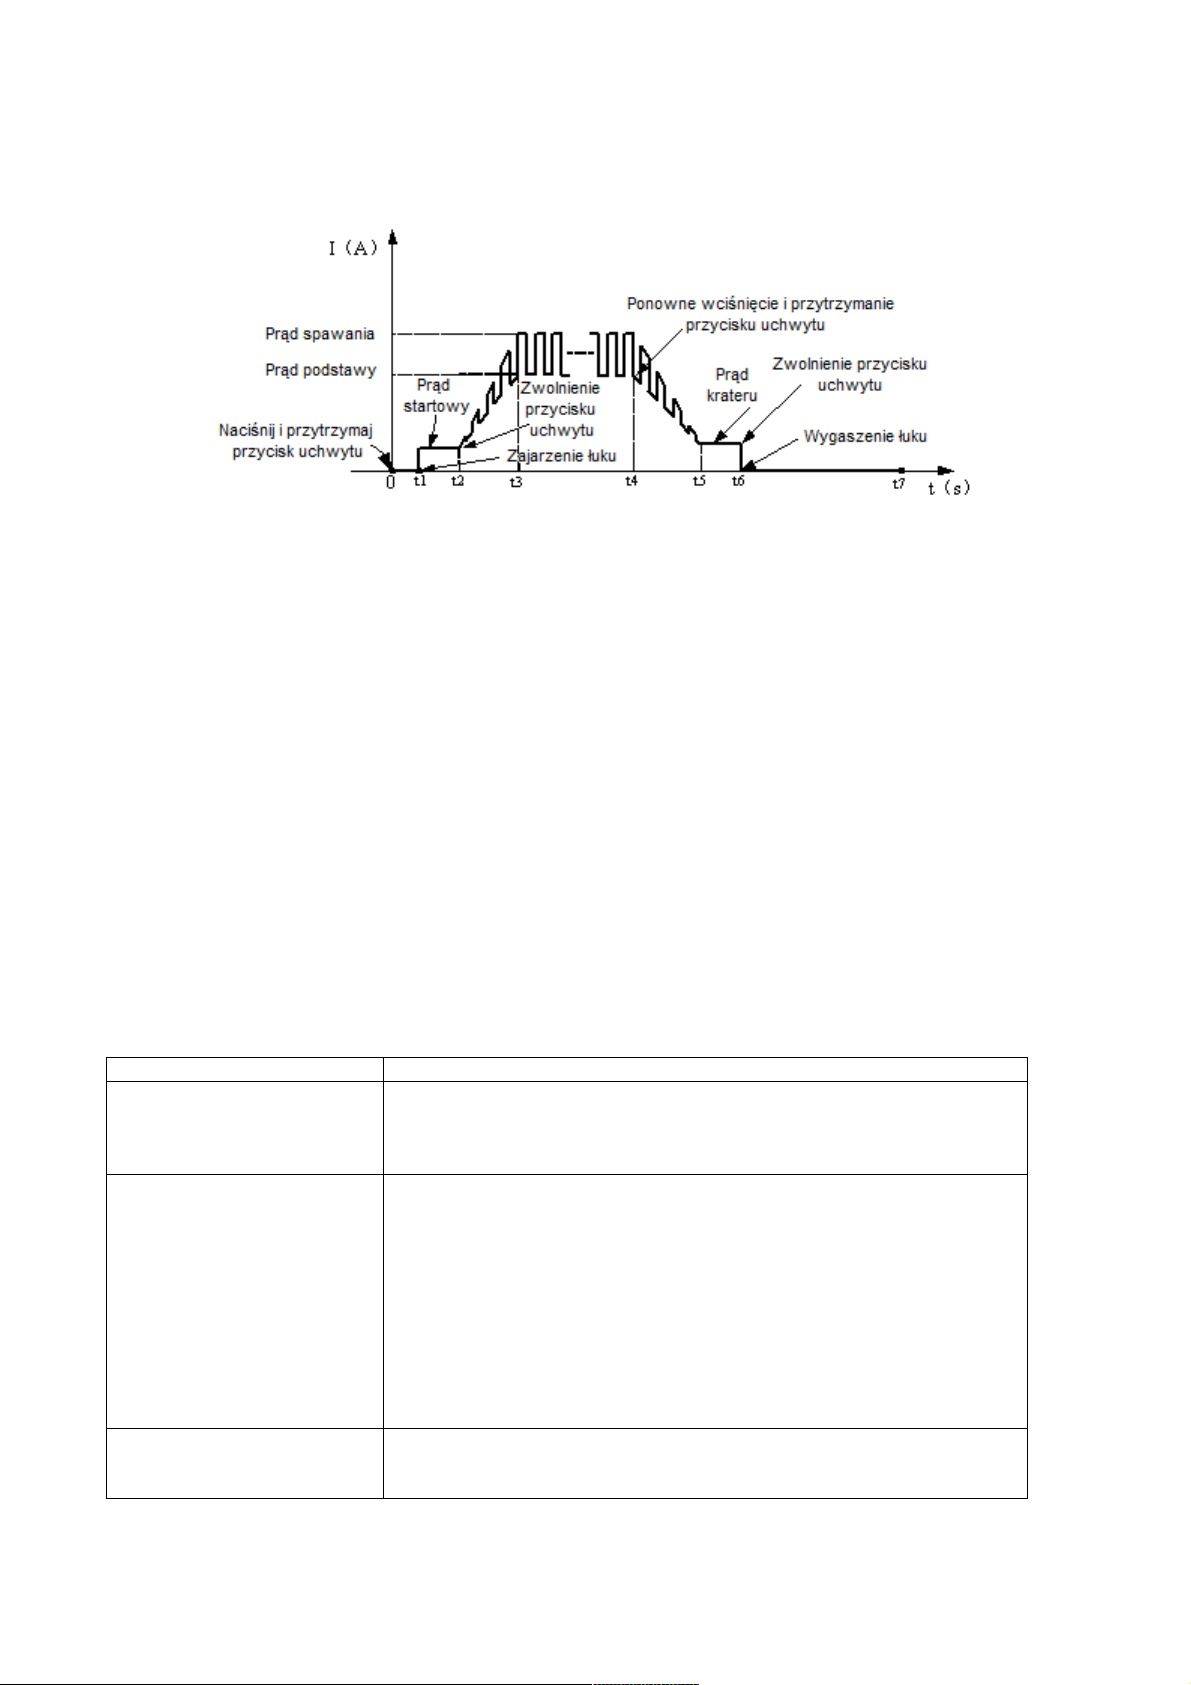
10.2.3 TIG mode 4T :10.2.3 TIG mode 4T :
0 :0 : push rte d and hold Æ the handle. starts ę the flow of protective gas; push rte d and hold Æ the handle. starts ę the flow of protective gas; push rte d and hold Æ the handle. starts ę the flow of protective gas; push rte d and hold Æ the handle. starts ę the flow of protective gas; push rte d and hold Æ the handle. starts ę the flow of protective gas; push rte d and hold Æ the handle. starts ę the flow of protective gas; push rte d and hold Æ the handle. starts ę the flow of protective gas;
0 ~:0 ~:t1 Time gas pre. Mo with possibility SC adjustment range: 0 ~ 1.0 sec; Time gas pre. Mo with possibility SC adjustment range: 0 ~ 1.0 sec; Time gas pre. Mo with possibility SC adjustment range: 0 ~ 1.0 sec; Time gas pre. Mo with possibility SC adjustment range: 0 ~ 1.0 sec; Time gas pre. Mo with possibility SC adjustment range: 0 ~ 1.0 sec;
t1 :t1 : Arc ignition, is determined pr and d starter; Arc ignition, is determined pr and d starter; Arc ignition, is determined pr and d starter;
t2 :t2 : release Æ the handle starts ę increase pr and du to the set ś you pr and the welding. In the case of ON and czonego pulsator, pr and d is release Æ the handle starts ę increase pr and du to the set ś you pr and the welding. In the case of ON and czonego pulsator, pr and d is release Æ the handle starts ę increase pr and du to the set ś you pr and the welding. In the case of ON and czonego pulsator, pr and d is release Æ the handle starts ę increase pr and du to the set ś you pr and the welding. In the case of ON and czonego pulsator, pr and d is release Æ the handle starts ę increase pr and du to the set ś you pr and the welding. In the case of ON and czonego pulsator, pr and d is release Æ the handle starts ę increase pr and du to the set ś you pr and the welding. In the case of ON and czonego pulsator, pr and d is release Æ the handle starts ę increase pr and du to the set ś you pr and the welding. In the case of ON and czonego pulsator, pr and d is release Æ the handle starts ę increase pr and du to the set ś you pr and the welding. In the case of ON and czonego pulsator, pr and d is release Æ the handle starts ę increase pr and du to the set ś you pr and the welding. In the case of ON and czonego pulsator, pr and d is release Æ the handle starts ę increase pr and du to the set ś you pr and the welding. In the case of ON and czonego pulsator, pr and d is release Æ the handle starts ę increase pr and du to the set ś you pr and the welding. In the case of ON and czonego pulsator, pr and d is release Æ the handle starts ę increase pr and du to the set ś you pr and the welding. In the case of ON and czonego pulsator, pr and d is release Æ the handle starts ę increase pr and du to the set ś you pr and the welding. In the case of ON and czonego pulsator, pr and d is release Æ the handle starts ę increase pr and du to the set ś you pr and the welding. In the case of ON and czonego pulsator, pr and d is release Æ the handle starts ę increase pr and du to the set ś you pr and the welding. In the case of ON and czonego pulsator, pr and d is
modulated;
t2 ~:t2 ~: t3 Rise time pr and du; Rise time pr and du; Rise time pr and du;
t3 ~:t3 ~: t4 The welding process; Note: ś l On and pulsator is connected, pr and the welding flashes, it ś If pulsator is off and on, pr and the The welding process; Note: ś l On and pulsator is connected, pr and the welding flashes, it ś If pulsator is off and on, pr and the The welding process; Note: ś l On and pulsator is connected, pr and the welding flashes, it ś If pulsator is off and on, pr and the The welding process; Note: ś l On and pulsator is connected, pr and the welding flashes, it ś If pulsator is off and on, pr and the The welding process; Note: ś l On and pulsator is connected, pr and the welding flashes, it ś If pulsator is off and on, pr and the The welding process; Note: ś l On and pulsator is connected, pr and the welding flashes, it ś If pulsator is off and on, pr and the The welding process; Note: ś l On and pulsator is connected, pr and the welding flashes, it ś If pulsator is off and on, pr and the The welding process; Note: ś l On and pulsator is connected, pr and the welding flashes, it ś If pulsator is off and on, pr and the The welding process; Note: ś l On and pulsator is connected, pr and the welding flashes, it ś If pulsator is off and on, pr and the The welding process; Note: ś l On and pulsator is connected, pr and the welding flashes, it ś If pulsator is off and on, pr and the The welding process; Note: ś l On and pulsator is connected, pr and the welding flashes, it ś If pulsator is off and on, pr and the The welding process; Note: ś l On and pulsator is connected, pr and the welding flashes, it ś If pulsator is off and on, pr and the The welding process; Note: ś l On and pulsator is connected, pr and the welding flashes, it ś If pulsator is off and on, pr and the
welding has become and worth SC;welding has become and worth SC;welding has become and worth SC;welding has become and worth SC;
t4 :t4 : push rte d the handle. pr and welding current starts falling Æ the worth ś you pr and large crater. them ś l On and pulsator is connected, push rte d the handle. pr and welding current starts falling Æ the worth ś you pr and large crater. them ś l On and pulsator is connected, push rte d the handle. pr and welding current starts falling Æ the worth ś you pr and large crater. them ś l On and pulsator is connected, push rte d the handle. pr and welding current starts falling Æ the worth ś you pr and large crater. them ś l On and pulsator is connected, push rte d the handle. pr and welding current starts falling Æ the worth ś you pr and large crater. them ś l On and pulsator is connected, push rte d the handle. pr and welding current starts falling Æ the worth ś you pr and large crater. them ś l On and pulsator is connected, push rte d the handle. pr and welding current starts falling Æ the worth ś you pr and large crater. them ś l On and pulsator is connected, push rte d the handle. pr and welding current starts falling Æ the worth ś you pr and large crater. them ś l On and pulsator is connected, push rte d the handle. pr and welding current starts falling Æ the worth ś you pr and large crater. them ś l On and pulsator is connected, push rte d the handle. pr and welding current starts falling Æ the worth ś you pr and large crater. them ś l On and pulsator is connected, push rte d the handle. pr and welding current starts falling Æ the worth ś you pr and large crater. them ś l On and pulsator is connected, push rte d the handle. pr and welding current starts falling Æ the worth ś you pr and large crater. them ś l On and pulsator is connected, push rte d the handle. pr and welding current starts falling Æ the worth ś you pr and large crater. them ś l On and pulsator is connected, push rte d the handle. pr and welding current starts falling Æ the worth ś you pr and large crater. them ś l On and pulsator is connected, push rte d the handle. pr and welding current starts falling Æ the worth ś you pr and large crater. them ś l On and pulsator is connected,
drooping and cy pr and d is modulated; drooping and cy pr and d is modulated; drooping and cy pr and d is modulated; drooping and cy pr and d is modulated; drooping and cy pr and d is modulated;
t4 ~:t4 ~: t5 Fall time pr and du; Fall time pr and du; Fall time pr and du;
t5 ~:t5 ~: t6 pr and d crater; pr and d crater; pr and d crater;
t6 :t6 : release Æ the handle. Arc is extinguished, the shielding gas flows;release Æ the handle. Arc is extinguished, the shielding gas flows;release Æ the handle. Arc is extinguished, the shielding gas flows;
t7 :t7 : Solenoid valve closes the gas flow, complete ñ welding connection. Solenoid valve closes the gas flow, complete ñ welding connection. Solenoid valve closes the gas flow, complete ñ welding connection.
11. Before calling service,
In the event of a malfunction device and equipment, welding before sending to the site should with s check Æ letter ę basic failure and try Æ remove In the event of a malfunction device and equipment, welding before sending to the site should with s check Æ letter ę basic failure and try Æ remove In the event of a malfunction device and equipment, welding before sending to the site should with s check Æ letter ę basic failure and try Æ remove In the event of a malfunction device and equipment, welding before sending to the site should with s check Æ letter ę basic failure and try Æ remove In the event of a malfunction device and equipment, welding before sending to the site should with s check Æ letter ę basic failure and try Æ remove In the event of a malfunction device and equipment, welding before sending to the site should with s check Æ letter ę basic failure and try Æ remove In the event of a malfunction device and equipment, welding before sending to the site should with s check Æ letter ę basic failure and try Æ remove In the event of a malfunction device and equipment, welding before sending to the site should with s check Æ letter ę basic failure and try Æ remove In the event of a malfunction device and equipment, welding before sending to the site should with s check Æ letter ę basic failure and try Æ remove In the event of a malfunction device and equipment, welding before sending to the site should with s check Æ letter ę basic failure and try Æ remove In the event of a malfunction device and equipment, welding before sending to the site should with s check Æ letter ę basic failure and try Æ remove
them yourself rte d.them yourself rte d.
Any repair device and devices can and would Æ made off and only after disconnecting and combined the power plug from the socket and lying. Attention! office and device Any repair device and devices can and would Æ made off and only after disconnecting and combined the power plug from the socket and lying. Attention! office and device Any repair device and devices can and would Æ made off and only after disconnecting and combined the power plug from the socket and lying. Attention! office and device Any repair device and devices can and would Æ made off and only after disconnecting and combined the power plug from the socket and lying. Attention! office and device Any repair device and devices can and would Æ made off and only after disconnecting and combined the power plug from the socket and lying. Attention! office and device Any repair device and devices can and would Æ made off and only after disconnecting and combined the power plug from the socket and lying. Attention! office and device Any repair device and devices can and would Æ made off and only after disconnecting and combined the power plug from the socket and lying. Attention! office and device Any repair device and devices can and would Æ made off and only after disconnecting and combined the power plug from the socket and lying. Attention! office and device Any repair device and devices can and would Æ made off and only after disconnecting and combined the power plug from the socket and lying. Attention! office and device Any repair device and devices can and would Æ made off and only after disconnecting and combined the power plug from the socket and lying. Attention! office and device Any repair device and devices can and would Æ made off and only after disconnecting and combined the power plug from the socket and lying. Attention! office and device Any repair device and devices can and would Æ made off and only after disconnecting and combined the power plug from the socket and lying. Attention! office and device Any repair device and devices can and would Æ made off and only after disconnecting and combined the power plug from the socket and lying. Attention! office and device Any repair device and devices can and would Æ made off and only after disconnecting and combined the power plug from the socket and lying. Attention! office and device Any repair device and devices can and would Æ made off and only after disconnecting and combined the power plug from the socket and lying. Attention! office and device
is not sealed and in with Users can with e pictures rte d housing ę welding in order to remove ę cutting minor breakdowns. symptomsis not sealed and in with Users can with e pictures rte d housing ę welding in order to remove ę cutting minor breakdowns. symptomsis not sealed and in with Users can with e pictures rte d housing ę welding in order to remove ę cutting minor breakdowns. symptomsis not sealed and in with Users can with e pictures rte d housing ę welding in order to remove ę cutting minor breakdowns. symptomsis not sealed and in with Users can with e pictures rte d housing ę welding in order to remove ę cutting minor breakdowns. symptomsis not sealed and in with Users can with e pictures rte d housing ę welding in order to remove ę cutting minor breakdowns. symptomsis not sealed and in with Users can with e pictures rte d housing ę welding in order to remove ę cutting minor breakdowns. symptomsis not sealed and in with Users can with e pictures rte d housing ę welding in order to remove ę cutting minor breakdowns. symptomsis not sealed and in with Users can with e pictures rte d housing ę welding in order to remove ę cutting minor breakdowns. symptomsis not sealed and in with Users can with e pictures rte d housing ę welding in order to remove ę cutting minor breakdowns. symptomsis not sealed and in with Users can with e pictures rte d housing ę welding in order to remove ę cutting minor breakdowns. symptoms
Methods for removing ę photos Methods for removing ę photos Methods for removing ę photos
The control panel and not months ś lit é, the The control panel and not months ś lit é, the The control panel and not months ś lit é, the The control panel and not months ś lit é, the The control panel and not months ś lit é, the The control panel and not months ś lit é, the The control panel and not months ś lit é, the
fan is not working, no voltage ę cut output ś processing fan is not working, no voltage ę cut output ś processing fan is not working, no voltage ę cut output ś processing fan is not working, no voltage ę cut output ś processing fan is not working, no voltage ę cut output ś processing
industry
1. Make sure Æ si é, or off and switch is in position with ON-up 1. Make sure Æ si é, or off and switch is in position with ON-up 1. Make sure Æ si é, or off and switch is in position with ON-up 1. Make sure Æ si é, or off and switch is in position with ON-up 1. Make sure Æ si é, or off and switch is in position with ON-up 1. Make sure Æ si é, or off and switch is in position with ON-up 1. Make sure Æ si é, or off and switch is in position with ON-up 1. Make sure Æ si é, or off and switch is in position with ON-up 1. Make sure Æ si é, or off and switch is in position with ON-up
2. Check Æ and voltage protection ę a network 2. Check Æ and voltage protection ę a network 2. Check Æ and voltage protection ę a network 2. Check Æ and voltage protection ę a network 2. Check Æ and voltage protection ę a network
3. Photo rte d housing ę and check Æ Temp and Starting all plugins 3. Photo rte d housing ę and check Æ Temp and Starting all plugins 3. Photo rte d housing ę and check Æ Temp and Starting all plugins 3. Photo rte d housing ę and check Æ Temp and Starting all plugins 3. Photo rte d housing ę and check Æ Temp and Starting all plugins 3. Photo rte d housing ę and check Æ Temp and Starting all plugins 3. Photo rte d housing ę and check Æ Temp and Starting all plugins 3. Photo rte d housing ę and check Æ Temp and Starting all plugins 3. Photo rte d housing ę and check Æ Temp and Starting all plugins
internal electrical and inside the office and equipment internal electrical and inside the office and equipment internal electrical and inside the office and equipment internal electrical and inside the office and equipment internal electrical and inside the office and equipment
The control panel and cy ś lit é,The control panel and cy ś lit é,The control panel and cy ś lit é,The control panel and cy ś lit é,The control panel and cy ś lit é,The control panel and cy ś lit é,
the fan is not working, no voltage ę cut the fan is not working, no voltage ę cut the fan is not working, no voltage ę cut
output ś partial. output ś partial. output ś partial.
1. Check æ, or devices and device is not connected and connected to the network 1. Check æ, or devices and device is not connected and connected to the network 1. Check æ, or devices and device is not connected and connected to the network 1. Check æ, or devices and device is not connected and connected to the network 1. Check æ, or devices and device is not connected and connected to the network 1. Check æ, or devices and device is not connected and connected to the network 1. Check æ, or devices and device is not connected and connected to the network
you with st voltage ę five. them ś If so, connect and whether Æ to 3x400V and owned and whether Æ again you with st voltage ę five. them ś If so, connect and whether Æ to 3x400V and owned and whether Æ again you with st voltage ę five. them ś If so, connect and whether Æ to 3x400V and owned and whether Æ again you with st voltage ę five. them ś If so, connect and whether Æ to 3x400V and owned and whether Æ again you with st voltage ę five. them ś If so, connect and whether Æ to 3x400V and owned and whether Æ again you with st voltage ę five. them ś If so, connect and whether Æ to 3x400V and owned and whether Æ again you with st voltage ę five. them ś If so, connect and whether Æ to 3x400V and owned and whether Æ again you with st voltage ę five. them ś If so, connect and whether Æ to 3x400V and owned and whether Æ again you with st voltage ę five. them ś If so, connect and whether Æ to 3x400V and owned and whether Æ again you with st voltage ę five. them ś If so, connect and whether Æ to 3x400V and owned and whether Æ again you with st voltage ę five. them ś If so, connect and whether Æ to 3x400V and owned and whether Æ again you with st voltage ę five. them ś If so, connect and whether Æ to 3x400V and owned and whether Æ again you with st voltage ę five. them ś If so, connect and whether Æ to 3x400V and owned and whether Æ again you with st voltage ę five. them ś If so, connect and whether Æ to 3x400V and owned and whether Æ again you with st voltage ę five. them ś If so, connect and whether Æ to 3x400V and owned and whether Æ again
2. Napi ę the power of and which it is unstable and causes incl and connection 2. Napi ę the power of and which it is unstable and causes incl and connection 2. Napi ę the power of and which it is unstable and causes incl and connection 2. Napi ę the power of and which it is unstable and causes incl and connection 2. Napi ę the power of and which it is unstable and causes incl and connection 2. Napi ę the power of and which it is unstable and causes incl and connection 2. Napi ę the power of and which it is unstable and causes incl and connection
overvoltage protection ę partial. off and whether Æ device and take 2-3 minutes and owned and whetherovervoltage protection ę partial. off and whether Æ device and take 2-3 minutes and owned and whetherovervoltage protection ę partial. off and whether Æ device and take 2-3 minutes and owned and whetherovervoltage protection ę partial. off and whether Æ device and take 2-3 minutes and owned and whetherovervoltage protection ę partial. off and whether Æ device and take 2-3 minutes and owned and whetherovervoltage protection ę partial. off and whether Æ device and take 2-3 minutes and owned and whetherovervoltage protection ę partial. off and whether Æ device and take 2-3 minutes and owned and whetherovervoltage protection ę partial. off and whether Æ device and take 2-3 minutes and owned and whetherovervoltage protection ę partial. off and whether Æ device and take 2-3 minutes and owned and whetherovervoltage protection ę partial. off and whether Æ device and take 2-3 minutes and owned and whetherovervoltage protection ę partial. off and whether Æ device and take 2-3 minutes and owned and whether
Æ again Æ again
3. On Short and connection and off and connection switch and switch 3. On Short and connection and off and connection switch and switch 3. On Short and connection and off and connection switch and switch 3. On Short and connection and off and connection switch and switch 3. On Short and connection and off and connection switch and switch 3. On Short and connection and off and connection switch and switch 3. On Short and connection and off and connection switch and switch
caused incl and overvoltage protection connection ę partial. off and whether Æ device and take caused incl and overvoltage protection connection ę partial. off and whether Æ device and take caused incl and overvoltage protection connection ę partial. off and whether Æ device and take caused incl and overvoltage protection connection ę partial. off and whether Æ device and take caused incl and overvoltage protection connection ę partial. off and whether Æ device and take caused incl and overvoltage protection connection ę partial. off and whether Æ device and take caused incl and overvoltage protection connection ę partial. off and whether Æ device and take caused incl and overvoltage protection connection ę partial. off and whether Æ device and take caused incl and overvoltage protection connection ę partial. off and whether Æ device and take caused incl and overvoltage protection connection ę partial. off and whether Æ device and take caused incl and overvoltage protection connection ę partial. off and whether Æ device and take
2-3 minutes and owned and whether Æ again 2-3 minutes and owned and whether Æ again 2-3 minutes and owned and whether Æ again 2-3 minutes and owned and whether Æ again 2-3 minutes and owned and whether Æ again
4. Nast and drank other damage requiring and ce-repair 4. Nast and drank other damage requiring and ce-repair 4. Nast and drank other damage requiring and ce-repair 4. Nast and drank other damage requiring and ce-repair 4. Nast and drank other damage requiring and ce-repair
authorized service
The control panel and cy ś lit é,The control panel and cy ś lit é,The control panel and cy ś lit é,The control panel and cy ś lit é,The control panel and cy ś lit é,The control panel and cy ś lit é,
fan works, problems with arc is started 1. Check Æ TIG, replace Æ part rts those supplies, it ś l 1. Check Æ TIG, replace Æ part rts those supplies, it ś l 1. Check Æ TIG, replace Æ part rts those supplies, it ś l 1. Check Æ TIG, replace Æ part rts those supplies, it ś l 1. Check Æ TIG, replace Æ part rts those supplies, it ś l 1. Check Æ TIG, replace Æ part rts those supplies, it ś l 1. Check Æ TIG, replace Æ part rts those supplies, it ś l 1. Check Æ TIG, replace Æ part rts those supplies, it ś l 1. Check Æ TIG, replace Æ part rts those supplies, it ś l
s and zu with used s and zu with used s and zu with used s and zu with used s and zu with used