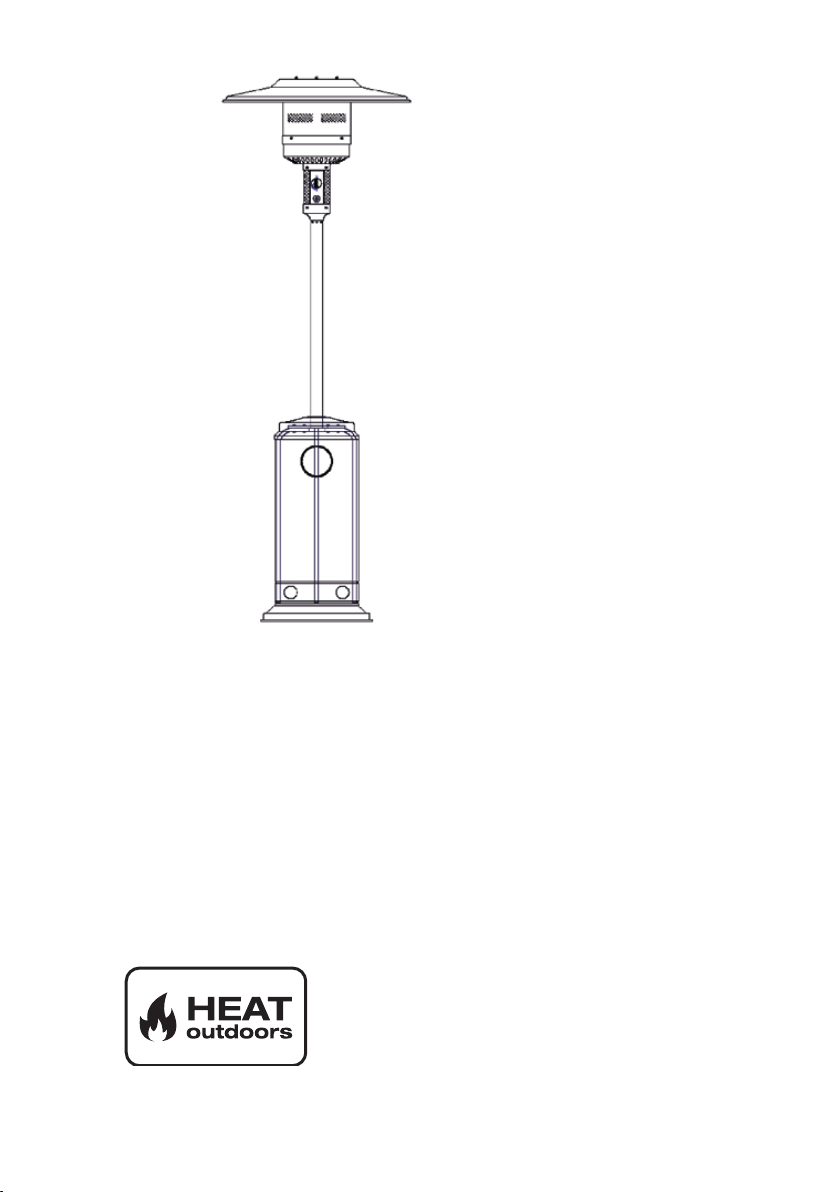
Sherpa 901233C Operation and maintenance manual

Sherpa Commercial
Gas Flame Patio Heater
Safety Instructions and Operation Manual
901233C
Heat Outdoors
Unit 9, Stort Valley Industrial Estate
Stansted Road, Bishop’s Stortford
Hertfordshire, United Kingdom
CM23 2TU
www.heat-outdoors.co.uk
01279 466500

2Contents
Contents
Warning . . . . . . . . . . . . . . . . . . . . . 3
Location . . . . . . . . . . . . . . . . . . . . . 4
Safety Precautions . . . . . . . . . . . . . . . . . 5
Gas Requirements . . . . . . . . . . . . . . . . . 6
Assembly Instructions . . . . . . . . . . . . . . . 7
Parts and Specications . . . . . . . . . . . . . . 8
Assembly Procedure . . . . . . . . . . . . . . . . 9
Operation . . . . . . . . . . . . . . . . . . . . 11
Cleaning & maintenance . . . . . . . . . . . . . 12
Storage . . . . . . . . . . . . . . . . . . . . . 13
Servicing . . . . . . . . . . . . . . . . . . . . 14
Solving Common Problems . . . . . . . . . . . . 14
Problem Checklist . . . . . . . . . . . . . . . . 15
Customer Service . . . . . . . . . . . . . . . . 17

3
Warning
Warning
Please carefully read all instructions provided before using this appliance. This heater
must be installed in accordance with the instructions and local regulations. The use of
this appliance in enclosed areas can be dangerous and is prohibited.
• Perform the ‘leak test’ after each changing gas cylinder.
Never check for leaks with a naked ame
• Do not store other ammable vapors or liquids near this appliance.
If you smell gas, follow the steps below:
1. Extinguish all naked ames; do not operate any electrical appliances
2. Close the valve of the regulator to stop gas running to the unit and turn the heater to
the OFF position (full disk = • )
3. Ensure the regulator is xed to the bottle correctly.
4. Check the hose from the gas bottle to the unit has no splits - this can be done with
soapy water to identify splits in the hose.
5. If odour persist contact Heat Outdoors or a gas supplier.
Leakage Test
Gas connections on the appliance are leak tested prior to shipment. Possible mishandling
of the appliance during shipment can damage the integrity of some parts.
A complete gas leakage test must be performed again at the installation site. Please
follow the procedure below for leakage test.
1. It is advised to make a soap / liquid detergent and water solution to identify any
holes/splits or loose ttings in the tube.
2. Make sure the control tap is in the OFF position (full disk = • ) on the control panel.
3. Apply the solution to the hose using a brush or rag.
4. Turn ON the gas supply and check for bubbles from the hose. If the air bubbles
appear this indicates a leak in the hose.
5. If a leak is present, turn OFF the gas supply immediately, tighten any leaking tting
carefully, turn gas ON again and recheck.

4Location
Location
The appliance is for outdoor use only.
• Do not use the heater indoors or in an enclosed area. Always ensure that adequate air
ventilation is provided.
• Do not use the heater in a basement or below ground level.
• This appliance should only be used in an above ground open-air environment with
natural ventilation, where gas leakage or combustible materials are dispersed.
• Any enclosure in which the appliance is used should comply with one of the following:
• Within a partial enclosure that includes an overhead cover and more than
two walls, the following shall apply:
• At least 25% of the total wall area is completely open and at least 30% of
the remaining wall area is open and unrestricted.
• If being used on a balcony area, at least 20% of the total wall area should
remain open and unrestricted.
This appliance should only be used in an outdoor area and should not be used in a
building, garage or any other enclosed area.
Technical Specications
Nominal HEAT INPUT 15 kW (450 g/hr - 870 g/hr)
Appliance Category I3+ I3B/P I3B/P I3B/P
Gas Reference G30/G31 G30/G31 G30/G31 G30/G31
Normal Gas Pressure 28-30/37 mbar 28-30 mbar 30 mbar 50 mbar
Burner Injector 2.2mm 2.2mm 2.2mm 2.2mm
FOR USE OUTDOORS ONLY
Use propane only. Burner pressure: 37 mbar - Burner injector: 1.9 mm - Pilot injector: 0.20 mm
Close the valve of the gas cylinder or the regulator after use. The use of this appliance in closed
areas can be dangerous and is PROHIBITED. Read the instructions before using this appliance.
The appliance must be installed in accordance with the instructions and local regulations.
Metal w/ powder coating 18 kg. Stainless Steel 17 kgs. Height: 2250 mm
Countries of destination:
AT-BE-BG-CH-CZ-CY-DE-DK-EE-ES-FI-FR-GB-GR-HU-IE-IS-IT-LU-LT-LV-MTNL-
NO-PL-PT-RO-RU-SE-SI-SK-TR

5
Safety Precautions
Safety Precautions
• Performance and safety service of this heater should be performed annually by a
qualied gas engineer.
• Do not use the heater in a combustable atmosphere.
• Do not store or use petrol or other ammable liquids in or near the heater unit.
• Before using the unit check the whole gas system ie. hoses for splits, twists which
may cause gas to leak or prevent ow.
• The recommended frequency of checking the tubing or the exible hose is at least
once per month and each time the cylinder is changed. If it shows signs of cracking,
splitting or other deterioration it should be changed for new hose of the same length
and of the equivalent quality.
• Disconnect gas cylinder before moving the heater.
• Do not attempt to modify any parts of the heater.
• The appliance is not recommended to be used in basements, below ground level or
in areas with limited / no ventilation.
• Ensure the heater is placed on a solid and level surface.
• It is recommended that you change the regulator annually to avoid blockages.
• Do not clean the heater with cleaners that are combustible or corrosive.
• Do not paint any part of the heater.
• The gas cylinder valve should be turned off when the heater is not in use.
• Avoid using the heater when it is raining to prevent water ingress.
• Keep children and vulnerable people away from the heater when in use.
• Do not move the heater when it is in use.
• Check the heater immediately if any of the following exists:
- There is smell of gas.
- The heater performance of the heater seems to be reduced.
- The burner makes popping noise during use (a slight popping noise is normal
when the ame is extinguished after use).
• When the heater is in use the surface of the grills, reector and glass will reach a
high temperature. Do not touch these parts.
• Do not obstruct the ventilation holes of the cylinder housing.
• Only use the gas specied - 13kg-15kg Propane patio gas.
• In adverse weather conditions it is advised the heater is stored undercover or inside
where possible.
• The gas cylinder should be turned off when the heater is not in use.

6Gas Requirements
Gas Requirements
• Use propane or LPG only.
• The heater is designed for use with 11-13 kg cylinder. Maximum size of cylinder
suitable for the appliance, w/ regulator attached, is Æ31 cm x 64 cm. Inner
dimension of stand within the supporting bars is Æ32 cm x 69 cm.
• The appliance requires approved gas hose in 60 cm length and a regulator, or a gas
hose in 140 cm length and a regulator if no gas pipe (approx. 84 cm) is used.
• Regulator maximum inlet pressure must not exceed 690 kPa (100 PSI).
• Regulator outlet pressure to be 37 mbar.
• The hose and regulator assembly must conform to local standard codes.
• The installation must conform to local codes, or in the absence of local codes, to the
standard for the storage and handling of liquid petroleum gases.
• A dented, rusted or damaged gas cylinder may be hazardous and should be checked
by your gas supplier. Never use a gas cylinder with a damaged valve connection.
• The gas cylinder must be arranged to provide for vapor withdrawal from the
operating cylinder.
• Avoid twisting the exible tubes and hoses.
• Never connect an unregulated gas cylinder to the heater.
• Disconnect the gas cylinder when the heater is not use.

7
Assembly Instructions
Tools you will need:
• Open end wrench 10 & 13 mm
• Adjustable opening wrench (2) 20 cm long
• Slip joint pliers 23 cm long
• Philips screwdriver w/ medium blade
• Spray bottle of soap solution for leakage test
Parts supplied:
• Stand with tank housing
• Assembly post with 3 pcs post brackets
• 10 mm x 84.5 cm (L) galvanized steel pipe + 60 cm gas hose conforming to local standard
codes (pressure regulator not included), or 140 cm gas hose only (if no gas pipe is used)
• Reector 813 mm with 6 pcs washers Ø8 mm and 3 pcs M8 castle nuts
• 3 pcs 90 mm pins for reector support
• 4 pcs bolts M6 x 10 mm for assembly post and burner
• 6 pcs bolts & nuts M6 x 35 mm for post and post brackets
• 3 pcs bolts M8 x 16 mm for post brackets and base
• 3 pcs ground xture kit
• 6 pcs M6 x 10 mm ground xer bolts & nuts

8Parts and Specications
Parts and Specications
Construction and characteristics
• Transportable outdoor patio heater with tank housing
• Stainless steel ame screen
• Heat emission from reector
• Variable control knob with electric ignition
• Tilt switch which shuts gas supply off automatically when the heater is knocked over
44
6
mm
Reflector
Flame screen
Burner base
Air admittance fence
Gas valve controller
Base of control housing
Post
Tank housing
Tank housing support
Stand
950 mm
800 mm
2250 mm

9
Assembly Procedure
Assembly Procedure
Step 1
1-1 As shown, put the ve root support bars in each
respective position in the chassis.
1-2 Connect the support bars to the chassis with 5x
M8 x 15mm screws.
Step 2
2-1 Tighten three M8 screws with the cover placed at the
bottom of the support rod.

10 Assembly Procedure
Step 3
4-1 Secure the 3 pcs 90 mm pins (reector support bolts)
on the cap of ame screen.
4-2 Connect the gas hose to the tapered end of the gas
pipe and secure with metal clamp. (For gas hose with
threaded connectors, bind 2 or more rounds of plumbing
tape around the gas pipe for security.)
4-3 Bind 2 or more rounds of Teon plumbing tape around
the gas burner inlet connector and connect the gas pipe.
Use a wrench to tighten the connection.
4-4 Fix the completed burner unit to the post by 4 pcs M6 x
10 mm bolts.
Step 4
5-1 Put Ø8 mm washer on each reector support bolt.
5-2 Fasten the reector with 3 pcs washers and 3 pcs M8
mm castle nuts.
Step 5
6-1 Lift the tank housing and rest it on the post plate.
6-2 Connect the other end of gas hose to the regulator
and secure with metal clamp. (For gas hose with threaded
connectors, bind 2 or more rounds of plumbing tape
around the regulator outlet connector before connecting
the gas hose for security.)
6-3 Connect the regulator to the gas cylinder and tighten it
with adjustable wrench.
6-4 Put gas cylinder on the stand.

11
Operation
Operation
Check and ensure that a battery is inside the ignition chamber and
the unit has power. Ensure the anode (+) faces outside. The
battery must be installed behind the igniter.
To turn on the heater
1. Turn on the valve on the gas supply cylinder.
2. Press and turn the variable control knob to PILOT position
(counter clockwise 90˚).
3. Press down the variable control knob and hold for 30 seconds.
While holding down the variable control knob, press the igniter
button several times until the pilot ame ignites. Release the
variable control knob 20-30 seconds after the ignition.
4. Turn the variable control knob to LO and leave it there for 5 minutes or more before
turning the knob to desired temperature setting.
5. If the burner ame goes out accidentally or it is blown out by wind, turn off the heater
and wait at least 5 minutes or more to let the gas disperse before re-lighting to avoid
possible gas explosion. Repeat steps 2 to 4.
Note
• If a new tank has just been connected, please allow at least one minute for the air in the
gas pipeline to release through the pilot hole, or simply continue with step 3.
• When lighting the pilot ame make sure that the variable control knob is continuously
depressed while pressing the igniter button.
• Variable control knob can be released after the pilot ame is lit for 20-30 seconds.
• Pilot ame can be watched and checked from the peephole located on the base of burner.
• If the pilot ame does not light or it goes out, repeat step 3.
To turn off the heater
1. Turn the variable control knob to PILOT position.
2. Press and turn the variable control knob to OFF position.
3. Turn off the valve of the gas cylinder and disconnect the cylinder
Warning
FOR YOUR SAFETY:
•DO NOT touch or move heater for at least
45 minutes after use.
•Allow all burner elements to cool before
Touching.
NOTE
•In a salt-air environment (such as near an
Ocean) corrosion occurs more quickly
than normal.
•Wait until heater is cool before covering.

12 Cleaning & maintenance
Warning
Changing of the gas cylinder must be undertaken in a ame free environment. Ensure
that all taps on the heater are in the closed position. Do not change the gas cylinder
whilst smoking
Replacing the gas cylinder
1. Close the valve of the gas cylinder.
2. Disconnect the regulator from the cylinder.
3. Replace the cylinder.
4. In the absence of any ame, remove the plug or seal cap from the cylinder valve.
5. Check for the presence and good state of the gasket before connecting the regulator.
6. Perform leak test using soapy water solution. (page 3)
Cleaning & maintenance
To enjoy outstanding performance of your heater for years make sure you perform the
following maintenance activities on a regular basis:
• Keep exterior surfaces clean.
•Use warm soapy water for cleaning. Never use ammable, corrosive or abrasive
cleaners.
• While washing your unit, be sure to keep the area around the burner and pilot
assembly dry at all time. If the gas control is exposed to water in any way, do NOT try
to use it. It must be replaced.
• After a long break from operation, the unit should be inspected for spiders, spider
webs or other insects.
•Air ow must be unobstructed. Keep controls. Burner and circulating air
passageways clean.
Signs of possible blockage include:
•Gas odour with extreme yellow tipping of ame.
• Heater does NOT reach the desired temperature.
• Heater glow is excessively uneven.
• Heater makes popping noises.
•Spider and insects can nest in burner or orices. This dangerous condition can
damage the heater and render it unsafe for use. Clean burner holes by using a heavy-
duty pipe cleaner. Compressed air may help clear away smaller particles.
•Carbon deposits may create a re hazard.

13
Storage
Storage
Between uses:
• Turn the control knob to “OFF” position.
• Turn LPG cylinder to “OFF” position.
• Store heater upright in an area sheltered away from weather conditions (such as rain,
sleet, hail, snow).
• If desired, cover heater to protect exterior surfaces and to help prevent dust and
debris collecting in air passages.
During periods of extended inactivity or
when transporting:
• Turn the control knob to “OFF” position.
• Disconnect LPG Cylinder and move to a secure, well-ventilated location outdoors.
• DO NOT store in a location that will exceed 50 degrees C.
• Store heater upright in a sheltered area away from weather conditions (such as rain,
sleet, hail, snow).
• If desired, cover heater to protect exterior surfaces and to help prevent dust and
debris collecting in air passages.
Disposal
In accordance with European Directive 2001/96/EG concerning used
electrical and electronic appliances (waste electrical and electronic
equipment – WEEE), please return any electrical equipment that you will no
longer use to the collection points provided for their disposal.
This symbol indicates that the appliance cannot be treated as normal domestic trash, but
must be handed to a collection point for recycling electric and electronic appliances.
Information concerning where the equipment can be disposed of can be obtained from
your local authority.

14 Servicing
Servicing
It is recommended that before using the heater after a period of 3 months or before using
the heater:
• Check the condition of the gas cylinder.
• Check the hose assembly for any wear or damage. If the hose and regulator assembly is
damaged or more than 1.5 years old replace with an approved hose and regulator.
• Frequently checking the tubing or the exible hose at least once per month and each
time the cylinder is changed. If it shows signs of cracking, splitting or other deterioration
it should be exchanged for a new hose of the same length and off the equivalent quality.
• The tubing or the exible hose must be change within the recommended time frame.
• Check for leaks.
Solving Common Problems
The 3 most common problems associated with any gas heater are gas leaks, wrong gas
pressure and dirt.
DO NOT USE YOUR HEATER WITHOUT CHECKING FOR LEAKS. Leaks can occur during
shipment and installation. A simple solution of soap and water dabbed on the ttings will
bubble if a gas leak is present. (page 3)
WRONG GAS PRESSURE. Too much gas pressure may severely damage your heater. Too
little gas pressure and your heater will not burn correctly.
DUST AND DIRT. This heater requires some cleaning. If the pilot light will not stay lit, your
heater is probably in need of cleaning and servicing. Replacement of thermocouple or
pilot assembly is generally not needed. Refer to CLEANING AND MAINTENANCE in this
manual.
Warning
Servicing should be carried out by a qualied
gas engineer only.

15
Problem Checklist
Problem Checklist
Problem Cause Solution
No spark at pilot when the
control knob is engaged and
turned counter clockwise to the
pilot position
• Ignition positioned incorrectly
• Ignition electrode broken
• Ignition cable bent or broken
• Replace the ignition
• Free ignition cable. If
damaged, replace this part
There is spark but the heater
will not light
• Gas supply turned off
• Control knob not in the pilot
position
• Control knob not pressed in
while in pilot position
• Pilot is clogged
• Air in gas pipe
• Turn on the gas supply
• Turn the variable knob to the
pilot position
• Press the control knob while
in the pilot position
• Call qualied gas engineer
• Air will disperse from the pipe
by pressing the control knob
continuously until there is a
slight smell of gas
Pilot light present but ame
goes out when the control knob
is released
• Control knob not being held in
for long enough
• Pilot ame not touching the
thermocouple. Problem could
be a result of one or both of
the following:
• Partially clogged pilot injector
• Low gas pressure
• Thermocouple damaged
• Thermocouple connection is
loose at gas control valve
• Gas control valve damaged
• After pilot lights keep control
knob pressed in for a further
30 seconds.
• Contact a qualied gas
engineer
• Replace thermocouple
• Tighten by hand then a further
¼ with a wrench
• Replace gas control
Burner dos not light after pilot
is lit
• Main burner injector clogged
• Low gas supply pressure
• Ensure the main burner is
clean
• Call gas supplier
Burner ame goes off
immediately after ignition
• Low gas pressure • Keep the pilot ame lit for 10
minutes before turning down
to LO setting
Delayed ignition • Main burner ports may be
blocked
• Low gas pressure
• Ensure that the burner is
clean
• Call your gas supplier
Inadequate combustion on
burner
• Not enough air within the unit • Check air passageways and
burners for dirt and debris.
Clean with compressed air

16 Problem Checklist
Burner ame is low • Hose may be bent or twisted
• Low gas supply pressure
• Straighten out the hose and
ensure there are no splits,
perform leakage test to
ensure that there is no splits
or damage to the hose.
• Check gas bottle level and call
gas supplier
Emitter glows unevenly • Blockage in the burner
• Base is not on a level surface
• Low gas pressure
• Clean or replace the burner
injector
• Place heater on level surface
• Check level of gas in the
bottle. Replace where required
Slight smoke and order during
initial operation
• Residue from manufacturing
process
• Will burn away after 30
minutes of operation
Black smoke • Blockage in burner • Turn off the heater and let it
cool. Remove blockage and
clean burner and outside
Heater produces whistling noise
when burner is lit
• Air passageways maybe
blocked
• Air in the gas line
• Check minimum installation
clearances and air
passageways for debris.
• Continue to operate the
heater the air will disperse
slowly
Heater produces a clicking
noise just after burner it lit or
turned off
• Metal expanding and
contracting
• This is common with heaters.
If the noise is excessive
contact manufacturer
Gas odour during use • Foreign element in gas or
burner ports
• Heater burning vapors from
paint
• Gas leakage from:
• Regulator and hose
connection
• Valve and pipe connection
• Pipe split/ damage
• Check gas passageways and
burner.
• Stop storing or using paint
products near the heater
• Locate and correct leaks,
replace parts where
necessary or contact a
gas engineer to locate the
problem for you
Carbon build up • Dirt or lm on reector and
ame screen
• Clean reector and ame
screen to eliminate any debris
build up

17
Customer Service
Customer Service
• Repairs must be carried out by authorized specialists, thus ensuring electrical safety.
• Please contact with the service agent or a suitably qualied electrician.
• Improper repairs could lead to danger to the user.
Warranty does not cover damage of failure which results from alteration, accident,
misuse, abuse, neglect, commercial use or improper maintenance. In line with our policy
of continuous product development we reserve the right to change the product and
documentation specications without notice.

18 Customer Service

19
Customer Service

Heat Outdoors
Unit 9, Stort Valley Industrial Estate
Stansted Road, Bishop’s Stortford
Hertforshire, United Kingdom
CM23 2TU
www.heat-outdoors.co.uk
01279 466500
Table of contents
Other Sherpa Patio Heater manuals
Popular Patio Heater manuals by other brands

Suntec Wellness
Suntec Wellness Klimatronic Heat Cannon 2000 instruction manual

Lehner Versand
Lehner Versand ZHQ2070-K-C-MI instruction manual

Patio Heater 4U
Patio Heater 4U BFX740 operating instructions

MCS Master
MCS Master BP 13 User and Maintenance Book

Britec
Britec TURIN user manual

ALZA
ALZA HPS-B user manual