Sherwood Scientific CHROMA M260 User manual

260 91 000 Issue 1 26th May 2010 ECN 613
G:\DOCUMENT CONTROL\Manuals\Chroma\26091000 Operator Manual M260 Issue 1 #20864 on.doc
CHROMA M260
Colorimeter
Operator Manual
Copyright © 2010, Sherwood Scientific Ltd., All rights reserved.

Sherwood Scientific Limited
260 91 000 Issue 1 26th May 2010 ECN 613 2
Contents
Contents ………………………………………………………………………2
Intended Use ………………………………………………………………………4
Chapter One Introduction.................................................................................. 5
1.1 Contacting Sherwood Scientific Ltd .......................................................... 5
1.1.1 If your Model 260 Colorimeter was supplied by a third party....... 5
1.1.2 If the Instrument was obtained from Sherwood Scientific Ltd ...... 5
1.2 Using this Manual ..................................................................................... 6
1.3 Safety........................................................................................................ 6
1.4 Reagents.................................................................................................... 6
1.5 Sample Preparation.................................................................................... 6
1.6 Warranty ................................................................................................... 6
Chapter Two Installation.................................................................................... 7
2.1 Location.................................................................................................... 7
2.2 Services Required...................................................................................... 7
2.3 Unpacking................................................................................................. 7
2.4 Assembly .................................................................................................. 7
2.5 Connecting Peripheral Devices.................................................................. 7
2.5.1 Printer.......................................................................................... 7
2.5.2 Thermostatted Cuvette Holder (267 86 001)................................. 8
2.6 Instrument Setup ....................................................................................... 8
Chapter Three Scientific Background .................................................................. 9
3.1 Historical................................................................................................... 9
3.2 Principles of Colorimetry........................................................................... 9
3.3 Clinical Chemistry..................................................................................... 9
Chapter Four Specifications...............................................................................10
4.1 Sample Requirements...............................................................................10
4.1.1 Total Volume Required:..............................................................10
4.2 Measurement Range.................................................................................10
4.2.1 Operating Range.........................................................................10
4.2.2 Resolution...................................................................................10
4.2.3 Warm Up Time...........................................................................10
4.2.4 Wavelength Range......................................................................10
4.2.5 Alternative Filters.......................................................................10
4.2.6 Thermostatted Cuvette Holder (267 86 001)................................10

Sherwood Scientific Limited
260 91 000 Issue 1 26th May 2010 ECN 613 3
Chapter Five Product Description.....................................................................11
5.1 Controls and Indicators.............................................................................11
5.1.1 Typical Front Panel Layout.........................................................11
5.1.2 The LCD Display:.......................................................................11
5.1.3 Buttons .......................................................................................11
5.1.4 Modifying Numbers etc..............................................................12
5.2 Sample Heating and Incubation Times......................................................12
5.3 Operating Modes......................................................................................13
5.3.1 Warm Up....................................................................................13
5.3.2 Main Menu.................................................................................13
5.3.2.1 Setup ..........................................................................................13
5.3.2.2 Simple ........................................................................................13
5.3.2.3 Last.............................................................................................13
5.3.2.4 Method.......................................................................................13
5.4 Menu Structure.........................................................................................14
Chapter Six Operation.....................................................................................15
6.1 Start Up....................................................................................................15
6.2 Zeroing and Calibration............................................................................15
6.3 Simple Method.........................................................................................16
6.4 Concentration Methods.............................................................................17
6.5 Time Based Measurements.......................................................................17
6.5.1 End-Point Methods.....................................................................17
6.5.2 Kinetic Measurements.................................................................17
6.5.3 Incubation and Measurement Times............................................18
6.6 Automated Measurements ........................................................................18
6.7 Sample Numbering...................................................................................18
Chapter Seven Method Setup...............................................................................19
7.1 Factor Method - Setup Procedure..............................................................19
7.2 Concentration Method - Setup Procedure..................................................20
7.3 End Point Method with Factor - Setup Procedure......................................21
7.4 End Point Method with Calibrator - Setup Procedure................................22
7.5 Kinetic Method with Factor Method - Setup Procedure.............................23
7.6 Kinetic Method with Calibrator – Setup Procedure...................................24
Chapter Eight Method Run Details.....................................................................25
8.1 Factor Method - Run Procedure................................................................25
8.2 Concentration Method - Run Procedure....................................................26
8.3 End Point Method with Factor - Run Procedure........................................27
8.4 End Point Method with Calibrator - Run Procedure..................................28
8.5 Kinetic Method with Factor – Run Procedure...........................................30
8.6 Kinetic Method with Calibrator– Run Procedure .....................................32
Appendix A Warranty .....................................................................................34
Appendix B Gelatin and Interference Filters..................................................36
Appendix D Time Based Methods for Clinical Analysis.................................37
Appendix E Simple Factor Procedure.............................................................40

Sherwood Scientific Limited
260 91 000 Issue 1 26th May 2010 ECN 613 4
Intended Use
This CHROMA Model 260 Colorimeter is intended to be used by professional
chemists/biochemists. Programming the unit is easier with detailed understanding of
the mechanisms of both the test kits to be used in conjunction with the instruments
and the underlying principles of colorimetry.
Please note that the drop–in Gelatin filters, although sealed, are subject to
deterioration when exposed to excessive heat and humidity. Storage in a cool area and
in a plastic bag with silica gel moisture absorbent pack is recommended.
The unit incorporates a “Warm-up” time period which can be over-ridden. If this is
done then care needs to be taken over the validity of the results.

Sherwood Scientific Limited
260 91 000 Issue 1 26th May 2010 ECN 613 5
Chapter One Introduction
1.1 Contacting Sherwood Scientific Ltd
1.1.1 If your Model 260 Colorimeter was supplied by a third party
i.e. a Distributor in UK or Overseas, the first contact should be that Distributor
for all issues of supply and operation. Please note here the details of the
Company where you purchased this unit:
Company……………………………………………
Tel Number…………………………………………
Contact Name……………………………………….
Email………………………………………………..
1.1.2 If the Instrument was obtained from Sherwood Scientific Ltd
Contact for all issues of supply and operation should be sent to:
info@sherwood-scientific.com
Tel +44 (0)1223 243444
Fax +44 (0)1223 243300

Sherwood Scientific Limited
260 91 000 Issue 1 26th May 2010 ECN 613 6
Introduction (continued)
1.2 Using this Manual
Reading the Operator Manual will allow the user to operate the Colorimeter.
The user will be able to enter new methods, edit existing methods and run
methods.
The performance to be expected is listed in Chapter 4 of this Manual.
Your CHROMA Programmable Colorimeter incorporates an Interactive
Interface, designed to be used in conjunction with third party water-testing and
clinical diagnostic kits. The Programming Instructions are shown in Chapter 7
of this manual and the Methods of Operation for programmed tests are in
Chapter 8.
1.3 Safety
Your Model 260 Colorimeter operates at low voltage (12 Volts DC), powered
from a universal self adjusting power supply.
CARE should be taken to use the correct adapter for the user’s local supply.
1.4 Reagents
The CHROMA range of Colorimeters is designed to be used with
commercially available diagnostic and water testing kits. The programming
options should accommodate the vast majority of applications. Please contact
your kit supplier for the details of the sample preparation, measurement
procedure, standard concentrations, factors and calculations. These can then be
programmed into the colorimeter.
1.5 Sample Preparation
Samples should be prepared according to the protocols of the reagent kit
manufacturers. The total volume of reagent and sample required for the
Colorimeter to operate satisfactorily is dependent on the profile of the cuvette
used. These are listed in Chapter 4 (see 4.1.1) of this manual.
1.6 Warranty
The Sherwood Scientific warranty statement is included at Appendix A.

Sherwood Scientific Limited
260 91 000 Issue 1 26th May 2010 ECN 613 7
Chapter Two Installation
2.1 Location
The Colorimeter should be placed on a stable bench out of direct sunlight and
with sufficient space to accommodate a separate heating block if necessary.
2.2 Services Required
The Model 260 Colorimeter is supplied with a universal power supply.
The Colorimeter can also be used with a car battery or any 12V battery giving
1.25A for field use when fitted with the appropriate battery lead (471 88 200).
Visit www.sherwood-scientific.com for a complete list of accessories,
consumables and spares.
2.3 Unpacking
The Model 260 Colorimeter is packed in a custom designed box, which will
protect the instrument for both air-freight and sea-freight transport. The box
contains:
Description Part No.
M260 Colorimeter 26000009
Box 100 Cuvettes as per packing list
Spare Bulb 001 44 137
Universal PSU with Multi-plug Adapters 001 53 313
Cuvette Holder 252 11 002
Operator Manual 260 91 001
Lead, instrument to printer 926 09 052
2.4 Assembly
Remove the Colorimeter from the packaging.
Insert the Cuvette Holder into the Instrument.
2.5 Connecting Peripheral Devices
2.5.1 Printer
Connect the printer lead to the RS232 output at the rear of the Colorimeter.
Ensure that the printer is set up to the following condition:
9600 baud
8 bit
Parity None
Stop bit 1

Sherwood Scientific Limited
260 91 000 Issue 1 26th May 2010 ECN 613 8
Connecting Peripheral Devices (continued)
2.5.2 Thermostatted Cuvette Holder (267 86 001)
The thermostatted cuvette holder (if ordered) should be inserted with the
power lead taken through the drain hole in the instrument before inserting the
holder into the instrument. This device will, when connected to a power
source, automatically settle to 37ºC with the indicator light showing green.
NB the thermostatted cuvette holder is not connected electronically to the CHROMA
Colorimeter and its set point cannot be altered from 37ºC. It will only accommodate
the micro cuvette 001 26 120.
2.6 Instrument Set-up
The CHROMA Model 260 is based on the very reliable and stable Sherwood
design but now incorporates full programmability.
However it is still possible to operate the “Simple” protocol which enables the
Absorbance and % Transmission of a sample to be measured, without
involving programming, after Auto-zeroing the instrument.
In addition, simple Factor and Concentration experiments may also be carried
out, without need to create Methods or include Sample Naming, if such an
approach is better suited for your requirements.
The Model 260 is supplied without wavelength filters which must be ordered
separately. This model is thus suitable to be used as a colorimeter dedicated to
applications where only a few different wavelength filters are required.
A full list of available Gelatin and Interference Filters is given in Appendix B.

Sherwood Scientific Limited
260 91 000 Issue 1 26th May 2010 ECN 613 9
Chapter Three Scientific Background
3.1 Historical
We can trace the heritage of the Sherwood CHROMA range of colorimeters
back to the very first Model 2 Colorimeter developed for a Dr Rose at
Hammersmith Hospital in London by Evans Electro-Selenium Ltd. (EEL) in
the 1940s. Prior to the Model 2 the concentrations of analytes by reference to
their colour was accomplished by the optical matching by eye; the Tintometer
approach. The Model 2 was superseded by the original Model 252 colorimeter
and then in the 1980s by the CHROMA models 254 and 257. Sherwood now
has brought the line into the 21st century and included programmability with
the models 260, 264 and 267.
3.2 Principles of Colorimetry
The two most basic laws which describe the foundations of a quantitative
analysis by photometry are attributed to Lambert and Beer. Lambert’s Law
states that the intensity of transmitted light decreases logarithmically as the
path length increases arithmetically. Beer’s Law states that increasing the
concentration of analyte had the same effect as a proportional increase in the
path length. Both laws use a constant related to the amount of light absorbed
per analyte molecule, i.e. specific absorption. (This property has been given
many names in the literature, such as molar absorptivity and extinction
coefficient. These names are simply trying to introduce the concept that
different analyte molecules are able to absorb a different amount of light per
molecule, which relates to the energy states of their electrons).
The combined laws are now simply referred to as Beer’s Law and are
expressed as follows: -
log10
I
I0= abC
where ais an absorptivity constant, bis related to path length and Cis analyte
concentration
or - A = abC
Since in most analytical work, the path-length is kept constant using a 1 cm
cell, the calibration graph generated for a particular analyte is linear with a
measurement given in absorbance units over a wide range.
Once the linearity of a calibration curve has been established, an analyst has
the convenient option of entering a factor, fon the 260 Colorimeter and
reading out in Concentration units directly, shown as follows: -
C = f A
where the factor, f, combines the previous path length and absorptivity factors,
aand b.
3.3 Clinical Chemistry
For a detailed description of time based and kinetic enzyme measurements as
it applies to Clinical Chemistry see Chapter Six, Seven and Eight.
For an overview of time based methods with calculations see Appendix D.

Sherwood Scientific Limited
260 91 000 Issue 1 26th May 2010 ECN 613 10
Chapter Four Specifications
4.1 Sample Requirements
When used with test kits, the manufacturer of the kit will specify the
individual sample parameters depending on the particular assay.
4.1.1 Total Volume Required:
Standard cuvettes: 1.4ml Part No: 471 88 300
Semi-micro cuvette: 600µl Part No: 471 88 400
Micro cuvette 400µl Part No: 001 26 120
4.2 Measurement Range
When used with test kits, the manufacturer of the kit will specify the
individual measurement ranges depending on the particular assay.
4.2.1 Operating Range
0 to 2.999 Abs
100.0 to 0 %T
0 to 9999 Conc
4.2.2 Resolution
0.001 Abs
0.1 %T
0.001 Conc
4.2.3 Warm Up Time
15 minutes. (Instrument monitors this).
4.2.4 Wavelength Range
400 to 750nm.
4.2.5 Alternative Filters
•Interference Filters wavelengths 405-660 nm band pass ±5 nm
•Hi Spec filter at 430 nm ±1 nm for EBC beer colour method
4.2.6 Thermostatted Cuvette Holder (267 86 001)
Controls to 37° C ±0.1°C
Only for use with micro-cuvette (001 26 120)
Sherwood Scientific Limited
260 91 000 Issue 1 26th May 2010 ECN 613 11
Chapter Five Product Description
5.1 Controls and Indicators
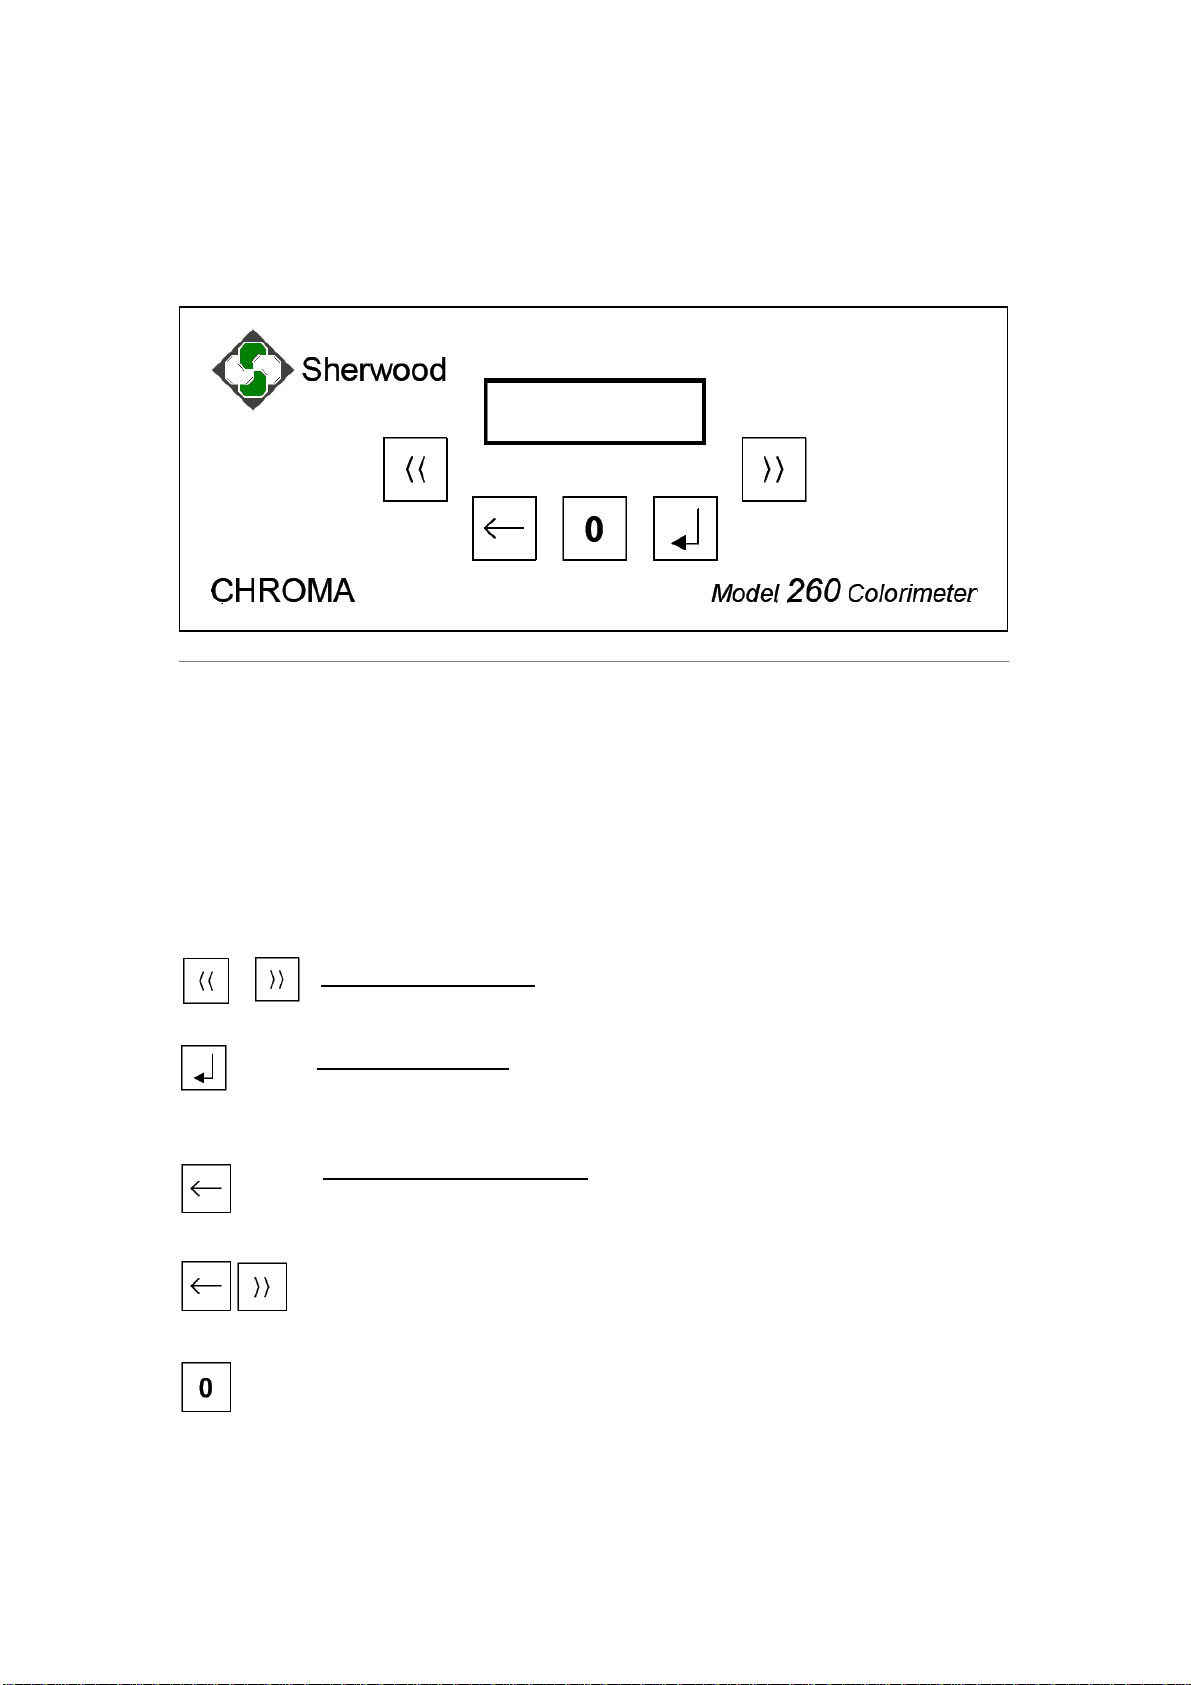
5.1.1 Typical Front Panel Layout
5.1.2 The LCD Display:
Has three lines with a maximum of 16 characters per line. When results are
displayed the digits are shown over two rows in double size.
The buttons were designed to be universally understood.
5.1.3 Buttons
The Select buttons
These allow various choices to be displayed in the Menu sequence.
The Enter button
Allows the user to select the choice displayed in the Menu. It also
accepts a reading or result and operates the Print function.
The Back Space button
Allows the user to go back one or more steps in the protocol.
Pressing these two buttons simultaneously will take the user straight
back to the start up screen.
Traditional Zero/Blank Button.

Sherwood Scientific Limited
260 91 000 Issue 1 26th May 2010 ECN 613 12
Product Description (continued)
5.1.4 Modifying Numbers etc.
Where there are numbers to change i.e. concentration factor values or letters to
change, i.e. to label tests and to define sample numbers or names, then the
Enter button changes the decade or letter position and the select buttons are
used to change the value of the number or letter.
For example to enter a concentration factor of 100 the user would do the
following when prompted:
Press to leave the 0 in the first unit column
Press to get 1 in the second unit column then press to accept
then press to leave 0 in the 3d and 4th unit column.
5.2 Sample Heating and Incubation Times
Our protocols only cover the functions of the Colorimeter. They do not control
the use of a heating block or water bath. We indicate when a particular
incubation or measurement should start and an alarm sounds before the end of
the incubation/measurement. This allows the user to transfer the cuvette back
to the colorimeter for the measurement. Provision is made to enter the
temperature of a particular test in the programmed methods, but this is for
completeness of method recording and reporting purposes only.
Note: For any test requiring samples to be incubated at a specified
temperature (especially time based i.e. kinetic and end-point tests) it is critical
that the specified temperature is actually attained by reagents and samples
alike. Failure to ensure that is the case will give rise to results which are
incorrect. As an example, low results are often caused by poor temperature
transfer to the sample; often exacerbated by the use of micro cuvettes in an in-
appropriate heater block or a heater block which is controlling at the “set”
temperature but is actually lower than stated. The user is advised to establish
the correct settings for their sample preparation “system” before embarking on
the analysis of critical samples. A difference of just one degree Celsius from
the required setting can yield results as much as 10% in error.
.

Sherwood Scientific Limited
260 91 000 Issue 1 26th May 2010 ECN 613 13
Product Description (continued)
5.3 Operating Modes
5.3.1 Warm Up
There is a 15 minute warm up period built into the start up routine. This can be
over-ridden by pressing the Enter button
5.3.2 Main Menu
5.3.2.1 Set-up
While the Model 260 Colorimeter is warmed, you can enter Setup to:
•set time and date format
•set the actual time and date
•select (Uart) the RS232 settings for printer
•set the LCD screen contrast.
(for a full list of setup options see the Model 260 Menu structure on the next
page).
5.3.2.2 Simple
To use the colorimeter for a simple Absorbance measurement, (or %
Transmission), Simple mode is used. This only requires instrument with
appropriate filter selected to be zeroed against a blank solution (See 6.3)
prior to measurement of samples. Straightforward Factor and
Concentration experiments may also be performed in Simple Mode; they
just require the entering of a factor or measurement of a ‘known’ standard
in addition to blanking before measurement of samples.
NB In the “Simple” mode there is no sample labelling or operator identifier, or
storage of the methodology used.
5.3.2.3 Last
Takes the user straight back to the last used method.
5.3.2.4 Method
Entering the Method screen gives two options.
1. Recall
Allows an existing Method to be selected, which can then be:-
Run, Edited, Deleted or Printed.
2. New
Allows a New Method to be entered and stored.
See Chapter 7 for detailed method entry procedures.
The Model 260 Colorimeter Menu Structure is displayed on the next page.

Sherwood Scientific Limited
260 91 000 Issue 1 26th May 2010 ECN 613 14
5.4 Menu Structure
Main Menu
Simple
Last
Method
Setup
Absorbance
% Transmission
Recall
New
Time Format
Date Format
Set Clock
Language
Uart
AutoPrint
Contrast
Run
Edit
Delete
Concentration
Factor
Time Based
Print
Endpoint
Kinetic
NB. Uart is for RS232 parameter setup
If you enter “Update Firmware” the only
way out, is to switch the power off to the
unit.
Update Firmware
Factor
Concentration

Sherwood Scientific Limited
260 91 000 Issue 1 26th May 2010 ECN 613 15
Chapter Six Operation
6.1 Start Up
Switch on the Colorimeter and, if needed, a heater block or water bath for sample
and standard preparation. Allow the heater block, or water bath to get to the
control temperature.
NB The nominal temperature setting point of a Heating Block should be
checked with an accurate thermometer in a liquid sample in a cuvette (of the
same profile you intend to use with your samples) in the block to ensure that the
desired temperature is achieved.
6.2 Zeroing and Calibration
Once the correct temperature has been reached and the Colorimeter has ended its
warm up phase and shows “Ready” then the correct filter should be inserted.
When the appropriate filter has been put in the filter slot, the user should press the
Enter key to move on to the next step in the procedure/method.
It is important that the cuvette holder and filter are in their correct positions
and that nothing is in the cuvette holder at this point.
The detector will saturate and the unit will “freeze” if return is pressed
before the filter is in place. If that happens, switch the power off and then on
again to recover normal operation.
The filter required and the actual procedures for zeroing and calibration are
prompted by the menu system for each analytical procedure required.

Sherwood Scientific Limited
260 91 000 Issue 1 26th May 2010 ECN 613 16
Operation (continued)
6.3 Simple Method
The simple method allows measurement of Absorbance or % Transmission of a
sample. Here there is no calibration procedure. The instrument is zeroed against a
blank solution before a reading is taken of the sample. Put the blank cuvette in the
cuvette holder and press the zero button when prompted. Then put the sample
cuvette in the cuvette holder and the absorbance or % Transmission reading will
be displayed. To print the result, if a printer is connected, press the enter button.
When all the sample readings have been taken, press the back space button.
Many applications for the Colorimeter involve measurement of the concentration
of an analyte either by:-
1. Using a factor supplied by the test kit manufacturer.
2. Comparison with a calibrator (or ‘standard’) of known concentration.
In the Model 260 Colorimeter’s ‘Simple’ Menu, these two facilities are
respectively denoted as:-
1. Factor.
2. Concentration.
Within the Simple Menu the Model 260 allows Factor or Concentration
experiments to be performed very simply if the user does not require to save and
store a method protocol or to enter sample identifiers (mane or numbers). The
instrument, with appropriate filter selected, is zeroed against a blank solution after
which the user is prompted to enter a factor (or a standard of known concentration
and that concentration value) before the instrument is then ready to take a reading
and calculate a result for an unknown sample or samples.
For detailed operational flow charts of the ‘Simple’ Factor or Concentration
procedures, please refer to Appendix E.

Sherwood Scientific Limited
260 91 000 Issue 1 26th May 2010 ECN 613 17
Operation (continued)
6.4 Concentration Methods
As stated, the majority of applications for the Colorimeter will be the
measurement of the concentration of an analyte either by:-
1. Using a factor supplied by the test kit manufacturer.
2. Comparison with a calibrator (or “standard”) of known concentration.
In the 260 series colorimeters, these two methods are respectively denoted as:-
1. Factor Method
2. Concentration Method
The ‘Method’ section within the Model 260’s Menu allows for methods to be
constructed, saved, recalled and operated for assistance with GLP and SOP
procedures. In addition, these ‘Methods’ allow the operator to enter sample
identifiers (names or numbers) for subsequent sample/result correlation.
Detailed illustration of the ‘Setup’ and “Running” of these method types is given
in Chapter 7 and 8 respectively of the Manual.
6.5 Time Based Measurements
Some measurements, particularly of clinical samples, require time to develop an
absorbing reactant, which then allows the presence of the analyte of interest to be
determined and quantified. These have two categories:-
6.5.1 End-Point Methods
Used when the colour needs time to develop but is then stable for, usually, at least
an hour.
6.5.2 Kinetic Measurements
This Procedure is used, for example, when the analyte is an enzyme which
catalyses a particular reaction. Higher concentrations of the analyte result in faster
rates of reaction. The rate of change of adsorption is calculated having measured
the adsorption at two different times in the constant rate period of the reaction
(pre-determined by the test kit manufacturer).
Both time based measurement types can be made using a known factor or in
comparison to a calibrator (or “Standard”), both supplied by the test kit
manufacturer.

Sherwood Scientific Limited
260 91 000 Issue 1 26th May 2010 ECN 613 18
Operation (continued)
Consequently, in the Model 260 Colorimeter, four method types can be entered,
edited and/or run to accommodate the methodologies outlined above. They are
respectively denoted as:-
1. End Point Method with Factor
2. End Point Method with Calibrator
3. Kinetic Method with Factor
4. Kinetic Method with Calibrator
In many cases the sample itself may contain interfering coloured substances. The
protocols provided in the Model 260 Colorimeter require a sample blank to be
measured and then the sample. The blank result is subtracted from the absorbance
of the reacted sample (this is done automatically by the colorimeter software).
Detailed Illustration of the Setup and “Running” of these method types is given in
Section 7 and 8 respectively of the Manual.
6.5.3 Incubation and Measurement Times
Many kinetic measurements procedures require an initial incubation time before a
second reagent is added. This time is sometimes referred to as the “delay” time.
Sherwood differentiates between the incubation and the “Measurement” time
during which the reaction takes place and the change in absorbance is measured.
6.6 Automated Measurements
The main feature of the New CHROMA Colorimeter is its programmability. Once
the correct methodology is selected and e.g. the correct calibration concentration
value and wavelength is programmed, each measurement operation is prompted
by the instrument. Once named and saved the method can be recalled from a list
of methods by name.
6.7 Sample Numbering
The Model 260 Colorimeter allows both numerical and alpha-numerical sample
numbering to be used so that a result can be printed against the original sample
number. This is important where Good Laboratory Practice is employed.
It is possible to accept a sequential number as the default option.
Sherwood Scientific Limited
260 91 000 Issue 1 26th May 2010 ECN 613 19
Chapter Seven Method Set-up
The following flowcharts give detailed illustration of entering a new Method of a type
accommodated by the Model 260 Colorimeter software (outlined in Section 6.4 and 6.5).
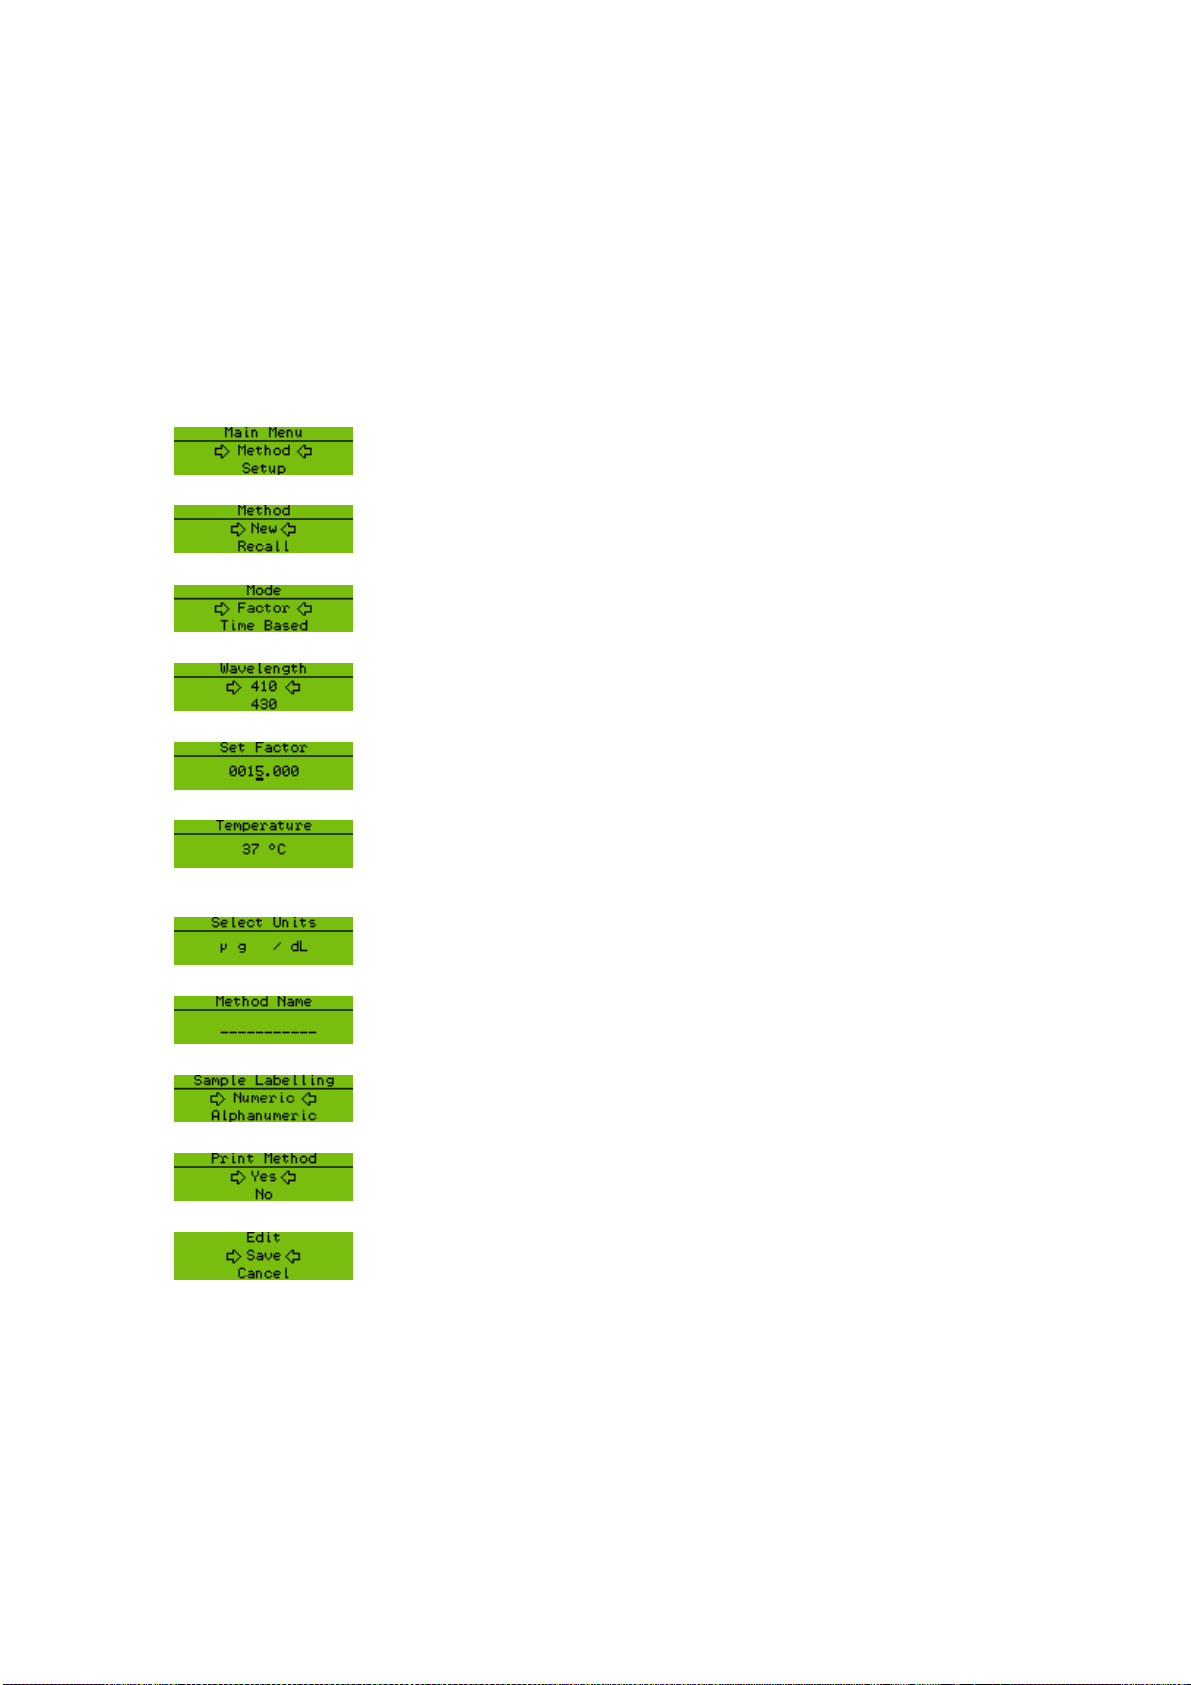
7.1 Factor Method – Set-up Procedure
Select Method from Main Menu using >> then press ↵
↵↵
↵
Select New from Method Menu using >> then press ↵
↵↵
↵
Select Factor from Mode Menu using >> then press ↵
↵↵
↵
Select wavelength from list* using >> then press ↵
↵↵
↵
Set Factor value. Use >> and ↵
↵↵
↵for each number column
Note sample temperature if required using >> then ↵
↵↵
↵
(This facility only allows a record of the test temperature used to be printed
for traceability. The colorimeter does not control sample temperature).
Set concentration units for the test kit using >> then ↵
↵↵
↵
Enter a method name using >> and then ↵
↵↵
↵for each letter
Select sample labelling format using >> then press ↵
↵↵
↵
You can print the method and check it before you save it
You can edit, save or cancel your new method

Sherwood Scientific Limited
260 91 000 Issue 1 26th May 2010 ECN 613 20
7.2 Concentration Method – Set-up Procedure
Select Method from Main Menu using >> then press ↵
↵↵
↵
Select New from Method Menu using >> then press ↵
↵↵
↵
Select Concentration from Mode Menu using >> then press ↵
↵↵
↵
Select wavelength from list* using >> then press ↵
↵↵
↵
Set Standard concentration value as outlined in the test kit. Use
>> then press ↵
↵↵
↵for each number column
Set concentration units using >> then ↵
↵↵
↵
Note sample temperature if required using >> then ↵
↵↵
↵
(This facility only allows a record of the test temperature used to be printed
for traceability. The colorimeter does not control sample temperature).
Enter a method name using >> and then ↵
↵↵
↵for each letter
Select sample labelling format
You can print the method and check it before you save it
You can choose to edit, save or cancel your new method
Table of contents
Other Sherwood Scientific Measuring Instrument manuals


