Sherwood Scientific 926S User manual

926 91 017 Issue 1 29th. January 2011 ECN 638
G:\DOCUMENT CONTROL\Manuals\Chloride\926S\92691017 Sherwood M926S Operator Manual Issue 1.docx
Model 926S
Chloride Analyser
Operator’s
Manual
Sherwood Scientific Limited
1 The Paddocks
Cherry Hinton Road
Cambridge
CB1 8DH
UK
Copyright© 2011 Sherwood Scientific Ltd.

2
Contents
page
1 Introduction
1.1 Introduction ………………………………. 4
1.2 Summary of Test …………………….. 4
1.3 Reagents ………………………………. 5
Dilution
Storage
Purification
Instability
2 Installation
2.1 Electrical supply …………………….. 6
2.2 Unpacking ………………………………. 6
2.3 Assembly ………………………………. 7
3 Principles of operation
3.1 Description ………………………………. 8
4 Performance characteristics and specifications
4.1 Range ……………………………………….. 9
4.2 Accuracy ……………………………… 9
4.3 Linearity ……………………………… 9
4.4 Reproducibility ……………………………… 9
4.5 Stability …………………………….. 9
4.6 Response time …………………………….. 9
4.7 Measurement capacity …………………… 9
4.8 Samples …………………………….. 9
Type
Presentation
Volume
4.9 Readout …………………………….. 10
4.10 Warm up …………………………….. 10
4.11 Environmental conditions ………….. 10
Operation
Transportation
Installation category
4.12 Power requirements ……………………. 10
4.13 Size ………………………………………… 10
4.14 Weight ………………………………………… 10
5 Operating Instructions
5.1 Controls and indicators ……………………… 11
Condition
Titrate
Select Units
5.2 Rear panel components …………… 12
Power switch
Power
RS232 socket
USB A socket
USB B socket

3
Contents
Page
5.3 Operation ………………………………. 13
5.4 RS232 output and Printing …………... 14
5.5 USB B Output …........................................ 14
6 Operating precautions and hazards
6.1 Operating precautions ………………………. 15
6.2 Hazards ………………………………… 15
7 Quality control
7.1 General ………………………………… 16
7.2 Quality control checks ………………………. 16
8 Maintenance
8.1 General ………………………………… 17
8.2 Daily ………………………………………….. 17
8.3 Electrode cleaning and replacement ……. 18
9 Troubleshooting
9.1 Display not illuminated ……............. 19
9.2 On-screen messages ……............. 19
9.3 Non-reproducible results …………….. 19
9.4 Reproducibly high or low results …... 19
9.5 Non-reproducible results …................ 19
7 Spares and accessories
10.1 Ordering information ……………………… 20
10.2 Spares and accessories ……………. 20
11 Warranty statement …………………………………………. 21,22

4
1 Introduction
1.1 Introduction
The M926S is a direct reading, digital chloride meter. It is designed for fast and
accurate determinations of Chloride levels in clinical samples.
Sample volume is 100µl. or 20µl. and results are displayed on a digital readout in
mmol/l. (millimoles per litre) Chloride.
This manual presents complete instructions for setting up and using the M926S. A
short time spent familiarising yourself with these instructions will be more than repaid
in satisfactory operation.
The M926S is intended for use by persons knowledgeable in safe laboratory
practices. If the M926S is not used in accordance with these instructions for the
protection provided by the equipment may be impaired.
A Service Manual is available as an optional extra, for use by appropriately qualified
technical personnel. Please refer to Section 10.2.
1.2 Summary of the Test
The M926S is used for the determination of chloride ions. It is an instrumental
analogue of ”Argentimetry”, the traditional titrimetric methods using Silver Nitrate
reagent. Like these classical methods it relies on the chemical formation of the very
insoluble salt, Silver Chloride. The importance of chloride determination has been
realised for well over a century, with many variations and changes being made to the
techniques in order to improve the detectability and selectivity. Research into the
analysis of chloride was conducted by Gay-Lussac (1832), Levol (1853), Mohr (1856)
and Volhard (1874) and their findings have proven to be the basis of the methods that
are still in common use today.

5
Introduction
continued
1.3 Reagents
The following solutions are recommended for use with the M926S. Ordering
information is given in Section 10.2.
NOTE All reagents contain preservatives where required.
Standard Solution is 100mmol/l Chloride as Sodium Chloride.
Combined Acid Buffer Solution is a support electrolyte consisting of a mixture of
Acetic and Nitric acids which maintains the correct pH for the complete cycle of
titrations, and a colloid to hold precipitated silver chloride in suspension.
WARNING Acid Buffer is an irritant – avoid contact with skin. Wash exposed
areas with water.
Dilution
No dilution is required for Sherwood Scientific reagents.
Storage
Solutions should be stored away from direct sunlight in a cool place, preferably with
an ambient temperature below 25°C (77°C). Do not us e solutions after the expiration
date shown on the bottle. Do not return decanted contents to the original bottle. Caps
of standard solution bottles must be done up firmly to prevent evaporation.
Purification
No purification or treatment is required when using Sherwood Scientific reagents.
Instability
Never leave bottles of Standard Solution uncapped as prolonged exposure to the
atmosphere will affect the solution’s concentration.

6
2 Installation
2.1 Electrical Supply
The M926S operates at low voltage (12 Volts d.c.). The universal mains adapter
supplied with the M926S comes with a range of plugs to suit most a.c. supplies
around the world. The a.c. supply can be in the range 100 – 240V, 50 – 60Hz.
2.2 Unpacking
Upon receipt, the M926S should be removed from its carton and inspected for
damage. Contact your Sherwood Scientific representative if any items are missing or
damaged.
1. Lift out the accessory tray.
2. Lift the instrument out of the polythene cover on to a bench.
3. Check the instrument and all the items in the carton for signs of damage.
Check items received against the following list and notify your Sherwood
Scientific representative if any discrepancies are discovered.
IMPORTANT Quantities shown in the following list are those supplied with a new
instrument. DO NOT re-order from this list; instead refer to Section 10 of this
manual.
Part No. Description Quantity
001 53 313 Universal mains adapter 1
001 09 006 USB lead, A(M) – B(M), 1.8m 1
001 56 202 Chloride Standard Solution, 100mmol/l Cl, 1 x100ml 1 bottle
001 56 205 Silver Electrode Polish 1 vial
001 56 208 CombinedAcid Buffer Solution, 1 x 500ml 1 bottle
925 11 002 1 x Cathode, 2 x Detector Electrode, set of 3 1 set
925 11 003 Anodes, pack of 3 1 pack
926 11 001 Beaker, plastic, graduated at 14ml, Sherwood 2
925 14 001 Stirrer 1
926 00 109 Chloride Meter 926S Clinical 1
926 09 051 Lead, M926 to Printer/Computer 1
926 91 017 Operators Manual M926S 1

7
Installation
continued
2.3 Assembly
1. Fit the two shorter, sleeved electrodes into the two rear positions on the
underside of the electrode head, Item 3, Figure 2.1. Ensure both electrodes
are pushed firmly into their sockets behind the protective rubber boots.
Figure 2.1 Electrode Head
1. Cathode, 2. Anode, 3. Detector electrodes, 4. Stirrer.
2. Insert the stirrer through the stirrer hole and push it firmly into its coupling, as
shown in Figure 2.1, Item 4.
3. Insert the cathode (un-sleeved, short electrode) through the left-hand hole and
push it firmly into its socket, as shown in Figure 2.1, Item 1.
4. Fit an anode (70mm long electrode) through the remaining hole into its socket.
5. Check that the three shorter electrodes are all fully inserted and then adjust the
position of the anode so that all four electrodes are the same length.
6. Position the M926S so that there is clear access to the on/off switch (Item1,
Figure 5.2, p.12).
7. The universal mains adapter supplied with the M926S comes with a range of
plugs to suit most a.c. supplies around the world. Choose and fit the one that
suits your local electricity supply.
8. Refer to Section 5 of this manual for detailed operating instructions.
1
2
4
3

8
3 Principles of Operation
3.1 Description
An accurately measured volume of sample (100µl. or 20µl. set by the 'select' button
on the front panel) is added to an acid buffer. The M926S automatically titrates
chloride ions by passing a known constant current between two silver electrodes
which provides a constant generation of silver ions. These silver ions combine with
the chloride in the sample to form silver chloride, which is held in suspension by the
colloid stabiliser. During the titration period the digital readout is updated
approximately every 0.3 seconds. During these periods the number of silver ions
introduced into the sample combine with one unit measurement of chloride. When all
the chloride has been precipitated as silver chloride, free silver ions begin to appear
and the solution conductivity changes. This change is detected by the detector
electrodes and the readout is stopped, displaying the results directly in millimoles per
litre of Chloride. Another sample may now be added to the same acid buffer and the
cycle repeated. The digital display is held until starting another cycle, when it is
automatically reset to zero.
NOTES
1. The M926S uses an absolute method of operation and is calibrated at the
factory. Recalibration should only be necessary after changing internal
electronic components.

9
4 Performance Characteristics and Specifications
4.1 Range
10 to 299mmol/l Chloride.
4.2 Accuracy
Results will be within ±2mmol/l. (at the 100mmol/l. level) of the values obtained by
standard wet-chemical methods after allowing for pipetting errors.
4.3 Linearity
Results will be within ±1mmol/l in the range 10 to 299mmol/l. or ±1% concentration
value whichever is the greater.
4.4 Reproducibility
The values obtained from 20 consecutive titrations of a nominal 100mol/l. solution will
give a coefficient of variance of ≤1.5%.
4.5 Stability
The calibration level (mean of five titrations of a standard solution) will change by less
than ±2 Least Significant Digits over the life of any silver anode.
4.6 Response Time
A stable reading will be displayed within 26 seconds of pressing the ‘titrate’ button, at
a concentration level of 100mmol/l.
4.7 Measurement Capacity
Twenty samples at 100µl. or 20µl. sample volume, per reagent change.
4.8 Samples
Type
Chloride in solution, having low ionic strength, neutral pH and free of silver halides,
silver reactive constituents (other than chloride), solid matter and high levels of
dissolved solids.
Presentation
By pipette directly into the beaker of Sherwood Scientific CombinedAcid Buffer.
Volume
100µl. or 20µl. – user selectable.

10
Performance Characteristics and Specifications
continued
4.9 Readout
Measurement results are shown in characters 15mm. high on a 2.75” 60 dpi backlit
LCD screen. Separate areas of the display are reserved for measurement units and
instrument status information.
4.10 Warm Up
Five minutes warm up is required to meet the stated specification.
4.11 Environmental Conditions
Operation
Temperature range +10°C to +35°C
Maximum relative humidity 85% at +35°C (non condensin g)
Transportation
Temperature range -40°C to + 45°C
Maximum relative humidity 95% at +45°C
Compliance with the stated specification will be unaffected by a change in ambient
temperature up to 4°C per hour, provided the operat ing temperature range is not
exceeded.
Installation Category
Installation category 1.
4.12 Power requirements
Mains adapter Input
100V – 240V ~, 50Hz – 60Hz, 0.6A
Mains adapter Output
12V … 1.25A
4.13 Size
Width 200mm (7”)
Depth 250mm (9.8”)
Height 315mm (12.4”)
4.14 Weight
1.9kg (4.2lbs)
11
5
Operating Instructions
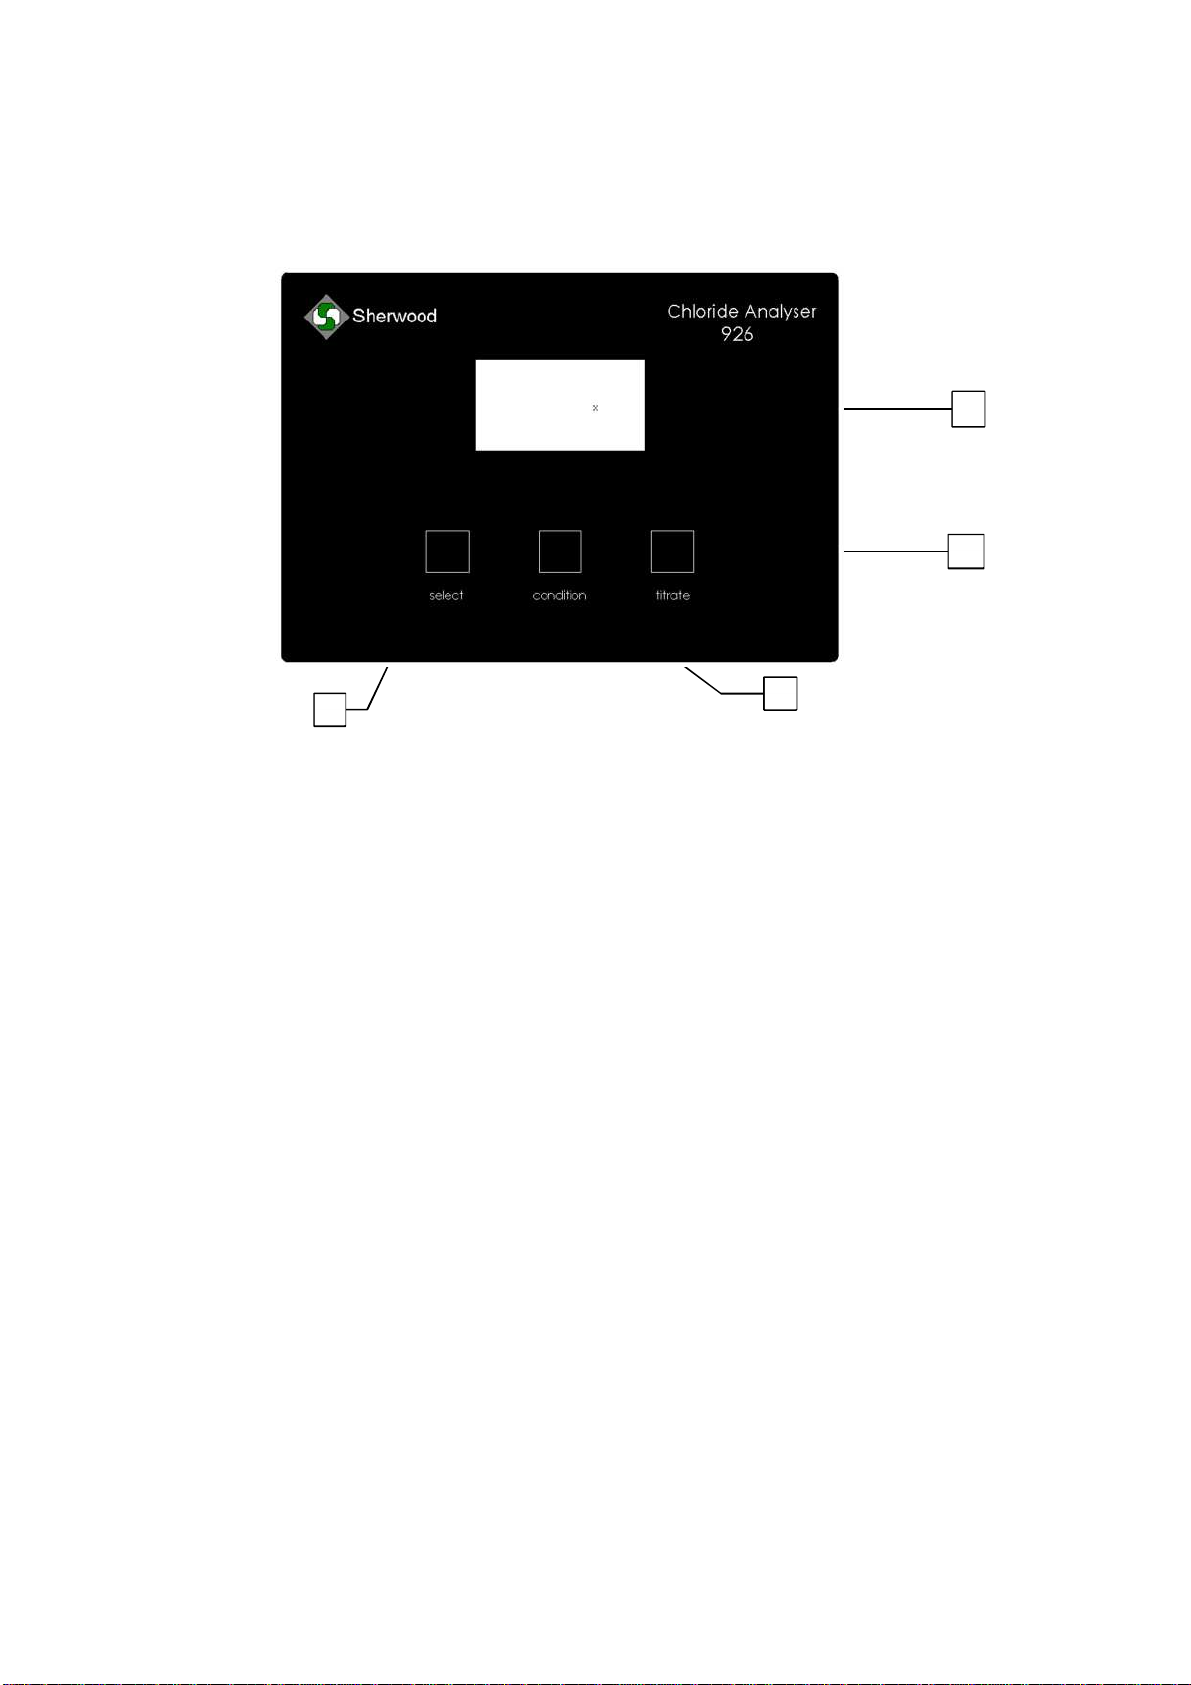
5.1 Controls and Indicators
Figure 5.1 Front Panel
1. Display screen, 2.
'titrate'
button, 3.
'condition'
button, 4.
'select'
button.
'
condition
'
Pressing this button initiates a conditioning cycle. The purpose of the conditioning
cycle is to titrate out any Chloride present in the buffer or beaker, so that the
subsequent titration is accurate. The conditioning cycle must be run each time the
M926S is switched on and each time the buffer is changed, usually when 'Change
Buffer And Condition/ Condition Required' is displayed.
'
titrate
'
Pressing this button initiates a titration cycle. During a titration the stirrer operates for
approximately 5 seconds before the readout is set to zero. The Chloride is then
titrated out of the solution while the readout is incremented. When all the chloride is
titrated the readout is stopped and held. The ‘titrate’ button is inoperative at switch on
and when 'Change Buffer And Condition/ Condition Required' is displayed, usually
after the allowed maximum number of consecutive samples (20) have been titrated.
In each case this ensures that a condition cycle is carried out first. This prevents an
erroneous result on the first titration due to chloride being present in the buffer or
beaker.
'select'
The 'select' button on the M926S allows the user to choose the volume of sample to
be measured – 100µl. or 20µl. - and shown on the display screen. The M926S
measures in units of mmol/l Chloride.
Press Titrate
100
mmol/l (20µl)
1
2
3
4
select
condition
titrate
S

12
Operating Instructions
continued
5.2 Rear Panel Components
Figure 5.2 Rear Panel and Label detail
1. Power switch On/Off toggle switch that switches the d.c. supply from the
mains adapter to the instrument. 0 for Off, 1 for On.
2. Power Input socket for d.c. lead from mains adapter to the
instrument.
3. RS232 socket Input connector for Serial Cable (926 09 051).
4. USB A socket To accept a memory stick for firmware upgrades.
5. USB B socket Connector for USB Cable (001 09 006) as an alternative
for connecting to computers that do not have an RS232
serial comms. Port.
1
2
3
4
5
A
B
13
Operating Instructions
continued
5.3 Operation
1. Connect power, switch on and allow 5 minutes for the M926S to warm-up.
2. Fill a plastic beaker, supplied, to the mark with combined acid buffer, place
the beaker on the platform and raise the platform until it locates in the up
position.
3. Set the sample volume to 100µl or 20µl using the 'select' button.
4. Pipette the chosen volume of 100mmol/l standard solution into the beaker.
5. Press the 'condition' button and wait for the condition cycle to complete.
6. Pipette the chosen volume of sample into the beaker and press the ‘titrate’
button.
7. When the stirrer stops, note the reading on the display.
8. Repeat paragraphs 5 and 6 for further samples.
9. At the end of the 18
th
titration, the message ‘Condition in 2’ will appear on the
screen. If only two further samples are to be run, return to paragraph 5.
However, if more than two samples are to be run, continue with paragraph 10.
‘Condition in 1’ will be shown after the 19
th
titration.
IMPORTANT When the 20
th
titration is complete any further sample added will be
lost. “Change Buffer And Condition/ Condition Required” will be
displayed on the screen and the 'titrate' button will have no effect. Go
to paragraph 10 below.
10. If “Change Buffer And Condition/ Condition Required” is displayed, continue
with paragraph 10.
11. Lower beaker and empty out contents. Rinse with deionised water and dry
with clean tissue.
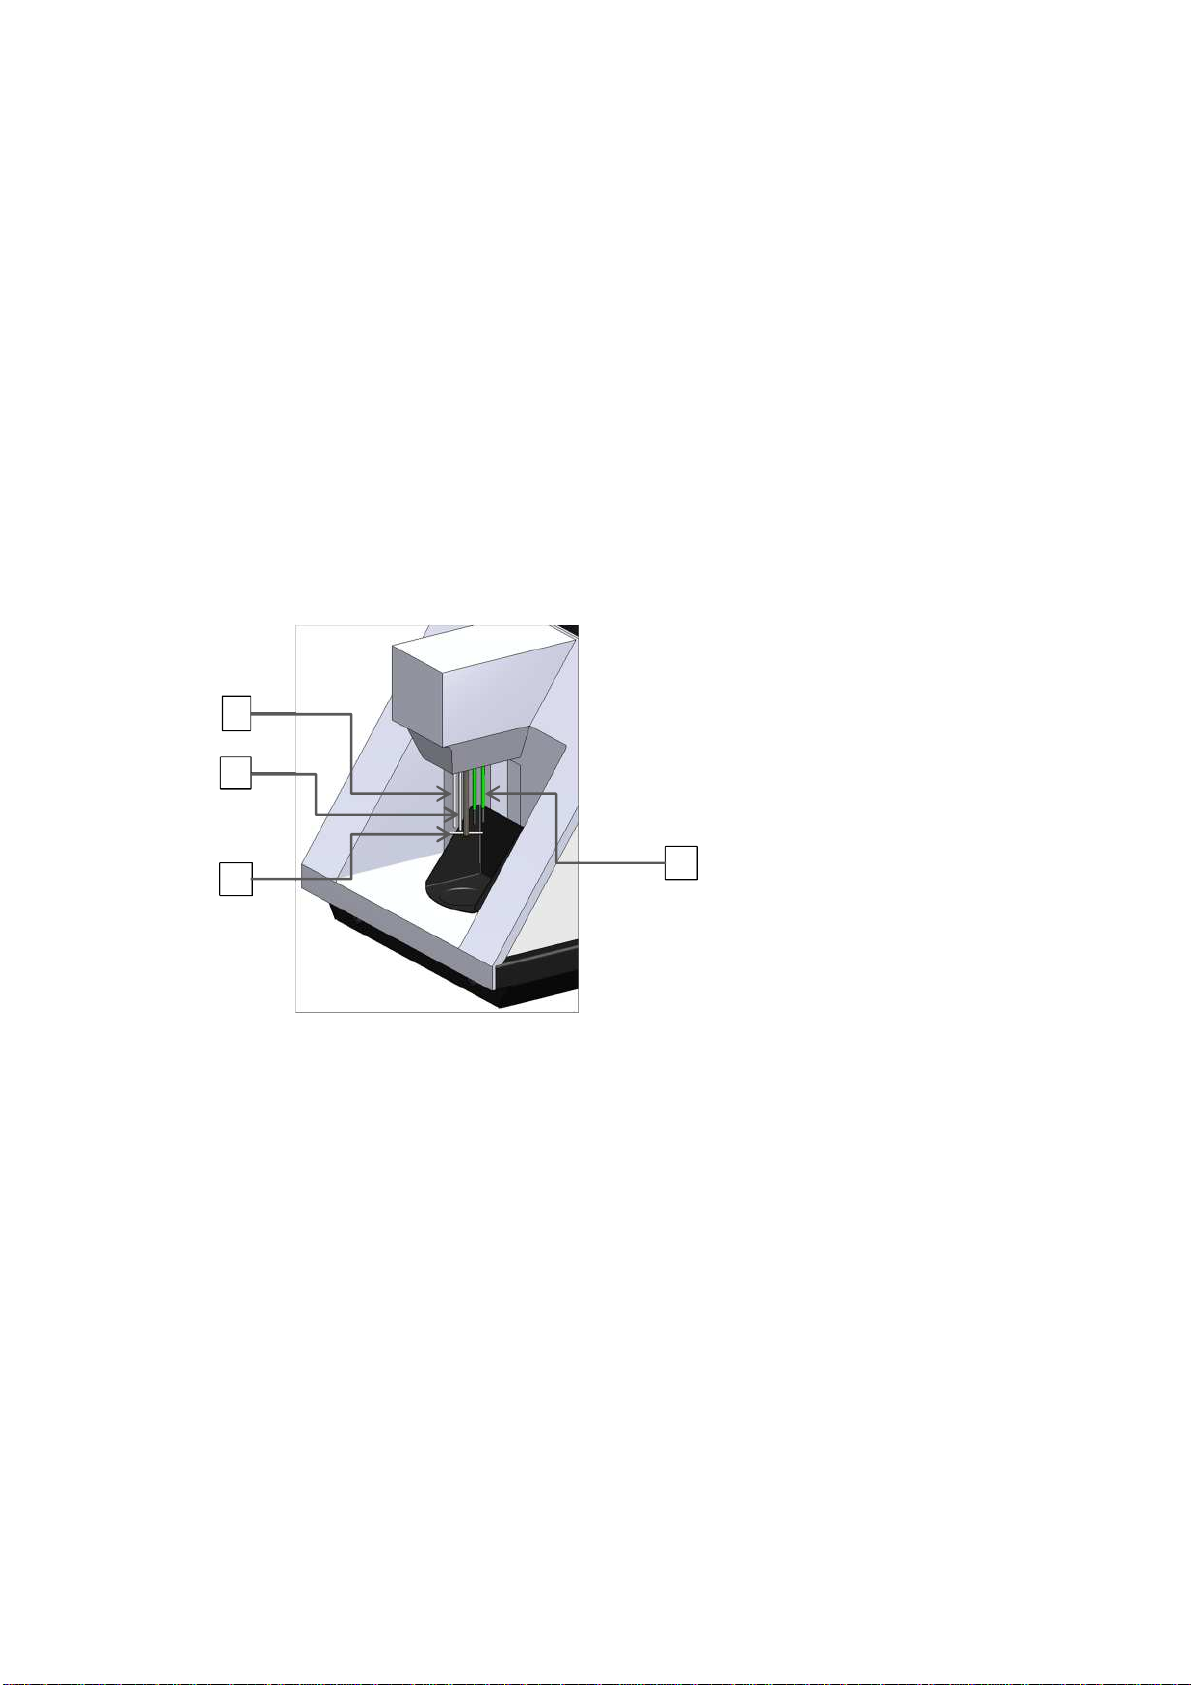
12. If necessary, adjust the vertical position of the anode, Item 2, Figure 5.3, so
that it is the same length as the other electrodes.
13. If more samples are to be titrated return to paragraph 2 near the top of this
page.
14. When determinations are complete, remove the beaker and dry the
electrodes and stirrer by blotting with a clean tissue.
Figure 5.3
Electrodes and Electrode Head
1
2
4
3
1. Cathode
2. Anode
3. Detector electrodes
4. Stirrer

14
Operating Instructions
continued
5.4 RS232 Output and Printing
The M926S has an RS232 output that enables results to be sent to external printers,
such as the Portable Printer (473 56 903), or other devices with serial inputs.
1. A Serial Cable (926 09 051) is provided if you wish to use an external device.
The small, round end of the cable fits into the socket on the rear of the M926S
(Item 3, Figure 5.2, page 12) and the other end into the serial input socket of
the external device - a printer or a computer serial interface.
2. Adjust the serial comms. settings of the external device to 9600 8-N-1.
3. Direct printing from the M926S Clinical.
Switch on the external device then switch on the M926S. After the
initialisation sequence the software version (e.g. v0.24) and serial number
(e.g. 16555) are shown on the display screen for approximately 5 seconds.
The printer will print:-
4. Perform measurements as described in Section 5.3, page 13. After each titration
the printer will print the screen value as: -
During and after the conditioning cycle there is no signal to the printer as
conditioning can be necessary during the measurement run of samples. The
sample number sequence is thus uninterrupted.
The number sequence on a printer can be reset to ‘001’ only by switching off the
M926S and reconditioning.
5.5 USB B Output
The M926S also has USB B port that enables results to be sent to computers that do
not have an RS232 serial comms. port. A USB cable (001 09 006) is provided. The
squarer end fits into the socket on the rear of the M926S (Item 5, Figure 5.2, page 12).
On the PC in Device Manager under Ports (COM & LPT) the M926S will typically
appear as - 926 Series Chloride Analyser (COM7).
A PC utilities communications programme such as HyperTerminal is required to
establish a connection with the M926S and receive data from it. Making a connection
requires knowledge of which COM port (7 in the example above) the M926S is on
and the settings 9600 8-N-1.
Sample 001 = 100 mmol/l
Sample 002 = 102 mmol/l
Sample 003 = 101 mmol/l
926 Chloride Meter
Serial Number: 16555
Software Version: 0.24

15
6 Operating Precautions and Hazards
6.1 Operating Precautions
1. The electrodes may go black during use; this will not affect the performance.
Only if the M926S will not measure a Standard or sample will it be necessary
to clean the electrodes.
2. The M926S requires a warm up period of five minutes to meet the stated
specification.
3. Reproducibly accurate results are dependent on reproducible pipetting from
sample to sample and from aqueous standard to sample. If the M926S
calibration is checked with an aqueous standard and reproducibly low results
are obtained, hold up in the pipette should be suspected and a rinse out
technique employed.
4. Always dispense standard solution into a small beaker or cup. Do not take
standard solution directly from the bottle with a pipette, as the standard could
become contaminated. Never pour standard solution back into the bottle once
it has been dispensed. Ensure that only genuine Sherwood Scientific
reagents and supplies are used with the M926S. Do not use solutions after
the expiry date shown on the bottle.
5. Samples should have low ionic strength, neutral pH and be free of sulphide,
sulphydryl silver halides, silver reactive substances (other than chloride), solid
matter and high levels of dissolved solids.
6. Do not leave the electrodes immersed in reagents when the instrument is not
in use.
7. Use only the beakers supplied with the M926S.
8. It is recommended laboratory practice to wear gloves when handling samples.
Gloves will also afford protection against the Combined Acid Buffer and
against accidental static damage to the electrodes.
6.2 Hazards
1. All electrical equipment is potentially hazardous. Never remove covers from
the M926S without first ensuring that it is isolated from the a.c. supply.
2. Do not move the M926S when there is a beaker containing Combined Acid
Buffer in position on the sample platform.

16
7 Quality Control
7.1 General
The M926S Chloride Analyser has been designed to provide fast and accurate
determinations of Chloride in clinical solutions.
The latest Sherwood Scientific technology has been incorporated into the M926S to
ensure the validity of the final results. However, the results can be affected by factors
other than instrument malfunction, such as sample handling and storage. Sherwood
Scientific recommend therefore that a Quality Control programme is set up to monitor
instrument and operator performance. Because the needs of each laboratory are
different, due to size of workload, number of hours worked, statutory regulations, etc.,
no attempt has been made to formulate a rigid programme. Instead, in Section 7.2
there are a number of suggestions that will be helpful in specifying a procedure to suit
your particular requirements.
The following references are recommended for further information on Quality Control.
BS600:2000 A guide to the application of statistical methods to quality and
standardisation
ISBN 058033227 6
Westgard, J.O., Clinical Chemistry 54:612, 2008.
IMPORTANT If you report your results to a Quality Control Scheme ensure that
they are informed of the change in method, i.e. Sherwood Scientific
926S ChlorideAnalyser.
7.2 Quality Control Checks
The following notes are designed to assist you in formulating a Quality Control
programme.
1. Include a Quality Control as specified in your Quality Control Scheme or at
least once per sample run, once per day or every 40 samples.
2. Check abnormally high and low values daily.
3. Routinely include aqueous Standards that contain chloride concentrations that
are different to the Standard concentration used for calibrating the M926S.
4. Ensure day-to-day variations do not exceed acceptable values.
5. Reproducibility should be checked on 20 replicate samples on a routine basis.

17
8Maintenance
8.1 General
The M926S has been designed to reduce the need for regular maintenance to an
absolute minimum. The maintenance required is detailed in Section 8.2, Daily. Refer
to Section 10 for ordering information and catalogue numbers of parts used for daily
maintenance, which are listed under Equipment Required.
8.2 Daily
Equipment Required
Disinfectant Solution
electrode polish
1 x anode
1 x cathode
2 x detector electrodes.
1. Check that all four electrodes are straight and parallel and the anode is the
same level as the other electrodes. If necessary, refer to Section 8.3 to clean,
adjust or replace the electrodes.
2. Check that the stirrer is present and is fitted firmly into its coupling.
3. Wipe down the sample area with disinfectant solution.
18
Maintenance
continued
8.3 Electrode Cleaning and Replacement
Equipment Required
Electrode polish, soft cloth, 1 x cathode, 1 x anode and 2 x detector electrode.
1. Remove the four electrodes by withdrawing them downwards from the
electrode head.
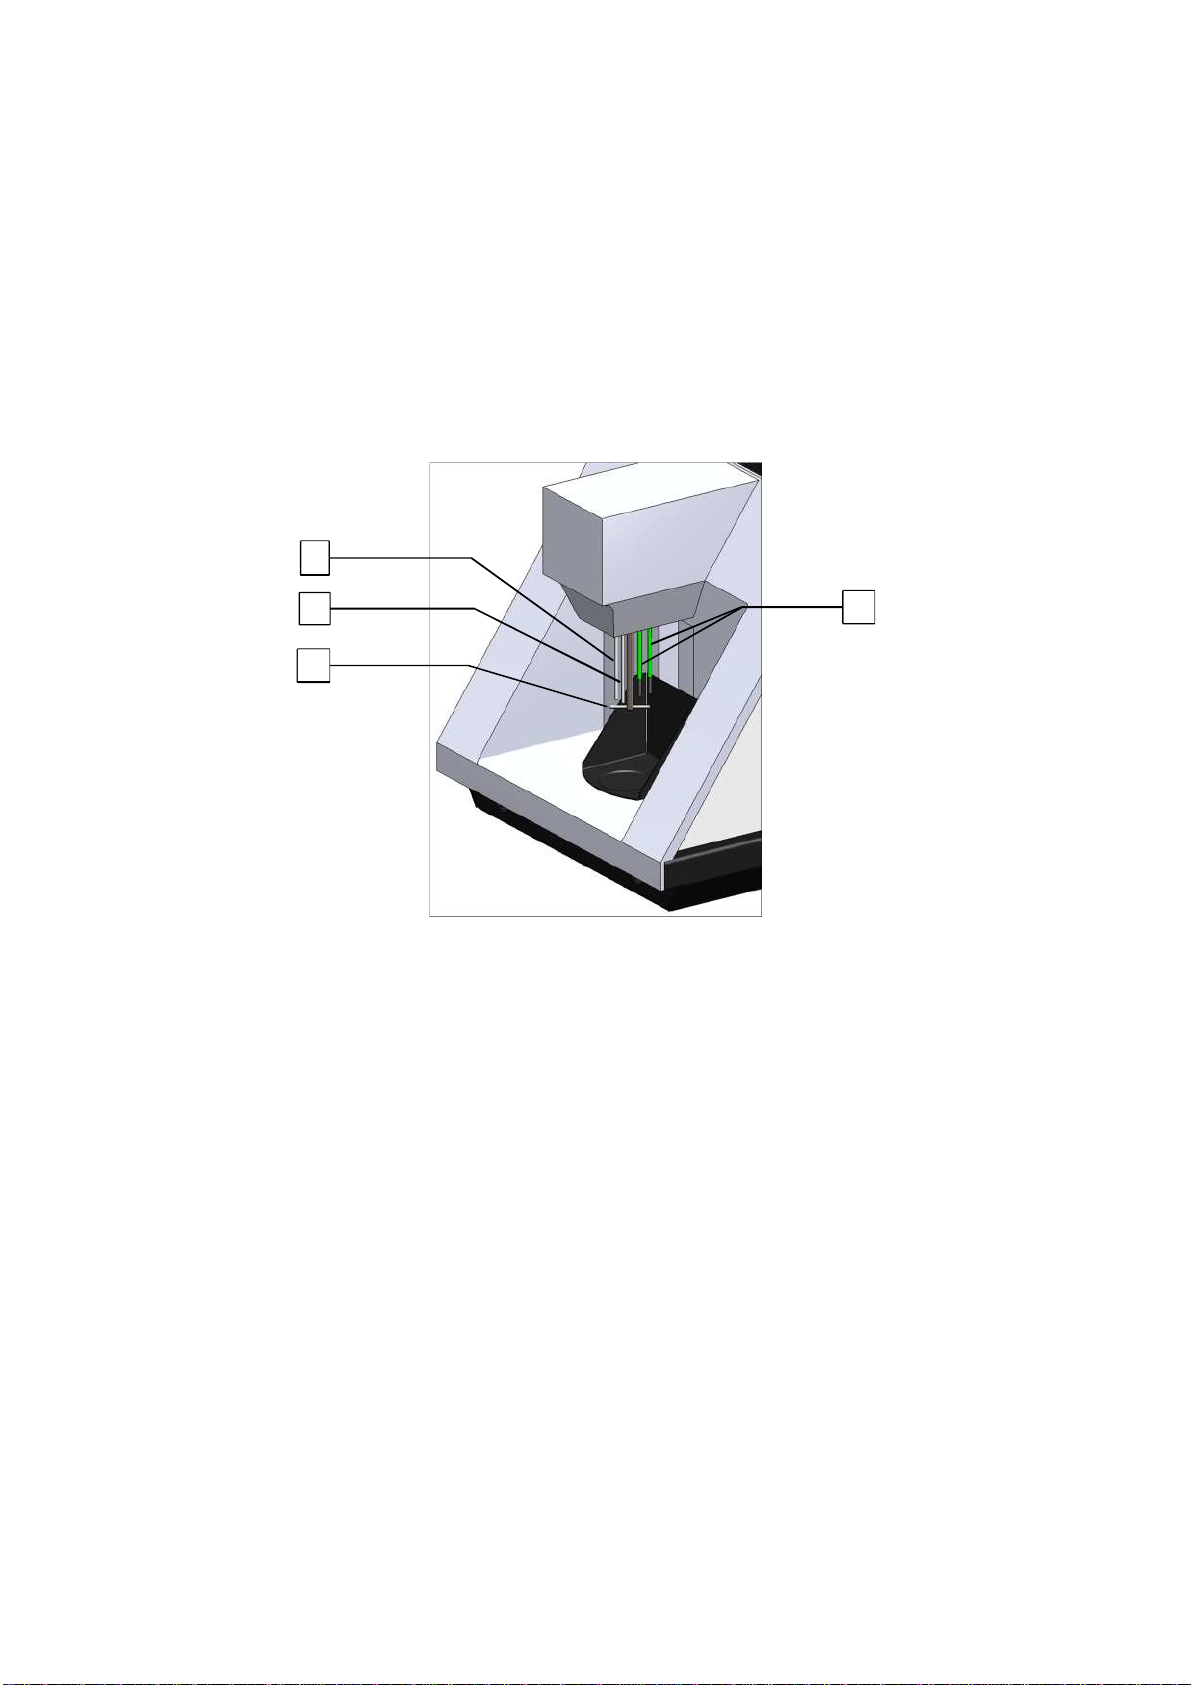
NOTE that the anode (Item 2, Figure 8.1) is longer than the other three electrodes.
Figure 8.1 Electrodes and Electrode Head
1. Cathode, 2. Anode, 3. Detector electrodes, 4. Stirrer.
2. If the length of the anode is less than 57mm discard it and fit a replacement.
3. Place a little Electrode Polish on a soft cloth and gently rub the exposed parts
of the electrodes until they are clean and bright.
4. Refit the electrodes; ensure that with the cathode and detector electrodes
fully inserted, the anode is adjusted to the same length.
5. Place a beaker of deionised water on the sample lift and immerse the
electrodes.
6. Carry out three condition cycles.
7. Remove the beaker and wipe the electrodes with a clean soft cloth.
8. Carefully inspect the electrodes to ensure that they are clean. If they are not
repeat paragraphs 1 to 7. If they are still not clean, fit replacements, ensuring
that they are fully inserted.
9. Check that all the electrodes are straight and parallel, adjusting as necessary.
1
2
4
3

19
9 Troubleshooting
9.1 Display not illuminated
Check that the instrument is connected to a working a.c. supply and that the power
switch is in the 'On' position.
If the fault persists contact your Sherwood Scientific distributor.
9.2 On-screen messages
These self-explanatory alerts may appear at the top of the display screen.
Shown at start-up and after twenty consecutive
samples have been titrated.
Shown after the 18th consecutive titration.
Shown after the 19th consecutive titration.
Shown if electrodes are not in liquid.
299mmol/l has been exceeded. Check sample
dilution and that pipette is dispensing correctly.
Conditioning took too long. Too much Chloride in
beaker. Stirrer not present or not turning.
9.3 Condition or titrate cycle inoperative
Check the beaker contains Chloride; add 100µl. of standard solution if necessary.
Clean or replace the electrodes, refer to Section 8.3.
Make sure that the cathode electrode is fully inserted into its socket.
If the fault persists contact your Sherwood Scientific distributor.
9.4 Reproducibly high or low results
Try using a fresh bottle of standard solution and another pipette.
Check that carry over in the pipetting is avoided by using a rinse out technique for
each sample.
If the fault persists contact your Sherwood Scientific distributor.
9.5 Non-reproducible results
The M926S requires a five minute warm up to meet the stated specification.
Try another pipette. (Ensure the pipette is reproducible to 0.5% Standard Deviation).
Clean or replace the electrodes, refer to Section 8.3.
Use a fresh bottle of CombinedAcid Buffer.
If the fault persists contact your Sherwood Scientific distributor.
Change Buffer / And Condition
Condition Required
Add Sample / Press Titrate
Condition in 2
Add Sample / Press Titrate
Condition in 1
Out of Solution / Check Buffer
Condition Required
Reading 299+ / Check Sample
Condition Required
Condition cycle timed out
Refer to Operator Manual

20
10 Spares and Accessories
10.1 Ordering Information
When ordering spares or accessories for the M926S please give the following
information to your Sherwood Scientific representative: -
Serial number
Catalogue number of part (Cat. No.)
Description
Quantity required
This will ensure that your order is dealt with quickly and efficiently.
The number shown in the third column (Quantity) is the quantity of items that are
supplied against the stated catalogue number. If the quantity is greater than one then
only multiples of that quantity can be supplied.
10.2 Spares and Accessories
Cat. No. Description Quantity
001 56 208 ChlorideAnalyser Combined Acid Buffer, 1 x 500ml 1 bottle
001 56 202 ChlorideAnalyser Standard, 100mmol/l Cl, 6x 100ml 1 pack
001 56 205 Silver Electrode Polish, 25g 1 vial
473 56 903 Printer Assembly, Universal 1
473 59 700 Printer consumables kit 1 pack
925 11 002 1 x cathode and 2 x detector electrode, set of 3 1 set
925 11 003 Anodes, pack of 3 1 pack
926 11 001 Beaker, plastic, graduated at 14ml, Sherwood 1
925 14 001 Stirrer, 20mm 1
926 89 001 Service manual 1
001 53 313 Universal Mains adapter 1
Other Sherwood Scientific Measuring Instrument manuals


Popular Measuring Instrument manuals by other brands

Powerfix Profi
Powerfix Profi 278296 Operation and safety notes

Test Equipment Depot
Test Equipment Depot GVT-427B user manual

Fieldpiece
Fieldpiece ACH Operator's manual

FLYSURFER
FLYSURFER VIRON3 user manual

GMW
GMW TG uni 1 operating manual

Downeaster
Downeaster Wind & Weather Medallion Series instruction manual

Hanna Instruments
Hanna Instruments HI96725C instruction manual

Nokeval
Nokeval KMR260 quick guide

HOKUYO AUTOMATIC
HOKUYO AUTOMATIC UBG-05LN instruction manual

Fluke
Fluke 96000 Series Operator's manual

Test Products International
Test Products International SP565 user manual

General Sleep
General Sleep Zmachine Insight+ DT-200 Service manual


