Shido EF16000-12 User manual

• 6 •
Charged by DC adaptor (Cigarette charger) while
driving
◎ Plug the DC adaptor into Jump starter's charging
port;
◎ Connect the DC adaptor to the vehicle’s cigarette
outlet, LCD displays <CHARGING>;
◎ LCD displays <CHARGING IS COMPLETED> when
the internal battery fully charged, Jump Starter will
stop charging circuit automatically;
◎ Disconnect the DC adaptor from the cigarette outlet,
and then unplug the DC adaptor from the Jump Starter.
Charged by AC charger
◎ Plug the AC adaptor into Jump starter's charging
port;
◎ Connect the AC adaptor to a 100~240VAC electrical
wall outlet, LCD displays <CHARGING>;
◎ LCD displays <CHARGING IS COMPLETED> when
the internal battery fully charged, Jump Starter will
stop charging circuit automatically;
◎ Disconnect the AC adaptor from the AC outlet, and
then unplug the AC adaptor from the Jump Starter.
NOTE
◎ Please wait for 10 min if several fail attempts, then start the vehicle again.
◎ If the vehicle couldn’t be started within 5S, let the Jump Starter cool for 3
mins before attempting to start the vehicle again, or you may damage the Jump
Starter.
◎ If the ambiance temperature is below -10℃, the cranking performance will
decrease sharply, the Jump Starter may not start the vehicle successfully. You
can try a few attempts to start for warm up the battery and then increase the
starting performance.
◎ If not successful, place the Jump Starter in a warmer area for a short time.
3.2 USING USB DC 5V OUTLET
The Jump Starter is a DC power source for all DC devices that are equipped
with a USB plug.
1. Press the <POWER> button to turn on the Jump Starter.
2.P lug the USB switch cable into the USB Outlet.
3.P lug the other end (Micro USB) of the cable into your device or use the
original charging cable of your device. Turn device on, if necessary.
4.W hen finished, turn off the device (if necessary) and unplug the device.
5. Press the <POWER> for 3S to turn off the unit or wait for 2 mins then the
Jump Starter will shut down automatically.
6.R echarge the Jump Starter immediately after unplugging the device.
3.3 USING DC 12V8A OUTLET
The Jump Starter is also a DC power source for all DC devices that are
equipped with a Cigarette plug.
1. Make sure the device to be powered is OFF before inserting the Cigarette
plug into the Cigarette outlet.
2. Press <POWER> button to turn on the Jump Starter.
3. Plug the Cigarette outlet cable into the Jump Starter’s 12V outlet.
4. Plug your device into Cigarette outlet and turn on the device (if required).
5. When finished, turn off the device (if required) and disconnect the device.
6. Press the <POWER> button for 3S to turn off the Jump Starter or wait for 2
mins then the Jump Starter will shut down automatically.
7. Recharge the Jump Starter immediately after unplugging the device.
NOTE: The Maximum output power of the 5V and12V is 120W totally, the
socket output will shut down automatically if the power of the device is over
120W.
Electrical devices must be removed first, or the Jump Starter can not shut down
automatically.
3.4 USING HIGH POWER LIGHT
1. Press <POWER> button to turn on the Jump Starter.
2. Quick press <LIGHT> button to switch three different LED light modes.
First: Highlight; Second: strobe; Third: SOS; Fourth: Off
3. Press <POWER> for 3S to turn off the Jump Starter.
MODEL: HJEF10000-12
HJEF12000-12
HJEF16000-12
HJEF20000-12
READ THE INSTRUCTION MANUAL COMPLETELY BEFORE USING THIS PRODUCT.
RETAIN THIS INSTRUCTION FOR FUTURE REFERENCE
2
7
8
9
10
3
45
6
11
1
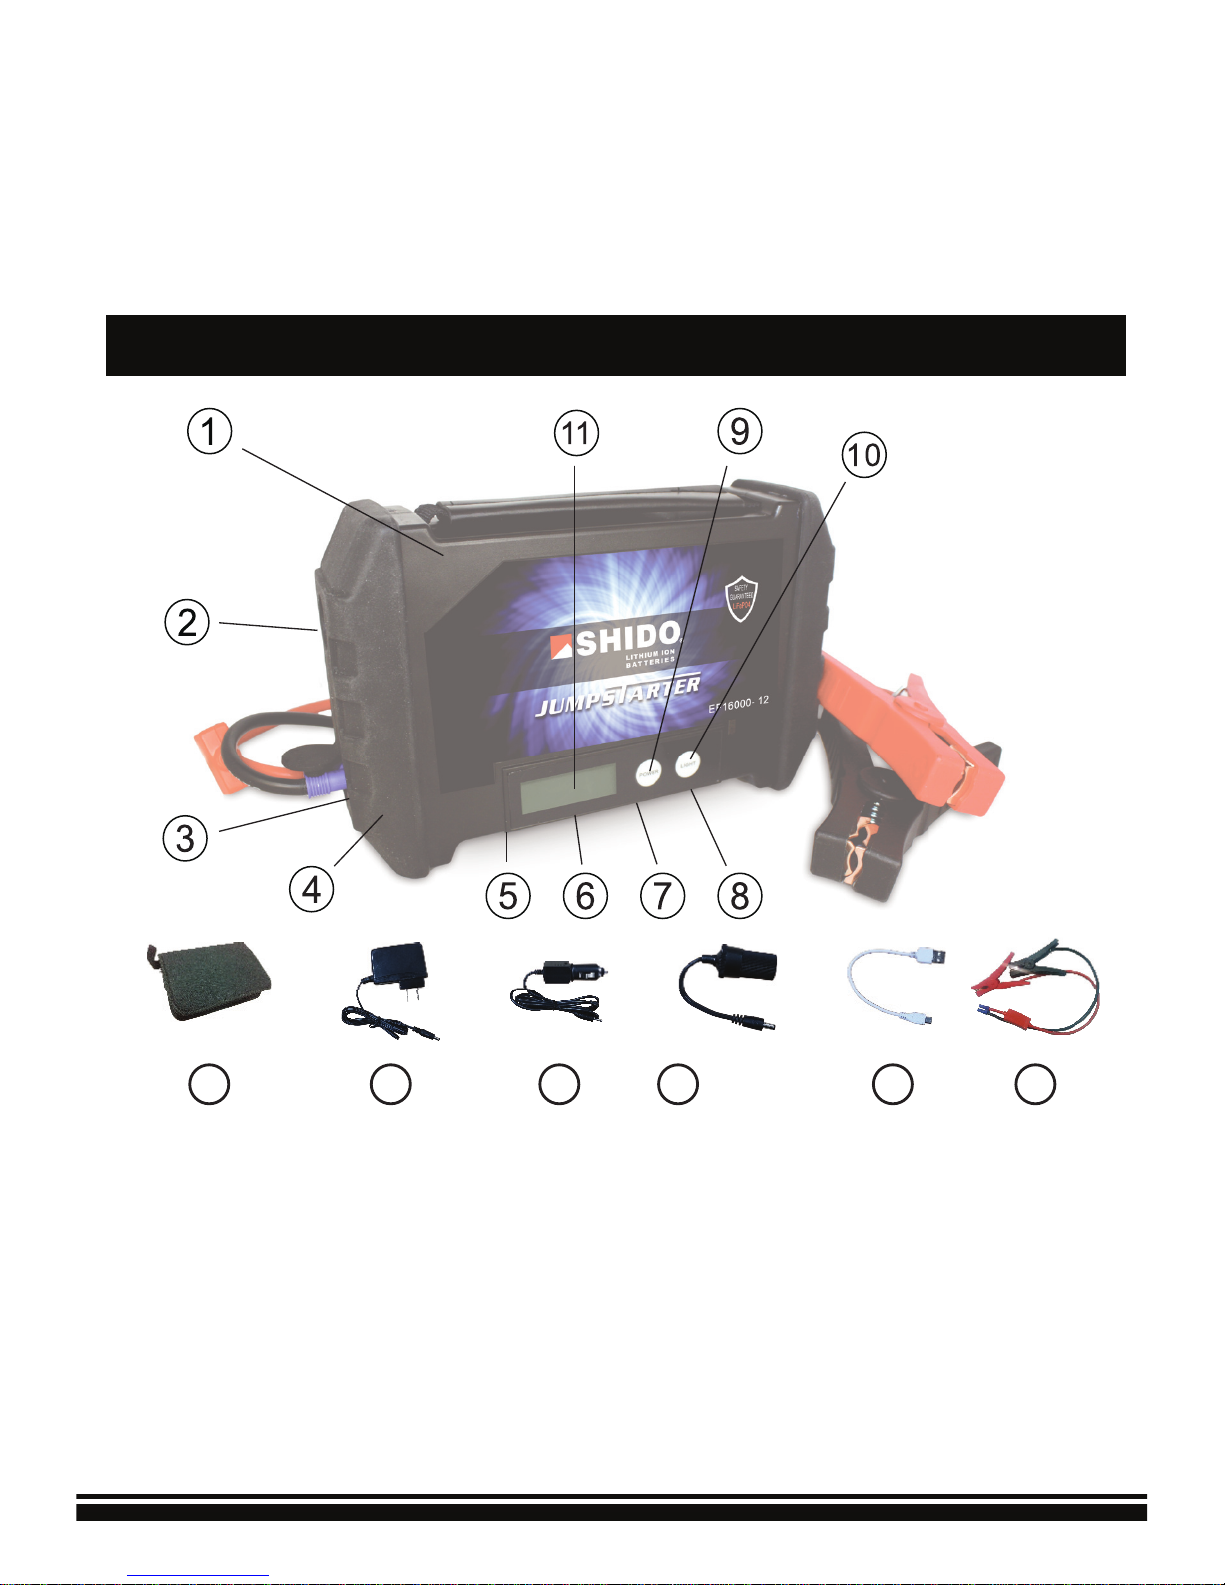
Product Feature
1.Jump Starter
2. High Power LED Light
3.Jumpstart socket
4.High-strength rubber handle
5.USB DC 5V/2.1A Outlet
6.USB DC 5V/1.0A Outlet
7. DC12V/8A Outlet
8.15V/1A Input port
9.POWER button
10. LIGHT button
11.LCD display
12. Oxford bag
13. AC charger
14. DC adaptor (cigarette charger)
15. 12V Switch Cable and Cigarette
Outlet (optional)
16. 5V USB/Micro USB Connector
(optional)
17. Cable and clamps with fuse
CONTENTS
1. WARNING
2. PRODUCT FEATURE
3. OPERATING INSTRUCTION
INSTRUCTION MANUAL
SMART LITHIUM
SAFETY
GUARANTEED
LiFePO4
Lithium Jump Starter and DC Power Source
12 13 14 15 16 17
IMPORTANT! CHARGE IMMEDIATELY AFTER PURCHASE, AFTER EACH
USE AND EVERY 6 MONTHS, ALWAYS KEEP THE INTERNAL BATTERY
FULLY CHARGED.
PROBLEM POSSIBLE CAUSE REMEDIES
5. TROUBLESHOOTING
The vehicle can not be
jumpstarted
The device can not be
powered
Can not turn on the Jump
Starter
1) Improper clamp
connections
2) The internal battery
capacity is too low
3) Too low outside
temperature
1) Improper clamp
connections
2) The switch cable and
connectors are defective
3) The internal battery
capacity is too low
4) The device of 12V to be
powered is over 120W
The internal battery
capacity is too low
1) Check and make sure the connections are
correct
2) Change a new switch cable and connectors
3) Check the internal battery capacity and
recharge it if necessary
4) Make sure the device to be powered is not over
120W
Check the internal battery capacity and recharge
it if necessary
6. MAINTENANCE AND CARE
7. SPECIFICATION
• 1 •
• 2 • • 3 • • 4 • • 5 •
Fuse Protection
Overcharge and
Overdischarge Protection Against-reverse Plug
• 7 •
30WH
250A
500A
1.98 lbs/900g
300A 400A
600A 900A
2.65 lbs/1200g2.20 lbs/1000g
500A
1200A
3.09 lbs/1400g
36WH 48WH 60WH
Nominal Capacity
( C10 25cels)
Cranking Amps
Peak Amps
Weight
Battery type 12V Lithium Iron Battery
15V 1 A and DC .0 AC charger adaptor (Cigarette charger)
Charger
DC 12V 8.0A Outlet (With 120W overload protection)
USB DC 5V 2.1A
USB DC 5V 1.0A
Model HJEF10000-12 HJEF12000-12 HJEF16000-12 HJEF20000-12
High Power LED Light (1W 90LM)
10AWG
Total 23.07" (58.6cm)
10AWG
Total 23.07" (58.6cm)
8AWG
Total 50" (127cm)
8AWG
Total 50" (127cm)
8.8"
×5.5"×2.8" (
223mm*140mm*72mm)
Size and length of
Jump Сable and Сlamps
Function
The dimension of
Jump Starter
The working
temperature
14 ℉~140 ℉ (-10℃-60℃)
1) Check and make sure the connections is
correct
2) Check the internal battery capacity and
recharge it if necessary
3) Try starting serval times to warm up the battery
and then the starting performance increase.
◎ Do not attempt to disassemble, modify, knock and throw the product, please
contact your local distributor if the product has any problem.
◎ Never place the Jump Starter directly above battery being jumped
◎ Keep out of reach of Children.
IMPORTANT! PLEASE READ THE INSTRUCTION MANUAL CAREFULLY,
AND OPERATE CORRECTLY ACCORDING TO INSTRUCTION.
WARNING! NEVER ALLOW CLAMPS TO TOUCH TOGETHER OR CONTACT
THE SAME PIECE OF METAL.
◎ Do not charge the Jump Starter in dangerous places, such as near fuel, near
fire etc.
◎ Do not expose the Jump Starter to the sun, rain or snow.
◎ Do not place the Jump Starter in microwave oven, pressurized container or
vacuum chamber.
◎ Do not charge the Jump Starter with non-standard charger, use only
specified charger equipped with Jump Starter.
◎ Do not immerse the Jump Starter in water or rinse by water, no waterproof
design.
◎ Do not operate the jump starter if it has received a sharp blow, been dropped
or otherwise damaged in any way.
www.skyrichbattery.com
Power by: Global Power Central Inc
Add: San Gabriel, CA 91776
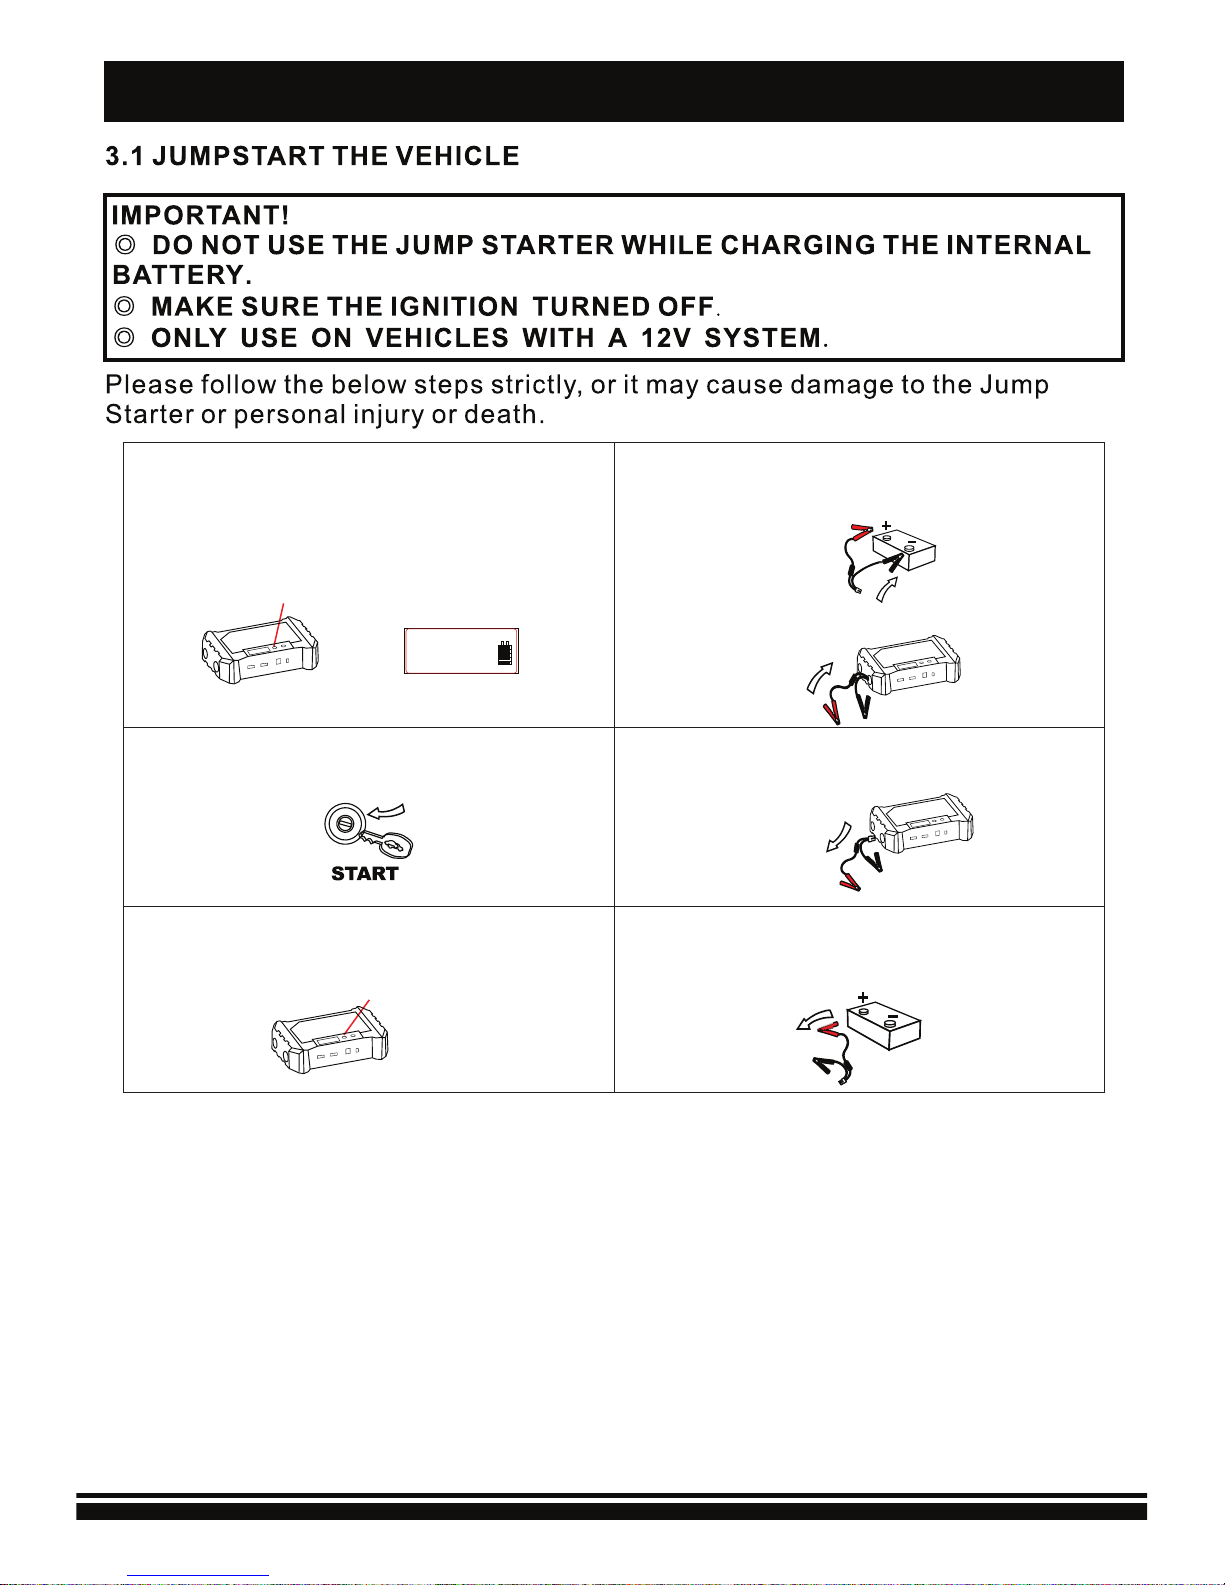
Step 4:
After successfully starting, remove the jump cable
from the Jump Starter.
Step 5:
Press <POWER> button for 3S to turn off, or wait for 30S
then the Jump Starter will shut down automatically.
Step 6:
Disconnect Red and Black clamps from the battery
terminals.
Recharge the Jump Starter as soon as possible after use.
Step 1:
Press the <POWER> button to turn on the Jump
Starter.
LCD displays the internal battery status, It is
recommended the battery capacity be over 60% for
jumpstarting.
Step 3:
Start the vehicle (Turn off all electronic devices to ensure a
successfully start.)
Step2:
Connect the red clamp to positive(+) terminal and
black clamp to negative(-)terminal
Plug the Jump cable into jumpstart socket.
LCD Display
13.4V
<POWER>
<POWER>
POWER
LIGHT
POWER LIGHT
Please read this instruction manual completely
before using this product.
Retain this instruction sheet for future reference.
SHIDO Jumpstarters are distributed by DC AFAM NV, Belgium.
For more info about SHIDO lithium batteries, please visit www.shido-batteries.com
MODEL: EF16000-12
I
N
S
T
R
U
C
T
I
O
N
M
A
N
U
A
L
MODEL: EF16000-12

• 6 •
Charged by DC adaptor (Cigarette charger) while
driving
◎ Plug the DC adaptor into Jump starter's charging
port;
◎ Connect the DC adaptor to the vehicle’s cigarette
outlet, LCD displays <CHARGING>;
◎ LCD displays <CHARGING IS COMPLETED> when
the internal battery fully charged, Jump Starter will
stop charging circuit automatically;
◎ Disconnect the DC adaptor from the cigarette outlet,
and then unplug the DC adaptor from the Jump Starter.
Charged by AC charger
◎ Plug the AC adaptor into Jump starter's charging
port;
◎ Connect the AC adaptor to a 100~240VAC electrical
wall outlet, LCD displays <CHARGING>;
◎ LCD displays <CHARGING IS COMPLETED> when
the internal battery fully charged, Jump Starter will
stop charging circuit automatically;
◎ Disconnect the AC adaptor from the AC outlet, and
then unplug the AC adaptor from the Jump Starter.
NOTE
◎ Please wait for 10 min if several fail attempts, then start the vehicle again.
◎ If the vehicle couldn’t be started within 5S, let the Jump Starter cool for 3
mins before attempting to start the vehicle again, or you may damage the Jump
Starter.
◎ If the ambiance temperature is below -10℃, the cranking performance will
decrease sharply, the Jump Starter may not start the vehicle successfully. You
can try a few attempts to start for warm up the battery and then increase the
starting performance.
◎ If not successful, place the Jump Starter in a warmer area for a short time.
3.2 USING USB DC 5V OUTLET
The Jump Starter is a DC power source for all DC devices that are equipped
with a USB plug.
1. Press the <POWER> button to turn on the Jump Starter.
2.P lug the USB switch cable into the USB Outlet.
3.P lug the other end (Micro USB) of the cable into your device or use the
original charging cable of your device. Turn device on, if necessary.
4.W hen finished, turn off the device (if necessary) and unplug the device.
5. Press the <POWER> for 3S to turn off the unit or wait for 2 mins then the
Jump Starter will shut down automatically.
6.R echarge the Jump Starter immediately after unplugging the device.
3.3 USING DC 12V8A OUTLET
The Jump Starter is also a DC power source for all DC devices that are
equipped with a Cigarette plug.
1. Make sure the device to be powered is OFF before inserting the Cigarette
plug into the Cigarette outlet.
2. Press <POWER> button to turn on the Jump Starter.
3. Plug the Cigarette outlet cable into the Jump Starter’s 12V outlet.
4. Plug your device into Cigarette outlet and turn on the device (if required).
5. When finished, turn off the device (if required) and disconnect the device.
6. Press the <POWER> button for 3S to turn off the Jump Starter or wait for 2
mins then the Jump Starter will shut down automatically.
7. Recharge the Jump Starter immediately after unplugging the device.
NOTE: The Maximum output power of the 5V and12V is 120W totally, the
socket output will shut down automatically if the power of the device is over
120W.
Electrical devices must be removed first, or the Jump Starter can not shut down
automatically.
3.4 USING HIGH POWER LIGHT
1. Press <POWER> button to turn on the Jump Starter.
2. Quick press <LIGHT> button to switch three different LED light modes.
First: Highlight; Second: strobe; Third: SOS; Fourth: Off
3. Press <POWER> for 3S to turn off the Jump Starter.
MODEL: HJEF10000-12
HJEF12000-12
HJEF16000-12
HJEF20000-12
READ THE INSTRUCTION MANUAL COMPLETELY BEFORE USING THIS PRODUCT.
RETAIN THIS INSTRUCTION FOR FUTURE REFERENCE
2
7
8
9
10
3
45
6
11
1
Product Feature
1.Jump Starter
2. High Power LED Light
3.Jumpstart socket
4.High-strength rubber handle
5.USB DC 5V/2.1A Outlet
6.USB DC 5V/1.0A Outlet
7. DC12V/8A Outlet
8.15V/1A Input port
9.POWER button
10. LIGHT button
11.LCD display
12. Oxford bag
13. AC charger
14. DC adaptor (cigarette charger)
15. 12V Switch Cable and Cigarette
Outlet (optional)
16. 5V USB/Micro USB Connector
(optional)
17. Cable and clamps with fuse
CONTENTS
1. WARNING
2. PRODUCT FEATURE
3. OPERATING INSTRUCTION
INSTRUCTION MANUAL
SMART LITHIUM
SAFETY
GUARANTEED
LiFePO4
Lithium Jump Starter and DC Power Source
12 13 14 15 16 17
IMPORTANT! CHARGE IMMEDIATELY AFTER PURCHASE, AFTER EACH
USE AND EVERY 6 MONTHS, ALWAYS KEEP THE INTERNAL BATTERY
FULLY CHARGED.
PROBLEM POSSIBLE CAUSE REMEDIES
5. TROUBLESHOOTING
The vehicle can not be
jumpstarted
The device can not be
powered
Can not turn on the Jump
Starter
1) Improper clamp
connections
2) The internal battery
capacity is too low
3) Too low outside
temperature
1) Improper clamp
connections
2) The switch cable and
connectors are defective
3) The internal battery
capacity is too low
4) The device of 12V to be
powered is over 120W
The internal battery
capacity is too low
1) Check and make sure the connections are
correct
2) Change a new switch cable and connectors
3) Check the internal battery capacity and
recharge it if necessary
4) Make sure the device to be powered is not over
120W
Check the internal battery capacity and recharge
it if necessary
6. MAINTENANCE AND CARE
7. SPECIFICATION
• 1 •
• 2 •
• 3 • • 4 • • 5 •
Fuse Protection
Overcharge and
Overdischarge Protection Against-reverse Plug
• 7 •
30WH
250A
500A
1.98 lbs/900g
300A 400A
600A 900A
2.65 lbs/1200g2.20 lbs/1000g
500A
1200A
3.09 lbs/1400g
36WH 48WH 60WH
Nominal Capacity
( C10 25cels)
Cranking Amps
Peak Amps
Weight
Battery type 12V Lithium Iron Battery
15V 1 A and DC .0 AC charger adaptor (Cigarette charger)
Charger
DC 12V 8.0A Outlet (With 120W overload protection)
USB DC 5V 2.1A
USB DC 5V 1.0A
Model HJEF10000-12 HJEF12000-12 HJEF16000-12 HJEF20000-12
High Power LED Light (1W 90LM)
10AWG
Total 23.07" (58.6cm)
10AWG
Total 23.07" (58.6cm)
8AWG
Total 50" (127cm)
8AWG
Total 50" (127cm)
8.8"
×5.5"×2.8" (
223mm*140mm*72mm)
Size and length of
Jump Сable and Сlamps
Function
The dimension of
Jump Starter
The working
temperature
14 ℉~140 ℉ (-10℃-60℃)
1) Check and make sure the connections is
correct
2) Check the internal battery capacity and
recharge it if necessary
3) Try starting serval times to warm up the battery
and then the starting performance increase.
◎ Do not attempt to disassemble, modify, knock and throw the product, please
contact your local distributor if the product has any problem.
◎ Never place the Jump Starter directly above battery being jumped
◎ Keep out of reach of Children.
IMPORTANT! PLEASE READ THE INSTRUCTION MANUAL CAREFULLY,
AND OPERATE CORRECTLY ACCORDING TO INSTRUCTION.
WARNING! NEVER ALLOW CLAMPS TO TOUCH TOGETHER OR CONTACT
THE SAME PIECE OF METAL.
◎ Do not charge the Jump Starter in dangerous places, such as near fuel, near
fire etc.
◎ Do not expose the Jump Starter to the sun, rain or snow.
◎ Do not place the Jump Starter in microwave oven, pressurized container or
vacuum chamber.
◎ Do not charge the Jump Starter with non-standard charger, use only
specified charger equipped with Jump Starter.
◎ Do not immerse the Jump Starter in water or rinse by water, no waterproof
design.
◎ Do not operate the jump starter if it has received a sharp blow, been dropped
or otherwise damaged in any way.
www.skyrichbattery.com
Power by: Global Power Central Inc
Add: San Gabriel, CA 91776
Step 4:
After successfully starting, remove the jump cable
from the Jump Starter.
Step 5:
Press <POWER> button for 3S to turn off, or wait for 30S
then the Jump Starter will shut down automatically.
Step 6:
Disconnect Red and Black clamps from the battery
terminals.
Recharge the Jump Starter as soon as possible after use.
Step 1:
Press the <POWER> button to turn on the Jump
Starter.
LCD displays the internal battery status, It is
recommended the battery capacity be over 60% for
jumpstarting.
Step 3:
Start the vehicle (Turn off all electronic devices to ensure a
successfully start.)
Step2:
Connect the red clamp to positive(+) terminal and
black clamp to negative(-)terminal
Plug the Jump cable into jumpstart socket.
LCD Display
13.4V
<POWER>
<POWER>
POWER
LIGHT
POWER LIGHT
• 6 •
Charged by DC adaptor (Cigarette charger) while
driving
◎ Plug the DC adaptor into Jump starter's charging
port;
◎ Connect the DC adaptor to the vehicle’s cigarette
outlet, LCD displays <CHARGING>;
◎ LCD displays <CHARGING IS COMPLETED> when
the internal battery fully charged, Jump Starter will
stop charging circuit automatically;
◎ Disconnect the DC adaptor from the cigarette outlet,
and then unplug the DC adaptor from the Jump Starter.
Charged by AC charger
◎ Plug the AC adaptor into Jump starter's charging
port;
◎ Connect the AC adaptor to a 100~240VAC electrical
wall outlet, LCD displays <CHARGING>;
◎ LCD displays <CHARGING IS COMPLETED> when
the internal battery fully charged, Jump Starter will
stop charging circuit automatically;
◎ Disconnect the AC adaptor from the AC outlet, and
then unplug the AC adaptor from the Jump Starter.
NOTE
◎ Please wait for 10 min if several fail attempts, then start the vehicle again.
◎ If the vehicle couldn’t be started within 5S, let the Jump Starter cool for 3
mins before attempting to start the vehicle again, or you may damage the Jump
Starter.
◎ If the ambiance temperature is below -10℃, the cranking performance will
decrease sharply, the Jump Starter may not start the vehicle successfully. You
can try a few attempts to start for warm up the battery and then increase the
starting performance.
◎ If not successful, place the Jump Starter in a warmer area for a short time.
3.2 USING USB DC 5V OUTLET
The Jump Starter is a DC power source for all DC devices that are equipped
with a USB plug.
1. Press the <POWER> button to turn on the Jump Starter.
2.P lug the USB switch cable into the USB Outlet.
3.P lug the other end (Micro USB) of the cable into your device or use the
original charging cable of your device. Turn device on, if necessary.
4.W hen finished, turn off the device (if necessary) and unplug the device.
5. Press the <POWER> for 3S to turn off the unit or wait for 2 mins then the
Jump Starter will shut down automatically.
6.R echarge the Jump Starter immediately after unplugging the device.
3.3 USING DC 12V8A OUTLET
The Jump Starter is also a DC power source for all DC devices that are
equipped with a Cigarette plug.
1. Make sure the device to be powered is OFF before inserting the Cigarette
plug into the Cigarette outlet.
2. Press <POWER> button to turn on the Jump Starter.
3. Plug the Cigarette outlet cable into the Jump Starter’s 12V outlet.
4. Plug your device into Cigarette outlet and turn on the device (if required).
5. When finished, turn off the device (if required) and disconnect the device.
6. Press the <POWER> button for 3S to turn off the Jump Starter or wait for 2
mins then the Jump Starter will shut down automatically.
7. Recharge the Jump Starter immediately after unplugging the device.
NOTE: The Maximum output power of the 5V and12V is 120W totally, the
socket output will shut down automatically if the power of the device is over
120W.
Electrical devices must be removed first, or the Jump Starter can not shut down
automatically.
3.4 USING HIGH POWER LIGHT
1. Press <POWER> button to turn on the Jump Starter.
2. Quick press <LIGHT> button to switch three different LED light modes.
First: Highlight; Second: strobe; Third: SOS; Fourth: Off
3. Press <POWER> for 3S to turn off the Jump Starter.
MODEL: HJEF10000-12
HJEF12000-12
HJEF16000-12
HJEF20000-12
READ THE INSTRUCTION MANUAL COMPLETELY BEFORE USING THIS PRODUCT.
RETAIN THIS INSTRUCTION FOR FUTURE REFERENCE
2
7
8
9
10
3
45
6
11
1
Product Feature
1.Jump Starter
2. High Power LED Light
3.Jumpstart socket
4.High-strength rubber handle
5.USB DC 5V/2.1A Outlet
6.USB DC 5V/1.0A Outlet
7. DC12V/8A Outlet
8.15V/1A Input port
9.POWER button
10. LIGHT button
11.LCD display
12. Oxford bag
13. AC charger
14. DC adaptor (cigarette charger)
15. 12V Switch Cable and Cigarette
Outlet (optional)
16. 5V USB/Micro USB Connector
(optional)
17. Cable and clamps with fuse
CONTENTS
1. WARNING
2. PRODUCT FEATURE
3. OPERATING INSTRUCTION
INSTRUCTION MANUAL
SMART LITHIUM
SAFETY
GUARANTEED
LiFePO4
Lithium Jump Starter and DC Power Source
12 13 14 15 16 17
IMPORTANT! CHARGE IMMEDIATELY AFTER PURCHASE, AFTER EACH
USE AND EVERY 6 MONTHS, ALWAYS KEEP THE INTERNAL BATTERY
FULLY CHARGED.
PROBLEM POSSIBLE CAUSE REMEDIES
5. TROUBLESHOOTING
The vehicle can not be
jumpstarted
The device can not be
powered
Can not turn on the Jump
Starter
1) Improper clamp
connections
2) The internal battery
capacity is too low
3) Too low outside
temperature
1) Improper clamp
connections
2) The switch cable and
connectors are defective
3) The internal battery
capacity is too low
4) The device of 12V to be
powered is over 120W
The internal battery
capacity is too low
1) Check and make sure the connections are
correct
2) Change a new switch cable and connectors
3) Check the internal battery capacity and
recharge it if necessary
4) Make sure the device to be powered is not over
120W
Check the internal battery capacity and recharge
it if necessary
6. MAINTENANCE AND CARE
7. SPECIFICATION
• 1 • • 2 •
• 3 •
• 4 • • 5 •
Fuse Protection
Overcharge and
Overdischarge Protection Against-reverse Plug
• 7 •
30WH
250A
500A
1.98 lbs/900g
300A 400A
600A 900A
2.65 lbs/1200g2.20 lbs/1000g
500A
1200A
3.09 lbs/1400g
36WH 48WH 60WH
Nominal Capacity
( C10 25cels)
Cranking Amps
Peak Amps
Weight
Battery type 12V Lithium Iron Battery
15V 1 A and DC .0 AC charger adaptor (Cigarette charger)
Charger
DC 12V 8.0A Outlet (With 120W overload protection)
USB DC 5V 2.1A
USB DC 5V 1.0A
Model HJEF10000-12 HJEF12000-12 HJEF16000-12 HJEF20000-12
High Power LED Light (1W 90LM)
10AWG
Total 23.07" (58.6cm)
10AWG
Total 23.07" (58.6cm)
8AWG
Total 50" (127cm)
8AWG
Total 50" (127cm)
8.8"
×5.5"×2.8" (
223mm*140mm*72mm)
Size and length of
Jump Сable and Сlamps
Function
The dimension of
Jump Starter
The working
temperature
14 ℉~140 ℉ (-10℃-60℃)
1) Check and make sure the connections is
correct
2) Check the internal battery capacity and
recharge it if necessary
3) Try starting serval times to warm up the battery
and then the starting performance increase.
◎ Do not attempt to disassemble, modify, knock and throw the product, please
contact your local distributor if the product has any problem.
◎ Never place the Jump Starter directly above battery being jumped
◎ Keep out of reach of Children.
IMPORTANT! PLEASE READ THE INSTRUCTION MANUAL CAREFULLY,
AND OPERATE CORRECTLY ACCORDING TO INSTRUCTION.
WARNING! NEVER ALLOW CLAMPS TO TOUCH TOGETHER OR CONTACT
THE SAME PIECE OF METAL.
◎ Do not charge the Jump Starter in dangerous places, such as near fuel, near
fire etc.
◎ Do not expose the Jump Starter to the sun, rain or snow.
◎ Do not place the Jump Starter in microwave oven, pressurized container or
vacuum chamber.
◎ Do not charge the Jump Starter with non-standard charger, use only
specified charger equipped with Jump Starter.
◎ Do not immerse the Jump Starter in water or rinse by water, no waterproof
design.
◎ Do not operate the jump starter if it has received a sharp blow, been dropped
or otherwise damaged in any way.
www.skyrichbattery.com
Power by: Global Power Central Inc
Add: San Gabriel, CA 91776
Step 4:
After successfully starting, remove the jump cable
from the Jump Starter.
Step 5:
Press <POWER> button for 3S to turn off, or wait for 30S
then the Jump Starter will shut down automatically.
Step 6:
Disconnect Red and Black clamps from the battery
terminals.
Recharge the Jump Starter as soon as possible after use.
Step 1:
Press the <POWER> button to turn on the Jump
Starter.
LCD displays the internal battery status, It is
recommended the battery capacity be over 60% for
jumpstarting.
Step 3:
Start the vehicle (Turn off all electronic devices to ensure a
successfully start.)
Step2:
Connect the red clamp to positive(+) terminal and
black clamp to negative(-)terminal
Plug the Jump cable into jumpstart socket.
LCD Display
13.4V
<POWER>
<POWER>
POWER
LIGHT
POWER LIGHT
• 6 •
Charged by DC adaptor (Cigarette charger) while
driving
◎ Plug the DC adaptor into Jump starter's charging
port;
◎ Connect the DC adaptor to the vehicle’s cigarette
outlet, LCD displays <CHARGING>;
◎ LCD displays <CHARGING IS COMPLETED> when
the internal battery fully charged, Jump Starter will
stop charging circuit automatically;
◎ Disconnect the DC adaptor from the cigarette outlet,
and then unplug the DC adaptor from the Jump Starter.
Charged by AC charger
◎ Plug the AC adaptor into Jump starter's charging
port;
◎ Connect the AC adaptor to a 100~240VAC electrical
wall outlet, LCD displays <CHARGING>;
◎ LCD displays <CHARGING IS COMPLETED> when
the internal battery fully charged, Jump Starter will
stop charging circuit automatically;
◎ Disconnect the AC adaptor from the AC outlet, and
then unplug the AC adaptor from the Jump Starter.
NOTE
◎ Please wait for 10 min if several fail attempts, then start the vehicle again.
◎ If the vehicle couldn’t be started within 5S, let the Jump Starter cool for 3
mins before attempting to start the vehicle again, or you may damage the Jump
Starter.
◎ If the ambiance temperature is below -10℃, the cranking performance will
decrease sharply, the Jump Starter may not start the vehicle successfully. You
can try a few attempts to start for warm up the battery and then increase the
starting performance.
◎ If not successful, place the Jump Starter in a warmer area for a short time.
3.2 USING USB DC 5V OUTLET
The Jump Starter is a DC power source for all DC devices that are equipped
with a USB plug.
1. Press the <POWER> button to turn on the Jump Starter.
2.P lug the USB switch cable into the USB Outlet.
3.P lug the other end (Micro USB) of the cable into your device or use the
original charging cable of your device. Turn device on, if necessary.
4.W hen finished, turn off the device (if necessary) and unplug the device.
5. Press the <POWER> for 3S to turn off the unit or wait for 2 mins then the
Jump Starter will shut down automatically.
6.R echarge the Jump Starter immediately after unplugging the device.
3.3 USING DC 12V8A OUTLET
The Jump Starter is also a DC power source for all DC devices that are
equipped with a Cigarette plug.
1. Make sure the device to be powered is OFF before inserting the Cigarette
plug into the Cigarette outlet.
2. Press <POWER> button to turn on the Jump Starter.
3. Plug the Cigarette outlet cable into the Jump Starter’s 12V outlet.
4. Plug your device into Cigarette outlet and turn on the device (if required).
5. When finished, turn off the device (if required) and disconnect the device.
6. Press the <POWER> button for 3S to turn off the Jump Starter or wait for 2
mins then the Jump Starter will shut down automatically.
7. Recharge the Jump Starter immediately after unplugging the device.
NOTE: The Maximum output power of the 5V and12V is 120W totally, the
socket output will shut down automatically if the power of the device is over
120W.
Electrical devices must be removed first, or the Jump Starter can not shut down
automatically.
3.4 USING HIGH POWER LIGHT
1. Press <POWER> button to turn on the Jump Starter.
2. Quick press <LIGHT> button to switch three different LED light modes.
First: Highlight; Second: strobe; Third: SOS; Fourth: Off
3. Press <POWER> for 3S to turn off the Jump Starter.
MODEL: HJEF10000-12
HJEF12000-12
HJEF16000-12
HJEF20000-12
READ THE INSTRUCTION MANUAL COMPLETELY BEFORE USING THIS PRODUCT.
RETAIN THIS INSTRUCTION FOR FUTURE REFERENCE
2
7
8
9
10
3
45
6
11
1
Product Feature
1.Jump Starter
2. High Power LED Light
3.Jumpstart socket
4.High-strength rubber handle
5.USB DC 5V/2.1A Outlet
6.USB DC 5V/1.0A Outlet
7. DC12V/8A Outlet
8.15V/1A Input port
9.POWER button
10. LIGHT button
11.LCD display
12. Oxford bag
13. AC charger
14. DC adaptor (cigarette charger)
15. 12V Switch Cable and Cigarette
Outlet (optional)
16. 5V USB/Micro USB Connector
(optional)
17. Cable and clamps with fuse
CONTENTS
1. WARNING
2. PRODUCT FEATURE
3. OPERATING INSTRUCTION
INSTRUCTION MANUAL
SMART LITHIUM
SAFETY
GUARANTEED
LiFePO4
Lithium Jump Starter and DC Power Source
12 13 14 15 16 17
IMPORTANT! CHARGE IMMEDIATELY AFTER PURCHASE, AFTER EACH
USE AND EVERY 6 MONTHS, ALWAYS KEEP THE INTERNAL BATTERY
FULLY CHARGED.
PROBLEM POSSIBLE CAUSE REMEDIES
5. TROUBLESHOOTING
The vehicle can not be
jumpstarted
The device can not be
powered
Can not turn on the Jump
Starter
1) Improper clamp
connections
2) The internal battery
capacity is too low
3) Too low outside
temperature
1) Improper clamp
connections
2) The switch cable and
connectors are defective
3) The internal battery
capacity is too low
4) The device of 12V to be
powered is over 120W
The internal battery
capacity is too low
1) Check and make sure the connections are
correct
2) Change a new switch cable and connectors
3) Check the internal battery capacity and
recharge it if necessary
4) Make sure the device to be powered is not over
120W
Check the internal battery capacity and recharge
it if necessary
6. MAINTENANCE AND CARE
7. SPECIFICATION
• 1 • • 2 • • 3 •
• 4 •
• 5 •
Fuse Protection
Overcharge and
Overdischarge Protection Against-reverse Plug
• 7 •
30WH
250A
500A
1.98 lbs/900g
300A 400A
600A 900A
2.65 lbs/1200g2.20 lbs/1000g
500A
1200A
3.09 lbs/1400g
36WH 48WH 60WH
Nominal Capacity
( C10 25cels)
Cranking Amps
Peak Amps
Weight
Battery type 12V Lithium Iron Battery
15V 1 A and DC .0 AC charger adaptor (Cigarette charger)
Charger
DC 12V 8.0A Outlet (With 120W overload protection)
USB DC 5V 2.1A
USB DC 5V 1.0A
Model HJEF10000-12 HJEF12000-12 HJEF16000-12 HJEF20000-12
High Power LED Light (1W 90LM)
10AWG
Total 23.07" (58.6cm)
10AWG
Total 23.07" (58.6cm)
8AWG
Total 50" (127cm)
8AWG
Total 50" (127cm)
8.8"
×5.5"×2.8" (
223mm*140mm*72mm)
Size and length of
Jump Сable and Сlamps
Function
The dimension of
Jump Starter
The working
temperature
14 ℉~140 ℉ (-10℃-60℃)
1) Check and make sure the connections is
correct
2) Check the internal battery capacity and
recharge it if necessary
3) Try starting serval times to warm up the battery
and then the starting performance increase.
◎ Do not attempt to disassemble, modify, knock and throw the product, please
contact your local distributor if the product has any problem.
◎ Never place the Jump Starter directly above battery being jumped
◎ Keep out of reach of Children.
IMPORTANT! PLEASE READ THE INSTRUCTION MANUAL CAREFULLY,
AND OPERATE CORRECTLY ACCORDING TO INSTRUCTION.
WARNING! NEVER ALLOW CLAMPS TO TOUCH TOGETHER OR CONTACT
THE SAME PIECE OF METAL.
◎ Do not charge the Jump Starter in dangerous places, such as near fuel, near
fire etc.
◎ Do not expose the Jump Starter to the sun, rain or snow.
◎ Do not place the Jump Starter in microwave oven, pressurized container or
vacuum chamber.
◎ Do not charge the Jump Starter with non-standard charger, use only
specified charger equipped with Jump Starter.
◎ Do not immerse the Jump Starter in water or rinse by water, no waterproof
design.
◎ Do not operate the jump starter if it has received a sharp blow, been dropped
or otherwise damaged in any way.
www.skyrichbattery.com
Power by: Global Power Central Inc
Add: San Gabriel, CA 91776
Step 4:
After successfully starting, remove the jump cable
from the Jump Starter.
Step 5:
Press <POWER> button for 3S to turn off, or wait for 30S
then the Jump Starter will shut down automatically.
Step 6:
Disconnect Red and Black clamps from the battery
terminals.
Recharge the Jump Starter as soon as possible after use.
Step 1:
Press the <POWER> button to turn on the Jump
Starter.
LCD displays the internal battery status, It is
recommended the battery capacity be over 60% for
jumpstarting.
Step 3:
Start the vehicle (Turn off all electronic devices to ensure a
successfully start.)
Step2:
Connect the red clamp to positive(+) terminal and
black clamp to negative(-)terminal
Plug the Jump cable into jumpstart socket.
LCD Display
13.4V
<POWER>
<POWER>
POWER
LIGHT
POWER LIGHT

• 6 •
Charged by DC adaptor (Cigarette charger) while
driving
◎ Plug the DC adaptor into Jump starter's charging
port;
◎ Connect the DC adaptor to the vehicle’s cigarette
outlet, LCD displays <CHARGING>;
◎ LCD displays <CHARGING IS COMPLETED> when
the internal battery fully charged, Jump Starter will
stop charging circuit automatically;
◎ Disconnect the DC adaptor from the cigarette outlet,
and then unplug the DC adaptor from the Jump Starter.
Charged by AC charger
◎ Plug the AC adaptor into Jump starter's charging
port;
◎ Connect the AC adaptor to a 100~240VAC electrical
wall outlet, LCD displays <CHARGING>;
◎ LCD displays <CHARGING IS COMPLETED> when
the internal battery fully charged, Jump Starter will
stop charging circuit automatically;
◎ Disconnect the AC adaptor from the AC outlet, and
then unplug the AC adaptor from the Jump Starter.
NOTE
◎ Please wait for 10 min if several fail attempts, then start the vehicle again.
◎ If the vehicle couldn’t be started within 5S, let the Jump Starter cool for 3
mins before attempting to start the vehicle again, or you may damage the Jump
Starter.
◎ If the ambiance temperature is below -10℃, the cranking performance will
decrease sharply, the Jump Starter may not start the vehicle successfully. You
can try a few attempts to start for warm up the battery and then increase the
starting performance.
◎ If not successful, place the Jump Starter in a warmer area for a short time.
3.2 USING USB DC 5V OUTLET
The Jump Starter is a DC power source for all DC devices that are equipped
with a USB plug.
1. Press the <POWER> button to turn on the Jump Starter.
2.P lug the USB switch cable into the USB Outlet.
3.P lug the other end (Micro USB) of the cable into your device or use the
original charging cable of your device. Turn device on, if necessary.
4.W hen finished, turn off the device (if necessary) and unplug the device.
5. Press the <POWER> for 3S to turn off the unit or wait for 2 mins then the
Jump Starter will shut down automatically.
6.R echarge the Jump Starter immediately after unplugging the device.
3.3 USING DC 12V8A OUTLET
The Jump Starter is also a DC power source for all DC devices that are
equipped with a Cigarette plug.
1. Make sure the device to be powered is OFF before inserting the Cigarette
plug into the Cigarette outlet.
2. Press <POWER> button to turn on the Jump Starter.
3. Plug the Cigarette outlet cable into the Jump Starter’s 12V outlet.
4. Plug your device into Cigarette outlet and turn on the device (if required).
5. When finished, turn off the device (if required) and disconnect the device.
6. Press the <POWER> button for 3S to turn off the Jump Starter or wait for 2
mins then the Jump Starter will shut down automatically.
7. Recharge the Jump Starter immediately after unplugging the device.
NOTE: The Maximum output power of the 5V and12V is 120W totally, the
socket output will shut down automatically if the power of the device is over
120W.
Electrical devices must be removed first, or the Jump Starter can not shut down
automatically.
3.4 USING HIGH POWER LIGHT
1. Press <POWER> button to turn on the Jump Starter.
2. Quick press <LIGHT> button to switch three different LED light modes.
First: Highlight; Second: strobe; Third: SOS; Fourth: Off
3. Press <POWER> for 3S to turn off the Jump Starter.
MODEL: HJEF10000-12
HJEF12000-12
HJEF16000-12
HJEF20000-12
READ THE INSTRUCTION MANUAL COMPLETELY BEFORE USING THIS PRODUCT.
RETAIN THIS INSTRUCTION FOR FUTURE REFERENCE
2
7
8
9
10
3
45
6
11
1
Product Feature
1.Jump Starter
2. High Power LED Light
3.Jumpstart socket
4.High-strength rubber handle
5.USB DC 5V/2.1A Outlet
6.USB DC 5V/1.0A Outlet
7. DC12V/8A Outlet
8.15V/1A Input port
9.POWER button
10. LIGHT button
11.LCD display
12. Oxford bag
13. AC charger
14. DC adaptor (cigarette charger)
15. 12V Switch Cable and Cigarette
Outlet (optional)
16. 5V USB/Micro USB Connector
(optional)
17. Cable and clamps with fuse
CONTENTS
1. WARNING
2. PRODUCT FEATURE
3. OPERATING INSTRUCTION
INSTRUCTION MANUAL
SMART LITHIUM
SAFETY
GUARANTEED
LiFePO4
Lithium Jump Starter and DC Power Source
12 13 14 15 16 17
IMPORTANT! CHARGE IMMEDIATELY AFTER PURCHASE, AFTER EACH
USE AND EVERY 6 MONTHS, ALWAYS KEEP THE INTERNAL BATTERY
FULLY CHARGED.
PROBLEM POSSIBLE CAUSE REMEDIES
5. TROUBLESHOOTING
The vehicle can not be
jumpstarted
The device can not be
powered
Can not turn on the Jump
Starter
1) Improper clamp
connections
2) The internal battery
capacity is too low
3) Too low outside
temperature
1) Improper clamp
connections
2) The switch cable and
connectors are defective
3) The internal battery
capacity is too low
4) The device of 12V to be
powered is over 120W
The internal battery
capacity is too low
1) Check and make sure the connections are
correct
2) Change a new switch cable and connectors
3) Check the internal battery capacity and
recharge it if necessary
4) Make sure the device to be powered is not over
120W
Check the internal battery capacity and recharge
it if necessary
6. MAINTENANCE AND CARE
7. SPECIFICATION
• 1 • • 2 • • 3 • • 4 •
• 5 •
Fuse Protection
Overcharge and
Overdischarge Protection Against-reverse Plug
• 7 •
30WH
250A
500A
1.98 lbs/900g
300A 400A
600A 900A
2.65 lbs/1200g2.20 lbs/1000g
500A
1200A
3.09 lbs/1400g
36WH 48WH 60WH
Nominal Capacity
( C10 25cels)
Cranking Amps
Peak Amps
Weight
Battery type 12V Lithium Iron Battery
15V 1 A and DC .0 AC charger adaptor (Cigarette charger)
Charger
DC 12V 8.0A Outlet (With 120W overload protection)
USB DC 5V 2.1A
USB DC 5V 1.0A
Model HJEF10000-12 HJEF12000-12 HJEF16000-12 HJEF20000-12
High Power LED Light (1W 90LM)
10AWG
Total 23.07" (58.6cm)
10AWG
Total 23.07" (58.6cm)
8AWG
Total 50" (127cm)
8AWG
Total 50" (127cm)
8.8"
×5.5"×2.8" (
223mm*140mm*72mm)
Size and length of
Jump Сable and Сlamps
Function
The dimension of
Jump Starter
The working
temperature
14 ℉~140 ℉ (-10℃-60℃)
1) Check and make sure the connections is
correct
2) Check the internal battery capacity and
recharge it if necessary
3) Try starting serval times to warm up the battery
and then the starting performance increase.
◎ Do not attempt to disassemble, modify, knock and throw the product, please
contact your local distributor if the product has any problem.
◎ Never place the Jump Starter directly above battery being jumped
◎ Keep out of reach of Children.
IMPORTANT! PLEASE READ THE INSTRUCTION MANUAL CAREFULLY,
AND OPERATE CORRECTLY ACCORDING TO INSTRUCTION.
WARNING! NEVER ALLOW CLAMPS TO TOUCH TOGETHER OR CONTACT
THE SAME PIECE OF METAL.
◎ Do not charge the Jump Starter in dangerous places, such as near fuel, near
fire etc.
◎ Do not expose the Jump Starter to the sun, rain or snow.
◎ Do not place the Jump Starter in microwave oven, pressurized container or
vacuum chamber.
◎ Do not charge the Jump Starter with non-standard charger, use only
specified charger equipped with Jump Starter.
◎ Do not immerse the Jump Starter in water or rinse by water, no waterproof
design.
◎ Do not operate the jump starter if it has received a sharp blow, been dropped
or otherwise damaged in any way.
www.skyrichbattery.com
Power by: Global Power Central Inc
Add: San Gabriel, CA 91776
Step 4:
After successfully starting, remove the jump cable
from the Jump Starter.
Step 5:
Press <POWER> button for 3S to turn off, or wait for 30S
then the Jump Starter will shut down automatically.
Step 6:
Disconnect Red and Black clamps from the battery
terminals.
Recharge the Jump Starter as soon as possible after use.
Step 1:
Press the <POWER> button to turn on the Jump
Starter.
LCD displays the internal battery status, It is
recommended the battery capacity be over 60% for
jumpstarting.
Step 3:
Start the vehicle (Turn off all electronic devices to ensure a
successfully start.)
Step2:
Connect the red clamp to positive(+) terminal and
black clamp to negative(-)terminal
Plug the Jump cable into jumpstart socket.
LCD Display
13.4V
<POWER>
<POWER>
POWER
LIGHT
POWER LIGHT

• 6 •
Charged by DC adaptor (Cigarette charger) while
driving
◎ Plug the DC adaptor into Jump starter's charging
port;
◎ Connect the DC adaptor to the vehicle’s cigarette
outlet, LCD displays <CHARGING>;
◎ LCD displays <CHARGING IS COMPLETED> when
the internal battery fully charged, Jump Starter will
stop charging circuit automatically;
◎ Disconnect the DC adaptor from the cigarette outlet,
and then unplug the DC adaptor from the Jump Starter.
Charged by AC charger
◎ Plug the AC adaptor into Jump starter's charging
port;
◎ Connect the AC adaptor to a 100~240VAC electrical
wall outlet, LCD displays <CHARGING>;
◎ LCD displays <CHARGING IS COMPLETED> when
the internal battery fully charged, Jump Starter will
stop charging circuit automatically;
◎ Disconnect the AC adaptor from the AC outlet, and
then unplug the AC adaptor from the Jump Starter.
NOTE
◎ Please wait for 10 min if several fail attempts, then start the vehicle again.
◎ If the vehicle couldn’t be started within 5S, let the Jump Starter cool for 3
mins before attempting to start the vehicle again, or you may damage the Jump
Starter.
◎ If the ambiance temperature is below -10℃, the cranking performance will
decrease sharply, the Jump Starter may not start the vehicle successfully. You
can try a few attempts to start for warm up the battery and then increase the
starting performance.
◎ If not successful, place the Jump Starter in a warmer area for a short time.
3.2 USING USB DC 5V OUTLET
The Jump Starter is a DC power source for all DC devices that are equipped
with a USB plug.
1. Press the <POWER> button to turn on the Jump Starter.
2.P lug the USB switch cable into the USB Outlet.
3.P lug the other end (Micro USB) of the cable into your device or use the
original charging cable of your device. Turn device on, if necessary.
4.W hen finished, turn off the device (if necessary) and unplug the device.
5. Press the <POWER> for 3S to turn off the unit or wait for 2 mins then the
Jump Starter will shut down automatically.
6.R echarge the Jump Starter immediately after unplugging the device.
3.3 USING DC 12V8A OUTLET
The Jump Starter is also a DC power source for all DC devices that are
equipped with a Cigarette plug.
1. Make sure the device to be powered is OFF before inserting the Cigarette
plug into the Cigarette outlet.
2. Press <POWER> button to turn on the Jump Starter.
3. Plug the Cigarette outlet cable into the Jump Starter’s 12V outlet.
4. Plug your device into Cigarette outlet and turn on the device (if required).
5. When finished, turn off the device (if required) and disconnect the device.
6. Press the <POWER> button for 3S to turn off the Jump Starter or wait for 2
mins then the Jump Starter will shut down automatically.
7. Recharge the Jump Starter immediately after unplugging the device.
NOTE: The Maximum output power of the 5V and12V is 120W totally, the
socket output will shut down automatically if the power of the device is over
120W.
Electrical devices must be removed first, or the Jump Starter can not shut down
automatically.
3.4 USING HIGH POWER LIGHT
1. Press <POWER> button to turn on the Jump Starter.
2. Quick press <LIGHT> button to switch three different LED light modes.
First: Highlight; Second: strobe; Third: SOS; Fourth: Off
3. Press <POWER> for 3S to turn off the Jump Starter.
MODEL: HJEF10000-12
HJEF12000-12
HJEF16000-12
HJEF20000-12
READ THE INSTRUCTION MANUAL COMPLETELY BEFORE USING THIS PRODUCT.
RETAIN THIS INSTRUCTION FOR FUTURE REFERENCE
2
7
8
9
10
3
45
6
11
1
Product Feature
1.Jump Starter
2. High Power LED Light
3.Jumpstart socket
4.High-strength rubber handle
5.USB DC 5V/2.1A Outlet
6.USB DC 5V/1.0A Outlet
7. DC12V/8A Outlet
8.15V/1A Input port
9.POWER button
10. LIGHT button
11.LCD display
12. Oxford bag
13. AC charger
14. DC adaptor (cigarette charger)
15. 12V Switch Cable and Cigarette
Outlet (optional)
16. 5V USB/Micro USB Connector
(optional)
17. Cable and clamps with fuse
CONTENTS
1. WARNING
2. PRODUCT FEATURE
3. OPERATING INSTRUCTION
INSTRUCTION MANUAL
SMART LITHIUM
SAFETY
GUARANTEED
LiFePO4
Lithium Jump Starter and DC Power Source
12 13 14 15 16 17
IMPORTANT! CHARGE IMMEDIATELY AFTER PURCHASE, AFTER EACH
USE AND EVERY 6 MONTHS, ALWAYS KEEP THE INTERNAL BATTERY
FULLY CHARGED.
PROBLEM POSSIBLE CAUSE REMEDIES
5. TROUBLESHOOTING
The vehicle can not be
jumpstarted
The device can not be
powered
Can not turn on the Jump
Starter
1) Improper clamp
connections
2) The internal battery
capacity is too low
3) Too low outside
temperature
1) Improper clamp
connections
2) The switch cable and
connectors are defective
3) The internal battery
capacity is too low
4) The device of 12V to be
powered is over 120W
The internal battery
capacity is too low
1) Check and make sure the connections are
correct
2) Change a new switch cable and connectors
3) Check the internal battery capacity and
recharge it if necessary
4) Make sure the device to be powered is not over
120W
Check the internal battery capacity and recharge
it if necessary
6. MAINTENANCE AND CARE
7. SPECIFICATION
• 1 • • 2 • • 3 • • 4 • • 5 •
Fuse Protection
Overcharge and
Overdischarge Protection Against-reverse Plug
• 7 •
30WH
250A
500A
1.98 lbs/900g
300A 400A
600A 900A
2.65 lbs/1200g2.20 lbs/1000g
500A
1200A
3.09 lbs/1400g
36WH 48WH 60WH
Nominal Capacity
( C10 25cels)
Cranking Amps
Peak Amps
Weight
Battery type 12V Lithium Iron Battery
15V 1 A and DC .0 AC charger adaptor (Cigarette charger)
Charger
DC 12V 8.0A Outlet (With 120W overload protection)
USB DC 5V 2.1A
USB DC 5V 1.0A
Model HJEF10000-12 HJEF12000-12 HJEF16000-12 HJEF20000-12
High Power LED Light (1W 90LM)
10AWG
Total 23.07" (58.6cm)
10AWG
Total 23.07" (58.6cm)
8AWG
Total 50" (127cm)
8AWG
Total 50" (127cm)
8.8"
×5.5"×2.8" (
223mm*140mm*72mm)
Size and length of
Jump Сable and Сlamps
Function
The dimension of
Jump Starter
The working
temperature
14 ℉~140 ℉ (-10℃-60℃)
1) Check and make sure the connections is
correct
2) Check the internal battery capacity and
recharge it if necessary
3) Try starting serval times to warm up the battery
and then the starting performance increase.
◎ Do not attempt to disassemble, modify, knock and throw the product, please
contact your local distributor if the product has any problem.
◎ Never place the Jump Starter directly above battery being jumped
◎ Keep out of reach of Children.
IMPORTANT! PLEASE READ THE INSTRUCTION MANUAL CAREFULLY,
AND OPERATE CORRECTLY ACCORDING TO INSTRUCTION.
WARNING! NEVER ALLOW CLAMPS TO TOUCH TOGETHER OR CONTACT
THE SAME PIECE OF METAL.
◎ Do not charge the Jump Starter in dangerous places, such as near fuel, near
fire etc.
◎ Do not expose the Jump Starter to the sun, rain or snow.
◎ Do not place the Jump Starter in microwave oven, pressurized container or
vacuum chamber.
◎ Do not charge the Jump Starter with non-standard charger, use only
specified charger equipped with Jump Starter.
◎ Do not immerse the Jump Starter in water or rinse by water, no waterproof
design.
◎ Do not operate the jump starter if it has received a sharp blow, been dropped
or otherwise damaged in any way.
www.skyrichbattery.com
Power by: Global Power Central Inc
Add: San Gabriel, CA 91776
Step 4:
After successfully starting, remove the jump cable
from the Jump Starter.
Step 5:
Press <POWER> button for 3S to turn off, or wait for 30S
then the Jump Starter will shut down automatically.
Step 6:
Disconnect Red and Black clamps from the battery
terminals.
Recharge the Jump Starter as soon as possible after use.
Step 1:
Press the <POWER> button to turn on the Jump
Starter.
LCD displays the internal battery status, It is
recommended the battery capacity be over 60% for
jumpstarting.
Step 3:
Start the vehicle (Turn off all electronic devices to ensure a
successfully start.)
Step2:
Connect the red clamp to positive(+) terminal and
black clamp to negative(-)terminal
Plug the Jump cable into jumpstart socket.
LCD Display
13.4V
<POWER>
<POWER>
POWER
LIGHT
POWER LIGHT
Table of contents
Popular Power Supply manuals by other brands

Clarion
Clarion CAA-188-200 installation instructions

TDK-Lambda
TDK-Lambda HFE2500-S1U instruction manual

L-Acoustics
L-Acoustics LA12X user manual

Rockwell Automation
Rockwell Automation Allen-Bradley 1606-XLE240E Reference manual

Watts
Watts Wx600 user manual

Hangzhou Ruideng Technology
Hangzhou Ruideng Technology RD6006-W instructions

Andover Controls
Andover Controls Continuum PS 120/240 AC 50-U manual

Oakley Sound
Oakley Sound PSU2 Builder's guide

Carrier
Carrier ComfortPro PC6000 Operation & service manual

Altronix
Altronix AL842ADA220 installation guide

Delta Electronics
Delta Electronics Delphi Q48DC datasheet

Akyga
Akyga AK-ND-32 user manual


