SHIE HSANG SH-0183-I Quick guide
Assembly and Maintenance Instructions
for
SH-0183-I & SH-0184-I
SH-0283-I & SH-0284-I
Before you begin assembling and using your new BBQ grills we recommend that you read
through owner’s use and care manual to avoid serious body injury or property damage.
Note to Assembler/Installer: Leave these instructions with the consumer.
Note to Consumer/User: Keep these instructions for future reference.

- 1 -
KEEP THESE INSTRUCTION FOR FUTURE USE
ASSEMBLY AND USER INSTRUCTIONS
FOR
OUTDOOR GAS GRILL
USING LIQUEFIED PETROLEUM GAS
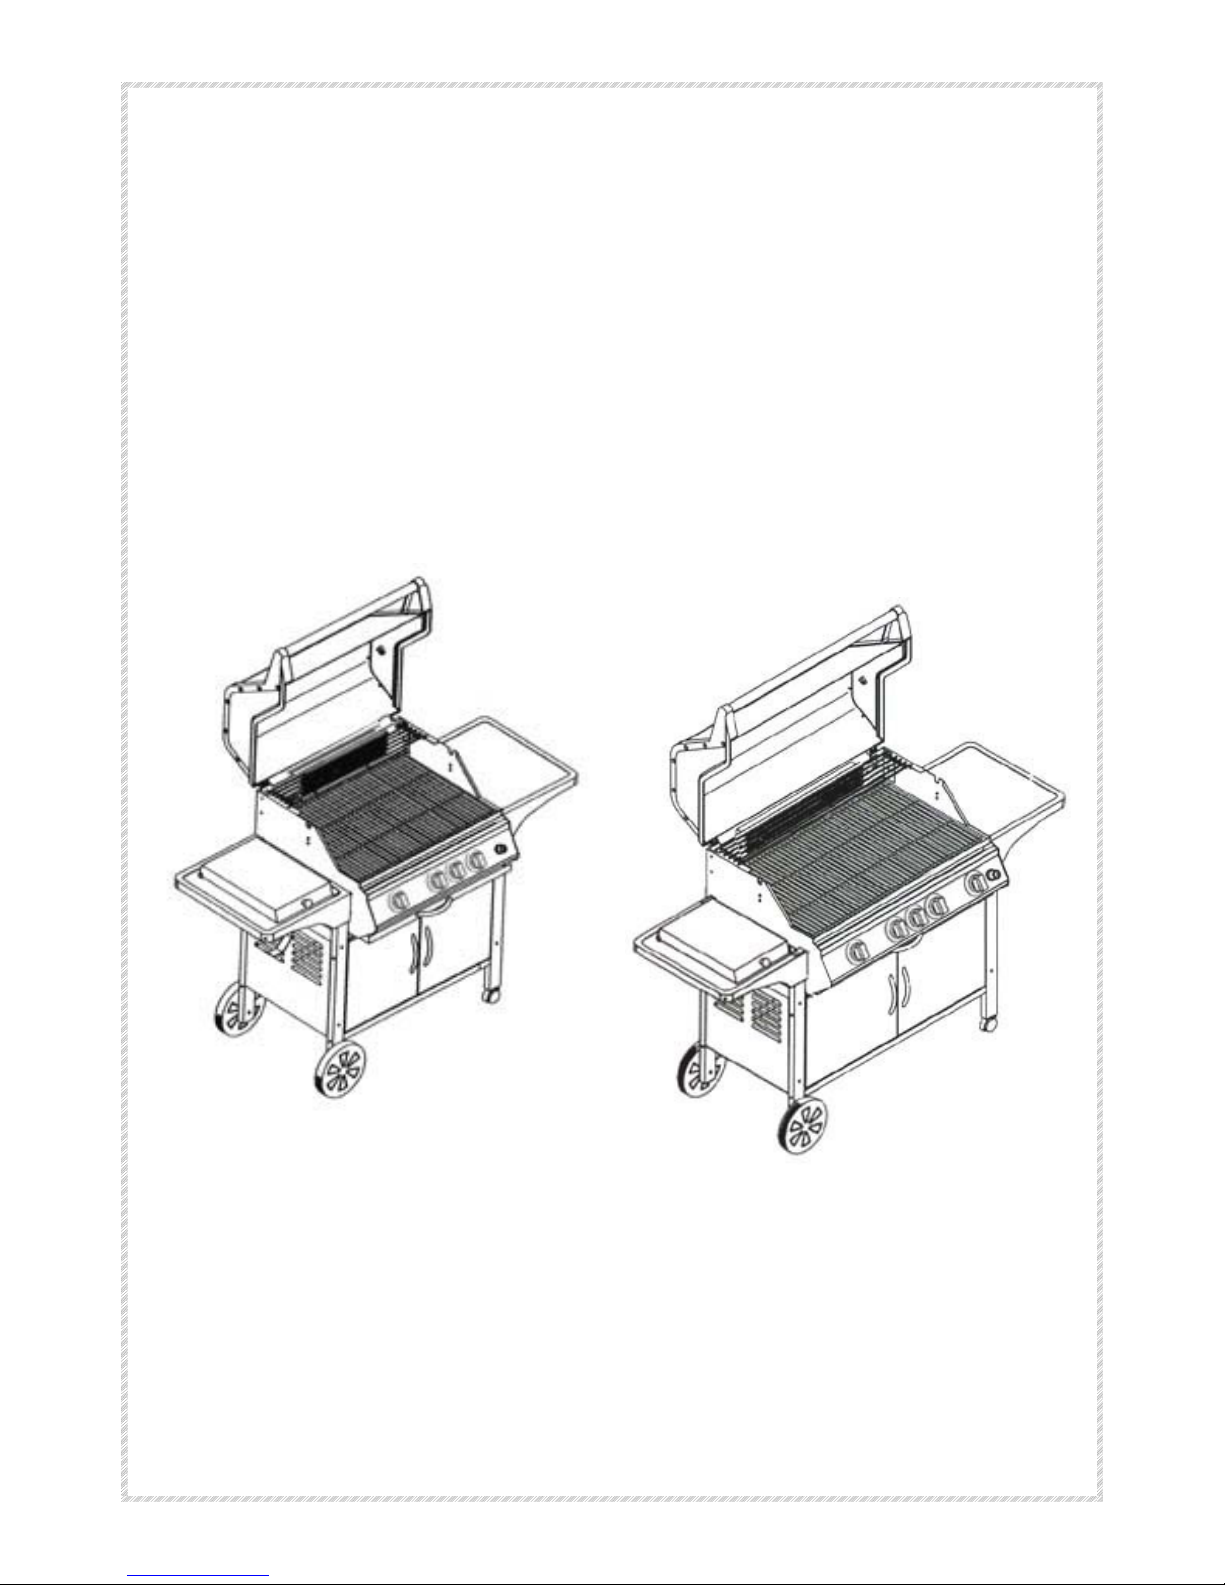
Your new
SH-0183-I & SH-0184-I
GRILL is made from the highest quality
materials, and produced under strict manufacturing controls
Please read the Instructions for assembly before commencing, and follow the
instructions for use carefully. We congratulate you on your decision to buy this
outdoor gas grill and wish you great fun when grilling with it.
PLEASE READ THIS SAFETY INSTRUCTION IN FULL BEFORE COMMENCING
ASSEMBLY.
Important Safety instructions
The barbecue is safe and easy to use. The following rules must be followed.
1. Ensure that the unit has been assembled correctly according to the instructions.
2. Never loosen, or allow the gas connection to become loose. Should this happen,
immediately ensure that the gas is turned off, and then re-check the security of
the connection.
3. The appliance shall be kept away from flammable materials. There should be
no combustible materials less than 250mm from the sides of the barbecue and
less than 1500mm above the cooking surface of the barbecue.
4. Read the Users instruction, and instructions written on the grill, refer to them
whenever necessary.
5. Never leave the grill unattended while grilling.
6. In the event of a gas leak, turn off gas supply at the cylinder.
7. Keep children well clear while grill is in use and after use until it has cooled.
8. Keep grill area clear of combustible materials and/or liquids.
9. Never obstruct free flow of air to the rear of the grill, or alter/adapt the barbecue to
suit any other situation.

- 2 -
10.A hose conforming to the national standard must be connected at one end to the
regulator and at the other to the barbecue nipple using hose clips. The hose
length must not exceed 1.5 m.
11.Lead the hose away from the grill body without twisting it. Do not let the hose
touch the hot surface.
12.Never change the pressure of the regulator or the air valve settings of the burner.
13.Every time the cylinder is reconnected do a leak test.
14.Protective gloves should be worn if hot parts or utensils are to be handled.
Contents
1.Technical Data
2. Instructions for assembly
3. Important tips
4. Connecting the gas
5. Instructions for the first Users
6. Instructions for use
7. Cooking tips
8. Care and Maintenance
9. Troubleshooting

- 3 -
1 . Technical Data –SH-0183-I & SH-0184-I Barbecue Grill
The barbecues are I 3+(28-30/37), I 3B/P(30) and I 3B/P(50) appliances, designed to
operate on Butane at 28/30mbar, Propane 37mbar and B/P 30/50mbar. Gas
consumption, pressures and injectors orifices sizes are shown below:
SH-0183-I
Injector Orifice Heat Output Gas Consumption
I 3+(28-30/37), I 3B/P(30)
1.15 18.4kw 1312g/h
I 3B/P (50) 0.95 18.4kw 1312g/h
SH-0184-I
Injector Orifice Heat Output Gas Consumption
I 3+(28-30/37), I 3B/P(30)
1.15 23.08kw 1648g/h
I 3B/P (50) 0.95 23.08kw 1648g/h
Note: For cooking longer periods of 30 minutes we recommend the use of Propane
Gas.
Gas Regulator
A gas regulator confirming to the national standard must be fitted to the gas cylinder
to provide the appropriate gas pressure.
Do Not use this appliance with an adjustable regulator.
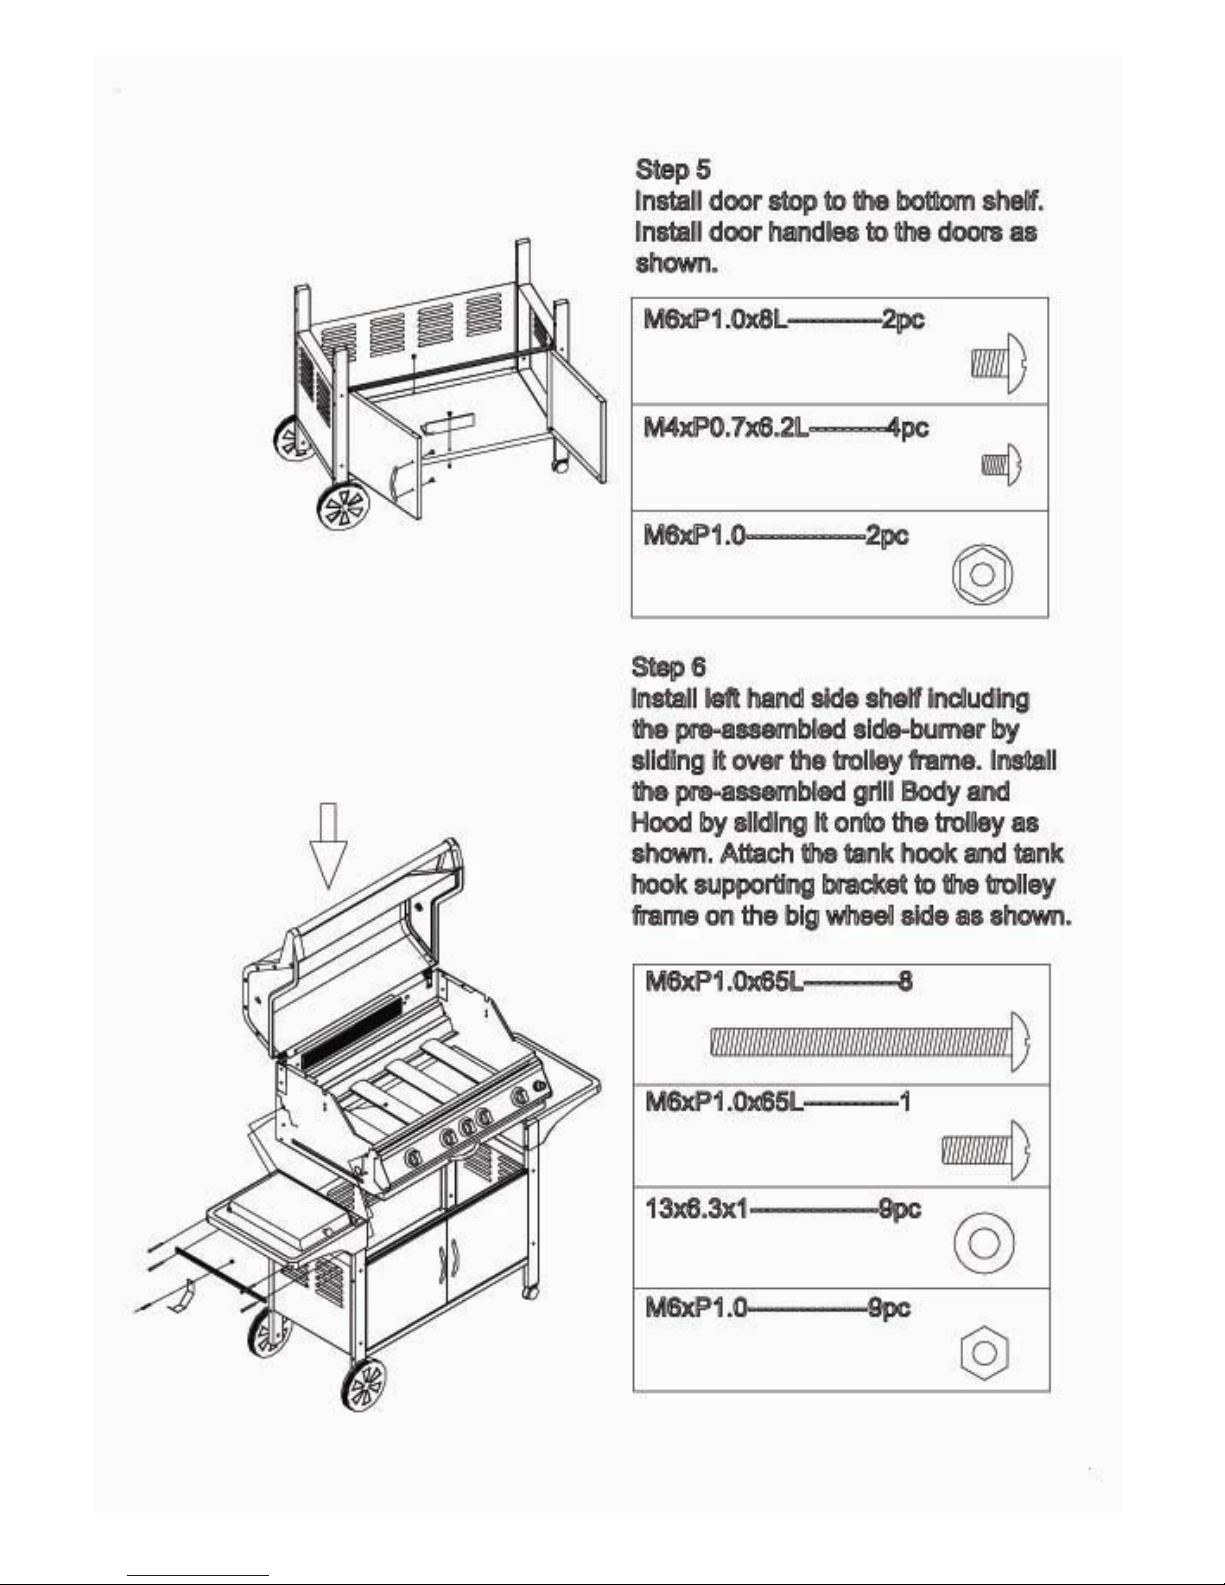
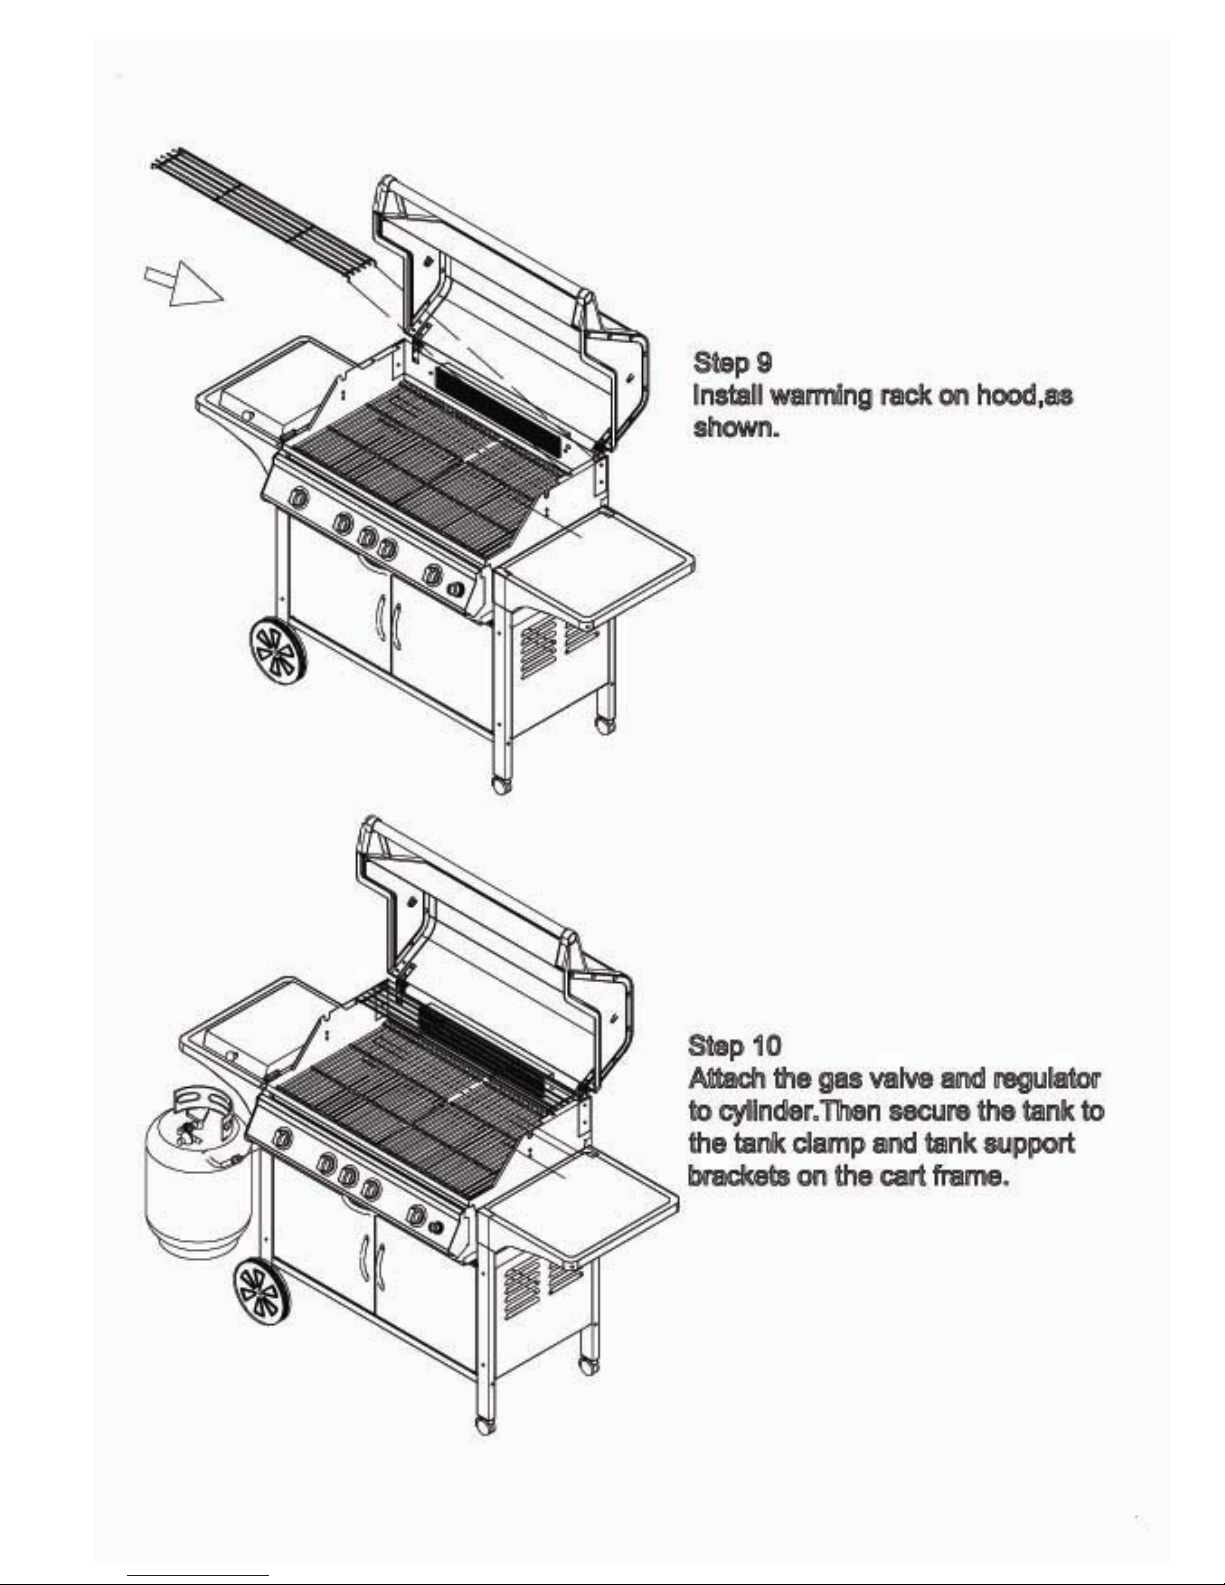
2. Instructions for assembly
Read these instructions through carefully before commencing assembly, and then
follow them step-by-step.
Two adults will be needed, to assist each other with assembly. You will need the
following tools. A medium size cross-recessed screwdriver, 10 mm and 11 mm A/F
open-ended / ring spanner, and a 14 mm A/F socket. Sort out and check the parts
according to the assembly instructions, before commencing the assembly.
- 4 -

- 5 -
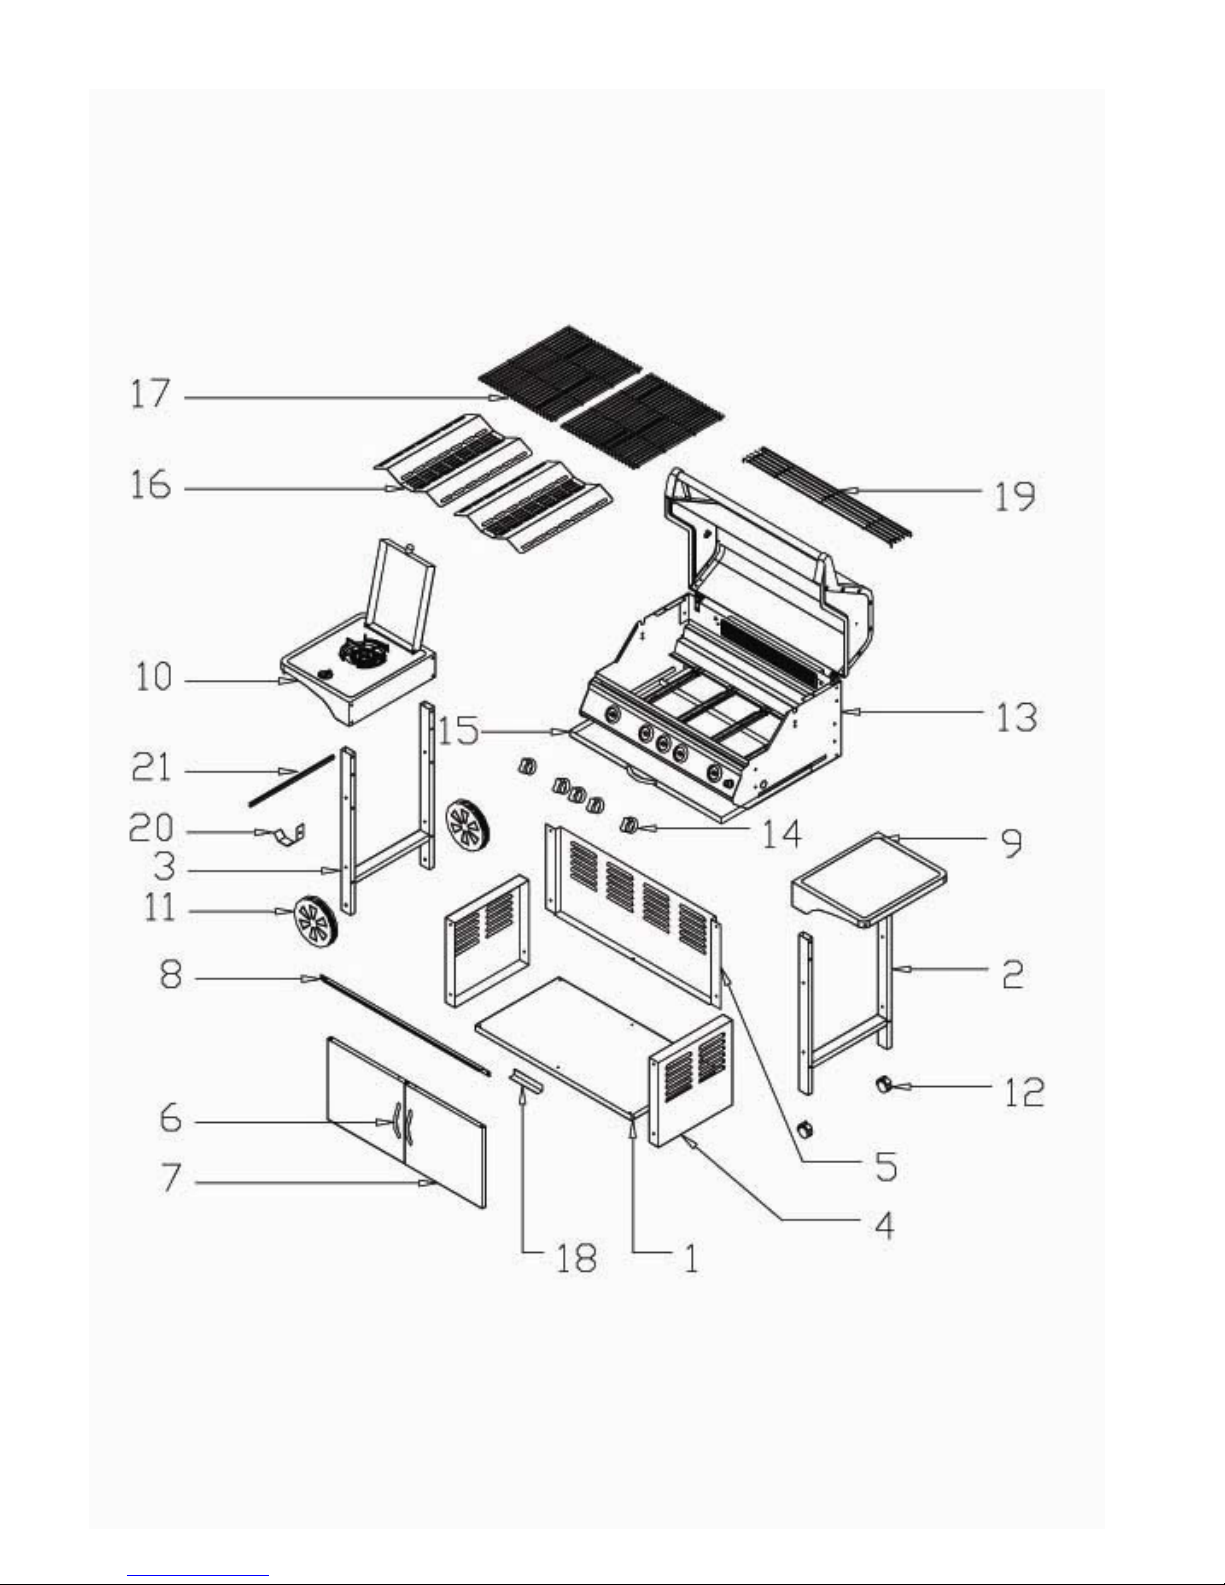
SH-0183-I
No. Parts QTY
1 Trolley base 1
2 Leg Unit for Caster 1
3 Leg Unit for Wheel 1
4 Cabinet Side Panel 2
5 Cabinet back panel 1
6 Handle of cabinet 2
7 Cabinet door 2
8 Door stop strip 1
9 Side table 1
10 Side burner 1
11 Wheel 2
12 Caster 2
13 Grill body 1
14 Control knob 4
15 Grease tray 1
16 Flame tamer 2
17 Cooking grid 2
18 Door stopper 1
19 Warming rack 1
20 Gas tank hook 1
21
Tank hook supporting bracket
1
22 Bag of screws, nuts, and bolts (not shown) 1
NOTE: regulator with hose
Because of a variety of fittings, this item is not included.
Available from dealer

- 6 -
SH-0184-I
No. Parts QTY
1 Trolley base 1
2 Leg Unit for Caster 1
3 Leg Unit for Wheel 1
4 Cabinet Side Panel 2
5 Cabinet back panel 1
6 Handle of cabinet 2
7 Cabinet door 2
8 Door stop strip 1
9 Side table 1
10 Side burner 1
11 Wheel 2
12 Caster 2
13 Grill body 1
14 Control knob 5
15 Grease tray 1
16 Flame tamer 2
17 Cooking grid 2
18 Door stopper 1
19 Warming rack 1
20 Gas tank hook 1
21
Tank hook supporting bracket
1
22 Bag of screws, nuts, and bolts (not shown) 1
NOTE: regulator with hose
Because of a variety of fittings, this item is not included.
Available from dealer

- 7 -

- 8 -
- 9 -

- 10 -
- 11 -

- 12 -

- 13 -
3. Always Be Aware
The grill must only be used outdoors and placed firmly on a solid, even and
non-combustible surface, shielded from wind. There should be no combustible
materials less than 250mm from the sides of the barbecue and less than 1500mm
above the cooking surface of the barbecue.
IMPORTANT: Keep children away from the barbecue
during use,
and until it has cooled down after use.
IMPORTANT: The hood must always be located on the rear of the body when grilling.
IMPORTANT: Any modification of this unit can be dangerous.
Do not put a vinyl BBQ cover or anything flammable in the cabinet area while
the BBQ is Hot.
Do not place the grill near entrances, doorways or in thoroughfares.
Do not use charcoal, briquettes or lighter fluid in any gas BBQ
Shield the Gas container from direct sunlight.
BBQ units should never be placed in a fully enclosed patio area without a
chimney or non-flammable exhaust hood, with an efficient exhaust fan.
Never move the grill while it is hot or in operation.
THE GAS CONTAINER MUST BE PLACED UPRIGHT BY THE SIDE OF
THE GRILL
4. To connect the gas bottle to the unit:
Attach the hose to the manifold inlet nipple and tighten hose clip. Ensure that
all connecting threads and surfaces are undamaged, clean and free from oil dirt.
When fitting the hose make sure that it is free from twisting, kinks or sharp
bends.
. Ensure that all connecting threads and surfaces are undamaged, clean and
free from oil dirt. When fitting the hose make sure that it is free from twisting,
kinks or sharp bends.
Dear User,
When you have assembled your barbecue, please pull all screws
tight after 2 – 3 days, especially the screws holding the frame (but
do not over tighten them). Only then can the stability of your
barbecue be assured. The materials used tend to loosen again
after the first tightening and connections could thus become
unsteady.

- 14 -
Protect the hose from dripping grease and do not allow it to touch any hot
surface or sharp edges.
Attach the regulator to the gas cylinder. Refer to the instructions supplied with
the regulator for details regarding fitting.
Test for gas leaks. Do a leak test each time the cylinder is installed, whether or
not it has been filled. Check all other joints at least once a year.
lf the hose shows deterioration or damage, leak test the entire outer surface
while under pressure. Replace at first sign of leak or age cracking.
Remember to turn the cylinder valve OFF before removing the hose.
Testing for Leaks
Ensure burner knobs are OFF and open the cylinder valve.
Use a solution of half detergent and half water for leak testing. Brush solution on
each connection and check for bubbles.
lf a leak is present, tighten the loose joint.
lf leak persists contact an authorized agent.
5. Instructions for first users
Before using the new grill for the first time, it is advisable to follow this
procedure:
Before cooking for the first time, operate the barbecue for about 15 minutes
with the lid opened and the gas turned on HIGH. This will “heat clean” the
internal parts and dissipate odour from the painted finish.
This will season the
grill and prepare it for your first barbecue.
Ensure that the cooking surfaces are clean and dry. Coat the cooking surfaces
with cooking oil, light all burners, reduce the heat to “small flame” setting and
allow the grill to heat up for 10/15 minutes.
Heating up- Always heat up the grill before starting to barbecue; use the ‘big
flame’ setting.
Heating up time- 6-10 minutes for food needing high temperatures;
2-5 minutes for food needing low temperatures.
Drip Tray – Before first use, the drip tray should be filled with sand to absorb fat
and avoid the possibility of fat accumulating with the consequent risk of fire.
First Aid – in the event of someone sustaining a burn, the affected part should be
immediately plunged into cold water, or held under a running cold-water tap, for
at least 5 minutes. Medical help and/or advice should be obtained as soon as
possible.

- 15 -
Do not leave the BBQ on the highest setting for an extended period – this may
damage your BBQ.
6. Instructions for use
Leak control check – Before use, ensure the security of the Gas supply.
To light –Open the lid of your grill before lighting. Do not stoop over the grilling
space.
Lighting instruction -
•To ignite BBQ’s with Piezo Ignition, turn the left hand burner control knob to
the large flame symbol position (full rate) whilst pressing the piezo button
several times.
•If the burner does not light, turn the burner to the off position ( O ).
•Wait 5 minutes and repeat the above lighting steps.
•The remaining burners must be lit from the left hand side of the appliance in
sequence to the right hand side of the appliance.
•Never attempt to light a burner when the burner on its adjacent left hand side
is not alight. ALWAYS LIGHT THE BURNERS IN SEQUENCE FROM LEFT
HAND SIDE TO AVOID INCIDENT. IF POSSIBLE ALWAYS TURN OFF THE
BURNERS IN THE SAME SEQUENCE AS PER IGNITION SEQUENCE SO
THAT YOU ARE AWARE OF WHICH BURNERS ARE ALIGHT.
•The same ignition sequence should also be followed in case of an ignition
device failure. The barbecue should then be ignited with a match from the left
hand side to the right.
•Lighting Instructions for the Side burner:
1. Open lid.
2. Push and turn the control knob to HIGH.
3. The built-in spark igniter will light the burner automatically.
4. You may have to push and turn the control knob up 3 to 4 times to
light.
5. If burner does not light, turn gas off and wait 5 minutes before retrial
or lighting by match.
•To ignite BBQ burners with battery operated igniter, turn the burner control
knob to full open and push down on igniter knob (red or black).

- 16 -
•Once all burners are lit, close the roasting hood and preheat cooking
surfaces before cooking.
IMPORTANT:
•
Should the flame be blown out by the wind, turn off the control knobs, open the
hood and wait five minutes before re-lighting.
•
Keep children clear of the grill when in use, and after use until it is cold.
•
Never move the grill while it is still hot.
•
Should there be a smell of gas, turn off the gas immediately.
7. Cooking Tips
Before starting to cook, prepare everything in advance, and ensure that all food is
properly cooked before it is consumed.
Cut surplus fat off meat before grilling to avoid it dripping down causing
flare-ups.
Practice with cheap cuts in order to get to know your grill, before using
expensive cuts.
If desired, meat can be marinated (in oil, wine, herbs and spices). This improves
taste and has a tenderizing effect. After marinating, the meat must be dried
before grilling as oily meat causes flare-ups and tends to burn.
Herbs and spices should be used before the meat is placed on the grill.
When grilling steaks grilling on high heat on both sides should seal the meat.
Complete the cooking on lower temperature. Turning the steaks once.
Use long tongs when grilling. Not a fork, as otherwise meat juices will be lost
through pricking when turning meat over.
Aluminum foil is most suitable for cooking vegetables, Wash the vegetables
thoroughly but do not dry them. There will be sufficient water remaining to cook
most vegetables. For very solid vegetables e.g. carrots, an ice cube can be
packed into the foil. Close the foil well before placing the package on the grill.
8. Care and maintenance
Cooking Grates and Solid Plates-
Ensure the hood is opened, and heat the grill for a few minutes on high
heat.

- 17 -
Tune off the gas, take precautions against burns, and clean the grate
surface with a metal brush. When cool, very dirty grates can be washed by
hand.
Brush with cooking oil before use.
Flame Tamer Plate-
Ensure that the hood is opened, and heat the grill for a few minutes on
high heat.
Tune off the gas, take precautions against burns, and clean the grate
surface with a metal brush. When cool, very dirty grates can be washed by
hand.
Upkeep-
Clean your barbecue after each USE. DO NOT use abrasive or
flammable cleaners, as it will damage the parts of the product and may
start a fire. Clean in warm soapy water.
CAUTION: All cleaning and maintenance should be carried out when the
barbecue is cool and with the fuel supply turned OFF at the gas cylinder.
In order to maintain you grill in good condition and give you good
service, it should be cleaned – depending upon the amount of use – once
or twice a month as follows:
When cold, remove and clean the grates and flame tamer plate as
described above.
Clean the inside of the grill body and front panel with detergents and
rinse with clean water, then dry, before re-assembling.
Use a soft cloth or sponge to prevent scratches and marring of the steel
surfaces.
Clean the trolley with any non abrasive metal polish.
Change the sand in the drip tray periodically
Cleaning burners-
Cleaning of Gas parts must be carried out by a LPGSASA registered
fitter, but the burners may be cleaned by following the instructions given
hereunder.
When cold, having been removed, burners may be cleaned using a wire
metal brush, the burner holes with a needle or similar, and the whole
burner washed with water. Or blow clean with compressed air and wipe
with a cloth.
Clean any clogged ports with a pipe cleaner or stiff wire (such as an
opened paper clip).
Ensure that no water is retained in the burner, prior to re-assembly.
Inspect burner for any damage (cracks or holes). If damage is found,
replace with a new burner. Reinstall the burner, check to ensure that the

- 18 -
Gas valve orifices are correctly positioned and secured inside the burner
inlet (venturi).
SERVICING
Your gas barbecue should be serviced annually by a competent registered person.
Storage-
Turn off gas container valve, and remove regulator from container.
Store gas container outside, on the ground level surface, upright, away
from sunlight and any drains or gully, with valves closed and valve caps in
place.
Clean the grill as in 3 above
When stored outdoors, the grill must stand on dry ground.
Ensure a small amount of fat or cooking oil is on the cooking plates to
prevent rust.
While this appliance is not in use, it should be covered with a cover, to
protect it from weather and other adverse conditions. In high humidity
and/or ocean beach areas, make sure to keep the unit clean and polished.
Use stainless steel cleaners, polishes or stainless steel oil protectants.
Warning
STORE CYLINDER IN A WELL VENTILATED AREA OUT OF REACH OF
CHILDREN.
When the gas cylinder is disconnected, replace the plug or cap on the valve outlet.
For extended storage it is suggested that the primary airports of the burners be
covered against the penetration of insects or vermin.
Also a vinyl or canvas cover may be placed over the appliance.
Do not allow food or liquid spills to accumulate in and on your BBQ

- 19 -
9 . Troubleshooting-
PROBLEM CAUSE CHECK
Gas smell 1. Orifice not fitted
properly in the venturi
tube
2. Bent hose
1. Check the connection
2. Straighten
Burner does not light 1. Gas tank is empty
2. Gas supply turned off
at the source
3. Igniter faulty
4. Valve obstructed
1. Exchange for a new
cylinder
2. Turn on the gas
supply
3. Check igniter spark
4. Check valve inlet for
obstructions
Flame is low when
burner control knob set at
HIGH or flames do not
run the whole length of
burner
1. Dirty burner
1. Clean burner holes
with a small pin. Be
careful not to enlarge
holes
Constant flare-ups 1. Grill too cold before
start of cooking
2. Fatty foods
3. Heat setting too high
1. Pre-heat the grill for
5-10 minutes
2. Trim excessive fat
from fatty meats
3. Lower heat setting
Burners light with a
match but not with igniter
1. Gap between igniter
and igniter point to big
2. Loose or damaged
wire connection
3. Spark plug is dirty
4. Battery to weak
1. Check gap – should
be 2.5 -3mm
2. Check all wire
connections
3. Check for excessive
fat on sparker
4. Unscrew igniter cap
and replace battery
Instruction Manual Rev. 20 April 2008
This manual suits for next models
3
Table of contents
Popular Grill manuals by other brands


COUNTRY SMOKERS
COUNTRY SMOKERS CS150PPG Assembly & operation

Napoleon
Napoleon PRESTIGE PRO PRO825-3 manual

Bodum
Bodum Bistro 11133 Instructions for use

GrillBlazer
GrillBlazer GrillGun Replacing the Valve Stem

Xo
Xo XOGRILL30L Care & use/installation

Wolfgang Puck
Wolfgang Puck TRI-GRILL BCGL0050 Use and care


