R
BS612/2 TPP30
1B4048 CATEYERR-0223
BS612/2 TPP30
1B4048 CATEYERR-0223
Reflector
Reflector
R
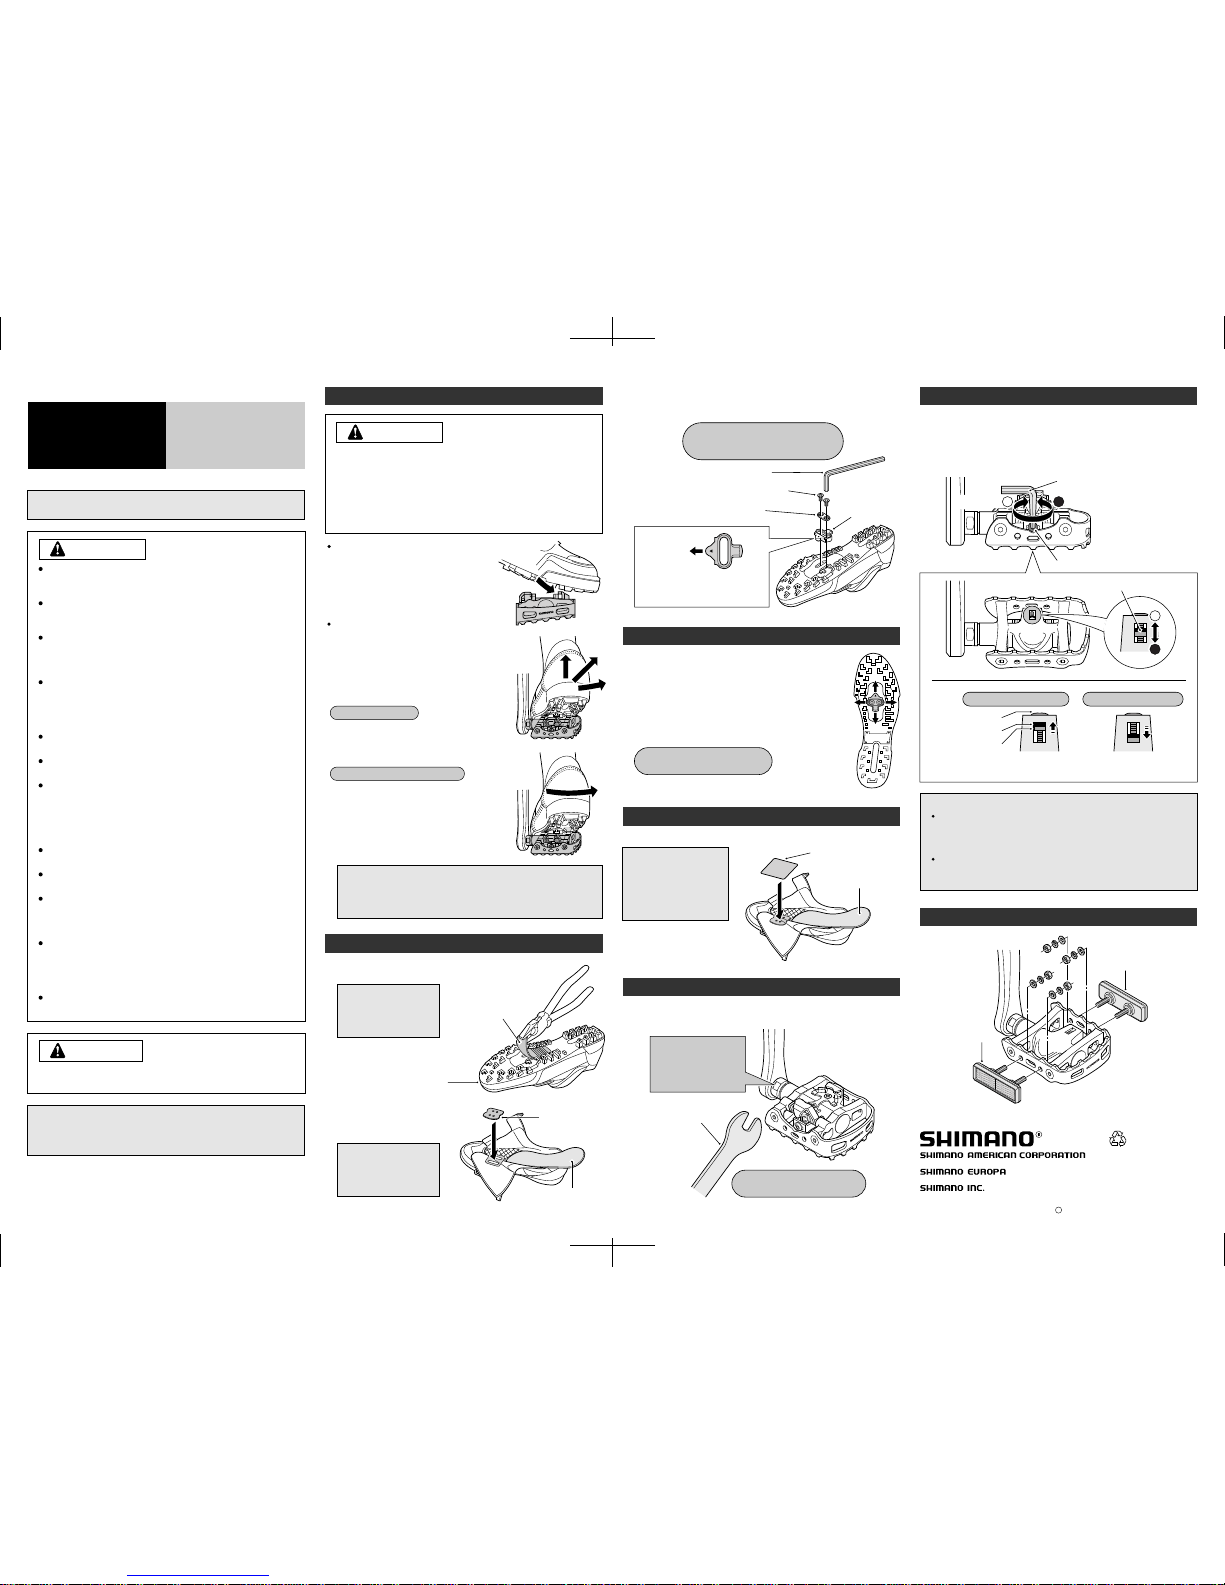
12
3 mm Allen key
Adjustment bolt
R
SM-SH51
SM-SH51
SM-SH51
SI-41N0B
SERVICE INSTRUCTIONS
Before use‚ read these instructions carefully‚ and follow them for correct use.
These pedals can be fitted with toe clips, but the toe clips
should be removed when using the pedals as SPD pedals.
Be sure to read and follow the above warnings carefully,
otherwise your shoes may not release from the pedals, or
they may release unexpectedly and slip from the pedals,
causing a fall that could result in severe injury.
These pedals have an SPD-type face on one side and a
standard face on the other side.
Use only SPD shoes with this product. Other types of
shoes may not release from the pedals, or may release
unexpectedly.
Use only Shimano cleats (SM-SH51/ SM-SH52 / SM-
SH55) and tighten the mounting bolts securely to the
shoes.
Before attempting to ride with these pedals and shoes,
make sure you understand the operation of the
engagement / release mechanism for the pedals and
cleats (shoes).
Before you attempt to ride with these pedals and shoes,
apply the brakes, then place one foot on the ground and
practice engaging and releasing each shoe from its
pedal until you can do so naturally and with minimal
effort.
Ride on level ground first until you become adept at
engaging and releasing your shoes from the pedals.
Before riding, adjust the spring tension of the pedals to
your liking.
When riding at low speed or when there is a possibility
that you might need to stop riding, (for example, when
doing a U-turn, nearing an intersection, riding uphill or
turning a blind curb), release your shoes from the pedal
beforehand so that you can quickly put your feet onto
the ground at any time.
Use a lighter spring tension for attaching the pedal
cleats when riding in adverse conditions.
Keep cleats and bindings clear of dirt and debris to
ensure engagement and release.
Remember to check the cleats periodically for wear.
When the cleats are worn, replace them. Always check
the spring tension after replacing the pedal cleats and
before riding.
Obtain, read and carefully service instructions when
installing parts. A loose, worn, or damaged parts may
cause injury to the rider.
We strongly recommend that only genuine Shimano
replacement parts be used.
If you have any questions concerning your pedals,
contact a professional dealer.
Cleat types and using the pedals
Adjusting the spring force of the binding
Do not use the pedals and cleats in any way other than as
described in these Service Instructions. The cleats are
designed to engage and disengage from the pedals when
the cleats and pedals are facing forward. See below for
instructions on how to install the cleats.
FAILURE TO FOLLOW THESE INSTRUCTIONS MAY
RESULT IN SERIOUS PERSONAL INJURY.
Press the cleats into the pedals with a
forward and downward motion.
The method of release varies according to
the type of cleats you are using.
(Check the model number and color of
your cleats to determine the proper
method of release.)
R
Single release mode
(Optional accessory)
Release the cleats from the pedals by
twisting your heels to the outside.
SM-SH51/ SM-SH52 (black)
In multiple release mode, it is necessary to practice releasing
until you become accustomed to the technique. Releasing by
lifting your heel requires particular practice.
Waterproof seal
Adjusting the cleat position
Remove the sockliner and attach the waterproof seal.
Mounting the pedals on the crank arms
1.
The cleat has an adjustment range of 20 mm front to
back and 5 mm right to left. After provisionally
tightening the cleat, practice engaging and releasing,
one shoe at a time. Readjust to determine the best
cleat position.
2.
After you have determined the best cleat position, firmly
tighten the cleat mounting bolts with a 4 mm Allen key.
2.
Remove the sockliner and
position a cleat nut over the oval
holes.
3.
From the bottom of the shoe, position a cleat and then a cleat adapter
over the cleat holes. The cleats are compatible with both left and right
pedals. Provisionally tighten the cleat mounting bolts.
Provisional tightening torque
for cleat mounting bolts:
2.5 Nm {22 in. lbs.}
Position the triangular portion
of the cleat toward the front of
the shoe.
Front
Note:
Note:
This step may not be
necessary depending
on the type of shoes.
Note:
This step may not be
necessary depending
on the type of shoes.
Note:
Attaching the cleats
1.
With a pair of pliers or a similar tool, pull off the rubber
cover to expose the cleat mounting holes.
Rubber cover for cleat
mounting holes
SPD shoe
Cleat nut
Sockliner
4 mm Allen key
Cleat mounting bolts
Cleat adapter Cleat
15 mm spanner
Use a 15 mm spanner to mount the pedals on the crank arms. The right
pedal has a right-hand thread; the left pedal has a left-hand thread.
If the spring tensions are unequal, a differen amount of effort will
be required to engage and release the cleats from the right and
left pedals. As a result, unexpected difficulty may arise because
of the unfamiliar effort required for engagement and release.
If the adjustment bolt is completely withdrawn from the spring
plate, disassembly and reassembly will be required. If this
occurs, ask a professional dealer for assistance.
If the tension indicator is at the strongest or the weakest
position, do not turn the adjustment bolt any further.
Pay attention to
the mark
R: right pedal
L: left pedal
R
Multiple release mode
Release the cleats from the pedals by
twisting your heels in any direction.
SM-SH55 (silver)
Engaging the cleats with the
pedals
Releasing the cleats from the
pedals
Tightening torque:
5 – 6 Nm {43 – 52 in. lbs.}
Tightening torque:
35 Nm {304 in. lbs.} min.
Jun. 2000 by Shimano Inc. PIT. IZM. Printed in Japan
C
One Holland Irvine CA 92618 U.S.A. Phone 949-951-5003
Industrieweg 24 NL-8071 CT Nunspeet‚ Holland Phone 31-341-272222
3-77 Oimatsucho‚ Sakai‚ Osaka‚ Japan Phone 0722-23-3243
WARNING
WARNING
Please note: Specifications are subject to change for improvement without notice. (English)
PD-M324 SPD Pedals
CAUTION
Mounting the reflectors (optional)
These service instructions are
printed on recycled paper and
can be recycled again.
The spring force is adjusted by means of adjustment bolts. The
adjustment bolts are located behind each of the bindings, and there is
one adjustment bolt on each pedal. Equalize the spring tensions by
referring to the tension indicators and by counting the number of turns of
the adjustment bolts. The spring tension can be adjusted in three steps
for each turn of the adjustment bolt.
Decrease
Increase
The waterproof seal is
supplied with
Shimano shoes which
require this step to be
carried out.
Note: Waterproof seal
Sockliner
NOTE:
For maximum performance we highly recommend Shimano lubricants
and maintenance products.
R
Tension indicator
1
2
Strongest position Weakest position
Adjustment bolt
Tension indicator
Spring plate
15