SHINOLA 5021.D Guide

CERTIFICATE OF WARRANTY
Model Number:
Modèle:
Modellnummer:
Sold To
Vendu à:
Verkauft an:
Country/Date:
Pays/Date :
Land/Datum:
Sold By:
Vendu par:
Verkauft durch:
Retailer Stamp:
Cachet du revendeur:
Stempel des Händlers:
Numero del modelo:
型号:
モデル番号:
Vendido a:
售予:
販売先:
País/Fecha:
国家/日期:
国/日付:
Vendido por:
出售方:
販売店:
Sello del vendedor:
零售商印章:
小売店のスタンプ:


English...................................................................................... Pg 04
Français................................................................................Page 32
Deutsch......................................................................................S. 60
Español.................................................................................. Pág. 90
中文..........................................................................................第120
日本語............................................................................. ページ 148
INDEX
DETROIT, U.S.A

4
At Shinola, we’ve made a lasting commitment to making
lasting things. World-class watches, beautiful leather goods,
high-integrity audio, thoughtful gifts, and a hotel. If it’s made,
we want to try to make it better.
With relentless optimism, tenacity, humor, and humility,
we help people shine in an understated way.
ENGLISH
5
SCREW-DOWN CROWNS
CROWN FUNCTIONALITY
The components of your Shinola watch are made of the finest materials and have been rigorously inspected
to meet our strict criteria. Some Shinola watches feature a screw-down crown, which adds an extra level of
water-tightness. To safeguard your investment, it is important to understand how this type of crown works:
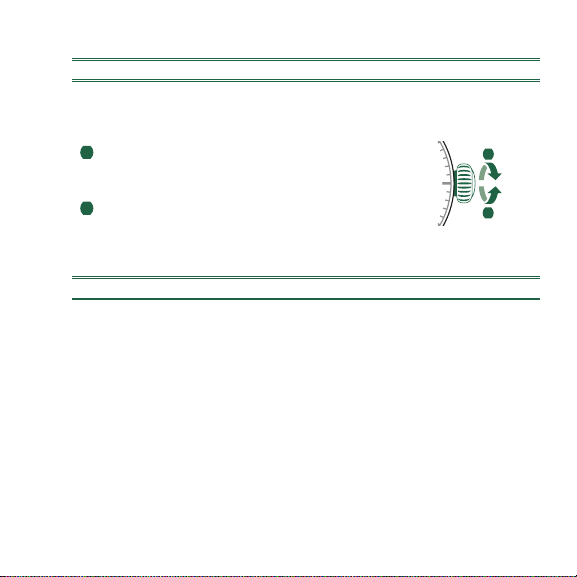
1 To make the crown operational, unscrew it from the case by turning it
counterclockwise until it releases. Once released, follow the instructions
for setting the time/date as described in the next sections.
2 To reseal the crown, press it in against the case until the threads engage,
and turn clockwise until tight. It is important to reseal your crown to
maintain water-tightness.
WATCH MODELS WITH DATE INDICATOR
PLEASE NOTE:
• If your watch features a date indicator, the date window might be in a different position from the one
depicted in this manual.
•Shinola timepieces have different movements. Depending on the movement, it may be necessary to adhere
to a specific time period when setting the date indicator. Before adjusting the date setting, please refer to
the instructions pertaining to the individual movement of the purchased timepiece.
CONFLICT-FREE DIAMONDS
Any diamonds used in Shinola watches have been purchased from legitimate sources not involved in funding
conflict and in compliance with United Nations resolutions. We hereby guarantee that these diamonds are
conflict-free, based on written guarantees provided by the supplier of these diamonds.
1
2

6
SINGLE TIME WITH DATE MODELS
SETTING THE TIME
1Pull out the crown to position III.
(The watch stops.)
2Turn the crown until you reach the
correct time.
3Push the crown back into position I.
SETTING THE DATE
1Pull out the crown to position II.
(The watch continues to run.)
2Turn the crown until the correct date appears.
3Push the crown back to position I.
4If setting the date between 9:30 p.m. and 12:00 a.m., follow steps 1
through 3, but be sure to set the date to the following day.
SINGLE TIME MODELS
SETTING THE TIME
1Pull out the crown to position II.
(The watch stops.)
2Turn the crown until you reach the
correct time.
3Push the crown back to position I.
III
3
1
2
II IIII
3
1
2
III
1
2
3
7
SETTING THE TIME
1Pull out the crown to position III.
(The watch stops.)
2Turn the crown until you reach the
correct time.
3Push the crown back to position I.
SETTING THE DATE
1Pull out the crown to position II.
(The watch continues to run.)
2Turn the crown until the correct date appears.
3Push the crown back to position I.
4If setting the date between 9:30 p.m. and 12:00 a.m., follow steps 1
through 3, but be sure to set the date to the following day.
CHRONOGRAPH MODEL 5020.B
DESCRIPTION OF THE DISPLAY AND CONTROL BUTTONS
Please note:
Before using the chronograph functions,
please ensure that:
-the crown is in position
I
(= normal position).
-the four chronograph hands are
precisely at zero position following
activation of push-button B. If the
hands are not precisely at zero,
their positions must be adjusted.
(See the chapter
Adjusting the
Chronograph Hands to Zero
.)
A
B
I
Big date
Center stop-second
Minute hand
Hour hand
Minute counter
Hour counter
Second hand
II IIII
3
1
2
II
1
2
3
8
ADJUSTING THE CHRONOGRAPH HANDS TO ZERO
1Pull crown out to position III.
(All four chronograph hands are in
their correct or incorrect zero position.)
2Keep push-buttons Aand Bdepressed
simultaneously for at least 2 seconds.
(The center stop-second rotates by
360° - corrective mode is activated.)
3Press push-button Ato single step the
center stop-second hand. Press and
hold push-button Ato advance the center
stop-second hand quickly. 3b Press
push-button Bto advance to the next hand.
Press push-button Ato single step the minute and the hour counter hands.
Press and hold push-button Ato advance the minute and hour counter hands
quickly.
Return the crown to position I.
BASIC FUNCTION (START / STOP / RESET)
Example
1Start: Press push-button A.
2Stop: to stop the timing, press push-button A.
once more and read the four chronograph
counters: 4 hr. / 20 min. / 5 sec.
3Zero positioning: Press push-button B.
(The four chronograph hands will
be reset to their zero positions.)
1
3
12
A
B
1
2
3
II IIII
1
2345
6
A
2
B
3b4b
4
5
5b

9
*
ACCUMULATED TIMING
Example
1Start: start timing.
2Stop: e.g., 15 min. 5 sec. following 1.
3Restart: timing is resumed.
4*Stop: e.g., 10 min. 5 sec. following 3.
The accumulated time = 25 min. 10 sec.
5Reset: The three chronograph hands
are returned to their zero positions.
Please note:
* Following 4, the accumulation of the timing can be
continued by pressing push-button A(Restart/Stop, Restart/Stop,…)
INTERMEDIATE OR INTERVAL TIMING
Example
1Start: start timing.
2Display interval:
e.g., 10 min. 10 sec. following 1.
Timing continues in the background.
3Making up the measured time:
the four chronograph hands are quickly
advanced to the ongoing measured time.
4Stop: (Final time is displayed).
5Reset: The three chronograph hands are
returned to their zero positions.
Please note:
* Following 3, further intervals or intermediates can be
displayed by pressing B(display interval / make up measured time, …)
5
B
1234
A
5
23
B
14
A
10
CHRONOGRAPH MODEL 5021.D
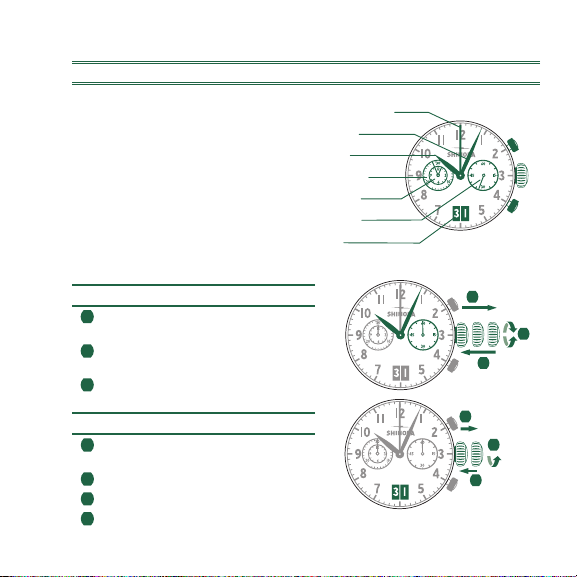
DESCRIPTION OF THE DISPLAY AND CONTROL BUTTONS
Please note:
Before using the chronograph functions,
please ensure that:
-the crown is in position I
(= normal position).
-the two chronograph hands are
precisely at zero position following
activation of push-button B. If the hands
are not precisely at zero, their positions
must be adjusted. (See the chapter
Adjusting the Chronograph Hands to Zero
.)
II IIII
3
1
2
SETTING THE TIME
1Pull out the crown to position III.
(The watch stops.)
2Turn the crown until you reach the
correct time.
3Push the crown back to position I.
SETTING THE DATE
1Pull out the crown to position II.
(The watch continues to run.)
2Turn the crown until the correct date appears.
3Push the crown back to position I.
4If setting the date between 9:30 p.m. and 12:00 a.m.,
follow steps 1 through 3, but be sure to set the date to
the following day.
III
1
2
3
A
Second hand
Center stop-second
Minute hand
Hour hand
Minute counter
Date
B
I
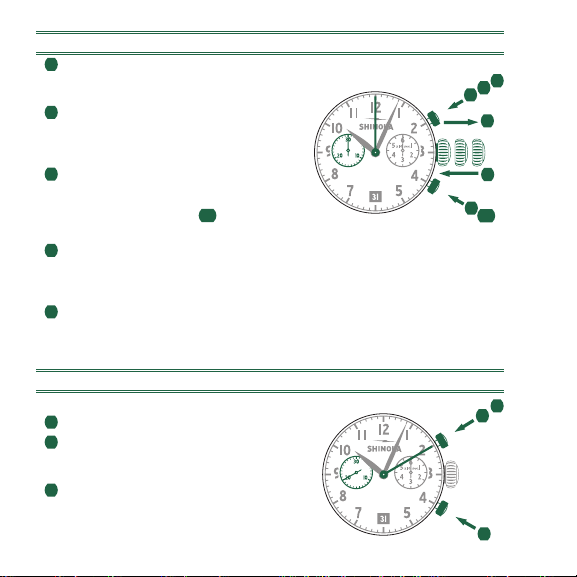
11
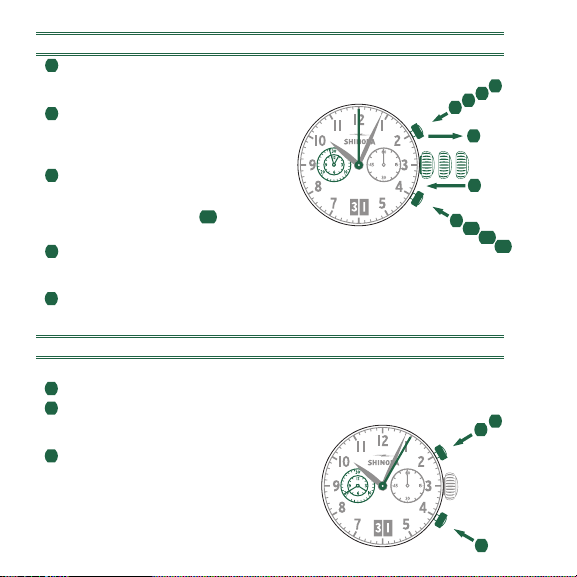
ADJUSTING THE CHRONOGRAPH HANDS TO ZERO
1Pull crown out to position III.
(All two chronograph hands are in
their correct or incorrect zero position.)
2Keep push-buttons Aand Bdepressed
simultaneously for at least 2 seconds.
(The center stop-second rotates by 360°
- corrective mode is activated.)
3Press push-button Ato single step the
center stop-second hand. Press and
hold push-button Ato advance the center
stop-second hand quickly. 3b Press
push-button Bto advance to the next hand.
4Press push-button Ato single step the
minute counter hand. Press and
hold push-button Ato advance the
minute counter hand quickly.
5Return the crown to position I.
BASIC FUNCTION (START / STOP / RESET)
Example
1Start: press push-button A.
2Stop: to stop the timing, press push-button A
once more and read the two chronograph
counters: 20min / 10sec.
3Zero positioning: Press push-button B.
(The two chronograph hands will
be reset to their zero positions.)
II IIII
1
234
5
2
A
B
3b
12
3
A
B
12
*
ACCUMULATED TIMING
Example
1Start: start timing
2Stop: e.g., 15 min. 5 sec. following 1.
3Restart: timing is resumed
4*Stop: e.g., 13 min. 5 sec. following 3.
The accumulated time = 28 min. 10 sec.
5Reset: the three chronograph hands
are returned to their zero positions.
Please note:
* Following 4, the accumulation of the timing can be
continued by pressing push-button A(Restart/Stop, Restart/Stop,…)
INTERMEDIATE OR INTERVAL TIMING
Example
1Start: start timing.
2Display interval:
e.g., 10 min. 10 sec. following 1.
Timing continues in the background.
3Making up the measured time:
the two chronograph hands are quickly
advanced to the ongoing measured time.
4Stop: e.g., 28 min. 10 sec. following 1.
5Reset: the three chronograph hands
are returned to their zero positions.
Please note:
* Following 3, further intervals or intermediates can be
displayed by pressing B(display interval / make up measured time, …)
1
5
234
A
B
235
B
14
A

13
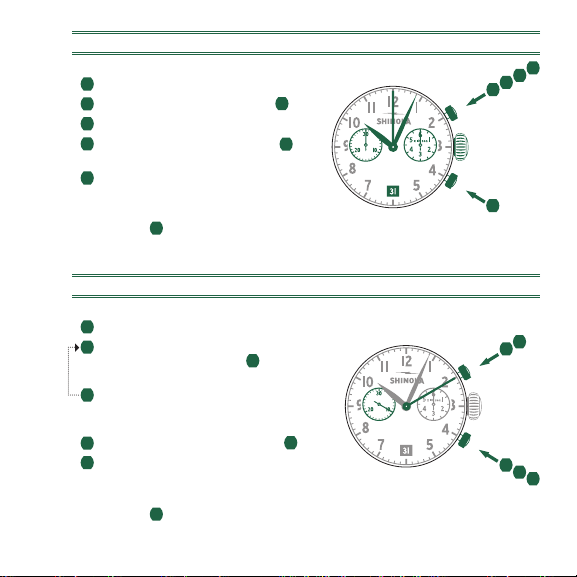
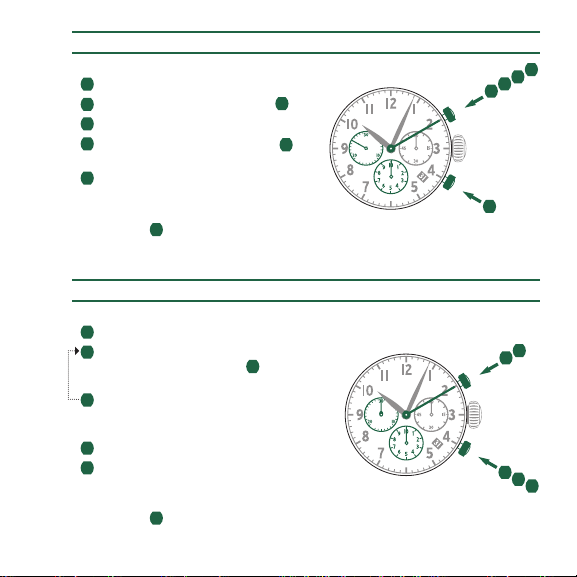
CHRONOGRAPH MODEL 5030.D
DESCRIPTION OF THE DISPLAY AND CONTROL BUTTONS
Please note:
Before using the chronograph functions,
please ensure that:
-the crown is in position I
(= normal position).
-the three chronograph hands are
precisely at zero position following
activation of push-button B. If the hands
are not precisely at zero, their positions
must be adjusted. (See the chapter
Adjusting the Chronograph Hands to Zero
.)
SETTING THE TIME
1Pull out the crown to position III.
(The watch stops.)
2Turn the crown until you reach the
correct time.
3Push the crown back to position I.
SETTING THE DATE
1Pull out the crown to position II.
(The watch continues to run.)
2Turn the crown until the correct date appears.
3Push the crown back to position I.
4If setting the date between 9:00 p.m. and 12:00 a.m., follow steps 1
through 3, but be sure to set the date to the following day.
A
Second hand
Date
Center stop-second
Minute hand
Hour hand
Minute counter
Hour counter
B
III
1
2
3
II IIII
3
1
2
I
14
ADJUSTING THE CHRONOGRAPH HANDS TO ZERO
1Pull crown out to position III.
(All three chronograph hands are in
their correct or incorrect zero position.)
2Keep push-buttons Aand Bdepressed
simultaneously for at least 2 seconds.
(The center stop-second rotates by 360°
- corrective mode is activated.)
3Press push-button Ato single step the
center stop-second hand. Press and
hold push-button Ato advance the center
stop-second hand quickly. 3b Press
push-button Bto advance to the next hand.
4Press push-button Ato single step the hour counter hand.
Press and hold push-button Ato advance the hour counter
hand quickly. 4b Press push-button Bto advance to the next hand.
5Press push-button Ato single step the minute counter hand. Press
and hold push-button Ato advance the minute counter hand quickly.
6Return the crown to position I.
BASIC FUNCTION (START / STOP / RESET)
Example
1Start: press push-button A.
2Stop: to stop the timing, press push-button A
once more and read the three chronograph
counters: 1h / 20min / 10sec.
3Zero positioning: Press push-button B.
(The three chronograph hands will
be reset to their zero positions.)
II IIII
1
2345
6
2
A
B
3b 4b
12
3
A
B

15
*
ACCUMULATED TIMING
Example
1Start: start timing
2Stop: e.g., 15 min. 5 sec. following 1.
3Restart: timing is resumed
4*Stop: e.g., 13 min. 5 sec. following 3.
The accumulated time = 28 min. 10 sec.
5Reset: the three chronograph hands
are returned to their zero positions.
Please note:
* Following 4, the accumulation of the timing can be
continued by pressing push-button A(Restart/Stop, Restart/Stop,…)
INTERMEDIATE OR INTERVAL TIMING
Example
1Start: start timing.
2Display interval:
e.g., 10 min. 10 sec. following 1.
Timing continues in the background.
3Making up the measured time:
the three chronograph hands are quickly
advanced to the ongoing measured time.
4Stop: e.g., 28 min. 10 sec. following 1.
5Reset: the three chronograph hands
are returned to their zero positions.
Please note:
* Following 3, further intervals or intermediates can be
displayed by pressing B(display interval / make up measured time, …)
1
5
234
A
B
235
B
14
A

16
A
B
Second Hand
Minute hand
Hour hand
Minute counter
Second counter
1/
10 Second counter
Running for the first 30 sec.
Hour counter after 30 min.
Date
SETTING THE TIME
1Pull out the crown to position III.
(The watch stops.)
2Turn the crown until you reach the
correct time.
3Push the crown back to position I.
SETTING THE DATE
1Pull out the crown to position II.
(The watch continues to run.)
2Turn the crown until the correct date appears.
3Push the crown back to position I.
4If setting the date between 9:00 p.m. and 12:00 a.m., follow steps 1
through 3, but be sure to set the date to the following day.
CHRONOGRAPH MODEL 5040.D
DESCRIPTION OF THE DISPLAY AND CONTROL BUTTONS
Please note:
Before using the chronograph functions,
please ensure that:
-the crown is in position
I
(= normal position).
-the four chronograph hands are
precisely at zero position following
activation of push-button B. If the
hands are not precisely at zero,
their positions must be adjusted.
(See the chapter
Adjusting the
Chronograph Hands to Zero
.)
II IIII
3
1
2
II
1
2
3

17
ADJUSTING THE CHRONOGRAPH HANDS TO ZERO
1Pull crown out to position III.
(All four chronograph hands are in
their correct or incorrect zero position.)
2Keep push-buttons Aand Bdepressed
simultaneously for at least 2 seconds.
(The center stop-second rotates by
360° - corrective mode is activated.)
3Press push-button Ato single step the
center stop-second hand. Press and
hold push-button Ato advance the center
stop-second hand quickly. 3b Press
push-button Bto advance to the next hand.
Press push-button Ato single step the 1/10 second counter hand.
Press and hold push-button Ato advance the 1/10 second hand quickly.
4b Press push-button Bto advance to the next hand.
Press push-button Ato single step the minute counter hands.
Press and hold push-button Ato advance the minute counter
hands quickly.
Return the crown to position I.
BASIC FUNCTION (START / STOP / RESET)
Example
1Start: Press push-button A.
2Stop: to stop the timing, press push-button A.
once more and read the three chronograph
counters: 7 hr. / 20 min. / 5 sec.
3Zero positioning: Press push-button B.
(The three chronograph hands will
be reset to their zero positions.)
1
3
12
A
B
1
2
3
II IIII
1
2345
6
A
2
B
3b4b
6
4
5
18
*
ACCUMULATED TIMING
Example
1Start: start timing.
2Stop: e.g., 15 min. 5 sec. following 1.
3Restart: timing is resumed.
4*Stop: e.g., 10 min. 5 sec. following 3.
The accumulated time = 25 min. 10 sec.
5Reset: The three chronograph hands
are returned to their zero positions.
Please note:
* Following 4, the accumulation of the timing can be
continued by pressing push-button A(Restart/Stop, Restart/Stop,…)
INTERMEDIATE OR INTERVAL TIMING
Example
1Start: start timing.
2Display interval:
e.g., 10 min. 10 sec. following 1.
Timing continues in the background.
3Making up the measured time:
the three chronograph hands are quickly
advanced to the ongoing measured time.
4Stop: (Final time is displayed).
5Reset: The three chronograph hands are
returned to their zero positions.
Please note:
* Following 3, further intervals or intermediates can be
displayed by pressing B(display interval / make up measured time, …)
5
B
1234
A
5
23
B
14
A

19
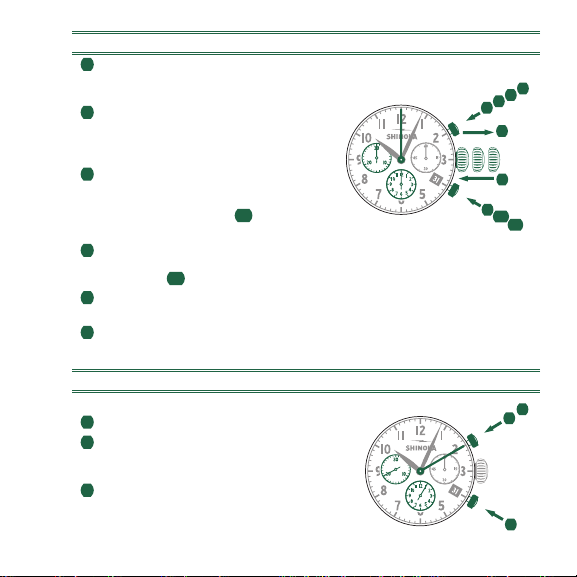
SETTING THE TIME
1Pull out the crown to position III.
(The watch stops.)
2Turn the crown until you reach the
correct time.
3Push the crown back to position I.
SETTING THE DATE
1Pull out the crown to position II.
(The watch continues to run.)
2Turn the crown until the correct date appears.
3Push the crown back to position I.
4If setting the date between 9:00 p.m. and 12:00 a.m., follow steps 1
through 3, but be sure to set the date to the following day.
CHRONOGRAPH MODEL 5050.B
DESCRIPTION OF THE DISPLAY AND CONTROL BUTTONS
Please note:
Before using the chronograph functions,
please ensure that:
-the crown is in position
I
(= normal position).
-the four chronograph hands are
precisely at zero position following
activation of push-button B. If the
hands are not precisely at zero,
their positions must be adjusted.
(See the chapter
Adjusting the
Chronograph Hands to Zero
.)
A
B
I
Second hand
Big date
Center stop-second
Minute hand
Hour hand
Minute counter
Hour counter
1/
10 Second counter
II IIII
3
1
2
II
1
2
3

20
ADJUSTING THE CHRONOGRAPH HANDS TO ZERO
1Pull crown out to position III.
(All four chronograph hands are in
their correct or incorrect zero position.)
2Keep push-buttons Aand Bdepressed
simultaneously for at least 2 seconds.
(The center stop-second rotates by
360° - corrective mode is activated.)
3Press push-button Ato single step the
center stop-second hand. Press and
hold push-button Ato advance the center
stop-second hand quickly. 3b Press
push-button Bto advance to the next hand.
Press push-button Ato single step the 1/10 second counter hand.
Press and hold push-button Ato advance the 1/10 second hand quickly.
4b Press push-button Bto advance to the next hand.
Press push-button Ato single step the minute and the hour counter hands.
Press and hold push-button Ato advance the minute and hour counter hands
quickly. 5b Press push-button Bto advance to the next hand.
Return the crown to position I.
BASIC FUNCTION (START / STOP / RESET)
Example
1Start: Press push-button A.
2Stop: to stop the timing, press push-button A.
once more and read the four chronograph
counters: 4 hr. / 20 min. / 5 sec. / 7⁄10 sec.
3Zero positioning: Press push-button B.
(The four chronograph hands will
be reset to their zero positions.)
1
3
12
A
B
1
2
3
II IIII
1
2345
6
A
2
B
3b4b
6
4
5
5b
Other manuals for 5021.D
2
This manual suits for next models
5
Table of contents
Other SHINOLA Watch manuals


