SHINPO SPRW User manual

SHINPO
SMOKELESS ROASTER
SPRW
OPERATION MANUAL
Thank you for purchasing SHINPO Smokeless Roaster.
● Before operating this product, please read and understand the instructions
contained in this manual.
● Keep this manual in a place where it can be reached for immediate references.
● If necessary, please contact your distributor from whom you have purchased the
product or us for clarification and/or further instructions.
CONTENT
Parts Identification Main Unit 1Operation Instructions 9
Parts identification 2Daily Inspections & Maintenance 11
Parts & Accessories Trouble Shooting 14
Safety Precautions 3Safety Features 15
Preparation before Use 7Specifications 16

SPRW_ENGLISH _101
1
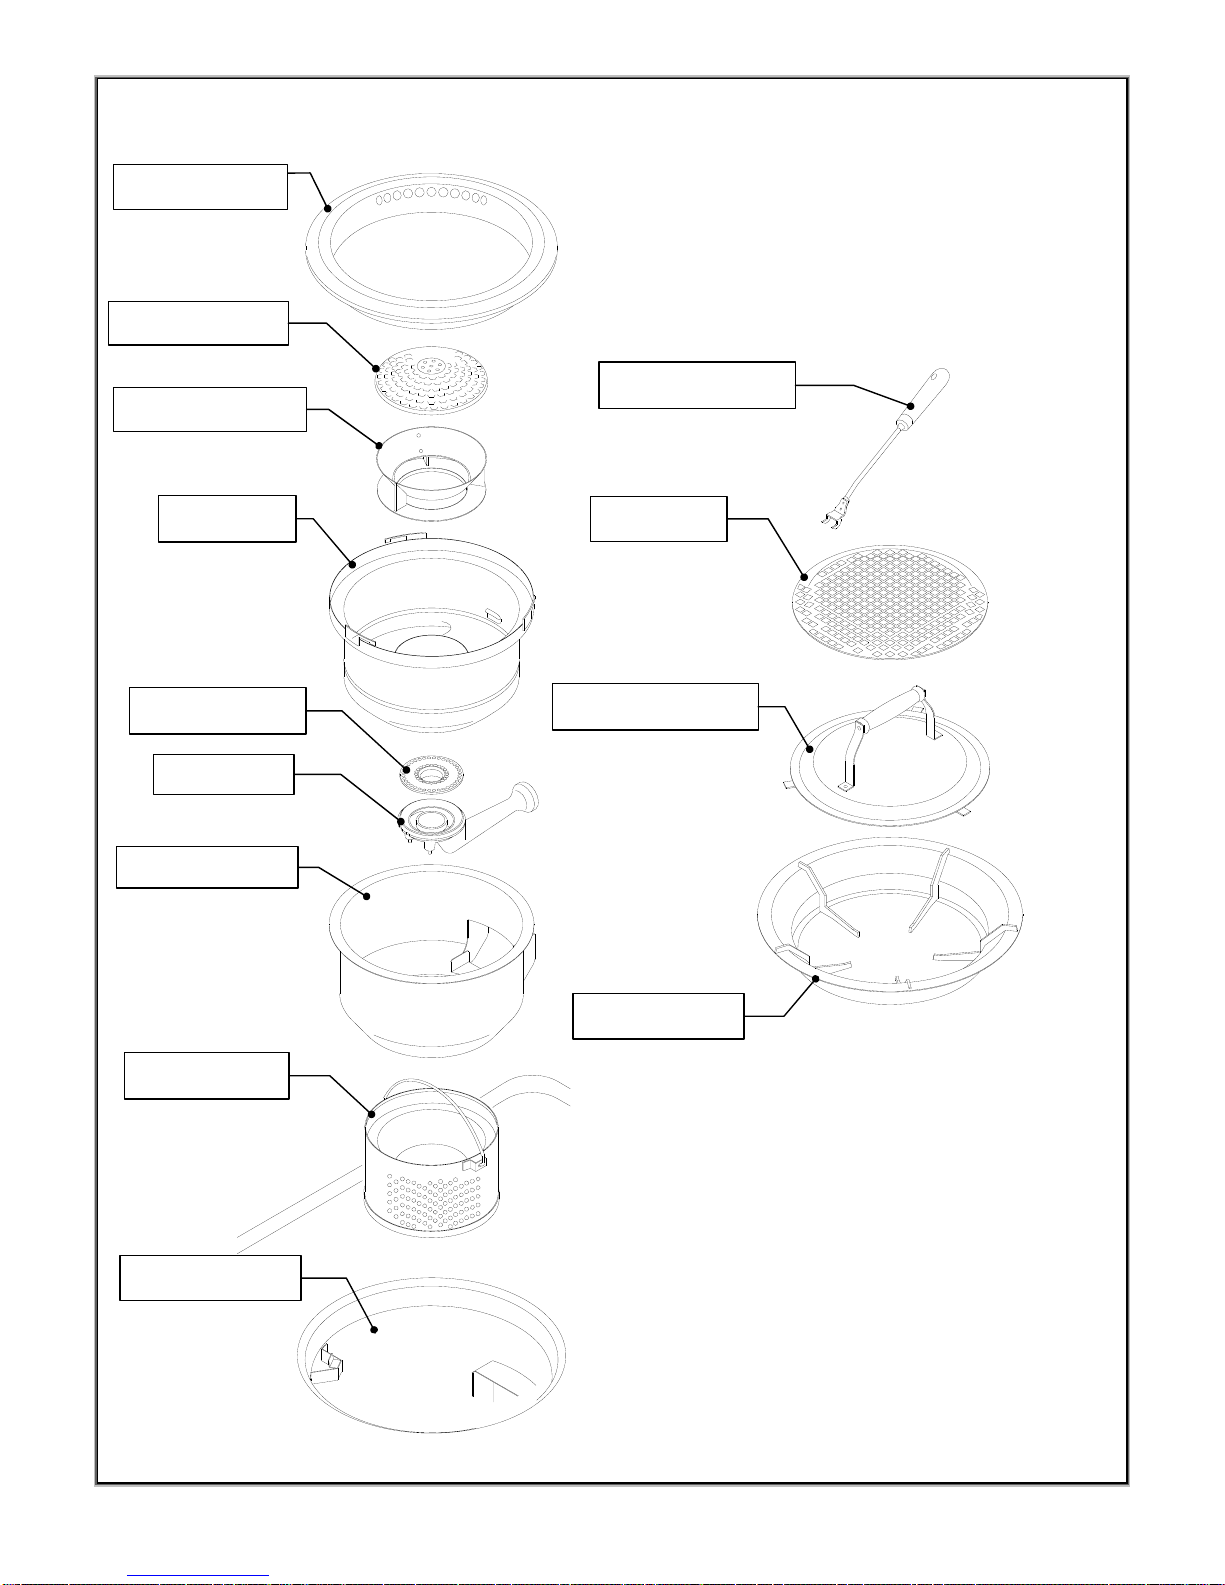
Parts Identification-Main Unit
Burner Control Knob
Table Top
Cabinet
Slim Control
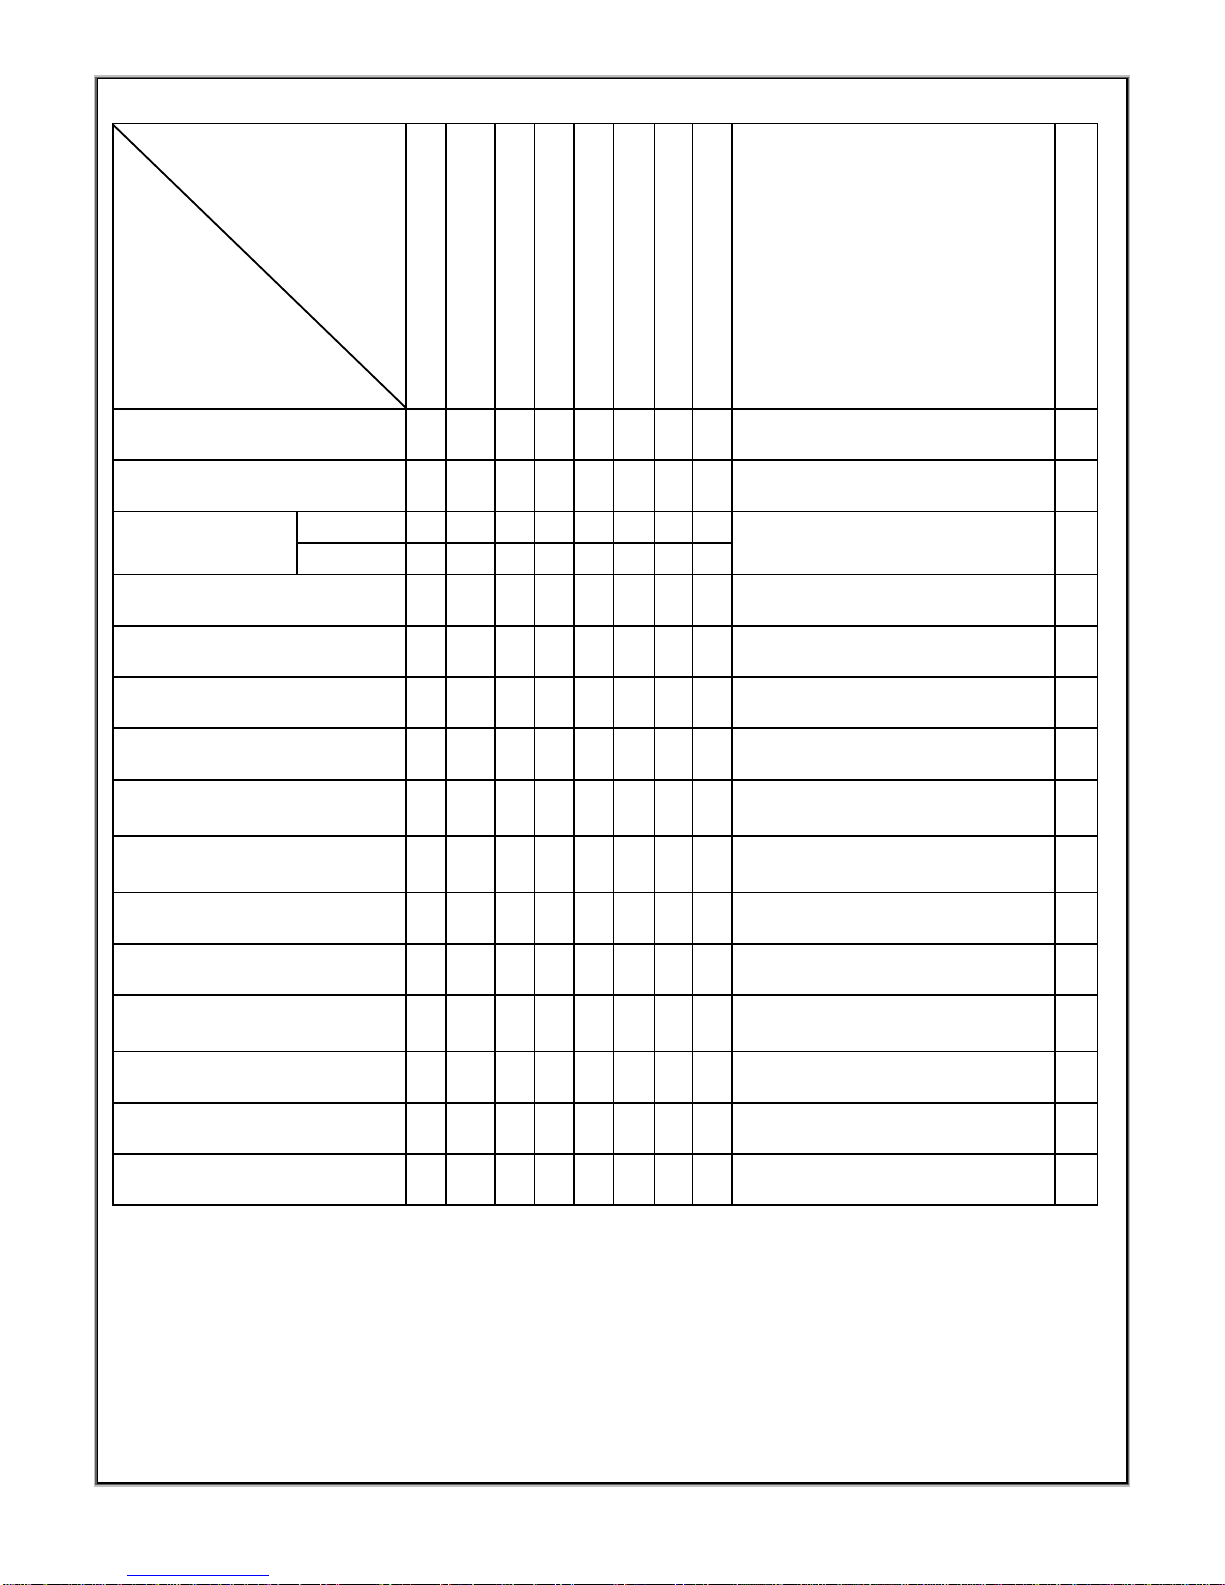
LPG Model Label Natural Gas Model
Model
Gas Type
Power
Source
ID No.
SPRW
NT Gas
220V
OOOOOO
SPRW
LPG
220V
OOOOOO
Rating Label
SPRW_ENGLISH _101
2
Parts Identification-Parts & Accessories
<The following four items are not included in
SPRW, may be purchased separately>
「Optional Parts」
Filter Set
Drain Pan
Radiant Plate Stand
Top Ring
Grill Plate Gripper
Outer Casing
Burner Head
Burner Body
Inner Casing
Grill Plate
Drain Pan Gripper
Trivet(Option)
Radiant Plate
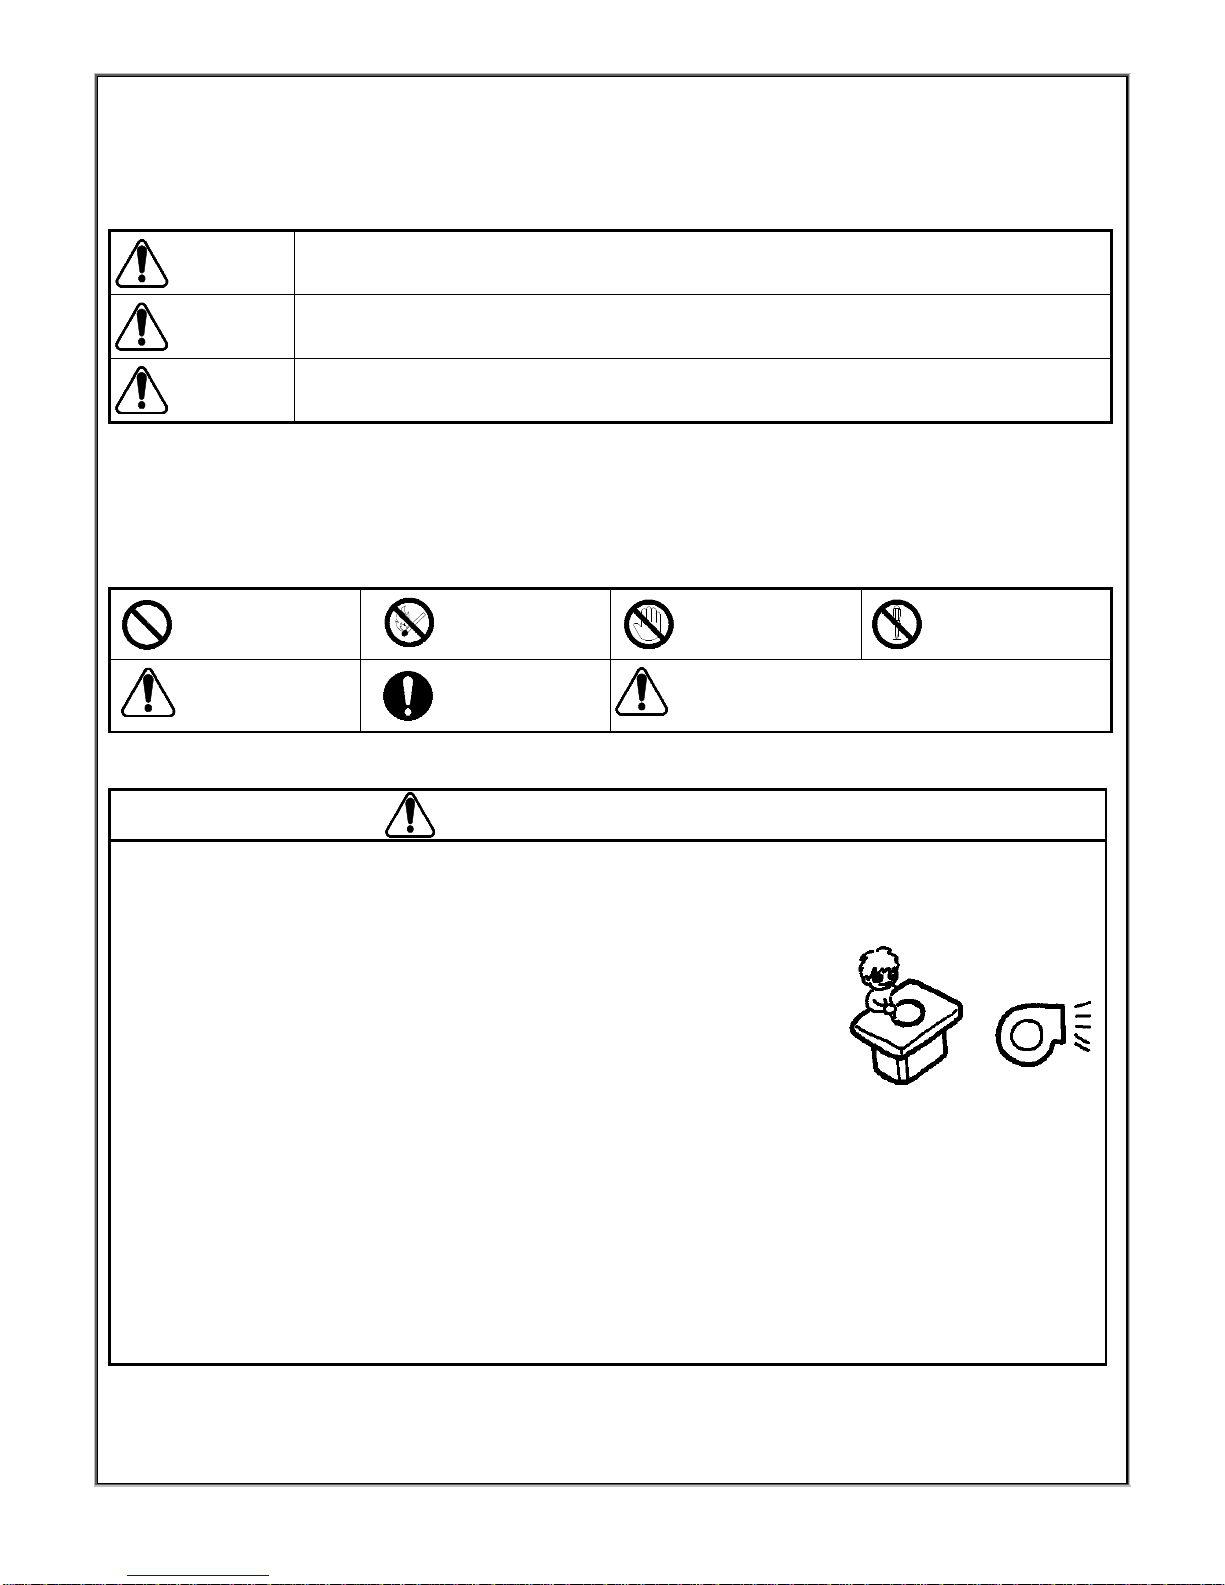
Safety Precautions
3
Safety Precautions
We are providing these instructions with illustrations for clarity and easy understanding in order to avoid
any harm to the users or damage to the properties. Insure proper installation and servicing. Have the
product installed and grounded by a qualified technician. Please make sure to understand fully the
meaning of each illustration before you proceed further.
DANGER Failure to observe this instruction m ay resultin a situation w here death or serious injury (N ote 1)
is im m inent.
WARNING Failure to observe this instruction m ay resultin a situation w here death orserious injury (N ote 1)
m ay occur.
Caution Failure to observe this instruction m ay result in a situation w here injury (N ote 2) to the user or
dam age to the property (N ote 3) m ay occur.
N ote1:Serious injury m eans loss ofeyesight,injury,burn (low /high tem perature),electric shock,broken bone or poisoning
w hich require hospitalization or long term outpatient treatm ent.
N ote2:Injury m eans injury,burn or electric shock w hich does notrequire hospitalization oflong-term outpatienttreatm ent.
N ote3:P roperty dam age m eans dam age to buildings,livestock or pet anim als.
The illustrations denote the follow ing precautions:
G eneralP rohibition
Fire P rohibited Contact
prohibited
Disassembly
Prohibited
G eneralC aution
M ust D o
U nplug from O utlet
◆This product is designed for com m ercialuse only,not for household use.
W A R N IN G
V entilation
▽ M ake sure to keep an exhaust fan(s)and ofappropriate
capacity operating w hile using the sm okeless roaster.
▼
Failure to observe this m ay cause incom plete com bustion due to
reduce oxygen in the surrounding area.
▼
It m ay also low er the quality ofthe air w ithin your establishm ent.
G as Supply
▽
D o not use other than the type ofgas specified on the R ating P late (see P.1).
Ifyou m ove to a new location,check the type ofgas supplied to that location.
▼ Failure to observe this m ay result in a risk offire or explosion.
G as Supply ⇔R ating P late on the M ain U nit.

Safety Precautions
4
W A R N IN G
P ow er S ource
▽D o not use other than the pow er source specified for this product.
▼Failure to observe this m ay result in a risk offire or explosion.
Fire P revention
▽D o not place flam m ables,except food item s to be cooked,near
the heating surface.
▽D o not use any flam m able substance such as gasoline,benzine
or spray.
▼Failure to observe these m ay result in a risk of fire or burn.
▽Never place any burning matter such as meat vegetable or
cigarette into the smoke intake holes.
▽D o not use this roaster w hen it is not clean.
▽D o not use this roaster w ithout an appropriate am ount ofw ater
in the D rain Pan.
▼Failure to observe these m ay result in a risk of fire.

Safety Precautions
5
W A R N IN G
Em ergencies
▽ Ifyou sense an abnorm alcom bustion,odor or sound,im m ediately stop
the use, shut off the gas m ain of the unit and refer to the
“Troubleshooting”section ofthis m anual.
▽ In an em ergency such as earthquake or fire,im m ediately stop the use
of this product and,if it’s safe to do so,shut off the gas m ain of the
unit.B efore you use the product again,contact your distributor or us
for inspection and,ifnecessary,repair.
▼ Failure to observe these m ay result in a risk ofexplosion or fire.
▽ In an electric storm ,shut the pow er offat the circuit breaker or unplug the pow er cord.
▼ Lightning often causes a reverse current ofelectricity,w hich m ay dam age the product.
P roper U se
▽ D o not use this product for other than heating and cooking of food.
▼ Failure to observe this m ay result in a risk of accident.
▽ D o not sit,stand or place a heavy object on this
roaster.
▼Failure to observe this m ay result in a dam age to the roaster or
accident.
▽ P lace or installthis roaster on a leveland secure surface only.
▼ Failure to observe this m ay result in a risk of fire or burn.
R em ovable & R eplaceable P arts
▽ U se only originalparts or those approved by us.
▼ Failure to observe this m ay result in incom plete com bustion or a dam age to the product.

Safety Precautions
6
W A R N IN G
D isassem bling
▽ D o not disassem ble this roaster,rem ovable parts excepted.(See P .2 for the list of rem ovable
parts)
▼ Failure to observe this m ay result in a dam age to the
product,electric shock or injury.
P revention of B urn
▽ D o not touch the heating surface or sm oke holes
▼ The heating surface and sm oke holes get
extrem ely hot.Touching these parts m ay cause a
severe burn.
▽ D o not touch any of the heated parts of the product im m ediately
after use.
▼ M ake sure that allthe heated parts have cooled dow n to prevent a
burn.
▽ D o not place seasoning containers or tablew are near the heating
surface.
▼ A ny object placed near the heating surface m ay get hot enough to
cause a burn.
▽ D o not use charcoalor food item s that m ay crack or burst open
w hile burning or being heated.(M ake necessary preparations w ith
food item s w ith high w ater content such as squid to reduce the
risk.)
▼ Failure to observe this m ay result in a risk ofburn.

SPRW_ENGLISH _101
7
Preparation before use
◆Setting up parts (Refer to P.1,2)
1. Place the Filter Set on the bottom of the Outer Casing.
2. Mount the Inner Casing onto the Outer Casing.
3. Mount the Burner Body onto the Inner Casing.
Note:
▼ Make sure that the two projections on the backside of the Burner Body go into the corresponding holes
in the Inner Casing.
▼ Make sure that the Burner Body is sitting squarely and level on the Inner Casing.
▼ If the Burner is sitting off to the side or tilted, incomplete combustion may occur.
4. Mount the Burner Head onto the Burner Body.
▼ Rotate the Burner Head a couple of times and make sure the Burner Head is sitting squarely and level.
▼ If the Burner Head is sitting off to side or tilted, incomplete combustion may occur.
5. Place the Drain Pan on the bottom of the Inner Casing.
Note:
▼ The Drain Pan is designed to sit on the top edge of the Inner Casing.
▼ Clean the Drain Pan if the contact surface of the Drain Pan or Inner Casing is soiled with dust or other
substances.
▼ If the Drain Pan is not sitting squarely, or the contact surfaces are not clean, incomplete combustion
may occur.
Off to Side/Tilted
Burner Body
Burner Head

SPRW_ENGLISH _101
8
6. Pour water into the Drain Pan
▼ Appropriate amount is approx 1 liter.
▼ Do not splash water on the Burner.
▼ If water accidentally splashes on the holes of the Burner, remove the Burner and wipe it dry with a
piece of cloth.
▼ If the holes are clogged with water or other substances, gas may reverse its flow at the Gas Intake
of the burner and burn within the appliances.
▼ Make sure gas is burning before you release the knob.
7. Place the Radiant Plate Stand on the center of the Drain Pan.
8. Mount the Radiant Plate onto the Radiant Plate Stand.
9. Mount the Top Ring onto the Drain Pan.
Note:
▼ The Top Ring is designed to fit inside the Drain Pan.
▼ Rotate the Ring a couple of times and make sure the Top Ring is sitting squarely and level on the Drain
Pan.
▼ If the Top Ring is not sitting squarely or tilted, smoke from cooking may not discharged properly or food
may not be cooked evenly.
10.Place the Grill Plate using Grill Plate Gripper.
▼ Use Grill Plate approved by us.
11.Check the following again before use.
▼ All the parts are installed correctly.
▼ Drain Pan holds an appropriate amount of water.
★ Pot Cooking
▼ Remove the Top Ring and mount the Trivet(Sold separately) on the Drain Pan.
▼ Use Trivet approved by us.
Drain Pan Inner Casin
g
Burner
※Pour the water up to this level
Water
SPRW_ENGLISH _101
9
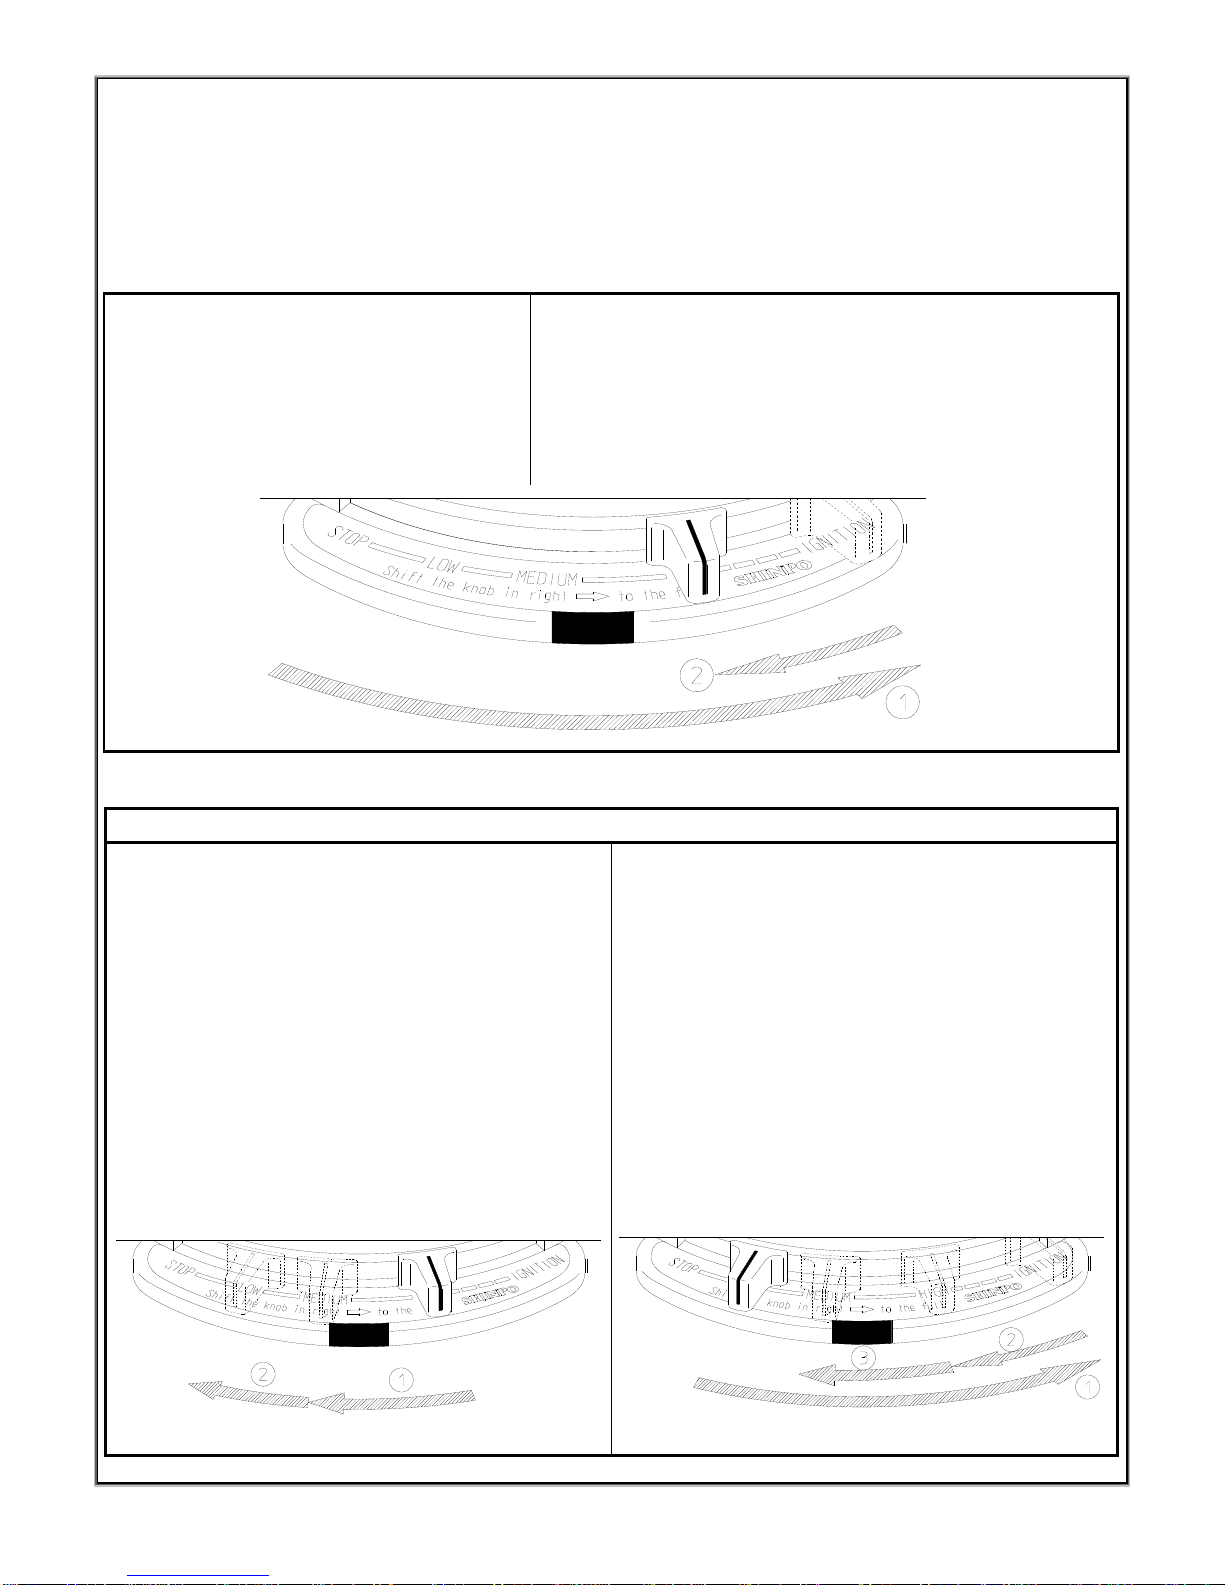
Operating Instructions(Slim Control Type)
Before you turn on the power and open the Gas Shutoff, make sure the Burner Control Knob
is at Off position and that every direction in the “Preparation before use” section of this
manual has been precisely followed. Also make sure that the Exhaust Fan is operating
normally.
◆ Ignition
① Slowly slide the Burner Control
Knob all the way to Ignition
position.
▼ When you try to ignite for the first time, you
may have some difficulty due to the air
remaining in the gas pipe.
▼ Remove the air completely and try again.
② The Igniter makes a clicking sound and ignite gas.
Make sure gas is burning before you release the
knob.
▼ If the Burner fails to ignite, slide the Knob back to Off position.
▼ Wait for a while and try again.
▼ Make sure you wait long enough to disperse the gas within the
appliance to avoid an explosive ignition.
◆ Adjusting flame force
The flame strength can be adjusted in 3-step of High, Medium and Low by controlling the knob.
① HIGH→MEDIUM
▼ Slowly shift the knob in left(in direction of STOP),
and it will stop at position of MEDIUM making a
clicking sound.
②MEDIUM→LOW
▼ Further shift the knob in left slowly, and it will stop
at position of LOW making a clicking sound
①②LOW/MEDIUM→HIGH
▼ Slowly slide the Burner Control Knob all the way
to IGNITION position.
▼ Release your hands, and it will stop at position of
HIGH.
①②③LOW→MEDIUM
▼ Slowly slide the Burner Control Knob all the way
to IGNITION position.
▼ Shift the Knob in left, and it will stop at position of
HIGH and MEDIUM making a clicking sound.

SPRW_ENGLISH _101
10
◆ Extinguishing Fire
① Slowly slide the Burner Control Knob to OFF position to turn off the burner.
② Make sure the Burner Control Knob is at OFF position
③ Make sure the Burner is off. Close the Gas Shutoff Cock and turn off the power.
▼ Allow the appliance to cool down before you touch it.
④ Make sure the appliance has cooled down to a safe level. Clean the appliance following
the directions in the “Daily Maintenance” section of this manual.

SPRW_ENGLISH _101
11
Daily Inspections & Maintenance
▼ For safe operation of this product, make sure to carry out daily inspections and maintenance.
▼ Make sure to close the Gas Shutoff Cock , turn off the power, check the Exhaust Fan is not
operating and allow the appliance to cool down before you attempt any inspections or
maintenance work.
◆Inspections
① Is every part or component clean?
② Is any part or component damaged or marred?
③ Is any part or component rusted or corroded.
④ Is every part or component present?
⑤ Is every part of the Roaster in order?
⑥ Inspect the exhaust ducts following the directions from the contractor who installed them.
※Conduct the above inspections (except ⑥) daily.
◆Maintenance
① Make sure to clean the Burner and Burner Head at the start of the business.(See page 12・13)
▼ Brush burnt grease and food stuff off the Burner and Burner Head.
▼ When wet, make sure let them dry well or wipe dry with a piece of cloth.
▼ Clogged Burner Holes may cause gas to flow backward and leak out from the Gas Intake, which
may result in a risk of dangerous combustion.
② Clean the Top Ring after use with a piece of cloth. Make sure to clean the back side too.
③ Clean the Outer Casing at the close of business.(Remove the Filter Set from the Outer Casing)
④ Clean the Inner Casing, Drain Pan at the close of business.
⑤ Clean the Radiant plate, Radiant Plate Stand at the close of business.
⑥ Clean and wash off the Filter Set using the dishwashing machine at the close of business.
Soak and clean the Filter Case and Filter (Stainless mesh filter) in exclusive detergent once a week.
Make sure the Filter Set is completely dry before use.
②:Top Ring
⑤:Radiant Plate
⑤:Radiant Plate Stand
③:Outer Casing
④:Drain Pan
④:Inner Casing
⑥:Filter Set

SPRW_ENGLISH _101
12
Too Much Air
Loud Hissing
<Burner Inspection>
Install the Burner correctly and check the burner flames by comparing to the drawings below.
If necessary, adjust the Damper attached to the Gas Intake of the Burner.
※Be extremely careful not to burn yourself or your clothes. Make sure the Burner and other
parts have cooled down to a safe level before you touch them.
◆ Burner Condition
◆ Burner Air Adjustment
Too Little Air
Incomplete Burning
Normal
Open
Dam
p
e
r
Close Damper
Burner
Close
O
p
en
Dam
p
e
r
Screw
Tighten
Loosen
Loosen the Screw and open/close the
Dam
p
er one touch at a time.
SPRW_ENGLISH _101
13
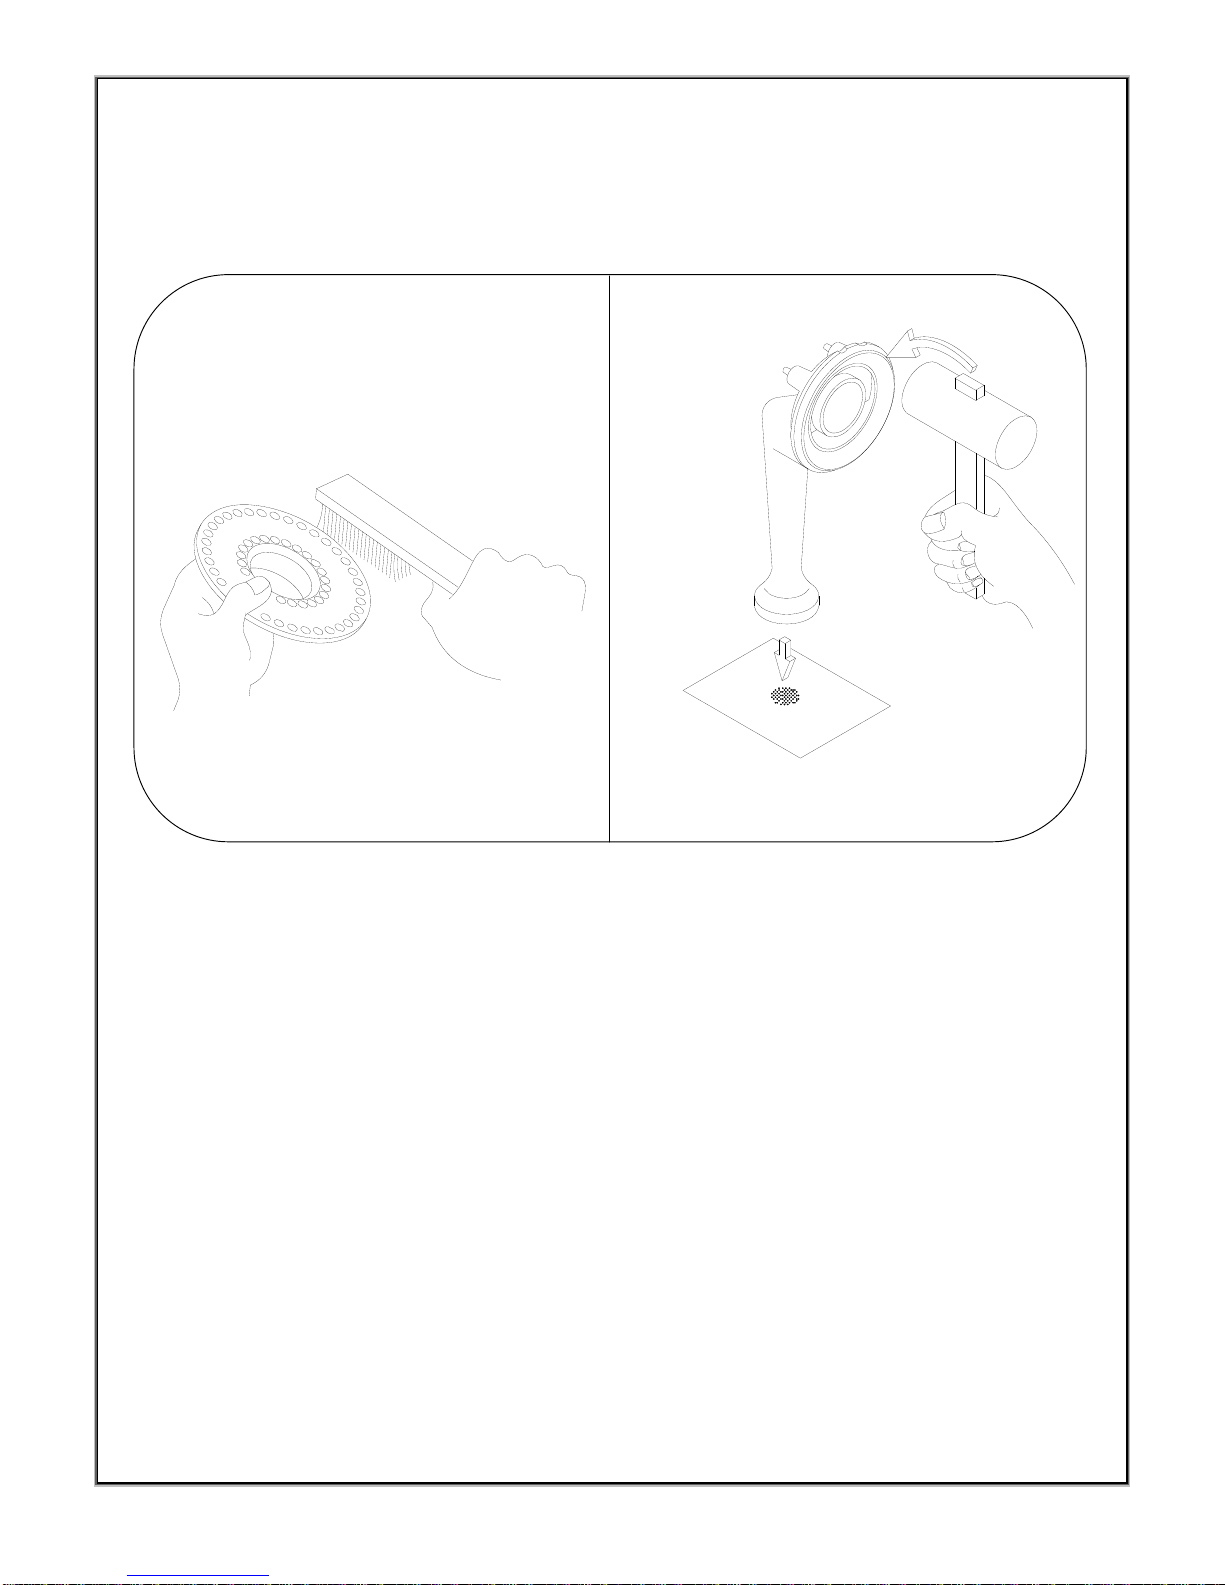
<Burner Maintenance>
Clogged Burner Holes (with water, grease, ashes) often causes the
Burner to rust shortening the operational life span of the Burner. It
also causes gas to flow backward, which may result in a risk of fire or
explosions.
①②
Brush the Burner Holes.
Brush thoroughly heavily
clogged holes.
Brush a few times
Tap a few times
Rust Ashes
Tap the Burner Head a few times with a plastic or
wooden hammer to remove the rust and ashes.
SPRW_ENGLISH _101
14
Troubleshooting
Trouble
Cause
Does not ignite
Fire goes out when the Knob
is released.
Pilot fire does not ignite.
Burner does not ignite
Explosive ignition
Unstable Flames
Fi
re goes ou
t
w
hil
e
i
n
operation
Smoke is released in the air
Solution
Reference page
Gas Shutoff Cock is closed ○
○○ ○ Position the Burner Control Knob to
Off. Open the Gas Shutoff Cock. 9
Air is present in the gas pipe ○
○ ○
Follow the directions described in
this manual. 9
Improper
gas pressure Low ○
○○ ○ Ask for professional servicing. -
High ○
○ ○ ○ ○
No electric Power ○
Check the Circuit Breaker.
Ask for professional servicing. -
Power Switch is not turned ON. ○
Turn the Power Switch ON. -
Burner Holes are clogged ○ ○ ○ ○ Follow the directions described in
this manual. 11
Burner is not properly installed ○ ○ ○ ○ Follow the directions described in
this manual. 7
Malfunction of Safety Device or
Ignition Devise ○○
○Ask for professional servicing. -
Exhaust Air is not properly
discharged.
○Contact the original contractor. -
Parts are soiled. ○○Clean soiled parts. 11
Safety Devise is activated ○○
○Follow the directions described in
this manual. 13
Malfunction of Gas Control
Knob.
○
Ask for professional servicing. -
Filter Set is soiled.
○Clean the Filter Set. 11
If the directions above do not solve your problem(s), please contact your distributor or our
Service Center. Do not attempt to disassemble or repair the roaster unless you are properly
trained and licensed to do so. Disassembling or repairing by untrained individual may result
in a risk of appliances malfunction, injury or electric shock.

SPRW_ENGLISH _101
15
Safety Features
▽ Misfiring Detector
Prevents gas being discharged when the burner is not lit.
▼ When fire goes out for any reasons, this devise detects it and shuts off the supply of gas to the Burner,
preventing gas being discharged into the air.
▽ Overheating Detector
When the appliance overheats, this device shuts off the supply of gas and Sounds an alarm.
▼ Possible causes for overheating include:
1. Water is not present in the Drain Pan.
2. Parts are soiled with grease and burner flames are being sucked into the exhaust duct.
3. Exhaust Fan is not operating properly.
4. The exhaust air volume is low due to filter clogging, etc.
5. Clogged Burner Holes force gas to flow backward and burn at the Gas intake.
▼ You may resume the operation of the appliance after it has cooled down (5 to 10 minutes) and the alarm
sound has stopped. The alarm will stop automatically when the appliance cools down.
※Allow the appliance to cool down before you attempt to service the appliance.
Shutting Alarm Off
You may stop the alarm manually by turning off the Alarm Switch located next to the Burner Control Knob.
The supply of gas however, however, will not be resumed until the appliance cools down to an acceptable
level.
Make sure to turn the Alarm Switch on again when normal operating conditions are restored (all the causes
for overheating have been removed and the appliance has cooled down to an acceptable level).
The Alarm Switch should be turned on during normal operation. If it is turned off, warning beep will not
sound and undetected overheating may result in a risk of fire.
Make sure the appliance has cooled down to a safe level when you inspect the appliances.
Table To
p
A
larm Shutoff Switch
Lam
p
Slim Control

SPRW_ENGLISH _101
16
Specifications
Model SPRW
Radiant Plate Roaster
Product
Gas
Consumption Natural Gas:3.26kw LPG:3.14kw
Gas Connection R1/2 Screw Connection
Power
Consumption Less than 5W
Power Source 220V
( )V
Ignition Method Spark Discharge Ignition
Safety Feature Overheating Detector/Misfiring Detector
Articles of consumption
Parts Material Endurance
Radiant plate SUS 1year
Radiant Plate
Stand SUS 1year
Burner Head SUS 3years
Burner Body Steel 1year
The above endurance period is a standard for reference.
The endurance period changes by the user’s use direction, use frequency, cleaning direction, and
cleaning frequency.

Memo

Memo
OVERSEAS DEPARTMENT
2-30-2 MITSUI SUMITOMO KAIJO OHJI BLDG.,8/F.,OHJI,KITA-KU,TOKYO
114-0002,JAPAN
TEL:81-3-5959-6761/FAX:81-3-5959-6830
HEAD QUARTERS
110 WAKABADAI,MEITOKU,NAGOYA 465-0015,JAPAN
TEL:81-52-7762231/FAX:81527762263
NAGOYA FACTORY
3-1 TOIAGE,FUKUDA-CHO, MIYOSHI-SHI,AICHI 470-0225,JAPAN
TEL:05613-2-3221/FAX:05613-2-3177
Technology&Development Dept.
3-1 TOIAGE,FUKUDA-CHO, MIYOSHI-SHI,AICHI 470-0225,JAPAN
TEL:05613-2-3267/FAX:05613-2-9580
SALES AGENT
・
DISTRIBUTOR
2011.07.11
SHINPO CO.,LTD.
Table of contents
Other SHINPO Kitchen Appliance manuals


