Jenn-Air W10549546A User manual

JENN-AIR®BEVERAGE CENTER/
REFRIGERADOR PARA BEBIDAS,,"
RE_FRIGERATEURPOUR BOISSONS
USE & CARE GUIDE
For questions about features, operation/performance, parts, accessories, or service, call:
1-800-JENNAIR (1-800-536-6247} or visit our website at www.jennair.eom.
In Canada, call: 1-800-JENNAIR (1-800-536-6247}, or visit our website at www.jennair.ea.
MANUAL DE USO Y CUIDADO
Si tiene preguntas respecto a las caracteristicas, funcionamiento, rendimiento, partes, accesorios o servicio tecnico, Ilame al:
1-800-JENNAIR (1-800-536-6247) o visite nuestro sitio web en www.jennair.com.
En Canada, Ilame al: 1-800-JENNAIR (1-800-536-6247), o visite nuestro sitio web en www.jennair.ca.
GUIDE D'UTILISATIONET D'ENTRETIEN
Au Canada, pour assistance, installation ou service, composez le 1-800-JENNAIR (1-800-536-6247}
ou visitez notre site web _ www.jennair.ca.
Table of Contents/indice/Table des matieres ...................................................................................... 2
JENN-AIR°
W10549546A

TABLE OF
BEVERAGE CENTER SAFETY ................................................................... 3
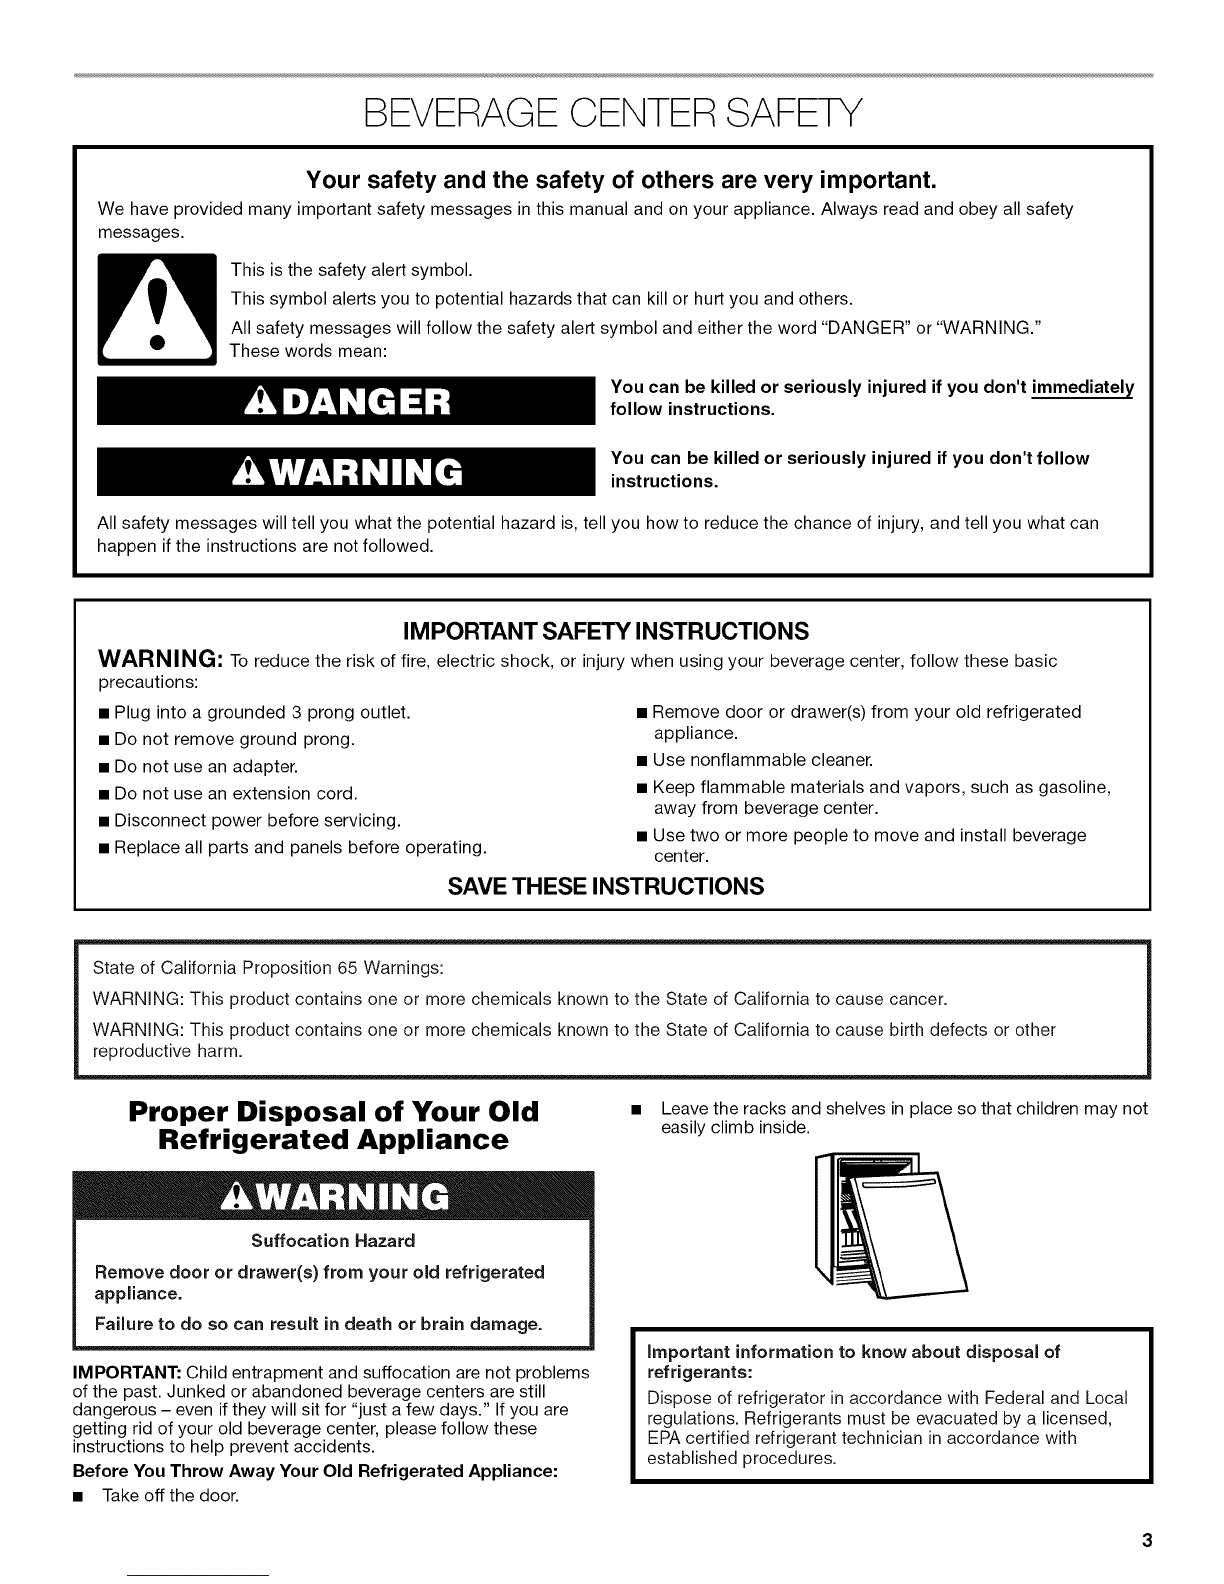
Proper Disposal of Your Old Refrigerated Appliance .............................. 3
INSTALLATION REQUIREMENTS ............................................................. 4
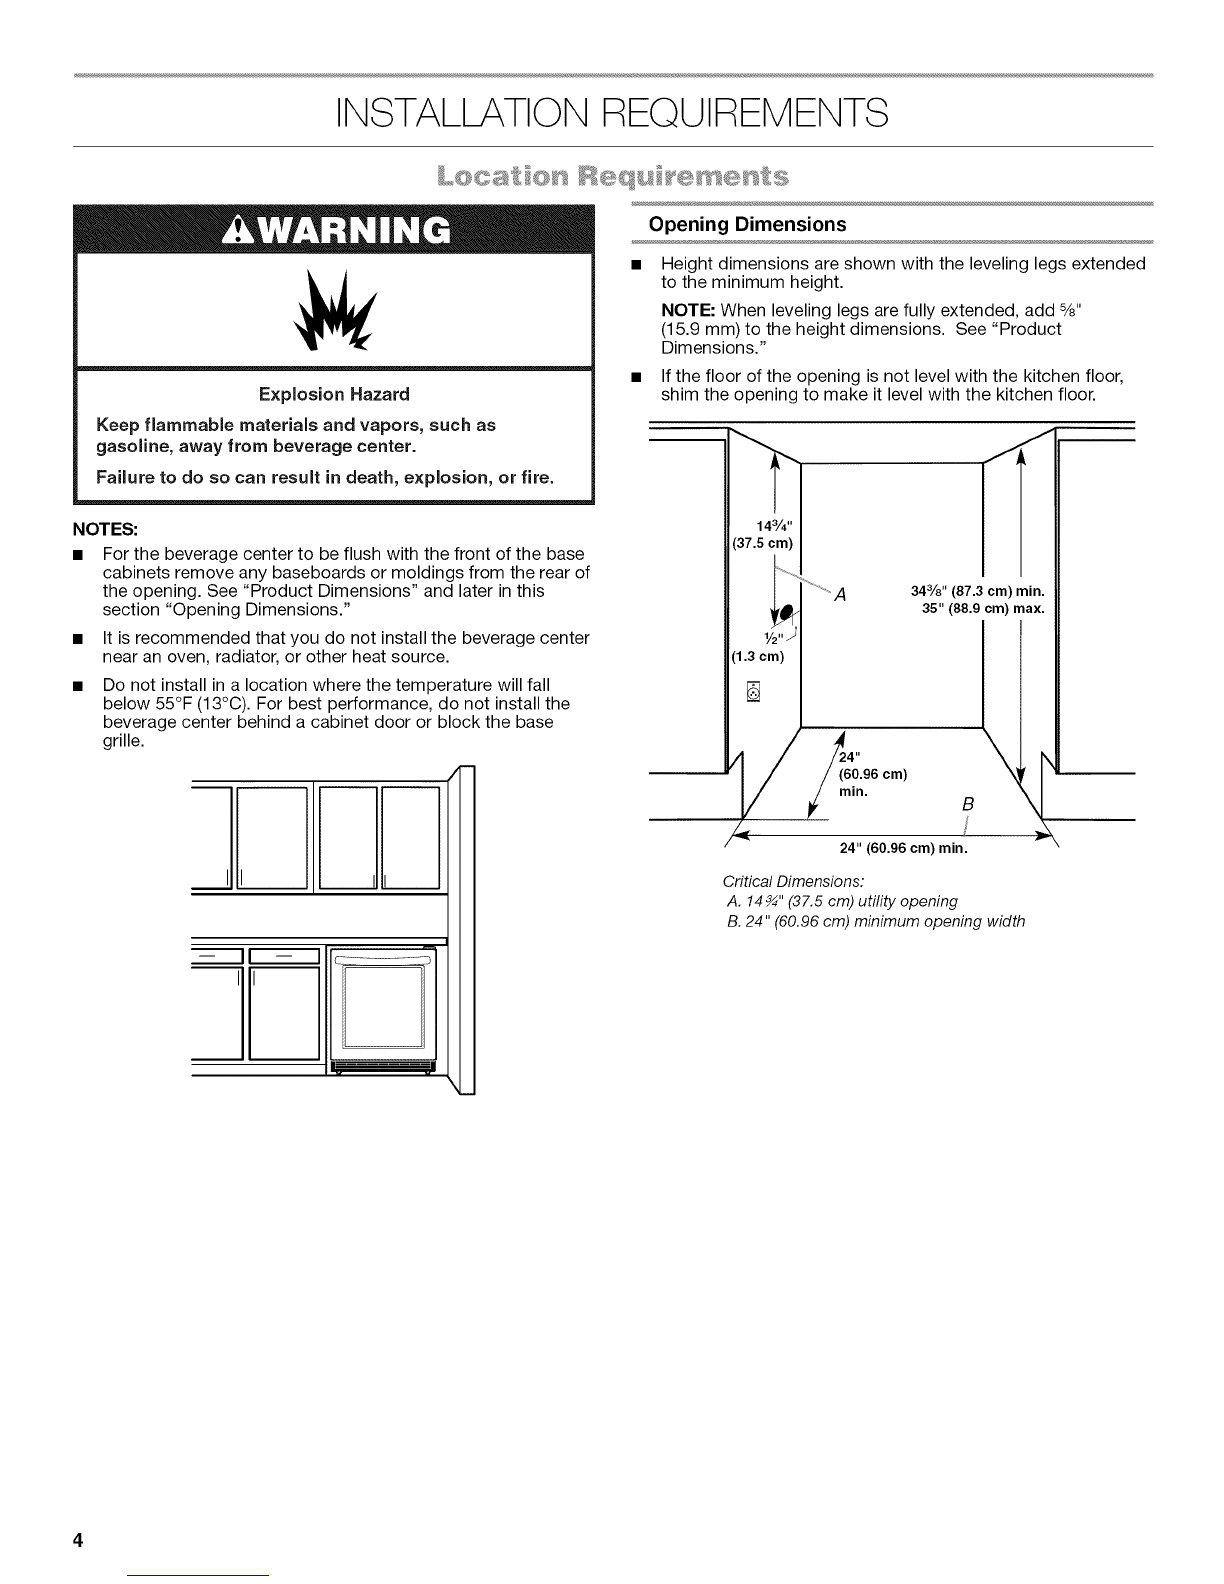
Location Requirements ............................................................................. 4
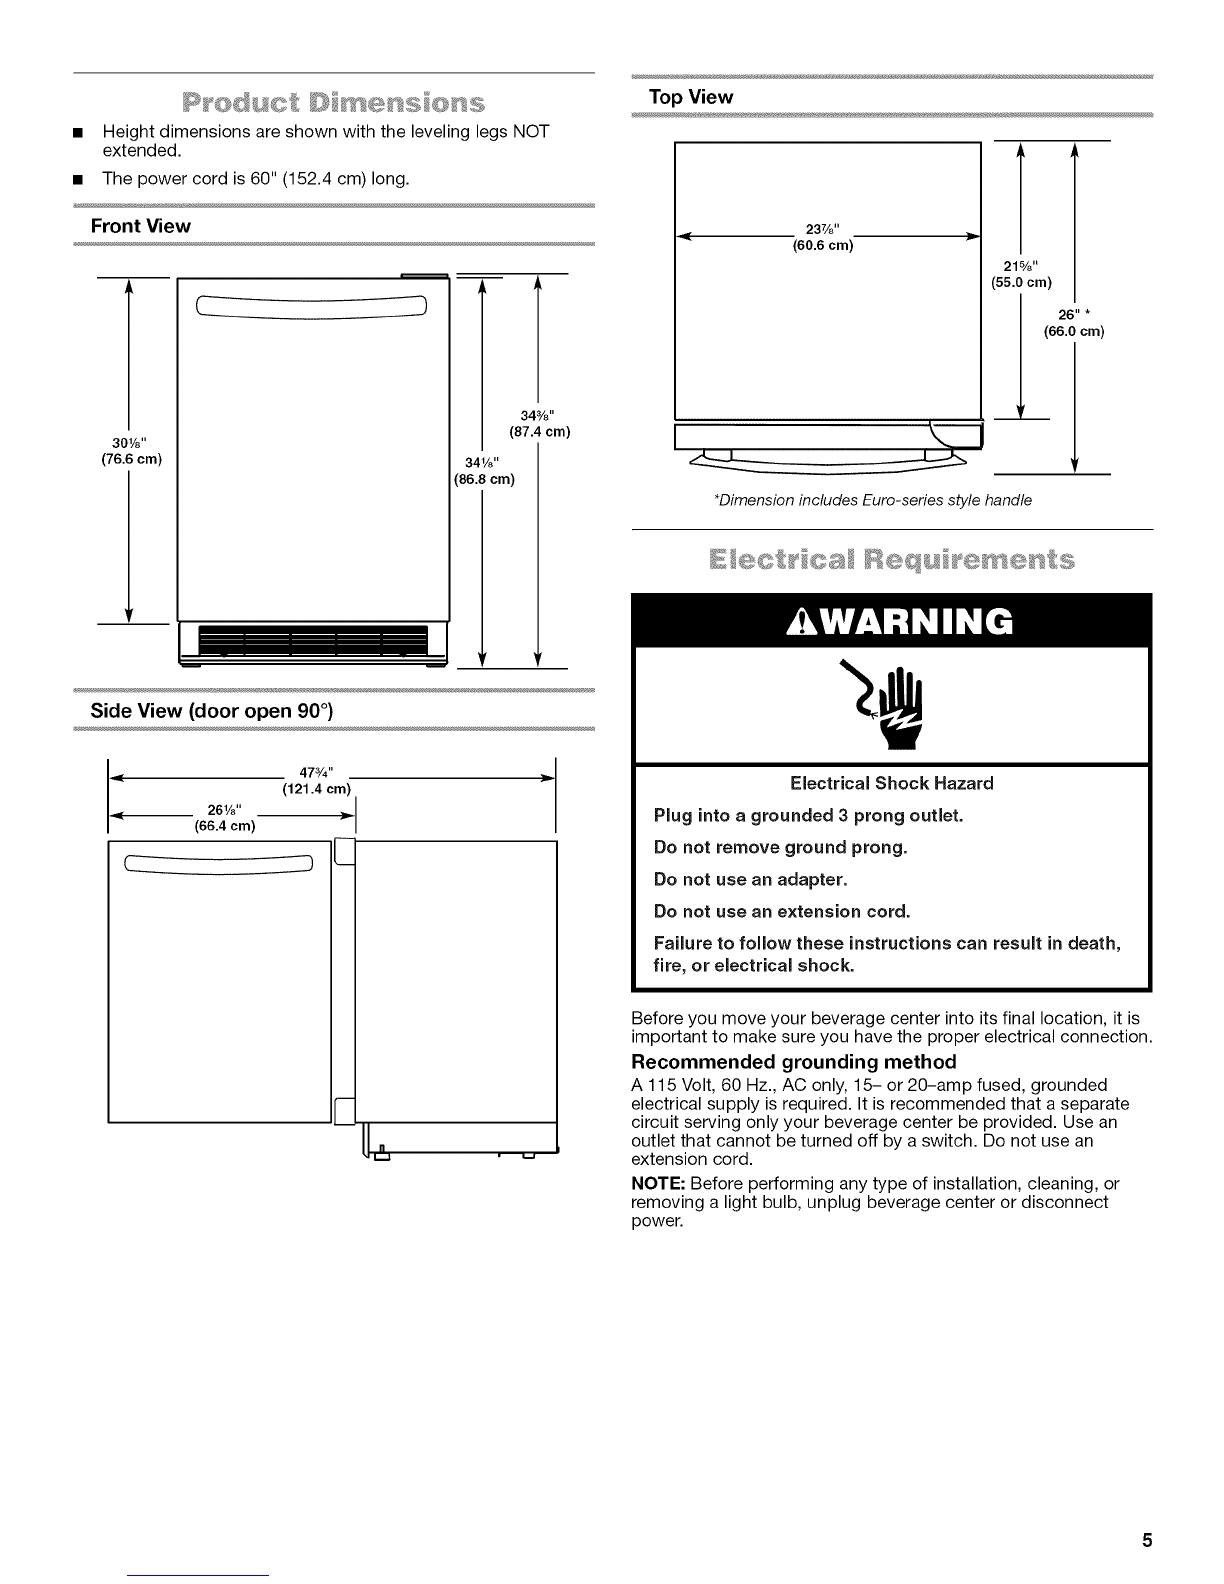
Product Dimensions ................................................................................. 5
Electrical Requirements ............................................................................ 5
INSTALLATION INSTRUCTIONS ............................................................... 6
Unpack the Beverage Center ................................................................... 6
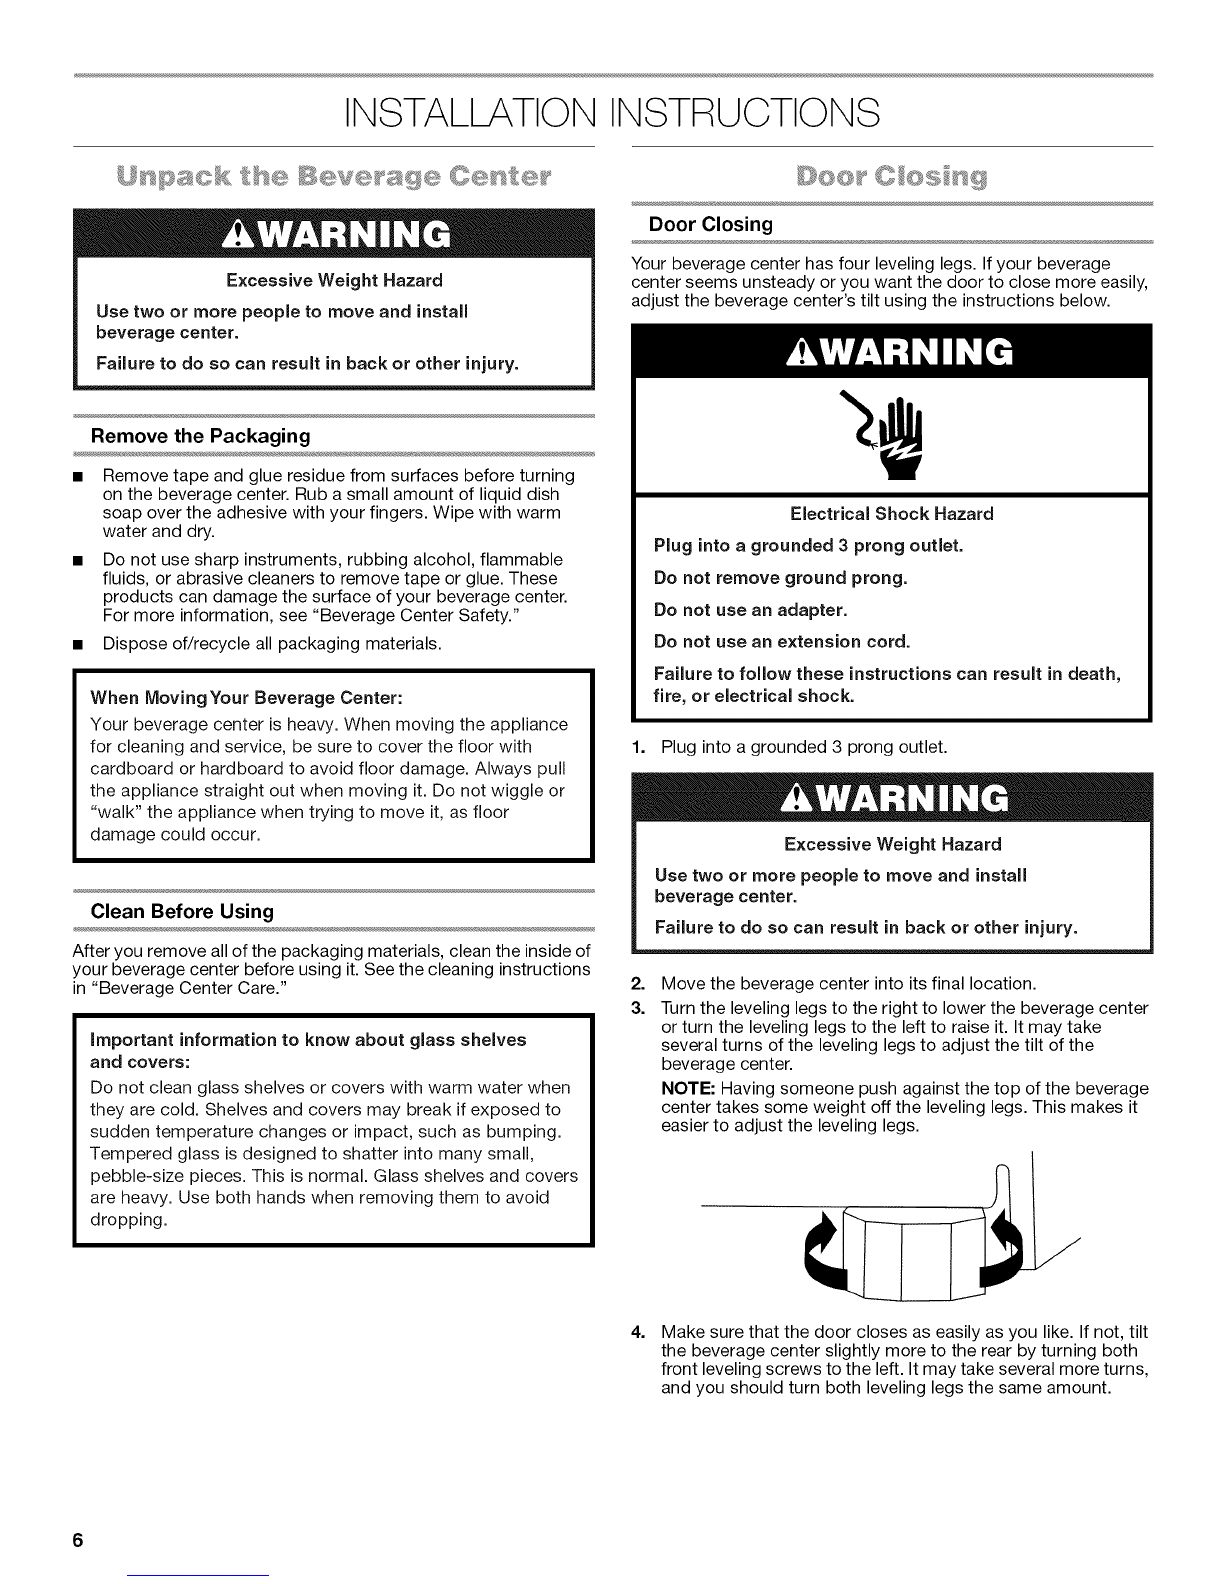
Door Closing ............................................................................................. 6
BEVERAGE CENTER USE .......................................................................... 7
Normal Sounds ......................................................................................... 7
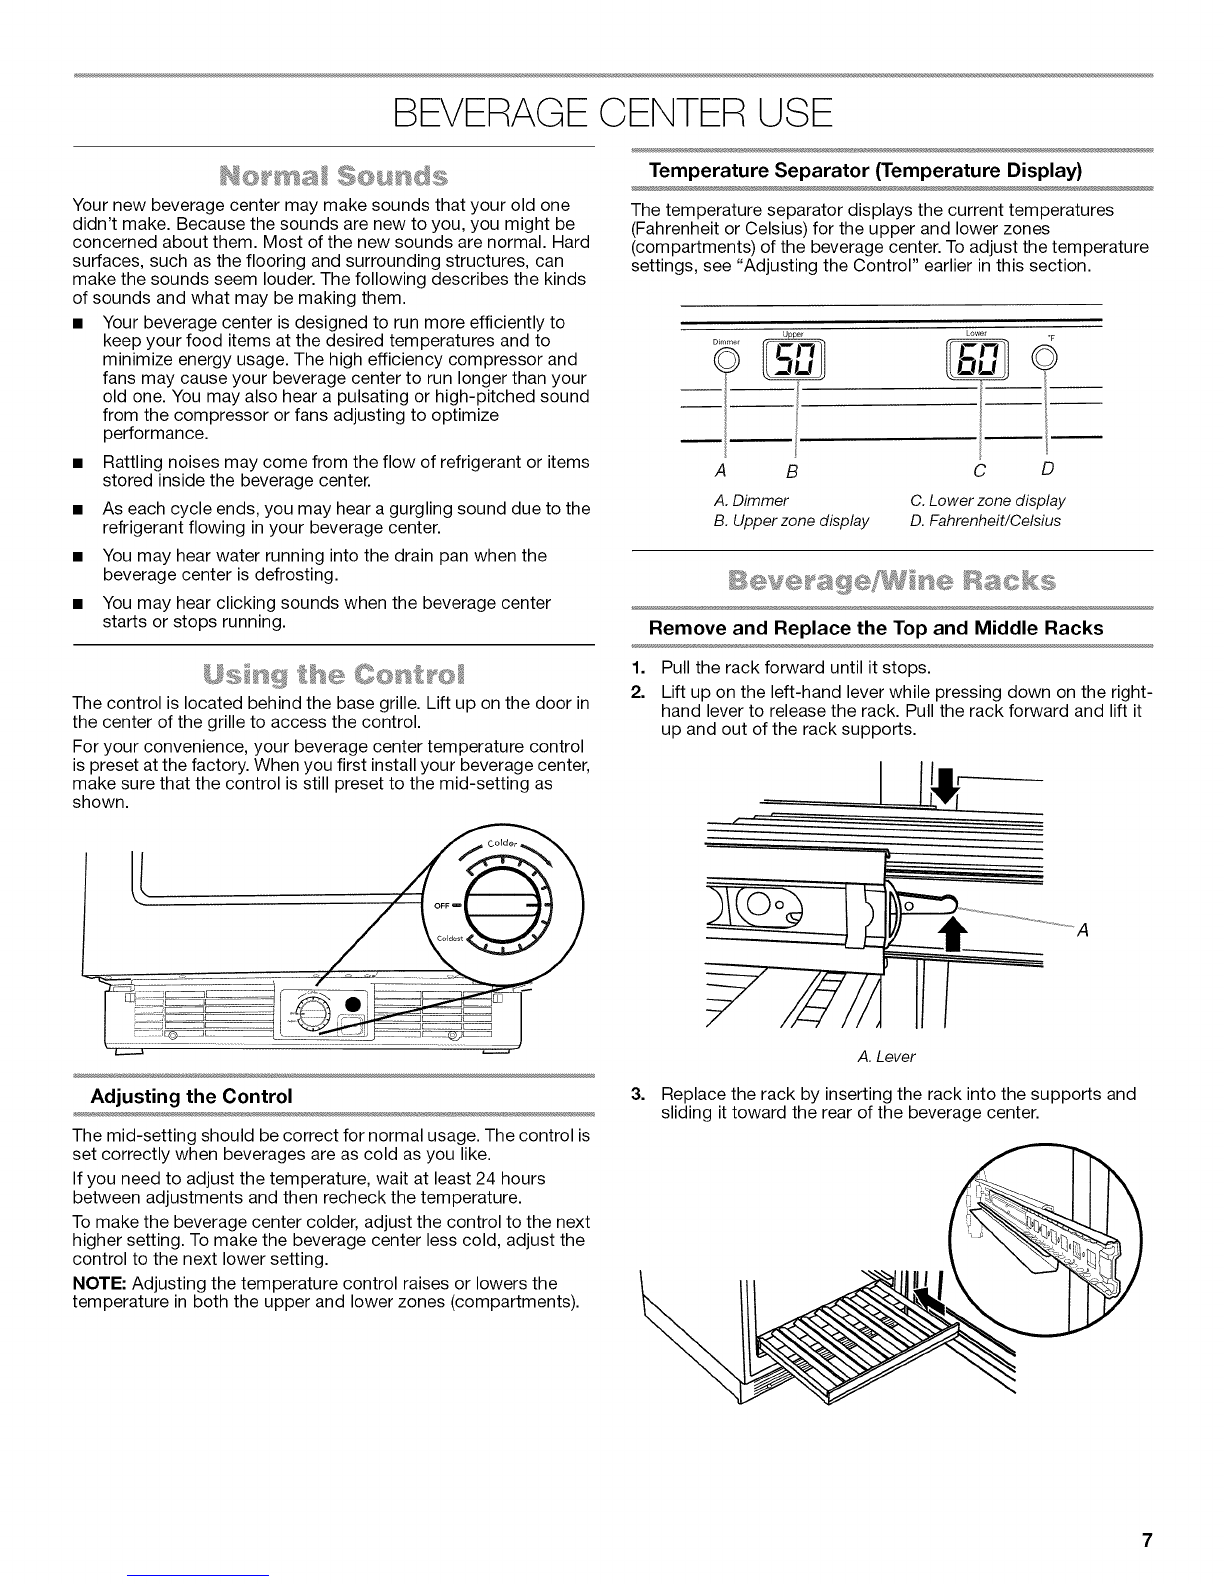
Using the Control ...................................................................................... 7
Beverage/Wine Racks .............................................................................. 7
CONTENTS
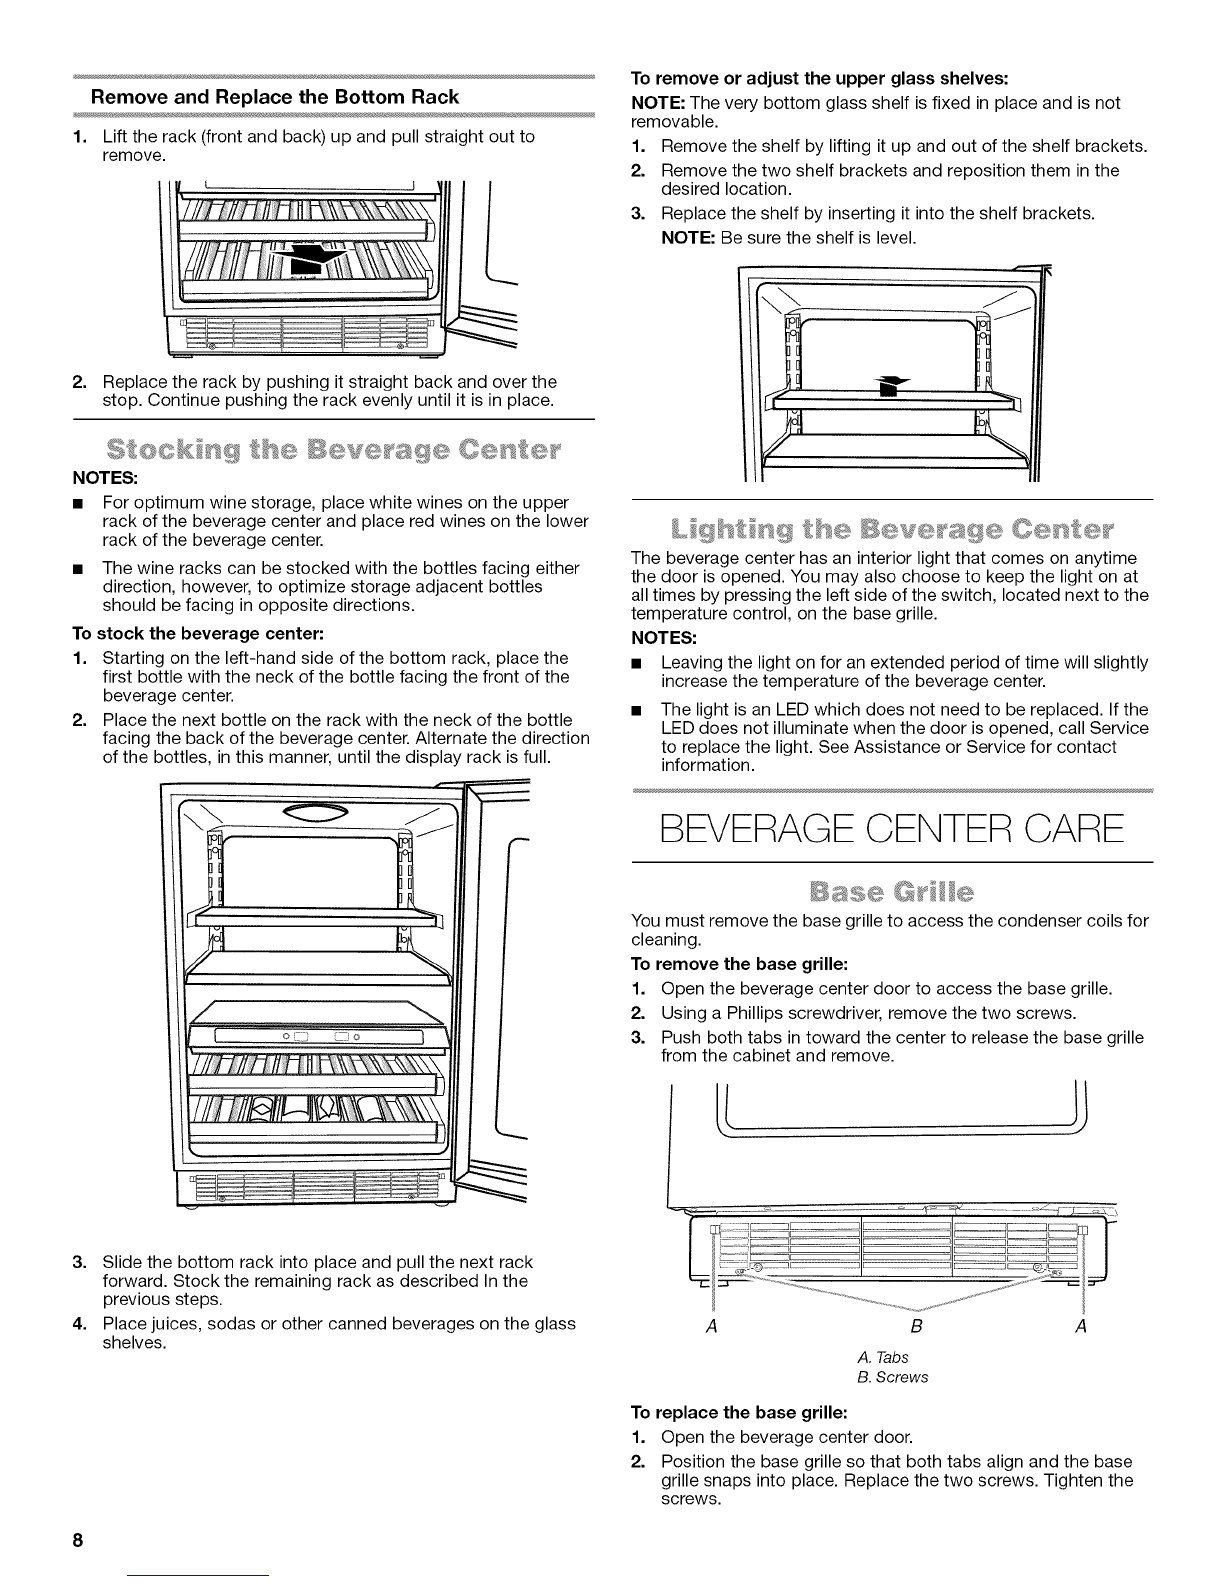
Stocking the Beverage Center ................................................................. 8
Lighting the Beverage Center ................................................................... 8
BEVERAGE CENTER CARE ....................................................................... 8
Base Grille ................................................................................................. 8
Cleaning .................................................................................................... 9
Vacation and Moving Care ....................................................................... 9
TROUBLESHOOTING ............................................................................... 10
ASSISTANCE OR SERVICE ...................................................................... 11
In the U.S.A ............................................................................................. 11
In Canada ................................................................................................ 11
WARRANTY ............................................................................................... 12
[NDICE
SEGURIDAD DEL REFRIGERADOR PAPA BEBIDAS ............................ 14
C6mo deshacerse adecuadamente de su aparato refrigerado viejo ....14
REQUISITOS DE INSTALACION .............................................................. 15
Requisitos de ubicaci6n ......................................................................... 15
Medidas del producto ............................................................................. 16
Requisitos electricos ............................................................................... 16
INSTRUCCIONES DE INSTALACION ...................................................... 17
Desempaque del refrigerador para bebidas .......................................... 17
Cierre de la puerta .................................................................................. 17
USO DEL REFRIGERADOR PAPA BEBIDAS .......................................... 18
Sonidos normales ................................................................................... 18
Uso del control ........................................................................................ 18
Portabebidas/portabotellas .................................................................... 18
C6mo almacenar en el refrigerador para bebidas ................................. 19
C6mo iluminar el refrigerador para bebidas .......................................... 19
CUIDADO DEL REFRIGERADOR PAPA BEBIDAS ................................ 19
Rejilla de la base ..................................................................................... 19
Limpieza .................................................................................................. 20
Cuidado durante las vacaciones y mudanzas ....................................... 20
SOLUCION DE PROBLEMAS ................................................................... 21
AYUDA O SERVICIO TI_CNICO ................................................................ 22
En los EE.UU ........................................................................................... 22
En Canad_ .............................................................................................. 22
GARANTIA ................................................................................................. 23
TABLE DES MATII RES
SECURITE DU REFRIGERATEUR POUR BOISSONS ........................... 25
Mise au rebut de votre vieil appareil refriger6 ........................................ 25
EXlGENCES D'INSTALLATION ................................................................ 26
Exigences d'emplacement ..................................................................... 26
Dimensions du produit ............................................................................ 27
Specifications electriques ....................................................................... 27
INSTRUCTIONS D'INSTALLATION ......................................................... 28
Deballage du refrigerateur pour boissons .............................................. 28
Fermeture de la porte ............................................................................. 28
UTILISATION DU REFRIGERATEUR POUR BOISSONS ....................... 29
Sons normaux ......................................................................................... 29
Utilisation de la commande .................................................................... 29
Grilles pour le remisage des boissons et du vin .................................... 29
Stockage dans le refrigerateur pour boissons ....................................... 30
€:clairage du refrig6rateur pour boissons ............................................... 30
ENTRETIEN DU REFRIGERATEUR POUR BOISSONS ......................... 30
Grille de la base ...................................................................................... 30
Nettoyage ............................................................................................... 31
Precautions a prendre pour les vacances
et avant un dem6nagement .................................................................... 31
DI_PANNAGE ............................................................................................. 32
ASSISTANCE OU SERVICE ...................................................................... 33
Aux I_tats-Unis ........................................................................................ 33
Au Canada .............................................................................................. 33
GARANTIE .................................................................................................. 34
2

BEVERAGE CENTER SAFETY
Your safety and the safety of others are very important.
We have provided many important safety messages in this manual and on your appliance. Always read and obey all safety
messages.
This is the safety alert symbol.
This symbol alerts you to potential hazards that can kill or hurt you and others.
All safety messages will follow the safety alert symbol and either the word "DANGER" or "WARNING."
These words mean:
You can be killed or seriously injured if you don't immediately
follow instructions.
You can be killed or seriously injured if you don't follow
instructions.
All safety messages will tell you what the potential hazard is, tell you how to reduce the chance of injury, and tell you what can
happen if the instructions are not followed.
IMPORTANT SAFETY INSTRUCTIONS
WARNING: To reduce the risk of fire, electric shock, or injury when using your beverage center, follow these basic
precautions:
• Plug into a grounded 3 prong outlet.
• Do not remove ground prong.
• Do not use an adapter.
• Do not use an extension cord.
• Disconnect power before servicing.
• Replace all parts and panels before operating.
• Remove door or drawer(s) from your old refrigerated
appliance.
• Use nonflammable cleaner.
• Keep flammable materials and vapors, such as gasoline,
away from beverage center.
• Use two or more people to move and install beverage
center.
SAVE THESE INSTRUCTIONS
State of California Proposition 65 Warnings:
WARNING: This product contains one or more chemicals known to the State of California to cause cancer.
WARNING: This product contains one or more chemicals known to the State of California to cause birth defects or other
reproductive harm.
Proper Disposal of Your Old
Refrigerated Appliance
Suffocation Hazard
Remove door or drawer(s) from your old refrigerated
appliance.
Failure to do so can result in death or brain damage.
IMPORTANT: Child entrapment and suffocation are not problems
of the past. Junked or abandoned beverage centers are still
dangerous - even if they will sit for "just a few days." If you are
getting rid of your old beverage center, please follow these
instructions to help prevent accidents.
Before You Throw Away Your Old Refrigerated Appliance:
• Take off the door.
Leave the racks and shelves in place so that children may not
easily climb inside.
important information to know about disposal of
refrigerants:
Dispose of refrigerator in accordance with Federal and Local
regulations. Refrigerants must be evacuated by a licensed,
EPA certified refrigerant technician in accordance with
established procedures.

INSTALLATION REQUIREMENTS
Opening Dimensions
Explosion Hazard
Keep flammable materials and vapors, such as
gasoline, away from beverage center.
Failure to do so can result in death, explosion, or fire.
NOTES:
For the beverage center to be flush with the front of the base
cabinets remove any baseboards or moldings from the rear of
the opening. See "Product Dimensions" and later in this
section "Opening Dimensions."
It is recommended that you do not install the beverage center
near an oven, radiator, or other heat source.
Do not install in a location where the temperature will fall
below 55°F (13°C). For best performance, do not install the
beverage center behind a cabinet door or block the base
grille. I!!
II
Height dimensions are shown with the leveling legs extended
to the minimum height.
NOTE: When leveling legs are fully extended, add %"
(15.9 mm) to the height dimensions. See "Product
Dimensions."
If the floor of the opening is not level with the kitchen floor,
shim the opening to make it level with the kitchen floor.
343/8'' (87.3 cm) min.
35" (88.9 cm) max.
[\,
?8 B \
24" (60.96 cm) min.
Critical Dimensions:
A. 14_" (37.5 cm) utility opening
B. 24" (60.96 cm) minimum opening width

• Height dimensions are shown with the leveling legs NOT
extended.
• The power cord is 60" (152.4 cm) long.
Front View
301/8"
(76.6 cm)
Side View (door open 90 °)
34W'
(86.8 cm)
34%"
(87.4 cm)
47%"
< (121.4 cm)
26W'
(66.4 cm) C
C
U,n _
Top View
23%"
(60.6 cm)
21%"
(55.0 cm)
*Dimension includes Euro-series style handle
R eq
Electrical Shock Hazard
Plug into a grounded 3 prong outlet.
Do not remove ground prong.
Do not use an adapter.
Do not use an extension cord.
Failure to follow these instructions can result in death,
fire, or electrical shock.
Before you move your beverage center into its final location, it is
important to make sure you have the proper electrical connection.
Recommended grounding method
A 115 Volt, 60 Hz., AC only, 15- or 20-amp fused, grounded
electrical supply is required. It is recommended that a separate
circuit serving only your beverage center be provided. Use an
outlet that cannot be turned off by a switch. Do not use an
extension cord.
NOTE: Before performing any type of installation, cleaning, or
removing a light bulb, unplug beverage center or disconnect
power.

INSTALLATION INSTRUCTIONS
Excessive Weight Hazard
Use two or more people to move and install
beverage center.
Failure to do so can result in back or other injury.
Remove the Packaging
Remove tape and glue residue from surfaces before turning
on the beverage center. Rub a small amount of liquid dish
soap over the adhesive with your fingers. Wipe with warm
water and dry.
Do not use sharp instruments, rubbing alcohol, flammable
fluids, or abrasive cleaners to remove tape or glue. These
products can damage the surface of your beverage center.
For more information, see "Beverage Center Safety."
• Dispose of/recycle all packaging materials.
When Moving "{our Beverage Center:
Your beverage center is heavy. When moving the appliance
for cleaning and service, be sure to cover the floor with
cardboard or hardboard to avoid floor damage. Always pull
the appliance straight out when moving it. Do not wiggle or
"walk" the appliance when trying to move it, as floor
damage could occur.
Clean Before Using
After you remove all of the packaging materials, clean the inside of
your beverage center before using it. See the cleaning instructions
in "Beverage Center Care."
important information to know about glass shelves
and covers:
Do not clean glass shelves or covers with warm water when
they are cold. Shelves and covers may break if exposed to
sudden temperature changes or impact, such as bumping.
Tempered glass is designed to shatter into many small,
pebble-size pieces. This is normal. Glass shelves and covers
are heavy. Use both hands when removing them to avoid
dropping.
Door Closing
Your beverage center has four leveling legs. Ifyour beverage
center seems unsteady or you want the door to close more easily,
adjust the beverage center's tilt using the instructions below.
Electrical Shock Hazard
Plug into a grounded 3 prong outlet.
Do not remove ground prong.
Do not use an adapter.
Do not use an extension cord.
Failure to follow these instructions can result in death,
fire, or electrical shock.
1. Plug into a grounded 3 prong outlet.
Excessive Weight Hazard
Use two or more people to move and install
beverage center.
Failure to do so can result in back or other injury.
2.
3. Move the beverage center into its final location.
Turn the leveling legs to the right to lower the beverage center
or turn the leveling legs to the left to raise it. It may take
several turns of the leveling legs to adjust the tilt of the
beverage center.
NOTE: Having someone push against the top of the beverage
center takes some weight off the leveling legs. This makes it
easier to adjust the leveling legs.
4. Make sure that the door closes as easily as you like. If not, tilt
the beverage center slightly more to the rear by turning both
front leveling screws to the left. It may take several more turns,
and you should turn both leveling legs the same amount.
6

BEVERAGECENTER USE
Your new beverage center may make sounds that your old one
didn't make. Because the sounds are new to you, you might be
concerned about them. Most of the new sounds are normal. Hard
surfaces, such as the flooring and surrounding structures, can
make the sounds seem louder. The following describes the kinds
of sounds and what may be making them.
• Your beverage center is designed to run more efficiently to
keep your food items at the desired temperatures and to
minimize energy usage. The high efficiency compressor and
fans may cause your beverage center to run longer than your
old one. You may also hear a pulsating or high-pitched sound
from the compressor or fans adjusting to optimize
performance.
• Rattling noises may come from the flow of refrigerant or items
stored inside the beverage center.
• As each cycle ends, you may hear a gurgling sound due to the
refrigerant flowing in your beverage center.
• You may hear water running into the drain pan when the
beverage center is defrosting.
• You may hear clicking sounds when the beverage center
starts or stops running.
tBe
The control is located behind the base grille. Lift up on the door in
the center of the grille to access the control.
For your convenience, your beverage center temperature control
is preset at the factory. When you first install your beverage center,
make sure that the control is still preset to the mid-setting as
shown.
Temperature Separator (Temperature Display)
The temperature separator displays the current temperatures
(Fahrenheit or Celsius) for the upper and lower zones
(compartments) of the beverage center. To adjust the temperature
settings, see "Adjusting the Control" earlier in this section.
A B C D
A. Dimmer C. Lower zone display
B. Upper zone display D. Fahrenheit/Celsius
1.
2.
Remove and Replace the Top and Middle Racks
Pull the rack forward until itstops.
Lift up on the left-hand lever while pressing down on the right-
hand lever to release the rack. Pull the rack forward and lift it
up and out of the rack supports.
Adjusting the Control
The mid-setting should be correct for normal usage. The control is
set correctly when beverages are as cold as you like.
If you need to adjust the temperature, wait at least 24 hours
between adjustments and then recheck the temperature.
To make the beverage center colder, adjust the control to the next
higher setting. To make the beverage center less cold, adjust the
control to the next lower setting.
NOTE: Adjusting the temperature control raises or lowers the
temperature in both the upper and lower zones (compartments).
3.
A.Lever
Replace the rack by inserting the rack into the supports and
sliding it toward the rear of the beverage center.

Remove and Replace the Bottom Rack
1. Lift the rack (front and back) up and pull straight out to
remove.
j
2. Replace the rack by pushing it straight back and over the
stop. Continue pushing the rack evenly until it is in place.
( Be Beve oage
NOTES:
• For optimum wine storage, place white wines on the upper
rack of the beverage center and place red wines on the lower
rack of the beverage center.
• The wine racks can be stocked with the bottles facing either
direction, however, to optimize storage adjacent bottles
should be facing in opposite directions.
To stock the beverage center:
1. Starting on the left-hand side of the bottom rack, place the
first bottle with the neck of the bottle facing the front of the
beverage center.
2. Place the next bottle on the rack with the neck of the bottle
facing the back of the beverage center. Alternate the direction
of the bottles, in this manner, until the display rack is full.
\
To remove or adjust the upper glass shelves:
NOTE: The very bottom glass shelf is fixed in place and is not
removable.
1. Remove the shelf by lifting it up and out of the shelf brackets.
2. Remove the two shelf brackets and reposition them in the
desired location.
3. Replace the shelf by inserting it into the shelf brackets.
NOTE: Be sure the shelf is level.
\
The beverage center has an interior light that comes on anytime
the door is opened. You may also choose to keep the light on at
all times by pressing the left side of the switch, located next to the
temperature control, on the base grille.
NOTES:
• Leaving the light on for an extended period of time will slightly
increase the temperature of the beverage center.
The light is an LED which does not need to be replaced. If the
LED does not illuminate when the door is opened, call Service
to replace the light. See Assistance or Service for contact
information.
BEVERAGECENTER CARE
Base lie
You must remove the base grille to access the condenser coils for
cleaning.
To remove the base grille:
1. Open the beverage center door to access the base grille.
2. Using a Phillips screwdriver, remove the two screws.
3. Push both tabs in toward the center to release the base grille
from the cabinet and remove.
3,
4,
Slide the bottom rack into place and pull the next rack
forward. Stock the remainnng rack as described In the
previous steps.
Place juices, sodas or other canned beverages on the glass
shelves. A B A
A. Tabs
B, Screws
To replace the base grille:
1. Open the beverage center door.
2. Position the base grille so that both tabs align and the base
grille snaps into place. Replace the two screws. Tighten the
screws.
8

Explosion Hazard
Use nonflammable cleaner.
Failure to do so can result in death, explosion, or fire.
Clean the beverage center about once a month to avoid buildup
of odors. Wipe up spills immediately.
To clean your beverage center:
1. Unplug beverage center or disconnect power.
2. Remove all racks and shelves from inside the beverage center.
3. Hand wash, rinse, and dry removable parts and interior
surfaces thoroughly. Use a clean sponge or soft cloth and a
mild detergent in warm water.
• To avoid damaging wooden tines and trim pieces, wipe
them off with a clean sponge or soft cloth and warm water.
Do not use detergent or immerse the entire rack into water
when cleaning.
Do not use abrasive or harsh cleaners such as window
sprays, scouring cleansers, flammable fluids, cleaning
waxes, concentrated detergents, bleaches or cleansers
containing petroleum products on plastic parts, interior
and door liners or gaskets. Do not use paper towels,
scouring pads, or other harsh cleaning tools. These can
scratch or damage materials.
• To help remove odors, you can wash interior walls with a
mixture of warm water and baking soda (2 tbs to 1 qt
[26 g to 0.95 L] of water).
4. Wash stainless steel and painted metal exteriors with a clean
sponge or soft cloth and a mild detergent in warm water. Do
not use abrasive or harsh cleaners, or cleaners containing
chlorine. These can scratch or damage materials. Dry
thoroughly with a soft cloth.
NOTE: To keep your stainless steel beverage center looking
like new and to remove minor scuffs or marks, it is suggested
that you use the manufacturer's approved Stainless Steel
Cleaner and Polish. To order the cleaner, see "Accessories."
IMPORTANT: This cleaner is for stainless steel parts only!
Do not allow the Stainless Steel Cleaner and Polish to come
into contact with any plastic parts such as the trim pieces,
dispenser covers or door gaskets. If unintentional contact
does occur, clean plastic part with a sponge and mild
detergent in warm water. Dry thoroughly with a soft cloth.
5.
6. Replace the racks and shelves.
Clean the condenser coils regularly. They are located behind
the base grille. Coils may need to be cleaned as often as every
other month. This may help save energy.
• Remove the base grille. See "Base Grille."
• Use a vacuum cleaner with an extended attachment to
clean the condenser coils when they are dusty or dirty.
• Replace the base grille.
7. Plug in beverage center or reconnect power.
Vacations
If you choose to turn the beverage center off before you leave,
follow these steps.
1. Remove all wine bottles from the beverage center.
2. Unplug the beverage center.
3. Clean the beverage center. See "Cleaning."
4. Tape a rubber or wood block to the top of the door to prop it
open far enough for air to get in. This stops odor and mold
from building up.
Moving
When you are moving your beverage center to a new home, follow
these steps to prepare it for the move.
1. Remove all wine bottles from the beverage center.
2. Unplug the beverage center.
3. Clean, wipe, and dry it thoroughly.
4. Take out all removable parts, wrap them well, and tape them
together so they don't shift and rattle during the move.
5. Tape the doors shut and tape the power cord to the beverage
center.
When you get to your new home, put everything back and refer to
the "Installation Instructions" section for preparation instructions.

TROUBLESHOOTING
Try the solutions suggested here first in order to avoid the cost of an unnecessary service call.
Your beverage center will not operate
Electrical Shock Hazard
Plug into a grounded 3 prong outlet.
Do not remove ground prong.
Do not use an adapter.
Do not use an extension cord.
Failure to follow these instructions can result in death,
fire, or electrical shock.
Is the power supply cord unplugged? Plug into a grounded
3 prong outlet.
Has a household fuse blown, or has a circuit breaker
tripped? Replace the fuse or reset the circuit.
Is the Beverage Center Control turned to the OFF
position? See "Using the Control."
The motor seems to run too much
Is the temperature outside hotter than normal? Expect the
motor to run longer under warm conditions. At normal
temperatures, expect your motor to run about 40% to 80% of
the time. Under warmer conditions, expect it to run even more
of the time.
Is the door opened often? Expect the motor to run longer
when this occurs. In order to conserve energy, try to get
everything you need out of the beverage center at once, keep
wine bottles positioned label side up so that they are easy to
find, and close the door as soon as the wine is removed.
Is the control set correctly for the surrounding conditions?
See "Using the Control."
Is the door closed completely? Push the door firmly shut. If
it will not shut all the way, see "The door will not close
completely" later in this section.
Are the condenser coils dirty? This obstructs air transfer and
makes the motor work harder. Clean the condenser coils. See
"Cleaning."
Temperature is too warm
Is the door opened often? Be aware that the beverage
center will warm when this occurs. In order to keep the
beverage center cool, try to get everything you need out of the
beverage center at once, keep wine bottles positioned label
side up so that they are easy to find, and close the door as
soon as the wine is removed.
•Is the control set correctly for the surrounding conditions?
See "Using the Control."
•Is the base grille blocked? For best performance, do not
install the beverage center behind a cabinet door or block the
base grille.
There is interior moisture buildup
is the door opened often? To avoid humidity buildup, try to
get everything you need out of the beverage center at once,
keep wine bottles positioned label side up so that they are
easy to find, and close the door as soon as the wine is
removed. When the door is opened, humidity from the room
air enters the beverage center. The more often the door is
opened, the faster humidity builds up, especially when the
room itself is very humid.
Is it humid? It is normal for moisture to build up inside the
beverage center when the air is humid.
Is the control set correctly for the surrounding conditions?
See "Using the Control."
The door is difficult to open
Explosion Hazard
Use nonflammable cleaner.
Failure to do so can result in death, explosion, or fire.
•Is the gasket dirty or sticky? Clean the gasket and the
surface that it touches. Rub a thin coat of paraffin wax on the
gasket following cleaning.
The door will not close completely
•Are the racks or shelves out of position? Put the racks or
shelves back into their correct positions. See "Beverage
Center Use" for more information.
Explosion Hazard
Use nonflammable cleaner.
Failure to do so can result in death, explosion, or fire.
• Is the gasket sticking? Clean the gasket and the surface that
it touches. Rub a thin coat of paraffin wax on the gasket
following cleaning.
10

ASSISTANCE
Before calling for assistance or service, please check
"Troubleshooting." It may save you the cost of a service call. Ifyou
still need help, follow the instructions below.
When calling, please know the purchase date and the complete
model and serial number of your appliance. This information will
help us to better respond to your request.
If you need replacement parts
If you need to order replacement parts, we recommend that you
only use factory specified replacement parts. Factory specified
replacement parts will fit right and work right because they are
made with the same precision used to build every new Jenn-Air ®
appliance.
To locate factory specified replacement parts in your area, call us
or your nearest designated service center.
Call the Jenn-Air Customer eXperience Center
toll free: 1-800-JENNAIR (1-800-536-6247}.
Our consultants provide assistance with:
• Features and specifications on our full line of appliances.
• Installation information.
• Use and maintenance procedures.
• Accessory and repair parts sales.
• Specialized customer assistance (Spanish speaking, hearing
impaired, limited vision, etc.).
• Referrals to local dealers, repair parts distributors, and service
companies. Jenn-Air designated service technicians are
trained to fulfill the product warranty and provide after-
warranty service, anywhere in the United States.
To locate the Jenn-Air designated service company in your area,
you can also look in your telephone directory Yellow Pages.
For further assistance
If you need further assistance, you can write to Jenn-Air with any
questions or concerns at:
Jenn-Air Brand Home Appliances
Customer eXperience Center
553 Benson Road
Benton Harbor, MI 49022-2692
Please include a daytime phone number in your correspondence.
OR SERVICE
...._a_@d8
Call the Jenn-Air Canada Customer eXperience Centre toll free:
1-800-JENNAI£ (1-800-536-6247}.
Our consultants provide assistance with:
• Features and specifications on our full line of appliances.
• Use and maintenance procedures.
• Accessory and repair parts sales.
Referrals to local dealers, repair parts distributors, and
services companies. Jenn-Air Canada designated service
technicians are trained to fulfill the product warranty and
provide after-warranty service, anywhere in Canada.
For further assistance
If you need further assistance, you can write to Jenn-Air Canada
with any questions or concerns at:
Jenn-Air Canada
Customer eXperience Centre
200 - 6750 Century Ave.
Mississauga, Ontario L5N 0B7
Please include a daytime phone number in your correspondence.
11

JENN-AIR®REFRIGERATORWARRANTY
FIRST YEAR LIMITED WARRANTY
For one year from the date of purchase, when this major appliance is installed, operated and maintained according to instructions attached
to or furnished with the product, Jenn-Air brand of Whirlpool Corporation or Whirlpool Canada LP (hereafter "Jenn-Air") will pay for factory
specified replacement parts and repair labor to correct defects in materials or workmanship that existed when this major appliance was
purchased.
SECOND THROUGH FIFTH YEAR LIMITED WARRANTY ON CAVITY LINER AND SEALED REFRIGERATION SYSTEM
In the second through fifth years from the date of purchase, when this major appliance is installed, operated and maintained according to
the instructions attached to or furnished with the product, Jenn-Air brand will pay for factory specified replacement parts and repair labor
for the following components to correct non-cosmetic defects in materials and workmanship in this part that prevent function of the
refrigerator and that existed when this major appliance was purchased:
• Refrigerator/freezer cavity liner if the part cracks due to defective materials or workmanship.
• Sealed Refrigeration system (includes compressor, evaporator, condenser, dryer and connecting tubing).
YOUR SOLE AND EXCLUSIVE REMEDY UNDER THE LIMITED WARRANTY SHALL BE PRODUCT REPAIR AS PROVIDED HEREIN.
Service must be provided by a designated Jenn-Air service company. This limited warranty is valid in the United States or Canada and
applies only when the major appliance is used in the country in which it was purchased. This limited warranty is effective from the date of
the original consumer purchase. Proof of original purchase date is required to obtain service under this limited warranty.
ITEMS EXCLUDED FROM WARRANTY
This limited warranty does not cover:
1. Replacement parts or repair labor if this major appliance is used for other than normal, single-family household use or when it is used in
a manner that is inconsistent to published user or operator instructions and/or installation instructions.
2. Service calls to correct the installation of your major appliance, to instruct you on how to use your major appliance, to replace or repair
house fuses, or to correct house wiring or plumbing.
3. Service calls to repair or replace appliance light bulbs, air filters or water filters. Consumable parts are excluded from warranty
coverage.
4. Damage resulting from accident, alteration, misuse, abuse, fire, flood, acts of God, improper installation, installation not in accordance
with electrical or plumbing codes, or use of products not approved by Jenn-Air.
5. Cosmetic damage, including scratches, dents, chips or other damage to the finish of your major appliance, unless such damage results
from defects in materials or workmanship and is reported to Jenn-Air within 30 days from the date of purchase.
6. Any food or medicine loss due to refrigerator or freezer product failures.
7. Pickup and delivery. This major appliance is intended to be repaired in your home.
8. Repairs to parts or systems resulting from unauthorized modifications made to the appliance.
9. Expenses for travel and transportation for product service if your major appliance is located in a remote area where service by an
authorized Jenn-Air servicer is not available.
10. The removal and reinstallation of your major appliance if it is installed in an inaccessible location or is not installed in accordance with
Jenn-Air's published installation instructions.
11. Replacement parts or repair labor on major appliances with original model/serial numbers that have been removed, altered or cannot
be easily determined.
12. Discoloration, rust or oxidation of stainless steel surfaces.
The cost of repair or replacement under these excluded circumstances shall be borne by the customer.
DISCLAIMER OF IMPLIED WARRANTIES
IMPLIED WARRANTIES, INCLUDING ANY IMPLIED WARRANTY OF MERCHANTABILITY OR IMPLIED WARRANTY OF FITNESS FOR A
PARTICULAR PURPOSE, ARE LIMITED TO ONE YEAR OR THE SHORTEST PERIOD ALLOWED BY LAW. Some states and provinces do
not allow limitations on the duration of implied warranties of merchantability or fitness, so this limitation may not apply to you. This warranty
gives you specific legal rights, and you also may have other rights that vary from state to state or province to province.
DISCLAIMER OF REPRESENTATIONS OUTSIDE OF WARRANTY
Jenn-Air makes no representations about the quality, durability, or need for service or repair of this major appliance other than the
representations contained in this Warranty. If you want a longer or more comprehensive warranty than the limited warranty that comes with
this major appliance, you should ask Jenn-Air or your retailer about buying an extended warranty.
LIMITATION OF REMEDIES; EXCLUSION OF INCIDENTAL AND CONSEQUENTIAL DAMAGES
YOUR SOLE AND EXCLUSIVE REMEDY UNDER THIS LIMITED WARRANTY SHALL BE PRODUCT REPAIR AS PROVIDED HEREIN.
JENN-AIR SHALL NOT BE LIABLE FOR INCIDENTAL OR CONSEQUENTIAL DAMAGES. Some states and provinces do not allow the
exclusion or limitation of incidental or consequential damages, so these limitations and exclusions may not apply to you. This warranty
gives you specific legal rights, and you also may have other rights that vary from state to state or province to province.
If outside the 50 United States and Canada, contact your authorized Jenn-Air dealer to determine if another warranty applies.
If you think you need repair service, first see the "Troubleshooting" section of the Use & Care Guide. If you are unable to resolve the problem
after checking "Troubleshooting," additional help can be found by checking the "Assistance or Service" section or by calling us at
1-800-JENNAIR (1-800-536-6247). 4/13
12

Keep this book and your sales slip together for future
reference. You must provide proof of purchase or installation
date for in-warranty service.
Write down the following information about your major appliance
to better help you obtain assistance or service if you ever need it.
You will need to know your complete model number and serial
number. You can find this information on the model and serial
number label located on the product.
Dealer name
Address
Phone number
Model number
Serial number
Purchase date
13

SEGURIDAD DEL REFRIGERADORPARA BEBIDAS
Su seguridad y la seguridad de los demos es muy importante.
Hemos incluido muchos mensajes importantes de seguridad en este manual yen su electrodomestico. Lea y obedezca siempre
todos los mensajes de seguridad.
Este es el simbolo de advertencia de seguridad.
Este simbolo le llama la atenci6n sobre peligros potenciales que pueden ocasionar la muerte o una lesi6n a
usted y a los demas.
Todos los mensajes de seguridad iran a continuaci6n del simbolo de advertencia de seguridad y de la palabra
"PELIGRO" o "ADVERTENCIA". Estas palabras significan:
Si no sigue las instrucciones de inmediato, usted puede
morir o sufrir una lesibn grave.
Si no sigue las instrucciones, usted puede morir o sufrir
una lesibn grave.
Todos los mensajes de seguridad le diran el peligro potencial, le diran c6mo reducir las posibilidades de sufrir una lesi6n y Io que
puede suceder si no se siguen las instrucciones.
INSTRUCCIONES IMPORTANTES DE SEGURIDAD
ADVERTENCIA: Para reducir el riesgo de incendio, choque electrico, o lesiones personales al usar su refrigerador para
bebidas, siga estas precauciones basicas:
• Conecte a un contacto de pared de conexi6n a tierra de
3 terminales.
• No quite la terminal de conexi6n a tierra.
• No use un adaptador.
• No use un cable electrico de extensi6n.
• Desconecte el suministro de energia antes de darle servicio.
• Vuelva a colocar todos los componentes y paneles antes de
hacerlo funcionar.
• Remueva la puerta o el(los) caj6n(cajones) de su aparato
refrigerado viejo.
• Use un limpiador no inflamable.
• Mantenga los materiales y vapores inflamables, tales como
gasolina, alejados del refrigerador para bebidas.
• Use dos o mas personas para mover e instalar el
refrigerador para bebidas.
GUARDE ESTAS INSTRUCCIONES
Advertencias de la Proposici6n 65 del estado de California:
ADVERTENCIA: Este producto contiene una o mas sustancias quimicas identificadas por el estado de California como
causantes de cancer.
ADVERTENCIA: Este producto contiene una o mas sustancias quimicas identificadas por el estado de California como
causantes de defectos cong6nitos o alg0n otro tipo de da_os en la funci6n reproductora.
Cbmo deshacerse adecuadamente de su aparato refrigerado viejo
Peligro de Asfixia
Remueva la puerta o el(los) caj6n(cajones) de su
aparato refrigerado viejo.
No seguir esta instrucci6n puede ocasionar Jamuerte
o da_o al cerebro.
IMPORTANTE: El atrapamiento y asfixia de ni_os no es un
problema del pasado. Los refrigeradores para bebidas tirados y
abandonados son un peligro, aOn si van a quedar ahi "por unos
pocos dias". Si Ud. esta por deshacerse de su refrigerador para
bebidas viejo, por favor siga las instrucciones que se dan a
continuacion para prevenir accidentes.
14

Antes de descartar su viejo aparato refrigerado:
• Saque la puerta.
• Deje las rejillas y los estantes en su lugar asi los ni_os no
pueden meterse adentro con facilidad.
Informaci6n importante para saber acerca del desecho
de refrigerantes:
Deshagase del refrigerador siguiendo los reglamentos
federales y locales. Los refrigerantes deberan ser evacuados
por un t_cnico certificado en refrigeraci6n por EPA (Agencia
de protecci6n del medioambiente) segOn los procedimientos
establecidos.
REQUISITOS DE INSTALACION
Peligro de Explosi6n
Mantenga los materiales y vapores inflamables,
tales como gasolina, alejados del refrigerador para
bebidas.
No seguir esta instrucci6n puede ocasionar la muerte,
explosi6n, o incendio.
NOTAS:
• Para que el refrigerador para bebidas este al ras con el frente
de los armarios de base, quite los zocalos o molduras de la
parte posterior de la abertura. Consulte "Medidas del
producto" y "Medidas de la abertura", m_s adelante en esta
seccion.
• No se recomienda instalar el refrigerador para bebidas cerca
de un horno, radiador u otra fuente de calor.
• No Io instale en un lugar donde la temperatura puede ser
menor de 55 °F (13 °C). Para obtener un funcionamiento
optimo, no instale el refrigerador para bebidas detras de una
puerta de un armario ni bloquee la rejilla de la base..
-- II -- I c:.... -z__]
'11'
Medidas de la abertura
Las medidas de altura indicadas consideran las patas
niveladoras extendidas a una altura minima.
NOTA: Si las patas niveladoras estan totalmente extendidias
1" (25 mm), agregue 3/4"(19,05 mm) alas medidas de altura.
Vea "Medidas del producto."
Si el piso de la abertura no esta nivelado con el piso de la
cocina, ponga calzas en la abertura para que quede nivelado
con el piso de la cocina.
(60,96 cm)
min. B
24" (60,96 cm) min.
34s/8'' (87,3 cm) min.
35" (88,9 cm) max.
Dimensiones fundamentales:
A. Abertura de use general de 143/4"(37,5 cm)
B. Ancho mfnimo de la abertura de 24" (60,96 cm)
15

Las medidas de altura se muestran con las patas niveladoras
NO extendidas.
El cable de suministro de energia es de 60" (152,4 cm) de
largo.
Vista delantera
301/8"
(76,6 cm)
i
Vista lateral (puerta abierta a 90 °)
341/8"
(86,8 cm)
34%"
(87,4 cm)
473/4" j=
(121,4 cm)
26V8"
(66,4 cm) C
CU,,, _
Vista superior
237/8"
(60,6 cm) 21%"
(55,0 cm)
J
*Las dimensiones incluyen el estilo de manija de la serie Euro
Peligro de Choque EI6ctrico
Conecte a un contacto de pared de conexi6n a tierra de
3terminales.
No quite la terminal de conexJ6n a tierra.
No use un adaptador.
No use un cable el_ctrico de extensi6n.
No seguir estas instrucciones puede ocasionar
la muerte, incendio o choque el6ctrico.
Antes de mover el refrigerador para bebidas a su ubicaci6n final,
es importante asegurarse de que tiene la conexi6n electrica
adecuada.
M_todo de conexi6n a tierra recomendado
Se requiere una fuente de energia electrica de 115 Voltios, 60 Hz.,
CA solamente y con fusibles de 15 6 20 amperios, debidamente
conectada atierra. Se recomienda que use un circuito separado
s61opara su refrigerador para bebidas. Use un tomacorriente que
no se pueda apagar con un interruptor. No use un cable electrico
de extensi6n.
NOTA: Antes de realizar cualquier tipo de instalaci6n, limpieza o
de quitar un foco de luz, desenchufe el refrigerador para bebidas
o desconecte el suministro de energia.
16

INSTRUCCIONES DE INSTALACION
_ _A_ ,_ _ _ G _ _ _ _ %_/_ _/_ %_ _&B
iss bebidss
Peligro de Peso Excesivo
Use dos o m_s personas para mover e instalar
el refrigerador para bebidas.
No seguir esta instrucci6n puede ocasionar una
lesi6n en la espalda uotro tipo de lesiones.
C6mo quitar los materiales de empaque
Quite los residuos de cinta y goma de las superficies antes de
encender el refrigerador para bebidas. Frote un poco de
detergente liquido para vajillas sobre el adhesivo con los
dedos. Limpie con agua tibia y seque.
No use instrumentos filosos, alcohol para fricciones, liquidos
inflamables o productos de limpieza abrasivos para eliminar
los restos de cinta o goma. Estos productos pueden da_ar la
superficie de su refrigerador para bebidas. Para obtener m_s
informacion, vea "Seguridad del refrigerador para bebidas".
• Deshagase de todos los materiales de embalaje o reciclelos.
Cuando mueva su refrigerador para bebidas:
Su refrigerador para bebidas es muy pesado. Cuando
mueva el electrodomestico para limpiarlo y darle servicio,
cerci6rese de cubrir el piso con cart6n o madera para evitar
da_os en el mismo. AI mover el electrodomestico, siempre
tire directamente hacia afuera. No menee el
electrodomestico de lado a lado ni Io haga "caminar"
cuando Io trate de mover ya que podria da_ar el piso.
Limpieza antes del uso
Una vez que usted haya quitado todos los materiales de
empaque, limpie el interior de su refrigerador para bebidas antes
de usarlo. Vea las instrucciones de limpieza en "Cuidado del
refrigerador para bebidas".
Informaci6n importante para saber acerca de los estantes
y tapas de vidrio:
No limpie los estantes y tapas de vidrio con agua caliente
mientras estAn frios. Los estantes y tapas pueden romperse
si se exponen a cambios bruscos de temperatura o impacto,
como seria un golpe brusco. El vidrio templado se ha
dise_ado para hacerse a_icos. Esto es normal. Los estantes
y tapas de vidrio son muy pesados. Use ambas manos al
sacarlos para evitar que se caigan.
Cierre de la puerta
Su refrigerador para bebidas tiene cuatro patas niveladoras. Si su
refrigerador para bebidas parece inestable ousted quiere que la
puerta se cierre con mayor facilidad, ajuste la inclinacion del
refrigerador para bebidas usando las instrucciones a
continuacion.
Peligro de Choque EI6ctrico
Conecte a un contacto de pared de conexi6n a tierra de
3 terminales.
No quite la terminal de conexi6n a tierra.
No use un adaptador.
No use un cable el_ctrico de extensi6n.
No seguir estas instrucciones puede ocasionar
la muerte, incendio o choque el6ctrico.
1. Conecte a un contacto de pared de conexion a tierra de
3 terminales.
Peligro de Peso Excesivo
Use dos o m_s personas para mover e instalar
el refrigerador para bebidas.
No seguir esta instrucci6n puede ocasionar una
lesi6n en la espalda uotto tipo de lesiones.
2.
3. Mueva el refrigerador para bebidas hacia su posicion final.
Gire las patas niveladoras hacia la derecha para bajar el
refrigerador para bebidas o girelas hacia la izquierda para
levantarlo. Puede precisar darles varias vueltas alas patas
niveladoras para ajustar la inclinacion del refrigerador para
bebidas.
NOTA: Para quitar un poco de peso de las patas niveladoras,
haga que alguien empuje la parte superior del refrigerador
para bebidas. Esto facilita el ajuste de las patas niveladoras.
4. AsegOrese de que la puerta cierre con la facilidad que usted
desea. De Io contrario, incline el refrigerador para bebidas
ligeramente mas hacia la parte posterior, girando ambos
tornillos reguladores frontales hacia la izquierda. Puede tomar
varias vueltas m_s, y usted debera girar ambas patas
niveladoras la misma cantidad de veces.
17

USO DEL REFRIGERADORPARA BEBIDAS
Su nuevo refrigerador para bebidas puede hacer ruidos que su
viejo refrigerador para bebidas no hacia. Como estos sonidos son
nuevos para Ud., puede ser que se preocupe. La mayoria de los
sonidos nuevos son normales. Las superficies duras tales como
el piso y las estructuras circundantes pueden hacer que los
sonidos parezcan mas fuertes. A continuacion se describen los
tipos de sonidos y qu6 puede causarlos.
• Su refrigerador para bebidas esta dise_ado para funcionar
con m_is eficiencia para conservar sus alimentos a la
temperatura deseada y para reducir al minimo el uso de
energia. El compresor y los ventiladores de alta eficiencia
pueden causar que su nuevo refrigerador para bebidas
funcione por periodos de tiempo m_is largos que su
refrigerador para bebidas viejo. Tambien puede escuchar un
sonido pulsante o agudo del compresor o los ventiladores que
se ajustan para un funcionamiento optimo.
• Las vibraciones pueden producirse por el flujo de liquido
refrigerante o articulos guardados dentro del refrigerador para
bebidas.
• AI final de cada ciclo, Ud. puede escuchar un gorgoteo
debido al flujo de liquido refrigerante en su refrigerador para
bebidas.
Ud. puede escuchar agua corriendo hacia la bandeja
recolectora cuando el refrigerador para bebidas se esta
descongelando.
Es posible que escuche sonidos de chasquido cuando el
refrigerador para bebidas comienza o deja de funcionar.
El control esta ubicado detras de la rejilla de la base. Levante la
puerta en el centro de la rejilla para acceder al control.
Para su comodidad, el control de su refrigerador para bebidas ha
sido prefijado de fabrica. AI instalar su refrigerador para bebidas
por primera vez, cerci6rese de que el control ann este prefijado en
el ajuste medio, como se ilustra.
C6mo ajustar los controles
El ajuste medio indicado en la seccion previa debe ser el correcto
para el uso normal. El control esta fijado correctamente cuando
las bebidas estan tan frias como a usted le gustan.
Si necesita ajustar la temperatura, espere por Io menos 24 horas
entre un ajuste y otro, y despues vuelva a verificar la temperatura.
Para hacer que el refrigerador para bebidas este m_is frio, coloque
el control en el siguiente ajuste m_is alto. Para hacer que el
refrigerador para bebidas este menos frio, coloque el control en el
siguiente ajuste m_is bajo.
NOTA" AI ajustar el control de temperatura, se aumenta o
disminuye la temperatura en ambas zonas (compartimientos),
superior e inferior.
Separador de temperatura (Pantalla de temperatura)
El separador de temperatura muestra las temperaturas actuales
(en Fahrenheit o centigrados) para las zonas (compartimientos)
superior media e inferior del refrigerador para bebidas. Para
regular los ajustes de temperatura, vea "Como ajustar los
controles" anteriormente en esta seccion.
A B C D
A. Reductor de luz C. Pantalla de la zona inferior
B. Pantalla de la zona superior D. Fahrenheit/centfgrados
Para quitar y volver a colocar los portabotellas
superior y central
1.
2. Jale el portabotellas hacia adelante hasta que se detenga.
Levante la palanca izquierda mientras presiona la palanca
derecha para liberar el portabotellas. Jale el portabotellas
hacia delante y levantelo fuera de los soportes del mismo.
3.
....... A
A. Palanca
Vuelva a colocar el portabotellas insertandolo en los soportes
y deslizandolo hacia la parte posterior del refrigerador para
bebidas.
18

Para quitar y volver a colocar el portabotellas inferior
1. Levante el portabotellas (por la parte frontal y trasera) y jalelo
derecho hacia afuera para quitarlo.
j
2, Vuelva a colocar el portabotellas empujando derecho hacia
atras, pasando el tope. ContinOe empujando el estante
derecho hacia atrAs y uniformemente hasta que quede en su
lugar.
s/msce sa
NOTAS:
Para un optimo almacenamiento de bebidas y vinos, coloque
los vinos blancos en la parte superior del refrigerador para
bebidas, en el portabotellas. Coloque los vinos tintos en la
parte inferior.
El portabotellas puede Ilenarse con botellas mirando hacia
cualquier lado. Sin embargo, para optimizar el
almacenamiento, las botellas adyacentes deben mirar en
sentido contrario.
AI almacenar en el refrigerador para bebidas:
1. Empezando por el lado izquierdo del portabotellas inferior,
coloque la primera botella de vino sobre la parte inferior del
estante, con el cuello de la botella mirando hacia la parte
delantera del refrigerador para bebidas.
2. Coloque la proxima botella en el portabotellas con el cuello
mirando la parte posterior del refrigerador para bebidas.
Alterne la direccion de las botellas, de esta manera, hasta
Ilenar el portabotellas.
\
3. Deslice el portabotellas inferior a su lugar y tire el siguiente
hacia adelante. Llene el portabotellas restante como se
describe en los pasos anteriores.
4. Coloque los jugos, refrescos y otras latas en los estantes
superiores de vidrio.
Para quitar y volver a colocar los estantes superiores
de vidrio:
NOTA: El estante de vidrio que se encuentra justo arriba de la
pantalla del separador de temperatura esta fijo en su lugar y no es
desmontable.
1. Quite el estante levantandolo un poco y jalandolo hacia
adelante.
2. Vuelva a colocar el estante bajandolo hacia las guias.
3. Replace the shelf by inserting it into the shelf brackets.
NOTE: Be sure the shelf is level
\
s>ei tss
El refrigerador para bebidas tiene una luz interior que se enciende
cada vez que se abre la puerta. Tambien puede encender la luz en
cualquier momento, presionando el lado izquierdo del interruptor
que esta ubicado al lado del control de temperatura, sobre la
rejilla de la base.
NOTAS:
• Si se deja la luz encendida por mucho tiempo, aumentara
ligeramente la temperatura del refrigerador para bebidas.
La luz es LED y no necesita reemplazarse. Si el LED no se
enciende cuando se abre la puerta, Ilame al Servicio tecnico
para reemplazar el foco. Vea "Ayuda o servicio tecnico" para
obtener la informacion de contacto.
CUIDADO DEL REFRIG-
ERADOR PARA BEBIDAS
Debe quitar la rejilla de la base para acceder a los serpentines del
condensador y limpiarlos.
Quite la rejilla de la base:
1. Abra la puerta del refrigerador para bebidas para tener acceso
a la rejilla de la base.
2. Saque los dos tornillos con un destornillador Phillips.
3. Empuje ambas lengQetas hacia el centro para liberar la rejilla
de la base del armario y quitela.
ILl
_- ...... I_ ,_- ...................._-_-_%
I[ :Z_IZ--_ ....................__I__ _ I
I _I_ ::S_ /
/_;5}_ _ _ .................. !_ _._L ::::::::::::::]/
s < '
A B A
A.LengfJetas
B. Tornillos
19

Vuelva a colocar la rejilla de la base
1. Abra la puerta del refrigerador para bebidas.
2. Coloque la rejilla de la base de manera que ambas lengQetas
esten alineadas y la rejilla de la base encaje en su lugar.
Vuelva a colocar los dos tornillos. Apriete los tornillos.
Peligro de Explosi6n
Use un limpiador no inflamable.
No seguir esta instrucci6n puede ocasionar la rnuerte,
explosi6n o incendio.
Limpie el refrigerador para bebidas mas o menos una vez al mes
para evitar la acumulacion de olores. Limpie los derrames de
inmediato.
Para limpiar su refrigerador para bebidas:
1. Desenchufe el refrigerador para bebidas o desconecte el
suministro de energia.
2. Retire todas las rejillas y los estantes del interior del
refrigerador para bebidas.
3. Lave a mano, enjuague y seque todas las partes
desmontables y las superficies interiores meticulosamente.
Use una esponja limpia o un patio liso y un detergente suave
en agua tibia.
• Para evitar dafios en las piezas del adorno de madera,
limpielas con una esponja limpia o patio suave y agua
tibia. No use detergente ni sumerja toda la rejilla en agua
cuando la este limpiando.
No use productos de limpieza abrasivos o asperos, como
aerosoles para ventanas, productos de limpieza para pulir,
liquidos inflamables, ceras para limpieza, detergentes
concentrados, blanqueadores o productos de limpieza
que contengan productos derivados de petroleo en las
partes de plastico, revestimientos interiores o de la puerta
o juntas. No use toallas de papel, estr.opajos para fregar u
otros utensilios de limpieza Asperos. Estos pueden rayar o
dafiar los materiales.
4=
Para ayudar a eliminar olores, puede lavar las paredes
interiores con una mezcla de agua tibia y bicarbonato de
sodio (2 cucharadas en un cuarto de galon [26 g en
0,95 L] de agua).
Lave las superficies externas metalicas pintadas y de acero
inoxidable con una esponja limpia o un patio suave y
detergente delicado con agua tibia. No use productos.de
limpieza abrasivos o asperos o que contengan cloro. Estos
pueden rayar o dafiar los materiales. Seque meticulosamente
con un patio suave.
NOTA" Para mantener como nuevo su refrigerador para
bebidas de acero inoxidable y para quitar marcas o rayaduras
pequefias, se sugiere usar un limpiador de acero inoxidable
aprobado por el fabricante. Para pedir el limpiador, vea
"Accesorios".
5=
6.
7=
IMPORTANTE: iEste limpiador es solamente para partes de
acero inoxidable!
No permita que el limpiador de acero inoxidable entre en
contacto con ninguna parte de plastico tales como las piezas
decorativas, las tapas del despachador o las juntas de la
puerta. Si se produce contacto no intencional, limpie la pieza
de plastico con una esponja y detergente suave en agua tibia.
Seque meticulosamente con un patio suave.
Vuelva a colocar las rejillas y los estantes.
Limpie los serpentines del condensador regularmente. Estan
ubicados detras de la rejilla de la base. Quizas necesite
limpiar los serpentines cada dos meses. Esto puede ayudar a
ahorrar energia.
• Quite la rejilla de la base. Vea "Rejilla de la base".
• Use una aspiradora con extension para limpiar los
serpentines del condensador siempre que esten sucios o
polvorientos.
• Vuelva a colocar la rejilla de la base.
Enchufe el refrigerador para bebidas o reconecte el suministro
de energia.
Vacaciones
Si Ud. decide apagar el refrigerador para bebidas antes de irse,
siga estos pasos.
1. Saque todas las botellas de vino del refrigerador para
bebidas.
2. Desenchufe el refrigerador para bebidas.
3. Limpie el refrigerador para bebidas. Vea "Limpieza".
4. Fije un bloque de goma o de madera con cinta adhesiva a la
parte superior de la puerta para que quede abierta y el aire
circule. Esto evita que se formen olores y que crezcan
hongos.
Mudanza
Si Ud. muda su refrigerador para bebidas a una casa nueva, siga
los pasos a continuacion para prepararse para la mudanza.
1. Saque todas las botellas de vino del refrigerador para
bebidas.
2. Desenchufe el refrigerador para bebidas.
3. Limpielo, enju_guelo y sequelo bien.
4. Saque todas las partes desmontables, envuelvalas bien y
asegQrelas con cinta adhesiva para que no se sacudan
durante la mudanza.
5. Sostenga las puertas cerradas y el cable pegado a la carcasa
del refrigerador para bebidas con cinta adhesiva.
Cuando Ilegue a la casa nueva, ponga todo de nuevo en su lugar
y lea la seccion "lnstrucciones de instalacion" para obtener
instrucciones de preparacion.
20
Table of contents
Languages:
Other Jenn-Air Kitchen Appliance manuals

Jenn-Air
Jenn-Air JUBFL242HL01 User manual

Jenn-Air
Jenn-Air BEVERAGE CENTER User manual

Jenn-Air
Jenn-Air JUB24FRACX User manual

Jenn-Air
Jenn-Air W10549547A User manual

Jenn-Air
Jenn-Air JUBFR242HM User manual

Jenn-Air
Jenn-Air Expressions JEA7000ADB User manual

Jenn-Air
Jenn-Air BEVERAGE CENTER User manual

Jenn-Air
Jenn-Air JUBFL242HX User manual

Jenn-Air
Jenn-Air JBC7624BS Technical manual

Jenn-Air
Jenn-Air AR14 Series User manual