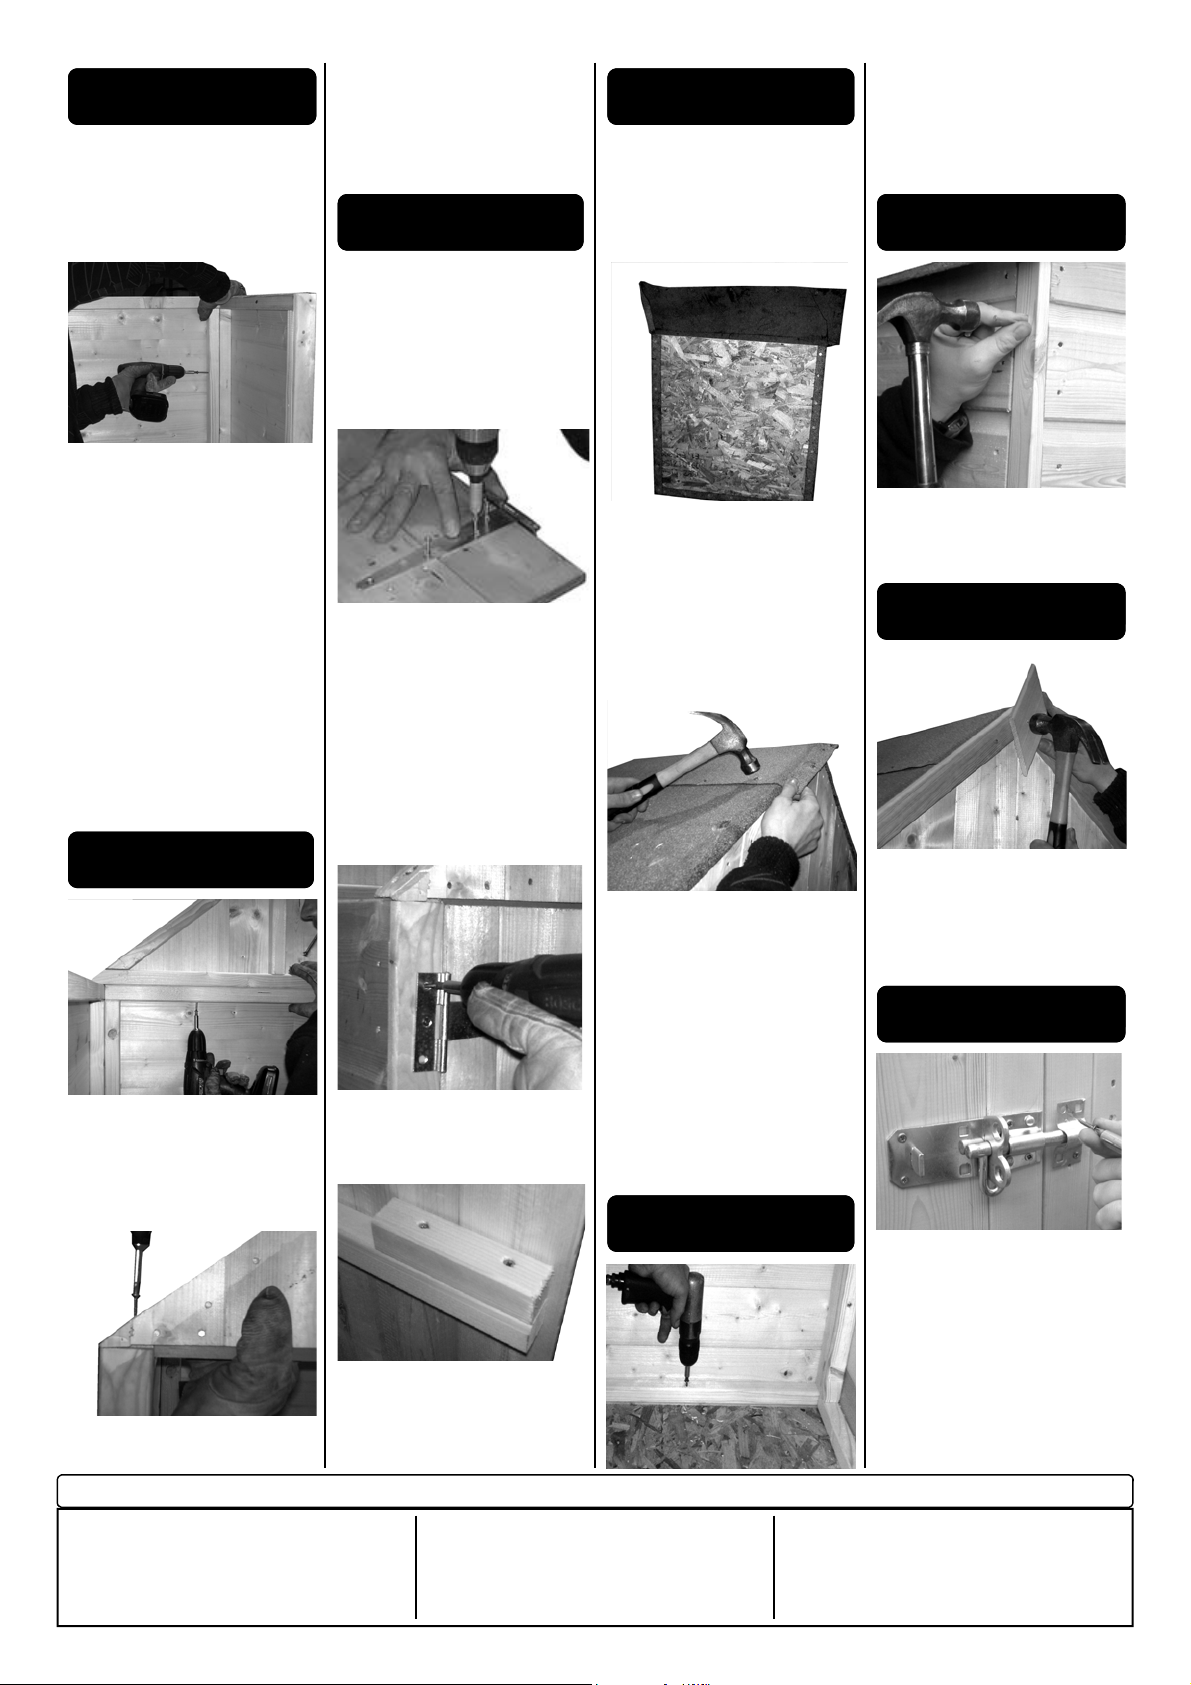
1. Ensure your base is firm and
absolutely level.
2. Lay floor panel down onto your
base.
3. Pre drill holes at top, middle and
bottom of each panel.
4. Place back panel and a side
panel at one corner of the floor
ensuring the cladding has overhung
the floor. Secure together from the
inside using 3 x 60 mm screws.
THE SIDE PANELS EXTEND
FROM FLOOR EDGE TO FLOOR
EDGE. THE PANELS AT THE
BACK AND FRONT SCREW TO
AND FIT INSIDE THE SIDE
PANELS.
5. Place other side panel in position
and secure to back panel from the
inside using 3 x 60 mm screws.
6. Place wing panel in position at
the front and secure to side panel
from the inside using 3 x 60 mm
screws.
1. Place one gable on top of back
panel ensuring the outer edges are
flush with shiplap of side panels.
Secure from underneath panel
framework into gable using 2 x 60
mm screws.
2. Place other gable in position at
the front. Secure half of the gable
from the inside from underneath
wing panel framework into gable
using 1 x 60 mm screw. Secure
other end of gable from the outside
through gable framework into side
panel framework.
1. Position door stop strip at the top
of the door aperture flush with the
front of framework. Secure using 3
x 40 mm nails.
2. Secure the cover strip which
goes at the corner of the building
where the door is to be placed
using 3 x 40 mm nails.
3. Lay door down onto a flat level
surface. Check which side of the
door the hinges are to be fitted. The
side where the bracing does not
extend to the edge of the boarding
is the hinge side.
4. The hinges are to be fitted onto
the boarding which covers each
horizontal door bracing. Make sure
the movable part of the hinge over-
hangs the edge of the door. Secure
using 4 x 25 mm screws per hinge.
5. Place door into aperture, check
door is square and even all the way
round and secure in place using 3 x
25 mm screws per hinge.
6. Pre drill two holes in pad bolt
fixing block. Place block to the top
side of the central bracing frame-
work on the back of the door and
secure using 2 x 60 mm screws.
1. Place one roof panel onto piece
of felt allowing approx. 45 mm over-
hang on all sides. Fold felt over
onto roof panel and secure
together using felt nails spaced at
approx. 100 mm intervals
2. Place other roof panel onto the
remaining piece of felt, allowing an
overhang of approx. 45 mm on
three sides and an approx. over-
hang of 200 mm on the forth side.
Fold felt over onto roof panel,
except for the side with the approx.
200 mm overhang, and secure in
place using felt nails.
3. Place roof panel, with felt on all
sides fixed, into position flush with
front and back of building. Secure
through roof panel into gable frame-
work using 3 x long felt nails per
gable edge and 2 x long felt nails
into side wall.
4. Repeat for other roof panel, en-
suring that the 200 mm felt over-
hang goes over the ridge of the
building to overlap felt of the other
panel. Secure panel as before and
secure overlapping felt using felt
nails.
1. Secure wall panels to the floor on
the inside of the building using 2 x
60 mm screws for back and side
panels and 1 x 60 mm screw for
wing panel, preferably into floor
bearer.
1. Secure remaining three cover
strips in position where the panels
meet using 3 x 40 mm nails per
strip.
1. Secure the four fascia boards to
gable ends using 3 x 40 mm nails
per fascia piece.
2. Secure diamond on top of and in
the centre of front fascia using 2 x
40 mm nails.
1. Place pad bolt on the outside of
the door directly over the horizontal
brace. Ensure the edge is flush with
the edge of the door. Secure to
door using 4 x 25 mm screws using
the round holes only.
2. Place pad bolt housing in position
to accommodate the pad bolt.
Secure using 2 x 25 mm screws
using the round holes only.
A Wall Assembly
B Gable Assembly
C DoorAssembly
D Roof Assembly
E Secure Walls to Floor
F Cover Strips
G Fascia & Diamond
H Bolt Assembly
1Check and ensure that no raised grain or splinters
are evident on timber components. Sand down
any raised grain or splinters using fine grade
sandpaper.
2Check that all screw, nail and pin heads are
properly tapped home and are not proud of the
timber surface.
3Check and ensure that no screws, nails or pins
protrude through any panel.
4 Check and ensure that all parts are properly
secured against reasonable force.
5Do not apply decorative wood finish/treatments to
wet or damp timber. Please observe the instruc-
tions of the wood finish/treatment manufacturer. 6
. Assembly Completion Checklist


