Showerbuddy P1 User manual

Owners Manual
ShowerBuddy
P1 & P2 Pediatric Kit
INTENDED USAGE:
The Showerbuddy shower/commode chair is a medical device indicated for use by persons with limited
mobility who are unable to stand, walk and/or seat independently. The device is specifically designed for
individuals who require additional support and stability during washing, toileting and other hygienic
activities. It is a class 1 medical device, which is intended to be used only as a seating option for toilet
issues, showering and bathing. Its purpose is to help physically handicapped people during their hygienic
activities. Any other use is prohibited.
INDICATIONS:
The device is specifically indicated for individuals who (because of the wide variety of possible health
problems) are unable to stand and /or walk and so they need an assistance device to maintain some or all
daily hygienic tasks.
CONTRADICTIONS:
This type of device must not be used by a disabled person alone. The user should always be accompanied
by a caregiver or assistance person. The device is not recommended for persons with flaccid paralysis or
other diseases that cause serious body control problems. Such persons require special wheelchairs
designed for extra stability and support of the user’s body. The need for this type of specialty wheelchair
should be always estimated and indicated by a physician or a physical therapist.
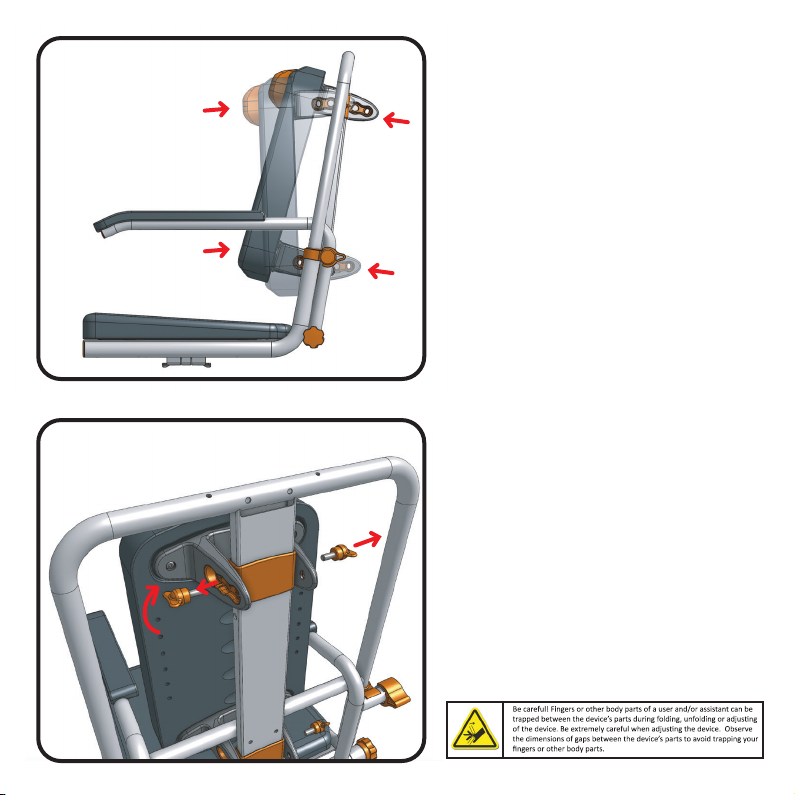
WARNING – Included in this packaging and fitted to the Showerbuddy chair are small parts, plastic wrap
and polystyrene packing that could be dangerous to children under 5.
Keep children away from this device and do not let them play with any parts.

This Shower Chair conversion kit is a Class 1 Medical Device designed to
support people with disabilities or users with reduced mobility during toileting
and showering.
P1 & P2 Parts
Pediatric Kit Assembly
Operation Pediatric Kit
Cleaning and Maintenance
Safety Instructions
Warranty Information
3
4
6
9
10
13
Contents Page
P1 & P2 Pediatric Conversion Kit 2

P1 Seat Pad
500-166-R
collar
plastic
500-117
38
500-264
Arm lactch
500-271
Arm lock
3 P1 & P2 Pediatric Conversion Kit
500-166-R
38
500-271
-264
500-117
Exploded Parts
P1 & P2 kit
500-481
500-480
500-480
500-481
P1 Handle frame
P2 Handle frame
500-117
142
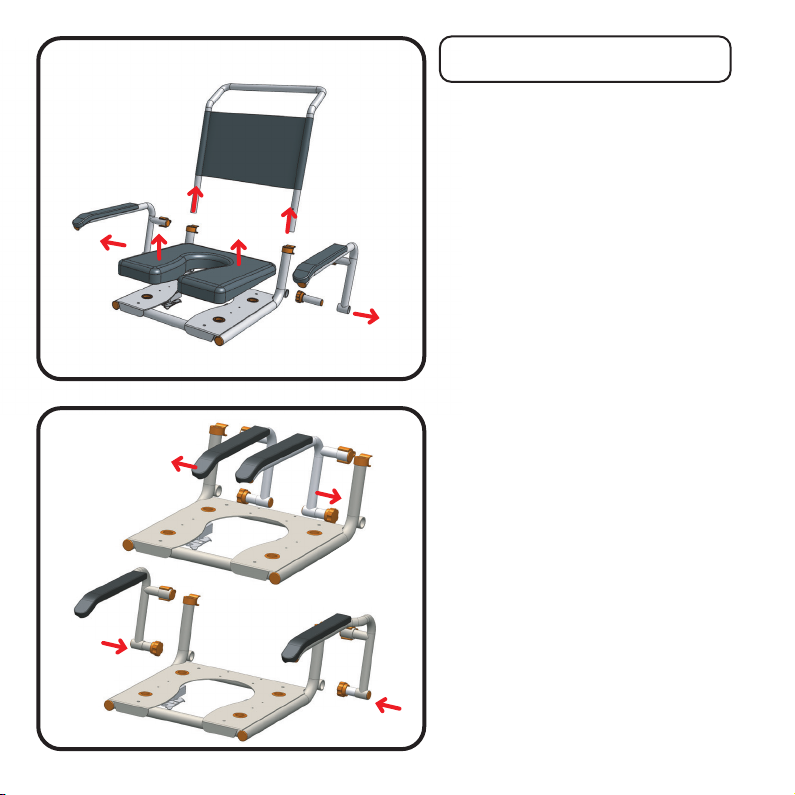
Step 1
Start by removing your handle, seat
cushion and arms as shown in the
illustration.
If needed you should refer to your
chairs user manual, if you don’t have
this you can find it on our website.
Note: If fitting to SB2T or SB3T you will
need to disconnect the tilt release
handle (part #75) from the chair push
handle. Refer to your chair user manual
Pediatric Kit Assembly
Both P1 and P2 kits are assembled in the
same way. A note will explain at each stage
where P1 & P2 options exist.
Step 2
Arm fitting is the reverse of step 1
using your newly supplied pediatric
arm assemblies.
If you are fitting the P1 kit, refer to the
top image, showing the arms being
inserted from the inside
If you are fitting the P2 kit, refer to the
bottom image showing the arms being
inserted from the outside.
P1 & P2 Pediatric Conversion Kit 4
P1
P2
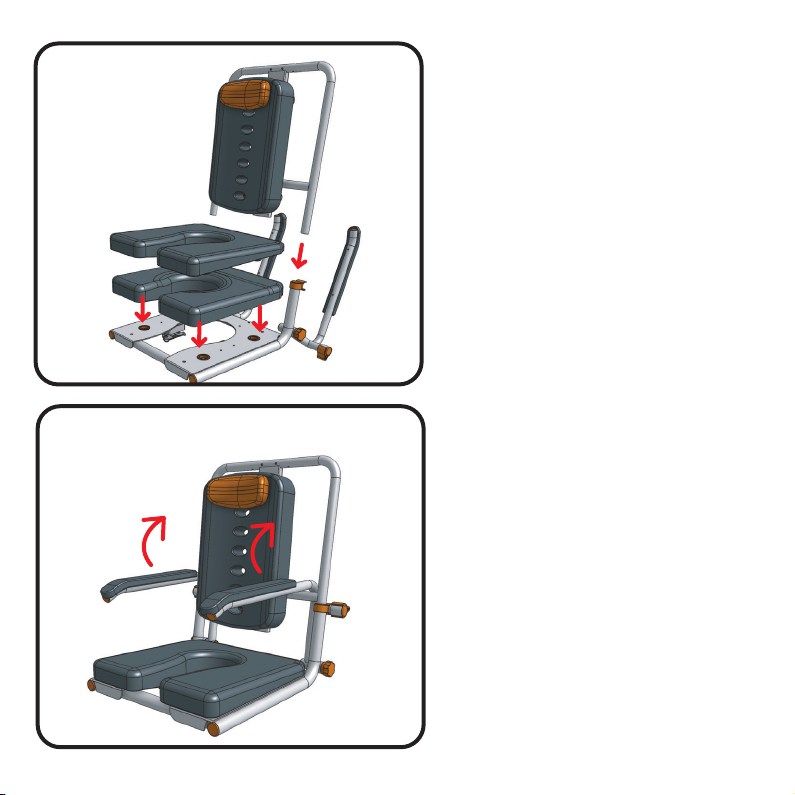
Step 3
Fit your new seat cushion (part
#500-166-R for P1 and part #500-167
for P2) as shown.
Your new seat cushion is a direct
replacement of your existing shower
chair and will fit in the existing holes in
the seat base plate.
Note: If fitting to SB2T or SB3T you will
need to reconnect the tilt release
handle (part #75) back using the holes
provided on the handle of your
pediatric kit.
Step 4
Once all the elements of the kit have
been fitted, check to make sure
everything is fitted correctly, tightened
up and that the arms can fold freely
back and forward.
5 P1 & P2 Pediatric Conversion Kit
P1
P2

Step 5
The existing chest restraint can be
transferred from the adult chair and
used as shown in the diagram.
If you do not have lateral supports
fitted simply wrap it around the back of
the seat back cushion as shown.
6
P1 & P2 Pediatric Conversion Kit
Operation Pediatric Kit
Your new pediatric conversion kit has
been designed in such a way to allow it
to grow with your child.
The P1 kit will accommodate younger
children from the approx age of 5+ but
allows a certain amount of growth
before needing to move to the P2 kit.
The P2 kit will accept a child from
around the age of 10 years up to
teenage before needed to convert back
to adult size seat.
Adjustments in the kit are as follows.
You can also make adjustments
through the backrest cushion adjust-
ment system.
This system has been designed to offer
unrivalled flexibility and superior
comfort to suit different users by
adapting the backrest angle and
backrest height that best suits the user.
7 P1 & P2 Pediatric Conversion Kit
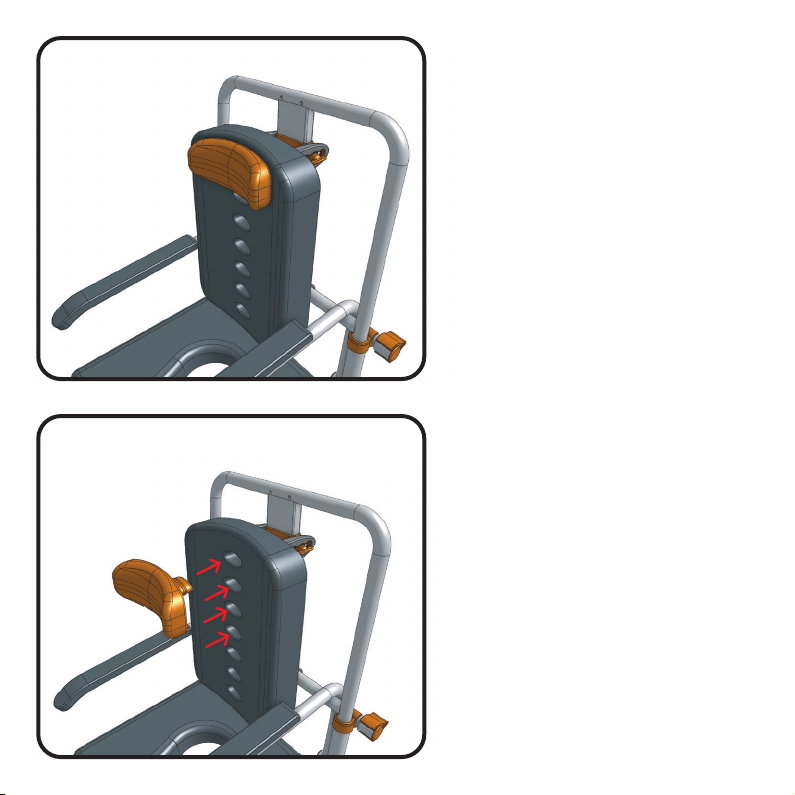
To adjust your seat back angle simply
undo the seat lock knobs (part #500-
263) and position the backrest to the
desired recline position by re-fixing the
lock knob into that desired location
hole. Screw the thread tight.
To adjust your seat backrest height
simply undo the seat lock knobs (part
#500-263) and position to the desired
height location hole in the metal spine
to give the required height. Screw the
thread tight.
These adjustments are best carried out
by adjusting the top or bottom individu-
ally while the other is still located, this
then acts as a pivot for the seat
backrest and makes alignment of holes
easier. Ensure all seat lock knobs are
tightened before use.
Cushion Support
Your Pediatric chair comes with a
unique cushion support that can be
used for a range of purposes.
1, It can be used to support the head
with its curved sides offering sideways
stability.
2. It can be used to provide neck
support should this be needed for
certain users.
3. It can also be used as a lower back
lumbar support to help sitting up
correctly.
8
P1 & P2 Pediatric Conversion Kit
We’ve design this system to be simple
and fast so that changes can be made
swiftly with minimal distruption to the
user.
Simply pull your support cusion (part
#500-179 P2 and part #500-178 P1) out
from the back rest cusion and position
it where required the selection of holes
provided.
Note: This support is optional and may not
suit all users. remove if not required.
These adjustments are best carried out
by adjusting the top or bottom individu-
ally while the other is still located, this
then acts as a pivot for the seat
backrest and makes alignment of holes
easier. Ensure all seat lock knobs are
tightened before use.

Cleaning and Maintenance
It is recommended that your shower chair and accessories are serviced annually by your Showerbuddy
Dealer or an authorised, competent service agent. In addition:
1. Regularly inspect all parts of the kit for defects. Any defective part should be attended to promptly by an
authorised service agent.
2. Clean the seat using a damp cloth and a mild cleanser. Always read the manufacturers instructions prior
to applying the cleanser. When using Sodium Hypochlorite (Bleach) on the seat, a solution of 0.1% Sodium
Hypochlorite should have no adverse effects on the cleaning of chairs. However, when using a solution of
1.0%, care should be taken to rinse the chairs thoroughly with clean water after application. Over a period
of time bleaching may occur, but the integrity of the product will remain unaffected.
3. Dry off the shower chair after use.
4. Do not oil or grease any parts.
5. Keep any moving parts free from lime scale, soap residue and hair by cleaning after use in the shower.
Caring for stainless steel.
Stainless steel has excellent corrosion resistance, but it is not stain or rust proof. Regular maintenance will
keep stainless steel clean and free of contaminants. In most applications stainless steel will not rust or stain
even after many years of service, but when used in certain environments such as concentrated chlorine or
other corrosive elements stainless steel requires proper care and maintenance. Do not leave stainless in
contact with iron, steel or other metals.
1. Clean stainless steel frequently with soap and water. Any cleaner safe for glass is usually safe for
stainless steel; apply with a cotton cloth.
2. Use a coating such as a good wax to help safeguard the stainless steel.
3. Remove discolouration or rust spots as soon as possible with a brass, silver or chrome cleaner. Irrevers-
ible pitting will develop under rust that remains on stainless steel for any period of time. Apply a mild
cleaner such as Ajax or an equivalent with a wet cotton cloth. Rinse thoroughly and wipe dry. Do not use
abrasives such as sandpaper or steel wool on stainless steel.
4. Do not clean with mineral acids or bleaches.
5. Do not store near any chlorine product.
P1 & P2 Pediatric Conversion Kit
9

Cleaning and Maintenance
It is recommended that your shower chair and accessories are serviced annually by your Showerbuddy
Dealer or an authorised, competent service agent. In addition:
1. Regularly inspect all parts of the kit for defects. Any defective part should be attended to promptly by an
authorised service agent.
2. Clean the seat using a damp cloth and a mild cleanser. Always read the manufacturers instructions prior
to applying the cleanser. When using Sodium Hypochlorite (Bleach) on the seat, a solution of 0.1% Sodium
Hypochlorite should have no adverse effects on the cleaning of chairs. However, when using a solution of
1.0%, care should be taken to rinse the chairs thoroughly with clean water after application. Over a period
of time bleaching may occur, but the integrity of the product will remain unaffected.
3. Dry off the shower chair after use.
4. Do not oil or grease any parts.
5. Keep any moving parts free from lime scale, soap residue and hair by cleaning after use in the shower.
Caring for stainless steel.
Stainless steel has excellent corrosion resistance, but it is not stain or rust proof. Regular maintenance will
keep stainless steel clean and free of contaminants. In most applications stainless steel will not rust or stain
even after many years of service, but when used in certain environments such as concentrated chlorine or
other corrosive elements stainless steel requires proper care and maintenance. Do not leave stainless in
contact with iron, steel or other metals.
1. Clean stainless steel frequently with soap and water. Any cleaner safe for glass is usually safe for
stainless steel; apply with a cotton cloth.
2. Use a coating such as a good wax to help safeguard the stainless steel.
3. Remove discolouration or rust spots as soon as possible with a brass, silver or chrome cleaner. Irrevers-
ible pitting will develop under rust that remains on stainless steel for any period of time. Apply a mild
cleaner such as Ajax or an equivalent with a wet cotton cloth. Rinse thoroughly and wipe dry. Do not use
abrasives such as sandpaper or steel wool on stainless steel.
4. Do not clean with mineral acids or bleaches.
5. Do not store near any chlorine product.
Safety Instructions
Safety Warning!
Failure to comply with these safety instructions may result in injury or damage!
It is important that the user(s), and/or the caregivers of the user(s), learn how to safely operate the Pediatric
kit on their shower chair.
The following must be read before using the shower chair to ensure the safe operation.
The Owner(s) Manual must be read and understood before using the shower chair. If you
don’t understand any parts of the Owner(s) Manual, clarification should be sought prior to using the
product.
For further clarification of any part of the Owner(s) Manual call your local dealer or visit
www.showerchairs.co
Transfers to and from the Showerbuddy shower chair can be dangerous. Consult a Physical or
Occupational Therapist to ensure safe and reliable transfer techniques is practiced.
Individuals who have not learned these skills must have assistance during transfers.
Do not use the Showerbuddy shower chair for any application outside of the manufacturers intended use,
this can result in damage to the shower chair and components. Not complying with the manufacturer’s
instructions can result in injury to the user(s) or caregiver. Showerbuddy will not be held responsible for any
injury or damage resulting from the misuse or inappropriate operation of the Showerbuddy shower chair.
If any part of the Showerbuddy P1 or P2 kit requires maintenance please don’t hesitate to contact your
dealer. Any problems that could affect the safe operation of the chair MUST be attended to immediately.The
MAXIMUM user weight for this Showerbuddy P1 & P2 kit is: 66lbs (30kg) & 200lbs (90kg) respectively.
ALWAYS ensure that your Showerbuddy shower chair is capable of manoeuvring over surfaces that will be
encountered prior to operating the shower chair with any user(s). This chair is only intended for use
indoors, on flat surfaces, without thresholds, steps, curbs or obstacles.
ALWAYS lock the castor wheels when the chair is stationary. To do this step-on the lever that activates the
wheel locks.
DO NOT lean forward or sideways out of the shower chair as this may cause the chair to tip.
DO NOT STAND or step on the footrest, as the chair will tip forward possibly causing injury to the User. The
footrests are not load bearing and are not intended or designed as a step.
DO NOT wheel the shower chair down an incline without a caregiver who can control the chair during its
descent.
DO NOT use the shower chair castor wheel locks as brakes when travelling down inclines.
DO NOT position the Showerbuddy shower chair sideways on a slope as this could cause it to tip.
Important!
Although every effort has been made by the Showerbuddy team to ensure the stability of the Showerbuddy
shower chairs during use, it is important to recognize that the most dangerous part of using any shower
chair is the transfer. If you are unsure of how to perform transfers in a way that can be performed safely,
then contact a Physical or Occupational Therapist who is familiar with transfer techniques and options.
The wheel locks on the castors are designed to prevent the castor wheels from rotating when the shower
chair is stationery. These DO NOT and CANNOT prevent the wheels from sliding if the floor is slippery. A
slippery floor can be caused by dust, water, soap or any substance that doesn’t allow the tires (tyres) to
grip. Transfers should never be attempted with the Showerbuddy shower chair positioned on slippery
surfaces since the wheel locks can only prevent the wheels from rotating. It is recommended that transfers
be performed on clean, dry non slippery surfaces. When transferring onto a Showerbuddy Shower Chair
always lock all castors in their outward position (front castors positioned in the forward and out position /
rear castors positioned to the rearward and out position) for maximum chair stability.
Never use the foot rest to assist with transfers. This could cause the chair to tip forward. The footrest should
be folded away during transfers to provide unobstructed access to the shower chair.
DO NOT stand on the footrest as this is designed to provide support for the user’s feet while seated and not
to act as a load bearing component when the user mounts or alights from the chair. Standing on the
footrests could cause the chair to tip forward.
The fasteners – Knobs, nuts, bolts, washers – should be checked periodically to ensure that they are
securely fastened. Your dealer should be called to check the fasteners and other components at least once
per year.
All Showerbuddy shower chairs are supplied with chest and lap restraining belts that ensure the correct and
safe operation of the shower chair for both the user(s) and the caregiver. It is important that these straps
are used every time the shower chair is operated. Your Showerbuddy P1 & P2 kit can use these existing
straps so that these can be easily and effortlessly attached. See page 8
Important!
ADJUSTMENTS SHOULD NEVER BE ATTEMPTED WITH THE
USER(S) IN THE CHAIR!
Your authorized Showerbuddy dealer can help you with any adjustments you may want to make on your
Showerbuddy shower chair or can provide clarification on any of the information contained herein.
Heavy Object
To avoid muscle strain or back injury, use lift aids and proper lifting techniques when lifting or moving this
product
10
P1 & P2 Pediatric Conversion Kit

Safety Instructions
Safety Warning!
Failure to comply with these safety instructions may result in injury or damage!
It is important that the user(s), and/or the caregivers of the user(s), learn how to safely operate the Pediatric
kit on their shower chair.
The following must be read before using the shower chair to ensure the safe operation.
The Owner(s) Manual must be read and understood before using the shower chair. If you
don’t understand any parts of the Owner(s) Manual, clarification should be sought prior to using the
product.
For further clarification of any part of the Owner(s) Manual call your local dealer or visit
www.showerchairs.co
Transfers to and from the Showerbuddy shower chair can be dangerous. Consult a Physical or
Occupational Therapist to ensure safe and reliable transfer techniques is practiced.
Individuals who have not learned these skills must have assistance during transfers.
Do not use the Showerbuddy shower chair for any application outside of the manufacturers intended use,
this can result in damage to the shower chair and components. Not complying with the manufacturer’s
instructions can result in injury to the user(s) or caregiver. Showerbuddy will not be held responsible for any
injury or damage resulting from the misuse or inappropriate operation of the Showerbuddy shower chair.
If any part of the Showerbuddy P1 or P2 kit requires maintenance please don’t hesitate to contact your
dealer. Any problems that could affect the safe operation of the chair MUST be attended to immediately.The
MAXIMUM user weight for this Showerbuddy P1 & P2 kit is: 66lbs (30kg) & 200lbs (90kg) respectively.
ALWAYS ensure that your Showerbuddy shower chair is capable of manoeuvring over surfaces that will be
encountered prior to operating the shower chair with any user(s). This chair is only intended for use
indoors, on flat surfaces, without thresholds, steps, curbs or obstacles.
ALWAYS lock the castor wheels when the chair is stationary. To do this step-on the lever that activates the
wheel locks.
DO NOT lean forward or sideways out of the shower chair as this may cause the chair to tip.
DO NOT STAND or step on the footrest, as the chair will tip forward possibly causing injury to the User. The
footrests are not load bearing and are not intended or designed as a step.
DO NOT wheel the shower chair down an incline without a caregiver who can control the chair during its
descent.
DO NOT use the shower chair castor wheel locks as brakes when travelling down inclines.
DO NOT position the Showerbuddy shower chair sideways on a slope as this could cause it to tip.
Important!
Although every effort has been made by the Showerbuddy team to ensure the stability of the Showerbuddy
shower chairs during use, it is important to recognize that the most dangerous part of using any shower
chair is the transfer. If you are unsure of how to perform transfers in a way that can be performed safely,
then contact a Physical or Occupational Therapist who is familiar with transfer techniques and options.
The wheel locks on the castors are designed to prevent the castor wheels from rotating when the shower
chair is stationery. These DO NOT and CANNOT prevent the wheels from sliding if the floor is slippery. A
slippery floor can be caused by dust, water, soap or any substance that doesn’t allow the tires (tyres) to
grip. Transfers should never be attempted with the Showerbuddy shower chair positioned on slippery
surfaces since the wheel locks can only prevent the wheels from rotating. It is recommended that transfers
be performed on clean, dry non slippery surfaces. When transferring onto a Showerbuddy Shower Chair
always lock all castors in their outward position (front castors positioned in the forward and out position /
rear castors positioned to the rearward and out position) for maximum chair stability.
Never use the foot rest to assist with transfers. This could cause the chair to tip forward. The footrest should
be folded away during transfers to provide unobstructed access to the shower chair.
DO NOT stand on the footrest as this is designed to provide support for the user’s feet while seated and not
to act as a load bearing component when the user mounts or alights from the chair. Standing on the
footrests could cause the chair to tip forward.
The fasteners – Knobs, nuts, bolts, washers – should be checked periodically to ensure that they are
securely fastened. Your dealer should be called to check the fasteners and other components at least once
per year.
All Showerbuddy shower chairs are supplied with chest and lap restraining belts that ensure the correct and
safe operation of the shower chair for both the user(s) and the caregiver. It is important that these straps
are used every time the shower chair is operated. Your Showerbuddy P1 & P2 kit can use these existing
straps so that these can be easily and effortlessly attached. See page 8
Important!
ADJUSTMENTS SHOULD NEVER BE ATTEMPTED WITH THE
USER(S) IN THE CHAIR!
Your authorized Showerbuddy dealer can help you with any adjustments you may want to make on your
Showerbuddy shower chair or can provide clarification on any of the information contained herein.
Heavy Object
To avoid muscle strain or back injury, use lift aids and proper lifting techniques when lifting or moving this
product
P1 & P2 Pediatric Conversion Kit
11

Safety Instructions
Safety Warning!
Failure to comply with these safety instructions may result in injury or damage!
It is important that the user(s), and/or the caregivers of the user(s), learn how to safely operate the Pediatric
kit on their shower chair.
The following must be read before using the shower chair to ensure the safe operation.
The Owner(s) Manual must be read and understood before using the shower chair. If you
don’t understand any parts of the Owner(s) Manual, clarification should be sought prior to using the
product.
For further clarification of any part of the Owner(s) Manual call your local dealer or visit
www.showerchairs.co
Transfers to and from the Showerbuddy shower chair can be dangerous. Consult a Physical or
Occupational Therapist to ensure safe and reliable transfer techniques is practiced.
Individuals who have not learned these skills must have assistance during transfers.
Do not use the Showerbuddy shower chair for any application outside of the manufacturers intended use,
this can result in damage to the shower chair and components. Not complying with the manufacturer’s
instructions can result in injury to the user(s) or caregiver. Showerbuddy will not be held responsible for any
injury or damage resulting from the misuse or inappropriate operation of the Showerbuddy shower chair.
If any part of the Showerbuddy P1 or P2 kit requires maintenance please don’t hesitate to contact your
dealer. Any problems that could affect the safe operation of the chair MUST be attended to immediately.The
MAXIMUM user weight for this Showerbuddy P1 & P2 kit is: 66lbs (30kg) & 200lbs (90kg) respectively.
ALWAYS ensure that your Showerbuddy shower chair is capable of manoeuvring over surfaces that will be
encountered prior to operating the shower chair with any user(s). This chair is only intended for use
indoors, on flat surfaces, without thresholds, steps, curbs or obstacles.
ALWAYS lock the castor wheels when the chair is stationary. To do this step-on the lever that activates the
wheel locks.
DO NOT lean forward or sideways out of the shower chair as this may cause the chair to tip.
DO NOT STAND or step on the footrest, as the chair will tip forward possibly causing injury to the User. The
footrests are not load bearing and are not intended or designed as a step.
DO NOT wheel the shower chair down an incline without a caregiver who can control the chair during its
descent.
DO NOT use the shower chair castor wheel locks as brakes when travelling down inclines.
DO NOT position the Showerbuddy shower chair sideways on a slope as this could cause it to tip.
Important!
Although every effort has been made by the Showerbuddy team to ensure the stability of the Showerbuddy
shower chairs during use, it is important to recognize that the most dangerous part of using any shower
chair is the transfer. If you are unsure of how to perform transfers in a way that can be performed safely,
then contact a Physical or Occupational Therapist who is familiar with transfer techniques and options.
The wheel locks on the castors are designed to prevent the castor wheels from rotating when the shower
chair is stationery. These DO NOT and CANNOT prevent the wheels from sliding if the floor is slippery. A
slippery floor can be caused by dust, water, soap or any substance that doesn’t allow the tires (tyres) to
grip. Transfers should never be attempted with the Showerbuddy shower chair positioned on slippery
surfaces since the wheel locks can only prevent the wheels from rotating. It is recommended that transfers
be performed on clean, dry non slippery surfaces. When transferring onto a Showerbuddy Shower Chair
always lock all castors in their outward position (front castors positioned in the forward and out position /
rear castors positioned to the rearward and out position) for maximum chair stability.
Never use the foot rest to assist with transfers. This could cause the chair to tip forward. The footrest should
be folded away during transfers to provide unobstructed access to the shower chair.
DO NOT stand on the footrest as this is designed to provide support for the user’s feet while seated and not
to act as a load bearing component when the user mounts or alights from the chair. Standing on the
footrests could cause the chair to tip forward.
The fasteners – Knobs, nuts, bolts, washers – should be checked periodically to ensure that they are
securely fastened. Your dealer should be called to check the fasteners and other components at least once
per year.
All Showerbuddy shower chairs are supplied with chest and lap restraining belts that ensure the correct and
safe operation of the shower chair for both the user(s) and the caregiver. It is important that these straps
are used every time the shower chair is operated. Your Showerbuddy P1 & P2 kit can use these existing
straps so that these can be easily and effortlessly attached. See page 8
Important!
ADJUSTMENTS SHOULD NEVER BE ATTEMPTED WITH THE
USER(S) IN THE CHAIR!
Your authorized Showerbuddy dealer can help you with any adjustments you may want to make on your
Showerbuddy shower chair or can provide clarification on any of the information contained herein.
Heavy Object
To avoid muscle strain or back injury, use lift aids and proper lifting techniques when lifting or moving this
product
12
P1 & P2 Pediatric Conversion Kit

Warranty Information
2 Year Limited Warranty
Showerbuddy warrants our Showerbuddy Transfer Systems and all Showerbuddy products
fortwo years from the date of purchase by the consumer. The warranty will only become
active oncethe consumer submits the warranty registration card to the company with a copy
of the purchase receipt. This warranty covers any defects in materials and workmanship on all
Showerbuddy products except those listed in the Warranty Exclusion below:
Warranty Exclusions
• Product or parts failure from normal wear and tear
• Damage caused by failure to adhere to the Owner’s Manual
• Damage from improper installation, use or repair
• Seat cushions and arm rests
Limitations
• The warranty is VOID if the original serial number tag is removed or altered
• The warranty is VOID if the unit sustains damage from unnatural causes
• The warranty is VOID if the shower chair has been subjected to neglect, improper
maintenance, storage, cleaning or operation as defined in the Owner’s Manual
• The warranty is VOID if the unit is modified without Showerbuddy’s written consent
• This warranty applies to the original purchaser only
Your Responsibilities
• If your unit requires warranty service, please contact the dealer from which you purchased the
• If you do not receive satisfactory dealer service, contact Showerbuddy at the address below
• Do not return the unit to Showerbuddy without first obtaining a Return Authorization
• A defective unit must be shipped to Showerbuddy within 14 days of issuance of a
Our Responsibilities
• Showerbuddy’s sole responsibility is to repair or replace, at our discretion, the warranty covered
components of the shower chair. This is the exclusive remedy for consequential or incidental
damages.
• Upon pre-approval, Showerbuddy may provide exchange services for Warranty returns.
• Under this program, a refurbished Showerbuddy unit may be shipped after the return ofthe
defective unit. The exchange unit may contain used parts that meet Showerbuddy quality standards. This
program is provided at the sole discretion of Showerbuddy. The original warranty term will not be extended
due to such a unit exchange and a return unit will become the property of Showerbuddy.
13 P1 & P2 Pediatric Conversion Kit
Showerbuddy unit.
Number from Customer Service
Return Authorization Number by Customer Service

Warranty Information
2 Year Limited Warranty
Showerbuddy warrants our Showerbuddy Transfer Systems and all Showerbuddy products
fortwo years from the date of purchase by the consumer. The warranty will only become
active oncethe consumer submits the warranty registration card to the company with a copy
of the purchase receipt. This warranty covers any defects in materials and workmanship on all
Showerbuddy products except those listed in the Warranty Exclusion below:
Warranty Exclusions
• Product or parts failure from normal wear and tear
• Damage caused by failure to adhere to the Owner’s Manual
• Damage from improper installation, use or repair
• Seat cushions and arm rests
Limitations
• The warranty is VOID if the original serial number tag is removed or altered
• The warranty is VOID if the unit sustains damage from unnatural causes
• The warranty is VOID if the shower chair has been subjected to neglect, improper
maintenance, storage, cleaning or operation as defined in the Owner’s Manual
• The warranty is VOID if the unit is modified without Showerbuddy’s written consent
• This warranty applies to the original purchaser only
Your Responsibilities
• If your unit requires warranty service, please contact the dealer from which you purchased the
• If you do not receive satisfactory dealer service, contact Showerbuddy at the address below
• Do not return the unit to Showerbuddy without first obtaining a Return Authorization
• A defective unit must be shipped to Showerbuddy within 14 days of issuance of a
Our Responsibilities
• Showerbuddy’s sole responsibility is to repair or replace, at our discretion, the warranty covered
components of the shower chair. This is the exclusive remedy for consequential or incidental
damages.
• Upon pre-approval, Showerbuddy may provide exchange services for Warranty returns.
• Under this program, a refurbished Showerbuddy unit may be shipped after the return ofthe
defective unit. The exchange unit may contain used parts that meet Showerbuddy quality standards. This
program is provided at the sole discretion of Showerbuddy. The original warranty term will not be extended
due to such a unit exchange and a return unit will become the property of Showerbuddy.
14
P1 & P2 Pediatric Conversion Kit
For all USA & Canada Warranties
Register online at: www.myshowerbuddy.com/resources/register
Or you can email us
Showerbuddy LLC
12405 Montague Street
Pacoima, CA 91331
U.S.A
Email: info@myshowerbuddy.com
Phone: (877) 7MY-BUDDY (769-2833)
For Chile enquiries
Orto-Medic
www.ortomedic.cl
Teléfono: 2269-8090
For all Other Countries
You can scan and email it to us.
Showerbuddy New Zealand Limited
Wellington, New Zealand
Email: info@showerbuddy.co.nz
Phone: (877) 7MY-BUDDY (769-2833)
Fax: (888) 312-3645

15 P1 & P2 Pediatric Conversion Kit
Reuse
This medical device can be reused by another owner if the original owner of the product
doesn’t need it anymore. Before reuse the device must be carefully inspected by authorized
technical staff.
Following elements should be checked:
• rigidity of the structure,
• tightness of bolts and nuts,
• condition of plastic elements,
• condition of wheels and ball bearings,
• efficiency and condition of brakes.
If any of above elements are torn or broken, they should be replaced with new parts. It is
specially recommended to install new wheels, seat and backrest for every new user of the
device. All lose bolts and nuts must be tightened. The product must be precisely cleaned and
disinfected. Every new owner must receive the device with this user’s manual attached.
WARNING! It is forbidden to reuse the device if the main frame is bent or broken.
Disposal of Your device
The device should not be deposited with normal garbage. Your shower chair must be disposed
according to applicable local and national statutory regulations. Contact your local waste
disposal agency or authorized dealer of rehab equipment for information on proper disposal of
the chair, packaging, metal frame components, plastic components and other materials.

www.showerbuddy.com
U.S.A
Email: info@showerbuddy.com
Phone: (877) 7MY-BUDDY(769-2833)
Chile
Orto-Medic (www.ortomedic.cl)
Emaill; ventas@ortomedic.cl
Phone: 2269-8090
For all Other Countries
International Head Office
Showerbuddy New Zealand Limited
Wellington
New Zealand
Email: info@showerbuddy.co.nz
All ShowerBuddy products are CE, TUV, ISO9001 and TGA certified.
complying to AS/NZS 3973:2009 and AS4069-2013
Independent Laboratory Testing Carried out by NovitaTech Laboratories, South Australia, February 2013.
Copyright © 2014 by Showerbuddy Global Limited, PO Box 494, Waikanae, 5250, New Zealand.
All rights reserved
This manual suits for next models
1
Table of contents
Other Showerbuddy Wheelchair manuals


Popular Wheelchair manuals by other brands


Shoprider
Shoprider XtraLite Jiffy UL7WR user manual

Sunrise Medical
Sunrise Medical Quickie Freestyle M11 User instruction manual & warranty

KIRTON
KIRTON Florien II user manual

Invacare
Invacare Mirage operating manual

Patron
Patron CLASSIC RPRB018UN INFORMATION FOR USE

Vermeiren
Vermeiren Inovys Junior user manual