SI-Elektronik Liquid-Check User manual
http://liquid-check-info.si-elektronik.de
Liquid-Check Levelsensor
Technical manual Installation
Safety
Programming
Handling

2
Congratulations
Congratulations on your purchase of this electronic level sensor
"Liquid-Check" of the highest quality and thank you for your trust.
The level sensor "Liquid-Check" is designed to measure and transfer
level levels of liquids in pressureless containers of all kinds.
The measuring range (container height) is 0 - 5 meter.
Before commissioning the device, we recommend this operating
manual carefully read through.
Please also refer to the instructions on the
use, the connection, as well as the safety and setting instructions.
Attention
All rights reserved. The contents of this manual are the property of the company
SI-Elektronik GmbH. A copy or reproduction of this manual or extracts thereof requires the
express permission of SI-Elektronik GmbH.
We reserve the right to make mistakes or printing errors, as well as to make changes.
We are not liable for any damage, loss or cost incurred towards the buyer or third parties
- by incorrect operation, Accident, misuse - or in case of improper
repairs or connections.
Use only original replacements or accessories.
Furthermore, we are not liable for consequential damages and losses caused by
caused by the use of this product.
SI-Elektronik GmbH
Max-Planck-Straße 5
63477 Maintal / Germany

3
Sitemap
Sitemap .................................................................................................... 3
Preliminary ............................................................................................... 4
Delivery ................................................................................................. 4
How does Liquid-Check work? ................................................................ 5
Liquid-Check offers the following features:.............................................. 5
Installation of the Liquid-Check................................................................ 6
Electrical connection of the Liquid-Check................................................ 7
Overview Operating functions.................................................................. 7
WPS-Button .......................................................................................... 7
Touch-Button......................................................................................... 7
Connecting to Wi-Fi.................................................................................. 7
Connection to the W-Lan via WPS function.......................................... 7
Connection with the "guest" W-Lan ...................................................... 8
Note....................................................................................................... 8
Browser View ........................................................................................... 9
Desktop view......................................................................................... 9
View on your phone .............................................................................. 9
Setting/viewing the parameters................................................................ 10
WLAN Parameter.................................................................................. 10
Tank-Shapes......................................................................................... 11
Measurement settings........................................................................... 12
Example: FHEM SmartHome................................................................... 12
Liquid-Check Cloud.................................................................................. 13
Technical data.......................................................................................... 15

4
Preliminary
Delivery
1. Plug power supply 5 volt /1A with microUSB plug
2. Measuring module "Liquid-Check"
3. Fixing material
4. Measuring hose and hose weight (Optional)
When unpacking, check the kit for completeness.
Intended use
The intended use is to accurately measure a level of liquids in pressureless containers. E.g.
water cisterns, tank contents, etc.
Liquid-Check was developed on the basis of the valid safety guidelines and built for use in
European countries.
The electronic measuring system "Liquid-Check" allows the measurement of liquid levels. By
specifying the shape of the container and the dimensions, the conversion into litres is also car-
ried out. The main useful values are therefore, among other indications, the level of the liquid in
metres and the amount of liquid in litres. The measured values are displayed via the digital dis-
play on the device as well as via A Wi-Fi connection via a PC or a mobile phone. Since the de-
vice has a local web page, the values can also be integrated into SmartHome systems that sup-
port reading values from web pages or HTTP-requests. A program module (see page 12) is
available for the open source SmartHome system "FHEM".
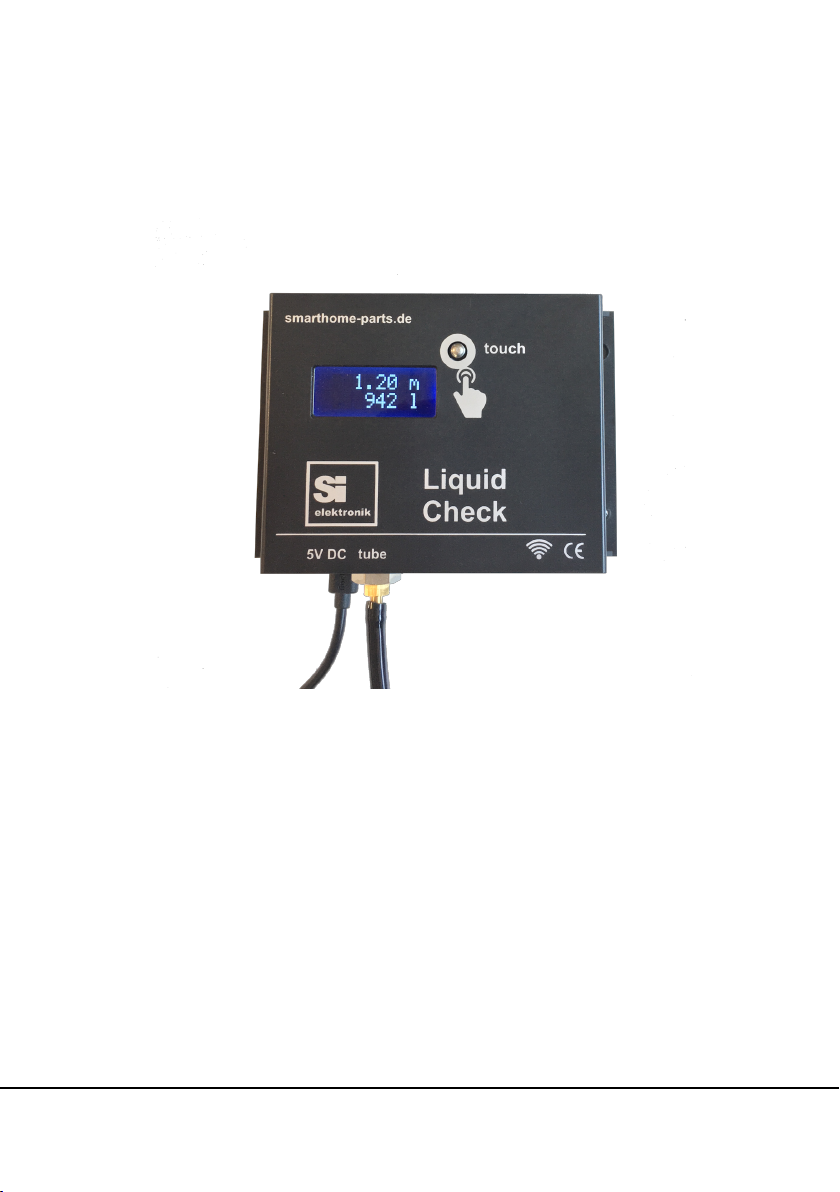
Design of the device
The complete measuring unit including
the LCD display and the W-Lan radio
module are located in a small wall hou-
sing that is easy to assemble. The elect-
ronic components have no connection to
the measuring medium.
The system is bundled with the contai-
ner by a thin hose. The recommended
measuring hose is available as an ac-
cessory and is made of polyurethane.
An examination of the material compati-
bility with the measuring medium is re-
commended. Measurement hoses made
of other materials can optionally be used
for non-suitable measuring media.
The power supply for the system is sup-
plied by a 5Volt plug-in power supply.
For applications without available power
supply, operation is possible, for exam-
ple, via a solar-charged battery module.

5
How does Liquid-Check work?
The measurement method is based on a hydrostatic measurement of the liquid level in a
container. Due to gravity, a liquid exerts pressure on the measuring hose positioned at or above
the bottom of a container, depending on its specific density. By building up a back pressure,
Liquid-Check can determine the corresponding value without being directly in or on the
measuring object. Measurements based on the "hydrostatic principle" always determine the
level of the liquid. Using the specified container shape parameters, Liquid-Check can also
determine the volume content. Liquid-Check does not have to be attached directly to the
container to be measured, but can be mounted for example in the nearby technical room. For
the measurement, only a thin hose connection to the container or tank is required. The end of
the hose must be positioned by a weight on or above the bottom of the container.
More information on Wikipedia:
https://de.wikipedia.org/wiki/Pneumatische_Füllstandmessung
Liquid-Check offers the following features:
1. Accurate measurement absolutely
2. Accurate repetition measurement
3. Installation not necessary directly on the container/tank
4. No calibration required
5. Good Wi-Fi connection, as in-house assembly
6. Good power supply, as in-house assembly
7. Connection to the Wi-Fi network via the router's WPS button
8. Setting all parameters via local website
9. Responsive display on mobile phone
10. No separate app required
11. Setting different container shapes and dimensions
12. Entering a bearing table for complex container shapes
13. Measuring interval adjustable
14. Specific density of the liquid adjustable
15. Offset for measuring position (hose position above the ground)
16. Direct replacement of existing pump tank watches
17. Integration into smart home systems possible
18. FHEM - Module for integration into the open source SmartHome system available
19. Low acquisition costs

6
Installation of the Liquid-Check
Installation
1. Find a suitable assembly place
Since the device is designed for indoor use, it is important to select a position from which
you can establish a hose connection to the measuring object (tank). As a rule, there is
already a pipe or hose connection from the house to a cistern or an earth tank, through
which one can establish a corresponding connection. Measuring hose lengths up to 50m
should not be a problem. A power outlet for the plug-in power supply should be in the
immediate vicinity. You should also be able to connect to the W-Lan router from the
installation site (See page 7). In advance, you can also check the Wi-Fi connection to your
router with your mobile phone.
2. After a good position has been found, mount the Liquid-Check module with the enclosed
fastening material.
When drilling the dowel holes, pay attention to any cables or pipes that may be laid
in the wall. Use a wire tester or have the module mounted by a specialist.
3. Route the hose connection from the measuring module to the corresponding tank. Plug the
hose on the measuring module onto the hose connector (4mm), which is outstanding at the
bottom, and fix the hose with the enclosed cable tie. To make it easy to attach the hose,
it is recommended to heat it with a hair dryer.
Attention: Do not bend the hose.
Avoid abrasion points, possibly protect with protective tube.
Always use a protective tube for wall bushings.
In order to measure the correct filling height, the end of the hose must be guided to the
bottom of the tank in question and fixed there. This can be achieved, for example, with a
rod or with a weight at the end of the hose. Tanks that have an old measuring clock with
hand pump already have a submersible pipe up to the tank bottom, which can be used
accordingly. If the hose or the immersive tube does not end up to the bottom, but with a
little distance above the bottom of the container, this can be taken into account in the
settings of the liquid check.
4. Note
Otherwise, no special requirements are placed on the installation. Height differences are
not noticeable in the measurement result. The hose should not be left unnecessarily long,
this will prolong the pumping cycle of the performed during a measurement.

7
Electrical connection of the Liquid-Check
The Liquid-Check is powered by a plug-in power supply, which is included in the scope of
delivery. The power supply has a micro-USB connector, which is plugged into the bottom of the
case.
Overview Operating functions
Since all parameters of the liquid check are set and read via the local web interface, the module
itself has only the most necessary operating functions.
1. WPS-Button
Small hole to the right of the power plug
show IP-address - short press
activate WPS - > 3 Sek. press until display show „WPS...“
WLAN-Standard reset - > 10 Sek. press
Resets the parameters to: SSID : Gast
Password : 12345678
Hostname : Liquid-Check
2. Touch-Button
Sensor button on the front
Trigger measurement - approx. 1 sec. touch
Connecting to Wi-Fi
Connection to the W-Lan via WPS function
Wi-Fi Protected Setup (WPS) is a feature that makes it very easy to connect to Wi-Fi. Two Wi-
Fi-enabled devices are connected at the touch of a button. The cumbersome entry of a pass-
word via a configuration menu is no longer necessary. To do this, the following 2 operations
must be performed.
Activating on the Wi-Fi router
To integrate Liquid-Check into the existing network, the WPS button must first be pressed on
the W-Lan router or the WPS function must be activated in the setting interface of your router. If
several WPS methods are available then select the push button method without PIN. If neces-
sary, refer to your router's instructions under the "WPS" key point. Then, within 2 minutes, press
the WPS function of the Liquid Check.
Activate at The Liquid Check:
To the right of the power supply plug is a small hole behind which there is a button (WPS but-
ton). For example, press the button with a curved paper clip for about 3 seconds to activate the
WPS function. Once the display shows "WPS . . . / 120 sec." release the button again. The "ǂ"
icon will now flash until the WPS connection is successful or after 2 minutes the connection is
canceled. By short pressing the WPS button, the device displays its received IP address.

8
Connection with the "guest" W-Lan
If a WPS connection with the WLAN router is not possible or desired, then there is the possibility to connect
Liquid-Check to a guest (Gast) WLAN. The following connection parameters are already preset in the deli-
very state: Wi-Fi Name (SSID): Gast , Wi-Fi Password: 12345678
Therefore, you must configure a Wi-Fi router with these parameters, then Liquid-Check automatically
connects to the network after plugging in the power supply. Now also connect your mobile phone to the Wi-Fi
"Guest" . You can then access the Liquid-Check setting menu via the mobile phone's web browser and
manually set and save the desired connection data to your Wi-Fi router.
Instead of providing the WLAN via a router, a mobile phone can also be used, with which one unlocks a
WLAN for other devices via the function "personal hotspot" (iPhone) or "Tethering+mobile hotspot" (Andriod).
Example setting on an Android phone
Below is a short Step by Step guide to activate the Wi-Fi hotspot on your phone.
1. Settings
Symbol „Gearwheel“icon or simply pull down the top of the image on the right
2. More
Select „Tethering + mobile Hotspot“
3. WLAN Hotspot
Set up Wi-Fi hotspot: network name: Gast, password: 12345678, security: WPA2
Now Liquid-Check can log in to the Wi-Fi of the mobile phone and gets a corresponding IP address.
Note for iPhone: Set the iPhone Name under <settings/general/info> temporarily to „Gast“
Note: If other connection data is already stored in the device, liquid check can be reset to the connection
parameters set in the delivery state. Pressing the WPS button (> 10 sec.) to set the connection parameters in
the delivery state.
Connecting to the Liquid Check
After successful WPS or guest (Gast) login, you can connect to the web interface of the Liquid-Check via a
popular internet browser (e.g. Goggle-Chrom, Firefox, MS-Edge, Opera, Safari). If your router supports a
name resolution such as the Fritz-Box 7390 then you can connect directly to the following input:
http://liquid-check
If you cannot connect by name, you have the option to display the IP address on the liquid check. To do this,
press the WPS button (button behind the hole) on the liquid check only shortly. The IP-Adr.
enter in the browser search box: e.g. http://192.168.x.x
Note
A prerequisite for both connection variants is that the router assigns the IP address via DHCP. This type of
address assignment is usually the default and can only be changed by manually changing the router.
In order for other WLAN devices to connect to a mobile phone or tablet PC with Liquid Check, for example,
the router must allow wi-Fi devices to connect to each other and also allow new Wi-Fi devices.
For example, for a Fritz box, this option is enabled by default. You can find the setting there under Wi-Fi/Se-
curity
(The displayed WLAN devices are allo-
wed to communicate with each other)
(Allow all new Wi-Fi devices)
The guest Wi-Fi may have its own radio button to activate these functions.
9
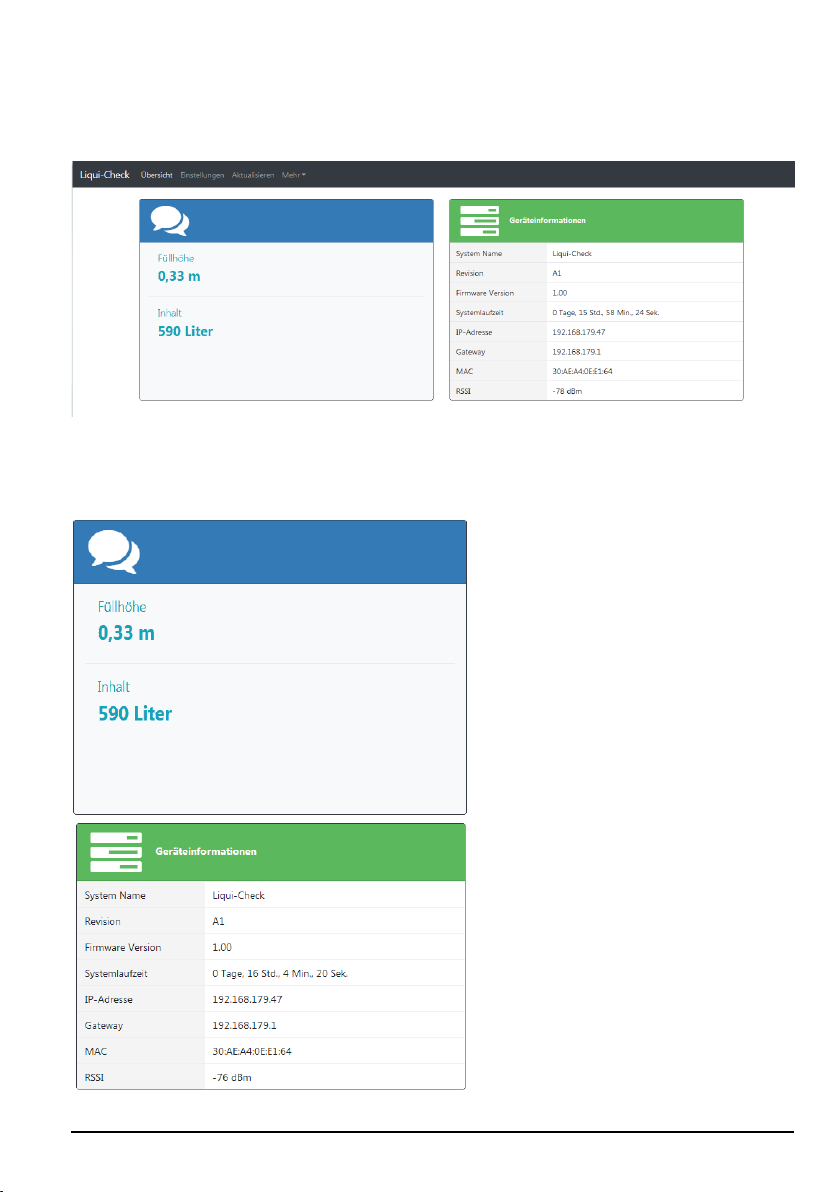
Browser View
Desktop view
View on your phone

10
Setting/viewing the parameters
Under the heading <Einstellungen> various parameters can be entered.
These are:
Wi-Fi connection data:
Access data to the Wi-Fi network and the host name that the module can usually use to access
the module by pre-http:// in the web browser.
Tank: (Shape-parameters)
The length, height or diameter of the container to be measured, these are usually self-
explanatory.
Messen: (Meassure)
Measuring interval: At what time interval a measurement is performed. The display always
shows the last reading.
Media density: Water has a density of 1 g/cm3, heating oil (HEL) has a range of 0.82 -0.86
g/cm3. On average, therefore, about 0.84 g/cm3
Bodenabstand: (Distance to the tank bottom)
Correction value, how much cm the measuring hose (or measuring tube) is positioned above the
ground.
Note: If a web browser does not accept the number entry with comma (,), try it with a point (.)
Save / Cancel
WLAN Parameter

11
Tank-Shapes
From the measurement of the height of the liquid, the volume can be determined in litres. To do
this, the tank shape used and the corresponding dimensions must be entered.
Standard tank shapes
Various geometric shapes are available
here.
- Box
- Ball
- Cylinder standing
- Cylinder lying
- Bearing table
Here you can specify the dimensions for the
selected tank shape.
Bearing table for complex tank shapes
A bearing table is provided by most tank manu-
facturers. Up to 10 values can be preset.

12
Measurement settings
Measuring interval
Here, for example, every 12 hours
The shortest interval is 1 hour
Media density
Here, for example, light heating oil HEL
It is in the range of 0.82 - 0.86
Bodenabstand (Ground distance)
The end of the hose hangs here in the example
2cm above the tank bottom.
Example: FHEM SmartHome
For integration into the open source SmartHome system "FHEM" a finished module with down-
load and installation instruction is published under "Github":
https://roma61.github.io/Liquid-Check/
Example of the integration of the measured values in an FHEM dashboard

13
View of the graphic in the "Dark" style
Liquid-Check Cloud
Liquid-Check powerd by Grafana
For recording your readings, "Liquid-Check" has an interface to our web portal. Our server uses
the visualization software "Grafana". Here your levels and quantities can be stored and
displayed graphically (see picture). With your personal login, you have the possibility to monitor
the graphics in another location via PC web browser or mobile phone. An alarm level can also
be defined, which takes place when the level is exceeded or fallen below. Then it sends a
notification by mail.
When you activate the cloud function
on the setup page of the Liquid
Check, you will receive the access
data to the web portal.
Your data is protected by an https
connection, as well as by an indivi-
dual security key.
Link to the login page:
https://liquidcheck.si-elektronik.de

14
View of the graphic in the "Light" style
Once the cloud function is activated, Liquid-Check sends its last measurement to the portal
cyclically every hour. In addition, the data is sent to the portal immediately if the measurement
is manually activated.
The following data is required for activation:
E-Mail : User's e-mail address
Größe : Maximum amount of filling of the container to be measured
Bezeichnung : Short description of the container e.g. cistern garden
Optionally:
Alarmwert : Filling quantity at which a notification should be made
Benachrichtigung : Notification when the value is above or below
Multiple devices can be managed by activating with the same <e-mail> in one account.
If the cloud function is deactivated in the "Liquid Check" setup page, measurement data will no
longer be sent to the web portal. The data that has already been stored is retained in the cloud.
Deleting the cloud account on the "Liquid Check" setup page causes the account to be
completely deleted, as well as the recorded measurement data.

15
Technical data
Power supply : 5 V DC / 1 A Plug power supply, microUSB
Power consumption : 0,3 W Normal / 3 W active measurement cycle
Pump Pressure Max : 0,5 BAR
Weight : 0,2 kg
Dimensions L/B/H : 131mm x 90mm x 48mm
Device installation position : Any
Accuracy : +/- 1cm
Temperature range : -5/+45°C
Protection class : IP30
Supported web browsers : Goggle-Chrom, Firefox, MS-Edge, Opera, Safari
Recommended measuring hose: Polyester-Polyurethan 6 x 4,
•small bending radius due to special flexibility
•very good refrigeration flexibility and reset properties
•kink- and abrasion-resistant
•resistant to aliphatic hydrocarbons and most lubricants
TX Frequenz
Wi-Fi: 2412-2472/2422-2462 MHz
RX Frequenz
Wi-Fi: 2412-2472/2422-2462 MHz
ITU Klassifizierung
G1D, D1D, F1D
Ausgangsleistung
Wi-Fi: 16,62 dBm (802.11b), 16,23 dBm (802.11g)
16.45 dBm (802.11n20), 16,02 dBm (802.11n40)
Modulation
Wi-Fi: DSSS, OFDM
Antenne
PCB Antenne, 2.0 dBi
EG-conformity
Produktname : Liquid-Check
Typ : LC1
Complies with the provisions of the EC directives listed.
Requirement
Standard, Testreport Number, Date & Laboratory
Radio
Spectrum
EN 300 328 V2.1.1 (2016-11)
Test Report RKS170508002-00A issued on 2017-05-10 by BACL, Kunshan
EN 300 328 V2.1.1 (2016-11)
Test Report RKS170508002-00B issued on 2017-05-10 by BACL, Kunshan
EN 300 328 V2.1.1 (2016-11)
Test Report RKS170508002-00C issued on 2017-05-10 by BACL, Kunshan
EMC
EN 301 489-1 V2.2.0 (2017-03), EN 301 489-17 V3.2.0 (2017-03)
Test Report RKS170508002-00E issued on 2017-05-18 by BACL, Kunshan
Safety
EN 60950-1:2006 + A11:2009 + A1:2010 + A12:2011 + A2:2013
Test Report RKS170508002-03 issued on 2017-05-18 by BACL, Kunshan
Health
EN 62311:2008
Test Report RKS170508002-00D issued on 2017-05-18 by BACL, Kunshan
16
SI-Elektronik GmbH
Max-Planck-Str. 5
63477 Maintal / Germany
Table of contents


