Sienna Luna SSM-3006 User manual
Luna
SSM-3006 Steam Mop
SSM-3016 Plus Steam Cleaner
SAP-3016 Accessory Kit
INSTRUCTION MANUAL

INTRODUCTION
Thank you for choosing Sienna for your household cleaning needs. Our floor care products use
the active power of steam without the use of chemicals; making it a green product that is safe
for the ecosystem. You have begun the first step into transforming your house into a green,
environmentally safe home. Our Sienna steam products are a modern way of cleaning that is
efficient and far more sanitary than conventional methods.
You can achieve a high level of effective cleaning by decreasing cleansing power thru steam.
When using our microfiber cloth pads to enhance absorbency combined with the power of
germ killing steam, dirt and grime can be eliminated in a matter of seconds. The tiny hot vapor
molecules penetrate porous surfaces being cleaned, expanding and forcing dirt, debris, and
bacteria to the surface. When used correctly, our steam mops can kill dust mites and certain
types of bacteria pathogens such as salmonella and E-coli on contact.
Since you do not need chemicals in order to use our products, not only will you see the savings in
your wallet, but you have provided a safer place for you and your family to live in. We encourage
you to improve your way of life, better the environment, and spend time enjoying your clean
chemical free floor.
Luna
The Luna Steam Mop is an innovative product that cleans and sanitizes your home by harnessing
the natural cleaning power of hot steam vapor. This unique versatile steam mop is well-suited to
clean a variety of floor surfaces and has a soft touch digital lighted control panel with a vibration
feature, a white LED light, and a black LED light along with 3 smart steam control settings for
optimum cleaning. Use the vibration feature to help lift dirt and debris from a stubborn area. The
white LED light will help to illuminate dark spaces and black LED light helps to make the spots
previously missed visible. The Luna heats water up and produces steam within 2 to 3 seconds.
The water tank can be quickly refilled for up to 20 minutes of steam time. In addition, the
included carpet glider ensures that your carpet is deodorized and refreshed. The user-friendly
design and energy saving feature is intended to tackle the toughest dirt and debris. The Luna
is an easy to assemble mop that requires no tools. It features a 1500-watt heating element, a
450ml/15.2 fl oz water tank, a swivel head, 2 heavy duty microfiber pads, and much more. A 12
piece accessory kit can be purchased separately.
Luna Plus
Not only is the Luna great for floors, but it can also be used on an endless amount of surfaces by
simply removing the handle and mop head then attaching the shoulder strap to the unit allowing
it to become a portable steam cleaner with multiple cleaning attachments (SSM-3016 model
only). The 12 piece accessory kit includes a shoulder strap, 4 nylon brushes, 2 brass brushes,
window squeegee, an angle concentrator nozzle, steam head, cloth pad and an extension hose.
2
SAFETY GUIDELINES
The Sienna Luna (SSM-3006) Steam Mop or Luna (SSM-3016) Plus Steam Cleaner are for
indoor domestic floor use only. Any commercial use will void warranty. They are designed for
sanitizing and cleaning an array of floor surfaces such as ceramic tile, sealed hardwood, marble,
sealed laminate, stone, and vinyl floors. In addition to floors, you can use the Accessory Kit (SAP-
3016) on countless surfaces such as countertops, windows, and outdoor grills.
Safety Instructions:
WARNING: DANGER OF SCALDING. BE SURE TO READ AND FOLLOW ALL SAFETY
INSTRUCTIONS BEFORE USING YOUR STEAM MOP. PROPER CARE AND MAINTENANCE WILL
HELP TO EXPAND THE LIFE OF YOUR STEAMER.
When using an electrical appliance, basic precautions should always be followed. To reduce the
risk of fire, electric shock, or injury:
Be sure to unplug the electrical cord when steamer is not in use and while servicing.
This steamer is not intended for use by persons (including children) with reduced physical,
sensory, mental capabilities or lack of experience and knowledge unless they have been
instructed to do so by a person responsible for their safety.
Children should be supervised and cautioned that the steamer is not a toy and should not be
played with.
Do not direct steam towards people, pets, electrical appliances, or electrical outlets.
Do not immerse the steamer in water or other liquids.
Do not handle steamer with wet hands.
Do not pull or carry by cord, use cord as a handle, or close a door on the cord.
Be sure to keep cord away from heat, water, and sharp edges.
Do not use if cord or plug is damaged.If the power cord is damaged, it must be replaced by the
manufacturer, its service agent or similarly qualified person in order to avoid a hazard.
Do not use extension cords or outlets with inadequate current carrying capacity.
Do not use steamer on any steam sensitive material such as velvet, leather, wax polished
furniture or floors, synthetic and other delicate fabrics.
Do not use on unsealed hardwood floors. By doing so, you may remove the sheen from the
hardwood. It is recommended to test an isolated area with the steam mop before proceeding.
Never put additives such as cleaning detergents or chemicals into the water tank. It will make
the product unsafe and damage the unit as well as be dangerous to use.
Do not use steamer without floor cloth pad in place.
Use only manufacturer's recommended accessories.
Stop using steamer if circuit breaker activates. Beware of risk of shock.
Wear proper shoes when operating your steamer. Open-toed shoes, slippers or bare feet may
cause you to slip and fall or cause hot steam on your feet.
Allow your steamer to cool down before storing in a cool, dry place.
•
•
•
•
•
•
•
•
•
•
•
•
•
•
•
•
•
•
3
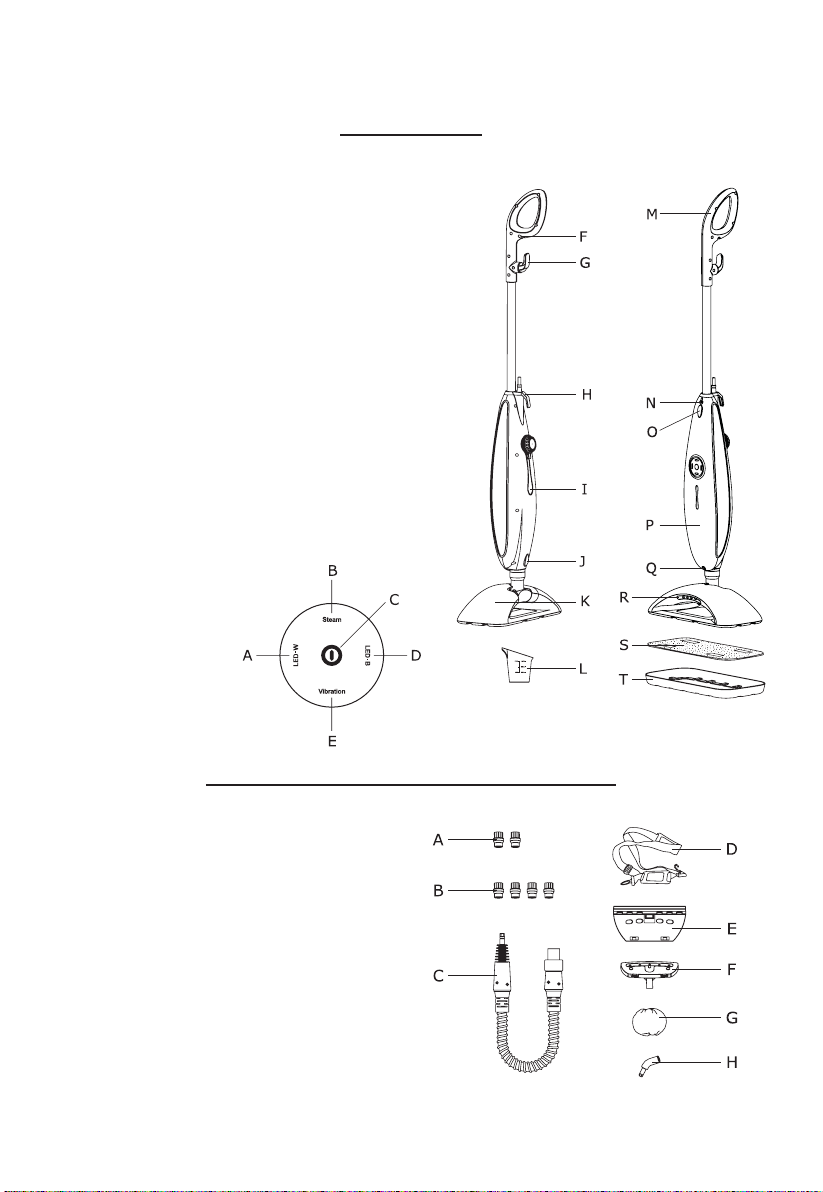
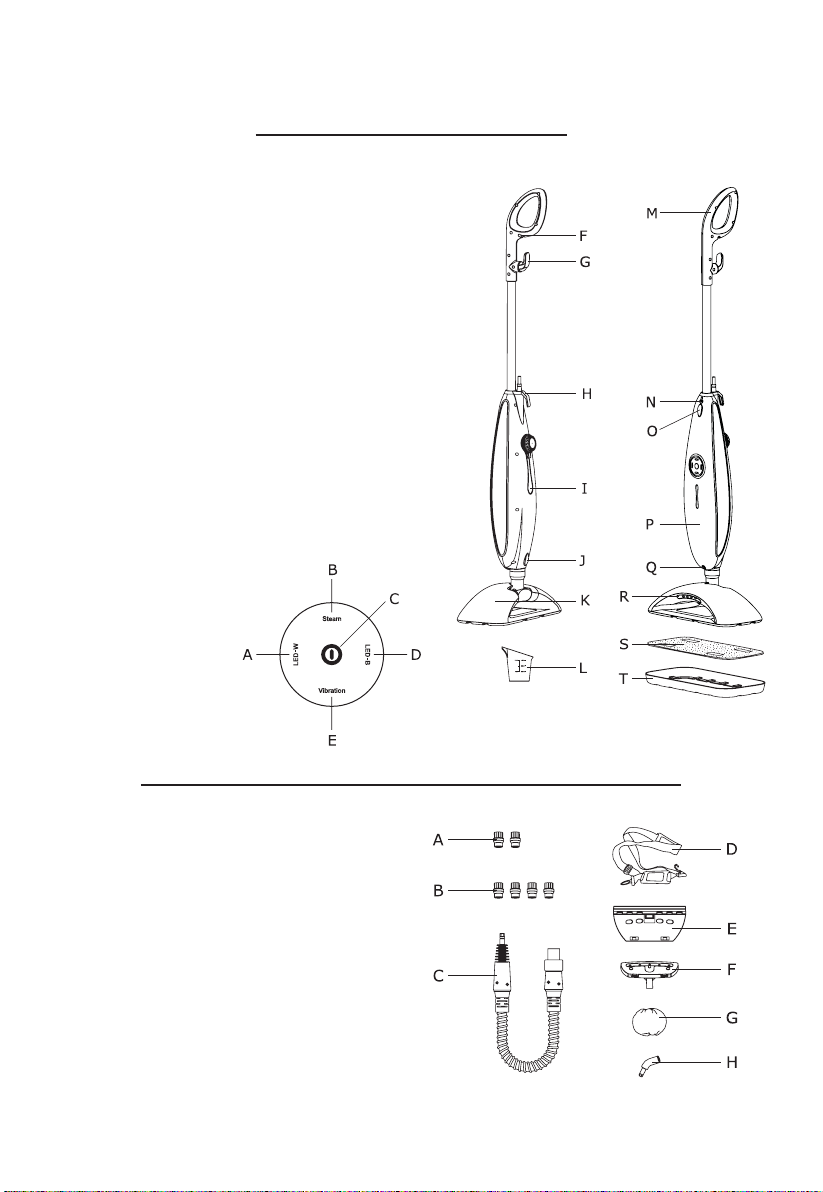
KEY FEATURES
A.
B.
C.
D.
E.
F.
G.
H.
I.
J.
K.
L.
M.
N.
O.
P.
Q.
R.
S.
T.
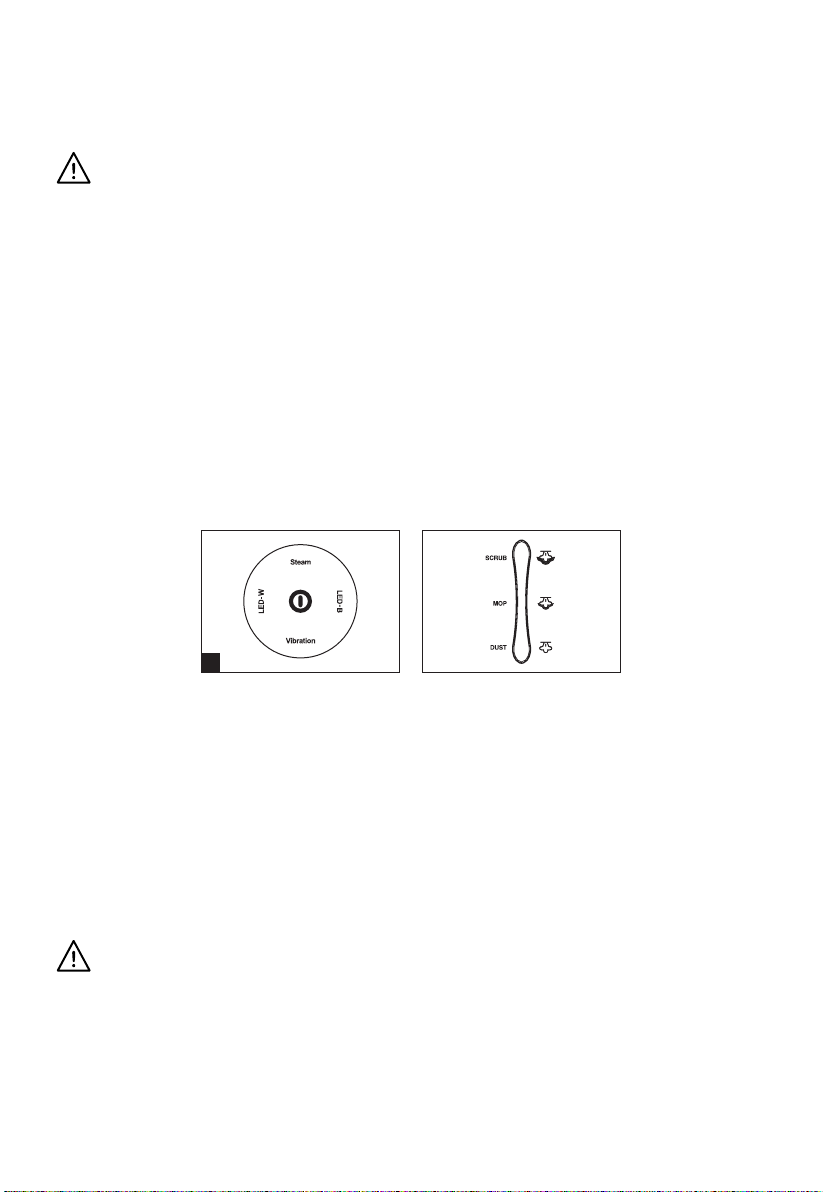
WHITE LED LIGHT BUTTON (LED-W)
3 LEVEL STEAM BUTTON
POWER ON/OFF BUTTON
BLACK LED LIGHT BUTTON (LED-B)
VIBRATION BUTTON
HANDLE CORD WRAP
QUICK RELEASE CORD WRAP
LOWER CORD WRAP
ILLUMINATED WATER TANK
STEAMER HEAD RELEASE BUTTON
STEAMER HEAD
REFILL CUP
HANDLE
UPPER SHOULDER STRAP ATTACHMENT
HANDLE RELEASE BUTTON
STEAMER BODY
LOWER SHOULDER STRAP ATTACHMENT
LED-W AND LED-B LIGHT
CLOTH PAD
CARPET GLIDER
ACCESSORY KIT (SSM-3016 MODEL ONLY)
A.
B.
C.
D.
E.
F.
G.
H.
BRASS BRUSHES
NYLON BRUSHES
EXTENSION HOSE
SHOULDER STRAP
WINDOW SQUEEGEE
STEAM HEAD
SMALL CLOTH PAD
ANGLE CONCENTRATOR NOZZLE
4

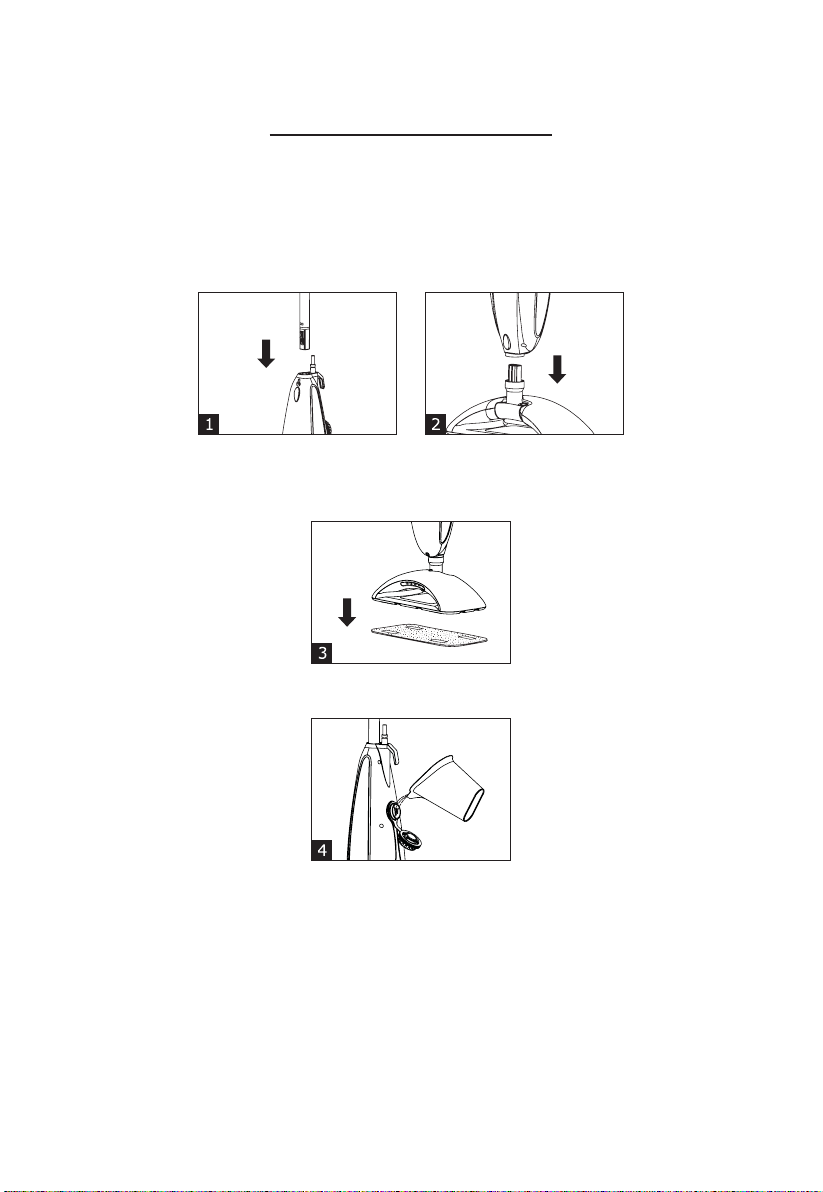
ASSEMBLY AND USE
1) Attach handle to steamer body by pressing handle release button located on the top front of
steamer body and insert handle into steamer body.
2) Attach steamer body to steamer head by pressing steamer head release button located on the
bottom back of steamer body and insert steamer body into steamer head.
3) Set cloth pad on the floor with microfiber side down. Align self adhesive strips at the bottom
of steamer head with cloth pad. Place steamer head on top of cloth pad and apply pressure to
assure hold.
4) Unscrew the water tank cap and fill with cool tap water by using refill cup provided.
NOTE: The steam mop does not require distilled water. Residents in areas with hard water
should use distilled water for better performance.
5) Twist the quick release cord wrap clockwise to unwrap the power cord completely.
NOTE: It is recommended that another high wattage appliance is not operated on the same
circuit to avoid a circuit overload.
NOTE: There is a metallic ball located in the water tank that can get lodged inside. Shake the
body of your unit, if you hear the ball rattle, then you are ready to start steaming. If not, shake
your unit to release the ball.
5
WARNING: ON SURFACES THAT HAVE BEEN TREATED WITH WAX, THE WAX MAY BE
REMOVED BY THE HEAT AND STEAM ACTION. DO NOT USE ON UNSEALED WOOD FLOORS
OR LET UNIT STAND ON ANY WOOD FLOOR FOR AN EXTENDED PERIOD OF TIME. THIS MAY
CAUSE THE WOOD GRAIN TO RISE. IT IS RECOMMENDED THAT A SECTION BE TESTED IN AN
ISOLATED AREA OF THE FLOOR. IT IS ALSO RECOMMENDED THAT YOU CHECK THE USE AND
CARE INSTRUCTIONS FOR CLEANING FROM THE FLOOR MANUFACTURER TO ENSURE STEAM
CLEANING IS ACCEPTABLE FOR YOUR FLOOR.
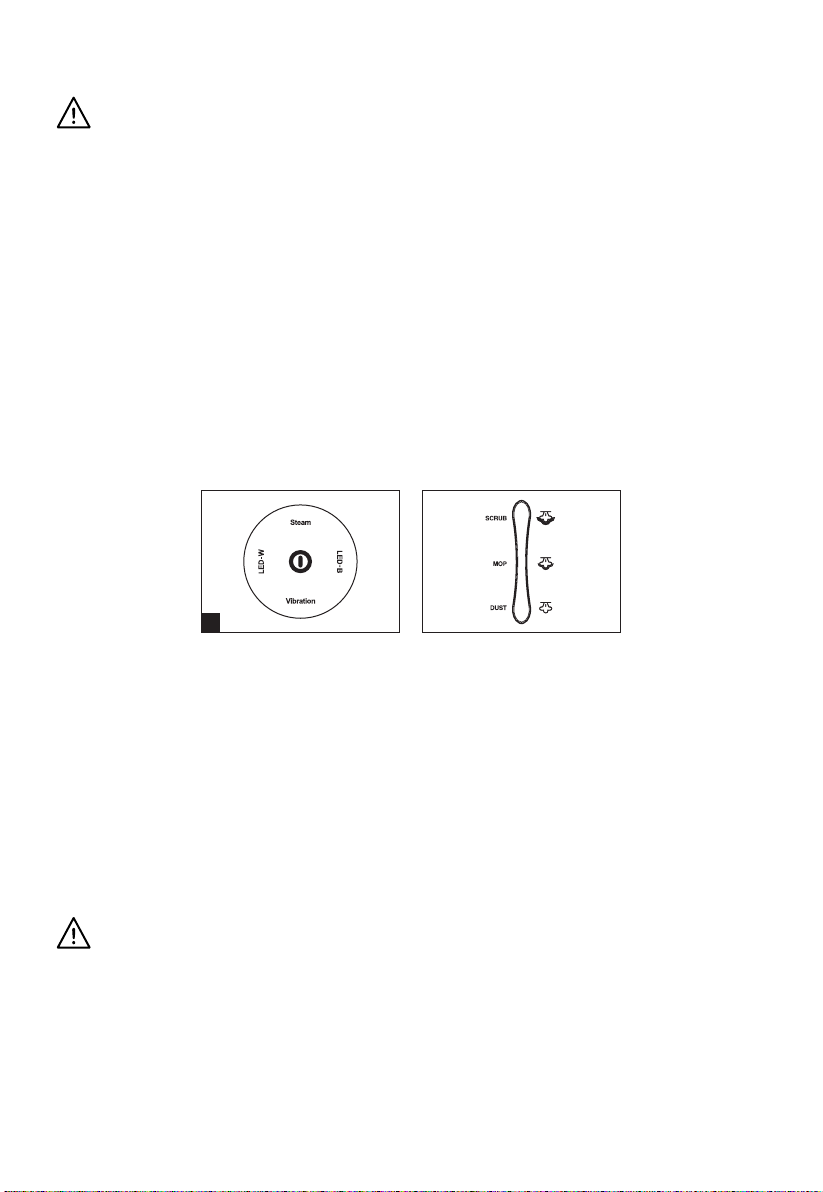
By pressing button(s) located on the soft touch digital control panel located on the front of the
steamer body, you can begin to use your steam mop by choosing the following settings:
6) Turn power ON/OFF button on.
7) With steam control options, push button to cycle thru and choose a setting that best fits your
cleaning needs. Steam option starts on mop setting. A colored light will indicate steam levels:
dust (Orange) for wood floor surfaces, mop (Green) for tile or linoleum, and scrub (Red) works
best in bathrooms.
8) The white LED light (LED-W) lights up the cleaning path for hard to see places.
9) The black LED light (LED-B) is used to show missed soiled stained areas.
NOTE: It is recommended to use both the LED-W light with the LED-B light together for maximum
efficiency and illumination.
10) Our latest patented vibration feature with Micro Pulse Technology breaks up dirt and grime
with over 90 vibrations per second. It allows for a deeper clean for tough; difficult areas by
assisting the steam mop across the floor. Use this feature when working with stubborn stains.
11) Slowly pass over surface to be cleaned when steam is emitted. It is recommended to sweep
or vacuum floor prior to using the steam mop.
CAUTION: To sanitize an area of your floor, leave the steam mop over the area for a
minimum of 8 seconds, but no longer than 15 seconds. Leaving the steam mop in a stationary
position for a longer period than recommended may cause build up of pale residue. This
residue can be removed by using a decalcifying product or with a few drops of vinegar on a
cloth and wiped away.
6
7

12) When steam mop stops emitting steam, simply refill the water tank, and continue steaming.
WARNING: NEVER RUN THE STEAM MOP WITHOUT WATER.
13) When you finish cleaning, unplug power cord from outlet. Be sure to empty water tank and
carefully remove cloth pad from steamer head. Store the unit upright in a dry area.
NOTE: Your floor will be slightly wet immediately after moping, this is normal. It will dry within 5
minutes. This is due to the cooling effect of steam.
CAUTION: The cloth pad may be very hot.
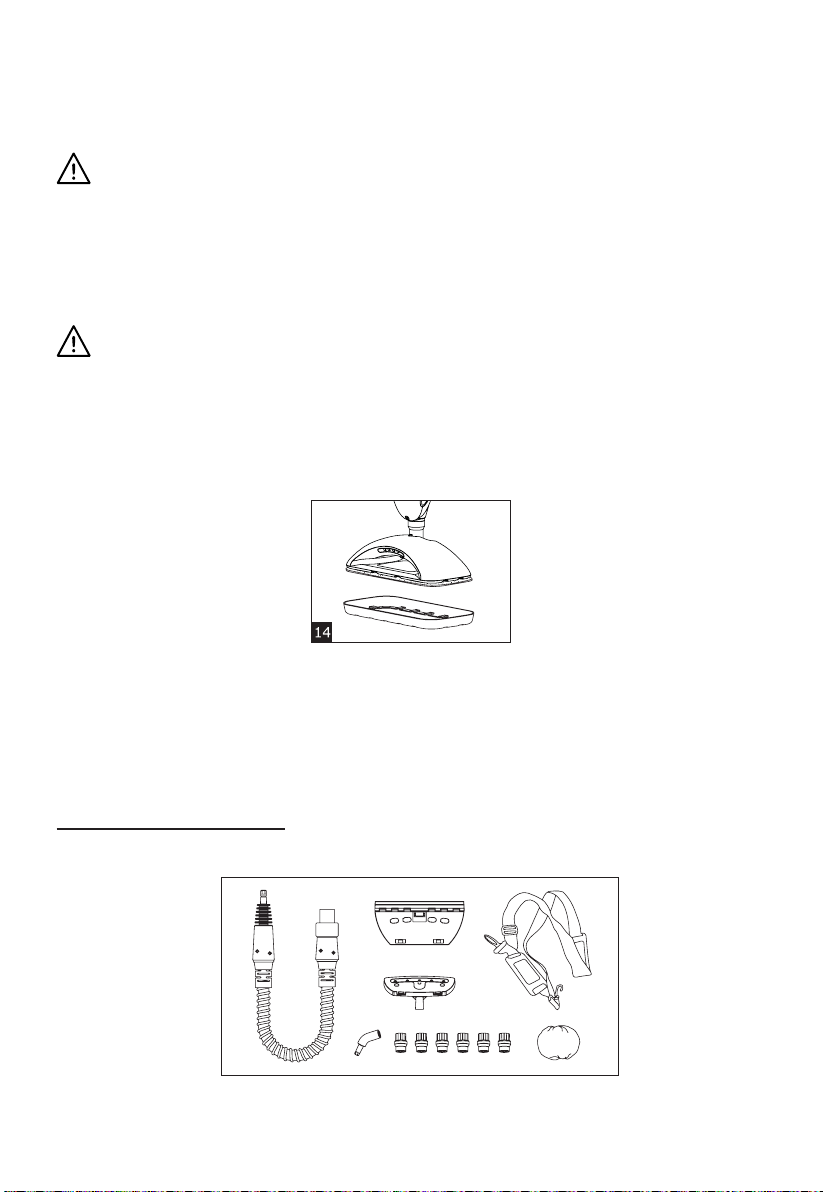
Carpet Glider
14) Lay carpet glider on the floor in an upright position with the rectangular flat surface facing
downward. Place steamer head on top of glider.
IMPORTANT: The carpet glider is not designed to be fixed to the steamer head for safety reasons
including preventing burns. It is designed for use on soft carpet areas only, not for hard floor
surfaces.
NOTE: The steam mop includes a 30 minute auto shutoff feature that meets the energy saving
requirements by the latest European ERP directive.
Plus (Accessory Kit)
7

WARNING: STEAMER MUST BE TURNED OFF IN ORDER TO SWITCH IT INTO A PORTABLE
STEAMER. WHEN IN USE, BE SURE TO PUT THE STEAM LEVEL ON MOP OR SCRUB STEAM
SETTINGS FOR OPTIMUM USAGE.
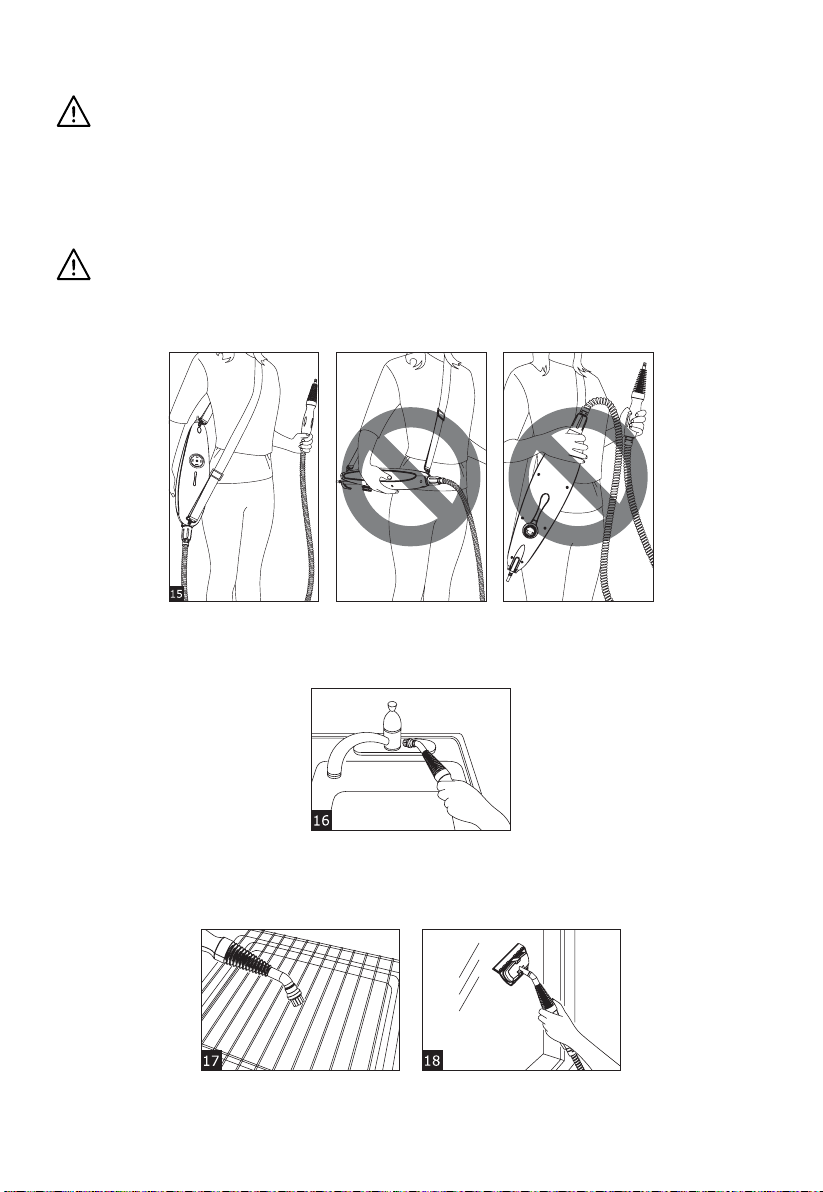
15) Shoulder strap- Attach strap to steamer body to convert the mop into a portable steam
cleaning device. Adjust your strap to a comfortable length where the steamer body and extension
hose is vertical to the floor.
WARNING: BE SURE THAT STEAMER BODY IS FACING UPRIGHT WITH SIENNA LOGO
FACING DOWNWARD TOWARDS THE FLOOR ALLOWING THE STEAMER TO STEAM PROPERLY.
YOU MAY NOTICE SLIGHT DRIPPING FROM THE EXTENSION HOSE; THIS IS NORMAL DUE TO
BUILD UP OF CONDENSATION.
16) Nylon brush- Attach brush onto either the extension hose nozzle or the angle concentrator
nozzle for cleaning in hard to reach places. Use in places such as grout, kids toys, tire rims and car
interior.
17) Brass brush- Use the brass brush in the same way as the nylon brush, but use for tough
surfaces that won't scratch such as outdoor grills.
18) Window squeegee- Attach squeegee to steam head for cleaning windows, mirrors and
shower doors.
8

CAUTION: When cleaning delicate surfaces such as glass, use the lowest steam setting to
prevent cracking.
19) Angle concentrator nozzle- This attachment is used for hard to reach places that you need to
get to with an angle. Both the nylon and brass brushes work best when using this attachment.
20) Steam head with small cloth pad- Attach the steam head to the extension hose and add the
small cloth pad to clean surfaces such as garments, window coverings, floors, upholstery, etc.
21) Extension hose- Use this 6 ft. hose to assist with all the attachments to make cleaning easier.
CLEANING AND MAINTENANCE
CAUTION: Prior to cleaning or maintaining your steam mop, isolate the unit by removing
the cord from the power socket and avoid immersing the unit in water.
1) The cloth pads can be machine washed in hot water. Do not tumble dry. Do not iron. Allow to
fully dry before use. Do not use bleach or fabric softener.
2) Wipe steamer and accessories with soft cloth when/if necessary.
Product Specs:
Voltage supply: 120V, 60 Hz
Output: 1500 W
Water tank capacity: max 15.2 fl oz
Cord: 25 ft
Weight: 5 lbs
Protection class: 2
Pads: SSM-3006-CP 2PK
CUSTOMER SUPPORT
For problems with your Sienna steam mop, please refer to Troubleshooting guide. Additional
inquiries should be directed to our Customer Service department by calling 1-888-574-3662 or by
e-mail to: customerservice@anvidproducts.com.
You may purchase replacement pads and accessories on our website at:
www.buysiennaproducts.com.
9
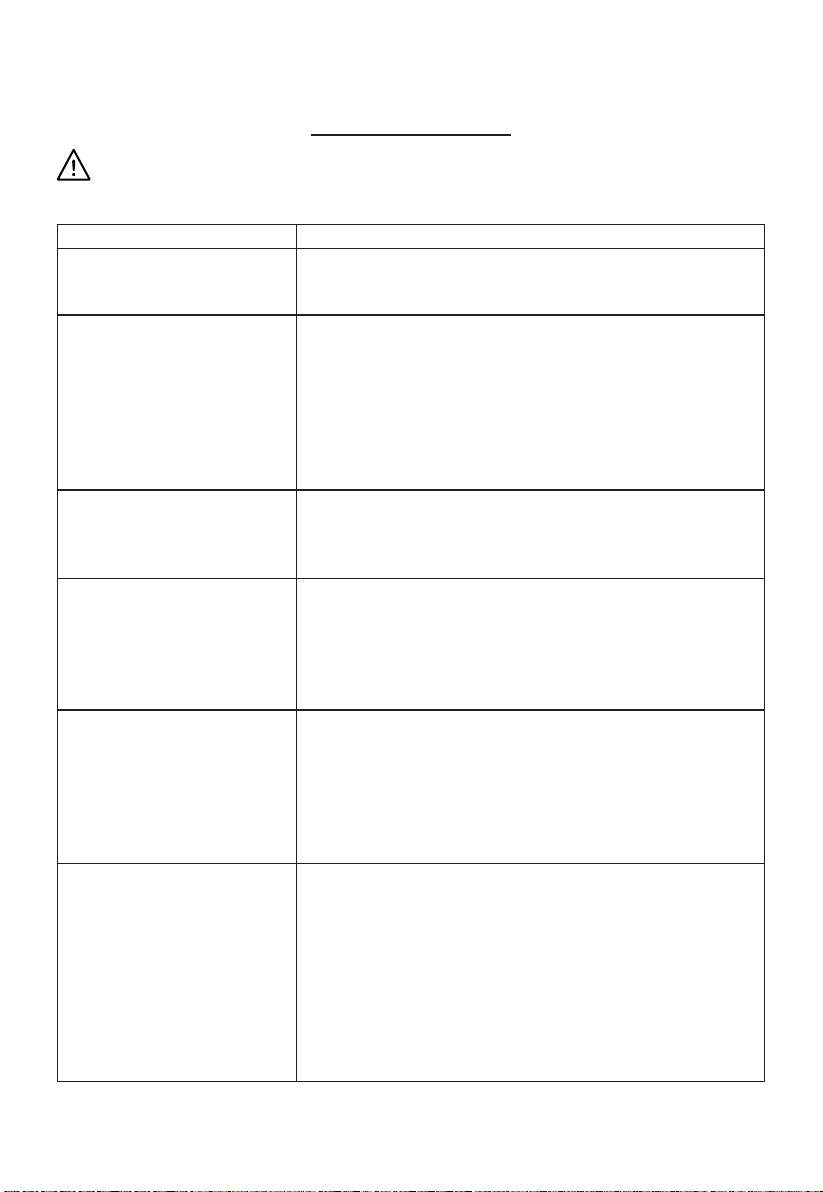
TROUBLESHOOTING
CAUTION: Prior to assessing your steam mop, isolate the unit by removing the cord from
the power socket.
PROBLEM SOLUTION
Steamer turns off while in
use
After 30 minutes of use, the " auto shut off " feature
engages. Simply turn the unit back on and continue
cleaning.
LED is not on Ensure auto shutoff feature has not been engaged. Simply
turn power button back on and proceed.
Ensure steamer power cord is correctly plugged into a
120V AC power outlet only.
Ensure circuit breaker is operational.
Try operating steamer from another power outlet.
If unit is still not working, call customer service at 1-888-
574-3662.
No steam Ensure water tank is full.
Calcium and mineral deposits can build up and impact
the performance of your steamer, use distilled water if
necessary.
Pale residue left on floor This can be caused by leaving the steamer in the same
spot for too long. Residue can be removed by using a
decalcifying product or with a few drops of vinegar on a
cloth and wiped away.
Alternatively, reheat the area for one minute to remove
residue (do not overheat area.)
Steamer is leaking water
all over the floor
The microfiber cloth pad may be overused and needs to
be changed out with additional cloth pad(s) provided.
Cloth pads can be cleaned in washer. Over time, however,
the cloth pads can start to wear.
Be sure microfiber cloth pad is attached properly.
If the unit should continue to leak water, unplug and wait
5 minutes before trying again.
Floors are cloudy, streaky or
spotty after mopping floor
Be sure to wash your cloth pads in light detergent before
use, any residue on pads may be transferred onto floor. To
remove, wash your pads at least once, sometimes twice to
remove the film from the pads. Go over your floor again
and streaks should disappear.
Replace cloth pad with a new; clean one for effective
cleaning.
If initial use of steamer, past cleaning products may have
left a residue on your floor, continue to go over affected
area until there is no residue or streaks left behind.
10
•
•
•
•
•
•
•
•
•
•
•
•
•
•
•
•

11
ONE YEAR LIMITED WARRANTY
Our Sienna product warranty extends only to the original customer purchaser of the product. It
is warranted by the manufacturer to be free from all defects in materials or workmanship for a
period of one year from the date of original purchase. This warranty is subject to the following
conditions, exclusions and exceptions.
Exclusions:
This warranty does not cover normal wear and tear of parts and does not apply to any product
that has been tampered with or used for commercial purposes. This warranty does not cover
damage caused by misuse, abuse, negligent handling or damage due to mishandling in transit or
shipping. This warranty does not cover damage or defects caused by or resulting from repairs,
service or alterations to the product or any of its parts, which have been performed by a repair
person not authorized by the manufacturer. This warranty is effective only if the product is
purchased and operated in the USA, and does not extend to any units which have been used in
violation of written instructions furnished by the manufacturer, or to units which have had the
serial number removed, altered, defaced or rendered illegible.
Performance:
During the limited warranty period, the manufacturer will, at its option, repair or replace free
of charge a defective product or part that is covered by this warranty. As a matter of warranty
policy, the manufacturer will not refund the purchase price. A repaired or replacement product
will be covered by this warranty for the balance of the initial one year warranty period.
To contact Customer Service:
Write: Anvid Products, Inc.
1401-1499 Greenville Road
Livermore, CA 94550
E-mail: customerservice@anvidproducts.com
Or call: 1-888-5SIENNA (1-888-574-3662)
Please refer to your product name and model number when contacting Customer Service.

12
Customer Service will give you further instructions for returning a defective product. When
returning a defective product, carefully pack the item to avoid damage in shipping, the
manufacturer cannot assume responsibility for loss or damage during incoming shipment. Be
sure to include the following items with your product: any accessories related to the product,
completed warranty form, and a copy of your sales receipt or other proof of purchase to
determine warranty status. C.O.D. shipments cannot be accepted.
Limitations of Remedies: No representative or person is authorized to assume for the
manufacturer any other liability in connection with the sale of our products. This limited
warranty is not transferable and any sale, transfer or other disposition of the product voids this
limited warranty. There shall be no claims for defects or failure of performance or product failure
under any theory of tort, contract or commercial law including, but not limited to, negligence,
gross negligence, strict liability, breach of warranty and breach of contract.
ANY IMPLIED WARRANTIES, OBLIGATIONS, OR LIABILITIES, INCLUDING, BUT NOT LIMITED TO,
THE IMPLIED WARRANTY OF MERCHANTABILITY AND FITNESS FOR A PARTICULAR PURPOSE,
SHALL BE LIMITED TO THE DURATION OF THIS WARRANTY. Some states do not allow limitations
on how long an implied warranty lasts, so the above limitations may not apply to you.
REPAIR OR REPLACEMENT SHALL BE THE SOLE REMEDY OF THE PURCHASER UNDER THIS
LIMITED WARRANTY, AND IN NO EVENT SHALL THE MANUFACTURER BE LIABLE FOR ANY
SPECIAL, INCIDENTAL, OR CONSEQUENTIAL DAMAGES, LOSSES OR EXPENSES YOU MAY INCUR
IN CONNECTION WITH YOUR PURCHASE OR USE OF THE PRODUCT OR FOR ANY BREACH OF
THIS OR ANY OTHER WARRANTY, EXPRESS OR IMPLIED, WHATSOEVER. Some states do not
allow exclusion or limitation of special, incidental, or consequential damages, so the above
limitation may not apply to you. This limited warranty gives you specific legal rights, and you
may also have other rights which vary from state to state.
Correct Disposal of this product
This marking indicates that this product should not be disposed with other
household wastes throughout the US. To prevent possible harm to the
environment or human health from uncontrolled waste disposal, we recommend
recycling it responsibly to promote the sustainable reuse of material resources.
To dispose of your used device, please contact your local city for proper disposal
locations.
Copyright © 2014 Anvid Products, Inc. Made in China ●Printed in China
SSM-3006 Luna
SSM-3016 Luna Plus
SAP- 3016 Kit de accesorios
MANUAL DE INSTRUCCIONES

INTRODUCCIÓN
Le agradecemos que haya elegido Sienna para sus necesidades de limpieza doméstica. Nuestros productos de
cuidado de pisos utilizan el poder activo del vapor sin requerir productos químicos; esto lo hace un producto
verde seguro para el ecosistema. Usted ha dado el primer paso para convertir su casa en un hogar verde
ecológicamente inocuo. Nuestros productos a vapor Sienna son un método moderno de limpieza que es
eficiente y mucho más higiénico que los métodos convencionales.
Se puede lograr un alto nivel de limpieza eficiente reduciendo el poder limpiador mediante el vapor. Cuando
usa nuestros paños de microfibra para mejorar la absorbencia en combinación con el poder destructor de
gérmenes del vapor, se puede eliminar la suciedad en cuestión de segundos. Las moléculas muy pequeñas
de vapor caliente penetran las superficies porosas que se limpian, se expanden y forzan suciedad, desechos
y bacterias a la superficie. Cuando se utilizan correctamente, nuestros trapeadores a vapor pueden matar los
ácaros del polvo y algunos patógenos bacterianos como la salmonella y el virus E-coli al contacto.
Puesto que no necesita productos químicos para utilizar nuestros productos, no sólo notará el ahorro,
pero usted ha proporcionado un lugar más seguro para vivir con su familia. Le aconsejamos mejorar sus
condiciones de vida, mejorar el medio ambiente y pasar el tiempo disfrutando de su piso limpio sin productos
químicos.
Luna
El trapeador Luna es un producto innovador que limpia y desinfecta su casa aprovechando el poder
limpiador natural del vapor caliente. Este trapeador a vapor versátil y único es muy apropiado para limpiar
una variedad de revestimientos de piso y tiene un panel de control digital iluminado de tacto suave con
una función de vibración, un indicador LED blanco y un indicador LED negro, y también tres ajustes de
control de vapor inteligentes para una limpieza óptima. Utilice la función vibración para ayudar a remover la
suciedad y los residuos de un área rebelde. El indicador LED blanco auyda a iluminar los espacios oscuros y
el indicador LED negro ayuda a hacer visibles las áreas que no se detectaron anteriormente. La Luna calienta
el agua a 100°C (212°F) y produce vapor dentro de dos o tres segundos. Se puede llenar rápidamente el
tanque de agua para obtener hasta 20 minutos de vapor. Además, el deslizador de alfombras proporcionado
asegura la desodorización y la aparencia renovada de su alfombra. Su diseño de fácil manejo se ha concibido
para enfrentar el polvo y la suciedad más rebeldes. El Luna es un trapeador fácil de montar sin necesitar
herramientas. Incorpora un componente calefactor de 1500 vatios, un tanque de agua de 450 ml/15.2 oz líq,
un cabezal giratorio, dos paños muy resistantes de microfibra y mucho más. Un kit de accesorios de 12 piezas
se puede comprar por separado.
Luna Plus
El Luna es no solamente excelente para pisos, pero se puede utilizar también en una cantidad infinita de
superficies retirando simplemente el mango y el cabezal del trapeador y después fijando la correa de hombro
a la unidad, transformándola en limpiador a vapor portátil con muchos accesorios de limpieza (modelo
SSM-3016 solamente). El kit de accesorios de 12 piezas incluye una correa de hombro, 4 cepillos con cerdas
de nylon, 2 cepillos con cerdas de latón, un jalador para vidrios, una boquilla concentradora de ángulo, un
cabezal de vapor, un paño y una manguera de extensión.
26

DIRECTRICES DE SEGURIDAD
El trapeador a vapor Sienna Luna (SSM-3006) y el sistema de limpieza a vapor Luna Plus (SSM-3016) se han
diseñados únicamente para uso doméstico en pisos interiores. Cualquier uso comercial anulará la garantía.
Están diseñados para la desinfección y la limpieza de varios revestimientos de piso, tales como alfombra,
baldosas de cerámica, pisos de madera dura sellada, mármol, pisos laminados sellados, piedra y vinilo.
Además de los pisos, se puede utilizar el Kit de accesorios (SAP-3016) en incontables superficies tales como
encimeras, ventanas y asadores exteriores.
Instrucciones de seguridad:
ADVERTENCIA: RIESGO DE QUEMADURAS. ASEGÚRESE DE LEER Y SEGUIR TODAS LAS
INSTRUCCIONES DE SEGURIDAD ANTES DE UTILIZAR SU TRAPEADOR A VAPOR. UN APROPIADO CUIDADO
Y MANTENIMIENTO CONTRIBUIRÁ A PROLONGAR LA VIDA ÚTIL DE SU LIMPIADOR A VAPOR.
Durante el uso de un aparato eléctrico, siempre debe seguir precauciones básicas. Para reducir el riesgo de
incendio, descarga eléctrica o daños personales:
•
•
•
•
•
•
•
•
•
•
•
•
•
•
•
•
•
•
Asegúrese de desenchufar el cable de alimentación cuando el aparato no esté en uso y antes del
mantenimiento.
Este aparato no está destinado al uso por personas (incluso de niños) con capacidades físicas,
sensoriales o mentales reducidas o con falta de experiencia y conocimiento, a menos que hayan recibido
instrucciones de una persona responsable de su seguridad.
Se debe supervisar a los niños y advertirlos que el limpiador a vapor no es un juguete y que no deben
jugar con el aparato.
No apunte el vapor hacia personas, mascotas, aparatos eléctricos o tomacorrientes.
No sumerja el limpiador a vapor en agua o ningún otro líquido.
No toque el limpiador a vapor con las manos húmedas.
No jale el cable de alimentación para desconectar el limpiador a vapor del tomacorrientes, ni utilice el
cable como mango.
Asegúrese de mantener el cable alejado del calor, del agua, y de bordes afilados.
No utilice el aparato si el cable o el enchufe está dañado. Si el cable está dañado, debe reemplazarse por
el fabricante, su agente de servicio o una persona cualificada similar a fin de evitar peligros.
No utilice un cable de extensión o tomacorriente de capacidad inadecuada.
No utilice el limpiador a vapor en superficies sensibles al vapor tales como terciopelo, cuero, muebles o
pisos lustrados con cera, telas sintéticas u otras telas delicadas.
No utilice el aparato en pisos de madera dura no sellada. Cuando lo hace, el vapor podría quitar el
brillo. Se recomienda que pruebe en un área aislada con el trapeador a vapor antes de continuar.
Como precaución, debe repasar el manual del fabricante del piso para ver las instrucciones de cuidado
apropiadas.
Nunca ponga aditivos como detergentes o productos químicos de limpieza en el tanque de agua. Puede
hacer que el producto se volverá inseguro y dañará la unidad y su uso estará peligroso.
No utilice el limpiador a vapor sin el paño de piso en su lugar.
Utilice únicamente los accesorios recomendados por el fabricante.
Deje de utilizar el limpiador a vapor si el disyuntor se activa. Tenga cuidado con el riesgo de electrocución.
Use zapatos adecuados cuando utiliza su limpiador a vapor. Los zapatos abiertos, las zapatillas de casa y
los pies descalzos pueden hacer que usted resbale y caiga o provocar un vapor caliente en sus pies.
Deje enfriar su limpiador a vapor antes de almacenarlo en un lugar fresco y seco.
27
PRINCIPALES CARACTERÍSTICAS
A.
B.
C.
D.
E.
F.
G.
H.
I.
J.
K.
L.
M.
N.
O.
P.
Q.
R.
S.
T.
BOTÓN DEL INDICADOR LED BLANCO (LED-W)
BOTÓN DE VAPOR CON 3 AJUSTES
BOTÓN DE ENCENDIDO/APAGADO
BOTÓN DE INDICADOR LED NEGRO ( LED-B)
BOTÓN DE VIBRACIÓN
GANCHO PARA ENROLLAR EL CABLE
GANCHO PARA CABLE DE LIBERACIÓN RÁPIDA
GANCHO INFERIOR PARA CABLE
TANQUE DE AGUA ILUMINADO
BOTÓN DE LIBERACIÓN DEL CABEZAL DEL LIMPIADOR A VAPOR
CABEZAL DEL LIMPIADOR A VAPOR
RECIPIENTE DE LLENADO
MANGO
CONEXIÓN SUPERIOR DE LA CORREA DE HOMBRO
BOTÓN DE LIBERACIÓN DEL MANGO
CUERPO DEL LIMPIADOR A VAPOR
CONEXIÓN INFERIOR DE LA CORREA DE HOMBRO
INDICADORES LED-W Y LED-B
PAÑO
DESLIZADOR DE ALFOMBRAS
KIT DE ACCESORIOS (MODELO SSM-3016 SOLAMENTE)
A.
B.
C.
D.
E.
F.
G.
H.
CEPILLO(S) CON CERDAS DE LATÓN
CEPILLO(S) CON CERDAS DE NYLON
MANGUERA DE EXTENSIÓN
CORREA DE HOMBRO
JALADOR PARA VIDRIOS
CABEZAL DE VAPOR
PAÑO PEQUEÑO
BOQUILLA CONCENTRADORA DE ÁNGULO
28
ENSAMBLAJE Y UTILIZACIÓN
1) Sujete el mango al cuerpo del limpiador a vapor presionando el botón de liberación del mango ubicado en
la parte frontal superior del cuerpo del limpiador a vapor y introduzca el mango en el cuerpo del limpiador a
vapor.
2) Sujete el cuerpo del limpiador a vapor al cabezal del limpiador a vapor presionando el botón de liberación
del cabezal del limpiador a vapor ubicado en la parte trasera inferior del cuerpo del limpiador a vapor y
introduzca el cuerpo del limpiador a vapor en el cabezal del limpiador a vapor.
3) Coloque el paño en el suelo con el lado de microfibra hacia abajo. Alinee las tiras autoadhesivas del fondo
del cabezal del trapeador con el paño. Coloque el cabezal del limpiador a vapor sobre el paño y aplique
presión para asegurarse que esté bien fijado.
4) Afloje el tapón del tanque de agua y llénelo con agua fría del grifo utilizando el recipiente de llenado
proporcionado.
NOTA: El limpiador a vapor no necesita agua destilada. Los habitantes de regiones con agua dura deben
utilizar agua destilada para obtener un mejor rendimiento.
5) Gire el gancho de liberación rápida en el sentido horario para desenrollar completamente el cable de
alimentación. Cuelge el cable del gancho para cable del mango para un mejor uso del limpiador a vapor
durante el transporte y la limpieza. Asegúrese de enchufar la unidad en un tomacorriente conectado a tierra.
NOTA: Hay una bola de metal en el tanque de agua que puede atascarse adentro durante el envío. Sacude
el cuerpo de su limpiador a vapor. Si escucha la bola que suena, puede empezar la limpieza a vapor. Si no,
sacude la unidad para liberar la bola.
29
NOTA: Se recomienda no utilizar un otro aparato de alta potencia en el mismo circuito para evitar la
sobrecarga del circuito.
ADVERTENCIA: EN SUPERFICIES TRATADAS CON CERA, EL ACCIÓN DEL CALOR Y DEL VAPOR PUEDE
SACAR LA CERA. NO UTILICE EL APARATO EN PISOS DE MADERA SIN SELLAR NI DEJE LA UNIDAD EN UN
PISO DE MADERA DURANTE UN PERÍODO DE TIEMPO PROLONGADO. ESTO PUEDE DEFORMAR EL GRANO
DE MADERA. SE RECOMIENDA PROBAR EN UN ÁREA AISLADA DEL PISO. SE RECOMIENDA TAMBIÉN QUE
REPASE LAS INSTRUCCIONES DE USO Y CUIDADO PARA LA LIMPIEZA PROVISTAS POR EL FABRICANTE DEL
PISO PARA ASEGURAR LA COMPATIBILIDAD DE SU PISO CON UNA LIMPIEZA AL VAPOR.
Cuando pulsa el o los botones ubicados en el panel de control digital de tacto suave que se encuentran en la
parte frontal del cuerpo del limpiador a vapor, puede empezar a utilizar su trapeador a vapor seleccionando
los siguientes ajustes:
6) Presione el botón ON/OFF (encendido/apagado) para encender.
7) Con las opciones de control de vapor, presione el botón para pasar a través de las opciones y elegir un
ajuste que mejor se adapte a sus necesidades de limpieza. La función de vapor empieza con el ajuste de
lavar. Una luz coloreada indicará los diferentes ajustes de vapor: ‘DUST’ (espolvorear) (anaranjado) para pisos
de madera, ‘MOP’ (lavar) (verde) para baldosas o el linóleo, y ‘SCRUB’ (fregar) (rojo) funciona mejor en los
baños.
8) El indicador LED blanco (LED-W) ilumina la pista de limpieza para las áreas difíciles de ver.
9) El indicador LED negro (LED-B) se usa para mostrar lugares ensuciados o manchados que no se detectaron.
NOTA: Se recomienda utilizar los indicadores LED-W y LED-B juntos para lograr la máxima eficiencia y
iluminación.
10) Nuestra última función de Vibración patentada con la tecnología Micro Pulse rompe la suciedad con
más de 90 vibraciones por segundo. Eso permite una limpieza más profunda en las áreas resistentes y
difíciles, ayudando el trapeador a vapor en su pasaje sobre el piso. Utilice esta función cuando trabaja con las
manchas rebeldes.
11) Pase el aparato lentamente sobre la superficie a limpiar cuando el vapor se emite. Se recomienda barrar
o pasar el aspirador antes de utilizar el trapeador a vapor.
ATENCIÓN: Para desinfectar una parte de su piso, deje el limpiador a vapor sobre la superficie
durante un mínimo de ocho segundos, pero no más de 15 segundos. Si deja el limpiador a vapor en
posición estática por más tiempo de lo recomendado, esto puede provocar residuos pálidos. Se puede
eliminar estos residuos utilizando un producto desincrustante o con algunas gotas de vinagre en un trapo
para quitarlos.
30
7
12) Cuando el limpiador a vapor deja de emitir el vapor, simplemente llene el tanque de agua y siga con la
limpieza.
ADVERTENCIA: NUNCA UTILICE EL LIMPIADOR A VAPOR SIN AGUA.
13) Cuando ha terminado la limpieza, desenchufe el cable de alimentación del tomacorriente. Asegúrese de
vaciar el tanque de agua y quite con cuidado el paño del cabezal del limpiador a vapor. Almacene la unidad
en posición vertical en un lugar seco.
NOTA: Su piso estará un poco húmedo inmediatamente después de trapear; esto es normal. Se secará dentro
de 5 minutos. Ello se debe al efecto refrigerante del vapor.
ATENCIÓN: El paño puede estar muy caliente.
Deslizador de alfombras
14) Ponga el deslizador de alfombras en el piso en posición vertical con la superficie plana rectangular hacia
abajo. Coloque el cabezal del trapeador a vapor en la parte superior del deslizador.
IMPORTANTE: El deslizador de alfombras no ha sido concebido para fijarse al cabezal del trapeador a vapor
por motivos de seguridad, incluyendo la prevención de quemaduras. Ha sido concebido para uso únicamente
en superficies blandas de alfombra, no para superficies de piso duras.
NOTA: El limpiador a vapor incluye una función de desconexión automática después de 30 minutos que
cumple los requisitos de ahorro de energía de la última directiva ErP europea.
Plus (Kit de accesorios)
31
ADVERTENCIA: HAY QUE APAGAR EL LIMPIADOR A VAPOR ANTES DE TRANSFORMARLO EN
LIMPIADOR A VAPOR PORTÁTIL. DURANTE SU UTILIZACIÓN, ASEGÚRESE DE PONER EL AJUSTE DE VAPOR A
‘MOP’ O ‘SCRUB’ PARA UN USO ÓPTIMO.
15) Correa de hombro – Sujete la correa de hombro al cuerpo del limpiador a vapor para transformar el
trapeador a vapor en aparato de limpieza a vapor portátil. Ajuste la correa de hombro a una longitud cómoda
donde el cuerpo del limpiador a vapor y la manguera de extensión están en posición vertical.
ADVERTENCIA: ASEGÚRESE DE QUE EL CUERPO DEL LIMPIADOR A VAPOR ESTÉ ORIENTADO
HACIA ARRIBA CON EL LOGO SIENNA ORIENTADO HACIA EL SUELO, PERMITIENDO QUE EL LIMPIADOR A
VAPOR EMITA EL VAPOR CORRECTAMENTE. USED PUEDE NOTAR UN LEVE GOTEO DE LA MANGUERA DE
EXTENSIÓN; ES NORMAL DEBIDO A LA ACUMULACIÓN DE CONDENSACIÓN.
16) Cepillo con cerdas de nylon – Sujete el cepillo a la boquilla de la manguera de extensión o a la boquilla
concentradora de ángulo para la limpieza en lugares de difícil acceso. Utilícelo en cosas como la lechada, los
juguetes para niños, las llantas de nuemáticos y el interior de un automóvil.
17) Cepillo con cerdas de latón – Utilice el cepillo con cerdas de latón de la misma manera que el cepillo con
cerdas de nylon, pero para las superficies resistentes que no se rayan como los asadores exteriores.
18) Jalador para vidrios – Sujete el jalador al cabezal de vapor para limpiar ventanas, espejos y puertas de
ducha.
32
Other manuals for Luna SSM-3006
2
This manual suits for next models
2
Table of contents
Languages:
Other Sienna Steam Cleaner manuals

Sienna
Sienna Flex SSM-4003 User manual

Sienna
Sienna Visio SSC-1001 User manual

Sienna
Sienna Steam Vortex SSM-0418 User manual

Sienna
Sienna Samson User manual

Sienna
Sienna Aqua Laser SSM-0618 User manual

Sienna
Sienna Visio SSC-1001 User manual

Sienna
Sienna SSS-2618SSS-5618 User manual

Sienna
Sienna Luna SSM-3006 User manual

Sienna
Sienna SSC-0312 User manual

Sienna
Sienna SSM-0619 User manual


