Sierra Flame FS-26-922 User manual

INSTALLATION ANDOPERATION INSTRUCTIONS FOR ZEROCLEARANCE
ANDFREE STANDING UNITS
FS-26-922
SAFETY INFORMATION
WARNING
If theinformationintheseinstructionsare
not followed exactly,afireorexplosion
mayresult causingpropertydamage,
personalinjuryorlossoflife.
Do not storeoruse gasolineorotherflammablevapors
and liquidsinthevicinity ofthisorany otherappliance.
INSTALLER: LEAVE THIS MANUAL WITHTHEAPPLIANCE.
CONSUMER: RETAINTHIS MANUAL FOR FUTURE REFERENCE.

2
TABLE OF CONTENTS
Pleasereadandcarefullyfollowalloftheinstructionfoundinthis manual.Pleasepayspecial
attentiontothesafetyinstructionsprovidedinthismanual.Theinstructionsincludedhere will
assure that you have many years of dependable and enjoyable service from your Sierra flame product.
IMPORTANTINSTRUCTIONS....................................................................................................................................3
UNPACKING ANDTESTINGAPPLIANCE...............................................................................................................3
GROUNDINGAPPLIANCE.........................................................................................................................................4
LOCATINGTHEFIREPLACE.....................................................................................................................................4
FS-26-922.......................................................................................................................................................................
HARD-WIRE INSTALLATION...................................................................................................................................6
MEDIAOPTIONS.........................................................................................................................................................7
DECORATIVEMEDIAINSTALLATION....................................................................................................................7
OPERATION..................................................................................................................................................................8
MANUALOPERATION................................................................................................................................................8
REMOTE CONTROLOPERATION.............................................................................................................................9
INSTALLING WALLTHERMOSTAT........................................................................................................................10
REPLACEMENTPARTS............................................................................................................................................12
EXPLODEDVIEW......................................................................................................................................................13
WIRING DIAGRAM...................................................................................................................................................14
TROUBLESHOOTING..............................................................................................................................................15
SERVICE HISTORY....................................................................................................................................................16
WARRANTY...............................................................................................................................................................17
5

3
IMPORTANT INSTRUCTIONS
Read all instructionsbeforeinstallingorusingthisheater.
2. Keepcombustiblematerials, suchas furniture,pillows, bedding, papers, clothesandcurtainsat
least 3feetfromthefront oftheheater;keepthemawayfromsidesandrear as well.
3. Alwaysunplugheaterwhenit snot in use.
4. Donotoperatethefireplaceifithasadamagedcordorplug,afterit hasmalfunctioned,orifthe
unithasbeendroppedordamaged in anyway.
5. Donotusetheheateroutdoors.
6. This heateris notintendedforuseinbathrooms, laundryareas andsimilar indoorlocations.
Neverplacetheheaterwhereit mayfall into abathtuborotherwatercontainers.
7. Donotrun thecordundercarpeting.Donotcoverthecordwiththrowrugs, runnersoranything
else.Arrangethecordawayfromtrafficareas whereit couldnotbetripped over.
8. To disconnecttheheater,turnthecontrolsto"OFF" beforeremovingtheplugfromtheoutlet.
9. Donotinsertorallowforeignobjectstoenteranyventilationorexhaustopening,as thismay
causeanelectricshock,fireordamagetotheheater.
10. To prevent apossiblefire,donotblockair intakesin anymanner.
11. Aheaterhashotand arcingorsparkingpartsinside.Donotuseitinareaswheregasoline,paint
orflammableliquidsareusedorstored.
12. Usethisheateronlyas describedinthismanual.Anyotherusenot recommendedbythe
manufacturermaycausefire,electricshockorinjurytopersons.
13. Avoidtheuseofanextensioncordbecausetheextension cordmayoverheat andcauseafire.
14. Alwaysuseproperlygroundedfused andpolarized outlets.
15. Alwaysusegroundfault protection whereitis requiredbyelectrical codes.
16. Alwaysdisconnectthepowerbeforeperforminganycleaning,maintenanceorrelocationofthe
heater.
17. To prevent apossiblefire,donotburn wood orothermaterials inthis heater.
18. To prevent electricshockorfire,alwaysuseacertifiedelectrician,shouldnewcircuitsoroutlets
berequired.
Whentransportingorstoringtheheater,keepit in adryplace,freefromexcessivevibration.
UNPACKINGANDTESTINGAPPLIANCE
Carefullyremovetheappliancefromthebox.
Priortoinstallingtheappliance,testtomakesuretheapplianceoperatesproperlybypluggingthe
powersupplycordintoaconvenientlylocated 120 Volt grounded outlet.
Testallaspectsofitsoperation(manualswitches, remoteand heater)tomakesure all components
operatecorrectly.
1.
19.

4
GROUNDINGAPPLIANCE
This applianceis foruseon 120Volts.Thecordhasaplugasshownin(A). Anadapterasshownin(C)
is availableforconnectingthree-bladegroundingtypeplugstotwo-slotreceptacles.Thegreen
groundinglugextendingfromtheadaptermustbeconnectedtoapermanentground suchasa
properlygroundedoutletbox. Theadaptershouldnotbeusedifathree-slotgroundedreceptacleis
available.
To disconnectappliance,turn controls to off,
then removeplugfromoutlet.
LOCATINGTHEFIREPLACE
Plan where tolocateand framethefireplace.Considerthefollowing:
1. Consideralocationwhere thefireplacescreenwill notbeexposedtodirectsunlight from
windowsordoors.
2. A15 ampere,120 Volt,60 Hz branchcircuit with properground mustbeavailableatthelocation.
Preferablyadedicatedbranchcircuitshouldbeprovidedtoavoidcircuitbreakerstotripoffuses
toblow.

5
FS-26-922
Description Free StandingAppliance
Voltage 120V AC60Hz
Watts 1500WMax
NOHEATER 25W
MOTOR HEATER 19W
ApplianceWidth 25 5/8" or 65.2 cm
ApplianceHeight 28" or 71.2 cm
ApplianceDepth 17 1/2" or 44.5 cm
Gross Weight 71.6 lbs or 32.5 kgs
PlugLocation Left side
Cord Length 707/8”or180 cm
This appliancehasbeentestedin
accordancewiththeULStandard2021
forfixedandlocationdedicated
electricroomappliancesintheUnited
Statesand Canada.Ifyouneed
assistanceduringinstallation,please
contactyourlocal dealer.
BTU 4800
NOTE:Thisappliancemustbe
electricallywiredandgroundedin
accordancewithlocalcodes.Inthe
absenceoflocalcodes,usethe
currentCSAC22.1CanadianElectrical
Codein CanadaortheANSI/NFPA70
NationalElectricalCodein theUnited
States.

6
HARD-WIRE INSTALLATION
Turnofftheappliancecompletelyand let coolbeforeservicing.Onlyaqualifiedserviceperson
should serviceandrepairthiselectricappliance.
If itis necessarytohardwirethisappliance,aqualifiedelectricianmustremovethecordconnection,
and wiretheappliancedirectlyto thehousehold wiring.
This appliancemustbeelectricallyconnectedandgroundedinaccordancewith localcodes,ifhard
wired.Intheabsenceoflocal codes, usethecurrentCSA C22.1CANADIANELECTRICAL CODEin
CanadaorthecurrentANSI/NFPA70 NATIONAL ELECTRICAL CODEintheUnited States.
1. Removethecoverplatefromtheleftsideoftheappliancebyremovingthetwoscrews, as
shownbelow.Unscrewand removepowercord.
2. Attachthewiringtothejunctionblock.Pleasemakesurethelivewiregoes into the "L", the
neutral wire into "N" and the ground wire into "G".
3. Puttheplatebackandscrew back.

7
MEDIAOPTIONS
Sable
DECORATIVEMEDIA INSTALLATION
STEP1: Unplugtheunitfromwall and make
surecontrols are switched off.
STEP2: Pushupwards(asshowsinbellow
picture)andremovethefront paneltodecorate
yourfireplace.Pourthedecorativemediainto
thetray.Feelfree touseanycombinationoffire
glass mediathatyoufindmostappealing.
STEP3: Afterfinishingdecoration,putbackthe
Log Set 11 pieces
Hold here firmly, then push upwards to take off
the front glass panel.
The glass panel is hooked by 2 hooks on each
side.
Then you can take off
the glass panel.
frontglasspanel.
Now you can start to decorate your fireplace
Your fireplaceshippedwith thefollowingmedia:
3bags ofsableglass and an11piecelogset.
Customerscandecoratetheirfireplace
accordingto their wisheswith supplied media.
This fireplaceincludesthefollowingdecorative
media:

8
OPERATION
Thefireplacecanbeoperatedeitherbytheswitcheslocatedontheleftfront ofthefireplaceunitor
bysupplied remotecontrol.
MANUAL OPERATION
Pushtoreveal themanual controlpanel.(As showsin bellowpicture)
1. ThemainpowerON/OFFswitchinpositionO,thefireplaceis OFF.
2. WhenmainpowerON/OFF switchis at position I,thefireplaceis readyto use.
3. Press the buttonrepeatedlytosettheheatertodesiredheatsetting.Theheaterindicator
LED will glowwhichshowsthecurrent heatersettings.
a) RED 1500WHEAT OUTPUT
b) BLUE750WHEAT OUTPUT
c) PURPLEAUTOMODE
Push here to open the manual control panel
AUTO MODE
Underthis modetheheaterwill automaticallyturnONathighheatsetting1500Wheatoutputwhen
theroomtemperature dropsbelow22 (72℉). Whentheroomtemperatureis between
22-25 (72-77℉)theheateroutput will switchtolowheatsetting750W.Whentheroom
temperature goesabove25 (77℉)theheaterwill beturnedoff andthecyclewill continue.The
LED indicatorwill bePURPLEincolourunderthis mode.
4. Flameeffect:Press thebuttonmarked toadjusttheflamebrightness.Theflamebrightness
will cyclethrough –Low-Medium-High-OFF.
5. Moodlight effect:Press thebuttonmarked to changethemoodlight colour.

9
NOTE: IfoperatedattheLowheatsetting,thefireplacewill notprovideasmuchheatoutputasin
theHighheatsetting,howeverthelowsettingwill notrequireasmuchelectrical powertooperate.
Toavoidoverloadingacircuit,donotplugthefireplaceintoacircuitthatalreadyhasother
appliancesworking.When thefireplaceis not in useswitchoff andunplug.
SAFETYCUT-OFF
lThis applianceis fittedwith asafetycut-offwhichwill operateifthefireplaceoverheats(eg.Due
toblockedairvents). Forsafetyreasons, thefireplacewill NOT automaticallyreset.
lToresettheappliance,disconnecttheappliancefromthemainsupplyforatleast10minutes.
Reconnectthesupplytothemainand switch ontheappliance.
REMOTE CONTROL OPERATION
Forremotetofunctionmakesuretheheateris pluggedinand mainpowerswitchis turned to the
ON position, located on the front bottom behind the panel.
Whenoperatingtheremotemakesureyoupointtheremotetothecentreofthefireplaceand make
sure eachtimeyoupressthebutton,thebuzzerinsidetheunitwill beeponce.Ittakessometimefor
thereceivertorespondtothetransmitter.DonotPRESS thebuttonsmorethanoncewithintwo
secondsforcorrectoperation.
DISPLAYON/OFF button:Switching thefireplaceflameand traylightON/OFF.It has
functionsof setting memory.
DISPLAYBLUEbutton:Adjust the blue colorbrightness of flameand tray.
DISPLAYYELLOWbutton:Adjust the yellowcolorbrightness of flameand tray.
DISPLAYORANGEbutton:Adjust the orangecolorbrightnessof flameand tray.
MOODLIGHTON/OFFbutton: Switching themood lightON/OFF.
ADJUSTbutton: Switching thecolorof the mood light.
Poweron button:Thepower-on button attop leftcorneroftheremoteisthe main
ON/OFF powerbutton.Thiswillturnoffallthefunctionsandthe fireplacewillbe instandby
mode.
10
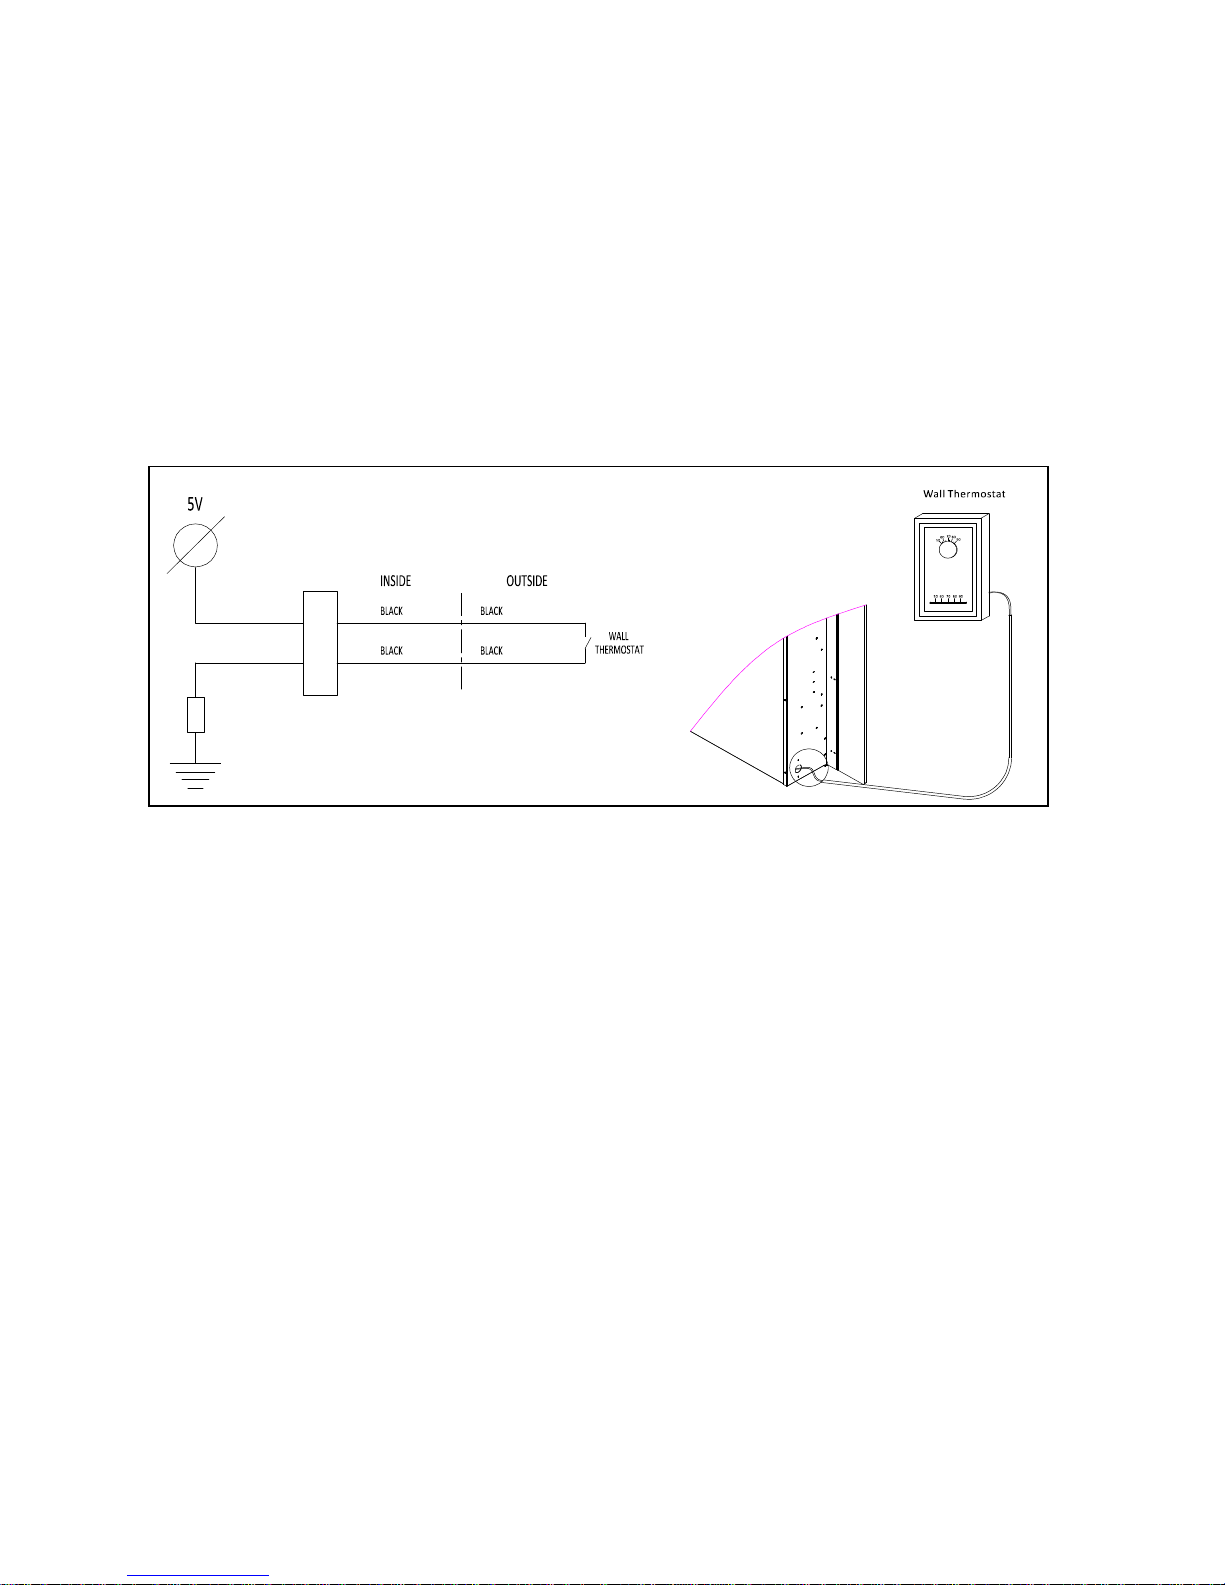
INSTALLINGWALL THERMOSTAT
WALL THERMOSTATWIRING DIAGRAMS
NOTE:THEWALL THERMOSTATWILL WORK ONLY WHEN THE HEATER IS SET TO TEMP. SETTING
PLEASE REFER TO THE MANUAL CONTROL AND THE REMOTE CONTROL.
Wirethewallthermostat prior toinstallingthefireplace.
WALL THERMOSTATWIRING(24VAC)
Install Wall Thermostat per instructionsprovided withkitandperthefollowinginformation:
1. Turn off circuitbreaker.
2. Removecoverplatelocatedontheleftup sideofappliance.
3. Pull thewire outandcuttheinsidethermostat.Connectthewirestothewall thermostatas
shownbelow.Followinstructionsprovidedwith wall switchkit.
FLASHbutton: Switches mood light into flash mode, this cycles through all mood light colors.
HEATERON/OFFbutton: Switching the heaterON/OFF.It hasfunctionsof settingmemory.
HIGHTbutton: Press the high button toswitchthe heatertohigh heat setting 1500W.
LOWbutton: Press the lowbutton toswitchthe heatertolowheat setting 750W.
TEMP. button: Press theTEMP. button toswitchthe heatertoAUTO mode. Underthismode
the heaterwilloperateinsimilarwayasexplained aboveforthe manualoperation.

11

12
REPLACEMENTPARTS
Thislist containsreplacement parts
NO. PARTNUMBER DESCRIPTION QTY.
1 10701213 FRONTCLEARGLASS(MIDDLE) 1
2 10701214 FRONTCLEARGLASS(SIDES) 2
3 10702166 BOTTOMGLASS 1
4 BACKBLACKPLASTICGLASS 1
5 10104002 SWITCH 1
6 FLICKERASSEMBLY 2
7 10101201C FLAMEMOTOR 2
8 601137B LEDSTRIPFORTRAY 1
9 601136B LEDSTRIPFORFLAME 2
10 3001506B REMOTERECIVER 1
11 602030C BLOWERANDHEATERASSEMBLY 1
12 601097B CIRCUITBOARD 1
13 601036 MANUALCONTROL1
14 TOPLIGHT 1
15 10105063 REMOTE 1
3126010
3126512
10125025

13
EXPLODEDVIEW
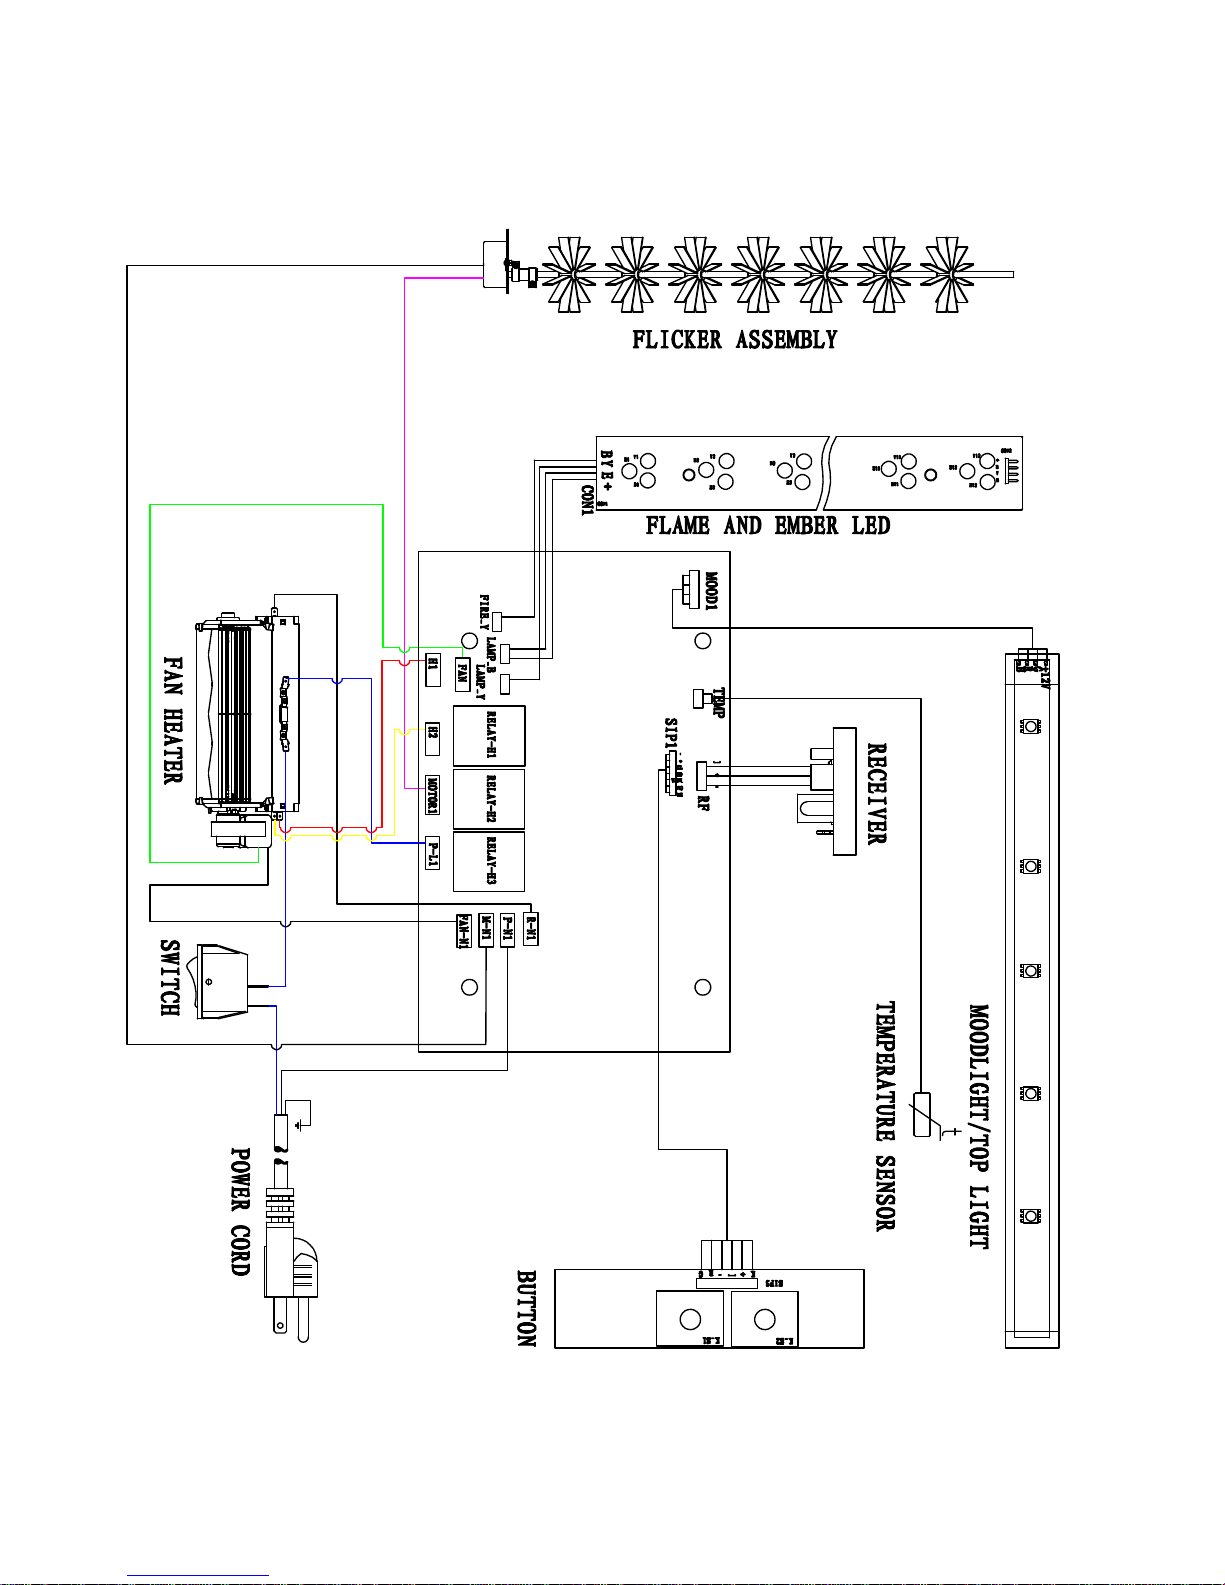
Wiring Diagram
14

15
TROUBLESHOOTING
PROBLEMPOSSIBLECAUSE SOLUTION
FlameLEDsareburntout InspecttheLEDsand replacethemif
necessary.
Dim orno flame
Backblackcloth is fallingoff
and rolled up in the flicker Changea flicker and back black cloth.
Emberbedis not
glowingordimming EmberLEDsare burnt out InspecttheemberbedLEDsand
replacethemifnecessary.
Appliancehasoverheatedand
safetydevicehascausedthe
thermal switchtodisconnect
Turnoffthemainswitch,allow
appliancetocoolfor10minutes, then
turn iton.
Housecircuitbreakerhas
tripped Reset housecircuitbreaker.
Applianceturnsoffand
will not turnon
Appliancesfusehasblown Replacethefuse.
Applianceis notpluggedintoan
electrical outlet Checkplugandplugin.
Appliancehasoverheatedand
safetydevicehascausedthe
thermal switchtodisconnect
Turnoffthemainswitch,allow
appliancetocoolfor10minutes, then
turn iton.
Appliancewill notcome
onwhenswitchis
flipped to ON
Circuitboardis burntout Inspectthecircuitboardandreplace
it ifnecessary.
No warmaircomingout
of appliance Heateris burnt out Inspecttheburnerand heater
assemblyandreplaceitif necessary.
Flamesputters
Flamemotoris defective. Call aqualifiedservicetechnicianand
replaceflamemotor.
RemoteControldoes
not work. Lowbatteries.
Unitswitch in “O”position. ReplaceAAA batteriesinremote
control.
Turn theswitchin “I”position.
Flameis fixed. Wiringmaybelooseorthe
flamemotormaybedefective.

16
SERVICE HISTORY
This heatermustbeserviced annuallydependingonusage.
DateDealer
Name Servicetechnician
Name ServicePerformed Special Concerns
NOTES:

17
Other manuals for FS-26-922
2
Table of contents
Other Sierra Flame Heater manuals

Popular Heater manuals by other brands


SPT
SPT SH-1960B Instructions for use

Coleman
Coleman SportCat 5035A750 Instructions for use

Curv
Curv CT12060 Installation & operating instructions

emerio
emerio HO-121844.1 instruction manual

Toyostove
Toyostove WC-105R Type D Operation and maintenance instructions

Glamox heating
Glamox heating H30 user guide