Sierra Flame VISTA-BI-7 User manual

INSTALLATIONAND OPERATIONINSTRUCTIONS FOR
VISTA-BI-7 UNITS
VISTA-BI-50-7
VISTA-BI-60-7
VISTA-BI-72-7
SAFETYINFORMATION
WARNING
Iftheinformationinthese
instructionsarenotfollowedexactly,
afireorexplosionmayresultcausing
propertydamage, personal injuryor
loss oflife.
Do not storeorusegasoline orotherflammable
vaporsand liquidsinthe vicinityofthisoranyother
appliance.
INSTALLER:LEAVE THIS MANUALWITHTHE APPLIANCE.
CONSUMER:RETAINTHIS MANUALFORFUTURE REFERENCE.

2
TABLE OFCONTENTS
Pleaseread and carefullyfollowallof the instructionfoundinthismanual. Pleasepayspecial
attention tothesafetyinstructionsprovided inthismanual. The instructionsincluded herewill
assurethatyou havemanyyearsofdependableand enjoyableservicefromyourAmantii
product.
IMPORTANTINSTRUCTIONS....................................................................................................................................3
UNPACKING AND TESTING APPLIANCE...............................................................................................................4
GROUNDINGAPPLIANCE.........................................................................................................................................4
LOCATING THEFIREPLACE.....................................................................................................................................4
VISTA-BI-50-7...............................................................................................................................................................5
VISTA-BI-60-7...............................................................................................................................................................6
VISTA-BI-72-7...............................................................................................................................................................7
INSTALLATION............................................................................................................................................................8
HARD-WIREINSTALLATION...................................................................................................................................9
MediaOptions..............................................................................................................................................................10
OPERATION................................................................................................................................................................11
INSTALLING WALLTHERMOSTAT........................................................................................................................13
REPLACEMENTPARTS............................................................................................................................................14
EXPLODEDVIEW......................................................................................................................................................15
TROUBLESHOOTING..............................................................................................................................................16
SERVICEHISTORY....................................................................................................................................................17
WARRANTY ....................................................................................................................................................18

3
IMPORTANTINSTRUCTIONS
Read allinstructionsbeforeinstalling orusing thisheater.
2.Keep combustiblematerials,suchasfurniture,pillows,bedding,papers,clothesand
curtainsatleast3feetfromthe frontofthe heater;keep themawayfromsidesand rear
aswell.
3.Always unplugheaterwhen itsnotinuse.
4.Donotoperatethe fireplaceifit hasadamagedcordorplug, afterit hasmalfunctioned, or
if theunit hasbeendropped ordamaged inanyway.
5.Thisheaterisnotintended foruseinbathrooms,laundryareasand similarindoor
locations.Neverplacethe heaterwhereitmayfall intoabathtuborotherwater
containers.
6.Donotrun the cordundercarpeting.Donotcoverthe cordwiththrowrugs,runnersor
anything else.Arrangethe cordawayfromtrafficareaswhereitcouldnotbetrippedover.
7.Todisconnecttheheater,turnthe controlsto"OFF"beforeremoving theplug fromthe
outlet.
8.Donotinsertorallowforeignobjectstoenteranyventilationorexhaustopening,asthis
maycausean electricshock, fireordamage tothe heater.
9.Toprevent apossiblefire, do not block airintakesinanymanner.
10.Aheaterhashotand arcing orsparkingpartsinside.Donotuseitinareaswhere
gasoline, paint orflammableliquidsareused orstored.
11.Usethisheateronlyasdescribed inthismanual. Anyotherusenotrecommended bythe
manufacturermaycausefire, electricshock orinjurytopersons.
12.Avoidtheuseofan extension cordbecausethe extensioncordmayoverheatandcause
afire.
13.Always useproperlygroundedfused and polarizedoutlets.
14.Always usegroundfaultprotection whereitisrequiredbyelectricalcodes.
15.Always disconnectthepowerbeforeperforming anycleaning,maintenanceorrelocation
of the heater.
16.Toprevent apossiblefire, do not burnwood orothermaterialsinthisheater.
17.Toprevent electricshock orfire, always useacertified electrician, shouldnewcircuits
oroutletsbe required.
When transporting orstoring the heater,keepitinadryplace,free fromexcessive
vibration.
1.
18.

4
UNPACKINGAND TESTINGAPPLIANCE
Carefullyremovethe appliancefromthe box.Priortoinstalling theappliance,testtomake
surethe applianceoperatesproperlybyplugging the powersupplycordintoaconveniently
located 120Voltgrounded outlet.
GROUNDINGAPPLIANCE
Thisapplianceisforuseon 120Volts.Thecordhasaplugasshownin(A).Anadapteras
shownin(C)isavailableforconnectingthree-bladegroundingtypeplugstotwo-slot
receptacles.The greengrounding lug extending fromthe adaptermustbe connected toa
permanentgroundsuchasaproperlygroundedoutletbox.The adaptershouldnot be used if
athree-slot grounded receptacleisavailable.
Todisconnectappliance, turncontrolstooff,then removeplugfromoutlet.
LOCATINGTHEFIREPLACE
Plan wheretolocateand framethe fireplace.Thiswillsavetimeand moneylaterwhen you
installthefireplace. Beforeinstallation considerthe following:
1.Wherethe fireplaceislocatedmustallowforwall and ceiling clearances(see
INSTALLATION)
2.Consideralocation wherethefireplacescreenwill notbeexposed todirectsunlightfrom
windowsordoors.
3. A15 ampere,120 Volt, 60 Hzbranchcircuitwithproperground mustbe availableatthe
location.Preferablyadedicated branchcircuitshouldbe provided toavoidcircuit
breakerstotripof fusestoblow.

5
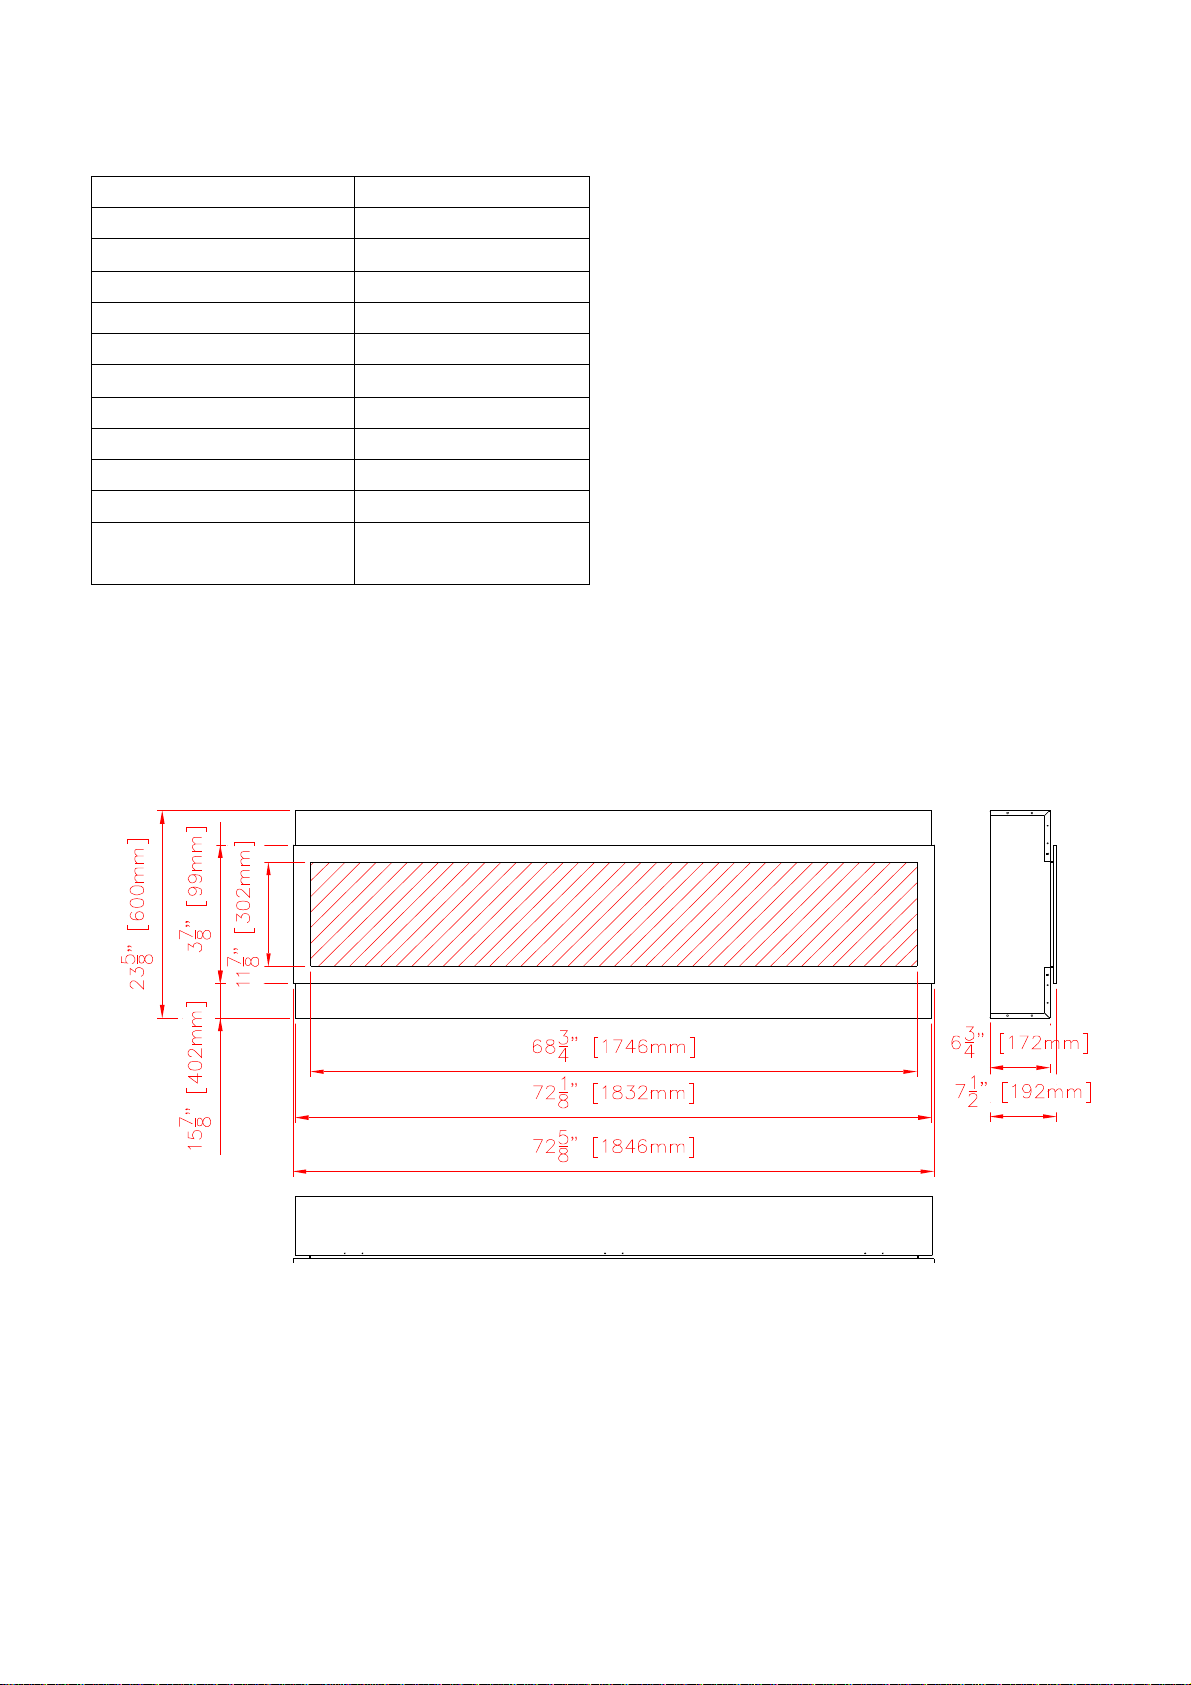
VISTA-BI-50-7
Description Built-inAppliance
Voltage 120VAC60Hz
Watts 1500WMax
NO HEATER 25W
MOTORHEATER 19W
ApplianceWidth 48 5/8”or123.5cm
ApplianceHeight 23 5/8”or60cm
ApplianceDepth 63/4”or17.2cm
Gross Weight 105.6lbsor48kg
Plug Location Left side
CordLength 70 7/8”or180 cm
Rough WallOpening
Size 50”24“or
127 cm 60 cm
Thisappliancehasbeentestedin
accordancewiththe ULStandard
2021 forfixed and location dedicated
electricroomappliancesinthe United
Statesand Canada.If you need
assistanceduring installation,please
contact yourlocaldealer.
NOTE:Thisappliance mustbe
electricallywiredandgroundedin
accordancewithlocalcodes.Inthe
absence oflocalcodes,usthe
currentCSAC22.1Canadian
ElectricalCodeinCanadaorthe
ANSI/NFPA70 NationalElectrical
CodeintheUnitedStates.

6
VISTA-BI-60-7
Description Built-inAppliance
Voltage 120VAC60Hz
Watts 1500WMax
NO HEATER 25W
MOTORHEATER 19W
ApplianceWidth 58 5/8”or148.5cm
ApplianceHeight 23 5/8”or60cm
ApplianceDepth 63/4”or17.2cm
Gross Weight 123.2lbsor56kg
Plug Location Left side
CordLength 70 7/8”or180 cm
Rough WallOpening
Size 60”24“or
152.4cm 60 cm
Thisappliancehasbeentestedin
accordancewiththeULStandard2021
forfixed andlocation dedicatedelectric
roomappliancesinthe UnitedStatesand
Canada.If you need assistanceduring
installation,pleasecontactyourlocal
dealer.
NOTE:Thisappliance mustbe
electricallywiredandgroundedin
accordancewithlocalcodes.Inthe
absence oflocalcodes,usthecurrent
CSAC22.1CanadianElectrical Codein
CanadaortheANSI/NFPA70 National
Electrical CodeintheUnitedStates.
7
VISTA-BI-72-7
Description Built-inAppliance
Voltage 120VAC60Hz
Watts 1500WMax
NO HEATER 25W
MOTORHEATER 19W
ApplianceWidth 72 1/8”or183.2cm
ApplianceHeight 23 5/8”or60cm
ApplianceDepth 63/4”or17.2cm
Gross Weight 149.6lbsor68kg
Plug Location Left side
CordLength 70 7/8”or180 cm
Rough WallOpening
Size 73 1/2”24“or
186.7cm 60 cm
Thisappliancehasbeen testedin
accordancewiththe ULStandard2021
forfixed andlocationdedicated electric
roomappliancesintheUnited States
and Canada.Ifyou need assistance
during installation,pleasecontactyour
localdealer.
NOTE:Thisappliance mustbe
electricallywiredandgroundedin
accordance withlocalcodes.Inthe
absence oflocalcodes,usthe
currentCSAC22.1Canadian
ElectricalCodeinCanadaorthe
ANSI/NFPA70 NationalElectrical
CodeintheUnitedStates.

8
INSTALLATION
The BI-SLIMmodelsaredesignedtobe built-inand allowforthefinishing material(drywall,
stone, tile, etc)tobe builtright downtothe glass edge. However, thatapplicationisnot
always desirableoravailablesothe surroundcouldbe usedasanalternatefinishoption.
Note:The optionaltrimcan be pullout directlyfromthe unit. It willneed twoperson todo it.
The rough wallopening sizeof thefireplace.
W(")D(") H(")
VISTA-BI-50-7 50 7 1/2 24
VISTA-BI-60-7 60 7 1/2 24
VISTA-BI-72-7 73 1/2 71/2 24
1.Takeoutthe unitfromthe box. Dothe
pre-test beforeyou installthe fireplace. Pull
out the optionaltrimfromthe unit asshow.
2. Screwthe framing platestothe fireplace.
3. Bent up theframing plates.
4. Insertthe fireplaceintothe wallopening.
5. Drivethe mounting screwsintothe
framing platesonthe unitsand thewall
studs.
9
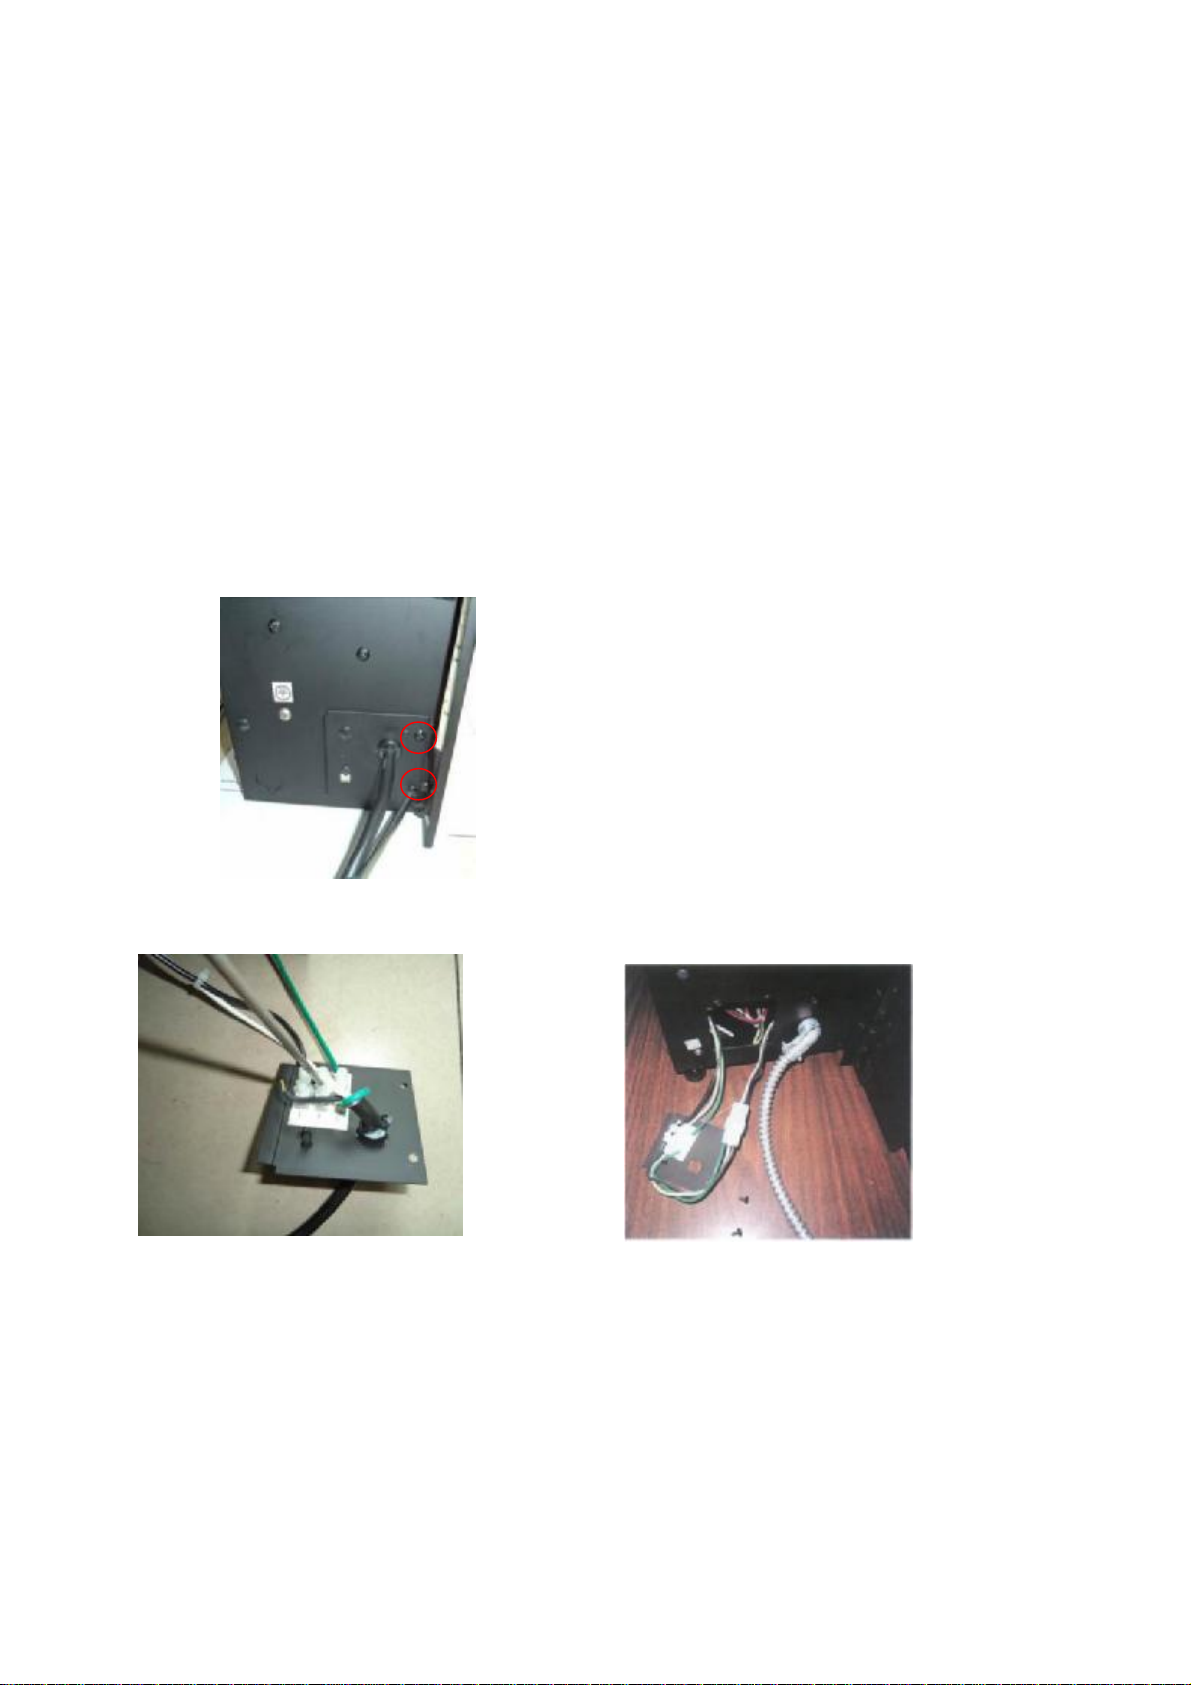
HARD-WIREINSTALLATION
Turnoff the appliancecompletelyand let coolbeforeservicing. Onlyaqualified service
person shouldserviceandrepairthiselectricappliance.
If itisnecessarytohardwirethisappliance, aqualified electrician must removethe cord
connection,and wirethe appliancedirectlytothe householdwiring.
Thisappliancemustbe electricallyconnected and groundedinaccordancewithlocalcodes,
ifhardwired.Inthe absenceoflocalcodes,usethecurrentCSA C22.1CANADIAN
ELECTRICALCODEinCanada orthe currentANSI/NFPA 70 NATIONALELECTRICAL
CODEinthe United States.
1.Removethe coverplatefromthe leftside oftheappliancebyremovingthetwoscrews,as
shownbelow. Unscrewand removepowercord. Removethe knockout.
2.Attachthe wiring tothe junction block.
3.Put the plateback andscrewback.

10
MediaOptions
Fireplaceshipped log set. Allpackage with
saltand sable.
FireGlass Media-LogInstallation
1.Takeoffthe frontclearglass.Thereisa
bracketwhichholdthefrontglass.It is
showasbelow.Unscrewthe screwand
takeoffthebracket. Turnaround and
inserttothe gap.Itcan hooktheglass
and pulloutthe glass.
2.Installingthefiremedia.Pourthe fire
mediaintothetrayasshownbelow.Feel
free touseanycombination offiremedia
that you findmost appealing.
3.Putback the frontglass and screwback
the bracket.
11
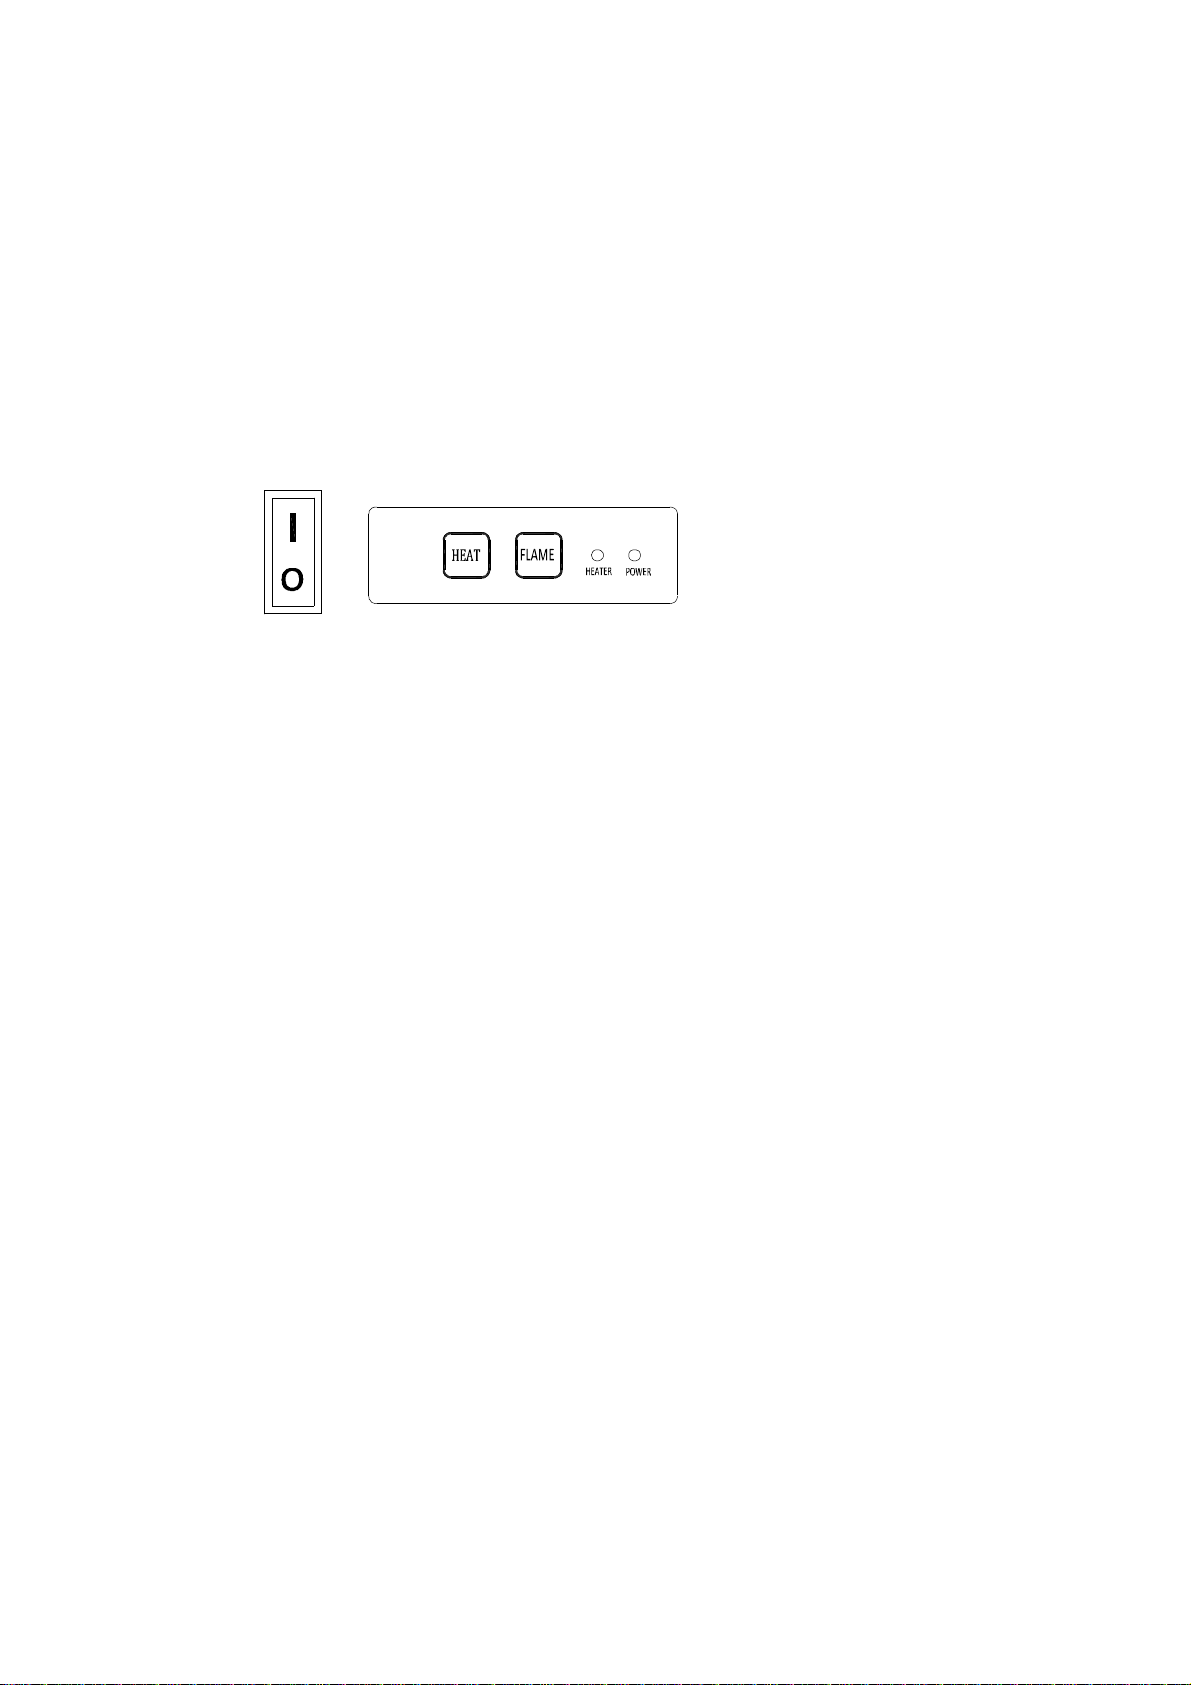
OPERATION
The fireplacecan be operated eitherbythe switcheslocatedontheleftbottomofthe fireplace
unitorbysupplied remotecontrol.
Plug thefireplaceintoa15 Ampwall socket.
MANUALOPERATION
1. The mainpowerON/OFFswitchinposition O,the fireplaceisOFF.
2.WhenmainpowerON/OFF switchisat positionI, the fireplaceisreadytouse.
3.Press the Heat button repeatedlytosetthe heatertodesired heatsetting.The heater
indicatorLEDwillglowwhichshowsthe current heatersettings.
a)RED1500WHEATOUTPUT
b)BLUE750WHEATOUTPUT
c)PURPLEAUTO MODE
AUTO MODE
Underthismode the heaterwillautomaticallyturnONat high heat setting 1500Wheat output
when the roomtemperaturedropsbelow22.When the roomtemperatureisbetween℃
22-25the heateroutputwillswitchtolowheatse℃tting750W.Whenthe roomtemperature
goesabove25the heaterwillbe turned off and the cyclewillcontinue.The LEDindicator℃
willbe PURPLEincolourunderthismode.
4.Flameeffect: Press the button marked Flame toadjustthe flamebrightness.The flame
brightness willcyclethrough –Low-Medium-High -OFF.
NOTE: If operated atthe Lowheatsetting,thefireplacewillnotprovide asmuchheatoutput
asinthe Highheatsetting,howeverthelowsetting willnotrequireasmuchelectricalpower
tooperate.Toavoidoverloadingacircuit,do notplugthe fireplaceintoacircuitthatalready
hasotherappliancesworking.When the fireplaceisnotinuseswitchoffand unplug.
SAFETYCUT-OFF
lThisapplianceisfitted withasafetycut-offwhichwill operateifthe fireplaceoverheats
(eg.Due toblocked airvents).Forsafetyreasons,the fireplacewillNOTautomatically
reset.
lToresettheappliance,disconnectthe appliancefromthe mainssupplyforatleast10
minutes. Reconnect the supplytothemainsand switchon the appliance.
12
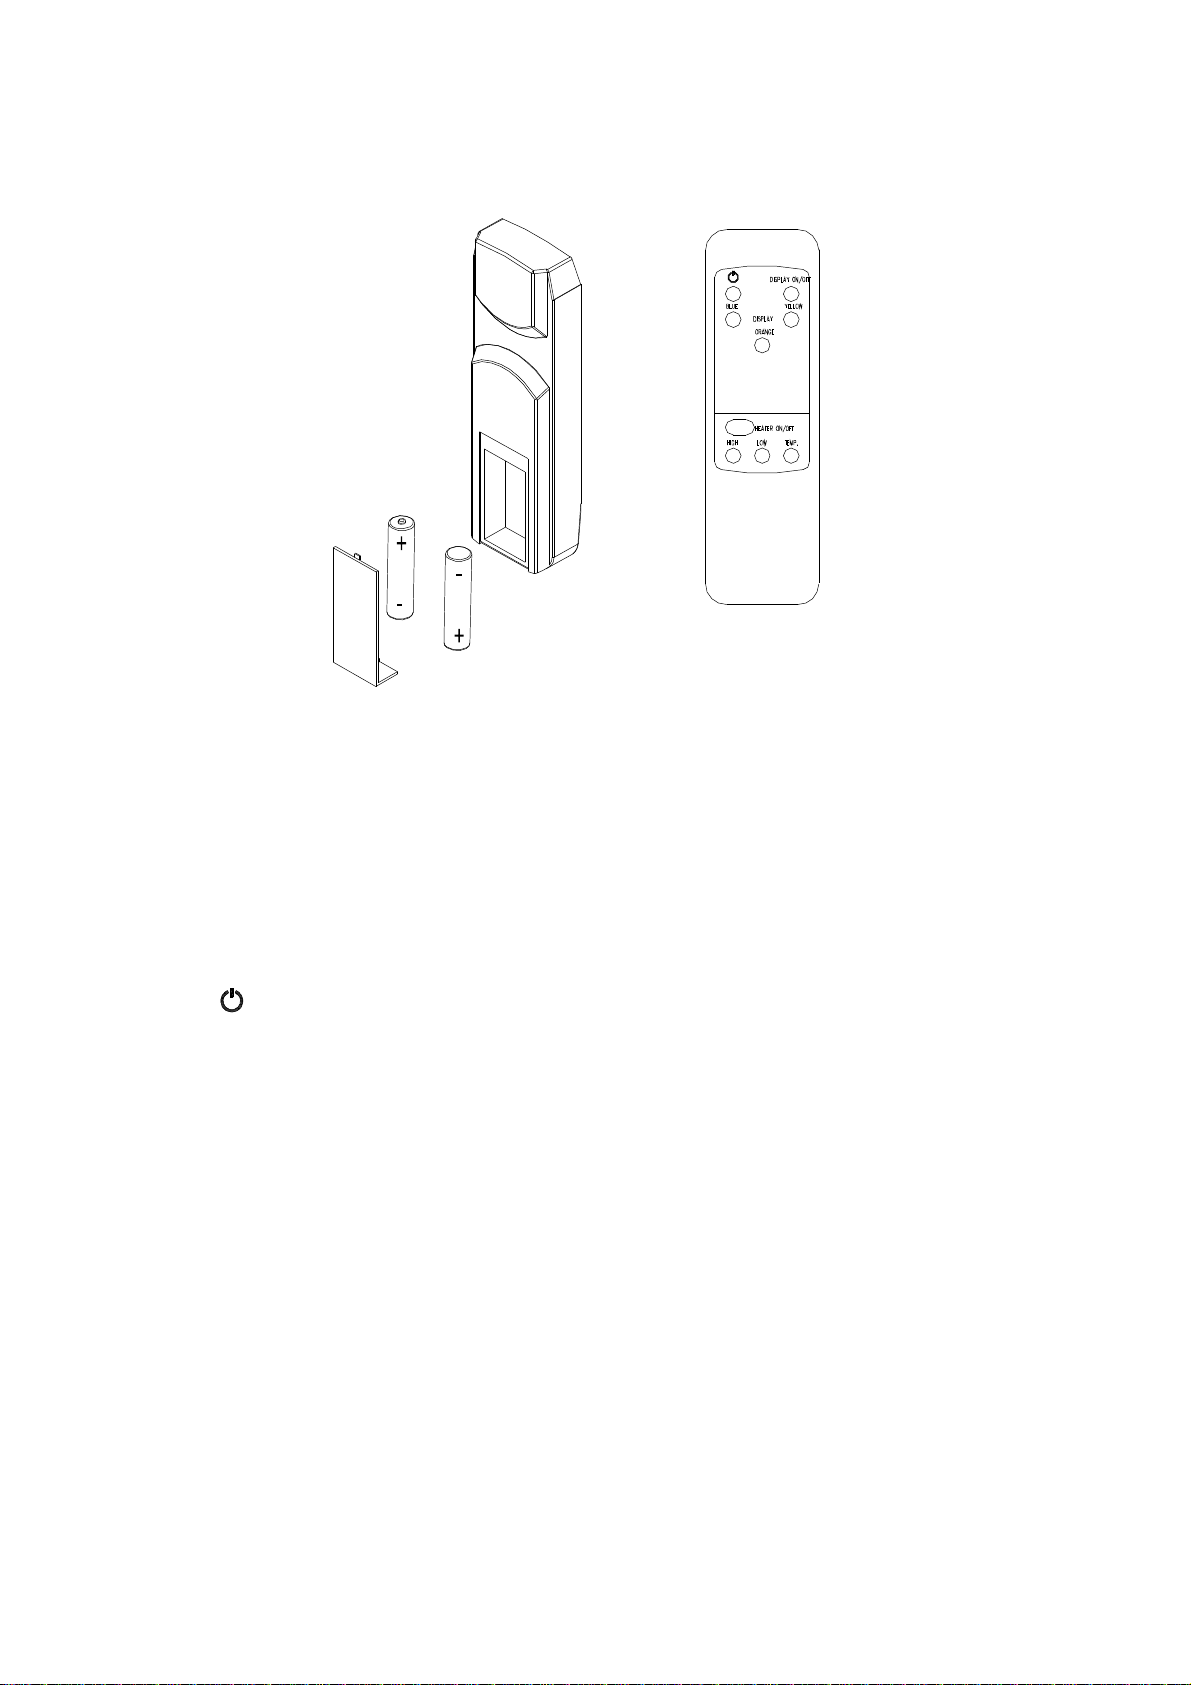
REMOTECONTROLOPERATION
Forremotetofunctionmakesuretheheaterispluggedinandmainspowerswitchlocatedon
the bottomleft hand side isat positionI.
When operating theremotemakesureyou point the remotetothe centreof the fireplaceand
makesureeachtimeyou press the button.Thebuzzerinside theunit willbeep once. It takes
sometimeforthe receivertorespond tothe transmitter.Donot PRESS the buttonsmorethan
oncewithintwosecondsforcorrectoperation.
Poweron button:Thepower-on button attop leftcorneroftheremoteisthe mains
ON/OFF powerbutton.Thiswillturnoffallthefunctionsandthe fireplacewillbe instandby
mode.
DISPLAYON/OFF button:Switching thefireplaceflameand traylightON/OFF.It has
functionsof setting memory.
BLUEbutton:Adjust the blue colorbrightnessof flameand tray.
YELLOWbutton:Adjust the yellowcolorbrightness of flameand tray.
ORANGEbutton:Adjust the orange colorbrightness offlameand tray.
HEATERON/OFFbutton: Switching the heaterON/OFF.It hasfunctionsof settingmemory.
HIGHTbutton: Press the high button toswitchthe heatertohigh heat setting 1500W.
LOWbutton: Press the lowbutton toswitchthe heatertolowheat setting 750W.
TEMP. button: Press theTEMP. button toswitchthe heatertoAUTO mode. Underthismode
the heaterwilloperateinsimilarwayasexplained aboveforthe manualoperation.
13
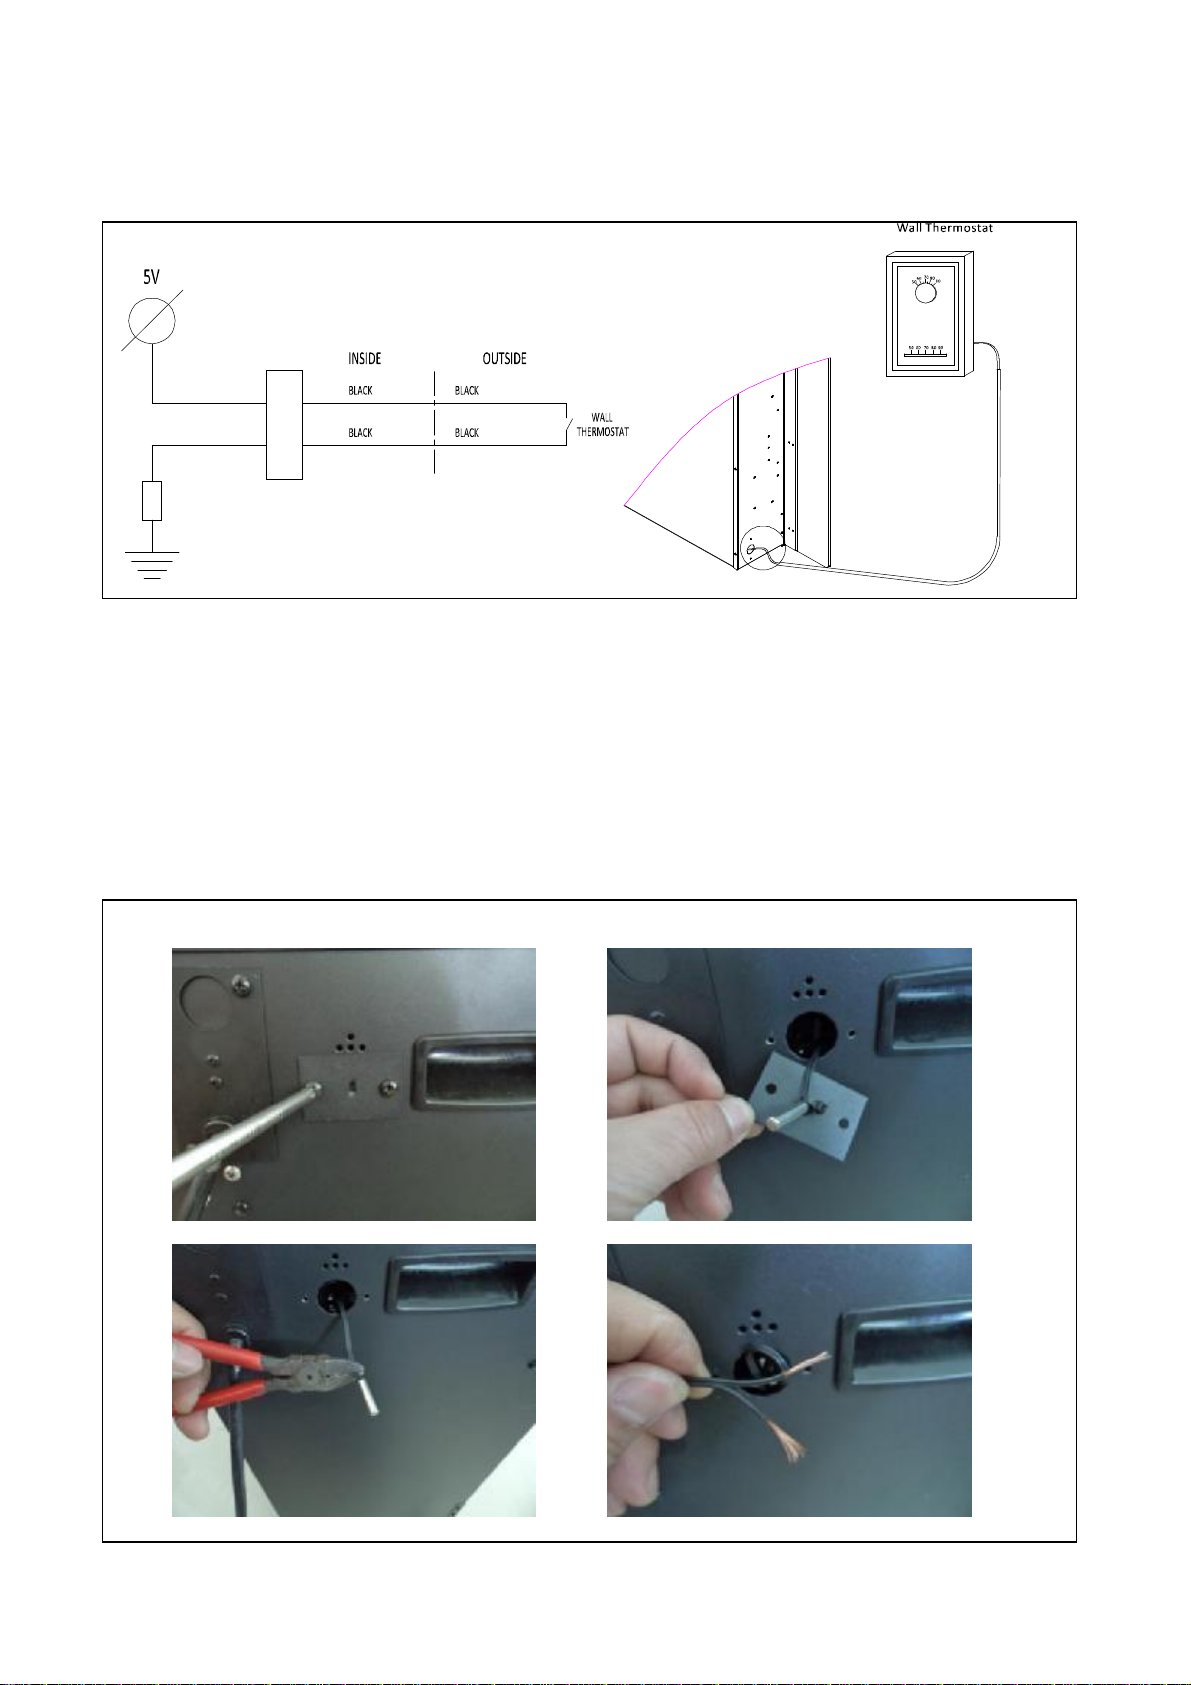
INSTALLING WALLTHERMOSTAT
WALLTHERMOSTATWIRING DIAGRAMS
Wirethewall thermostatpriortoinstallingthefireplace.
WALLTHERMOSTATWIRING(24 VAC)
Install Wall Thermostatperinstructionsprovidedwithkitand perthefollowing
information:
1.Turnoff circuit breaker.
2.Removecoverplatelocated on theleft side ofappliance.
3. Pullthewireoutandcutthe inside thermostat. Connectthewirestothe wall thermostat
asshownbelow. Followinstructionsprovidedwithwall switchkit.

14
REPLACEMENTPARTS
Thislist containsreplacement parts
NO
. VISTA-BI-50-7 VISTA-BI-60-7 VISTA-BI-72-7
DESCRIPTION QTY
.
1 602120 602120 602120 BLOWERAND HEATERASSEMBLY 1
2 FIREPLACEBOX
3 10104010 10104010 10104010 SWITCH 1
4 601032B 601032B 601032B CONTROLPANEL 1
5 601097B 601097B 601097B CIRCUITBOARD 1
6 10101201C 10101201C 10101201C FLAMEMOTOR 1
7 3057503 3110503 3058503 FLICKERASSEMBLY 1
8 601136B 601136B 601137B LEDSTRIP
9 10203015 10203015 10203015 ADJUSTABLEFOOT 4
10 FLAMEEFFECTGLASS(CLEARGLASS
WITH BLACKPLASTIC)
1
11 3057012 3057012 3057012 GLASS BRACKETLH 1
12 3057013 3057013 3057013 GLASS BRACKETRH 1
13 10702156 BOTTOMGLASS 1
14 357017 3110017 358017 MEDIAHOLD BRACKET 2
15 3057016 3057016 3057016 FRONTGLASS BRACKET. 2
16 ADJUSTABLESCREW 2
17 10701165 10701189 10701166 FRONTGLASS 1
18 3057501 3110501 3058501 OVERLAY 1
19 10105057 10105057 10105057 REMOTE 1


16
TROUBLESHOOTING
PROBLEMPOSSIBLECAUSE SOLUTION
Dimorno flame FlameLEDsareburnt out InspecttheLEDsand replace
themif necessary.
Emberbedisnot
glowingordimming EmberLEDsareburntout Inspectthe emberbed LEDsand
replacethemif necessary.
Appliancehasoverheated
and safetydevicehascaused
the thermalswitchto
disconnect
Turnoffthe mainswitch,allow
appliancetocoolfor10 minutes,
then turnit on.
Housecircuitbreakerhas
tripped Reset housecircuit breaker.
Applianceturnsoff
and willnot turnon
Appliancesfusehasblown Replacethe fuse.
Applianceisnotplugged into
an electricaloutlet Check plug andplug in.
Appliancehasoverheated
and safetydevicehascaused
the thermalswitchto
disconnect
Turnoffthe mainswitch,allow
appliancetocoolfor10 minutes,
then turnit on.
Appliancewillnot
comeon when switch
isflippedtoON
Circuitboardisburnt out Inspectthe circuitboardand
replaceitifnecessary.
Nowarmaircoming
out of appliance Heaterisburnt out Inspectthe burnerand heater
assemblyand replaceitif
necessary.
Flamesputters
Flamemotorisdefective. Callaqualified servicetechnician
and replaceflamemotor.
RemoteControldoes
not work. Lowbatteries.
Unit switchin “O”position. ReplaceAAAbatteriesinremote
control.
Turntheswitchin “I”position.
Flameisfixed. Wiringmaybe looseorthe
flamemotormaybe defective.


ELECTRIC FIREPLACE WARRANTY
Sierra Flame Hearth Products Inc (“Sierra Flame”) warrants that your newly purchased Sierra Flame electric fireplace is free from manufacturing and
material defects for a period of one (1) year from the date of the first purchase, subject to the conditions and limitations contained below.
Warranty Application & Exclusions
This limited warranty applies to your newly purchased Sierra Flame electric fireplace; the limited warranty's application is limited to purchases made
in any province of Canada or in any of the 52 States of the United States of America, including the District of Columbia. Only the original purchaser of
the product is eligible for coverage under this limited warranty; the warranty is not transferable.
Products excluded from this limited warranty
Light bulbs are not covered by this limited warranty and are the sole responsibility of the owner/purchaser.
Warranty Coverage and Term
Products covered by this limited warranty have been tested and inspected prior to shipment and, subject to the provisions of this warranty, Sierra
Flame warrants such products to be free from defects in material and workmanship for a period of one (1) year from the date of the first purchase of
such products.
The limited one (1) year warranty period for products also applies to any implied warranties that may exist under applicable law. Some jurisdictions
do not allow limitations on how long an implied warranty lasts, so the above limitation may not apply to the purchaser.
All other warranties—expressed or implied—with respect to the product, its components and accessories or any obligation/liabilities on the part of
Sierra Flame are hereby expressly excluded.
Limitations to Coverage Under Limited Warranty
This limited warranty does not apply to products that have been repaired, except by Sierra Flame or its authorized service representatives, or
otherwise altered. This limited warranty further does not apply to defects resulting from misuse, abuse, accident, neglect, incorrect installation,
improper maintenance or handling, or operation with an incorrect power source.
Products made by other manufacturers, sold with the product or thereafter, are not covered by this limited warranty. The use of unauthorized
components will render this warranty null and void.
Service Under Limited Warranty
Defects must be brought to the attention of Sierra Flame Technical Service by contacting Sierra Flame at (1-888-406-8764), or at 502-1027 Davie Street,
Vancouver, BC V6E 4L2. Please have your proof of purchase, catalogue/model and serial numbers available when calling; any and all service under
the limited warranty requires a proof of purchase of the product.
Defects
Should a product or part covered by this limited warranty be proven to be defective, in material or workmanship, and during the one (1) year limited
warranty period, Sierra Flame will replace such defective product or part without charge. If Sierra Flame is unable to replace such product, or if
replacement is not commercially practicable or cannot be timely done, in its sole discretion Sierra Flame may, in lieu of replacement, choose to
refund the purchase price for such product or part.
Limitations
In no event will Sierra Flame , including without limitation any of its directors, officers, shareholders, employees, consultants, agents, heirs, executors,
administrators and assigns, be liable to the purchaser or any third party, whether in contract, in tort, or on any other basis for any indirect, special,
punitive, exemplary, consequential, or incidental loss, cost or damage arising out of or in connection with the sale, maintenance, use or inability to
use the product, even if Sierra Flame, including without limitation any of its directors, officers, shareholders, employees, consultants, agents, heirs,
executors, administrators and assigns, have been advised of the possibility of such losses, costs or damages, or if such losses, costs or damages are
foreseeable. In no event will Sierra Flame, including without limitation any of its directors, officers, shareholders, employees, consultants, agents,
heirs, executors, administrators and assigns, be liable for any direct losses, costs or damages that exceed the purchase price of the product.
Some jurisdictions do not allow the exclusion or limitation of incidental or consequential damages, so the above limitation or exclusion may not
apply to the purchaser.
Vista Outdoor Units
All Vista units that are installed outdoors or in moisture intense conditions must use the stainless steel cover. Proof of purchase of the cover is required for
any warranty claims.
Application of Provincial and State Law
This limited warranty gives you specific legal rights, and you may also have other rights which vary from jurisdiction to jurisdiction. The provisions
of the United Nations Convention on Contracts for the Sale of Goods shall not apply to this limited warranty or the sale of products covered by this
limited warranty.
General
Sierra Flame reserves the right to make changes at any time without notice, in design, material, specifications, prices and the right to discontinue
styles and products.
502-1027 Davie Street, Vancouver, BC V6E 4L2 • Phone # 1-888-885-1837 • Fax # 1-877-498-4206
Sierra Flame August 2015
This manual suits for next models
3
Table of contents
Other Sierra Flame Heater manuals

Popular Heater manuals by other brands


Hornbach
Hornbach 10552214 operating manual

Rinnai
Rinnai RHFE-1004T Installation and user manual

Winterwarm
Winterwarm Ver GB 506i instruction manual

Fenix
Fenix ECOSUN S+ 18 Instructions for installation

Reznor
Reznor RAD 235 Installation and reference guide

Imetec
Imetec Silent Power Comfort operating instructions