SIFENE LPM201 User manual

Distinguished users, thank you for using LPM201 espresso Machine from SiFENE.
order to better acquaint you with the correct operations of this product please read these
instructions carefully before use Be sure to carefully read Chapter II“Safe Use
Instructions and Precautions and pay special attention to thebold face part in the
manual No further notice is made if technica specifications are altered in these
instructions.)
LPM201
Espresso Machine
A
I N T R O D U CT I O N
Espresso
is used as a
base
for
many
other rich and
delicious beverages
such as
Cappuccinos
and
Lattes.
A
Cappuccino
is
made
with about one third espresso,
one third
steamed milk,
and one third frothed
milk.
A
Latte,
on the other
hand,
is
a
combination
of
espresso
and
steamed milk
with a
small layer
of
foam
on top.
B

I MP O R
TA N T
SAF E G U
ARDS
When using electrical appliances, basic safety precautions should always be
f
ollowed,
including the
f
ollowing:
1. READ ALL INSTRUCTIONS BEFORE USING.
2. Do not touch hot surfaces. Use handles or knobs.
3. Scalding may occur if the lid is removed during or immediately after the brewing cycles. Contents may be hot.
Allow to cool before opening the lid.
4. The use of accessory attachments not recommended by the appliance manufacturer may result in fire,
electrical shock or injury to persons.
5. Do not place on or near a hotgas or electric burner, or in a heated oven.
6. Do not use outdoors.
7. To protect against fire, electric shock and injury, do not immerse cords, plugs or the appliance in water or an
y
other liquid.
8. Use only water in this appliance! Do notput any otherliquids or foods in the water reservoir
.
9. To disconnect, turn any control to
OFF, then remove plug
from wall outlet.
10. Do notoperate any appliance with a damaged cord or plug or after the appliance malfunctions or is damaged
in any manner. Contact your SiFENE Customer Service to arrange for replacement or repair
.
11. Do not let the cord hang over the edge of the table or counter, or touch hot surfaces.
12. Close supervision is necessary when any appliance is used by or near children.
13.
Always be sure water reservoir cap is tightened securely before turning appliance on.
14. To avoid possible burns to bodypart and/or other injury from hot steam and water, NEVER
open the water reservoir cap or portafilter while your SiFENE Steam Espresso, Latte and
Ca
ppuccino
Maker is turned on or as long as there is pressure in the water reservoir
.
15. Do not use appliance for other than intended use.
16. Place the espresso maker on a hard, flat, level surface to avoid interruption of airflow undernea
th.
17. This glass jug is designed for use with your SiFENE espresso maker. It must never be used on a range
top or in any oven, including a microwave oven.
18. Do not set a hot glass jug on a wet or cold surface.
19. Do not clean the glass jug with abrasive cleaners, steel woolpad or other abrasive materials.
20. DO NOT attempt to unscrew water reservoir cap OR remove portafilter without releasing pressure
first.
21. Avoid sudden temperature changes, such as rinsing, washing, filling, or immersing
a hot container with cold liquids.
22. Do not use a cracked glass jug or a mug having a loose or weakened handle.
23. Unplug from outlet whennot in use andbefore cleaning. Allow to cool before putting on or
taking off parts, and before cleaning the appliance.
For appliances with service panels:
WARNING: Risk of Fire or Electric Shock. Do not remove this cover. No user serviceable
parts inside.
Repair should be done by authorized service personnel onl
y
.
SAVE THESE INSTRUCTIONS
Please read ALL of the instructions in this manual carefully before you begin to use this appliance. Proper care and
maintenance willensure a longlife and a trouble-free operatio for this appliance. Please save these
instructions
and refer to them for cleaning and care
tips.
C

D
This appliance has
a
polarized
plug
(one
blade is wider
than
the
other).
As a
safety feature
to
reduce
the
risk
of
electrical shock,
this plug is
intended
to fit in a polarized
outlet
only
one
way.
If the plug does not fit
fully
in the
outlet, reverse
the plug. If it stilldoes not fit, contact a
qualified electrician.
Do not
attempt
to
defeat
this safety
feature
or
modify
the plug in
any way.
If the plug fits
loosely
into the AC outlet or if the AC outlet
feels
warm,
do not use tha
THIS UNIT IS FOR HOUSEHOLD USE ONLY.
POWER CORD INSTRUCTIONS
1. A short power
supply
cord is
provided
to
reduce
the
hazards resulting
from
becoming entangled
in or tripping
over
a
longer
cord.
2. An
extension
cord
may
be
purchased
and used if care is
exercised
in its
u
s
e
.
3. If an
extension
cord is
used,
the
marked electrical rating
of the extension
cord
must
be at
least
as great as the
electrical rating
of the appliance.
The resulting extended
cord
must
be
arranged
so that it will not drape
over
a
countertop
or tabletop
where
it can be
pulled
on by
children
or tripped over
unintentionally
.
t outlet.
POLARIZED PLUGS

GETTING TO KNOW YOUR SiFENE
STEAM ESPRESSO
/
CAPPUCCINO
MAKER
Steam
Lock
Brew
Water Reservoir Cap
Control Knob
P
or
tafilter
Glass
Removable Drip Tray
Coffee Scoop(The scoop
can be used as a
tam
p
in
g
tool
)
P
or
tafilter
F
ilter
Retainer Cli
p
F
ilter
F
ilter
Retainer
Clip
On/Off
Indicator
Light
F
r
othing
W
and
Remo
vable
Wand
Co
v
er
F
5
6
BEFORE FIRST USE, CLEAN AND PRI M E YOUR
M A
CHI NE
WHAT YOU NEED ON HAND:
•
Ceramic
mug
(included)
or a
stainless steel frothing
pitc
her
.
• Coffee
should
be ground to a fine
espresso
grind that
resembles
salt
grains. Use
a
quality grinder
or burr
mill,
such as a
SiFENE
burr mill.
•
Milk
for
making cappuccinos
or lattes.
•
For
best
espresso drinks,
we
recommend using
filtered
or bottled
water
.
CLEAN
YOUR MA
CH
I
N
E!
Note:
portafilter
is not
dishwasher safe, hand wash
only
.
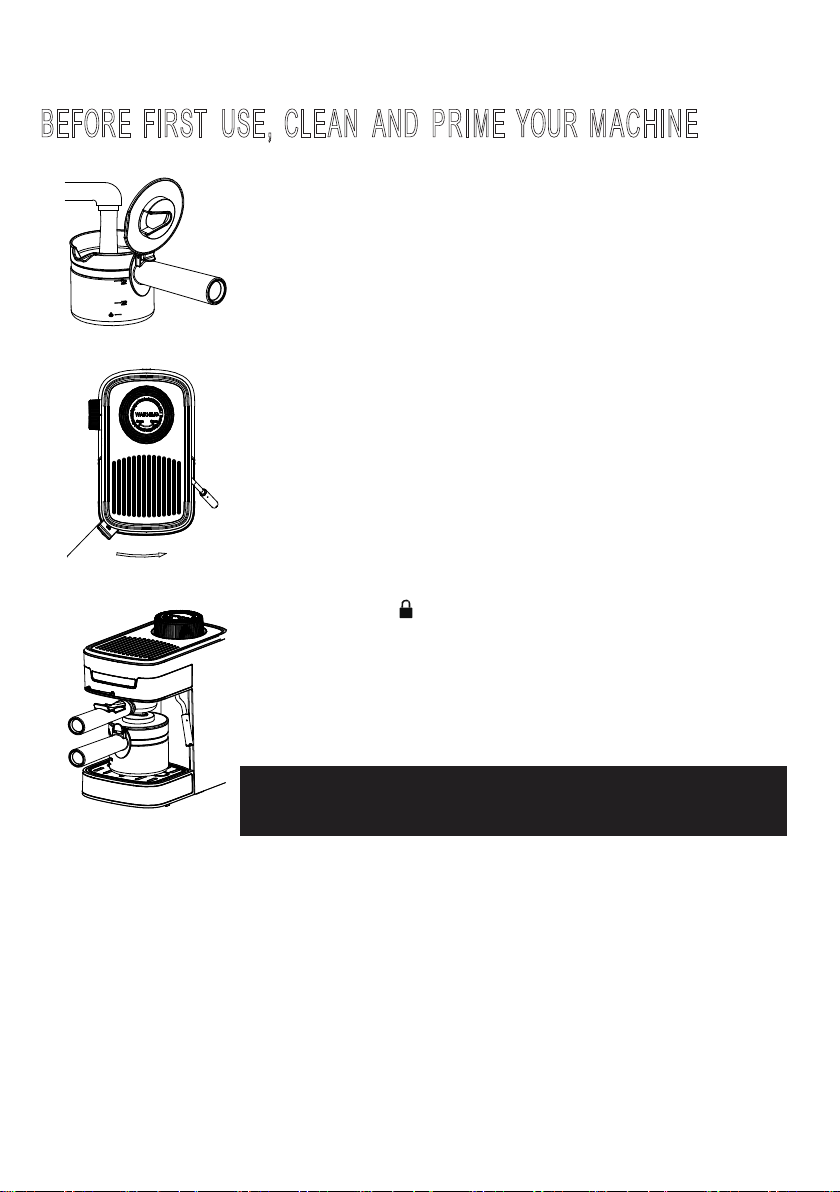
1. Wash the
glass jug
, filter and portafilter
with mild
detergent
and a soft sponge or cloth.
2.
Remove
the water
reservoir
cap.
3.
Fill
water
measuring
cup with
filtered
water to the 4 cup
mark
and
pour into water
reservoir
.
4. Screw cap back onto the water
reservoir
.
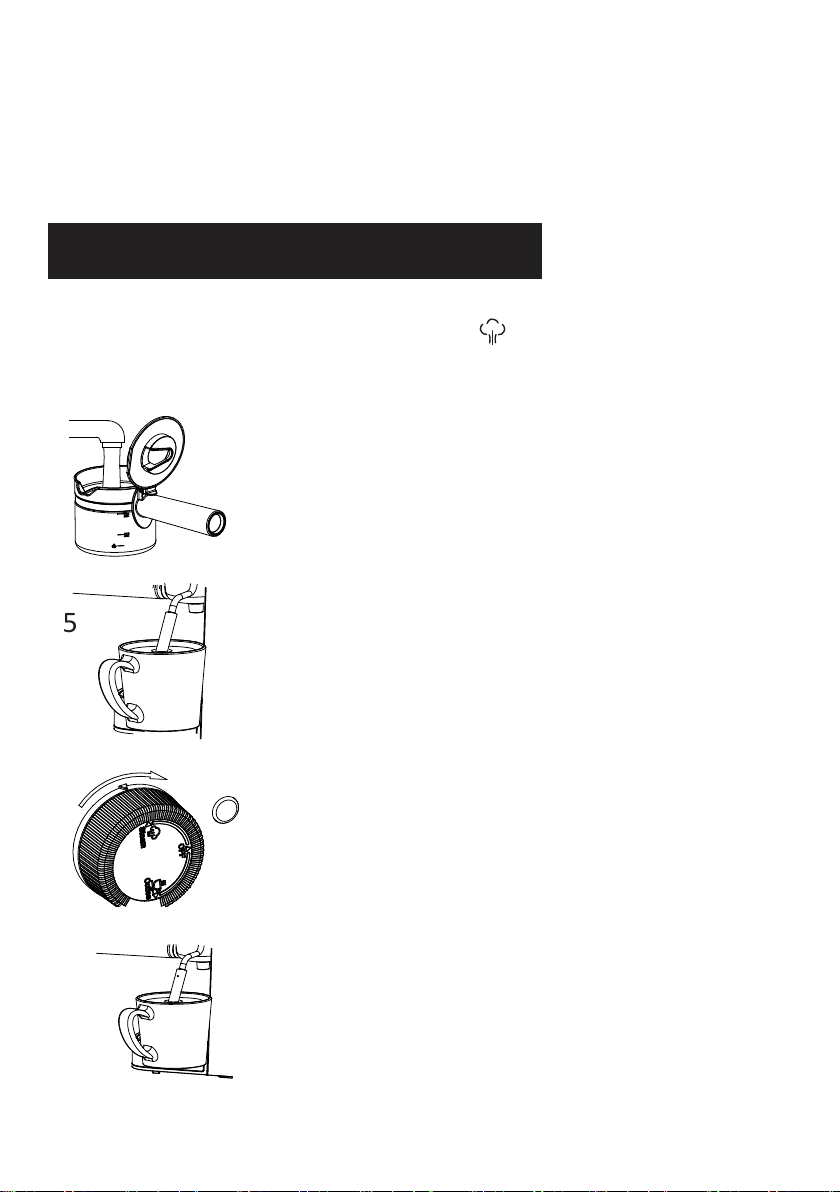
5.
Insert portafilter
into the
machine
with no coffee
from
left to right.
This
can be
tricky
the first
time you try,
so don’t
worry. The
best
way
to
learn
is to look at the
shape
of the top of the
portafilter.
It
can be
inserted
by placing it
from
the left and
locking
it into the
right. This may require force. The handle should
be
aligned
with
the lock symbol and
pointing directly
at
you when standing
in
front of the machine.
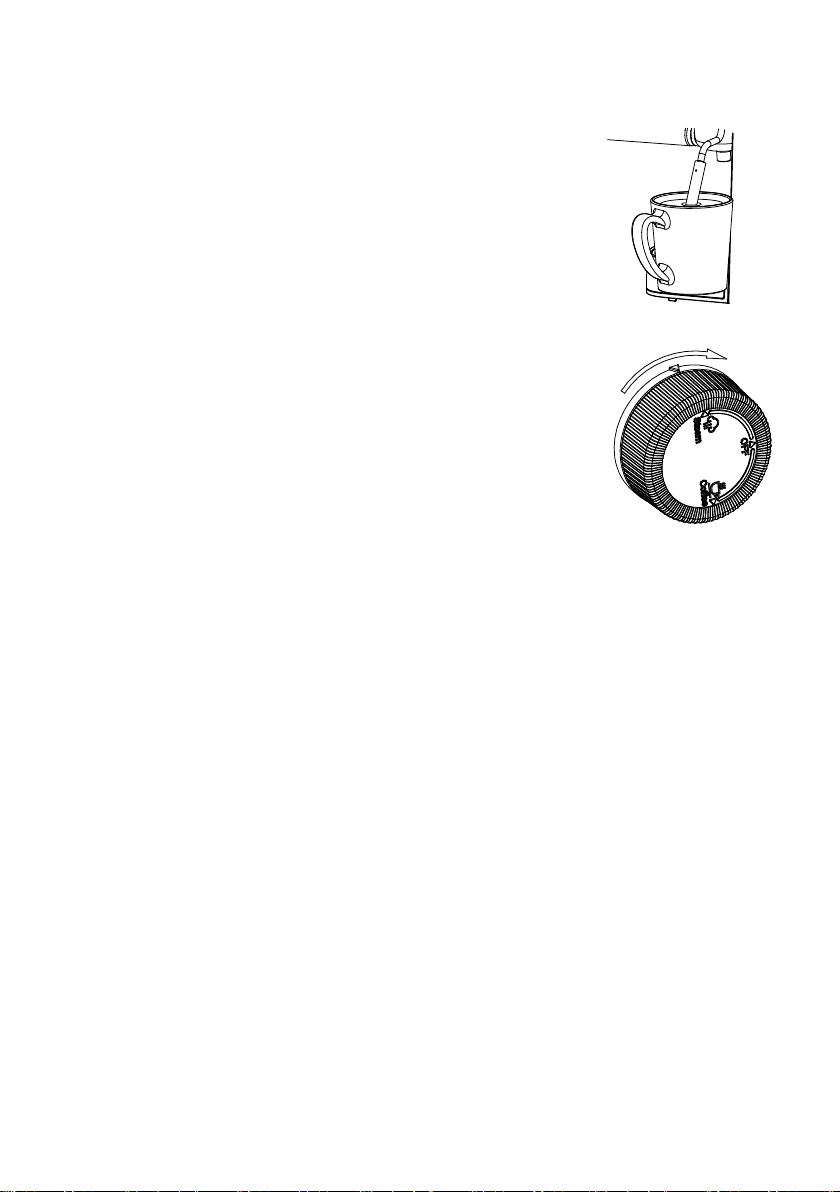
6.
Place glass jug under
the
portafilter
.
7. Turn
the control knob on the left side of the
machine
to “Brew
.
”
Keep
the control knob on “Brew” until
there
is no
longer
water
exiting
the
portafilter
.
8. Be
sure
to turn the control knob to the “Off” position and unplug
the appliance.
CAUTION: Do not
immerse
the power cord, power plug or
coffeemaker
in water or in
any
other liquid. Do not
remove
the water
reservoir
cap or portafilter until you
release pressure
in the unit.
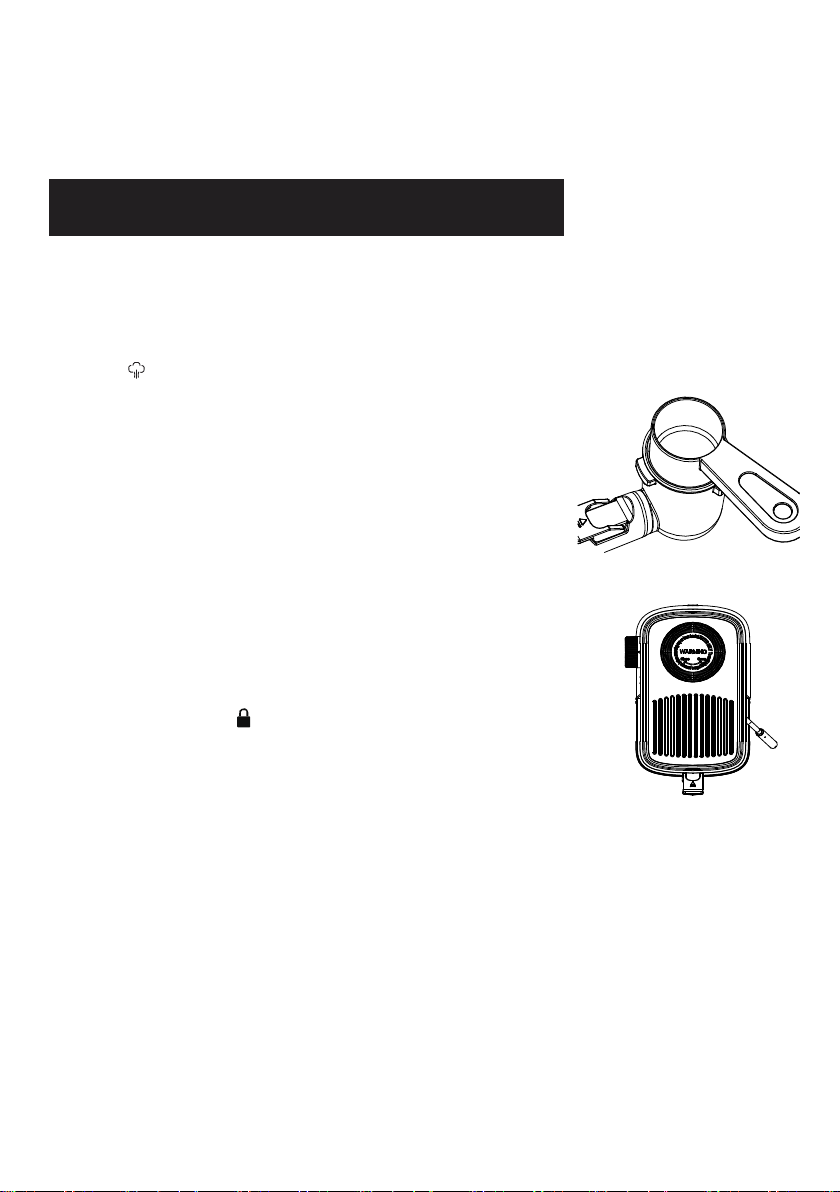
HOW TO RELEASE PRESSURE
B E F
O R E
REMOVING
WATER RESERVOIR
C
A P
1.
Unplug the machine. Place a glass jug under the frothing
wand.
2.
Turn control knob on the left side
of
the machine
to
“Steam
.
”
3.
Once there
is
no longer steam
or
water exiting the frothing wand, remove the water reservoir
cap.
4.
Turn control knob back
to “Off
.
”
5.
Slowly remove the
port
afilter
.
5
6
2
G
CAUTION: Do not
remove
water
reservoir
cap or
portafilter until you
release
the pressure in the unit
HOW TO MAKE ESPRESSO,
C
APPUCCI NO
OR
LA
TTE
.
WATER PREP:
1. Remove the water reservoir cap.
• For 2 or 4 servings of espresso, fill the water measuring cup with water to the
appropriate mark and pour into water reservoir.
• If making a cappuccino or latte, fill water galss jug with water up to the steam mark
and pour it into the reservoir.
2
• For 2 servings of espresso, fill filter to the 2 cup line locat
2. Screw cap back onto water reservoir.
ESPRESSO PREP:
1. Scoop your finely ground espresso into the port
afilter
.
ed
inside the port
afilter
.
• For 4 servings of espresso, fill filter to the 4 cup line located
inside the port
afilter
.
2. Lightly tamp/press down the espresso in the portafilter by
pushing down with the back of the measuring
scoop/t
amper
.
(If
tamped
too
much,
the
water
will not go
through
the espresso.)
3. Insert the portafilter into machine. The handle should be aligned
with the lock symbol and pointing directly at you when
standing in front of the machine.
TIME TO BREW AND FROTH:
Note: If making a
cappuccino
or a latte, follow steps 1-8.
If you are making an espresso, follow steps 1, 2, 7, 8!
1. Place the glass jug onto the drip tray and under the port
afilter
.
2. Plug in the machine and turn control knob on the left side of the machine to “Brew
.
”
3. Pour in your desired amount of cold milk into a the frothing pitcher, but allow enough room
for expansion of the foam (typically 1/3 or 1/2 of the top).
*Frothing texture is highly dependent upon the milk type used. 2% is recommended; whole
milk creates finer bubbles while skim milk creates larger bubbles.
3
H
4. Once the coffee begins to brew into the ceramic mug,
interrupt the brewing process by turning the control knob
to “Off,” place your frothing pitcher so that the frothing
wand is submerged about 1/2 -1” into the milk.
5. Turn the knob to “Steam.” This will take a few seconds to
heat up before bubbling. You should hear the steam coming
out. If it is silent, it may mean you are out of water and no
steam is coming out. If this happens, remove the frothing
pitcher from the frothing wand.
When you hear steam coming out, move the ceramic mug in
a circular motion until desired amount of froth is reached.
*It takes about 2 minutes to froth 4 oz. of milk to 165˚F heat.
6. Before removing the frothing pitcher from underneath the
frothing wand, turn the control knob back into the
“Brew”
position to complete the brewing process.
7. When the espresso finishes brewing, turn the control knob
to the “Off” position andunplug the machine. If brewing
4
cups and frothing, you may need to add additional water.
8. Follow “how to release pressure before removing water
reservoir lid” on page
7
.
BUILD YOUR CAPPUCCINO OR LATTE:
1. Grab your favorite drinking mug.
2. Then pour the espresso into your drinking mug.
3.
Finally,
pour froth into your mug, then stir and enjoy.
*A latte has less foam and more steamed milk than a cappuccino. A cappuccino has
1/3
of espresso, 1/3 of steamed milk and 1/3 milk foam whereas a latte has 1/3 espresso,
2/3
steamed milk topped with milk foam.
5
4
I
H O
W
T
O
F R O
T H
M I L K
WATER PREP:
CAUTION: Do not
remove
water
reservoir
cap or
portafilter
until you
release
the
pressure
in the unit.
1.
Remove
the water
reservoir
cap.
2. Fill the water glass jug to the
steam
line with
filtered water and our into
reservoir
.
3. Screw cap back onto water
reservoir
.
TIME TO FROTH:
4. Pour in
your
desired
amount
of cold
milk
into the ceramic
mug or a frothing
pitcher,
but allow
enough
room for
expansion
of the
foam (typically
1/3 or 1/2 of the top).
*Frothing texture
is
highly
dependent upon the
milk
type
used.
2% is
recommended;
whole
milk
creates finer
bubbles while
skim milk
creates
larger
bubbles.
5
5. Place
your ceramic
mug or frothing pitcher so that the
frothing wand is
submerged
into the milk.
About 1/2 -1” into the milk.
6
. Turn
the knob to
“Steam.” This
will
take
a few seconds
to heat up before bubbling. You should
hear
the steam
coming out. If it is
silent,
it
may mean
you are out of
6
6
water and no
steam
is coming out. If this happens,
remove
the frothing pitcher from the frothing wand.
When you
hear steam
coming out,
move
the ceramic
mug in a circular motion until desired
amount
of froth is
reached.
*It
takes
about 2
minutes
to froth 4
oz.
of milk
to 165˚F heat.
7. Before
removing
the
ceramic
mug from
underneath
the
frothing
wand,
turn the knob to the “Off”position
.
Note: it is extremely important to clean the frothing wand after
every use.Refer to page 11 for cleaninginstructions.
2
J

CLEAN YO UR
M A
C H I N E
A F T E R
E A
C H U S E
Keep
your SiFENE
machine running smoothly
by
taking care of it after
every use.
Follow these easy
steps to clean
your
machine:
1.
Rinse glass jug. Remove
the drip
tray cover. Empty
water
or coffee
from
drip
tray. Dry
with a
clean
cloth. Wipe the
exterior
of the
machine
with a
damp
cloth. Do not usemetal
scouring
pads or
abrasive
cleansers.
the
water
reservoir
CAUTION: Do not
remove
water
reservoir
cap or
portafilter
until you
release
the
pressure
in the unit.
2.
Remove portafilter, discard
coffee
grounds.
Lift
filter retainer
clip
over
the
filter and
hold in
place as you discard
coffee grounds.
This helps keep filter secured in place.
3.
Rinse portafilter
with
fresh water. Please
note that the
portafilter
is
NOT
dishwasher safe. Handwash
only !
NOTE:Ifyou didnotfrothmilk,skipsteps4-9.
4.
Fill water galss jug
to the
steam mark
with
water and
pour into
.
5. Screw cap back onto the water reservoir and plug in the machine.
cover. The frothing wand cover
is thetransparent silicone piece
at the tip of the frothing wand. Simply pull from the bottom to
remove.
9. Wipe down
frothing wand
with a
damp
cloth
and rinse
the frothi
6.
Fill ceramic mug half way
with
water and place
so that the frothingwand
is submerged into the water
30
seconds. This
will
help rinse
the
internal parts
of the machine.
8. Once the
frothing wand
is
cool, remove and rinse frothing
w
7.
Turn
the
knob
to “Steam”
and steam
with
water instead
of
milk
for
and
ng
wand cover
.
CAUTION: To protect against electric shock, do not
immerse
cord, plug or appliance in water or other liquids.
2
8
K

Once
every
1 to 3 months depending on usage and
the type of water, we recommend that you delime
your
machine
to keep it working properly
CLEANING
EVE R Y
1 - 3
M O N T H S
.
DELIME
INTERNAL
PARTS
1.
Make sure
the control knob is in the “Off” position.
CAUTION: Do not
remove
water
reservoir
cap or
portafilter
until you
release
the
pressure
in the unit.
2.
Fill
water glass jug to the 4 cup
mark
with fresh,
undiluted
white
household vinegar.
Add
vinegar
to the
water
reservoir
.
3. Brew just
enough
to get
some vinegar
to come out.
4.
Steam
just
enough
to get
some vinegar
to come out.
5.
Unplug
the
mac
hine.
6. Allow
appliance
to sit
overnight
with the
vinegar
solution
in the water
reservoir
.
7. Discard
vinegar through
the top
opening
of the espresso
maker
by
turning
the
machine upside
down
over
the sink.
8.
Rinse
the water
reservoir thoroughly
with tap water by
filling tank half
full with water and then
pouring
the water
back out into the
sink, repeating
this step twice.
9. Brew and
steam
with
fresh
water at
least
4
times
or until
you
do not
smell any vinegar
.
USER MAINTENANCE:
This appliance has
no
user serviceable parts. Any servicing beyond
that described in the
Cleaning
Section
should
be
performed
by an
Authorized Service Representative
only
.
See
warranty
section.
2
1
L

H E L PF U L
HI N T S
1.Make sure the control knob is
set to “Off” before using the machine.
2.Filter retainer clip should be in the back position
when installing the portafilter into the unit.
3.Do not attempt to turn portafilter handle past
the lock position.
4.Do not overfill the filter with ground coffee, as this
will cause an improper lock of the portafilter, which
could result in leaking and damage to the seal.
5.For best results, only use high-quality espresso
ground coffee.
6.Do not leave excess coffee grounds on the edge of
the portafilter. Excess grounds on the edge will cause
an improper lock which could result in leaking and
damage to the seal.
7. Do not “Brew” or “Steam” with the appliance
without water in the water reservoir.
8.Make sure the frothing wand is submerged in your milk
or milk substitute before turning the knob to “Steam
.
”
9.Storing the portafilter in the brew head can cause an
improper lock which could result in leaking and damage
to the seal.
10.Do not fill water to the top of the water reservoir.
11.This is a manual machine without auto shut-off.
You control how much espresso is brewed by
turning the control knob.
3
6
8
1
M

P R O B L E M S , C
A
U S E S
&
S O L U T I O N S
P
roble
Your SiFENE Espresso, Latte & Cappuccino Maker has been carefully designed to
give
you
many years of trouble-free service. In the unlikely event that your new espresso
machine
does
not operate
satisfactorily
,
please review the following potential problems and try the steps
recommended BEFORE you email SiFENE Service
Center
.
m
Possible Cause Solution
Unable to
steam
•
Water reservoir is
empty
•
Unit is not turned
on
•
Frothing wand is
clogged
•
Fill water reservoir with
2
oz (the steam
icon
on the fill cup) of water and pour into
water
reservoir
•
Plug in power cord and slowly turn
control
knob to Steam
position
•
Remove frothing wand cover and check
if
metal frothing wand is clogged with a
needle or paper clip. Then, follow cleaning
instructions
Coffee
does
not come
out
•
No water in water
reservoir
•
Coffee grind is too
fine
•
Too much coffee in the
filter
•
Appliance not turned on
or
plugged
in
•
Coffee has been tamped
/
compressed too
much
•
Add water to water
reservoir
•
Grind coffee less
fine
•
Fill portafilter following instructions
•
Plug in power
cord
•
Refill portafilter with espresso ground
coff
ee
and GENTLY
tamp
Coffee comes
out
too
quickly
•
Coffee is ground too
coarse
•
Not enough coffee in
the
portafilter
•
Use a finer grind of espresso
coffee
•
Follow How to Brew Espresso
instructions
carefully paying close attention
to
measurements for
coffee
Do you stillhave questions? You can call us toll-free at the SiFENE Consumer
Service
Department, SiFENE or you can visit us at
www
.SiFENE.com.
N

Problem Possible Cause Solution
Milk is not
foamy
after
frothing
•
Not enough water in
water
reservoir to
steam
•
Milk is not
cold
•
Using whole
milk
•
Follow the “How to Froth” instructions
paying close attention to the water
measurements
•
Use cold milk to
froth
•
For best results, use 2% or skim
milk
Coffee comes
out
around the
edge of
the
portafilter
•
Portafilter not rotated to
lock position
•
Coffee grounds around
edge of
filter
•
Too much coffee in the
filter
•
Rotate portafilter to lock
position
•
Wipe
off
excess grounds from rim
of portafilter
•
Put less coffee in the
filter
Portafilter
c
hanged
color
• Dishwasher •
It is still safe to use. We do
not
recommend putting
it
in the
dishwasher
Milk sucked in
the
machine
through
the
frothing
wand
•
Not enough water to froth
/
steam in the water
reservoir
•
You should hear the steam coming out.
If it
is silent, remove the frothing wand
from
the
milk. Then, follow frothing
instructions
O
SAN FRANCISCO
C
APPU C C I N O
espresso,
hot
steamed
c
hocolate,
brandy,
topped with
cream
and
cinnamon
C
A F É R O M A N O
espresso, brandy and lemon twist
CAFÉ V I E N N A
espresso, brandy,
topped
with
whipped-cream
CAF É I R I S H
espresso, Irish whiskey,
topped
with whipped-cream
No
claim
is
made
to
any
of the recipes or recipe
names listed. Any
rights to the recipe or recipe names
listed belong to their
respective owners,
if
any. Please drink responsibly
and
obey legal drinking
age laws.
P

CA
F
É
T
UACA
espresso,
tuaca
liqueur,
topped
with whipped-cream
C
AFÉ
T I A
M A RI A
espresso,
tia
maria
liqueur
,
topped with
frothed-milk
C
A F É
G R
A N D M A RNI E R
espresso,
grand
marnier liqueur
,
topped with
whipped-cream and
grated
orange peel
MEXICA N
C
AFÉ
espresso, kahlua, tequila,
topped with
whipped-cream
No
claim
is
made
to
any
of the recipes or recipe
names listed. Any
rights to the recipe or recipe names
listed belong to their
respective owners,
if
any. Please drink responsibly
and
obey legal drinking
age laws.
Q

Use
this
percentage
as guide
only
.
R

Use
this
percentage
as guide
only
S
EN
Specifications
Rated voltage: 120V~, 60Hz
Power input: 900W
Feedback and Help
Facebook: https://www.facebook.com/sifenefans
Youtube: https://www.youtube.com/channel/UCBraIqi5Ff0ByulojcTV27g
Instagram: https://www.instagram.com/sifeneofficial/
SiFENE Family:https://www.facebook.com/groups/sifene
Official Website: https://www.sifene.com
Email: [email protected]
T
Table of contents


