SiFive HiFive Unmatched v1p1 User manual

SiFive HiFive Unmatched Getting Started Guide
v1p1
© SiFive, Inc.
SiFive HiFive Unmatched Getting Started
Guide
Proprietary Notice
Copyright © 2020, SiFive Inc. All rights reserved.
Information in this document is provided “as is,” with all faults.
SiFive expressly disclaims all warranties, representations, and conditions of any kind, whether
express or implied, including, but not limited to, the implied warranties or conditions of mer-
chantability, fitness for a particular purpose and non-infringement.
SiFive does not assume any liability rising out of the application or use of any product or circuit,
and specifically disclaims any and all liability, including without limitation indirect, incidental, spe-
cial, exemplary, or consequential damages.
SiFive reserves the right to make changes without further notice to any products herein.
Release Information
Version Date Changes
v1p1 January 5, 2020
• Updated Boot Mode Select figure
• Changed minimum wattage of the power sup-
ply unit to be 150W
v1p0 December 14, 2020 • Initial release

Contents
1 Introduction ............................................................................................................. 2
1.1 HiFive Unmatched Components .................................................................................3
2 Hardware ................................................................................................................... 5
2.1 Packaged Components .............................................................................................5
2.2 Required Hardware ................................................................................................... 5
2.3 Optional Hardware .................................................................................................... 6
2.4 Qualified Vendor List .................................................................................................6
2.5 Problematic Hardware ...............................................................................................7
3 Board Setup............................................................................................................. 8
3.1 Initial Setup .............................................................................................................. 8
3.2 Connecting to the Power Supply...............................................................................10
3.3 Slotting the MicroSD Card .......................................................................................11
3.4 Checking the Fan Connection ..................................................................................12
3.5 Powering the Board.................................................................................................12
3.5.1 Turn ON Power to Board................................................................................12
3.5.2 Turn OFF Power to Board ..............................................................................12
3.6 Connecting IOs to the Board ....................................................................................12
4 Boot and Run ........................................................................................................ 13
4.1 Connecting with USB Console .................................................................................13
4.1.1 Installing USB-UART Drivers on macOS..........................................................13
4.1.2 Setting up the Terminal on Windows ...............................................................14
5 Support for HiFive Unmatched....................................................................17
HiFive Unmatched Getting Started Guide © SiFive, Inc. Page 1

1
Introduction
The HiFive Unmatched is a Linux development platform based on SiFive’s Freedom U740 SoC.
The platform features 64-bit DDR4, high-speed interconnects via PCIe Gen 3 x8 operating at
7.8 GB/s, Gigabit Ethernet and SuperSpeed+ USB (5Gbps).
HiFive Unmatched Getting Started Guide © SiFive, Inc. Page 2


Table 1: HiFive Unmatched Components
1 microSD Card Slot 14 Current Monitor
2 microUSB Connector 15 GPIO Header
3 RJ45 Ethernet Connector 16 Bootmode DIP Switch
4 x2 USB Type-A Connector 17 DDR4 Memories
5 x2 USB Type-A Connector 18 FU740 SoC
6 JTAG Header 19 32MB QSPI Flash
7 UART – USB Controller 20 PCIe Switch
8 Ethernet PHY 21 CPU Fan Header
9 PCIe - USB Bridge 22 x16 PCIe Connector
10 USB Hub 23 CR1220 Battery Connector
11 M.2 E Key Connector for WiFi/Bluetooth 24 Power Pushbutton
12 M.2 M Key Connector for NVMe SSD 25 Reset Pushbutton
13 Case Fan Header 26 ATX Power Connector
27 Front Panel Connector
1 Introduction
HiFive Unmatched Getting Started Guide © SiFive, Inc. Page 4

2
Hardware
2.1 Packaged Components
The HiFive Unmatched Development Kit comes packaged with the following components:
1. The HiFive Unmatched Board
2. A 32GB SD Card with pre-loaded software (for 1in Figure 1)
3. A M.2 Screw Package (for use with the optional NVMe SSD drive and WiFi/Bluetooth
cards)
4. Case mounting hardware for a mini-ITX compatible case
5. Ethernet cable for the RJ45 connector (connects to 3in Figure 1)
2.2 Required Hardware
Using the HiFive Unmatched Development Kit requires the following parts which are not
included in the kit:
•ATX Power Supply Unit (PSU):
Power to the board is provided by an ATX Power Supply via a 24-pin ATX Power Connec-
tor, see 26 in Figure 1. The PSU must be rated at a minimum of 150W.
Note
If the user is implementing a PCIe expansion device, please reference the manufacturer
specifications and power supply recommendations for the device before selecting a PSU.
•MicroUSB Cable:
A micro USB cable is required use the terminal feature of the HiFive Unmatched.
HiFive Unmatched Getting Started Guide © SiFive, Inc. Page 5

2.3 Optional Hardware
The following parts or components are recommended to supplement the HiFive Unmatched
board.
•Mini-ITX Compatible Case:
If the user would like to house the HiFive Unmatched board in a case, a mini-ITX compati-
ble case will be required.
•M.2 for NVMe SSD and WiFi/Bluetooth Cards:
The HiFive Unmatched board is enabled to support M.2 for an NVMe SSD drive and a Wi-
Fi/Bluetooth card (slotted to 12 and 11 respectively in Figure 1).
•PCIe Expansion Cards:
The HiFive Unmatched provides support for PCI Express up to Gen3 x8 via a PCIe x16 slot
(22 in Figure 1). Any PCIe expansion cards must be acquired through a third-party vendor.
•Keyboard and Mouse:
If a graphical user interface configuration is selected, then a keyboard and mouse may be
required. These may be plugged into the Type-A USB ports (4and 5in Figure 1).
2.4 Qualified Vendor List
Following third party components are being used and qualified by SiFive to work out of the box
with the Unmatched board.
•ATX Power Supply:
If the user is utilizing a PCIe expansion card, consult the manufacturer specification sheet
to identify the wattage needed to power the device before buying a power supply unit.
SiFive has tested the HiFive Unmatched board using the FSP Mini ITX Solution/Flex ATX
250W power supply (part# FSP250-50FGBBI(M)) without any PCIe expansion card.
•PCIe Expansion Cards:
An AMD RX 500-series GPU is recommended to enable graphical processing on the
HiFive Unmatched. After selecting a GPU, consult GPU system requirements and specifi-
cations documentation for the PSU wattage requirements.
•Bluetooth and WiFi Card:
An Intel®Wireless-AC 9260 Network adapter - M.2 2230 - 802.11ac, Bluetooth 5.0 (part#
9260.NGWG.NV) was tested to enable WiFi on the board. An Antenna and cable will be
required to use M.2 adapter listed above. SiFive has qualified and tested the HUYUN IPEX
MHF4 Antenna WiFi Cable for NGFF/M.2 WiFi/WLAN Card Module (part# 8541551175).
•NVMe SSD:
SiFive has qualified and tested Samsung 970 EVO Plus MZ-V7S250B NVMe SSD drive
(part# MZ-V7S250B/AM).
2 Hardware
HiFive Unmatched Getting Started Guide © SiFive, Inc. Page 6
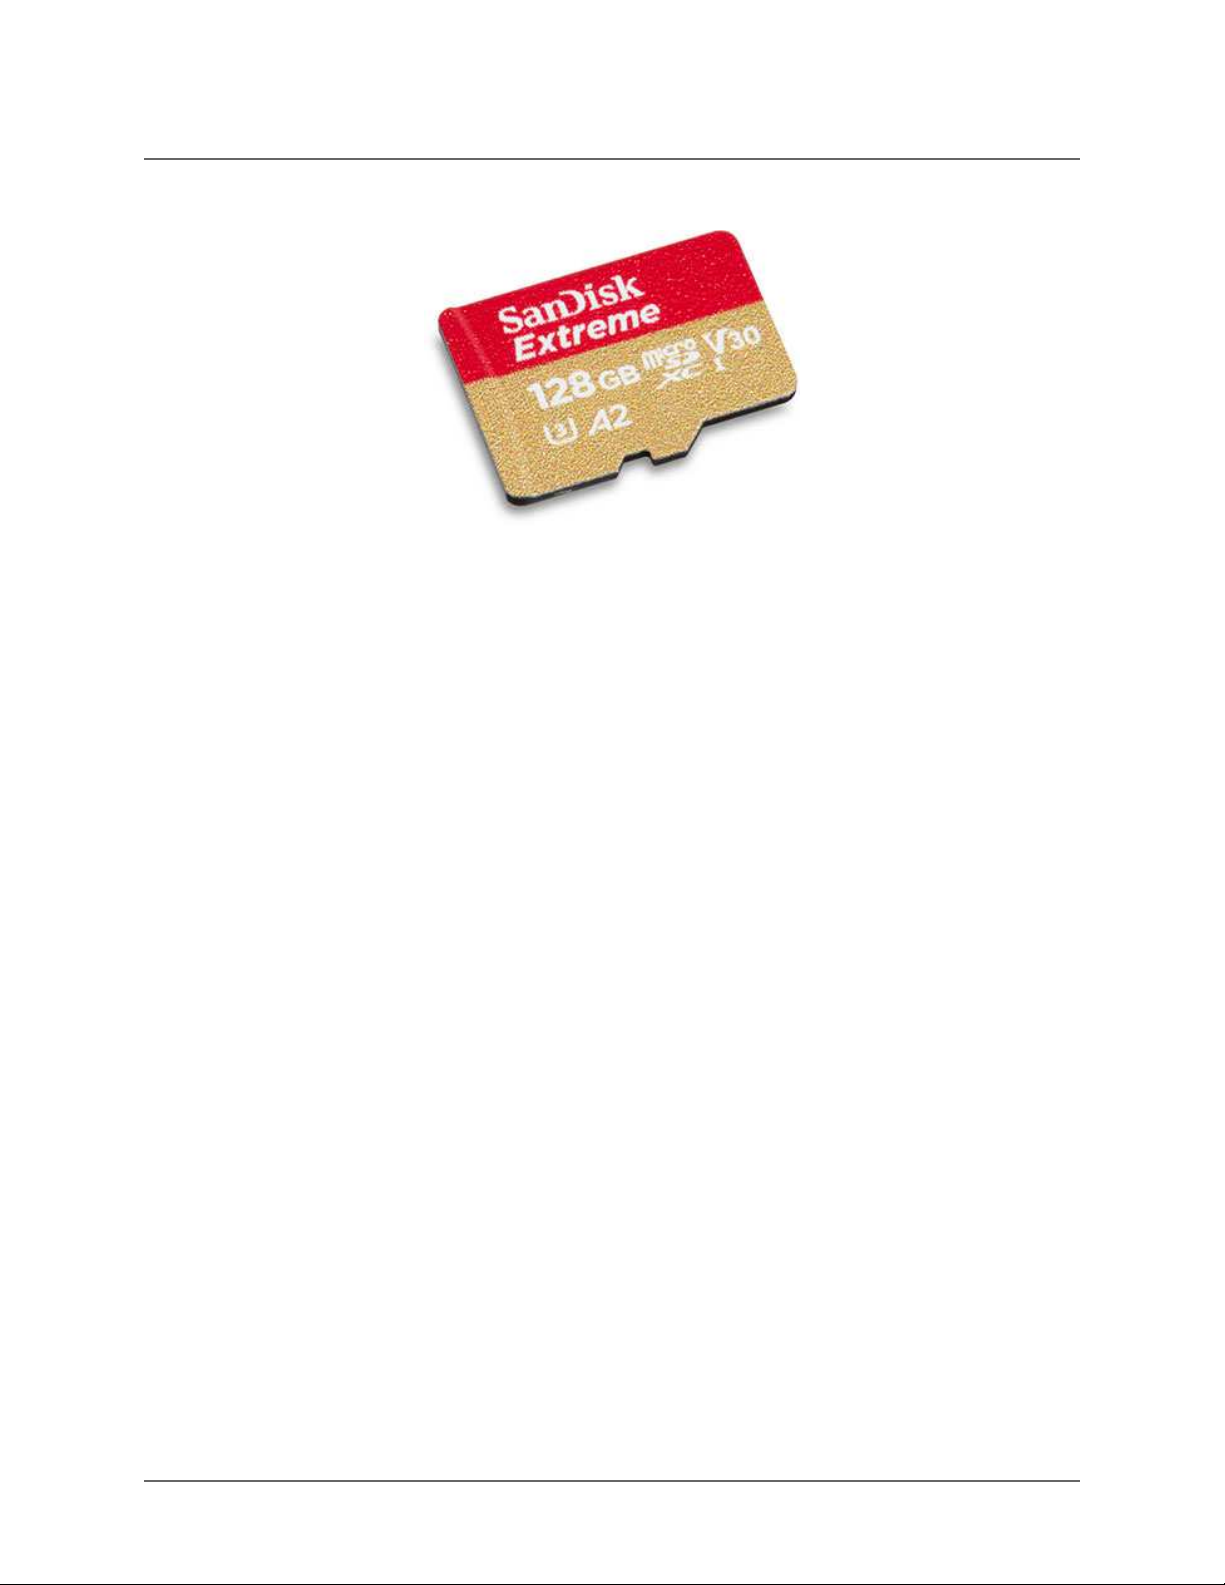
2.5 Problematic Hardware
Figure 2: SanDisk A2 SD Card
SanDisk™ microSD cards that are marked with "A2" (see Figure 2 above) been identified as
causing errors and crashes when connected to the HiFive Unmatched board. Other Sandisk
microSD cards that do not have the "A2" labeling function without problems. Please avoid using
the microSD cards marked with "A2" to load the HiFive Unmatched firmware.
2 Hardware
HiFive Unmatched Getting Started Guide © SiFive, Inc. Page 7
3
Board Setup
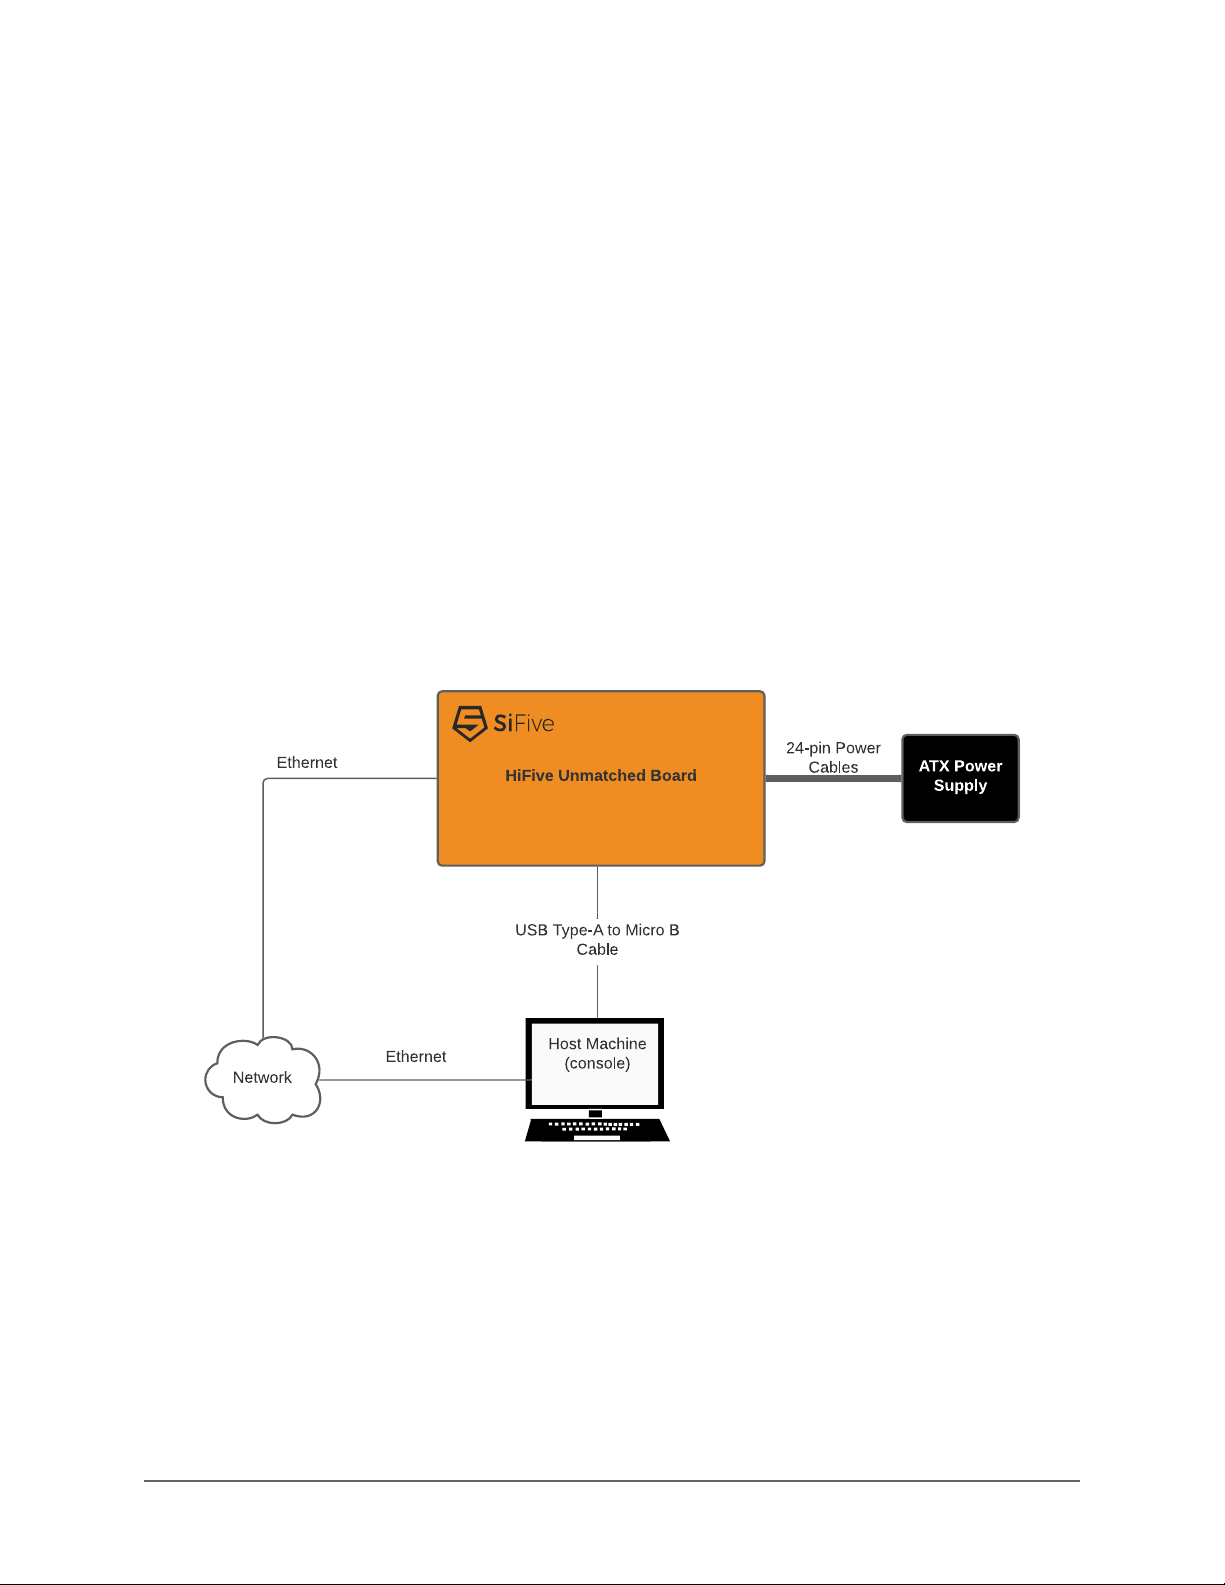
The following chapter provides the steps necessary to setup the HiFive Unmatched develop-
ment board. Figure 3 shows the proper board setup, where the board is connected to a host
machine and network.
Figure 3: HiFive Unmatched System Block Diagram
3.1 Initial Setup
Before powering the board, consider the following requirements.
•Boot Mode Select DIP Switch:
The Bootmode Select DIP switch (see 16 in Figure 1) should be set to the following:
MSEL[3:0] – [ON, OFF, ON, ON] or 1011.
HiFive Unmatched Getting Started Guide © SiFive, Inc. Page 8

Note
On HiFive Unmatched Version 2 boards, the silk screen which describes the orientation of
the Boot Mode Select switch is incorrect. Version 2 can be identified from the Board
Assembly Number Label on the board, HF105-ASSY-2A0, where number 2 indicates Ver-
sion 2. Please carefully match the orientation shown in Figure 4 to ensure that the
Unmatched Board boots from the SD card.
Figure 4: Boot Mode Select switch with default setting (MSEL = 4b'1011)
Table 2: Boot Mode Select Configuration Settings
MSEL[3:0] FSBL Location Access Method SPI Width
4b'0101 QSPI0 Flash Memory mapped X1
4b'0110 QSPI0 Flash Memory mapped X4
4b'0111 QSPI1 Flash Memory mapped X4
4b'1000 QSPI1 SD Card Bit-banged X1
4b'1001 QSPI2 Flash Bit-banged X1
4b'1010 QSPI0 Flash Memory mapped X4
4b'1011 (Default) QSPI2 SD Card Bit-banged X1
4b'1100 QSPI1 Flash Bit-banged X1
4b'1101 QSPI1 Flash Memory mapped X4
4b'1110 QSPI0 Flash Bit-banged X1
4b'1111 QSPI0 Flash Memory mapped X4
3 Board Setup
HiFive Unmatched Getting Started Guide © SiFive, Inc. Page 9
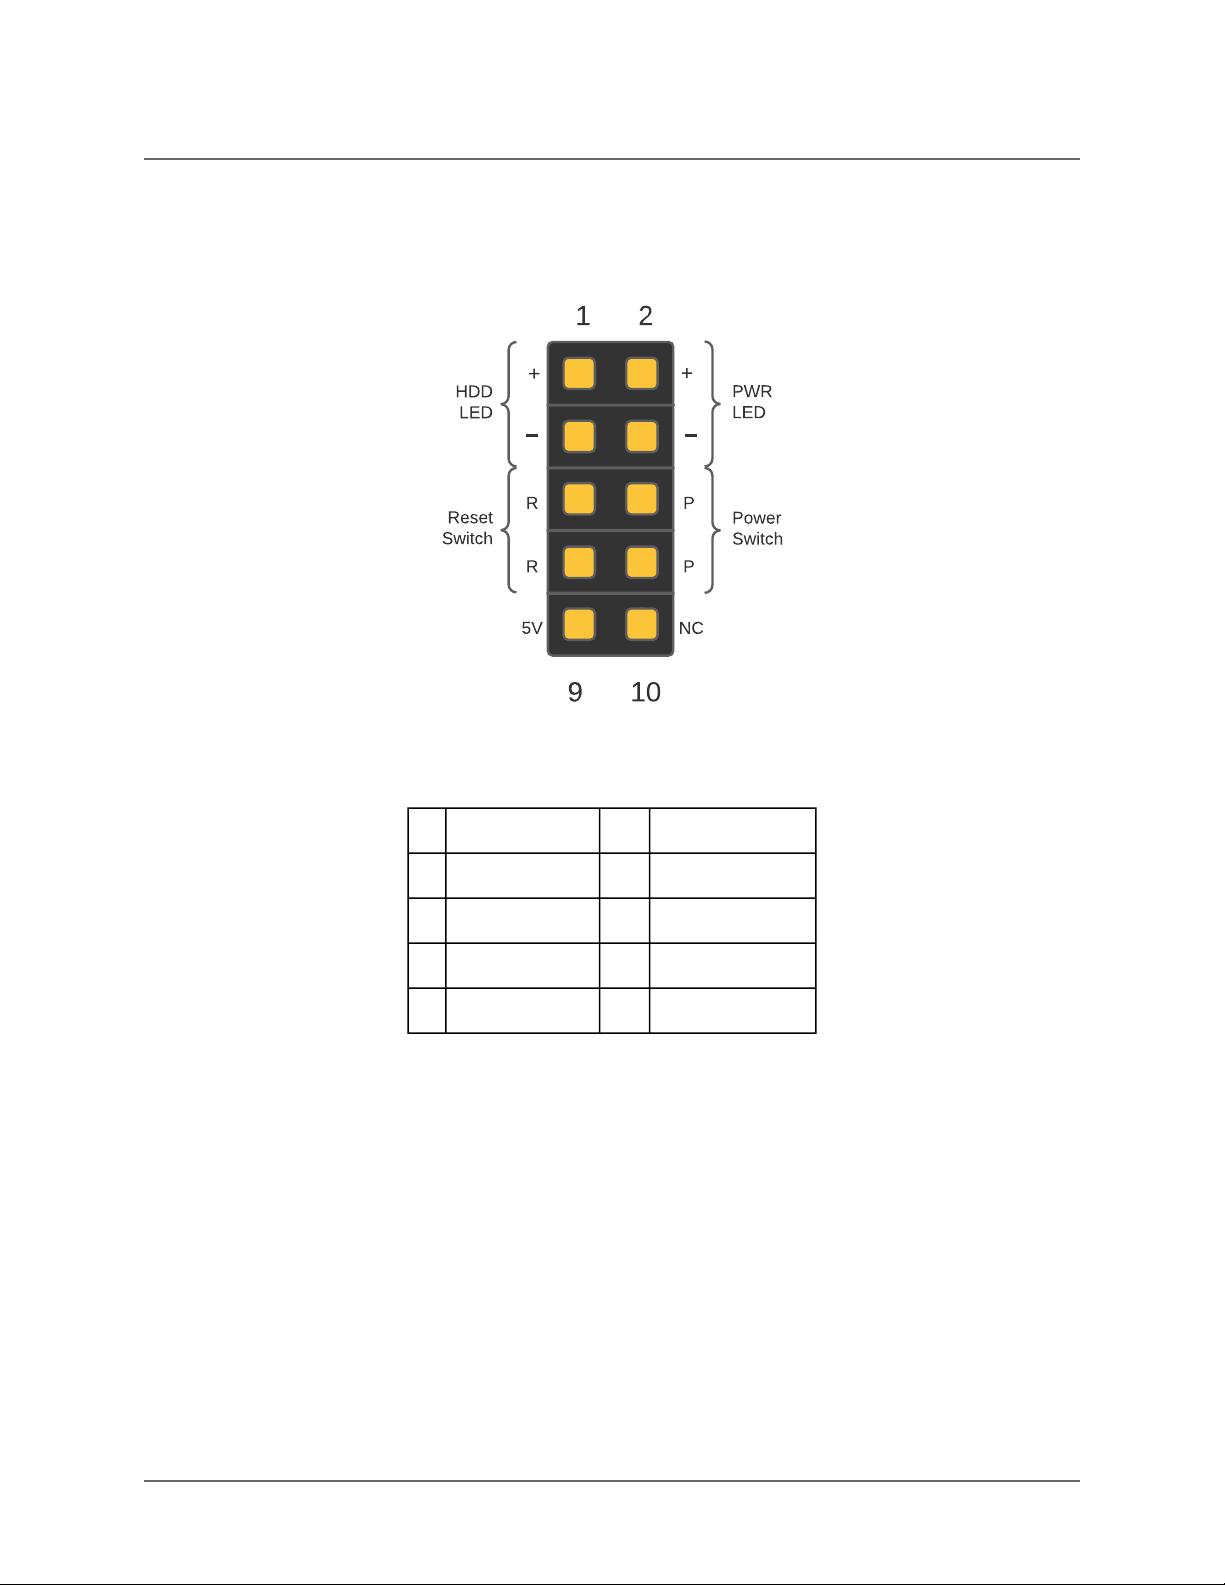
•Front Panel Connectors:
If the user is mounting the HiFive Unmatched board a mini-ITX case, connect the front
panel header wires to the front panel connector (see 27 in Figure 1).
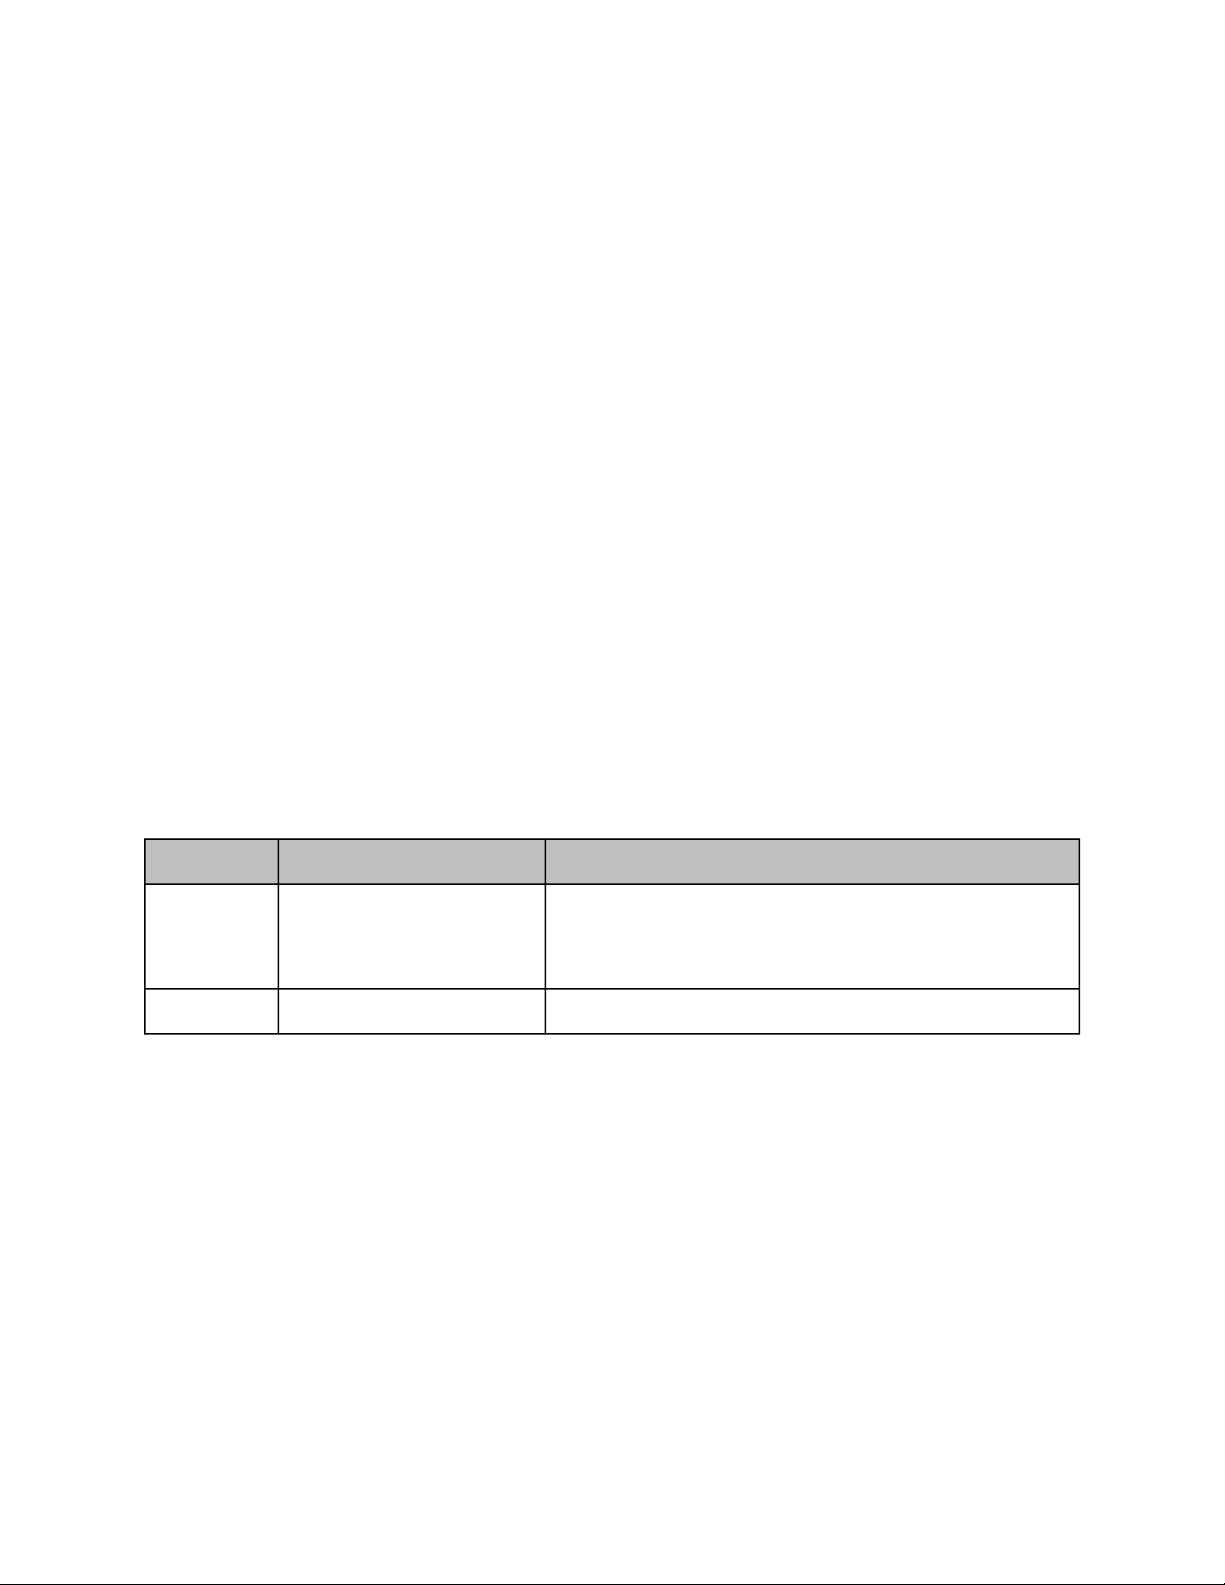
Figure 5: Front Panel Connector
Table 3: Front Panel Connections
1 HDD LED 2 Power LED
3 HDD LED - 4 Power LED -
5 Reset Switch 6 Power Switch
7 Reset Switch 8 Power Switch
9 +5V 10 No connection
3.2 Connecting to the Power Supply
First, connect the ATX power supply 24-pin connector to ATX header (26 in Figure 1) on the
board. Some 24-pin ATX power connectors are made of 20 pin and 4 pin connectors that must
be merged to ensure a good connection. Consider Figure 6.
3 Board Setup
HiFive Unmatched Getting Started Guide © SiFive, Inc. Page 10
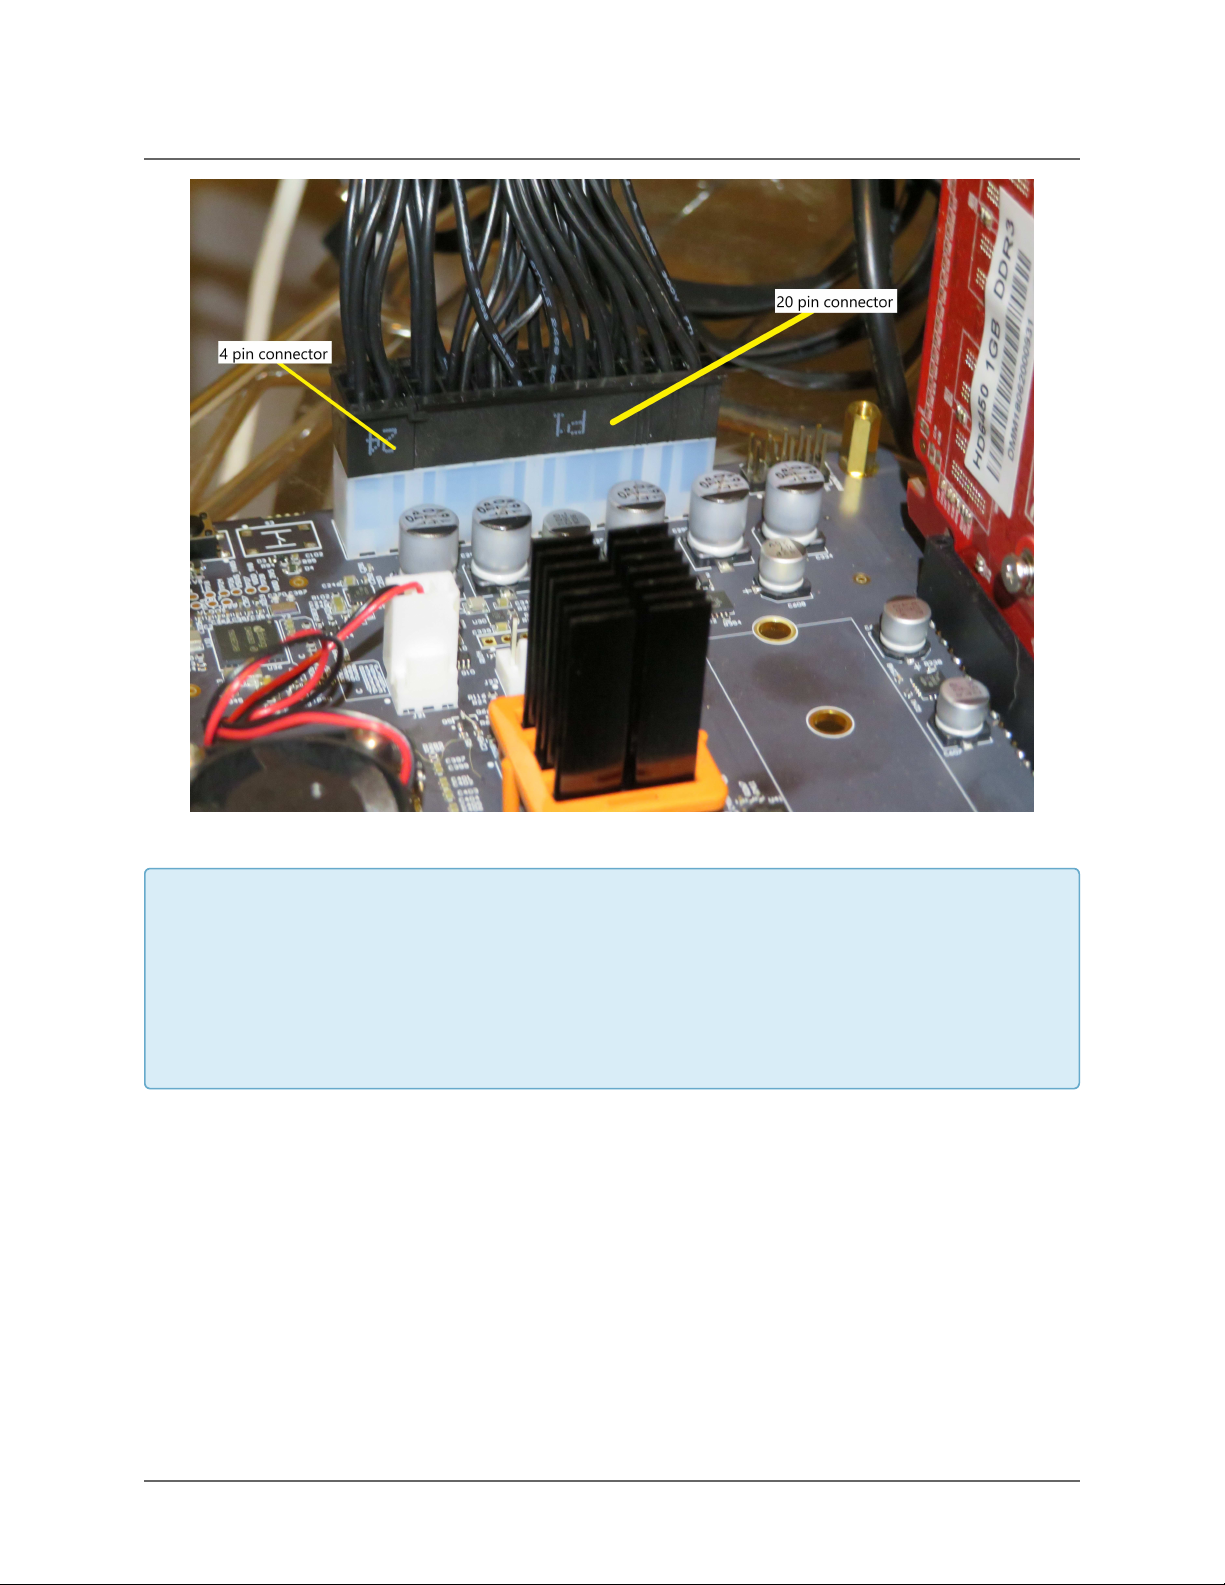
Figure 6: ATX Connection
Note
Care must be taken not to excessively flex the board when connecting or disconnecting the
ATX Power Connector. Note that the figure above is from the first version of the board.
Later versions of the fan header position the red cable on the left and the black cable on
the right.
Then, connect USB to microUSB cable to the microUSB connector (see 2in Figure 1).
3.3 Slotting the MicroSD Card
The HiFive Unmatched kit comes packaged with a preloaded microSD card. Connect this
microSD card to the microSD card slot (see 1in Figure 1).
3 Board Setup
HiFive Unmatched Getting Started Guide © SiFive, Inc. Page 11

3.4 Checking the Fan Connection
The HiFive Unmatched board comes packaged with the CPU fan installed. Ensure that the CPU
fan cables are firmly connected to the CPU Fan Header (21 in Figure 1) before turning ON the
board.
3.5 Powering the Board
Then, power the ATX power supply. The power supply might have a switch that needs to be
flipped on. After setting up the power supply, follow the steps below to power the board ON and
OFF.
3.5.1 Turn ON Power to Board
If the board is not connected to a PC case via the front panel header, power is switched on by
an on-board pushbutton. To turn on the board, press the power pushbutton (24 in Figure 1)
briefly. The on-board power supply will then turn on. Power LEDs will illuminate indicating that
the ATX power supply is turned ON and power is being regulated from the on-board power sup-
ply.
Alternatively, if the board is connected to the case, connect the front panel wires as shown in
Table 3 and press the power button on the PC case to turn ON the HiFive Unmatched board.
3.5.2 Turn OFF Power to Board
To turn off the board, press and hold the power pushbutton (24 in Figure 1) for about four sec-
onds. This will turn off the on-board power regulator, shutting off the board. Power OFF on the
board is indicated by the fan stopping and LEDs shutting off.
Alternatively, if the board is connected to the case, push and hold the power button on the case
to turn OFF the HiFive Unmatched board.
3.6 Connecting IOs to the Board
After setting up power to the board, connect IO devices as necessary.
3 Board Setup
HiFive Unmatched Getting Started Guide © SiFive, Inc. Page 12

4
Boot and Run
The user can connect to the HiFive Unmatched board over USB-UART Serial Console.
4.1 Connecting with USB Console
With a microUSB cable connected to the HiFive Unmatched, you can access the console. The
console both shows the linux boot process and can be used to log into the device.
From macOS, run:
sudo screen -L /dev/tty.usbserial-*01 115200
From Linux, run:
sudo screen -L /dev/serial/by-path/*-port0 115200
For the commands above, the "-L" flag enables automatic output logging. The default file name
for this logfile is "screenlog.0". This logfile will be created and appended to in the user’s working
directory. If major issues occur, such as kernel crashes and boot stage errors, this logfile can be
used to help the SiFive support team identify the source of an error. More information about the
"-L" flag is available in the manual page (command: man screen).
Alternatively, the user can use minicom and picocom commands to access the console.
Hit enter a few times to see the login prompt. Username root, password sifive.
To quit screen, hit Control-a,\,y. If you do not quit properly, you can end up with multiple
screens running at the same time. This manifests as lost characters both sent and received.
4.1.1 Installing USB-UART Drivers on macOS
To use the USB-UART serial console on macOS, the user may need to install an external driver
for FTDI chips.
HiFive Unmatched Getting Started Guide © SiFive, Inc. Page 13

1. Head over to the FTDI Chip drivers page:
https://www.ftdichip.com/Drivers/VCP.htm
2. Scroll down until you reach the table of download links and select your operating system.
3. Download the selected driver.
4. Open the installer DMG file.
5. Open the FTDIUSBSerial.pkg file. This will prompt an installer dialog box. Continue with
installation and agree to terms of software license agreement to install the drivers.
6. Enter your admin password.
7. Click "Install Software".
8. The drivers should be installed, and the user can now access the HiFive Unmatched con-
sole via USB-UART.
4.1.2 Setting up the Terminal on Windows
The following section describes getting started with the HiFive Unmatched terminal on Windows
using PuTTY.
After plugging your microUSB cable to the microUSB connector (2 in Figure 1), connect the
USB to your host machine. The HiFive Unmatched board should then appear in your Device
Manager, as shown in Figure 7. Note that the COM port number may be different for each envi-
ronment.
Figure 7: Device Manager COM Ports
Right click on the "USB Serial Port" and select "Properties" from the dropdown menu. This
should display the following, as shown in Figure 8. Note that "Manufacturer: FTDI" is expected.
4 Boot and Run
HiFive Unmatched Getting Started Guide © SiFive, Inc. Page 14
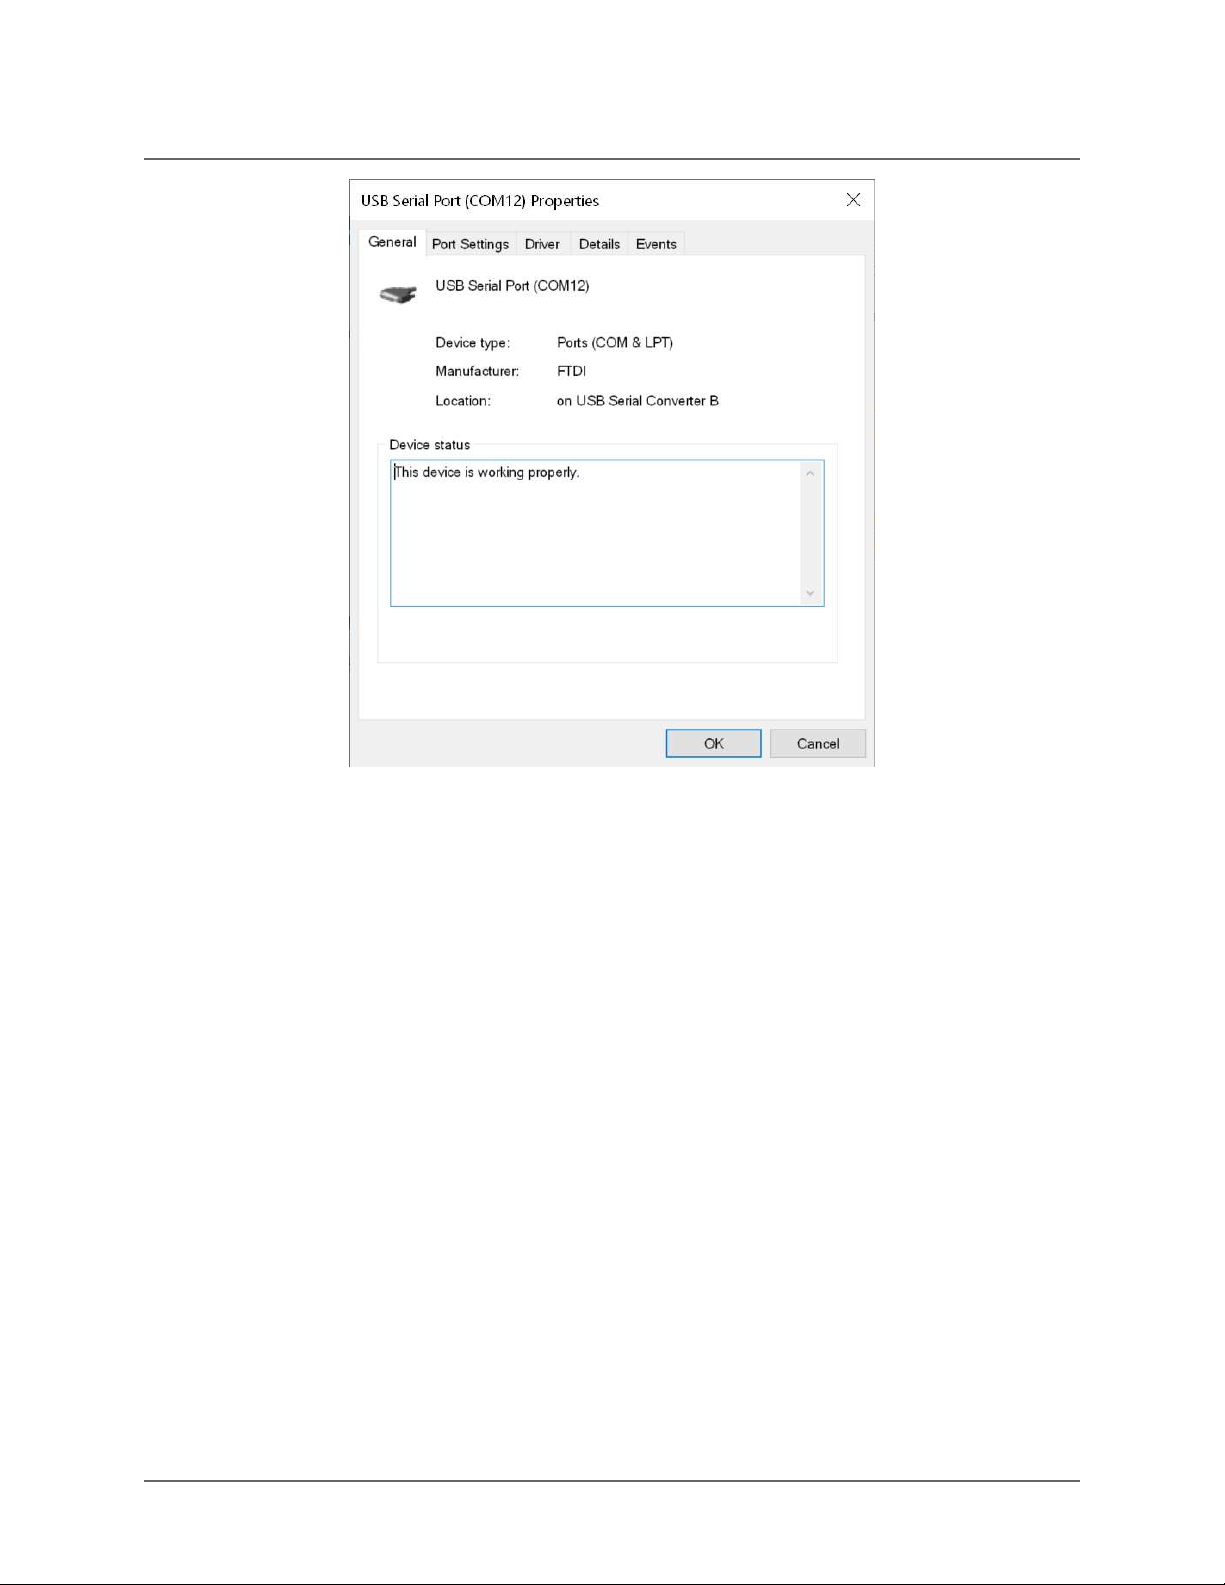
Figure 8: Serial Port Properties
Then, download and install the latest release of PuTTY:
https://www.chiark.greenend.org.uk/~sgtatham/putty/latest.html
Then, configure PuTTY as shown in Figure 9.
1. Select "Serial" connection type
2. Select Serial line for the COM port the HiFive Unmatched board is connected to as shown
in the Device Manager.
3. Select Speed of 115200
4. Click the "Open" button
4 Boot and Run
HiFive Unmatched Getting Started Guide © SiFive, Inc. Page 15
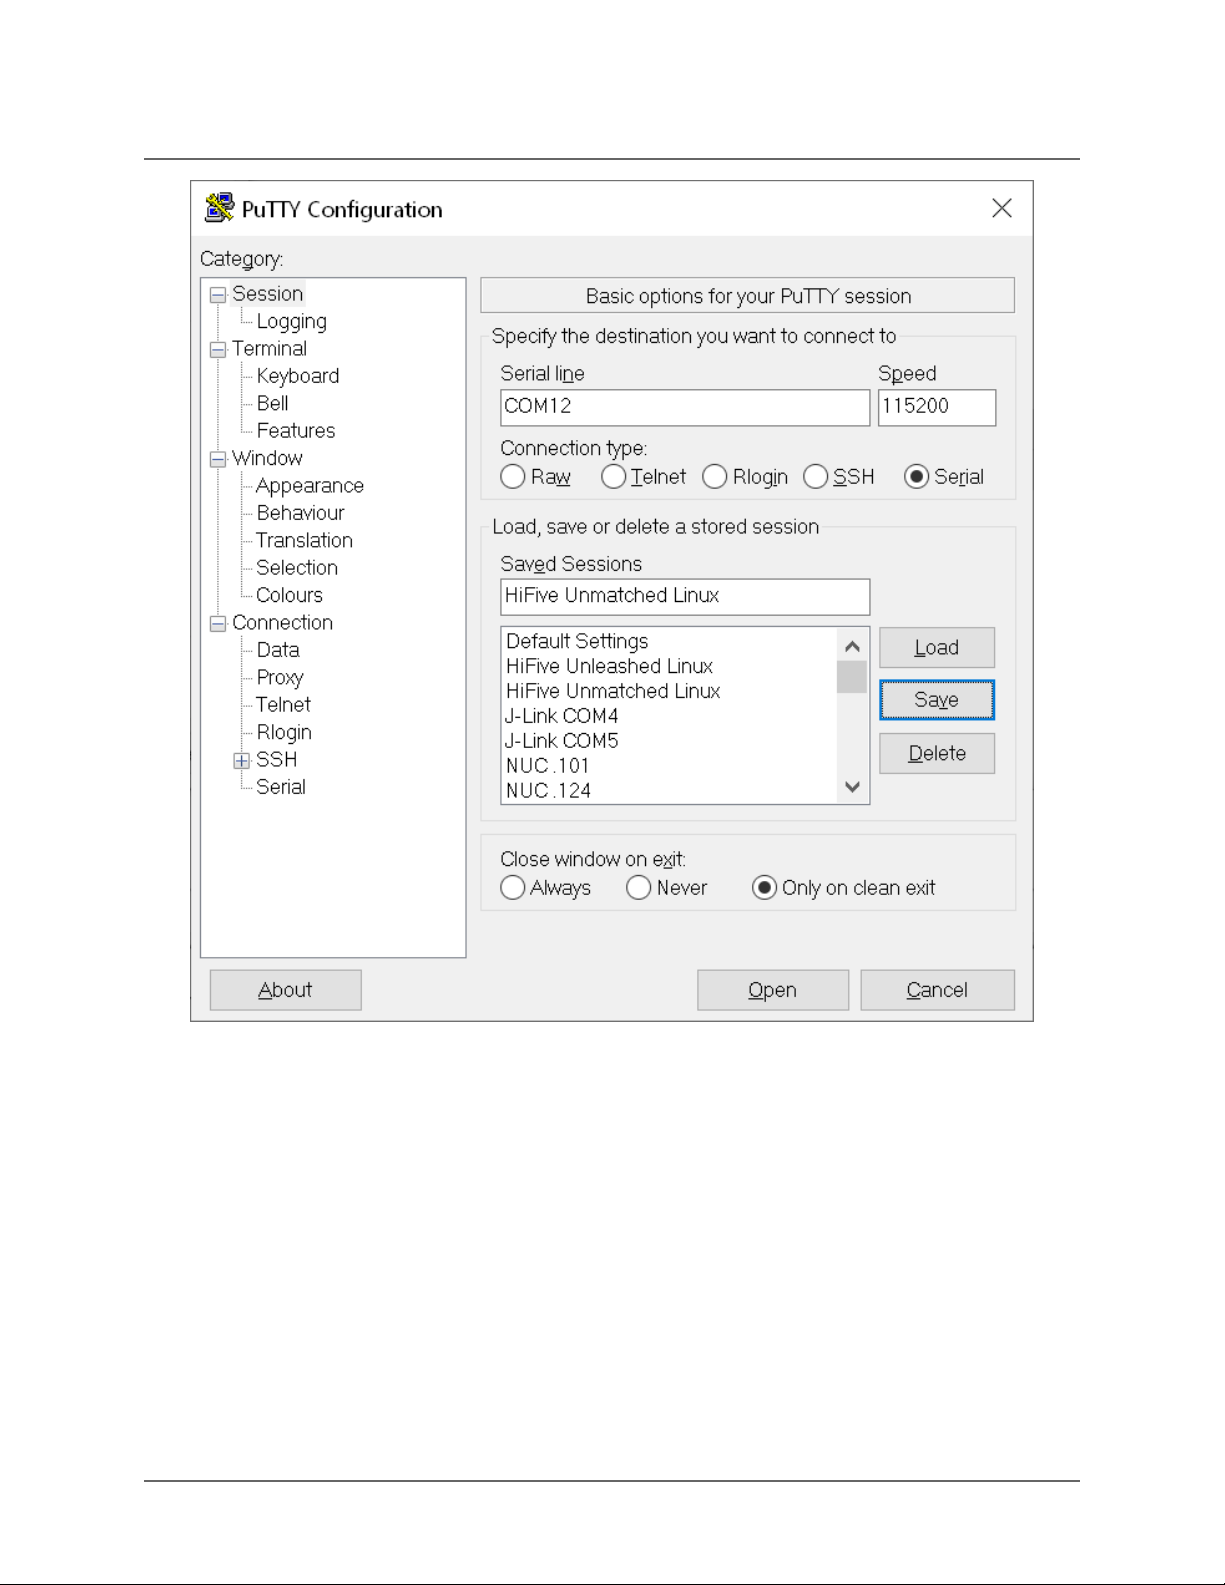
Figure 9: PuTTY Configuration
4 Boot and Run
HiFive Unmatched Getting Started Guide © SiFive, Inc. Page 16

5
Support for HiFive Unmatched
Join the SiFive forums to ask questions and receive support for the HiFive Unmatched develop-
ment board: https://forums.sifive.com/c/hifive-unmatched/16.
For supplemental information about HiFive Unmatched and the latest versions of the supporting
documentation, visit: https://www.sifive.com.
For direct questions, contact your SiFive representative.
HiFive Unmatched Getting Started Guide © SiFive, Inc. Page 17
This manual suits for next models
2
Table of contents
Other SiFive Motherboard manuals


