Sign HTM-LCB4-I-LF User manual
HEAT TRANSFERRING
We are looking for distributor, please ask us for better offer!
Samples are available.
Sign-in-China.com
Online Wholesale for AD & Signage Products
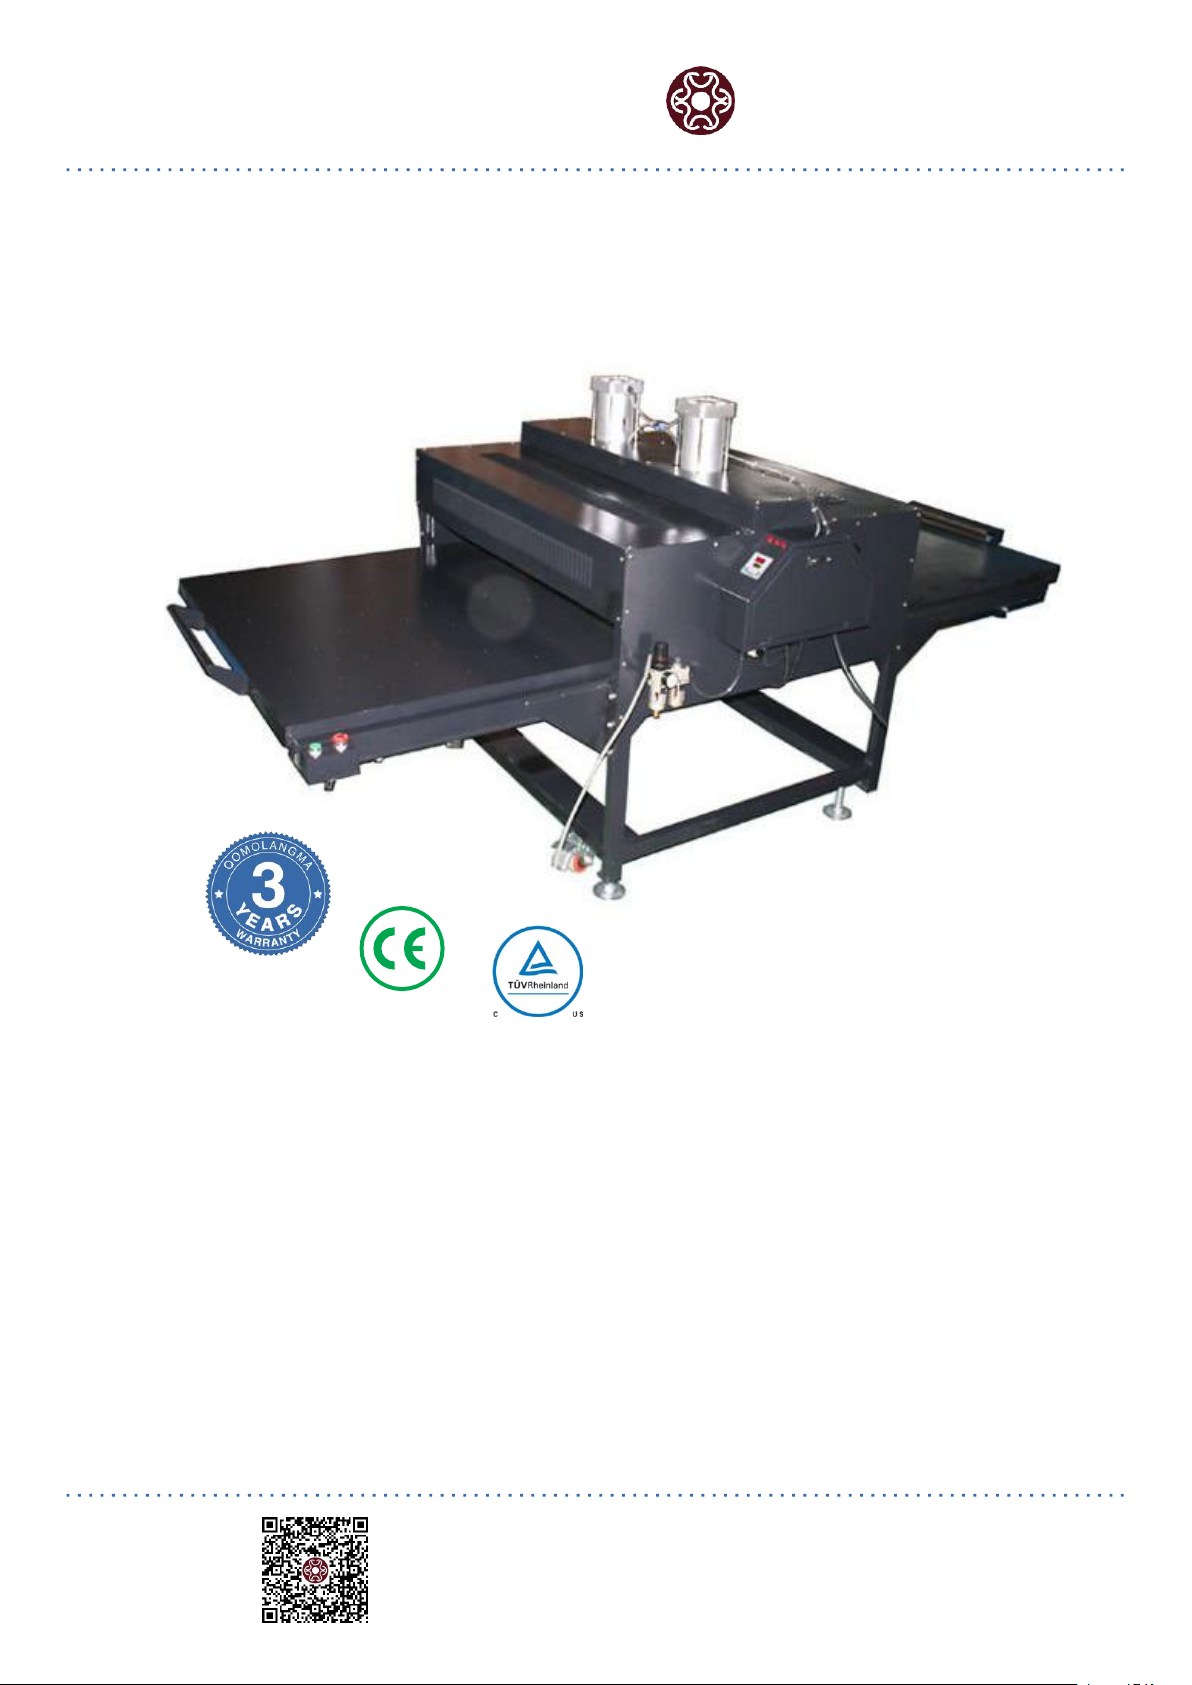
User Manual for Pneumatic Heat Press
HTM-LCB5-III
Operation Manual (CE)
This machine is designed not for
minors to use or food processing
Please read this manual carefully before operation
Learn More >>
Add: Room 17-20, F-3M, Building 1, Community 3, Hanwei International Plaza,
No.186, Western Road of South 4th Ring Road, Fengtai District, Beijing, China. 100070
Cell Phone: +86 138 012 487 14

Sign-in-China.com
Online Wholesale for AD & Signage Products
Learn More >>
-2-
Congratulations on your purchase of the Air Operated Automatic digital heat press machine!
This heat press machine has many ex - citing features, all of which are meant to help make
your heat transfer pressing endeavors as successful and easy as possible. Please take the
time now to thoroughly read through this manual to become acquaint -ed with them. It will
explain some key features, concepts and methods that will save much time and effort in
using this press and in your heat pressing applications.
Throughout this manual, many areas and components of this machine will be referred to by
specific names. Please refer to the illustrations below in order to become familiar with some
of the terminology used in this manual.
I. Applications
This large format T-shirt heat press machine is widely used for transfer image for T shirts,
cloth, cushion covers, rock photos, tiles, backpack school bag, jigsaw puzzle, etc.
31" x 39" Pneumatic Single Station Flat Heat Press Machine with Drawer

Sign-in-China.com
Online Wholesale for AD & Signage Products
Learn More >>
-3-
II. Heat Press Components
1Power Switch
2Temp / Time Gauge
3Pressure Meter
4Pressure Adjustment Knob
5Emergency-stop Button
6Start Button
Sign-in-China.com
Online Wholesale for AD & Signage Products
Learn More >>
-4-
III. Specifications
Model
HTM-LCB4-I-LF
HTM-LCB4-II-LF
HTM-LCB4-III-LF
Voltage
110V, 60Hz, 1P, 41A
220V, 60Hz,3P, 50A
380V, 60Hz, 3P, 27A
220V, 60hz, 3P, 60A
380V, 60Hz, 3P, 36A
Power
4500W
9000W + 1500W Air
Compressor
12000W + 1500W Air
compressor
Size
600mm x 800mm (24in x
31in)
800mm x 1000mm (31in
x 39in)
1000mm x 1200mm (39in x
47in)
Temperature Range
0°C - 250°C (32℉- 482℉)
Time Range
0-999sec
Air Cylinder
One
Two
Two
Cylinder Distance
125cm (49.2in)
125cm (49.2in)
125cm (49.2in)
Largest Pressure
8kg / cm2
8kg / cm2
8kg / cm2
Machine Size
1200mm x 2400mm x
1650mm
(47in x 95in x 65in)
1420mm x 3060mm x
1650mm
(56in x 120in x 65in)
1620mm x 3660mm x
1650mm
(64in x 144in x 65in)
Machine Weight
827lbs (375kg)
1135lbs (515kg)
1408lbs (639kg)
Packing Size
1200mm x 1550mm x
900mm
47in x 61in x 35in
1400mm x 1550mm x
1150mm
55in x 61in x 45in
1620mm x 1550mm x
1260mm
64in x 61in x 50in
Gross Weight
866lb (393kg)
1190lb (540kg)
1486lbs (674kg)

Sign-in-China.com
Online Wholesale for AD & Signage Products
Learn More >>
-5-
Warm Tips:
1. LCB4-I has only one air cylinder, other two bigger size machines with two cylinders.
2.The heat press machine uses electricity about 41A/50A/60 Amps, we suggest you
prepare thicker cables for safety reason.
3.You need to prepare one air compressor. And the suggested specification is that power
greater than 1.5KW, capacity about 30L, pressure more than 1MPa.
Heat Platen Test:
Each Single Copper sheathed heating rod is tested before it is cast in an aluminum alloy or
Mica Sheet. These heating rods are comparable to those found in industrial ovens that heat
up quickly, work efficiently and last many years.
Finished Machine Test:
1.
Turn on the machine, let it heating up to 200℃(392℉).
2.
Keep the temperature stay at 200℃(392℉) for at least half an hour.
IV. Installation
4.1 installation precautions
1. Before unpacking, carefully check if there is damage for the packing and machine during
transportation.
2. After unpacking, check if the service parts are correct as the packing list.
3. The installing place should be provided enough space for operating and free of dust,
novapor, no corrosive gas, no combustible or explosive substance around. Keep the
machine away from wind blowing place, otherwise will affect the roller temperature which
might bring the laminating quality.
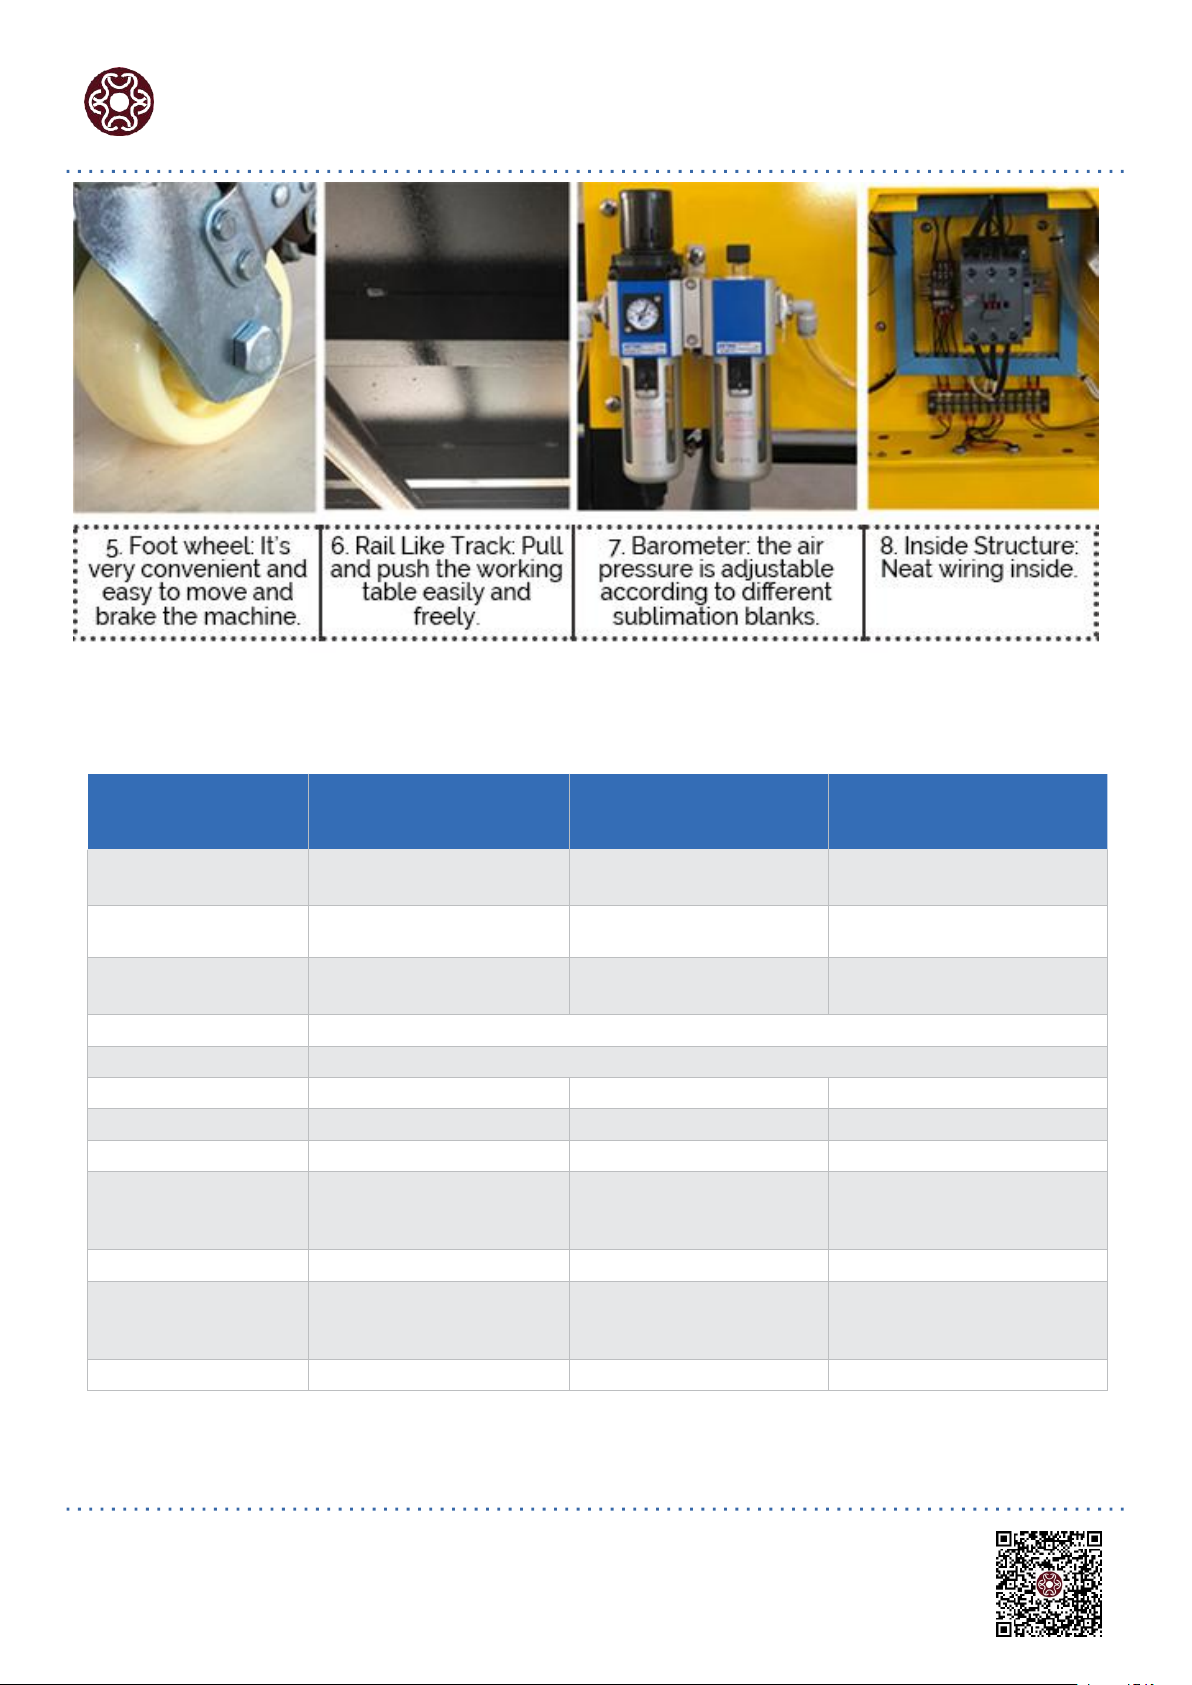
4. After installation, adjust each caster to reach level ground. The casters only be used on
even ground for short distance movement.
Not ice: Please move carefully since it is heavy equipment.

Sign-in-China.com
Online Wholesale for AD & Signage Products
Learn More >>
-6-
4.2 The Machine Assembly
1)
Take out the machine from the packing.
Place the heat press on a stable flat surface with good ventilation. Don’t put much staff around the
machine to avoid the necessary problem. The power cord not allow to put on ground nor
with object on top.
2)
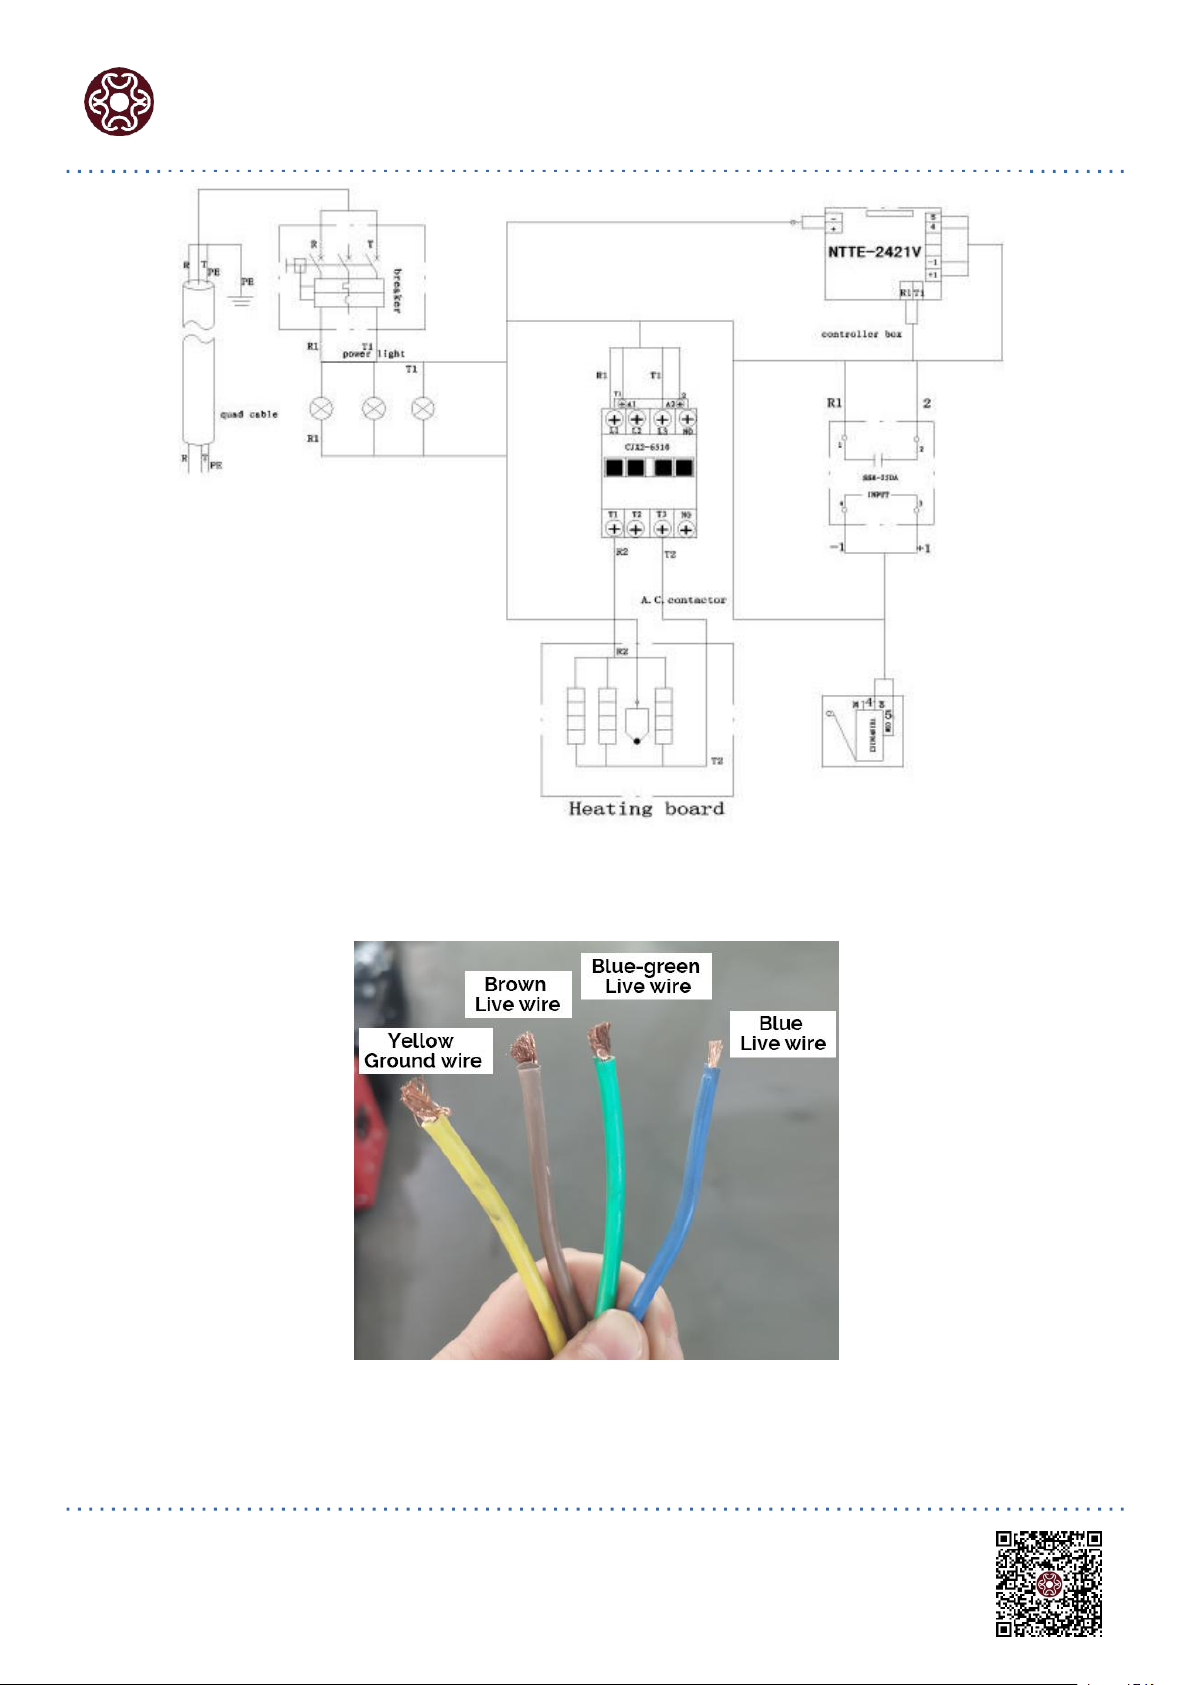
Wiring Diagram
It was installed the standard power supply plug, before plug in, please check your power supply
voltage is same as the machine's rated operating voltage, also should verify the access to the
socket is in requirements, and have a good grounding,and the capacity is large enough.
HTM-LCB4-I-LF Model heat press machine, 1 phase power, circuit diagram
Sign-in-China.com
Online Wholesale for AD & Signage Products
Learn More >>
-7-
HTM-LCB4-II-LF and HTM-LCB4-III-LF Model heat press machine, 3 phase power, circuit
diagram

Sign-in-China.com
Online Wholesale for AD & Signage Products
Learn More >>
-8-
3)
Turn on power switch①and connect air compressor, place the material on working
table.
4)
Adjust the pressure with pressure adjustment knob④, lift this knob up and rotate it for
adjusting pressure of air compressor. Clockwise for adding pressure, anticlockwise for
decreasing pressure (we advise 0.3-0.6)

Sign-in-China.com
Online Wholesale for AD & Signage Products
Learn More >>
-9-
5)
Set temperature & time with temp/time gauge ②

Sign-in-China.com
Online Wholesale for AD & Signage Products
Learn More >>
-10 -
1The temperature for heating plate will start to rise up, when it reaches the
temperature you have set, place the material on the working table.
2Push the working table inside, then press Start Button ⑥the heating plate will press
down.
3The heating plate will lift up automatic when the time you set is reached, pull out
the working table, and then take out the materia.
Note:
Because difference materials have different thickness, the temperature and time
required are different.
Pls try a small sample to get the right temperature and time needed before starting large
quantity printing.
Fabric requires the temperature about 180℃(356℉),Fabric clothing use with sublimation
paper: 30-50 sec, 100% cotton clothing use with transfer paper:15-20sec.
After using for a period of time, check whether there is water in the drainage cup. If
necessary, turn on the drain switch below. After the water is drained, tighten the switch.
Avoid contact with the heating plate during heating to avoid burns.
Successful transfer requires the correct time. The cooperation of temperature and
pressure, the thickness and material of the stamped object and the type of transfer paper
all affect the transfer effect.
Transfer paper must be approved for sample trial printing before mass production.
The function of the temperature control instrument is complicated, and extra adjustment
operation is not required except for setting the temperature value, otherwise it is easy to
cause the instrument program to be disordered and not to work properly !!!
Sign-in-China.com
Online Wholesale for AD & Signage Products
Learn More >>
-11 -
V. IProblems and Solutions
No.
Troubles
Reason
Solution
1
Picture burning
Heating time is too long or heating
temperature is too high.
Adjust time or temperature.
2
Fails to heat up, but display
well
Heating plate or relay broken
Check the heating plate or relay
3
Lack of color, faded image.
Insufficient temperature and / or
heating time.
Adjust the temperature and / or
increase the heating time.
4
Darkened, deep color;
blurred image.
Heating time is too long or heating
temperature is too high.
Adjust the temperature or heating
time.
5
Although the main is
plugged in and the power-
on button is pressed, the
LED does not light up.
The power plug is not well -
connected
Check the plug to ensure
connection.
The voltage of the main does not
adaptable to the required voltage.
Check the voltage of the main to
ensure its adaption to the machine.
Emergency stop is not switched on
Turn on the emergency stop.
The fuse link beside the power
cable is un-installed or damaged.
Check the fuse to ensure it is not
damage.
6
The actual heating
temperature exceeds the
setting temperature
Relay broken
Replace the relay
The cylinder does not move
When the heating plate cannot be pushed up and down, check
whether the pressure gauge on the air cylinder shows that there is
pressure, or observe whether the solenoid valve in the control box is
moved when the start button is pressed
VI. Maintenance
6.1 Notice
1) Only experienced operator could open the cabinet, be noted following measures;
2) Don’t use abrasive cleaner to clean the machine surface.
3) Check the rotation parts regularly and fill high-temperature grease to lubricate the
two bearings of heating rollers.
4)Do not wash the machine with water. This can damage the electrical circuits, cause
electrical shock or corrosion.

Sign-in-China.com
Online Wholesale for AD & Signage Products
Learn More >>
-12 -
5)During maintenance, don’t run the machine.
6)During maintenance, don't change, move and dismantle the safety parts. Make sure
the safety parts before using.
7) Cut the power supply before dismantling and assembly.
6.2 Cleaning
1) To extend the lifetime of the machines, please ensure the machine are clean.
2) Make sure environment clean and keep away from obstacles.
6.3 Checking
In order to ensure your safety, please check the safety of the machine regularly. If you find
failures in the check, please refer to the section of Trouble shooting and solution.
6.3.1 Visual Checking
Visual checking prior to maintenance.
1) Power supple cable undamaged.
2) Foot wheel is stable.
3) Any damage on machine
6.3.2 Safety Parts Checking
Emergency switch.
1) Turn on machine
2) press the emergency switch, machine stop or not
3) Turn on machine when emergency switch is on
4)Release the emergency switch, turn on and start to run machine.

WARRANTY CARD
Notes
i.
The warranty card should be filled by seller and kept by buyer. Alterations are prohibited.
ii.
The guarantee period is two years. The repair is free of charge within 6 months and will be charged
with material and labor cost after 6 months.
iii.
No free repair is available for any damages caused by the improperuse.
HEAT TRANSFERRING
We are looking for distributor, please ask us for better offer!
Samples are available.
Sign-in-China.com
Online Wholesale for AD & Signage Products
MODEL
LOT #
BUYER
DATE
SELLER
TEL
Learn More >>
Add: Room 17-20, F-3M, Building 1, Community 3, Hanwei International Plaza,
No.186, Western Road of South 4th Ring Road, Fengtai District, Beijing, China. 100070
Cell Phone: +86 138 012 487 14
This manual suits for next models
1
Table of contents


