Signature Kitchen Suite Q50941E User manual

Order Number
: GETEC-C1-20-149
FCC Part 18
Test Report Number
: GETEC-E3-20-019
Page 1 / 1
EUT Type: HOUSEHOLD COOKTOP
FCC ID.: BEJQ50941E
APPENDIX H
: USER’S MANUAL

ENGLISH ESPAÑOL FRANÇAIS
www.signaturekitchensuite.com
MFL54169109_00
OWNER’S MANUAL
CERAMIC-GLASS INDUCTION COOKTOP
Read this owner’s manual thoroughly before operating the appliance
and keep it handy for reference at all times.
SKSIT3601G
Copyright © 2020 Signature Kitchen Suite. All Rights Reserved.

2TABLE OF CONTENTS
TABLE OF CONTENTS
3IMPORTANT SAFETY
INSTRUCTIONS
9INTRODUCTION TO INDUCTION
COOKING
9 Induction Cookware
13 PARTS AND FEATURES
13 Parts and Features of the Cooktop
13 Accessories
14 Touch Control Features
15 OPERATING INSTRUCTIONS
15 First Operation
15 Getting Started
15 Changing Cooktop Settings
17 Before Using the Cooktop
18 Activating the Cooktop
20 Tips for Induction Cooking
22 Using the Cook Modes
23 Using the Flexible Cooking Zone
23 Using the Dual Cooking Zone
24 Other Functions
27 SMART FUNCTIONS
27 SIGNATURE KITCHEN SUITE Application
28 FCC Notice
28 FCC RF Radiation Exposure Statement
29 CARE AND CLEANING
29 Cleaning the Cooktop
31 INSTALLATION INSTRUCTIONS
31 Before You Begin
31 Unpacking the Cooktop
32 Technical Specifications
33 Preparing the Installation Location
35 Electrical Connections
37 Cooktop Installation
38 Final Check
39 TROUBLESHOOTING
39 Before Calling for Service
41 WARRANTY

3
IMPORTANT SAFETY INSTRUCTIONS
ENGLISH
IMPORTANT SAFETY INSTRUCTIONS
Read and follow all instructions when using the range to prevent the risk of fire, electric
shock, personal injury, or damage. This guide does not cover all possible conditions that
may occur. Always contact your service agent or manufacturer about problems that you do
not understand.
Download this owner's manual at: www.signaturekitchensuite.com
This is the safety alert symbol. This symbol alerts you to potential hazards that
can result in property damage and/or serious bodily harm or death.
All safety messages will follow the safety alert symbol and either the word
WARNING or CAUTION. These words mean:
WARNING -Indicates a hazardous situation which, if not avoided, could result
in death or serious injury.
CAUTION -Indicates a hazardous situation which, if not avoided, could result
in minor or moderate injury.
•For your safety, the information in this manual must be followed to minimize the risk of
fire, electric shock, or to prevent property damage, personal injury, or death.
WARNING
SAFETY PRECAUTIONS
•Proper Installation: Be sure your appliance is properly installed and grounded by a
qualified technician in accordance with the National Electrical Code ANSI/NFPA No.
70, latest edition in the United States, and all local code requirements. Install only per
installation instructions.
•The safety aspects of this appliance comply with accepted technical standards.
•Know how to disconnect the electrical power to the appliance at the circuit breaker
or fuse box in case of an emergency. Mark the breaker or fuse for ease of identification
and swift action if necessary.
•Do not repair or replace any part of the appliance. All servicing should be done only by
a qualified technician to avoid the risk of personal injury and damage to the appliance.
•Never modify or alter the construction of an appliance such as removal of panels,
wire covers or any other permanent part of the product.
WARNING
•Never use your appliance for warming or heating a room.
WARNING
•Persons with a pacemaker or similar medical device should exercise caution using or
standing near an induction unit while it is in operation, as the electromagnetic field may
affect the working of the pacemaker or similar medical device.
It would be advisable to consult your doctor or the pacemaker or medical device
manufacturer about your particular situation.

4IMPORTANT SAFETY INSTRUCTIONS
CAUTION
•DO NOT touch cooking zones or areas near these surfaces. Cooking zones may
be hot from residual heat even though they are dark in color. Areas near the cooking
zones may become hot enough to cause burns. During and after use, do not touch
or let clothing or other flammable materials touch these areas until they have had
sufficient time to cool.
•Never wear loose fitting or hanging garments while using this appliance.
•Always turn off all controls when cooking is completed.
•Do not use water or flour on grease fires. Smother the fire with a pan lid, or use baking
soda, a dry chemical or foam-type extinguisher.
•Use only dry pot holders. Moist or damp pot holders on hot surfaces may result in burns
from steam. Do not let pot holders touch hot surface units. Do not use a towel or other
bulky cloth instead of a pot holder.
•Do not heat unopened food containers. A buildup of pressure may cause the container
to burst and result in injury.
FLAMMABLE MATERIAL
•Remove all tape and packaging wrap before using the appliance. Destroy the carton and
plastic bags after unpacking the appliance.
Never allow children to play with packaging material.
•Storage on appliance: Flammable materials should not be stored near or on the
cooking surface. This includes paper, plastic and cloth items, such as cookbooks,
plasticware and towels, as well as flammable liquids. Do not store explosives, such as
aerosol cans, on or near the appliance. Flammable materials may explode and result in
fire or property damage.
•Do not store or use gasoline or other flammable vapors and liquids in the vicinity of
this or any other appliance.
•Never place combustible items on the cooktop.
•Never keep any combustible items or aerosol cans in a drawer located under the
cooktop.
DEEP FAT FRYER
•When heating fat or grease, watch it closely. Fat or grease may catch fire if allowed to
become too hot.
•Overheated fats and oils catch fire quickly.
You should supervise cooking when preparing foods in fat or oil.
•Use a deep fat thermometer, if possible, to prevent overheating fat beyond the smoking
point.

5
IMPORTANT SAFETY INSTRUCTIONS
ENGLISH
ELECTRICAL SAFETY
WARNING
•If the surface is cracked, switch off the appliance to avoid the possibility of electric
shock. Do not reuse your COOKTOP until the glass surface has been changed.
•When using the COOKTOP, never use aluminum foil, products wrapped in aluminum
foil, or deep-frozen food in aluminum cookware.
•If the supply cord is damaged, it must be replaced by the manufacturer, its service
agent or similarly qualified persons in order to avoid a hazard.
•The installation and connection of the new appliance must only be carried out by qualified
personnel.
•Flush-mounted appliances may only be operated following installation in suitable cabinets
and workplaces which conform to the relevant standards. This ensures sufficient protection
against electric shock as required by certification agencies.
•If your appliance malfunctions or fractures, switch off all cooking zones, and contact the
Signature Kitchen Suite Customer Information Center for service.
CHILD SAFETY
WARNING
•This appliance is not intended for use by young children or infirm persons unless they
have been adequately supervised by a responsible person to ensure that they can use
the appliance safely.
•Young children should be supervised to ensure that they do not play with the appliance.
•Accessible parts may become hot during use. Young children should be kept away.
CAUTION
•Items of interest to children should not be stored in cabinets above a cooktop or on the
backsplash of a cooktop – children climbing on the cooktop to reach items could be
seriously injured.
•Do not leave children alone. Children should not be left alone or unattended in
the area where an appliance is in use. They should never be allowed to sit or stand
on any part of the appliance.

6IMPORTANT SAFETY INSTRUCTIONS
SAFETY DURING USE
•This appliance may only be used for normal cooking and frying in the home. It is not
designed for commercial or industrial purposes.
•Take care when plugging in electric appliances near the cooktop. Cords must not
come into contact with the hot surface. This could cause damage to the cooktop and cable
insulation.
•After use, switch off the hob element by its control and do not rely on the pan
detector.
•Always keep the control display panel clean and dry.
Do not let liquids or grease remain on the cooktop display area. Spilled or burnt-on foods
can activate or deactivate the appliance. Clean the display area thoroughly to resume
normal operation of the appliance.
•Avoid placing metal cooking utensils on the cooking surface areas. Metal objects
can become hot and cause burns.
•Clean the appliance regularly to keep all parts free of grease that could catch fire.
Exhaust fan ventilation hoods and grease filters should be kept clean. Do not allow grease
to accumulate on hood or filter. Greasy deposits in the fan could catch fire. Refer to hood
manufacturer's instructions for cleaning.
•Use Proper Pan Sizes. This appliance is equipped with one or more surface units of
different size.
•Select utensils having flat bottoms large enough to cover the cooking zones. The
pan detection sensors will not allow the affected cooking zones to operate without a pan
present.
•Do not place any object on or near the display area in order to prevent accidental
activation of the cooktop controls.
•Cookware handles should be turned inward and not extend over adjacent surface
units. To reduce the risk of burns, ignition of flammable materials, and spillage due to
unintentional contact with the cookware, the handles of cookware should be positioned so
that they are turned inward, and do not extend over adjacent surface units.
•Never leave prepared food on the cooking zones. Boilovers cause smoking and greasy
spillovers that may ignite, or a pan that has boiled dry may melt or become damaged.
•Protective liners: Do not use aluminum foil to line any part of the cooktop. Only use
aluminum foil as recommended after the cooking process, if used as a cover to be placed
over the food. Any other use of aluminum foil may result in the risk of electric shock, fire or
short circuit.
•Glazed cookware: Only certain types of glass, glass/ceramic, ceramic, earthenware,
or other glazed cookware are suitable for rangetop service without breaking due
to the sudden change in temperature. Check the manufacturer’s recommendations for
cooktop use.
•Do not clean or operate a broken cooktop. If cooktop should break, cleaning solutions
and spillovers may penetrate the broken cooktop and create a risk of electric shock.
Contact a qualified technician immediately.
•Do not place hot cookware on cold cooktop glass. This could cause glass to break.
•Do not slide pans across the cooktop surface. They may scratch the cooktop surface.
•Do not let pans boil dry. This may cause permanent damage in the form of breakage,
fusion, or marking that can affect the ceramic-glass cooktop. (This type of damage is not
covered by your warranty.)
•Never leave surface units unattended at high heat settings. Boilover causes smoking
and greasy spillovers that may ignite.
•Always turn off all controls when cooking is completed.

7
IMPORTANT SAFETY INSTRUCTIONS
ENGLISH
SAFETY WHEN CLEANING
•Always switch off the appliance before cleaning.
•For safety reasons, do not clean the appliance with a steam jet or high-pressure
cleaner.
•Clean the cooktop in accordance with the maintenance and cleaning instructions in
this manual.
•Do not use harsh abrasive cleaners or rough metal scrapers to clean the cooktop
glass since they can scratch the surface, which may result in shattering of the
glass.
•Clean cooktop cautiously. Do not use sponges or cloth to wipe spills on a hot cooking
area. Use a proper metal scraper.
COOK MEAT AND POULTRY THOROUGHLY
•Cook meat and poultry thoroughly-meat to at least an INTERNAL temperature of 160°F
and poultry to at least an INTERNAL temperature of 180°F. Cooking to these temperatures
usually protects against food-borne illnesses.
HOW TO AVOID DAMAGE TO THE APPLIANCE
•Prior to using the cooktop for the first time, apply the recommended cooktop cleaning
cream to the ceramic surface. Buff with a non-abrasive cloth or pad. This will make
cleaning easier when soiled from cooking.
The special cooktop cleaning cream leaves a protective finish on the glass to help prevent
scratches and abrasions.
•Do not use the cooktop as a worksurface or storage space.
•Please be careful at the edges when moving pots and pans.
•Do not operate the cooking zones with empty pots or pans.
•Do not turn on the cooking zones with no pots or pans on the element.
•Ceramic glass is very tough, and impervious to sharp temperature changes but is not
unbreakable. It can be damaged if hard or sharp objects fall on it.
•Be very cautious if using pots made of cast iron, or other pots with rough edges or burrs.
Moving these can cause scratches on glass.
•If sugar or a mixture containing sugar falls onto a hot cooking zone and melts, remove
immediately, while still hot. If left to cool down, it may damage the surface when removed.
•Do not slide metal or glass across the cooktop surface.
•Keep meltable objects or materials away from the ceramic glass surface, for example,
plastic utensils, aluminum foil, or cooking wraps.
If any materials or foodstuffs melt on the ceramic-glass surface, these should be cleaned
up immediately.
NOTE
There is a risk of burning yourself when the glass scraper is used on a hot cooking zone!
•Do not use cookware with any dirt buildup on the bottom.
•Do not use cookware with rough or uneven bottoms. This cookware can mark and scratch
the cooktop surface.
•Refer to the owner's manual for proper cleaning and maintenance of the cooktop.
•Do not use the glass cooktop surface as a cutting board.

8IMPORTANT SAFETY INSTRUCTIONS
DISPOSAL OF OLD APPLIANCES
To protect the environment, it is important that worn-out appliances are disposed of in the
correct manner.
•The appliance must not be disposed of with household rubbish.
•You can obtain information about collection dates or public refuse disposal sites from your
local government offices or state environmental protection agency.
CAUTION
Before disposing of old appliances please make them inoperable so they cannot be a
source of danger. To do this, have a qualified person disconnect the appliance from the
house circuitry.
Read and follow this safety information carefully.
SAVE THESE INSTRUCTIONS

9
INTRODUCTION TO INDUCTION COOKING
ENGLISH
INTRODUCTION TO
INDUCTION COOKING
How Induction Cooking Works
An induction coil beneath
the ceramic glass cooking
surface generates magnetic
fields, which act directly on
the base of the pots and
pans.
Instead of heating the ceramic glass, this method
heats the base of the pan immediately, saving time
and energy. Since the heat required for cooking is
generated directly in the base of the pan, the cooking
zone itself warms up only slightly. The cooktop
does become hot when heat is transferred from the
cookware.
IMPORTANT
•Electromagnetic fields can affect electronic circuits
and interfere with portable radios and phones.
•Do not put magnetically active objects (e.g., credit
cards, computer diskettes, cassettes) on or near
the ceramic glass surface while one or more
induction cooking zones are in use.
•Do not put any metal objects (e.g., spoons, pan
lids) on the cooking zones as they can become hot
when the cooking zones are in use.
Induction Cookware
NOTE
Before using the induction cooking elements,
carefully read and follow these cookware
recommendations and the instructions in the pan
sensing sections.
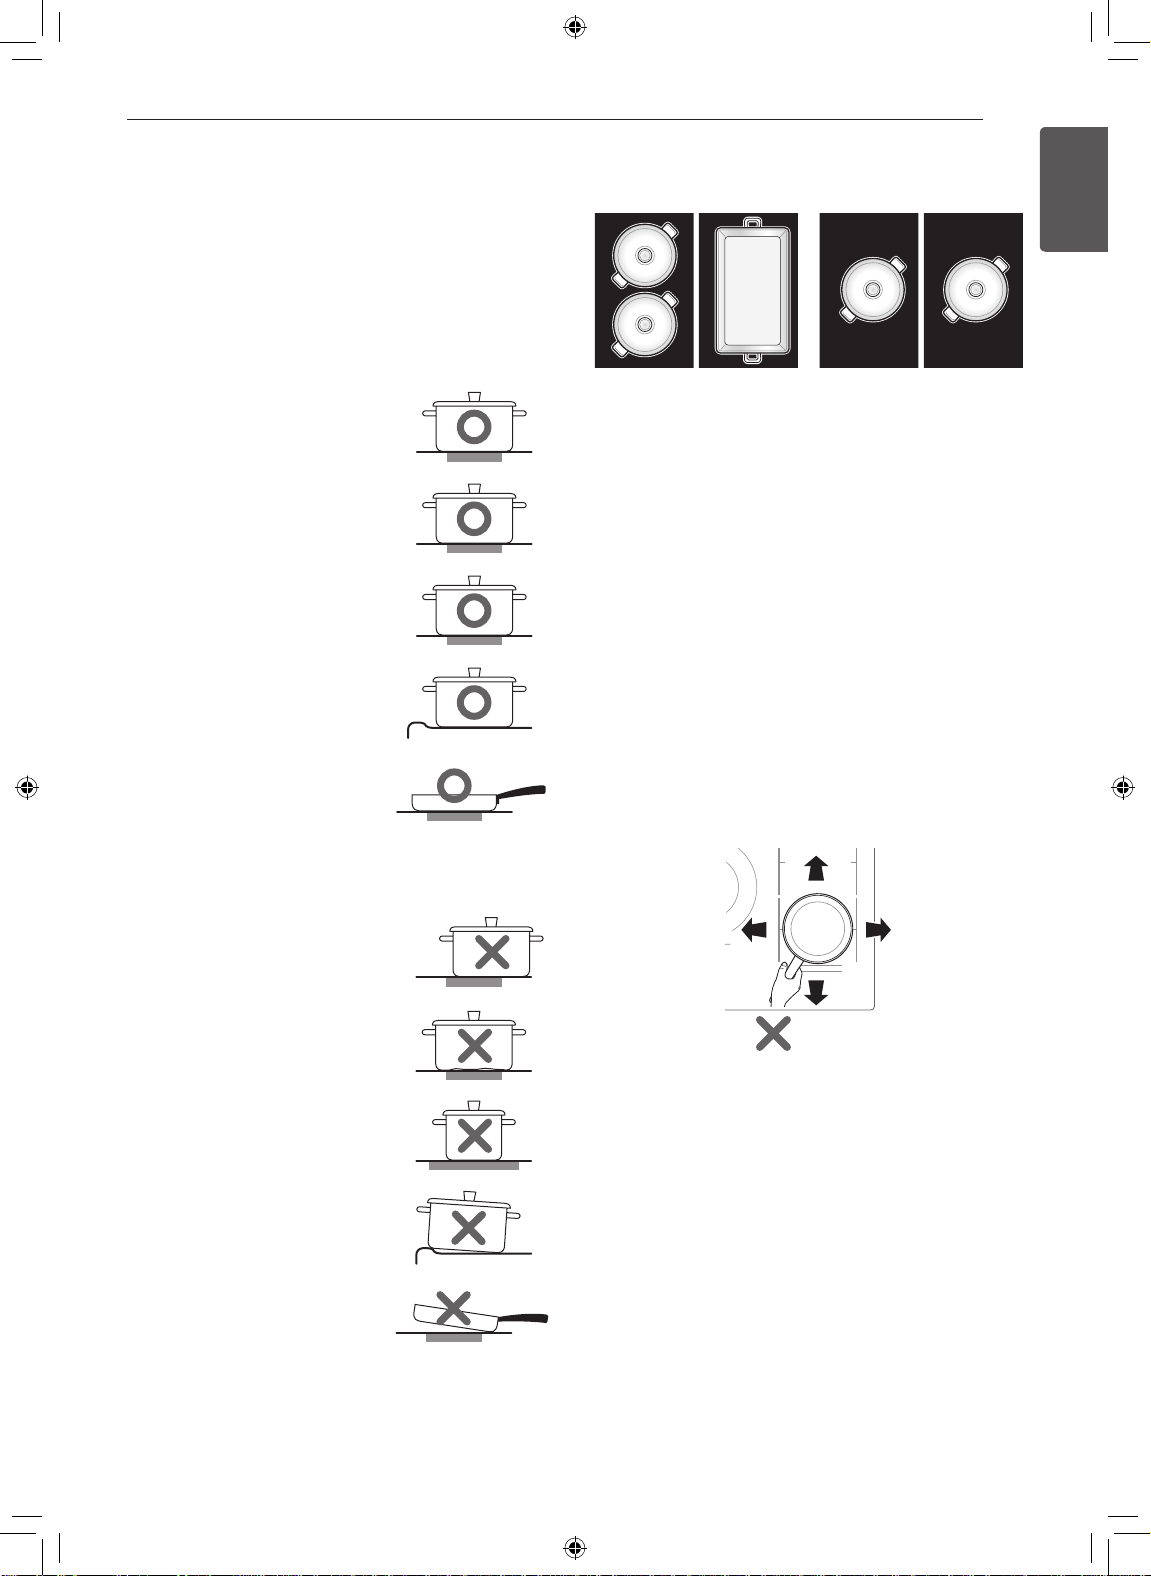
When purchasing pans for use on the induction
cooktop, look for cookware identified by the
manufacturer as "induction ready" or "induction
capable", or that is marked by the manufacturer as
specifically designed for induction cooking.
The base material of the cookware must be magnetic
for the cooking elements to activate. Use a magnet
to check if the cookware base material is suitable. If
the magnet sticks to the bottom of the cookware, the
cookware can be used for induction cooking.
For the best possible surface cooking results, use
only high-quality, heavy gauge steel cookware on the
induction cooking elements. Follow manufacturer's
recommendations when using induction cookware.
Induction Cookware Types
The three most common induction cookware types
available are stainless steel, cast iron, and porcelain-
enamel-coated metals.
•Stainless Steel is generally excellent for induction
cooking. It is durable, easy to clean, and resists
staining.
NOTE
Not all stainless steel cookware is magnetic;
stainless steel is not always suitable for induction
cooking.
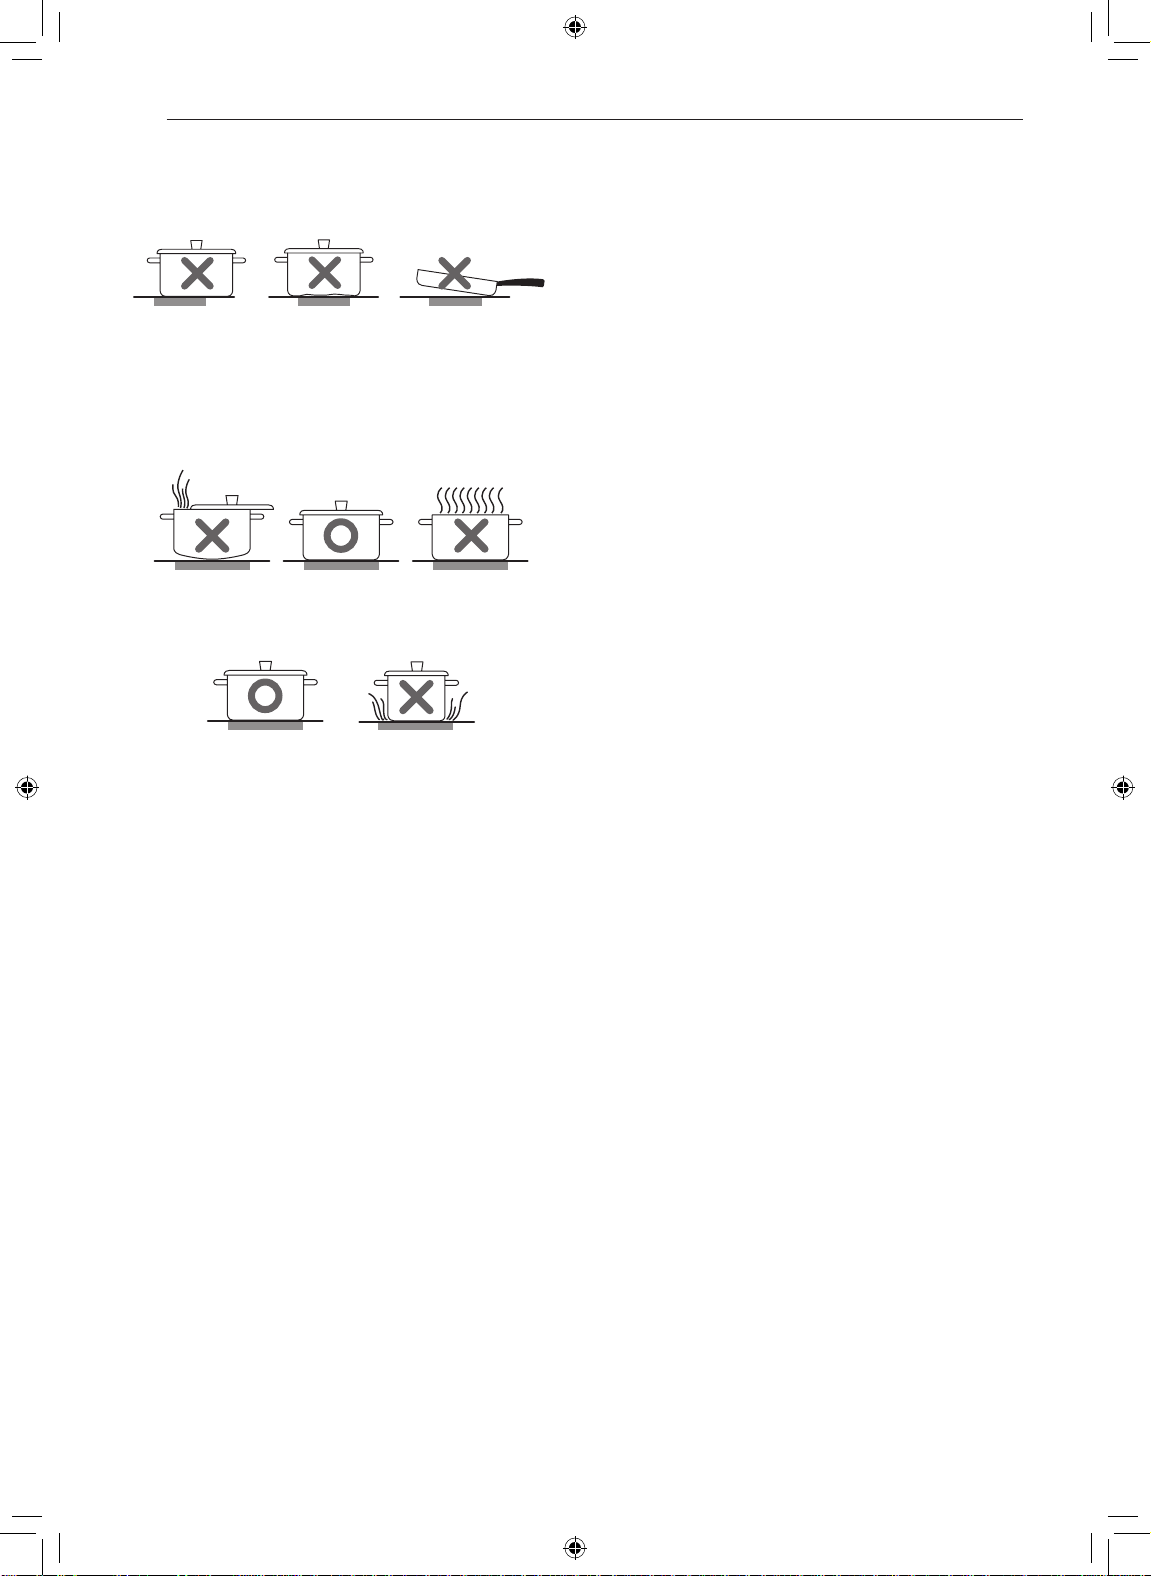
•Cast iron cooks evenly and is also good for
induction cooking. Do not slide cast iron cookware
on the cooktop; cast iron cookware with a rough
surface will scratch the ceramic cooktop.
•Porcelain-enamel-coated metals have variable
heating characteristics depending on the quality of
the base metal. Make sure the porcelain-enamel
coating is smooth to avoid scratching the ceramic
cooktop.

10 INTRODUCTION TO INDUCTION COOKING
Incompatible Cookware
•Aluminum, nickel-silver pots
•Heat-resistant glass pots
•Roasting pans
•Stone pots
•Stainless steel pots (without the IH mark)
−Without the IH mark, heating may not work well.
•Pots with partially magnetic base
−Even if there is an IH mark, a container that only
has magnetic material on part of the bottom of
the container may not be automatically detected
or the product may not work properly.
Material that sticks to the magnet
Material that does not stick to magnet
•A pot with legs
•A pot with a round bottom
−The smaller contact area
may give poor results.
•Do not use a container with
a flat bottom surface smaller
than the burner size.
Pan Preheat Recommendations
Induction cooking may decrease the amount of time
required to preheat cookware compared to cooking
on a radiant element cooktop or gas surface burner.
Pay close attention to all food items while cooking
on the cooktop and until all cooking processes are
complete.
CAUTION
Remember that induction surface cooking initially
heats the cookware VERY QUICKLY if the
cookware does not contain food.
Noises during Cooktop Operation
The electronic processes involved with induction
cooking may create some background noises. You
may hear a slight buzzing sound when cooking on
the cooktop. These noises are part of the induction
cooking process and are considered normal.
Some cookware will buzz, depending on the
construction or base material. The buzz may be more
noticeable if the contents of the pan are cold. As the
pan heats up, the noise will decrease. The noise will
also decrease if the power level setting is reduced.
NOTE
•When using the induction cooktop, operational
noises are more noticeable while cooking in
Boost mode. But very loud noises are not
normal when induction cooking.
•The cooktop fan may turn on to reduce the
temperature of the product, even when the
surface elements are not being used.
Use Flat-Bottomed Cookware
Cookware must fully contact the
surface of the cooking element.
Use flat-bottomed pans sized
to fit the cooking element and
amount of food being prepared.
Check for flatness by rotating a
ruler across the bottom of the
cookware.
Recommended Cookware Size
Pan Size
Dual cooking zone 5.5"-11"(140 mm - 280 mm)
Single cooking
zone 5.5"-7.1"(140 mm - 180 mm)
Flexible cooking
zone 4.7" x 10.6"(120 mm x 270 mm)

11
INTRODUCTION TO INDUCTION COOKING
ENGLISH
Cookware Placement
Use the proper cookware and place it correctly on
the cooktop. One or more of the cooking elements
will not heat if any of the incorrect conditions shown
is detected by the sensors located below the
ceramic cooktop surface. Correct the problem before
attempting to use the cooktop.
Correct
•Cookware is centered
correctly on surface of
cooking element.
•Pan has flat bottom and
straight sides.
•Pan size meets or exceeds
the recommended minimum
size for the cooking element.
•Pan rests completely on the
cooktop surface.
•Pan is properly balanced.
Incorrect
•Cookware is not centered on
surface of cooking element.
•Pan has curved or warped
bottom or sides.
•Pan does not meet the
minimum size required for
the cooking element used.
•Pan bottom rests on
cooktop trim or does not rest
completely on the cooktop
surface.
•Pan is unbalanced by heavy
handle.
Cookware placement in Flexible
Cooking Zones
Compatible Not compatible
Avoiding Scratches
Use heavier gauge stainless steel cookware on your
ceramic cooktop surface. This will help reduce the
possibility of developing scratches on the ceramic
surface.
Low-quality cookware can scratch the cooktop
surface.
Cookware should always be lifted over the ceramic
cooktop surface to prevent scratching.
Over time, sliding ANY type of cookware over the
ceramic cooktop may alter the overall appearance of
the cooktop. Eventually, the buildup of scratches can
make cleaning the surface difficult and degrade the
overall appearance of the cooktop.
Scratches can also result from grains of sand (e.g.,
after washing vegetables) which are dragged with the
pot across the cooking surface.
For Best Results:
Always follow the recommendations for proper
cookware type and size. In addition:
•Do not use dirty pans with grease buildup. Always
use pans that are easy to clean after cooking, and
make sure that the bottoms of the pans are clean
and dry.
•When cooking with large amounts of liquid, use
large pots so that nothing can boil over.
•Do not let pans boil dry. This may cause permanent
damage in the form of breakage, fusion, or marring
that can affect the ceramic cooktop. (This type of
damage is not covered by your warranty.)
•Match the pan size and cooking zone to the amount
of food being prepared.

12 INTRODUCTION TO INDUCTION COOKING
Tips for Saving Energy:
•Always position pots and pans before switching on
the cooking zone.
not aligned bottom not at handle too heavy
•Dirty cooking zones and cookware use more
electricity.
•Whenever possible, place lids firmly on pots and
pans so that they are completely covered.
•The base of the pot should be the same size as the
cooking zone.

13
PARTS AND FEATURES
ENGLISH
PARTS AND FEATURES
Parts and Features of the Cooktop
Throughout this manual, features and appearance may vary from your model.
Induction Cooktop
Dual Cooking Zone
11" / 7" (280 / 178 mm)
Electronic touch controls
Single Cooking Zone
8" × 7" (216×180 mm)
Single Cooking Zone
8" × 7" (216×180 mm)
Flexible Cooking Zone
8" × 14" (216×360 mm)
Flexible Cooking Zone
8" × 14" (216×360 mm)
Single Cooking Zone
8" × 7" (216×180 mm)
Single Cooking Zone
8" × 7" (216×180 mm)
Rating label
model and serial number plate
CAUTION
Burn Hazard: The cooking zones may appear cool when turned ON and after they have
been turned OFF.
Accessories
Included Accessories
Cleaner
Cooktop Cleaner
(1 ea) Non-scratch scouring pad
(1 ea) Retainer brackets
(2 ea) Bolt
(2 ea) Screw A
(2 ea)
Owner’s manual
(1 ea) User guide
(1 ea)

14 PARTS AND FEATURES
Touch Control Features
Locations of Surface Elements and Controls
The surface burner elements are positioned in the same locations on the cooktop and the control panel for ease
of use.
6
1 2 3 4 5
1
Power
Touch and hold for 1 second to turn the entire cooktop
ON and OFF. When it is ON, the cooktop is in standby
mode until a cooking zone is activated.
2
Pause
Sets the active cooking zone to minimum output.
Touch to activate or deactivate.
3
Clean Lock
Touch to lock the touch screen before cleaning it.
To set the element power level
Select the number on the element power settings for the active cooking zone to adjust the power level from 1 to 9.
If you've set 17 power levels in the Settings menu, touch the dots between the numbers to adjust the power level
up or down half a step.
Hot Surface Indicator
•It is displayed when the ceramic glass surface is hot, indicating caution.
•If it is displayed on the screen, be careful because the ceramic glass surface is hot.
−Failure to do so may result in burns or injuries.
•After turning off the burner, it is displayed continuously until the ceramic glass surface cools down.
−If the temperature near the product is high, it may take longer for the ceramic glass surface to
cool down.
•Even after the indicator light has turned off, be careful since the surface may still be hot.
4
Settings
Touch to adjust settings.
For a list of configurable settings, see "Operating
Instructions".
5
Kitchen Timer
Touch to set a kitchen timer.
For details, see "Operating Instructions".
6
Cooktop Control
To check the status of cooking zone and adjust the
cooking zone.
For details, see "Operating Instructions".

15
OPERATING INSTRUCTIONS
ENGLISH
OPERATING
INSTRUCTIONS
To operate the touch control pads, touch the pad
firmly with the flat part of your fingertip.
First Operation
The first time that power is supplied to the cooktop,
the Signature Kitchen Suite logo is displayed for 1
second.
Getting Started
After turning on the cooktop for the first time, adjust
the settings to suit your preferences.
1Touch POWER on the LCD display.
2After the startup animation, select the desired
language and touch NEXT.
3Set the correct time of day and choose between
a 12-hour or 24-hour time format, then touch
NEXT.
4Read through the application guide in the display
and touch DONE.
5The Main screen appears in the display.
Changing Cooktop Settings
Settings
To adjust settings after the initial setup, touch the
display to open the Main screen. Touch Settings at
the bottom center of the Main screen.
Swipe the screen or touch the "<, >" arrow keys to
navigate through the Settings screens.
Location of Settings
•Page 1: Lockout, Time, Wi-Fi, Brightness, Power
Levels, Language Selection
•Page 2: Volume, Program Update, Demo Mode,
Factory Data Reset, Open Source License

16 OPERATING INSTRUCTIONS
Lockout
The Lockout feature automatically prevents most
cooktop controls from being turned on. It does not
disable the clock or timer.
•If Lockout is turned on, all cooktop functions are
disabled except the POWER button.
Lock
1Touch Settings at the center bottom of the Main
screen.
2Touch Lockout on the first Settings screen.
3When Lockout is turned on, the lock icon
appears at the center bottom of the display.
Unlock
1Touch any part of screen while Lockout is on.
2A popup screen appears. Touch Unlock for 3
seconds.
3The lock icon disappears from the bottom of the
display.
Time
The time is displayed on the LCD display when the
cooktop is turned on.
Setting Time of Day
1Touch Settings at the center bottom of the Main
screen.
2Touch Time, then set the correct hour and
minutes by scrolling. You can also touch the
number pad icon and enter the desired
numbers.
3Select either a 12-hour or 24-hour clock mode
(12H/24H).
4Touch OK.
Wi-Fi
Connect the appliance to a home Wi-Fi network to
use Remote Start and other smart functions. See the
Smart Functions section for more details.
Setting Up Wi-Fi
1Touch Settings at the center bottom of the Main
screen, then touch Wi-Fi in the first Settings
screen.
2Follow the instructions in the Wi-Fi Guide in the
display.
3Select ON, OFF, or RESET and touch OK.
4If ON is selected, the Wi-Fi icon appears at
the bottom of the display.
5If you select RESET, you will have to re-enter
the Wi-Fi password.
Brightness
Adjust the brightness of the LCD display from 20 % to
100 % in increments of 20 %.
Setting Display Brightness
1Touch Settings at the center bottom of the Main
screen, and touch Brightness.
2Adjust the display brightness by touching and
dragging the dot across the bar, by tapping
anywhere on the bar, or by touching +or –.
3Touch OK.
Power Levels
1Touch Settings at the center bottom of the Main
screen, and touch Power Levels.
2Choose between 17 levels and 9 levels. (the
output of each maximum level is the same)
3Touch OK.

17
OPERATING INSTRUCTIONS
ENGLISH
Language Selection
Set the display language to English, Spanish, or
French.
Selecting a Language
1Touch Settings at the center bottom of the Main
screen, and touch Language Selection.
2Select the desired language.
3Touch OK.
Volume
Adjust the volume of the cooktop controls.
Setting the Volume
1Touch Settings at the center bottom of the Main
screen, swipe to the second Settings screen,
and touch Volume.
2Select Mute, Low, or High.
3Touch OK.
Program Update
Once the appliance is connected to a home Wi-Fi
network, use this setting to check for available
programming updates and install them.
1Touch Settings at the center bottom of the Main
screen, swipe to the second Settings screen,
and touch Program Update.
2The display shows available programming
updates. Touch UPDATE to download and install
the new version.
Demo Mode
The Demo Mode is for showroom use only. It prevents
the cooking zones from heating up.
1Touch Settings at the center bottom of the Main
screen, swipe to the second Settings screen,
then touch Demo Mode on the Settings screen.
2Select either ON or OFF.
3Touch OK.
NOTE
•When Demo Mode is on, the appliance will not
heat up.
•The cooktop Demo Mode icon appears in the
display if the Demo Mode is on.
Factory Data Reset
This function returns all settings to the factory defaults.
1Touch Settings at the center bottom of the Main
screen, swipe to the second Settings screen,
and touch Factory Data Reset.
2If you want to reset data to the factory defaults,
touch RESET and then OK.
NOTE
•All stored data will be deleted.
Open Source License
This screen contains open source software licensing
information.
1Touch Settings at the center bottom of the Main
screen and swipe to the second Settings screen.
2Touch Open Source License.
Before Using the Cooktop
Before using the cooktop for the first time, clean
it thoroughly with the included cleaner or ceramic
cooktop cleaner according to the Care and Cleaning
instructions in this guide. This will help protect the
ceramic surface and make future cleanup easier.
CAUTION
Never use abrasive scrubbing pads or
cleaners. They can cause permanent damage to
the cooktop surface.

18 OPERATING INSTRUCTIONS
Activating the Cooktop
To turn ON the cooktop, touch the POWER key for
approximately 1 second. The LCD panel will turn on.
To turn OFF the cooktop, touch the POWER key.
NOTE
After turning on the cooktop with the POWER key,
you must select one of the cooking zones within
60 seconds. If no selection is made, the cooktop
will turn off for safety.
Automatic Detection
•The automatic detection is the function that checks
whether or not a container is placed on top of the
burner.
•When a container is placed on the burner, the
words "Auto Detected" will be displayed.
(The words "Auto Detected" will disappear after 30
seconds or when the burner is running.)
•The words "Auto Detected" will not be displayed
if a container is not placed on the burner, and this
function is activated initially only once after the
power is turned on.
•Depending on the conditions of use (whether
the burner is being used, the container material,
status of the container base, etc.), the automatic
detection time may differ or the cookware may not
be detected automatically.
NOTE
If the container is too small, the words "Auto
Detected" may be displayed but the burner may
not work.
Selecting the Cooking Zone
Place an induction-compatible pan on top of the
desired cooking zone.
Touch the icon in the desired cooking zone to set
the power level.
NOTE
Once the cooking zone has been selected the
power level must be selected within 3 seconds
with the element power settings. Otherwise, the
power settings will turn off for safety.

19
OPERATING INSTRUCTIONS
ENGLISH
Setting the Power Level
The power level for the selected cooking zone can be
set from 1to 9.
Selecting the Power Level
1Touch a number in the Power Level popup to
set the power level from 1 to 9. If you've set 17
power levels in the Settings menu, touch the
dots between the numbers to adjust the power
level up or down half a step.
12
2Selecting a power level turns on the cooking
zone. The cooking zone indicator remains lit and
the power level is stored.
Figure BFigure A
NOTE
If power level is not selected, the power settings
will turn off after 3 seconds.
Readjusting the Power Level
1Touch the desired cooking zone to bring up the
Power Level popup.
1
2
Readjusting power level 5 to 4
2Touch the desired level in the Power Level
popup. If no selection is made, the Power Level
popup disappears after 3 seconds and the power
level remains the same.
NOTE
Once the power level is changed, the burner
operation is temporarily stopped and then
restarted at the changed power level.
Power Level Indicator
•Cooking Element LED Bar
The range provides an LED bar for each cooking
element on the cooktop.
Check the display and use the LEDs to monitor the
power levels of the elements.
1
2
3
4
5
6
7
8
9
9 Step
Boost
Melt
Simmer
•Available Power Level Settings
The cooktop control’s LED bar displays the
element’s power level settings, ranging from Level
1 to Level 9 to Boost.
This manual suits for next models
1
Table of contents
Other Signature Kitchen Suite Cooktop manuals

Signature Kitchen Suite
Signature Kitchen Suite SKSIT3601G User manual

Signature Kitchen Suite
Signature Kitchen Suite UPCG3054ST User manual

Signature Kitchen Suite
Signature Kitchen Suite UPCG3054ST User manual

Signature Kitchen Suite
Signature Kitchen Suite UPCG3654ST User manual

Signature Kitchen Suite
Signature Kitchen Suite HN951VA User manual