SIGURO SGR-RV-L650B Operating instructions
SGR-RV-L650B
SGR-RV-L651B
Laser Robotic Vacuum Cleaner
Laser Robotic Vacuum Cleaner
Laser-Robotersauger
Laserový robotický vysavač
Lasrový robotický vysávač
Lézeres robotporszívó
EN Translation of the operating instructions from the original language.
DE Übersetzung der Bedienungsanleitung aus der Originalsprache.
CZ Návodkpoužitívoriginálnímjazyce.
SK Prekladnávodunapoužitiezoriginálnehojazyka.
HU Ahasználatiutasításfordításaeredetinyelvről.

ENGLISH 4
Safety information 4
Use 8
Cleaning and maintenance 10
Troubleshooting 11
DEUTSCH 12
Sicherheitshinweise 12
Verwendung 17
Reinigung und wartung 19
Problemlösung 20
ČESKY 21
Bezpečnostní informace 21
Použití 25
Čištění a údržba 27
Řešení problémů 28
SLOVENSKY 29
Bezpečnostné informácie 29
Použitie 33
Čistenie a údržba 35
Riešenie problémov 36
MAGYAR 37
Biztonsági információk 37
Használat 41
Tisztítás és karbantartás 43
Problémamegoldás 44

2
1
3
4
5
6
7
8
9
10
11
14
12
13
15
16
17
18
19
20 21
22
23
24
25

Scan this QR code to download the app.
Scannen Sie diesen QR-Code, um die App herunterzuladen.
Pro stažení aplikace si naskenujte tento QR kód.
Na stiahnutie aplikácie si naskenujte tento QR kód.
Az alkalmazás letöltéséhez olvassa be ezt a QR kódot.
EN
EN - 6
Thank you for purchasing a SIGURO appliance. We thank you for
your trust and are proud to introduce on the following pages the
device, its functions and uses.
We believe in a fair and responsible company, and therefore we only work
with suppliers who meet our strict criteria to protect the interests of employ-
ees, prevent their abuse and fair working conditions.
If you need help with extensive maintenance or repair of the product, which
requires intervention in its internal parts, our authorized service is available
at the email address siguro@alza.cz or operators at the seller's info line. For
your convenience in solving any problems with the product, we have unied
these contact points so that the contacts above can also be used for warran-
ty claims and post-warranty service.
SAFETY INFORMATION
Please read this manual carefully before
use and keep it for future reference.
1. This appliance is intended for use by children 8 years of age and older
and persons with reduced physical, sensory or mental capabilities, or lack
of experience and knowledge, provided they have been given supervision
or instruction concerning use of the appliance in a safe manner and
understand the potential hazards
2. Children must not play with the device.
3. Cleaning and user maintenance should never be performed by
unsupervised children.
4. If the power adapter or charging station are damaged, they must be
replaced by the manufacturer, its service agent or similarly qualied
persons to avoid danger. Never use the appliance if the power adapter or
charging station is damaged.
5. Before cleaning or maintenance, unplug the appliance and turn off the
main power switch.
6. The appliance may only be used with the supplied power adapter and
charging station.
7. WARNING: Never use the power adapter or charging station to charge
batteries or appliances they were not designed for.
8. The appliance is intended for vacuum cleaning in households, ofces and
similar premises. Do not use in industrial settings or outdoors.
9. The appliance is not designed to suck in water and should not be used in
wet or damp areas, such as in laundry rooms or bathrooms and around
swimming pools. Water will damage the vacuum cleaner’s internal
electronics on contact.
10. Do not use to clean:
ENGLISH

EN
EN - 6 EN - 7
ENGLISH
‐smoldering cigarettes, burning or combustible items, matches, ash;
‐water or other liquids;
‐sharp objects such as glass shards, needles, pins, etc.;
‐ our, wall plaster, construction materials;
‐large pieces of paper and plastic bags – these could clog the suction
aperture.
11. Before plugging in the power adapter, make sure the input voltage on its
type plate matches the voltage of the power outlet.
12. Only plug the power adapter into properly grounded outlets. Do not use
extension cords.
13. Do not lay the power adapter cable across sharp objects. Make sure the
power cord does not hang off a table edge or touch warm or hot surfaces.
14. When unplugging the power adapter, pull on the plug, not on the cord.
Pulling on the cord may damage the adapter or the outlet.
15. Do not touch the power cord or cable with wet hands.
16. Keep the appliance and power adapter in a dry place out of the reach of
children.
17. Do not expose the appliance to direct sunlight; do not place it near open
ame or heat sources.
18. Only use original accessories supplied with the appliance or
recommended by the manufacturer.
19. Before each use, make sure the appliance is assembled properly and the
dustbin and lter unit are installed.
20. Before use, make sure the door leading out of the premises is closed.
Remove from the oor any items the vacuum cleaner might accidentally
suck in, such as clothing, papers, toys, data and power cables, etc. Lift
oor-length curtains enough to keep them from being sucked in.
21. Make sure the suction aperture and exhaust grille remain clear of
obstructions throughout the appliance’s operation. Otherwise, the
appliance may sustain damage.
22. Do not use the appliance on narrow elevated surfaces, such as the tops
of tables and other furniture. The limited maneuvering space may cause
the appliance to fall off and sustain damage.
23. Do not place objects on top of the appliance; do not step or sit on it.
While the appliance is in operation, watch for the presence of children
and pets.
24. Do not disassemble, modify or repair the appliance. None of its parts are
intended to be user-repairable. Any and all maintenance not described in
this manual should be left to an authorized service center. Do not use the
appliance if it appears damaged or faulty, fell in the water, or if the power
adapter or charging station is damaged.
25. Follow the cleaning and maintenance instructions in this manual.
26. To prevent electrocution, avoid water dripping or splashing on the
appliance, power adapter or charging station; do not submerge any of
these in water or other liquids.
27. Remove the battery in periods of prolonged disuse. Before removing
the battery, make sure the main power switch is off and the appliance is
unplugged.

EN
EN - 8
28. Do not put pressure on the laser navigation module and do not attempt
to remove its cover. You might damage the module.
Class I Laser Device
The laser sensor complies with class I of the EN 60825-1 laser safety standard.
When using, handling and maintaining this laser-equipped robotic vacuum cleaner,
always observe these precautions:
• Set the vacuum’s main power switch to the off position before handling the device
in any way.
• Do not aim the laser beam at or near people.
• Do not look into the laser emitter, or even into reected laser beams.
• The laser sensor may only be modied and repaired by an authorized service
center.
Warning:
Failing to follow the use and maintenance instructions in this manual may
cause radiation injury!
Electrocution protection class: II
Double or reinforced insulation for electrocution protection.
The “interior use only” symbol means the appliance is not designed for out-
door use.
DISPOSAL OF USED BATTERIES
Batteries contain materials harmful to the environment. Do not dispose of
batteries in a regular community waste. Dispose of used batteries properly at
collection points.
DISPOSAL OF THE BUILT-IN BATTERY
The product is equipped with a built-in battery. Before ecological disposal of
the product or its delivery to an electronics disposal point, the battery must
be removed. The battery may only be removed by authorised service center
technicians. Turn on the appliance and wait until the battery is completely
discharged. Then remove it. The battery contains environmentally harmful
substances and should never be put in ordinary waste bins. Take the battery to an
appropriate collection point for environmentally friendly disposal.

EN
EN - 8 EN - 9
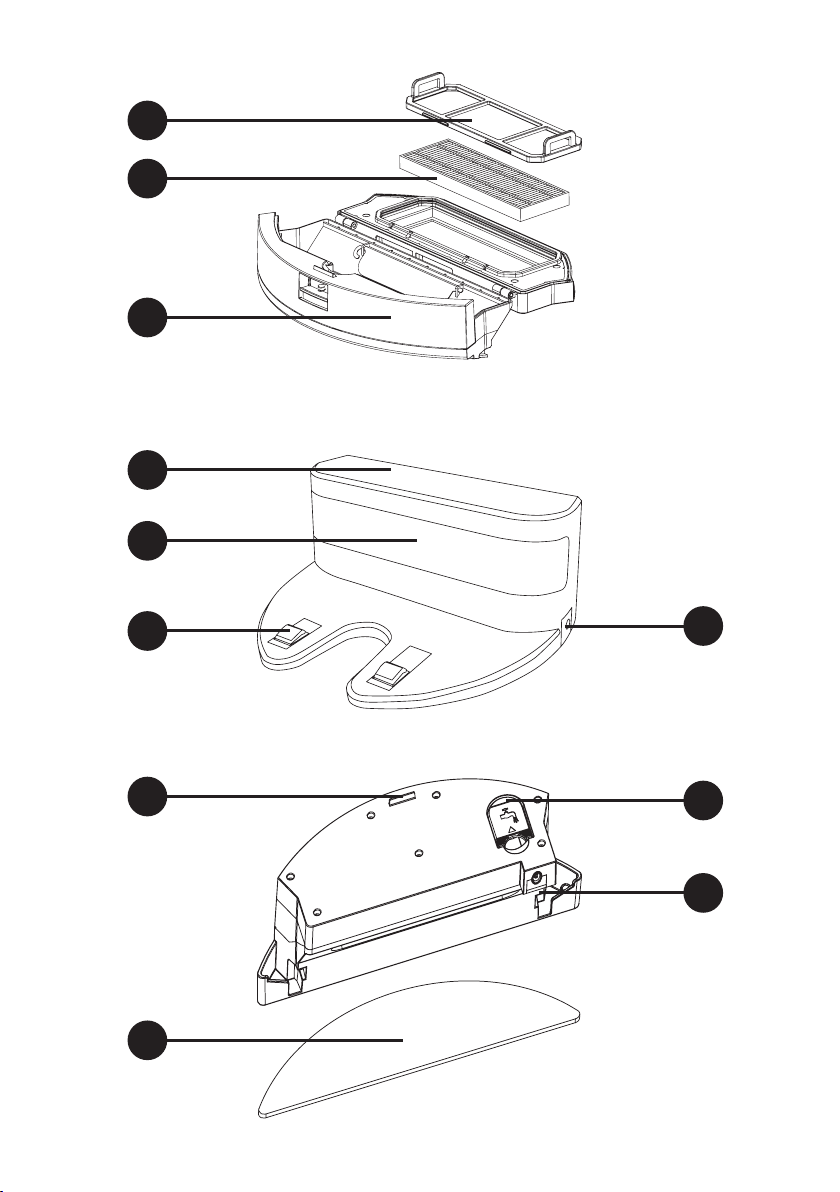
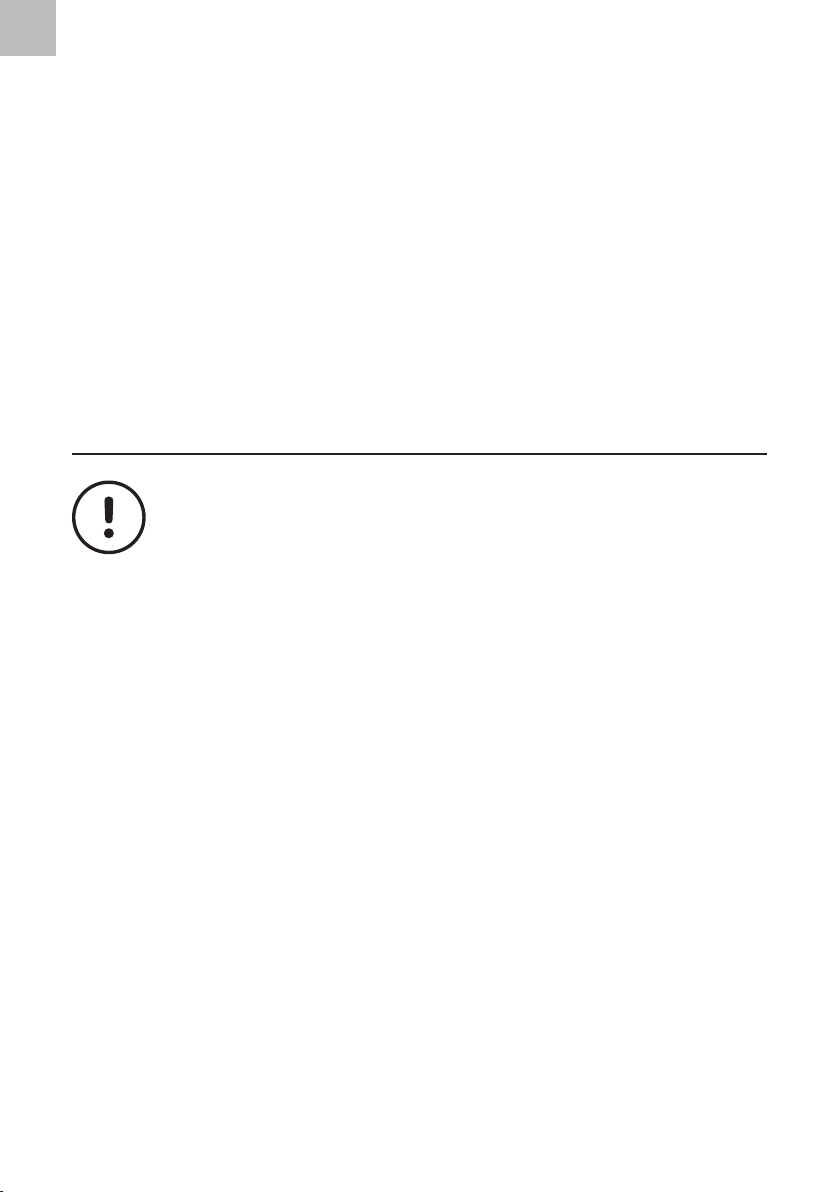
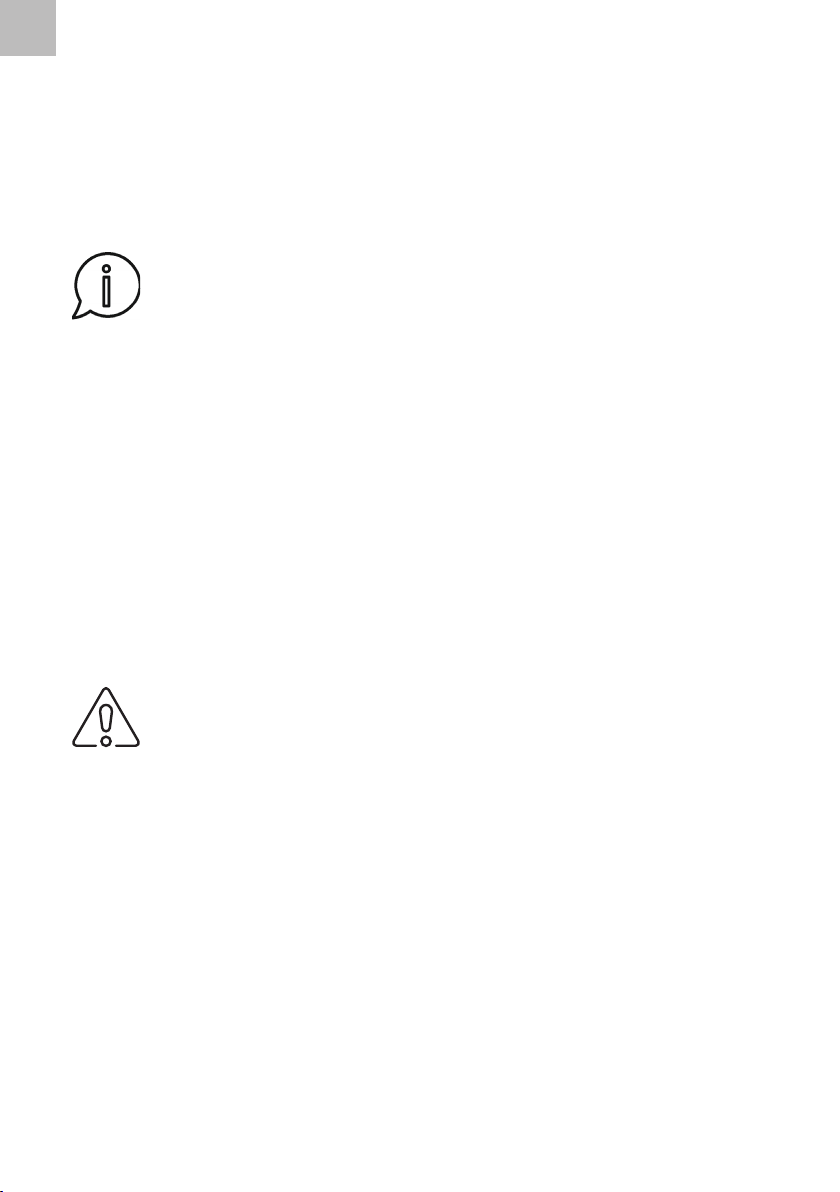
Overview
1 Cleaning start / stop button
2 Bumper
3 Laser module
4 Power cord socket
5 Front castor
6 Charging contacts
7 Sensors (both sides)
8 Battery cover plate
9 Central rotary brush
10 Main power switch
11 Dustbin
12 Rotary brushes (both sides)
13 Castors
14 Dustbin release catch
15 Bulk lter
16 HEPA lter
17 Dustbin lid
18 LED status light
19 Signal sensor
20 Charging contacts
21 Power adapter socket
22 Filler cap
23 Tank safety catch
24 Air supply
25 Wet cleaning rag
• Power adapter (not pictured)
Remote control
“Go recharge” button
Arrow buttons
Cleaning start / stop button
Wi-Fi button
Automatic zigzag cleaning button
Timer button
Edge-and-corner cleaning
button Thorough cleaning button
Timed cleaning button
3

EN
EN - 10
List of Accessories
• Charging station
• Power adapter
• Remote control
• Rotary brush (4 pc)
• Spare HEPA lter
• Cleaning brush
• Wet cleaning attachment (1 cleaning rag included)
• Magnetic tape for delimiting the cleaning area
SPECIFICATIONS
Adapter Input: 100–240 V~, 50/60 Hz, 0.5 A
Output: 19 V 1 A, 19 W
Battery Li-Ion 14.8 V, 4,900 mAh
Charging station Input: 19 V= 1 A
Output: 19 V= 1.5 A
Charge time 4 to 5 hours
Operating time Up to 150 minutes
Dimensions (diameter x height) 325 × 110 mm
Weight 3.94 kg
Dustbin volume 600 ml
Wet cleaning tank volume 300 ml (dustbin) + 150 ml (water tank)
Noise level 60 dB
BEFORE USE
Before rst use
1. Remove the appliance and its accessories from the packaging. Before disposing
of packaging, make sure no components are left inside. Check the appliance for
damage.
2. Remove all stickers and labels from the appliance.
Installing the Rotary Brushes
1. Turn the vacuum upside down.
2. Press the rotary brushes into the sockets on the bottom of the device until they
click into place. Make sure to align the L and R markings on the brushes with those

EN
EN - 10 EN - 11
on the device.
3. Turn the vacuum right side up again.
The rotary brushes are designed for cleaning smooth oors. They allow efcient clean-
ing in corners and along wall and furniture edges. When vacuuming carpets, make
sure to rst remove the rotary brushes. To do so, reverse the installation procedure
described above.
Inserting and Removing the Battery
The vacuum cleaner is powered by a built-in rechargeable Li-Ion battery (Li-Ion 14.8
V, 4,900 mAh). Where the battery is delivered separately, it must be installed in the
device before rst charge and use.
Warning:
Only use the battery supplied with the device or a manufacturer-recom-
mended replacement.
1. Make sure the device is powered off, with the main power switch in the 0 (off)
position.
2. Turn the vacuum upside down.
3. Unscrew the battery cover plate.
4. Carefully remove the cover plate and pull out the charging plug.
5. Connect the charging plug to the battery and insert the battery (so that the side
with lettering faces up).
6. Tuck the charging cord into the space around the battery. Avoid excessively
bending or otherwise deforming the cord to prevent damage.
7. Replace the cover plate and tighten the screws.
Note:
When replacing the battery, the procedure is the same, except that the
old battery needs to be unplugged and removed rst.
Charging station
The vacuum can nd and dock with the charging station, which will then automatical-
ly charge it. The station must be placed in a location accessible to the vacuum.
Place the charging station on a hard, level, dry surface within reach of mains power.
We recommend placing the station by the wall.
For reliable docking, the vacuum should have 1 m (3 ft) of space to either side and 2 m
(6 ft) in front of the charging station. This space should be clear of obstacles that might
foul up the vacuum’s navigation and docking procedure.
Plug the adapter power cord into the socket on the side of the charging station, and
the plug into a properly grounded mains socket. Lay the power cord so as to keep peo-
ple from tripping on it, the vacuum’s brushes from catching on it, and to keep it away
from hot or sharp objects, etc.
During prolonged disuse, unplug the charging station and securely store it.
First Charge
The vacuum needs to be charged to full before rst use. This rst charge may take up
to 6 hours.
1. Make sure the charging station is well placed and plugged in.
2. Turn the vacuum upside down and set the main power switch to I (on).
EN
EN - 12
3. Turn the vacuum right side up again and manually insert it into the charging
station so that the charging contacts on the bottom of the vacuum touch
those on the charging station. Once there is electrical contact, charging begins
automatically.
4. The LED status light will ash while the vacuum is charging. Once full charge is
reached, the light will glow blue.
5. Once the battery is full, unplug the power adapter from the charging port on the
vacuum and from the wall.
Note:
During prolonged disuse, recharge the vacuum once every 2 to 3 months
to extend the useful life of the battery pack.
Remote control
Before using the remote control, insert its batteries.
1. On the bottom of the remote, remove the battery cover plate.
2. Remove both batteries and insert new ones (2x 1.5 V AAA). Observe the polarity
markings on the bottom of the battery compartment.
3. Replace the cover.
The procedure is the same when replacing batteries, except that old batteries must be
removed rst.
If you want to use the remote control, point it to the signal receiver on the appliance.
The maximum range of signal sent from the remote control is 6 m. If obstacles are
located between the remote control and the appliance, the signal cannot be transmit-
ted.
If you will not use the remote control for a long time, we recommend removing the
batteries. If the batteries leaked into the interior of the remote control, it could damage
it.
Warning:
Never put batteries in re, short circuit or damage them in any way. After
the end of their lifetime, discard them in environmentally friendly man-
ner. Never dispose of batteries in household waste. Always replace both
batteries together. Do not mix rechargeable and single-use battery types.
Preparing the Room for Cleaning
Before using the vacuum, take these steps to avoid damage to the appliance or other
property, or hazardous situations.
1. Clear the oor of all cables and small items that might entangle the vacuum.
2. Secure any free carpet edges on which the vacuum might trip and tassels it might
suck in. The vacuum is not designed to clean carpets with pile height exceeding 26
mm (1 in).
3. Prevent the vacuum from attempting to enter spaces with less than 70 mm
clearance; it might get stuck. If necessary, block off such spaces by setting a
suitable ground-standing object before them.
4. The vacuum is not designed for cleaning wet areas. Do not expose it to water or
moisture.
5. The vacuum can drive over obstacles up to 16 mm high. Remove taller obstacles if
necessary.
6. The vacuum is equipped with surface sensors, designed to keep it from falling off
stairs etc. These sensors’ readings can be fouled by dirt on the sensor eye, dark

EN
EN - 12 EN - 13
or reective oor materials, and other adverse conditions. We thus recommend
blocking off areas where the vacuum might fall off a step or ledge with suitable
obstacles.
USE
Power On / Off
1. Set down the vacuum in the room to be cleaned. Make sure it has a full charge.
2. Set the main switch to the I (on) position.
3. Turn the appliance on by pressing on the vacuum itself or on the remote. The
vacuum will turn on in automatic cleaning mode.
4. Once the space has been cleaned or if you need to stop cleaning, press on the
vacuum or on the remote. The vacuum will stop cleaning and go to standby
mode.
5. To power down completely, set the main switch to 0 (off).
Standby Mode
The vacuum automatically enters standby mode after 3 minutes of inactivity. The
button stops glowing. Press again to exit standby mode; the display will light up.
Cleaning Mode Selection
The cleaning mode can only be changed using the remote control.
1. Edge Cleaning Mode
The edge cleaning mode allows for effective cleaning along walls, furniture edges, etc.
The vacuum will start out same as in automatic mode, but will slow down and then
keep hugging a wall or edge as soon as it detects one. The slower speed allows better
cleaning of such places. Once the vacuum detects an end to the edge it has been
following, it will return to automatic cleaning mode.
To turn on edge cleaning mode, press on the remote.
This mode is also available together with automatic cleaning mode.
2. Thorough Cleaning Mode
Thorough mode improves the thoroughness of cleaning in a bordered space. Once ac-
tivated, the vacuum will move in a spiral, cleaning the space from the center outward.
This approach allows for maximum coverage and effectiveness.
To turn on thorough cleaning mode, press on the remote.
3. Automatic Zigzag Cleaning Mode
In automatic mode, the vacuum combines various pathnding algorithms to efcient-
ly cover the entire oor space.
Automatic mode is the default mode the vacuum starts in when powered on.
To turn on automatic cleaning mode, press on the remote.
Note:
In some situations, the vacuum will switch to a different mode on its own,
usually in reaction to obstacles or other features of the room. This is nor-
mal behavior intended to improve the efciency of the vacuum’s cleaning
routine.

EN
EN - 14
Planned Cleaning
For effective use of the cleaning planner feature, the internal clock must be set accu-
rately.
Step 1: Set Clock
1. Long-press . The display will ash the hour component of the current time as set
in the internal clock.
2. Use the /buttons to set the hour to the correct current hour.
3. Then press ; the minute component of the current time will ash. Press to
return to setting the hour component if needed.
4. Use the /buttons to set the minute component to the correct current minute.
5. Press to conrm.
Note:
While not technically necessary for operation, we recommend setting the
clock to match the actual current time.
Step 2: Plan Cleaning
1. Press . The display will ash the hour component of the current time as set in
the internal clock.
2. Use the /buttons to set the hour to the correct current hour.
3. Then press ; the minute component of the current time will ash. Press to
return to setting the hour component if needed.
4. Use the /buttons to set the minute component to the correct current minute.
5. Press to conrm. A chime will sound to conrm the setting has been saved.
Note:
If you hear no chime, the cleaning plan was not set properly and will need
to be set again.
6. The vacuum will activate at the set time. There may be a delay of 15 to 30 seconds
after the set time before the vacuum actually begins cleaning; this is normal
behavior.
Cancelling Planned Cleaning
If you need to cancel your cleaning plan, there are two options:
1. Set planned cleaning time to “00:00”; no cleaning will occur with this setting.
Follow the procedure set out in “Step 2: Plan Cleaning“ above.
2. Turn off the vacuum and set the main switch to 0 (off); this will automatically
cancel planned cleaning.
Wet Cleaning Attachment
This rear-mounted attachment allows the appliance to also wipe the oor it has just
vacuumed.
1. Remove the ller cap and ll the tank with clean water. Replace the cap and check
that water is not leaking anywhere. Wipe the wet cleaning attachment dry.
2. Rinse the rag in warm water, wring out by hand and mount on the wet cleaning
frame.
3. Turn the vacuum upside down. First remove the dustbin, then mount the wet
cleaning attachment. Make sure it is securely mounted.
EN
EN - 14 EN - 15
4. Turn the vacuum right side up again and power on.
5. The tank will begin to release water into the rag only once the vacuum has
powered up.
6. Once done cleaning, remove the attachment and empty the tank of any leftover
water.
7. If you need to top up the water tank, always rst turn off the vacuum, set the main
power switch to 0 (off), then remove the wet cleaning attachment. Never top up
the water tank with the wet cleaning attachment mounted on the vacuum.
8. Avoid using an overly soaked rag; the wheels might slip on its trail otherwise.
Note:
The wet cleaning attachment is not designed to clean carpets.
Charging
If the vacuum detects that battery is running low while cleaning is still ongoing, it will
stop cleaning and scan for the charging station. Once the station is located, the vacu-
um will park itself there and begin charging. The LED status light will ash while the
vacuum is charging. Once full charge is reached, the light will glow blue.
It may occur that the vacuum runs out of its remaining power before it can nd and
reach the charging station. In this case, it will stop in place and will need to be manual-
ly brought to the station.
Note:
The vacuum can also be charged without using the station, by plugging
the adapter power cable directly into the socket on the side of the vac-
uum. Plug the other end of the adapter into a properly grounded mains
socket.
CONTROL VIA THE APPLICATION
The vacuum can also be controlled through an app from a smartphone or tablet.
Downloading the App
1. Download and install the Tuya Smart app. A QR code is provided for this purpose
on one of the preface pages of this manual.
2. The vacuum can only communicate over Wi-Fi at 2.4 GHz. If your router is equipped
with 5 GHz Wi-Fi, make sure to have it set to 2.4 GHz mode.
3. Create an account and log into the app.
4. The app has a step-by-step wizard to help you with installation, registration and
login.
Adding Your Device
1. Turn on your vacuum.
2. In the app, tap the “+” in top right corner, or tap “Add Device” if this is the rst
device you are registering in your app.
3. On the next screen, select “Small Appliances”, then “Robotic Vacuum Cleaner
(WiFi)”.
4. Press and hold for 5 seconds, until the button begins ashing rapidly.

EN
EN - 16
5. In the app, conrm you see the button ashing, and enter your Wi-Fi password (if
any). Then tap “Conrm” to begin pairing the vacuum with your phone, after which
it will automatically be added to the device list.
Once you can see the vacuum in the device list, tap its icon to show the control inter-
face. Commands include power on / off, cleaning mode selection, and more.
Note:
The app will automatically update from time to time, unless you have this
behavior turned off in your OS.
Targeted Sweep
1. In the app, tap “Where to sweep”.
2. Tap the point in the map where you want the vacuum to begin cleaning, then tap
“Go here”.
3. The vacuum will automatically activate and go clean the selected area.
4. It will use thorough cleaning mode on an area 1.5 x 1.5 m (5 x 5 ft) centered on the
targeted point.
5. Once the area has been cleaned, the vacuum will automatically return to the
charging station.
Custom Area Cleaning
You can dene the size and location of the targeted cleaning area. The vacuum will
clean this area and nothing else. You have the option of setting the number of times it
is to repeat cleaning.
1. In the app, go to “Area cleaning”, then tap “Add” in the bottom right corner.
2. Tap “Go here”. The vacuum will automatically activate and only clean the dened
area. Once done, it will automatically return to the charging station.
Note:
The area selection cannot be canceled, but will be cleared automatically
once cleaning is nished.
No-Go Zones
You can dene “no-go zones” where the vacuum is not allowed to enter. These can
also be set to persist in memory.
1. In the app, go to “Area cleaning”, then tap “Set wall”.
2. Tap “Area”, then tap “Add” in the bottom right corner. Tap “Save” once you have
congured your no-go zone.
3. Once done cleaning, the vacuum will automatically return to the charging station.
4. To clear a no-go zone:
• Go to “Area cleaning”, then tap “Set wall”.
• Tap “Area”, then tap the no-go zone you want to clear.
• Tap the Xin the zone and save. The no-go zone will be cleared (deleted).

EN
EN - 16 EN - 17
Notes:
• The vacuum may intrude upon a no-go zone in cases where its
navigation fails, due to faulty sensors, etc.
• Persistent no-go zones may be automatically cleared when furniture
or the charging station is moved. Do not move the charging station
and avoid lifting, turning, or manually moving the vacuum while it is
operating.
• The vacuum will rebuild its internal area map following such actions,
which will clear all existing no-go zones.
Virtual Wall
You can dene imaginary walls to serve as obstacles the vacuum will not cross.
1. In the app, go to “Area cleaning”, then tap “Set wall”.
2. Tap “Wall”, then tap “Add” in the bottom right corner. Tap “Save” once you have
congured your wall.
3. Once done cleaning, the vacuum will automatically return to the charging station.
4. To clear a virtual wall:
• Go to “Area cleaning”, then tap “Set wall”.
• Tap “Wall”, then tap the wall you want to clear.
• Tap the Xon the wall and save. The virtual wall will be cleared (deleted).
Planned Cleaning
The app allows you to plan a time for cleaning. The vacuum will activate at the set
time.
In the app, tap the Settings icon at top right, then follow the app’s instructions.
Manual Cleaning
In the app, tap the Settings icon at top right, then follow the app’s instructions to man-
ually activate the vacuum.
Other App Features
• Reset internal area map
• Set suction power: Mute, Normal, Strong
• Set water ow for wet cleaning: Fast, Medium, Slow
CLEANING AND MAINTENANCE
Before any cleaning or maintenance, rst power off the appliance and unplug the
adapter from the wall socket.
For best cleaning efciency and service life, the vacuum should be cleaned after each
use.
Warning:
Never immerse the appliance, charging station, or adapter in water or
other liquids.
Never clean any part of the appliance with plastic or metal scrapers, harsh cleaners,
chemicals, hydrocarbon cleaners, solvents, or similar substances. The surface nish
could be seriously damaged.
EN
EN - 18
Cleaning the Rotary Brushes
1. Unmount the brushes from the appliance frame and clean them.
2. Heavily soiled brushes should be rinsed in running water, then set out to dry. If a
brush has bent bristles, straighten them by immersing the brush in warm water.
3. Only remount the brushes on the vacuum once they are completely dry.
4. Damaged rotary brushes should be replaced.
Cleaning the Dustbin and Filter Assembly
The dustbin needs to be emptied as necessary, which may occur in mid-cleaning.
Make sure the device is powered off, with the main power switch in the 0 (off) position.
1. Press the dustbin release catch and remove the dustbin.
2. Open the dustbin lid and carefully remove the bulk lter and the HEPA lter frame.
3. Empty the dustbin in the trash. From a sanitation perspective, it is best to empty
the dustbin outside living areas.
4. If required, the dustbin and bulk lter can be rinsed in running water, then set out
to dry.
5. Remove the HEPA lter from its frame, take it outside the living area, and shake it
out. You can also clean it using the provided brush. HEPA lters may not be rinsed
in water. A damaged or excessively soiled HEPA lter needs to be replaced.
Note:
Dirty or damaged HEPA and bulk lters may decrease suction power and,
therefore, cleaning performance; for this and other reasons the lters
should be kept clean.
6. Make sure all parts are clean and dry, then install the lters.
7. Close the dustbin lid and insert the dustbin assembly into the vacuum.
Cleaning the Wet Cleaning Attachment
1. Press the wet cleaning attachment release catch and remove the attachment.
2. Carefully remove the rag from the attachment frame and rinse it in warm water.
Add a modest amount of mild laundry detergent if required. Wash the rag by hand
until clean. Rinse the rag in warm water, wring out by hand, and hang out to dry.
3. Empty any remaining water from the tank and set the tank out to dry with the
ller cap open.
Note:
The rag should not be machine-washed or -dried.
Cleaning the Sensors
The sensors on the bottom of the vacuum allow it to safely navigate a room, and
should be cleaned regularly.
Wipe the sensors with a soft, dry sponge.
Cleaning the Central Rotary Brush
1. Remove the central rotary brush cover plate.
2. Grab the central rotary brush at one end and carefully remove it from its mounting
in the suction aperture.
3. Clean tangled hair, fur and other detritus from the rotary brush and its bearings.

EN
EN - 18 EN - 19
4. Clean the brush bay with a dry cloth and check the suction aperture for
obstructions.
5. Replace the rotary brush in its mounting, then replace the cover plate.
Cleaning the Vacuum Body and Charging Station
Wipe the outer body of the vacuum and the charging station with a clean, dry cloth.
Turn the vacuum upside down and remove any hair and dirt that may have become
entangled in the castors.
Storage
Before putting the vacuum into storage, make sure it is clean, the dustbin is empty
and clean, and lters are clean and properly installed. Store the appliance in a dry and
well-ventilated place out of the reach of children or pets. Do not place any objects on
the appliance.
During long storage, charge the battery once every 3 months to prolong its life.
TROUBLESHOOTING
Problem Solution
Vacuum keeps going in reverse Check:
• ambient light is not too strong;
• surface being cleaned is not a black
carpet;
• condition and cleanliness of sensors on
device bottom; clean if required;
• wheels are not stuck; clean if required.
Vacuum will not power on Check:
• main power switch on device bottom;
set to I (on) if not so already;
• charge level; charge if necessary.
Charge the battery.
Automatic charging not working Check:
• charging station status LED is lit;
• vacuum has obstacle-free path to
charging station;
• vacuum did not run out of power
before reaching station; plug in
manually if it did.
Dock the vacuum with the charging sta-
tion before beginning a cleaning cycle.
Vacuum not charging Verify that you are using the original
power adapter and it is correctly plugged
into the mains.
If you believe the battery may be dam-
aged, contact an authorized service
center.

EN
EN - 20
Problem Solution
Vacuum does not resume cleaning when
it should
The vacuum should resume cleaning on
its own after it has been lifted from the
oor, rebooted, cleaned, or brought out
of standby. If it does not, it likely was not
able to triangulate its position. To resolve,
manually return the vacuum to the
charging station and restart the cleaning
cycle. Once the vacuum has recreated its
internal map of its surroundings, re-speci-
fy virtual walls and no-go zones and save.
Vacuum will not connect to Wi-Fi Check Wi-Fi is operational (e.g. using your
phone). Attempt again to connect the
vacuum to the Wi-Fi as described above.
Vacuum fails to return to charging station • Charge the vacuum fully before use.
• Place charging station near wall and
provide the following clearance on the
oor: 2 m (6 ft) in front; 1 m (3 ft) either
side.
• Clean charging contacts on vacuum
and station.
Side brush has come loose Reattach. Brushes are designed as de-
tachable and replaceable.
Vacuum not working • Check suction aperture is free of
obstructions, clogging etc.
• Empty the dustbin.
• Clean lters using brush or another
vacuum, if available.
• Check lters are not wet. Set out to dry
completely before further use.
Fall sensors malfunctioning Clean off with dry, soft cloth.
Bumper stuck Carefully free bumper with your hands
and check its free movement.
Vacuum stopped suddenly • Check vacuum is not stuck or hit an
obstacle.
• Check charge level.
• Set main power switch to off, wait 2
seconds, then set to on again.
If the problem is not listed in the table above or if the problem persists, switch off the
appliance, disconnect the plug from the electrical outlet and contact an authorized
service center.
This manual suits for next models
1
Table of contents
Languages:
Other SIGURO Vacuum Cleaner manuals


