Siku 6206L User manual

Page 1of 9
Instruction Manual
Wall-mounted Heater
Model : SIKU 6206L

Page 2of 9
FOR HOUSEHOLD USE ONLY
IMPORTANT INSTRUCTIONS –OPERATING MANUAL
READ AND SAVE THESE INSTRUCTIONS
READ CAREFULLY BEFORE ATTEMPTING TO ASSEMBLE, INSTALL, OPERATE OR MAINTAIN THE
PRODUCTS DESCRIBED PROTECT YOURSELF AND OTHERS BY OBSERVING ALL SAFETY
INFORMATION. FAILURE TO COMPLY WITH INSTRUCTIONS COULD RESULT IN PERSONAL INJURY
AND/OR PROPERTY DAMAGE!
RETAIN INSTRUCTIONS FOR FUTURE REFERENCE.
GENERAL SAFETY WARNING:
1. The heater should be hung on the wall and make the wind outlet down or be placed on flat appliance. You
must not place it precipitately or tipsily.
2. Use only the voltage specified on the rating plate of the heater.
3. The heater must not be located immediately below a socket-outlet.
4. Do not cover or restrict airflow to the inlet or exhaust grilles in any manner as the appliance overheat and
become a fire risk.
5. Do not block air inlets or outlets in any manner. Check the openings from time to time for accumulated
dust.
6. Do not place the appliance close to a radiant heat source.
7. Do not operate in areas where gasoline, paint or other flammable liquids are used or stored.
8. Do not use the appliance to dry clothes.
9. Do not insert or allow foreign objects to enter any ventilation or exhaust opening, as this may cause an
electric shock, fire or damage to the appliance.
10. Do not operate any appliance with a damaged cord or after the appliance malfunctions or has been
dropped or damaged in any manner. Return to a qualified electrical person for examination, electrical or
mechanical adjustment, service or repair.
11. This appliance is intended for household use only and not for commercial or industrial use.
12. Use this appliance only as described in this manual. Any other use is not recommended by the
manufacturer and may cause fire, electric shock or injury.
13. The most common cause of overheating is deposits of dust or fluff in the appliance. Ensure these deposits
are removed regularly by unplugging the appliance and vacuum cleaning air vent.
14. Do not use abrasive cleaning products on this appliance. Clean with a damp cloth (hot wet) rinsed in hot
soapy water only. Always unconnected from the mains supply before cleaning.
15. The appliance heats up slightly when in use. To avoid burns, do not let bare skin touch hot surfaces.

Page 3of 9
16. The use of an extension cord with this appliance is not recommended.
17. Do not allow cord to come in contact with heated surfaces during operation.
18. If the supply cord is damaged, it must be replaced by the manufacturer its service agent or similarly
qualified persons in order to avoid a hazard.
19. If the heater needs repair, please ask for special person or our company authorized maintenance
department.
20. Do not use this appliance outdoors, or on wet surfaces.
21. The heater is to be installed so that switches and other controls cannot be touched by a person under the
absence of supervision (This appliance is without plug, do not touch the cord directly).
22. Heater must be installed at least 0.2 m below the ceiling.
23. The heater should not be installed close to curtains and other combustible materials.
24. If the motor is not working properly, please stop it immediately, then check it by the qualified persons.
25. During using the heater, please do not open the door or window continually otherwise it will influence the
heating effect.
26. If want to shut off the heater, press the on/off switch to off, then the heater will keep the fan working 30
seconds until it blowing out cool wind, then the heater will stop working, but do not pull the supply cord
directly, it is risky exist.
27. Do not use this heater in the immediate surroundings of a bath, a shower or a swimming pool.
28. Timer sets the heater working time.
29. The battery must be removed from the appliance before it is scrapped.
30. The battery is to be disposed of safely.
31. The heater must be installed at least 2 m above the floor.
32. This appliance can be used by children aged from 8 years and above and persons with reduced physical,
sensory or mental capabilities or lack of experience and knowledge if they have been given supervision or
instruction concerning use of the appliance in a safe way and understand the hazards involved. Children
shall not play with the appliance. Cleaning and user maintenance shall not be made by children without
supervision.
33. Children of less than 3 years should be kept away unless continuously supervised. Children aged from 3
years and less than 8 years shall only switch on/off the appliance provided that it has been placed or
installed in its intended normal operating position and they have been given supervision or instruction
concerning use of the appliance in a safe way and understand the hazards involved. Children aged from 3
years and less than 8 years shall not plug in, regulate and clean the appliance or perform user
maintenance.
Page 4of 9
CAUTION –Some parts of this product can become very hot and cause burns. Particular attention
has to be given where children and vulnerable people are present.
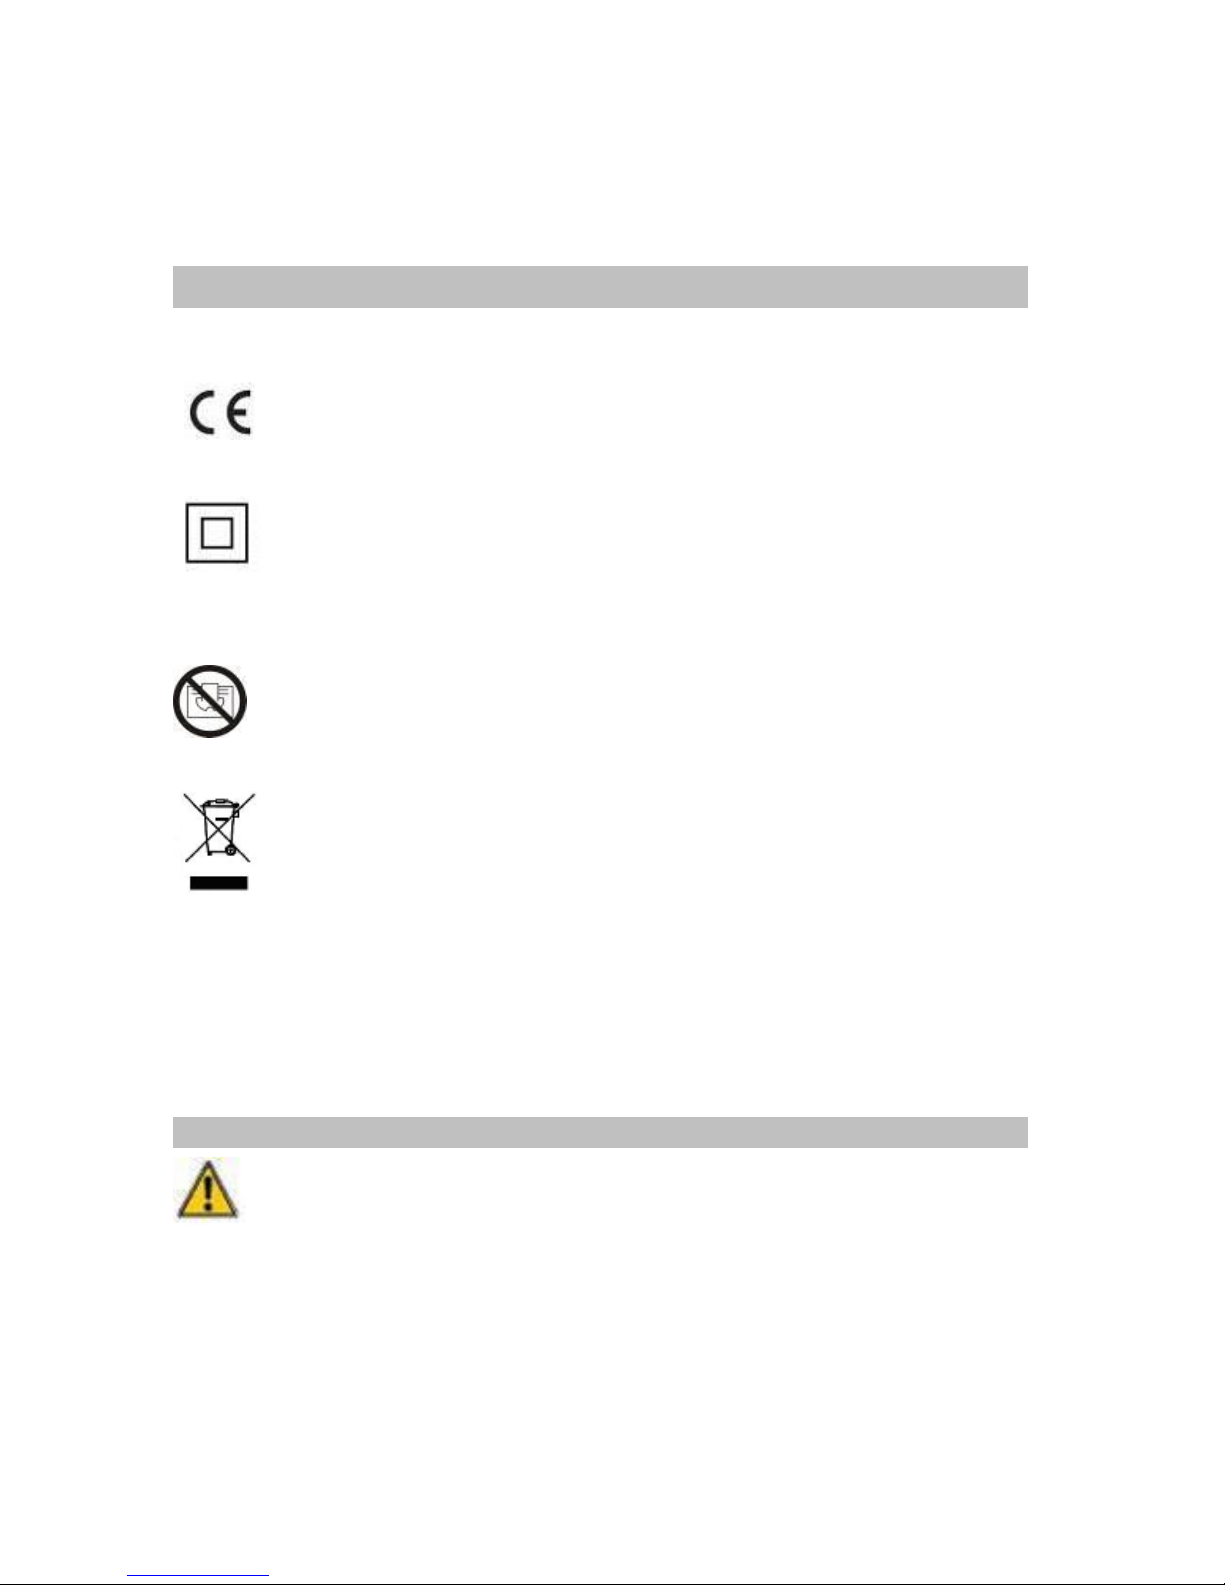
DESCRIPTION OF THE SYMBOLS:
Before any use, refer to the corresponding section in this user manual.
In accordance with European directives applicable to this product
Class II symbol: this appliance is designed with double insulation. It is not necessary to connect it to earth
connection.
Warning: To avoid overheating, do not cover
The crossed-out wheeled bin symbol indicates that the item should be disposed of separately from household
waste. The item should be handed in for recycling in accordance with local environmental regulations for waste
disposal. By separating a marked item from household waste, you will help reduce the volume of waste sent to
incinerators or land-fill and minimize any potential negative impact on human health and the environment.
INSTALLING THE DEVICE
The heater shall be installed and used according to the safe standard.
To avoid all dangers, follow the safety instructions.
- The installation must be done by the service agent or similarly qualified persons in order to avoid a hazard.
- Important! Make sure that there are no electric cables or other installations (for example water pipes) near the
drill holes. Make sure that the appliance is securely and vertically fitted to the wall.
Get two holes on the wall 2 m above the floor and near the corner more 25 mm, be sure to make the diameter
just as same as the expanding pipe. Fix two screws on the expanding pipe, keep the tips of the screws out for
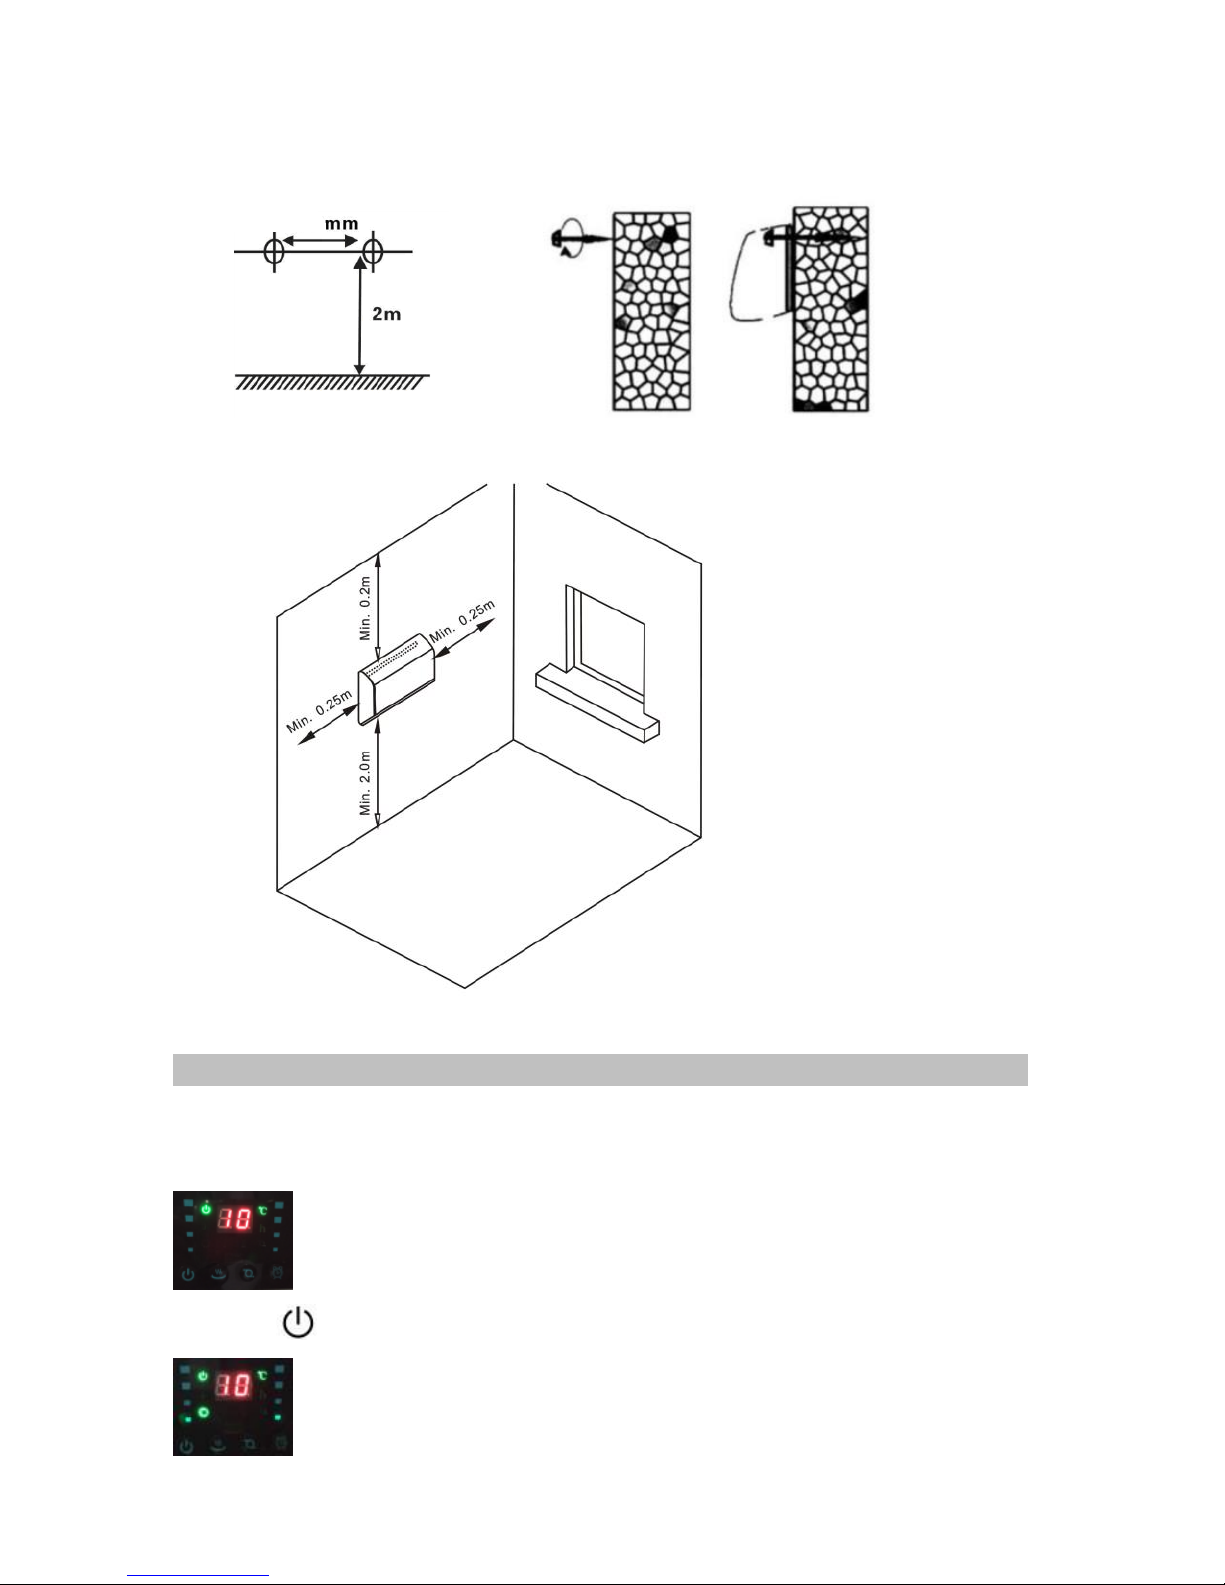
Page 5of 9
10mm, and hang up the machine after the screws are fixed enough.
OPERATION
1. Connect to any 220-240V, 50Hz,AC source. Press the ON/OFF switch at the right side, the heater standby,
LED will display room temperature, then use remote control or button on control panel to set power and time.
2. Press the “ ” button on control panel of the heater, will be into “FAN” mode, and blow the natural wind.
535

Page 6of 9
3. Turn on the heater by Press the “ ” button, will set the heater into 1000W power(I).
4. Press the “ ” button again, set the heater into 2000W power(II).
5. Press the “ ” button, the louver will oscillate automatically,press again,the louver stop oscillating.
6. Press the “ ” button LED display twinkle,start to set timer as follows:1H,2H……8H. display
After finished timer setting, LED will display room temperature.
7. When turn off the heater, press “ ” button once again. Fan keeps working for 30 seconds to blow the
natural wind and cool down the heater inside (after heating).
Page 7of 9
Control panel
Timer
This function will work in any mode. The timer function allows you to set the time of operation from 1 hour to 8
hours. Press the timer button in the control panel or remote control, press one time will increase the time of
operation by 1 hour, the most 8 hours.
Remote control
1. Install 2x AAA batteries
2. All the functions performed with the remote control work identically to the panel control.
Indicator light
On/off indicator light
Timer indicator light
Heating indicator light
Indicator light
Temperature indicator light
Louver oscillation
indicator light
Heating
ON/OFF
Louvers
oscillating
Timer
LED display
Timer indicator light
Page 8of 9
3. When don’t use the remote control, remove the batteries before storage.
“ON/OFF”
Press the button once and the power is on. The appliance blows out natural wind. Press again, the power is off.
“+”
Press the button to adjust the higher temperature(max. 49°C).
“-”
Press the button to make the temperature lower ( min.10°C)
“Mode”
You can select 2 powers 1000W / 2000W through this button.
“Timer”
Press the “Timer” button to set the timer as follows: 1H,2H,3H,4H,5H,6H,7H,8H; it can be showed by the LED
display.
“Swing/Cancel”
Press the “Swing/Cancel” button, the louvers will oscillate automatically.
OVERHEAT PROTECTION
The heater is protected with an overheat protector that switches off the heater automatically in case of overheat.
e.g. due to the total or partial obstruction of the grids. In this case, unplug the appliance, wait about 30 minutes
for it to cool and remove the object which is obstructing the grids. Then switch it back on as described above.
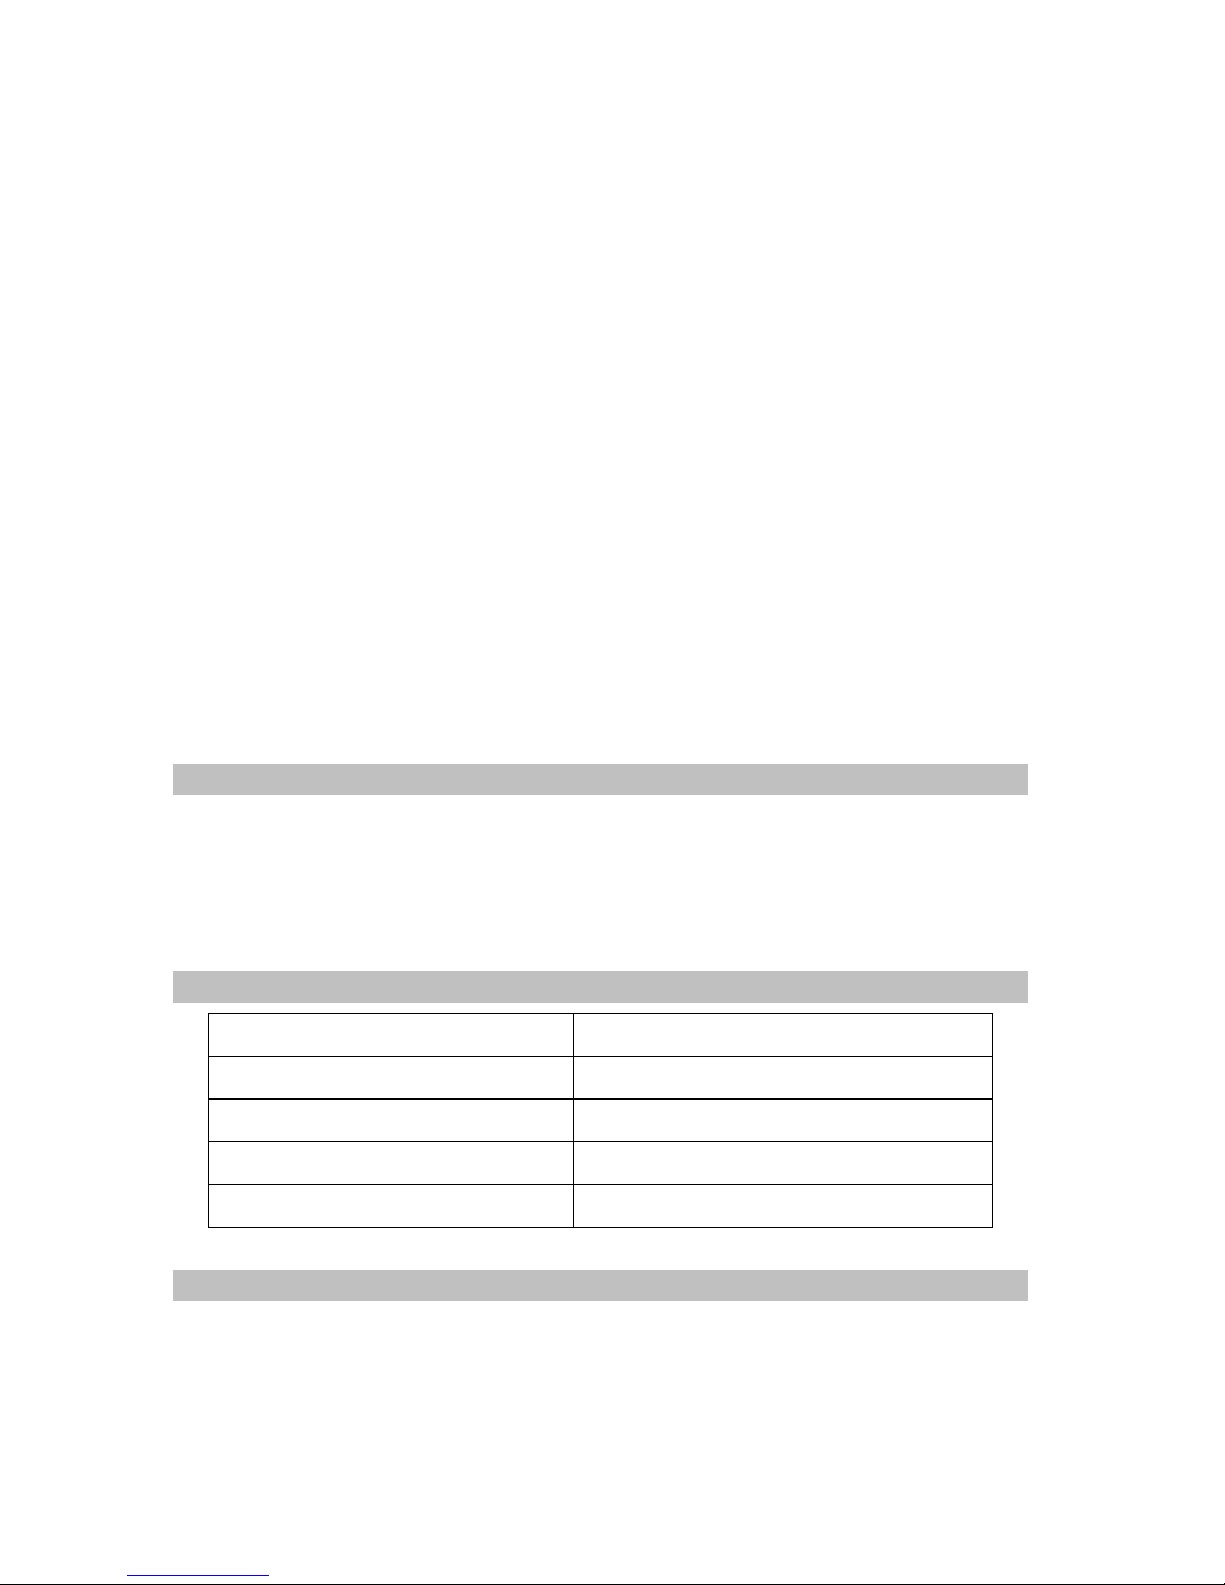
TECHNICAL SPECIFICATIONS:
Model
6206L
Rated Voltage
220-240V~
Rated Frequency
50Hz
Rated Power
2000W
Protective Class
II
CLEANING AND MAINTENANCE
1. If you don’t use the heater for a long time, please wipe the surface and put it into the box. Lay the carton on
the ventilated and dry place. Humidity and force press was prohibited.
2. Wait for the machine being cool and pull out the plug, then clean it. Wipe it clean with wet washcloth or cleaner.
Never directly wash with water; do not drop the water into the machine. Never clean it with acids, chemical
thinner, gasoline, benzene etc.

Page 9of 9
Siku Vertriebsges.m.b.H
Bundesstraße 5, A-2102 Bisamberg | Tel +43 (0)2262 61 521, Fax +43 (0)2262 61 520 | email office@siku.cc www.siku.cc
3. Before you use it again, please check it and make sure that the outlet ventilation has not any sundries.
RECYCLING (DISPOSAL OF THE PRODUCT AT THE END OF ITS LIFE):
The crossed-out wheeled bin symbol indicates that the item should be disposed of
separately from household waste. The item should be handed in for recycling in accordance
with local environmental regulations for waste disposal. By separating a marked item from
household waste, you will help reduce the volume of waste sent to incinerators or land-fill
and minimize any potential negative impact on human health and the environment.
Table of contents
Other Siku Heater manuals


Popular Heater manuals by other brands

Clas Ohlson
Clas Ohlson DL06A STAND manual

Etherma
Etherma TC Series Installation and operating instructions

Star Progetti
Star Progetti HELIOSA Hi design 66 Series operating instructions

Helo
Helo HIMALAYA Elite Quick instructions

Atlantic
Atlantic DIVALI manual

Webasto
Webasto Air Top 2000 ST B Workshop manual


