Silex technology ClickShow R101 User manual

User Guide
Silex ClickShow R101

2
User Guide - Silex ClickShow R101
Table of Contents
1. Introduction .......................................................................... 3
2. The meeting room main display ......................................................... 3
3. Sharing using the Button ............................................................... 3
4. Sharing from Windows laptops using the soft Button Desktop App .......................... 4
4.1- Installing the Soft Button Desktop App.............................................. 4
4.2- Using the Soft Button Desktop App ................................................. 4
5. Sharing from an iOS device using AirPlay ................................................. 5
6. Sharing from an Android device using the soft Button App.................................. 5
6.1- Installing the Android Soft Button App .............................................. 5
6.2- Using the Android Soft Button App ................................................. 5
7. Connecting to the base unit ............................................................. 6
8. Switching between users ............................................................... 7
9. Sharing from Windows laptops in extended desktop mode ................................. 7
10. Pairing the Buttons with the Base unit .................................................. 7
11. How to access the configurator ........................................................ 8
12. Enable / disable pin code.............................................................. 8
13. WiFi configuration.................................................................... 9
13.1- WiFi hotspot configuration ........................................................ 9
13.2- Wireless bridging configuration ................................................... 10
14. Network configuration ............................................................... 10
15. Multicasting ........................................................................ 11
16. Video Settings ...................................................................... 11
17. Changing the administrator password ................................................. 12
18. Customize the startup and wallpaper images .......................................... 12
18.1- Specifications of the images: ..................................................... 12
18.2- Update the images via the configurator ............................................ 12
18.3- Update the images using a USB flash drive ......................................... 13
19. Touch back reverse control ........................................................... 13
20. System upgrade..................................................................... 13
20.1- Download the latest file.......................................................... 13
20.2- Update the system via the Configurator............................................ 14
20.3- Update the system using a USB flash drive ......................................... 14
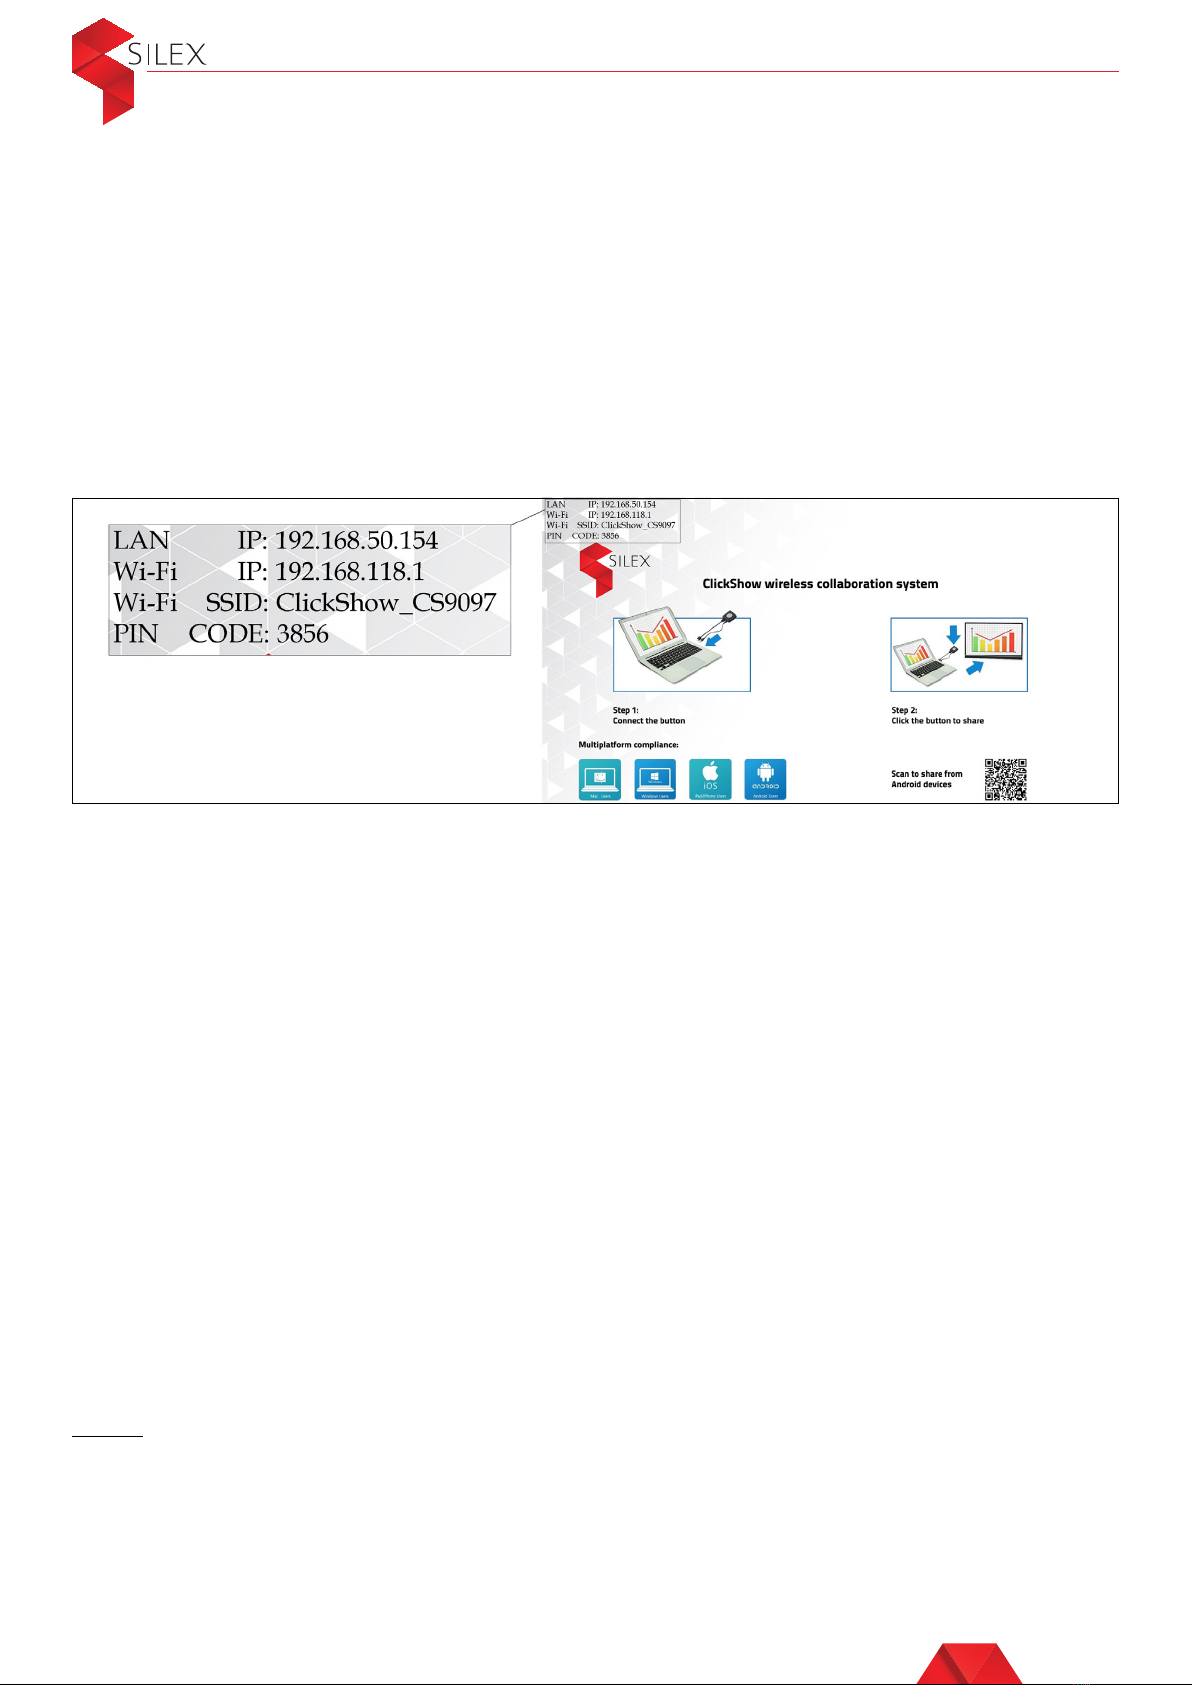
3
User Guide - Silex ClickShow R101
1. Introduction
Thank you for choosing the Silex ClickShow R101 wireless presentation system. This
system is designed with the complex nature of today’s business in mind, allowing for a
flexibility that matches the product to the customer’s needs, not the other way around.
This users guide gives you information on how to use and configure the system.
2. The meeting room main display
When the ClickShow Base unit is installed and running, the default wallpaper is
displayed on the meeting room main screen.
On the top left corner, some information is displayed from the default configuration: the
LAN IP address, the WiFi hotspot IP address, the Wi-Fi hotspot name (SSID) and the
PIN code (if this option is enabled).
If no network cable is plugged in the LAN port of the ClickShow base unit, then the first
line will display the device version number.
3. Sharing using the Button
Sharing content using the HDMI Button can be done from any device that has an HDMI
output, such as: Windows and MAC PCs and laptops, DVD players, media player box,
video conference terminals, etc…
• Plug the HDMI cable and the USB cable of the Button into the HDMI port and the
USB port of your device. The light indicator will blink in blue color
• When the Button indicator becomes static blue, it is ready to connect.
Click the Button. The light indicator turns static red and your content is shared on
the main display
To stop sharing, click the Button again.
Note:
The USB cable is used to power the HDMI button, to pair the Button if needed and for
touch back reverse control. If the device you are trying to connect the button to does
not have a USB port, then you can plug the USB cable to a USB power adaptor in a
wall power socket. The USB Power adaptor IS NOT included in the ClickShow box at
purchase.

User Guide - Silex ClickShow R101
4
4. Sharing from Windows laptops using the soft Button Desktop App
Windows users can install the ClickShow Soft Button Desktop App and share their
content from their laptop without using a physical button. The laptop and the
ClickShow Base unit must be connected first as described in Section 7.
4.1- Installing the Soft Button Desktop App
Download the Desktop App from the following link: https://bit.ly/2XD65Fh
Run the ESHOW software and follow the installation instructions.
4.2-Using the Soft Button Desktop App
Locate the ESHOW icon on your laptop. Click on the ESHOW icon to open the soft
button Desktop App. If the laptop and the base unit are connected as described in
Section 7, then the App should directly display the name of the ClickShow base unit
it is connected to. If the base unit is not listed, then click on the refresh button on the
top right corner of the App, and select the ClickShow unit you want to connect to
from the list (the color of the sharing button will change from grey to blue when the
unit is selected). Click on the sharing button, and your desktop will appear on the main
display.
To stop sharing, click on the close button.
Note:
If Pin Code security is enabled on the Base unit, you will have to enter a Pin code before
you can share using the Soft button Desktop App. The Pin code can be found on the
ClickShow Wallpaper on the main display.

User Guide - Silex ClickShow R101
5. Sharing from an iOS device using AirPlay
This option works for all iOS devices that support AirPlay. To share from iOS tablets,
smartphones and Mac PCs, the device should first be connected to the ClickShow base
unit wirelessly as described in Section 7.
On the iOS device, flip down (or flip up) the control center menu, select ‘Screen
Mirroring’ (or AirPlay) then tap on ClickShow_CSxxxx. and your device will be mirrored
on the main display.
To stop sharing, flip down (or flip up) the control center menu and stop Screen
Mirroring (or Airplay).
Note:
•
The above procedure could slightly vary from a device or software version to another.
•
If Pin Code security is enabled on the Base unit, you will have to enter a Pin code
before you can share using AirPlay. The Pin code can be found on the ClickShow
Wallpaper on the main display.
6. Sharing from an Android device using the soft Button App
To share from Android tablets and smart phones, users need to install the ClickShow
Android Soft Button App. The laptop and the ClickShow Base unit must be connected
first as described in Section 7.
6.1- Installing the Android Soft Button App
Download and install the Android App by scanning the QRcode from the ClickShow
wallpaper on the meeting room main display (See Section 2).
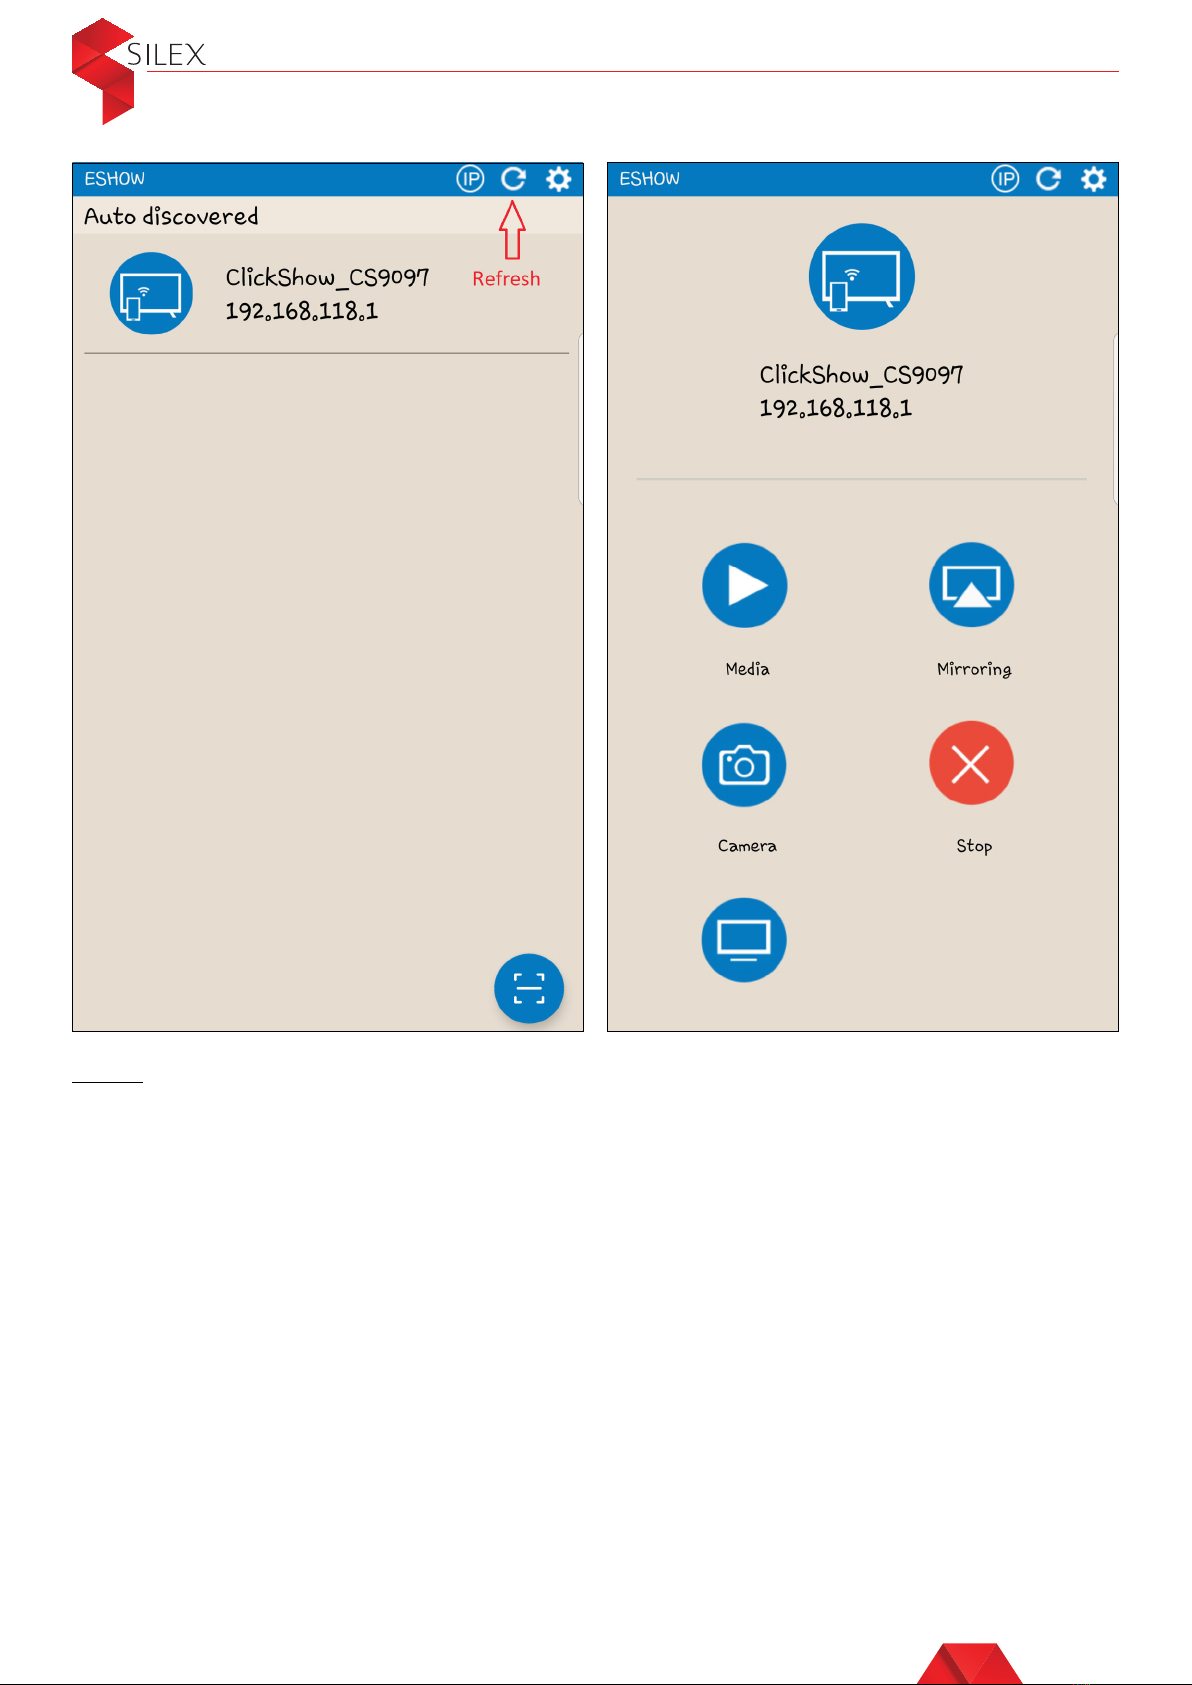
6.2- Using the Android Soft Button App
Locate the ESHOW icon on your Android device and run the app. If the Android device
and the Base unit are connected as described in Section 7, then the App should directly
display the name of the ClickShow Base unit it is connected to. If the base unit is not
listed, then click on the refresh button on the top right corner of the App.
Click on the sharing button and your content will appear on the main display.
To stop sharing, click on the Stop button.
5
User Guide - Silex ClickShow R101
Note:
If Pin Code security is enabled on the Base unit, you will have to enter a Pin code before
you can share using the Android soft Button app. The Pin code can be found on the
ClickShow Wallpaper on the main display.
7. Connecting to the base unit
To share using the Desktop App from Windows laptops, the Android App from Android
tablets and smart phones, and AirPlay from iOS devices, or to access the Configurator,
the device used should connect to the ClickShow Base unit first.
Depending on the device in use, there are dierent ways to connect:
• Via the LAN (Windows and MAC laptops)
If the ClickShow Base unit is connected to the same LAN as the laptop, then the
connection is already established
6
User Guide - Silex ClickShow R101
• Wirelessly via the network access point (Windows and MAC laptops, Android
devices, iOS devices)
If the ClickShow Base unit is connected to the LAN wirelessly, then the iOS device
can be connecter wirelessly to the same network.
• Wirelessly to the ClickShow base unit (Windows laptops, Android devices, iOS
devices)
Connect your laptop to the access point of the ClickShow Base unit. Look for the
ClickShow access point SSID and enter the default password when prompted.
The default password is: 12345678.
The WiFi SSID is displayed on the top left corner of the ClickShow wallpaper on the
meeting room main display (See Section 2).
8. Switching between users
When a first user clicks on a button or shares from the desktop app, the Android app
or AirPlay, the content is displayed on the meeting room’s main display. When another
user tries to share from another device, the content of the second user will be displayed
instead.
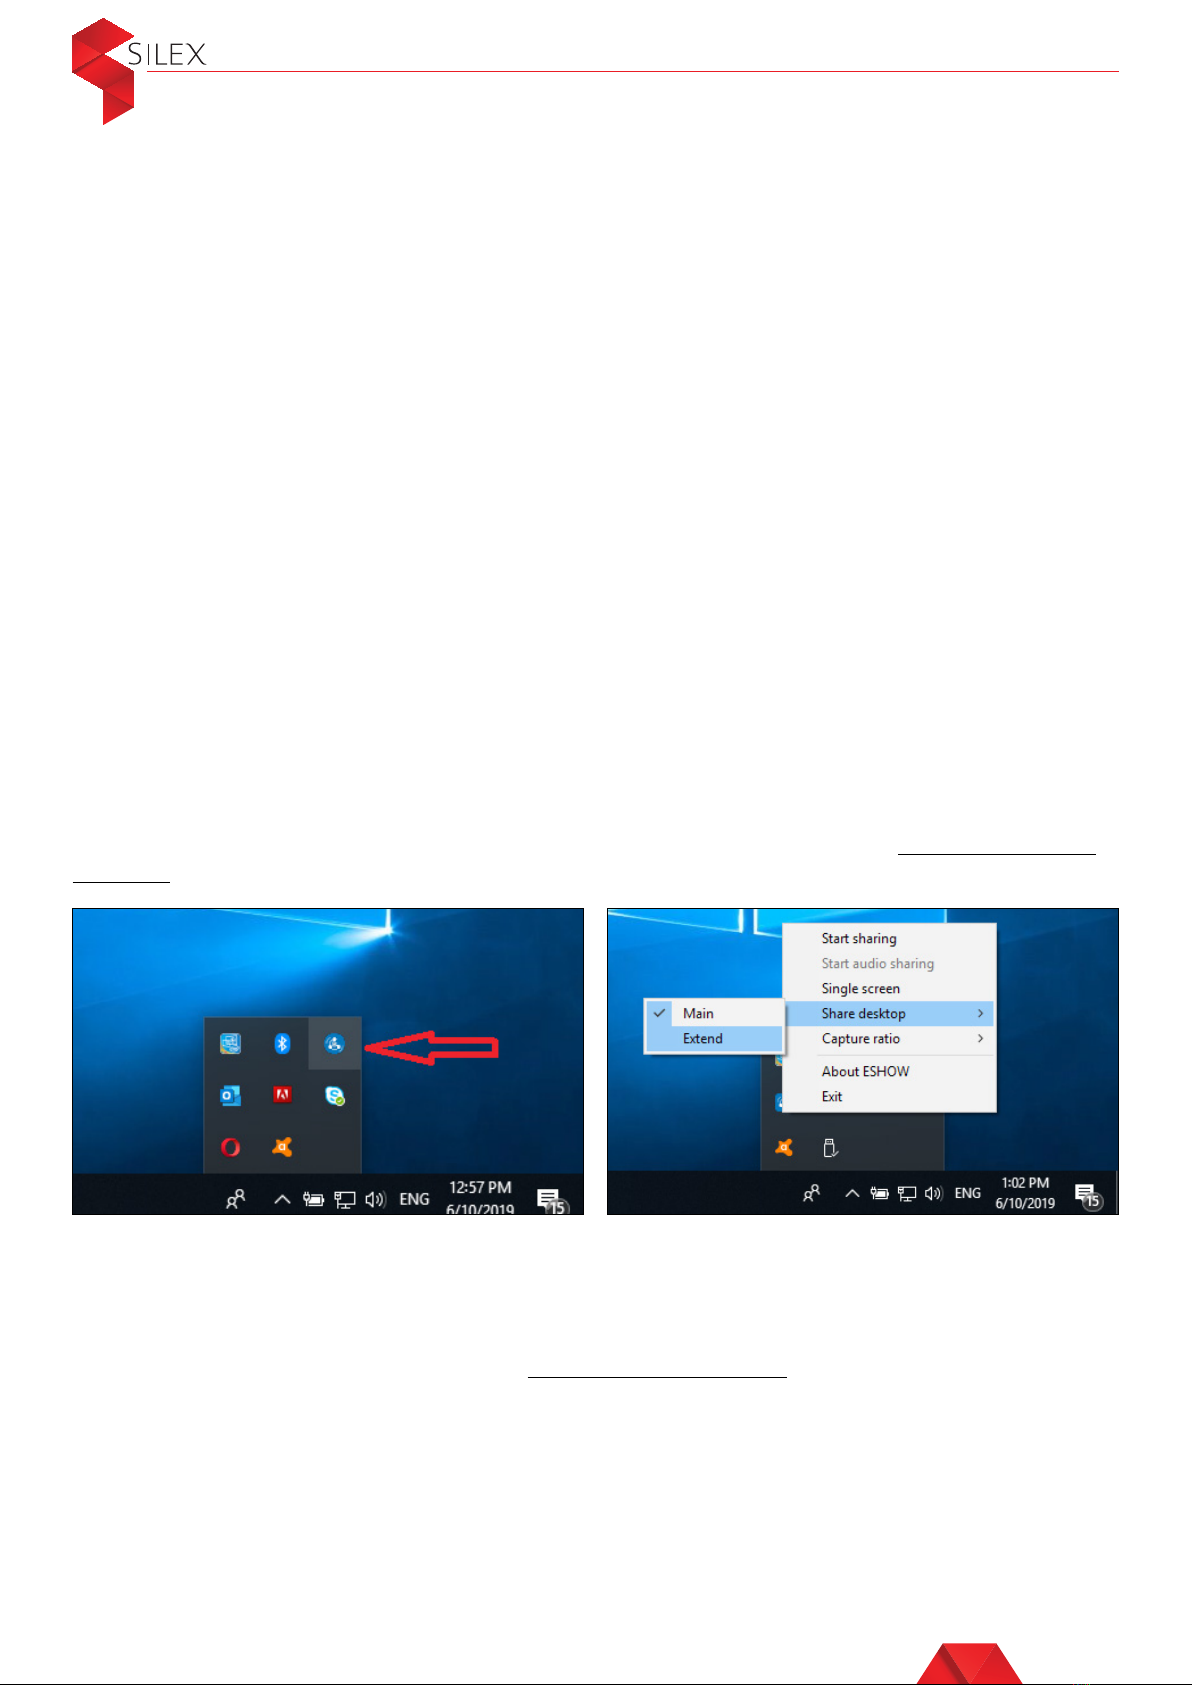
9. Sharing from Windows laptops in extended desktop mode
Sharing content in extended mode can be done from a Windows laptop while using the
Button. Once the Button is plugged and ready to share (see Section 3), right click on
the ESHOW icon in the hidden icons’ menu in your taskbar and go to Share desktop –
Extend.
The content will automatically appear in extended desktop mode. While the button is
plugged to the laptop, whenever you stop sharing then share again, the content will be
shared in extended desktop mode.
To stop sharing in extended desktop mode, right click on the ESHOW icon in the hidden
icon’s menu in your taskbar and go to Share desktop – Main.
10. Pairing the Buttons with the Base unit
By default, the Button(s) are already paired to the Base unit they are delivered with
and ready to be used. In case you buy additional Buttons or when a Button should be
assigned to another Base Unit, then it should be paired.
7

User Guide - Silex ClickShow R101
To pair a Button, insert the USB cable of the Button in the USB port on the Base unit.
The light indicator on the Button will remain static blue during the pairing process.
When the Button pairing is done, the light indicator on the Button turns static red. At
this point, you can unplug the Button from the Base unit.
Note:
•
A Button can be paired to one Base unit at a time and will connect to the Base unit it
was last paired to
11. How to access the configurator
Some features can be set from the Configurator.
To access the Configurator, first connect your device to the ClickShow Base unit as
explained in Section 7.
Open your browser. It is recommended to use Google Chrome in no trace mode. On
your browser, type the IP address of the ClickShow Base unit. If you are connected Via
the LAN, then enter the LAN IP. If you are connected wirelessly to the Base unit directly,
then enter the WiFi IP. Both the WiFi IP and the LAN IP are displayed on the top left
corner of the ClickShow wallpaper on the meeting room main display (see Section 2).
You will be prompted to enter the administrator credentials. The Default is:
Username: admin
Password: admin
12. Enable / disable pin code
By default, the PIN code is disabled. When PIN Code is enabled, the users will be
prompted to enter a PIN Code before sharing from a personal device. The PIN Code to
enter can be found on the ClickShow wallpaper on your meeting room main display.
when sharing using a Button, there is no PIN Code required.
The PIN Code will only be requested when sharing from:
• Android devices from V.1.4.2, using the Android App
• Windows laptops from V1.3.1, using the Desktop App
• iOS devices using AirPlay
To enable PIN Code:
Connect to the Configurator (see Section 11), then go to Settings – PIN CODE settings.
Enable the PIN Code then save your changes.
8
User Guide - Silex ClickShow R101
The ClickShow Base unit will automatically restart, and a random PIN Code will be
displayed in the top left corner of the Wallpaper on the meeting room main display.
To disable PIN Code:
Connect to the Configurator (see Section 11), then go to Settings – PIN CODE
settings. Disable the PIN Code then save your changes. The ClickShow Base unit will
automatically restart without PIN Code.
Note:
•
Every time the ClickShow Base unit restarts, a new random PIN Code is generated.
•
Users need to enter the PIN Code every time before sharing
13. WiFi configuration
13.1- WiFi hotspot configuration
The WiFi hotspot is enabled by default on the ClickShow base unit. However, it is
possible to disable the WiFi hotspot and in that case, only devices connected via the
LAN or with a Button can share content.
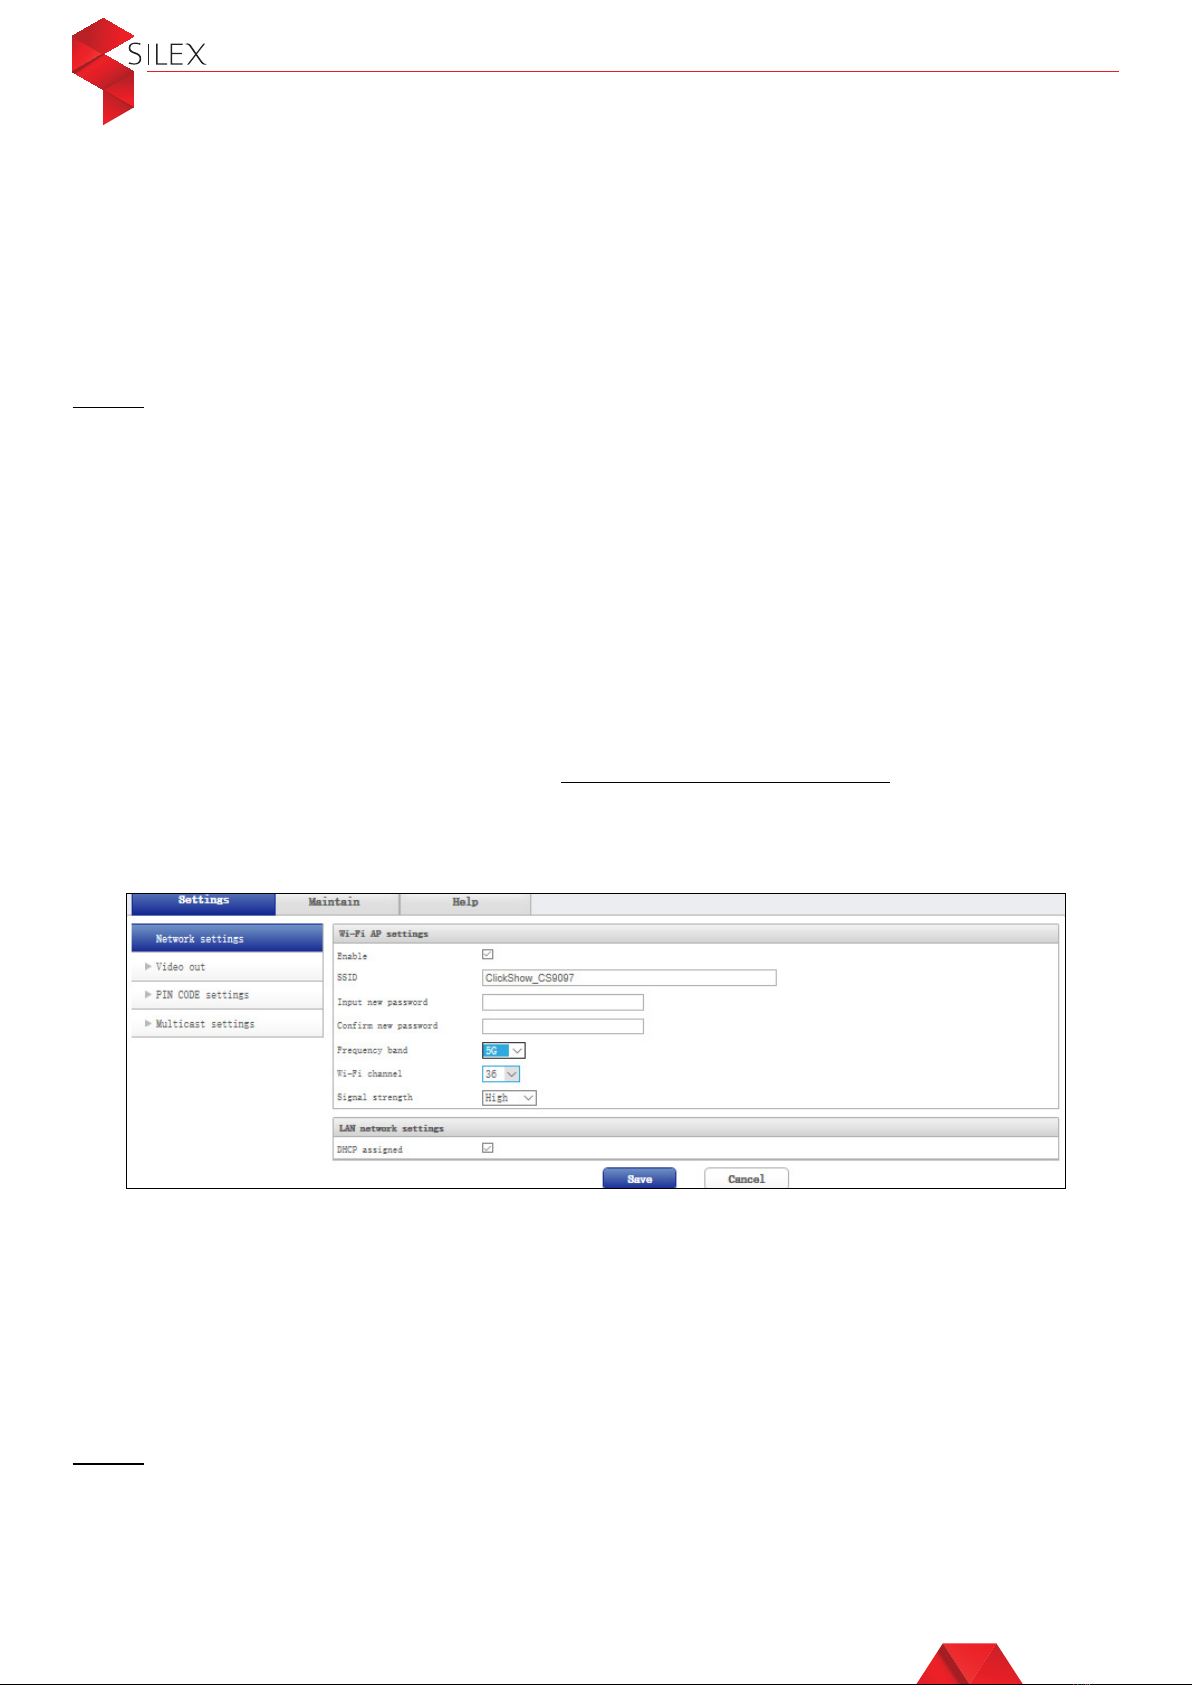
To Enable / disable the WiFi Hotspot on the ClickShow Base unit connect to the
Configurator (See Section 11), then go to Settings – Network settings, and tick or untick
‘Enable’. To save your changes, click on ‘Save’. The WiFi IP and the WIFI SSID will
automatically be displayed or removed from the top left corner of the wallpaper on the
meeting room main display (see Section 2).
When the WiFi hotspot is enabled, the following changes can be done:
• Change the Hotspot name (SSID)
• Change the WiFi password
• The frequency band (the factory default is 5.8G)
• Pick a WiFi channel (When there are wireless interferences from many wireless
devices, it is possible to set the channel to minimize the interference eect)
• Define the signal strength (the factory default is High)
Note:
After modifying the parameters of the WiFi hotspot, the ClickShow Base unit will
automatically restart, and all the Buttons need to be re-paired (see Section 10)
9

User Guide - Silex ClickShow R101
13.2- Wireless bridging configuration
The ClickShow can connect to an access point on the Local Area Network (LAN),
creating a wireless bridge between the ClickShow and the LAN. This allows the
users who are connected to the ClickShow Base unit, to access the LAN (Network
peripherals, internet…) and the users on the LAN, to connect to the ClickShow device
via the LAN to share content.
To configure the wireless bridging on you ClickShow Base unit, login to the configurator
(see Section 11) and go to Settings – Network settings – Wifi WLAN settings. Enter the
Name and password of your network access point, then click on ‘connect’. Once the
connection status mentions ‘connected’ click on ‘save’. The ClickShow base unit will
automatically restart.
14. Network configuration
The LAN is set to DHCP by default on the ClickShow base unit. However, it is possible to
configure an IP address from the Configurator (See how to connect to the Configurator
in Section 11).
Go to Settings – Network settings and disable the option ‘DHCP assigned’ then
configure your IP address and click on ‘Save’. The ClickShow Base unit will
automatically restart and the configured LAN IP address will appear on the top left
corner of the wallpaper on the meeting room main display (see Section 2).
Note:
When the ClickShow device is connected to the LAN, it creates a network bridge
allowing users who are connected to the ClickShow Base unit, to access the LAN
(Network peripherals, internet…) and the users on the LAN, to connect to the ClickShow
device via the LAN to share content.
10
User Guide - Silex ClickShow R101
15. Multicasting
If you have multiple ClickShow devices in your enterprise, it is possible to use them for
multicasting by setting one of them as a sender and the others as receivers.
1. Requirements:
• Each ClickShow Base unit should be connected to one display screen
• All ClickShow devices used for multicasting should all be from the same model
• One Clickshow device only can be set as a sender
• Up to 254 ClickShow devices can be set as receivers
• All ClickShow devices should be connected on the same LAN. For a better
performance, it is recommended to connect the devices to the LAN rather than
through the wireless network.
• The Switches and routers should support the multicast function
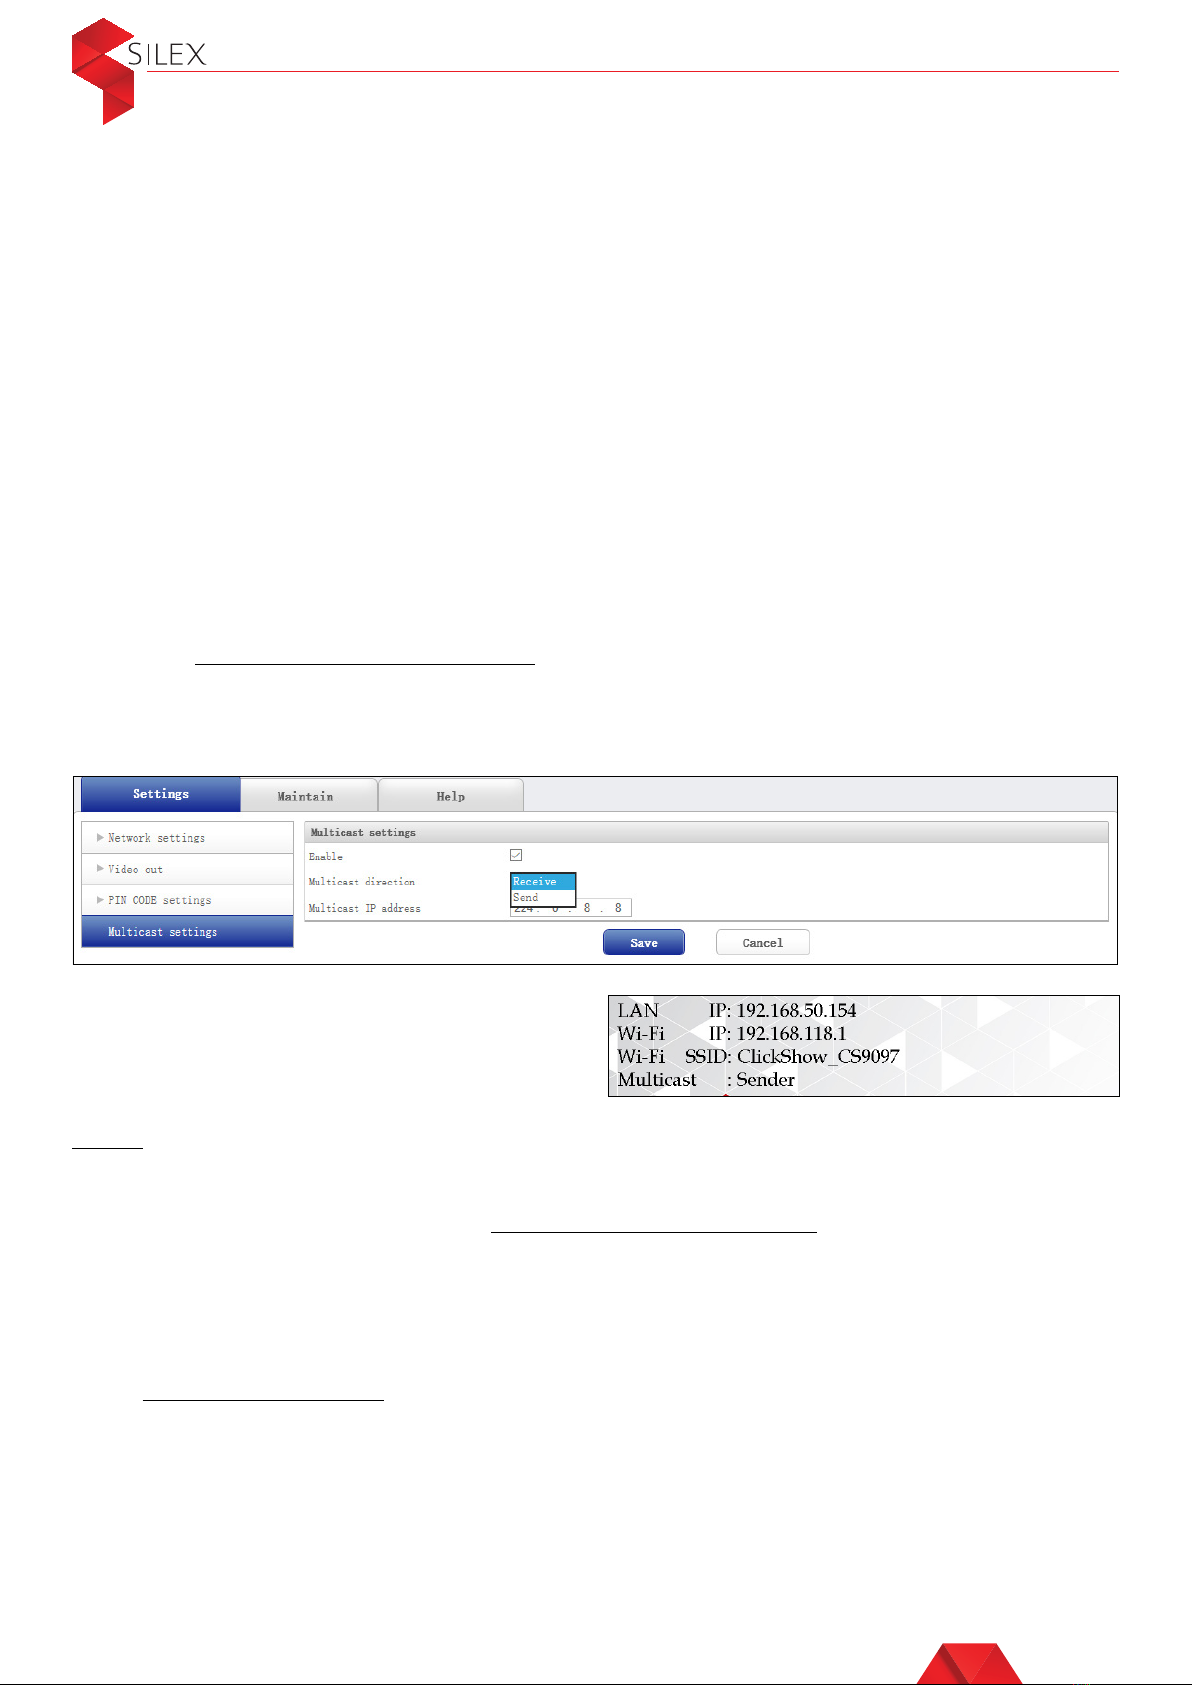
2. Configuration:
Log in to each ClickShow Base unit using the Configurator as explained in Section 11
and go to Settings – Multicast settings. Enable the multicast function and chose the
‘Multicast direction’ to set the ClickShow device as a sender or as a receiver. If it is the
sender device, then choose ‘Send’ and if it is a receiver device then choose ‘Receive’.
Click on ‘Save’ and the ClickShow Base unit will automatically restart.
Note:
If many ClickShow devices are installed in the same environment, you can reduce the
WiFi interference by disabling the WiFi hotspot on the Receiver devices. Login to the
Configurator (see Section 11), go to Settings – Network settings and disable the ‘WiFi AP
settings’ and click on ‘Save’.
16. Video Settings
To modify the HDMI video output settings, login to the configurator (see Section 11) and
go to Settings – Video out. The following parameters can be adjusted:
• HDMI resolution: The default HDMI output resolution is set to auto, but 12 possible
resolutions are also available
• OSD Transparency: This parameter is used to adjust the transparency of the caption
displayed on the top left corner of the meeting room main display in case it is not
displaying clearly
11
Once the ClickShow Base unit restarts, the
configured Multicast direction will appear
on the top left corner of the wallpaper on
the meeting room main display.

User Guide - Silex ClickShow R101
17. Changing the administrator password
To Change the default administrator password for the Configurator access, login to
the Configurator (see Section 11) and go to Maintain – Password. Enter the current
password and the new password then click on ‘Save’.
18. Customize the startup and wallpaper images
It is possible to change the start-up image or the wallpaper image appears on the
main screen in your meeting room.
18.1- Specifications of the images:
The start-up image should meet the below specifications prior to uploading it:
• Image format: JPG
• Image name (lowercase): logo
• Image resolution: 800*600
• Image size: less than 256K
The wallpaper image should meet the following specifications prior to uploading it:
• Image format: JPG
• Image name (lowercase): home
• Image resolution: 1920*1080
• Image size: less than 512K
18.2- Update the images via the configurator
To change the start-up image or the wallpaper image that appears on the main screen
in your meeting room, login to the Configurator (see Section 11) and go to Maintain –
logo&home pictures updated.
The ‘logo picture’ is the start-up image.
The ‘home picture’ is the wallpaper image.
12
• Sharpness: Used to set the sharpness of the output image.
• Volume: To set the audio output volume

Select the image to upload for each of the ‘logo picture’ and/or ‘home picture’, then
click on ‘update’. The wallpaper update will take eect immediately.
The start-up screen update will take eect after an automatic reboot of the ClickShow
base unit.
18.3- Update the images using a USB flash drive
1. Prepare the USB flash drive:
• USB flash drive name: you can name the USB flash drive anything except ESHOW.
• The file format of the USB flash drive should be FAT32 or FAT. If it is not the case,
you need to format the USB flash drive into FAT32 or FAT file format
• Create a new ESHOW folder under the root directory of the USB flash drive
(uppercase) and copy the images that need to be updated to that ESHOW folder
2. Update the images:
• Power o the ClickShow Base unit, then insert the USB flash drive into its USB
interface. Power on again
• When the light indicator of the ClickShow Base unit changes from blue to purple, the
image(s) update will be completed
• Once the update is done, light indicator will change from purple to blue
• Power o the ClickShow Base unit, remove the USB flash drive and then power on
again. The new start-up/wallpaper images will be displayed.
19. Touch back reverse control
If the Silex ClickShow Base unit is connected to a touch screen, then users can control
the shared content from the main touch screen. For this, connect the meeting room
touch display to the Silex ClickShow Base unit using a USB cable.
Note:
•
The USB cable is NOT INCLUDED in the ClickShow box at purchase
•
Some touch screen models may not be supported or recognized. You can refer to
support@silexpro.com for help
20. System upgrade
20.1- Download the latest file
To upgrade you ClickShow device, you need to download the latest software version
from the following link: https://bit.ly/2Xdq3tU. Download the Kernel version and the OS
version for your Device model.
The Kernel version name looks like this: ulmage-2C.bin
The OS version name looks like this: rootfs-2C-ESHOW.js2
Note:
The software version running on your ClickShow device should appear on the top left
corner of the wallpaper on the meeting room main display. If it is not displayed on the
main screen of your meeting room, then connect to the Configurator (see Section 11)
and go to Help.
User Guide - Silex ClickShow R101
13

User Guide - Silex ClickShow R101
20.2- Update the system via the Configurator
To update the ClickShow device, the Kernel upgrade should be processed separately
first. Only when the Kernel upgrade is completed, can the OS upgrade take place.
Login to the Configurator as described in Section 11 and go to Maintain – Upgrade.
Select the downloaded Kernel file then click on ‘Upgrade’. The ClickShow Base unit will
automatically restart.
After performing the Kernel upgrade, you can upgrade the OS. Select the downloaded
OS file then click on ‘Upgrade’. Once the upgrade is done, the ClickShow Base unit will
automatically restart and the new software version will appear on the top left corner of
the wallpaper on the meeting room main display.
20.3- Update the system using a USB flash drive
1. Prepare the USB flash drive:
• USB flash drive name: you can name the USB flash drive anything except ESHOW.
• The file format of the USB flash drive should be FAT32 or FAT. If it is not the case,
you need to format the USB flash drive into FAT32 or FAT file format
• Create a new ESHOW folder under the root directory of the USB flash drive
(uppercase) and copy the downloaded upgrade files (the Kernel and the OS) to that
ESHOW folder
2. System update:
• Power o the ClickShow Base unit, then insert the USB flash drive into its USB
interface. Power on again
• When the light indicator of the ClickShow Base unit changes from blue to purple,
and a message showing that the system is updating will appear on the meeting
room main display. The update takes 3 to 5 minutes
• Once the update is done, light indicator will change from purple to blue
• Power o the ClickShow Base unit, remove the USB flash drive, and then power on
again. The new software version will appear on the top left corner of the wallpaper
on the meeting room main display
- info@silexpro.comE: support@silexpro.com W: www.silexpro.com
© 2019 SilexPro. All rights reserved.
14
Table of contents
Other Silex technology Projector Accessories manuals


