MTC MTC-5000 User manual

MTC-5000
User Guide

www.mtc-technologies.com info@mtc-technologies.com
Table Of Content
1. What’s in the box 3
2. About the unit 4
3. Getting started 5
4. Networking options 6
5. Turning on the MTC-5000 Unit 7
6. The Status Bar Menu 8
7. Connecting participants 9
a. Connect using Windows® application 9
b. Connect using web browser 10
c. Installation of the MTC-5000 Extension 10
8. Connecting using the Web Client 11
9. Connect iOS devices using ArPlay® 12
10. Connect Apple® Macs using AirPlay® 13
11. Connect an Android® device using Miracast® 14
12. Managing participants 14
a. Adding and removing attendees 14
b. Make an attendee full screen (Active Display) 15
c.
Take control of a PC 15
d. Active display menu options 16
13. Windows Application 16
a.
Active display menu options 17
b. Viewing the active display 17
c. Pause screen sharing 17
d. Share audio and video 17
e. Share a file 17
14. Web Client 18
a. Become the active display 18
b. View the Active Display 19
c. Pause screen sharing 19
d. Share mic/webcam 19
e.
Share a file 19
15. MTC 5000 unit settings 20
a. MTC-5000 information 20
b.
Changing MTC-5000 features 21
c. Changing Access Point settings 22
d. Wireless Access 23
e. Network 24
f. Audio 25
2

MTC-5000 User Guide
The MTC-5000 unit
What’s in the box
Included in your MTC-5000 box:
1.MTC-5000 unit
2.Mounting plate
3.Screws for mounting plate
4.Power supply
5.Quick start card
www.mtc-technologies.com info@mtc-technologies.com
3

About the unit
Touch sensitive
power button
Top of unit
Front of unit
Back of unit
2 x USB 3.0 ports 3.5mm TRS mini audio jack
HDMI
port
Ethernet
port
2 x USB
3.0 ports
mini
Display
Port
Power supply port
Kensington lock port
www.mtc-technologies.com info@mtc-technologies.com
4

Product
information
Screw hole for
mounting plate
Serial
information
1. 2. 3. 4.
1. Connect the power cable.
2. Connect the display to either the HDMI or mini-Display
Port connection.
3. Connect to a network via Ethernet or using Wi-Fi under
Wireless Access in the settings.
4. If using a touch display, connect the USB touch cable
from the display to the MTC-5000 unit. Or, connect a
mouse for a standard display.
Getting started
Connecting the MTC-5000 unit
Screw hole for
mounting plate
1
2
3
4
www.mtc-technologies.com info@mtc-technologies.com
5

Networking options
Network scenarios:
(i) Connect MTC-5000 to a wired network with the Access Point enabled.
Ethernet connection: Connected to network
Access Point: On
WiFi: N/A
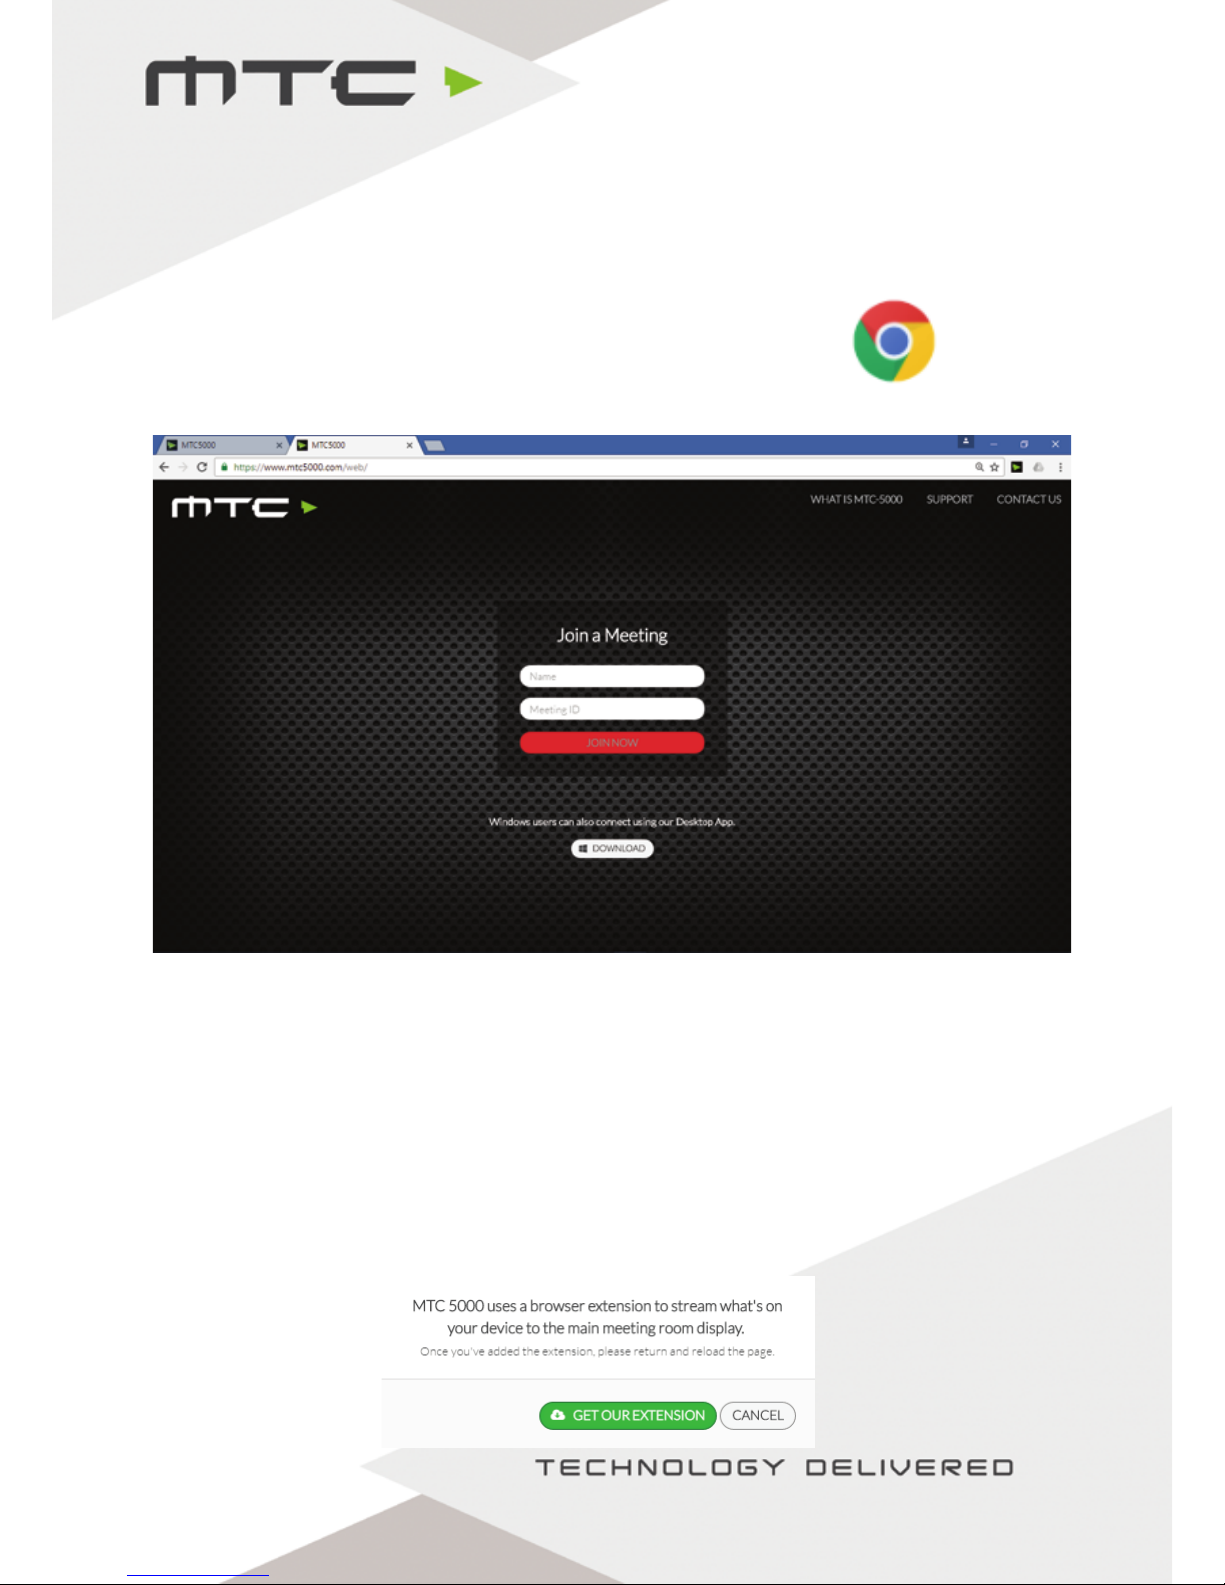
Attendees can connect to MTC-5000 via the existing network or by joining the MTC-5000 Access Point
which is enabled by default. If the network has Internet Access, remote attendees can connect via the
Internet. Miracast is not available.
(ii) Connect MTC-5000 to a wired network with the Access Point disabled.
Ethernet connection: Connected to network
Access Point: Off
WiFi: Off
Attendees can connect to MTC-5000 via the existing network. If the network has Internet Access,
remote attendees can connect via the Internet. The Access Point is not enabled.
(iii) Connect MTC-5000 to a wireless network.
Ethernet connection: Not connected
Access Point: N/A
WiFi: Connected to network
Attendees can connect to MTC-5000 via the existing network. If the network has Internet Access,
remote attendees can connect via the Internet. The Access Point is not available.
(iv) Connect MTC-5000 to network 1 via Ethernet and simultaneously to network 2 via Wi-Fi.
Ethernet connection: Connected to network 1
Access Point: N/A
WiFi: Connected to network 2
Attendees on both networks can connect to the MTC-5000 meeting. If one of the networks has Internet
access, remote attendees can connect via the Internet. The Access Point is not available.
(v) Run MTC-5000 without internet/local network and the Access point enabled.
Ethernet connection: Not connected
Access Point: On
WiFi: N/A
MTC-5000 is not connected to a network. Attendees must connect using the MTC-5000 Access Point.
Miracast is not available.
www.mtc-technologies.com info@mtc-technologies.com
6

Meeting ID
& PIN
Menu
Joining
Instructions
Status bar Status icons
Turning on the MTC-5000 unit
To power on, press the MTC logo on the top of the box for two seconds.
Once switched on, the light around the top of the unit will illuminate.
When the MTC-5000 unit has powered on the above screen will be shown.
This screen contains the status bar at the bottom, the Meeting ID (and PIN, if activated) to join the
meeting and instructions on how to connect devices in the bottom left.
www.mtc-technologies.com info@mtc-technologies.com
7

The Status Bar Menu
The status bar menu is at the bottom of the display and contains a group of status icons to the right.
The meeting menu is accessible by tapping or clicking on the menu icon in the top left corner, revealing
the options above.
These options enable a new meeting to be started, settings to be viewed and the MTC-5000 unit to be
restarted or shut down.
Click or tap on the Meeting ID at the bottom any time to view the MTC-5000 Meeting ID screen. This
can be closed by using the ‘X’ in the top right hand corner.
On the right side of the status bar there are some information icons;
Symbol
Meaning
Access Point enabled/disabled
Cloud services (internet) enabled/disabled
Connected speaker volume off/low/high
Eject USB device connected to MTC-5000 unit
Attendees (number of connected attendees shown to right)
Software update available
x
www.mtc-technologies.com info@mtc-technologies.com
8

Connecting participants
participants can join a meeting by using;
• The Windows application for Windows 7® and above
• The Web Client for Google Chrome® browser (Version 34+) on Windows®, Mac®, Linux® or Chrome
book®
• AirPlay® for iOS devices running iOS 6+
• AirPlay® for Apple® Macs running OS X 10.8+ (*Apple Mac’s can also use the Chrome web client)
• Miracast® for Android devices running Android 4.4+
Attendees must be connected to the same local network as the MTC-5000 unit, or be connected to the
MTC-5000 Access Point to use Miracast® or AirPlay®.
Connect using Windows® application
Go to https://www.mtc5000.com/ to download the Windows® application and follow the on-screen
instructions to install on the PC.
Once installed, double click the MTC-5000 icon to launch the application.
When the application opens, enter Attendee name, Meeting ID, and a PIN if the organise has requested
it. Click ‘Join’ when ready.
`
www.mtc-technologies.com info@mtc-technologies.com
9

Connect using web browser
If using Windows®, Mac®, Linux® or Chromebook® participants can connect using the MTC-5000 Web
Client in Google Chrome®.
Chrome® can be downloaded from http://www.google.com/chrome.
Open Chrome® and navigate to https://www.mtc5000.com - attendees will see the page below.
For the best experience when using the web client, the MTC-5000 Extension must be installed from the
Chrome® web store in order to share the screen.
If the MTC-5000 Extension is not installed, the connected device will still be able to view the Active
Display and to share webcam but will not be able to screen share.
Installation of the MTC-5000 Extension
The extension can be installed by clicking on the ‘get our extension’ link and following the prompts
on-screen to add the extension.
www.mtc-technologies.com info@mtc-technologies.com
10

Connecting using the Web Client
Enter Attendee’s Name, Meeting ID and optional pin for additional security. Click ‘Join Now’ when ready to
connect.
Next, a prompt will appear asking what the attendee wishes to share – either the entire desktop or a
specific window. Once an option is selected, click ‘Share’ to be connected to the meeting.
When connected using the web client, attendees must keep the Chrome® browser window open in
order to stay connected to the meeting.
www.mtc-technologies.com info@mtc-technologies.com
11

Connect iOS devices using ArPlay®
Ensure the iOS device is on the same network as MTC-5000 or connected to the MTC-5000 Access Point.
Swipe up from the bottom of the screen on the iOS device to reveal the Control Center.
Select the applicable MTC-5000 unit and tap the ‘AIr-Play Mirroring’ toggle. At this point an AirPlay®
password is required – this will be the Meeting ID.
After tapping ok the screen of the iOS device will appear on the MTC-5000 screen.
www.mtc-technologies.com info@mtc-technologies.com
12

Connect Apple® Macs using AirPlay®
Mac® computers can currently join using the Web Client or by using AirPlay®.
To mirror the screen using AirPlay®, make sure the Mac® is connected to the same network as MTC-5000
or is connected to the MTC-5000 Access Point.
When connected to a valid network with AirPlay®, the AirPlay® icon will be shown in the top right of
the OS X Menu Bar, click this to see a list of available AirPlay® receivers on the local network.
‘MTC-5000’ will be in this list (or the name of the MTC-5000 network, if it has been renamed).
At this point AirPlay® will prompt for a password (this will be the Meeting ID), enter this and the Mac®
screen will be mirrored to the display.
www.mtc-technologies.com info@mtc-technologies.com
13

Connect an Android® device using Miracast®
To use Miracast® attendees will need:
• A supported device running Android 4.4 or above
• Miracast® enabled in MTC-5000 settings.
• The Access Point disabled in MTC-5000 settings
*Steps to connect via Miracast® vary dependent on device, please check with the respective phone manual
for instructions on how to share the device screen.
Managing participants
Attendees will appear in the participants view when connected, as seen above. Up to a maximum of 12
attendees can be connected at once.
This view can be altered by using the slider at the bottom of the screen. This can change between
having 1 device on screen up to 6 screens. If there is a mic, webcam or visualizer attached
to the MTC-5000 unit, these can be toggled on or off using the icons to the right of the slider.
Adding and removing attendees
Attendees can join at any time during a session - if joining after a session has started, the Meeting ID
and Meeting PIN will be visible in the bottom of the MTC-5000 display. Tapping/clicking on this
will open the MTC-5000 Meeting ID screen with the Meeting ID in a larger format.
If the maximum amount of attendees are already connected, attendees can easily be removed by
dragging an attendee’s display to the trash bin. If an attendee wants to disconnect they can select to
‘Leave MTC-5000’ in the app, or disconnect from Airplay® or Miracast®.
www.mtc-technologies.com info@mtc-technologies.com
14

Make an attendee full screen (Active Display)
To select an attendee as the Active Display, double tap/click that attendee in the MTC-5000 view, this display
will then become full screen. This screen is now the ‘Active Display’.
Attendee’s displays can be easily swapped between by using the Sidebar – expand the
Sidebar by pulling the tab from the right side of the screen. Drag and drop the desired screen to change
the Active Display.
Attendees will also be able to set themselves as the Active Display from within the Windows application
and web client.
Take control of a PC
When a Windows® PC using the MTC-5000 Windows® application is set as the Active Display, MTC-5000
has full mouse control of that PC from the display.
www.mtc-technologies.com info@mtc-technologies.com
15

Active display menu options
When a display is the active screen on MTC5000, then swipe up from the bottom to get the active display
options menu.
Back – Select this option to return to the participants view of all connected devices.
Annotation Pen – Used to annotate over the current display. Click or tap to cycle through colours.
Cursor control – Take mouse control of the Active Display.
Erase annotations – Delete all annotations from the current screen.
Toggle webcam – Show or hide the webcam of the connected attendee.
Share screenshot – Capture a snapshot of the current screen and send it to connected attendees.
(Windows Application/Web client only)
Volume control – Control the volume of any audio output connected to the MTC-5000 unit.
Windows Application
Back Annotation
pen
Cursor
control
Erase
annotation
Toggle
webcam
Share
screenshot
Volume
control
www.mtc-technologies.com info@mtc-technologies.com
16

Active display menu options
A device can be made the Active Display by clicking the ‘Make Active Display’ icon in the menu bar. This will
make that attendee’s device full screen on the main display, this will also share the content to anyone
viewing the active display on the Windows® Application or Web Client.
Viewing the active display
The current Active Display can be viewed by selecting the ‘View Active Display’ icon. The screen will change
with extra options, as below.
An attendee can deselect themselves as the Active Display (stopping others from viewing the screen) by
pressing the red Active Display button. Pressing the ‘+’ will expand with additional options, giving quick
access to pause screen, turn on/off outgoing audio, start/stop sharing webcam or to share a file.
Annotations can be made using the Annotation tool. These will be visible on the main display and to all
other attendees viewing the Active Display.
Pause screen sharing
The attendee can press the ‘pause screen sharing’ button at any time, allowing them to use other
applications without them being shared to the main display or other attendees. Click again to resume
sharing.
Share audio and video
Audio inputs and outputs can be controlled from within the MTC-5000 Windows Application, allowing
MTC 5000 to be used for two way voice or set to send system audio from the client PC (e.g. from a video).
Share a file
This allows sending of a file from this attendee to all attendees who have joined the meeting using either
the Windows application or web client. Please note there is a file size limit of 20MB.
www.mtc-technologies.com info@mtc-technologies.com
17

Web Client
Open the Google Chrome Browser and open the URL www.mtc5000.com.
Become the Active Display
A device can be made the Active Display by clicking the ‘Toggle Active Display’ icon in the menu bar. This
will make that participants device full screen on the main display, this will also share the content to
anyone viewing the active display on the Windows® Application or Web Client.
Mouse control of the Active Display is not available when using the web client.
Toggle
active
display
Toggle
screen
share
Toggle
Mic
Toggle
Webcam
Toggle
Speaker
Share
le
View
active
display
Leave
meeting
www.mtc-technologies.com info@mtc-technologies.com
18

View the Active Display
The Active Display can be viewed by selecting the ‘View Active Display’ icon in the toolbar. This will allow
the participants connected via the Web Client to view the current Active Display within Chrome.
When Active Display is selected additional options appear allowing the user to annotate, select and erase
annotations from the content. Annotations will be visible on the main display and to all other attendees
viewing the Active Display.
An attendee can deselect themselves as the Active Display (stopping others from viewing the screen) by
clicking the red Active Display button on the toolbar.
Pause screen sharing
The attendee can press the ‘pause screen sharing’ button at any time, allowing them to use other
applications without them being shared to the main display or other attendees. Click again to resume
sharing.
Share mic/webcam
After joining the meeting, the participant can share the PC’s microphone and webcam by enabling the
corresponding button on the Web Client toolbar. For best results, if there are multiple in-room attendees
do not activate more than one participant’s microphone per room, or enable a microphone connected
directly to the MTC5000 unit.
Share a file
This allows sending of a file from one attendee to all attendees who have joined the meeting using either
the Windows application or web client. Please note there is a file size limit of 20MB.
Cursor
Control
Annotation
Pen
Erase
annotation
www.mtc-technologies.com info@mtc-technologies.com
19

MTC 5000 unit settings
To access the settings menu, click or tap on the ‘Menu’ button on the top left corner of the MTC 5000 home
screen. The drop down will appear – tap or click on Settings.
The settings are arranged into a number of different tabs:
About – To view general information on the MTC-5000 unit: Version, Serial Number, SSID.
General – To modify features, such as cloud connectivity, file sharing, iOS and Miracast®
receiver settings or to set a PIN for extra security.
Access Point – Enable or disable the Access Point or change wireless settings.
Wireless Access – Connect MTC-5000 to a wireless network.
Network – View MAC addresses and set between dynamic and static IP
Audio – Change audio inputs and outputs
MTC-5000 information
The About tab in the settings contains information about the MTC-5000 Unit.
MTC5000 Version: The version of MTC5000 Unit
currently running on the unit. The unit will check for
updates automatically if connected to the Internet.
Any available updates will be notified in the Status
Bar, giving the option to install if required.
S/N: The MTC-5000 Serial Number. This will be
needed to register the unit at
http://www.mtc5000.com/register
Network name: The network name that will show
on devices connecting by Miracast® or Airplay®.
www.mtc-technologies.com info@mtc-technologies.com
20
Other manuals for MTC-5000
1
Table of contents
Other MTC Projector Accessories manuals