SILLA PRISM SOLAR RFID Service manual

PRISM
SOLAR RFID
Installation, use and maintenance manual
rel. 2.2.2 - rev. 20220517

Note
The information in this manual is subject to change over time. To always have the latest
version of the documentation, scan the QR Code or go to
https://silla.industries/documentazione/
See PDF documentation
Copyright
The copyright of these operating instructions is owned by the manufacturer. Texts and
images are shown at the technical level of the product at the time of printing. Silla reserves
the right to change the information provided in the documentation. The content of the
documentation shall not give rise to any complaints on the part of the purchaser. Silla
Prism is a registered trademark owned by Silla SRL.

TABLE OF CONTENTS
TABLE OF CONTENTS 1
WARNINGS 3
Identification of product 4
Location of assembly 5
Safety - Line electrical 6
Security - Use 7
IT Security 8
Good practices for IoT security 8
Packaging 9
Tools needed 9
Product dimensions (mm) 10
Input for power supply 10
Fixing to wall 11
PRISM SINGLE-PHASE 12
Connection power supply 12
Sensor Placement 13
Connecting the sensor to Prism Single-phase 14
PRISM THREE-PHASE 15
Connection power supply 15
Location of Sensor 16
Sensor installation for Prism Three-phase 17
Connecting the sensor to Prism Three-phase 18
PRISM SOLAR DUO 19
Power connection in system single-phase 19
Installation of the sensor for Prism Duo in a single-phase installation 20
Power connection in system three-phase 21
Installation of sensors for Prism Duo in a three-phase installation 22
Connecting sensors to Prism Duo 23
COMPLETE THE INSTALLATION 24
Closing of cover 24
First use 25
Prism SOLAR rel. 2.2.2 -1

Guided configuration wizard 26
CONNECTION TO INTERNET 27
Connection to a wired network (Ethernet) 27
Connection to an existing WiFi network 27
USE OF PRISM 30
Button touch 30
Connect to Prism with PC or Smartphone via internal WiFi 31
Main page 31
Functionality Advanced 32
Current setting of recharge 32
Modes of recharge 32
Charging Modes 33
Mode Solar 33
Mode Normal 33
Mode Pause 33
RFID Display 34
Key usage with RFID display 34
How to store the charging cable 35
Procedure reset 35
Update 35
Cleaning periodically 36
Disposal 36
TROUBLESHOOTING 36
Problems with balancing 36
Problems with network 38
ATTACHMENTS 39
Technical sheet 39
Led Indicator Color Chart 40
WARRANTY 42
2-Prism SOLAR rel. 2.2.2
WARNINGS
Verify that the product packaging contains all the items listed in the Packaging section,
and immediately notify Silla if any components are missing or even partially illegible. If
any part of the documentation is missing or illegible, consult Silla SRL before performing
any further work on the device.
Read this manual carefully before carrying out any work with the
Prism
The intervention procedures described in the documentation must be carried out in the
manner indicated. The safety rules and procedures for installation, configuration,
operation and maintenance given in this document are also a supplement to the general
work safety rules that must be observed. Different countries may have different safety
regulations. It should therefore be noted that in all cases in which the standards of the
documentation are in conflict with or reduce the standards of the country in which
Prism is used, the standards of the country will take precedence over the standards of
the documentation.
Silla cannot under any circumstances be held liable for accidents or
damage resulting from the inappropriate use of Prism, as well as
from the non-observance, even partial, of the safety regulations and
intervention procedures described in the documentation.
Failure to comply with the instructions for use, installation, configuration, operation and
maintenance of the loader and its accessories contained in the manual will also
invalidate the terms of the warranty. During installation, configuration and subsequent
use of the Prism, incorrect operating situations may occur which are not foreseen in the
documentation. These abnormal situations can be caused by environmental factors or
accidental failures not foreseeable by Silla. In these situations, stop all operations in
progress and contact support. The manual must be kept by the user and/or personnel
responsible for the installation, operation, maintenance and use of the loader and its
accessories. In the event of deterioration or loss, a certified copy may be requested
from Silla. Keep the documentation in a place where it cannot be damaged or lost.
Prism SOLAR rel. 2.2.2 - 3
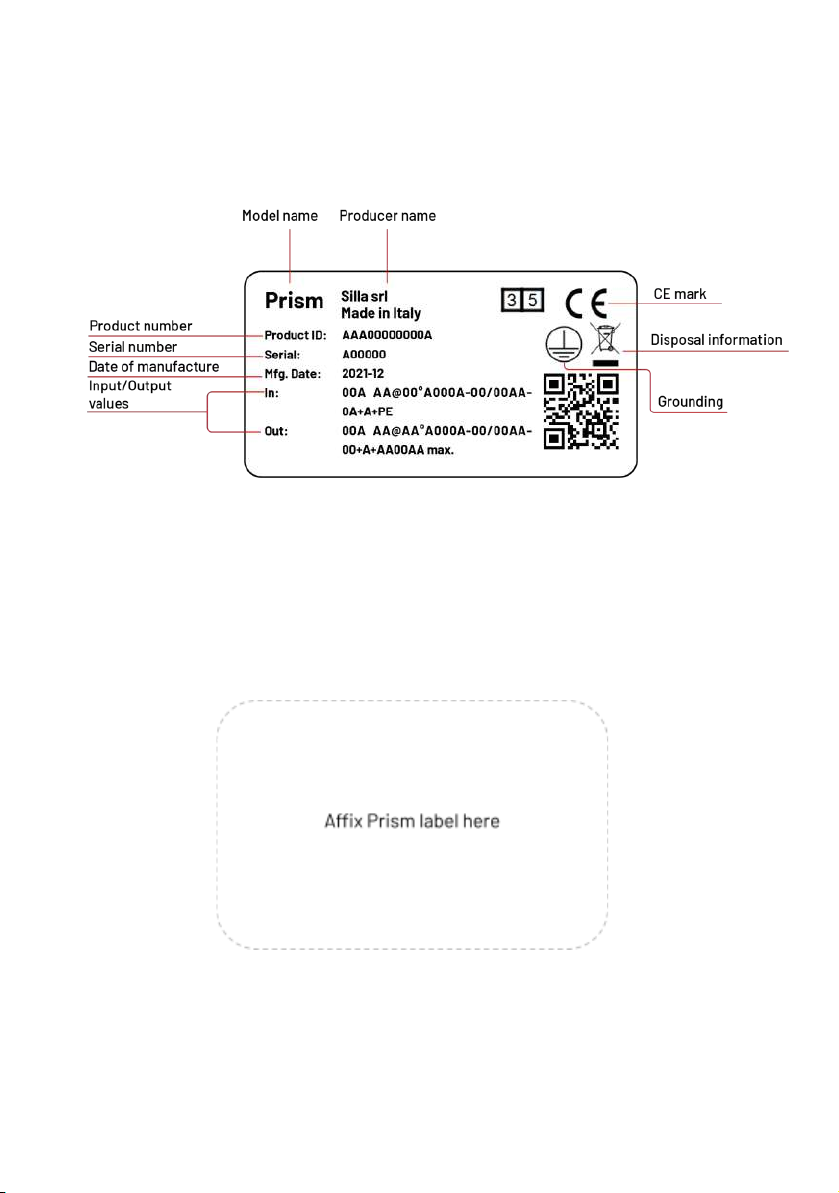
Identification of product
To correctly identify your Prism, refer to the data on the label on the outside of the
Prism. The label contains the following information:
To identify the Wi-Fi network connecting to Prism, and to know the credentials set by
default for the different user profiles, please refer to the label below (username on the
left, password on the right).
4-Prism SOLAR rel. 2.2.2

Location of assembly
The installation of Prism must be carried out by qualified personnel in accordance with
the applicable regulations. Local electrical installation regulations, fire and accident
prevention measures and emergency routes from the point of installation must be taken
into account.
Please contact an electrician or arrange installation at your utility with your local
distributor.
Find a location for the Prism that allows the vehicle to be within easy reach of the
integrated charging cable.
We recommend an installation height of 130 - 170 cm between the floor and the lower
edge of the outer structure.
Sucient air circulation must be ensured in the installation position
so that the Prism cools down when it is recharging.
The mounting surface must have a flat base that provides sucient stability for
mounting the Prism, taking into account the possible mechanical stresses resulting
from the use of the charging cable.
It must be ensured that the maximum permissible operating temperature cannot be
exceeded under the influence of external influences such as direct sunlight or similar.
Prism meets the requirements for outdoor installation. In order to minimise dirt and
weather wear, it is recommended that the Prism be mounted outdoors in a covered area.
Do not install the Prism in the vicinity of flammable, explosive or
combustible materials, chemicals or solvents, gas pipes or steam
vents, radiators or batteries, as well as in areas subject to flooding,
high humidity or running water. Do not install Prism in direct sunlight.
Prism SOLAR rel. 2.2.2 - 5

Safety - Line electrical
Infringement of or failure to observe these guidelines may result in
serious injury due to electric shock, with even fatal consequences. In
addition, regular use of Prism cannot be guaranteed in the event of
infringement of these warnings.
The Prism models are designed to operate at a mains voltage of 230V (single-phase) or
400V (three-phase) 50Hz.
An adequately dimensioned mains connection must be available at the installation site.
This connection should only be provided for Prism and cannot supply other electrical
equipment. If necessary, a separate supply line must be arranged in accordance with the
general requirements on supply lines and building technology.
The cable cross-section must be adjusted in accordance with the desired connected
power and other aspects (such as line length, material, type of arrangement, etc.). The
Prism connection terminals are designed for a line with a minimum cross-section of
2.5mm2 up to 10mm2.
Prism incorporates a type B RCD (20mA AC, 6mA DC). The supply line for Prism must
always be dimensioned and secured in accordance with nationally applicable regulatory
requirements.
Prism does not have a separate on/off switch. If you want to deactivate the Prism, you
must always set the MCB switch installed upstream in the domestic installation to
position 0 (off).
In various countries, the requirements set out in this manual differ
from the connection conditions for the electricity grid local. Prism
must always be connected in accordance with the applicable
regulations for the installation location.
6-Prism SOLAR rel. 2.2.2

Security - Use
Infringement of or failure to observe these guidelines may result
in serious injury due to electric shock, with even fatal
consequences. In addition, regular use of Prism cannot be
guaranteed in the event of infringement of the above warnings.
No adapter or extension cable may be used to connect the Prism to the vehicle. Always
check the charging cable and contacts for damage and dirt before connecting the
vehicle. Never connect the cable to the vehicle if the connector is dirty or damp or if the
cable is damaged.
Never use force to disconnect the cable connector from the vehicle connector.
Always make sure to disconnect the charging cable before starting the vehicle.
If the device or connector emits smoke or starts to melt, never touch the charging cable.
Stop the charging process immediately and disconnect the power supply to the Prism.
Ensure that the charging cable is out of the reach of children. Do not step on the cable or
its connector.
Once the vehicle is connected, the cable must never be stretched. Never charge if the
cable is taut.
Prism does not support the ventilation mode of the charging zone.
It is absolutely forbidden to:
●Use of the device for applications other than those indicated.
●Modify the device (hardware and firmware).
●Use the device with non-compatible accessories.
●Tamper with the safety devices
Prism SOLAR rel. 2.2.2 - 7

IT Security
In order to take full advantage of the Prism functions, the user may authorise Silla to
acquire, store and process certain sensitive data.
Please visit https://silla.industries/privacy to view the Privacy Policy. Prism has been
designed with safety in mind. Despite this, it is still an IoT device connected to the
network and as such should be integrated following standard cyber security guidelines.
It is the sole responsibility of the user to implement the necessary
security measures to mitigate potential attacks based on the
configuration of the existing network.
Good practices for IoT security
Update the firmware of Internet of Things devices whenever the device requires it, even
if you have just purchased it. Enable the option to automatically update the firmware if
available.
Change the default password, and choose strong passwords when registering for online
services. Most users use the same password to access the services they use most
frequently. This practice is wrong and very dangerous. The security of your data is more
important than ease of use.
Properly set up the security of the router, which is the main access node for potential
cyber attacks. To protect the router keep the firmware up to date and change the
password to access the device.
Create an isolated secondary network for IoT devices to keep them separate from the
internal network.
Replace connected objects that no longer receive updates with newer models.
Non-updated devices are more exposed on the security front, not receiving any kind of
update against new attacks.
Do not connect your smart devices to unsecured connections, whose origin and
operator you are not sure of. Disconnect Internet of Things devices when no longer in
use.
8-Prism SOLAR rel. 2.2.2
Packaging
Check that the packaging delivered contains:
●Prism
●Small parts kit:
○4 flat head screws 8 x 60 with dowel and washer with gasket for fixing
the bottom of the Prism
○12 screws for fixing the cover
●Installation, use and maintenance manual
●Drilling patterns
●1 sensor (for single-phase Prism)
●3 sensors + SEM Three module with manual (for Prism Three and Prism Duo)
Tools needed
In addition to the contents of the packaging, the following tools are required for
installation:
●Phillips screwdriver
●Cordless drill or screwdriver
●Conical cutter
●Drill bit for wall Ø 8 mm
●Grommet or cable gland
A spirit level is recommended.
Prism SOLAR rel. 2.2.2 - 9
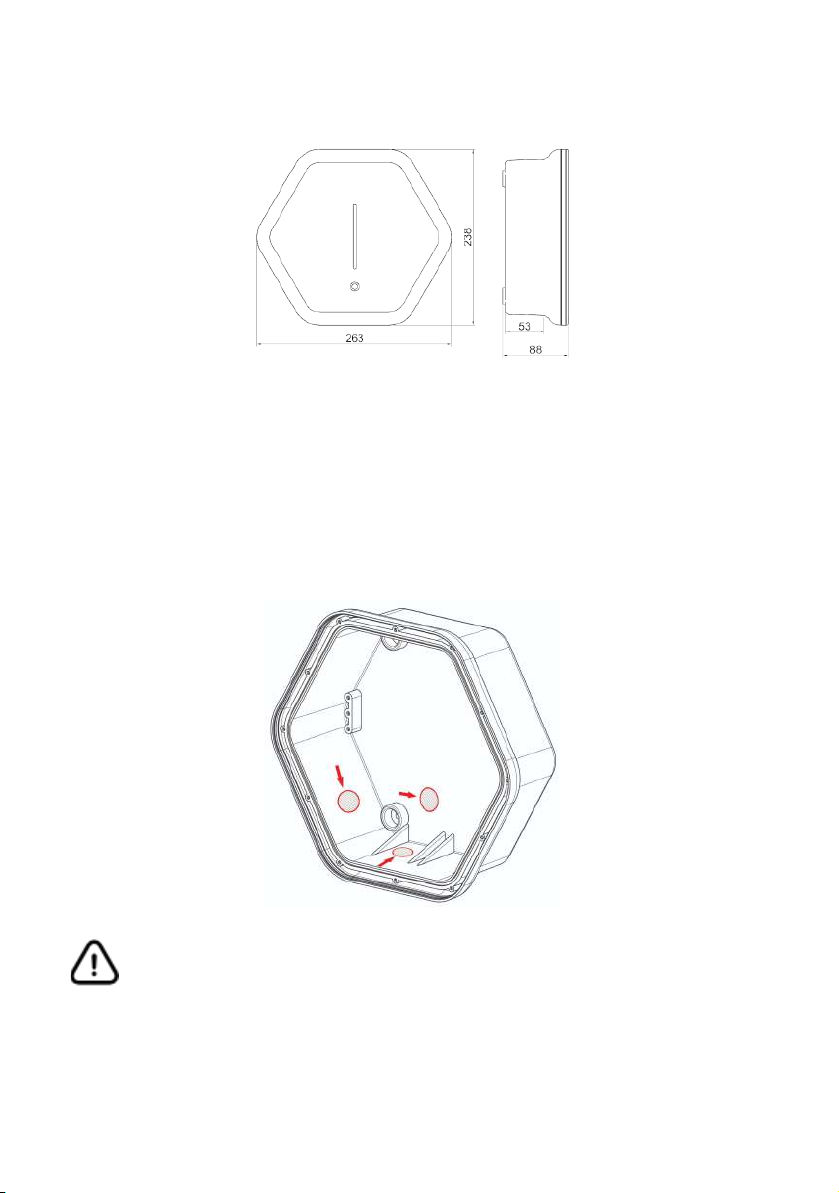
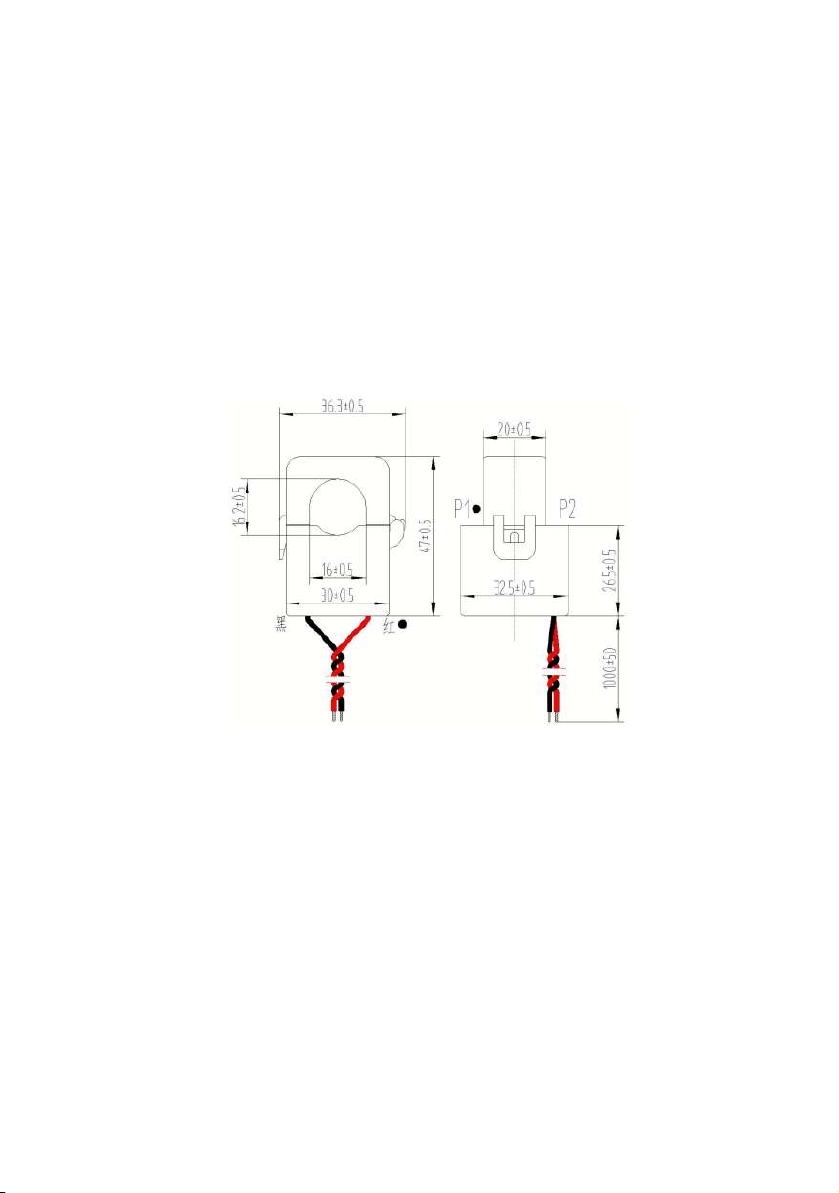
Product dimensions (mm)
Input for power supply
Drill the hole for the cable passage on the base of the Prism, choosing between the
bottom or the bottom, depending on how you want to bring the power supply to the
Prism. Follow the guide point engraved on the Prism casing to drill the hole. For the hole
at the bottom, install a suitable cable gland with a maximum diameter of 32 mm and a
maximum nut size of 36 mm.
The cable glands used must be selected and installed in such a way as to maintain the IP
rating of the enclosure.
Do not drill prisms in places other than those indicated in this manual. Drilling
at points other than those indicated will result in the loss of the warranty.
10 -Prism SOLAR rel. 2.2.2
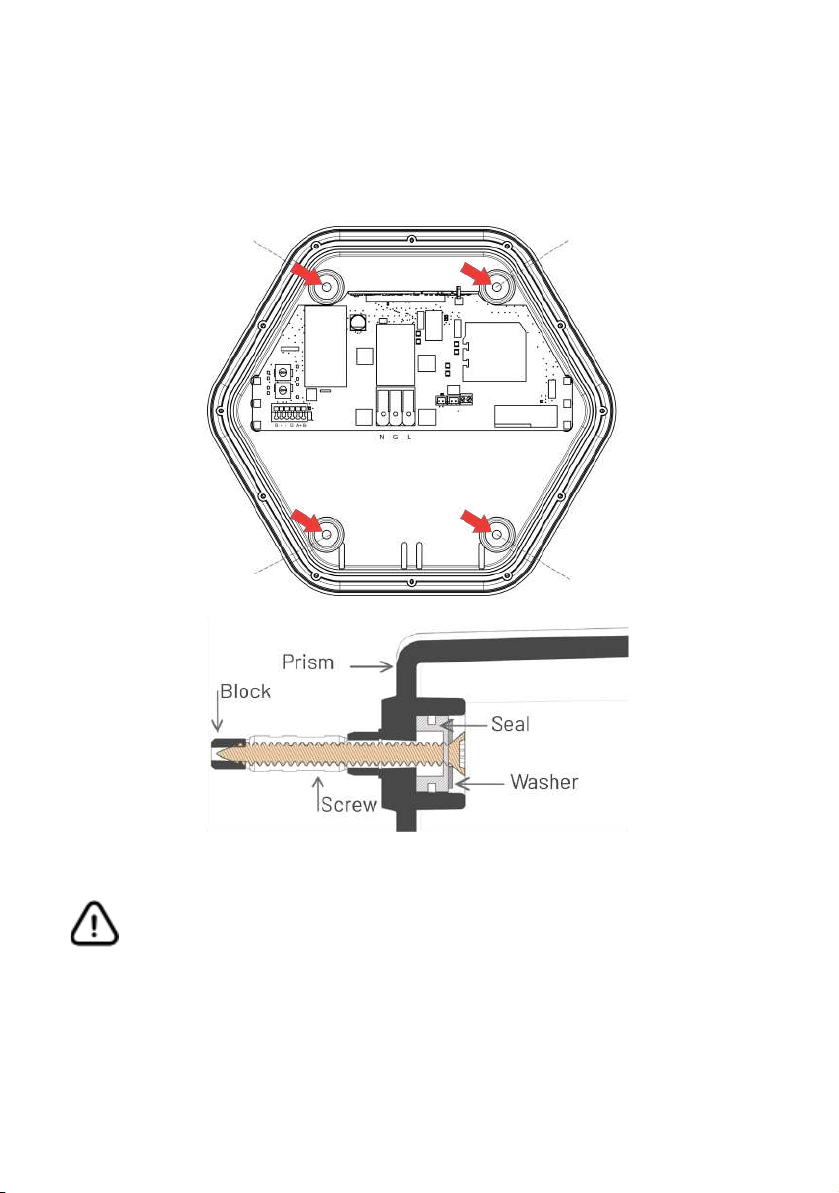
Fixing to wall
Use the enclosed drilling template to drill the holes in the supporting wall.
Screw the supplied screws (8 x 60) into the dowels provided.
The IP degree of protection of the Prism is only guaranteed if the
supplied screws and washers (or equivalent) are used
Prism SOLAR rel. 2.2.2 - 11

PRISM SINGLE-PHASE
Connection power supply
For single-phase variants, connect the power supply according to the following diagram:
Name
Thread colour
Connection marking
Phase 1
Brown
L1
Neutral conductor
Blue
N
Conductor on the
ground
Green-yellow
G
12 -Prism SOLAR rel. 2.2.2

Sensor Placement
The sensor allows Prism to regulate the charging current according to household loads
and any photovoltaic system.
Refer to the following diagrams for installation of the additional sensor. In the diagrams
only the phase line is shown, the neutral must be passed outside the current sensor.
In the case of single-phase systems without a storage system, the current sensor
should be placed according to the following diagram:
Note: for systems with storage systems, please refer to the section on systems with
storage systems.
Prism SOLAR rel. 2.2.2 - 13
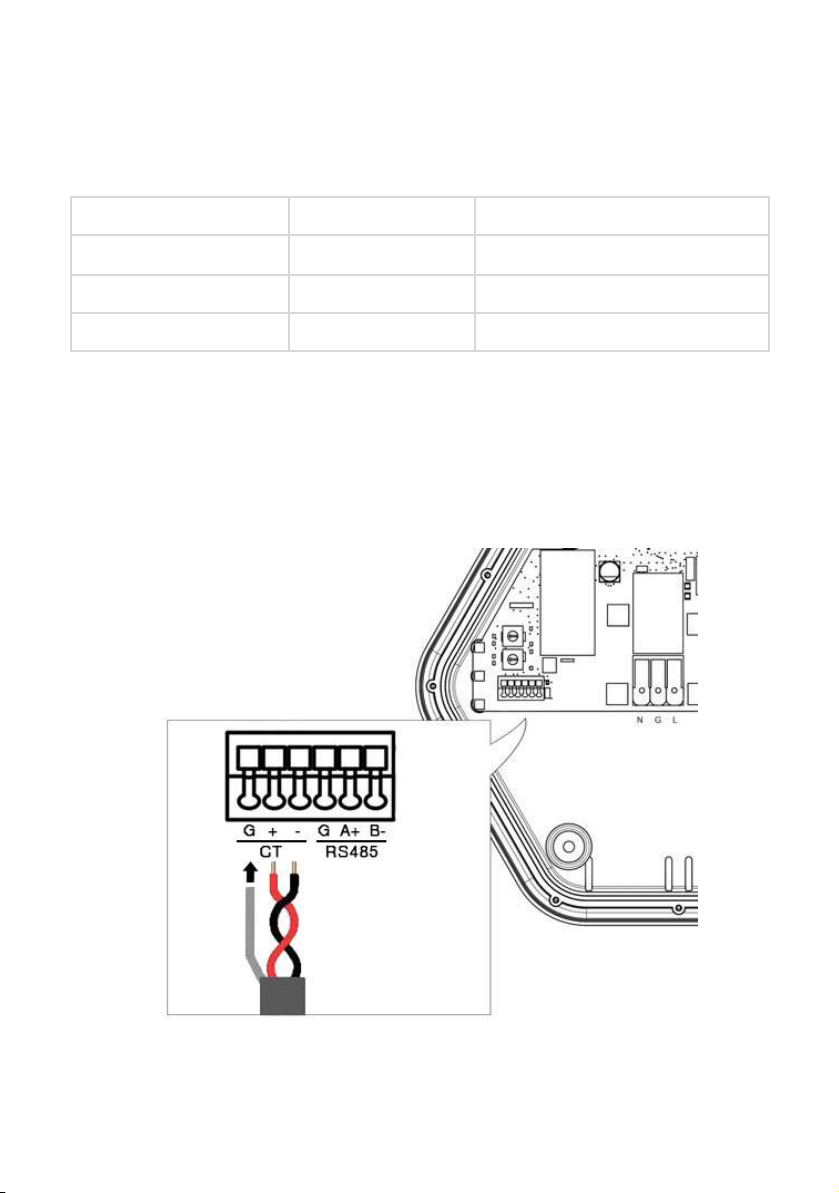
Connecting the sensor to Prism Single-phase
For single-phase Prism, the sensor must be connected as follows:
Name
Thread color
Connection marking
Positive
Red
+
Negative
Black
-
Screen
Open stocking
G
To extend the connection, use a twisted pair with a recommended cross-section of
0.25-0.5 mm2.
Note: for distances below 100 m a pair of CAT5 or similar cables can be used.
If the twisted pair is laid in contact with power cables or Ethernet cables, or the
installation takes place in a place where electromagnetic interference is present, the
use of a shielded cable is recommended. Connect the braid on the Prism side only.
14 -Prism SOLAR rel. 2.2.2

PRISM THREE-PHASE
Connection power supply
For three-phase variants, connect the power supply according to the diagram:
Name
Thread colour
Connection marking
Phase 1 (see note)
Brown
L1
Phase 2
Black
L2
Phase 3
Grey
L3
Neutral conductor
Blue
N
Earth conductor
Green-yellow
G
Note: some cars charge using only one phase. For this reason, it is advisable to connect
the least engaged phase of the system to L1 in order to mitigate the imbalance created
during single-phase charging.
Prism SOLAR rel. 2.2.2 - 15
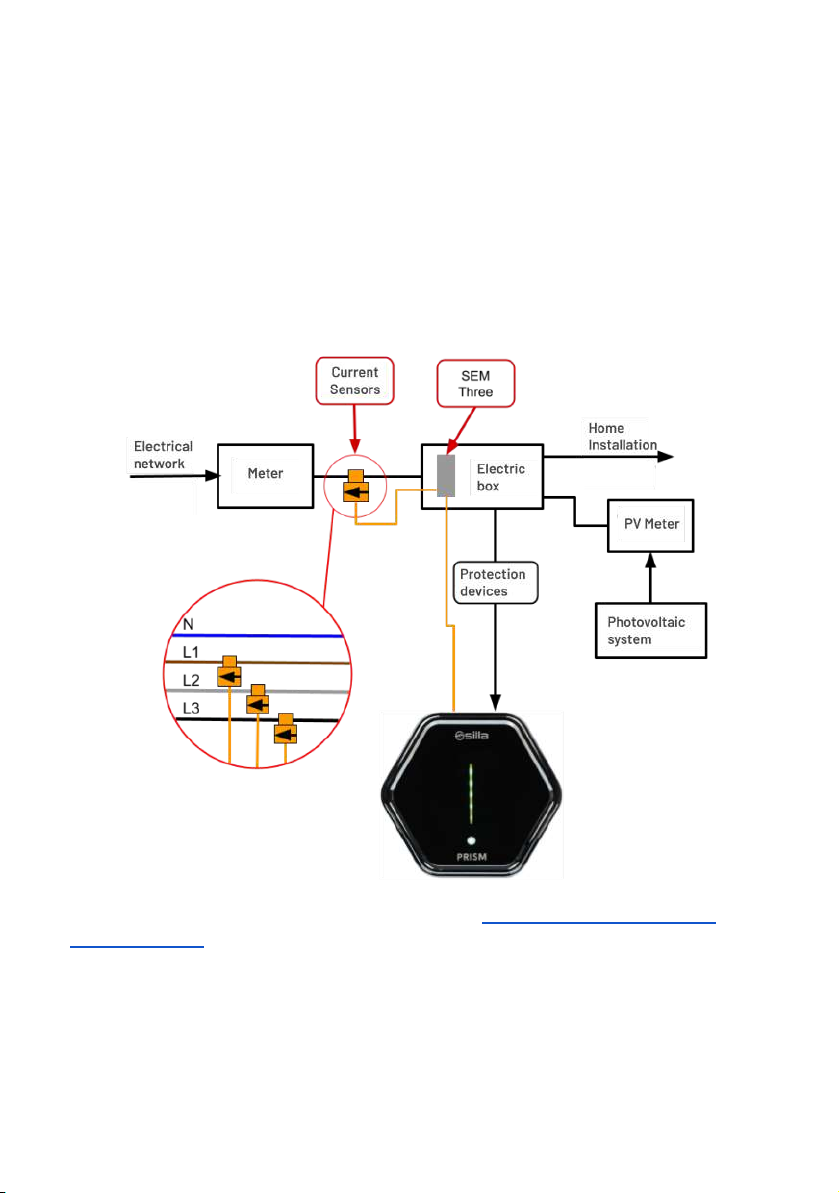
Location of Sensor
The sensor allows Prism to regulate the charging current according to household loads
and any photovoltaic system.
Refer to the following diagrams for installation of the additional sensor. Only the phase
line is shown in the diagrams. The neutral must be passed outside the current sensor.
In the case of systems without a storage system the current sensor should be placed
according to the following diagram:
Note: for systems with storage systems, please refer to the section on systems with
storage systems.
16 -Prism SOLAR rel. 2.2.2
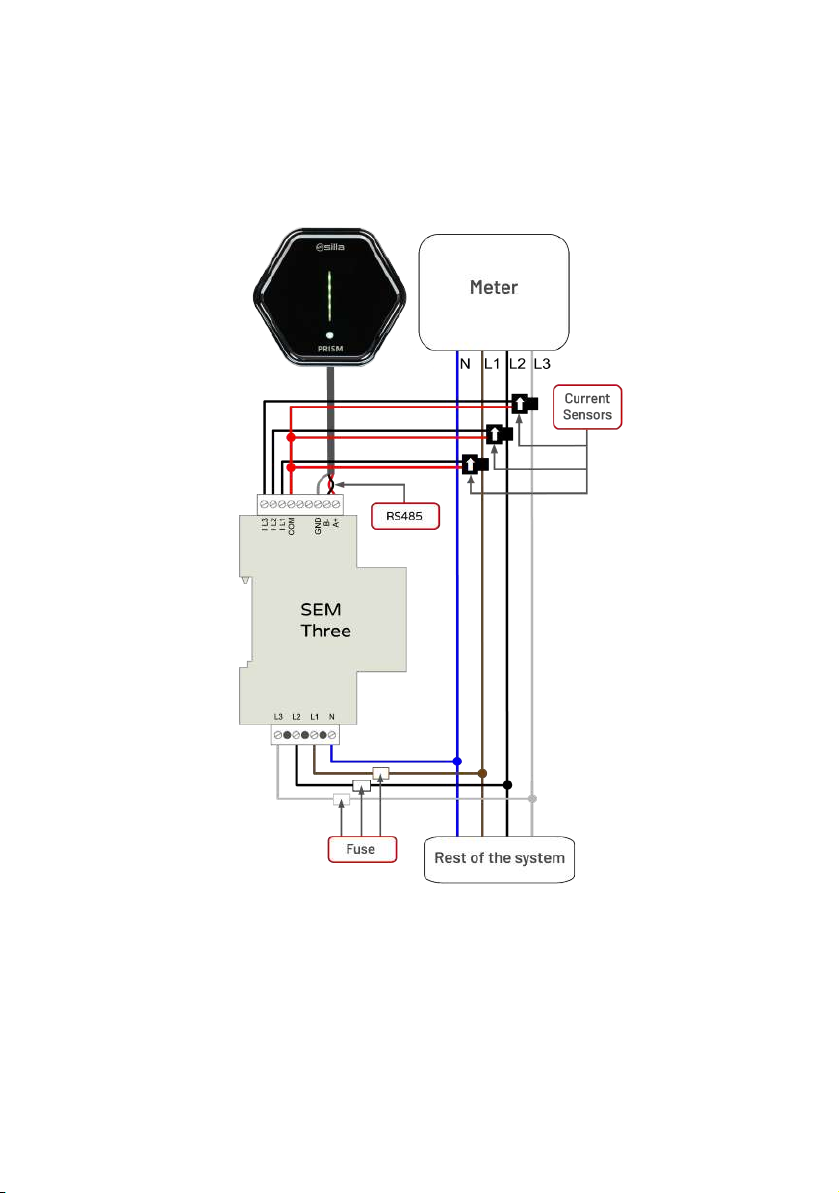
Sensor installation for Prism Three-phase
For three-phase Prism, the 3 sensors are connected according to the following diagram:
For installation of the device (SEM Three) refer to the manual supplied with it. Use type
gL (IEC 269) or type M fuses of 0.5A to 2A for instrument protection.
Prism SOLAR rel. 2.2.2 - 17

Connecting the sensor to Prism Three-phase
For three-phase Prism, the sensor must be connected as follows:
Connection marking
Connection marking
A+ RS485
A+
B- RS485
B-
GND
G
Terminating resistors:
The 120 ohm terminating resistor is connected to the end of the cable at the meter
terminals. Inside Prism, check that the jumper on the right-hand side of the connector is
correctly installed.
Cables:
●The communication line is RS485 at 9600bps
●The length of the cables should not exceed 200 metres
●Use a twisted and shielded twisted pair, with GND conductor, with a
recommended cross section of 0.25-0.5 mm2.
For distances less than 100 m, a pair of CAT5 cable or similar can be used. Preferably,
choose a cable suitable for RS485/Modbus communication.
18 -Prism SOLAR rel. 2.2.2
Table of contents


