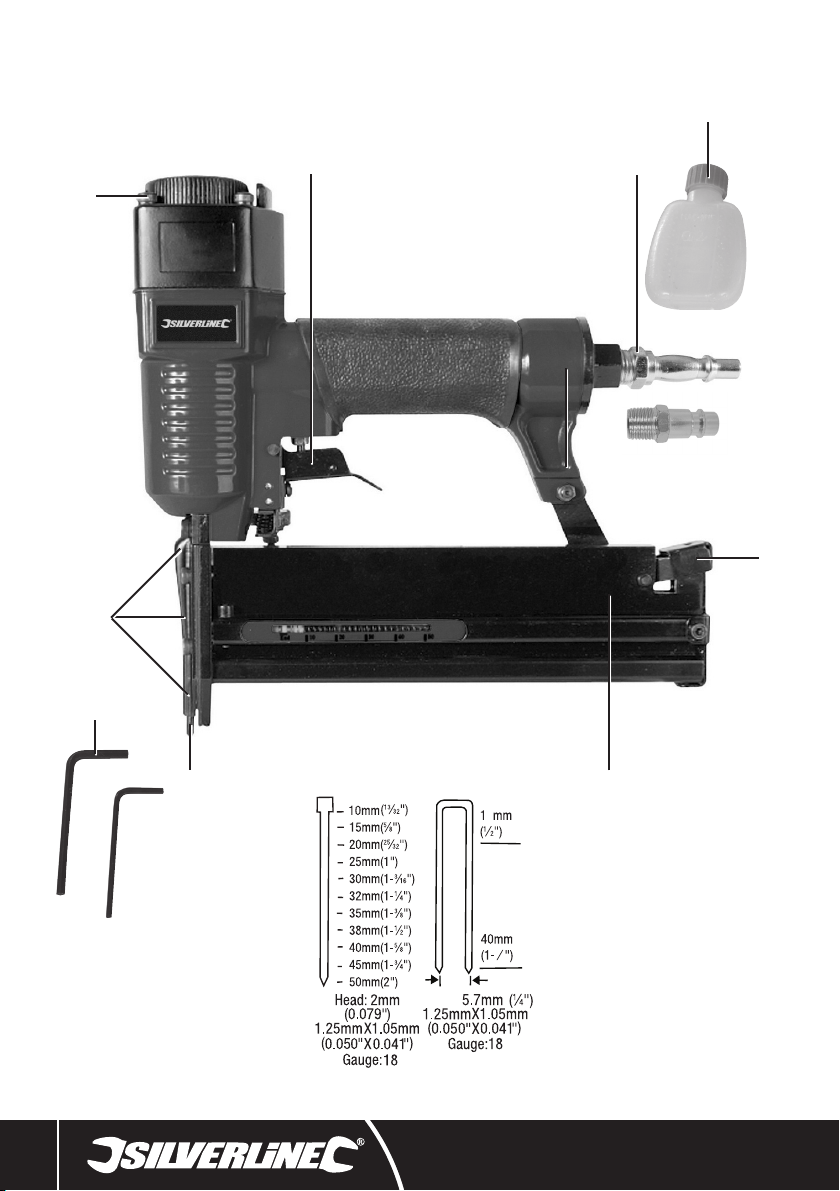
Air Nailer Stapler 50mm
9
silverlinetools.com
Fastener Tool Safety Warnings
WARNING: Read and understand the safety instructions before installing,operating,
repairing,maintaining,cleaning,changingaccessorieson,orworkingnearthistool.Failuretodoso
can result in serious injury.
Save all warnings and instructions for future reference.
WARNING: This appliance is not intended for use by persons (including children) with
reduced physical or mental capabilities or lack of experience or knowledge unless they have been
given supervision or instruction concerning use of the tool by a person responsible for their safety.
Children must be supervised to ensure that they do not play with the tool.
• Onlyqualiedandtrainedusersshouldinstall,adjust,orusethetool.
• Donotmodifythetool.Modicationscanreducetheeffectivenessofsafetymeasuresand
increase the risks to the user.
• Do not discard the safety instructions; give them to the user.
• Do not use the tool if it has been damaged.
• Inspect the tool periodically to verify that the ratings and markings required by ISO 11148
(detailed in the Description of Symbols) are legibly marked on the tool.The user (and employer
if appropriate) should contact the manufacturer to obtain replacement marking labels when
necessary.
• Compressed air can cause severe injury.
• Always disconnect the tool from the air supply when not in use.
• Always disconnect the tool from the compressed air supply before changing accessories,making
adjustments and/or repairs and when moving away from an operating area to a different area.
• Keepngersawayfromtriggerwhennotoperatingthetoolandwhenmovingfromone
operating position to another.
• Never direct compressed air at yourself, others or animals.
• Whippinghosescancausesevereinjury.Alwayscheckfordamagedorloosehosesorttings.
• Never carry or drag an air tool by its hose.
• When using air tools, do not exceed the maximum operating pressure.
• Inspect tools and accessories before each use. Do not use if damaged or excessively worn.
• Air tools should only be powered by compressed air at the lowest pressure required by the task to
reduce noise and vibration and minimise wear.
• Never use pure oxygen or combustible gases to power an air tool.Air tools are not designed for
thesepowersourcesandtheirusecreatesareandexplosionhazard.
• Be aware that air tools may become cold during use, affecting grip, control and susceptibility to
vibration-related injury.
IMPORTANT: Even when this tool is used as prescribed it is not possible to eliminate all residual risk
factors. If you are in any doubt as to the safe use of this tool, do not use it.
Projectile Hazards
a) Be aware that failure of the workpiece, accessories,or tool itself can generate high-velocity
projectiles.
b) Always wear impact-resistant eye protection during operation of this tool.The grade of protection
required should be assessed for each use.
c) Assess risk to others when considering projectile hazard risk.
d) Ensurethattheworkpieceissecurelyxed.
e) The fastener driving tool shall be disconnected when unloading fasteners, making adjustments,
clearing jams or changing accessories.
f) Ensurethatfastenerspenetratematerialcorrectlyandcannotbedeected/misredtowards
operator and/or any bystanders.
g) Becarefulwhenringfastenersintothinmaterialorattheedgeofmaterial.Thefastenersmay
go straight through or miss the material and cause damage or injury to people nearby.
h) During operation, debris from workpiece and fastening/collation system may be discharged.
i) Ensure tool is always safely engaged on the workpiece and cannot slip.
Operating Hazards
a) Ensure users and maintenance personnel are physically able to handle the bulk, weight and
power of the tool.
b) Hold the tool correctly; be ready to counteract normal or sudden movements such as recoil.Have
both hands available.
c) Maintain a balanced body position and secure footing.
d) Only use lubricants recommended by the manufacturer.
e) Personal protective safety glasses should be used; suitable gloves and protective clothing are
recommended.
f) Foroverheadwork,wearasafetyhelmet.
g) Avoid direct contact with moving parts to prevent injury by pinching or cutting.
h) Be aware that there is a risk of electrostatic discharge if used on plastic and other non-conductive
materials.Take appropriate steps to reduce this risk when working with these materials (e.g.
using a grounding system).
i) Beawarethatcertainmaterialsmaypresentreorexplosionriskswhenbeingprocessed.Take
appropriate precautions to reduce hazards.Employers should make risks clear to operators.
j) Switch off device/release start-and-stop control if the air/power supply is interrupted.
k) Never operate the tool with the safety mechanism disabled.
l) Never use the tool if defective or operating abnormally. Stop using immediately and have the
tool serviced by an authorised service centre.
m)Be careful when handling fasteners, especially when loading and unloading,as the fasteners
have sharp points which could cause injury.
n) Incorrect fasteners not designed or the incorrect size for your tool can cause operator injury and
damage to the tool.
o) Only wear gloves that provide adequate feel and safe control of triggers and any adjusting
devices.
Repetitive Motions Hazards
When using the tool the user may experience discomfort in the hands, arms,shoulders, neck or
other parts of the body.
a) Adopt a comfortable posture whilst maintaining secure footing and avoiding awkward or
off-balance postures. Change posture during extended tasks; this can help avoid discomfort and
fatigue.
b) Symptoms such as persistent or recurring discomfort, pain,throbbing, aching,tingling,
numbness, burning sensations or stiffness should not be ignored. Inform employer if
appropriateandconsultaqualiedhealthprofessional.
Accessory Hazards
a) Disconnectthetoolfromtheairsupplybeforettingorchangingtheaccessory.
b) Avoid direct contact with the accessory during and after use.Accessories are often sharp and may
become hot during use.
c) Use only sizes and types of accessories and consumables that are recommended by the
manufacturer of the tool; do not use other types or sizes of accessories or consumables.
d) Ensure the maximum operation speed of any accessory equals or exceeds the rated speed
marked on the tool.
Work area hazards
a) Be aware of slippery surfaces caused by use of the tool and trip hazards caused by the air line.
Slips, trips and falls are major causes of injury.
b) Where possible do not obstruct thoroughfares and passageways with air lines or cables.Take
appropriatemeasurestoreducetriprisksuchaserectingwarningsignsandxingcablesandair
lines in place.
c) Proceed with care in unfamiliar surroundings to minimise risk from hidden hazards such as
utility lines.
d) The tool is not intended for use in potentially explosive atmospheres and is not insulated against
contact with electric power.
e) Ensure that there are no electrical cables, gas pipes,etc., which could cause a hazard if damaged
by use of the tool.
f) Keepbystandersaway(whenworkinginanareawherethereisalikelihoodofthroughtrafcof
people). Clearly mark off your operating area.
Noise Hazards
Exposure to high noise levels can cause permanent, disabling hearing loss and other problems,
such as tinnitus (ringing, buzzing,whistling or humming in the ears). Risk assessment and use of
appropriate controls for these hazards are essential.
a) Use appropriate controls to reduce the risk of noise-related injury.These can include actions such
asdampingmaterialstopreventworkpiecesfrom‘ringing’.
b) Use hearing protection in accordance with any employer's instructions and as required by
occupational health and safety regulations.
c) Operate and maintain this tool as recommended in the instructions to prevent an unnecessary
increase in the noise level.
d) Select, maintain and replace the consumable/accessory as recommended in the instructions,to
prevent an unnecessary increase in noise.
e) Where a silencer is available, ensure it is in place and in good working order when the tool is
being operated.
f) Take steps to reduce noise in the work area where possible (e.g.by using damping mats).
Vibration Hazards
Exposure to vibration can cause disabling damage to the nerves and blood supply of the hands
and arms. Not all vibration hazards can be eliminated by tool design or construction,and some
residual risks remain. Check the vibration-emission value (obtained using ISO 28927-3) shown in
thespecicationtable.Ensuretheriskitrepresentsisassessedandmanaged.Iftheriskcannotbe
managed so that it falls within acceptable limits, then do not use the tool.
Take the following steps to reduce risk of vibration-related injury:
a) Wear warm clothing when working in cold conditions. Keep hands warm and dry.
b) Ifnumbness,tingling,painorwhiteningoftheskinofngersorhandsisexperienced,stop
usingthetool,informemployer(whereappropriate)andconsultaqualiedhealthprofessional.
633524_OwnerManual.indd 9633524_OwnerManual.indd 9 06/10/2023 12:1406/10/2023 12:14