SilverStar LSB2 User manual

R
Th
a
Ple
a
R
ob
o
a
nk you for pur
c
a
se read the us
e
o
t V
a
L
c
hasing this pr
o
e
r guide carefu
l
- 00 -
a
cu
u
L
SB2
o
duct.
l
ly before use.
u
m
Use
r
r
Ma
n
n
ual
A0

Tha
n
Cle
a
If y
o
our
s
Ho
t
1. Safe
t
1.
1
1.
2
1.
3
1.
4
1.
5
1.
6
2. Pro
d
2.
1
2.
2
2.
3
2.
4
2.
5
3. Pro
d
4. Ope
r
4.
1
4.
2
4.
3
4.
4
4.
5
4.
6
n
k you fo
r
a
ner. I ho
p
o
u have any
s
ervice hotl
i
t
line:
4
t
y Instructions
…
1
Instructions
f
2
Safety preca
u
3
About child
s
4
About the b
a
5
Scope of us
e
6
Disclaimers
d
uct Overview
…
1
Machine an
d
2
Machine an
d
3
Machine an
d
4
Mop modul
e
5
Charging do
c
d
uct Installatio
n
r
ating Instructi
o
1
Use of the
m
2
Sweep mod
e
3
Select suctio
4
Use of mop
m
5
Map manag
e
6
System rese
t
r
purchas
i
p
e you wi
l
questions
a
i
ne.
4
006-
7
Tabl
e
…
……………
…
f
or use
u
tions
s
afety
a
tteries
e
of the product
…
……………
…
d
its accessorie
s
d
dust box
d
its sensors
e
ck
n
………………
o
ns…………
…
m
achine
e
s
n intensity
m
odule
e
ment
t
- 01 -
i
ng the L
S
l
l enjoy it
!
a
bout the p
r
7
88-2
2
e
of C
…
…2-4 5.
M
…
…5-8 6.
B
s
7.
C
…8-11 8.
W
…
…11-16
- 01 -
S
B2 Intell
i
!
r
oduct duri
n
2
8
o
nten
t
M
aintenance…
5.1 Clean its
d
5.2 Clean the
5.3 Clean its
s
5.4 Clean cas
t
5.5 Clean se
n
5.6 Clean the
B
asic Paramete
r
C
ommon Fault
s
7.1 Voice
7.2 Trou
b
7.3 Fault
s
W
arranty Car
d
i
gent Vac
u
n
g use, plea
s
t
s
………...……
…
d
ust box and
w
main brush
s
ide brushes
ters
n
sors and charg
i
mop module
rs ……………
s
……………
…
prompts
b
leshooting
s
in WiFi conn
e
……………...
…
u
um
s
e call
…
… 17-20
w
ater tan
k
i
ng electrodes
………....21
…
..…...22-27
e
ction
…
……… 28

r
uctions
s
for use
o
the following
n
ual carefully
a
n
ual well for fu
t
n
sfer the prod
u
t
in conformit
y
nj
ury or damag
e
a
utions
This
p
dock
resul
t
b
y hi
g
Do n
o
this
p
servi
c
desig
n
disas
s
Unpl
u
Do n
o
are
w
If th
e
man
u
to av
o
To p
r
this
p
whic
h
The
u
Prev
e
from
clean
e
Do
flam
m
If th
e
or c
a
elect
r
- 02 -
basic safety pr
e
a
nd follow the
i
t
ure reference.
u
ct to a third
p
y
to the instr
u
e
to the product
p
roduct can o
n
that are provi
d
t
in damage to
t
g
h voltage.
o
t use this pro
d
p
roduct are fou
n
c
e departmen
t
n
ated o
r
aut
h
s
emble, repair
o
u
g the product
b
o
t touch the p
o
w
et, as this may
e
power cord
u
facturer, its se
r
o
id danger.
r
event the pro
d
p
roduct in a su
s
h
may result in
u
ser shall not r
e
e
nt clothing or
getting caugh
e
r. Failure to d
o
not place
m
able/explosiv
e
e
user manual i
s
a
ll the afte
r
-
s
r
onic user man
u
e
cautions befo
r
i
nstructions in
t
p
arty, please at
t
u
ctions in the
u
itself.
n
ly use the ada
p
ed with this pr
o
t
he product, ele
d
uct if the host
n
d to be dama
g
t
. Except for
h
orized by ou
r
o
r modify this
p
b
efore mainten
a
o
wer plug or th
e
result in electri
is damaged, i
t
r
vice departme
n
d
uct from falli
n
s
pended place
p
ersonal injur
y
place the batte
r
any part of yo
u
t
in the brus
h
o
so may result
the pr
o
e
/corrosive mat
s
missing, plea
s
s
ales service
u
al.
r
e using the pr
o
t
he user annua
l
t
ach the user
m
u
ser manual
m
p
ter, batteries
a
o
duct. Failure
t
e
ctrical shock,
o
machine and a
c
g
ed. Contact o
u
the service
r
company,
n
p
roduct.
ance.
h
e product whe
n
i
cal shock.
t
must be rep
l
n
t or a similar
n
g accidentall
y
without a prot
y
.
r
ies privately.
ur body (hair,
h
or wheel of
in personal inj
u
o
duct near
t
erials.
s
e contact you
r
department t
o
o
duct:
l
when using
m
anual along
m
ay result in
a
nd charging
t
o do so may
o
r fire caused
c
cessories of
u
r afte
r
-sales
technicians
n
o one may
n
your hands
l
aced by the
professional
y
, do not use
e
ctive fence,
fingers, etc.)
the vacuum
u
ry.
fire or
r
local dealer
o
obtain an

This pro
d
used ind
o
The char
g
p
laced a
g
on a flat
f
affecting
function
a
Do not u
s
a wet, fl
a
explosiv
e
environ
m
1.3 A
b
* Childr
p
rodu
c
disabi
l
canno
t
opera
t
Child
r
clean/
r
* Child
r
p
acka
g
Cautio
n
d
uct can only be
o
ors.
g
ing dock shall be
g
ainst the wall an
d
f
loor for fear of
product
a
lity.
s
e this product in
a
mmable,
e
or corrosive
m
ent.
b
out child s
e
n under the age
o
c
t. Persons with p
l
ities or lack of
r
t
use the machi
n
t
ing instructions
r
en are not allow
e
r
epair the machin
e
r
en are not allow
g
in
g
ba
g
for fear
o
n
Prevent the s
u
water, oil or ot
h
which may da
m
vacuum clean
e
High volta
g
dry your h
a
operation f
o
electrical sho
c
e
d
Unplug the ch
dock if it rem
a
unused for a l
o
afety
o
f 8 are not allow
e
hysical, sensory
o
r
elevant experien
c
n
e unless under
or awareness of
e
d to play with th
e
e
unless under sup
w
ed to play with
t
o
f suffocation.
- 03 -
u
ction of
h
er liquids,
m
age the
e
r.
Ar
r
on
t
fea
r
no
r
va
c
g
e! Please
a
nds before
o
r fear of
c
k!
arging
a
ins
o
ng time.
W
h
wo
r
ch
a
the
the
e
d to use this
o
r intellectual
c
e/knowledge
supervision,
the danger.
e
machine or
ervision.
t
he product's
5
.
T
e
n
r
e
r
ange scattered wi
r
t
he floor before u
s
r
of affecting the
r
mal operation of t
h
c
uum cleaner.
h
en the product is
r
king, removal of
t
a
rging dock will a
f
normal rechargin
g
machine.
1.4 About t
h
1. Only t
h
manu
f
p
rodu
c
2. The ba
t
p
rodu
c
3. If you
n
host
m
after-
s
wron
g
accid
e
4. If the
b
the liqui
d
Immedia
t
send it to
maintena
n
.
Please properly di
sp
T
he batteries contai
n
n
vironment. Pleas
e
e
gulations and send
t
r
es
s
e for
t
he
Remove
before u
s
the
f
fect
g
of
Do not u
to suck i
n
(e.g. sha
t
nails) fo
r
to the pr
o
h
e batteries
h
e batteries provi
d
f
actu
r
er are applic
a
ct.
a
tteries shall be re
m
ct is discarded.
n
eed to replace th
e
m
achine, please co
n
s
ales service depa
r
g
batteries may ca
u
e
nt.
b
atteries leak, pre
v
d
with the skin or
c
t
ely wipe it with a
the recycling stat
i
n
ce point. Do not
s
pose of the old
b
att
e
n
hazardous substa
n
e follow the l
o
t
hem to the designa
t
fragile objects
s
e.
se this product
n
sharp objects
t
tered glass and
r
fear of damage
o
duct.
d
ed by the
a
ble to the
m
oved when the
e
battery of the
n
tact our
r
tment. Use of
u
se a safety
v
ent the contact of
c
lothing.
dry cloth and
i
on or designated
discard it.
e
ries of the product.
n
ces harmful to th
e
o
cal environmenta
l
t
ed recycling site.
e
l
1.5
S
Sco
p
1.6 D
i
Un
d
fre
e
A.
B.
C.
D.
E.
F.
G.
No
t
Ne
w
the
S
cope of use
p
e of applicatio
n
Wooden floor
i
sclaimers
d
er any of the
f
e
warranty, but
Damage due t
o
user manual o
r
The machine
o
Damage due
t
company or a
u
A valid purch
a
The product
m
repaired or is
a
Damage cause
d
Product failu
r
(including ope
r
handling, bum
p
t
e: Our compa
n
w
Regulations
o
product.
of the pro
d
The
p
roduc
t
f
ollowing circ
u
paid repair ca
n
o
the user’s fa
i
r
due to improp
e
o
r parts have ex
c
t
o disassembly
u
thorized by ou
r
a
se voucher nu
m
m
odel on the
w
a
ltered;
d
by irresistibl
e
r
e or damage
r
ational errors,
p
ing, input of i
n
n
y provides a
w
o
n Warranty”.
F
- 04 -
d
uct
t
is suitable for
Ceramic
t
u
mstances, the
p
n
be provided:
i
lure to operate
e
r storage;
c
eeded the fre
e
by those oth
e
r
company;
m
ber cannot be
w
arranty card
d
e
factors such a
caused by
u
liquid ingress,
n
appropriate v
o
w
arranty for th
e
F
or details, ple
the following
f
ile
p
roduct will be
the product i
n
warranty peri
o
e
r than the ma
i
provided;
d
oes not matc
h
s
natural disast
e
n
expected fac
t
improper plug
g
o
ltage, etc.)
e
product in ac
c
a
se check the
w
f
loors:
Short-st
a
excluded from
n
strict accorda
n
o
d;
i
ntenance pers
o
h
that of the p
e
rs;
tors or man-
m
g
ing/unpluggi
n
c
ordance with
t
w
arranty card
p
a
ple carpet
the scope of
n
ce with our
o
nnel of our
roduct to be
m
ade causes
n
g, scratching,
t
he “National
rovided with
2.
P
2.1
M
M
A
c
Char
g
Wate
r
(
O
Use
r
P
roduc
t
M
achine an
d
M
achine
c
cessories
g
ing dock ×1
r
proof pad ×1
O
ptional)
r
manual ×1
t
Overv
i
d
its acces
s
Power ada
p
Screwdri
v
(Optio
n
Mopping c
(Optio
n
- 05 -
i
ew
s
ories
Recharg
e
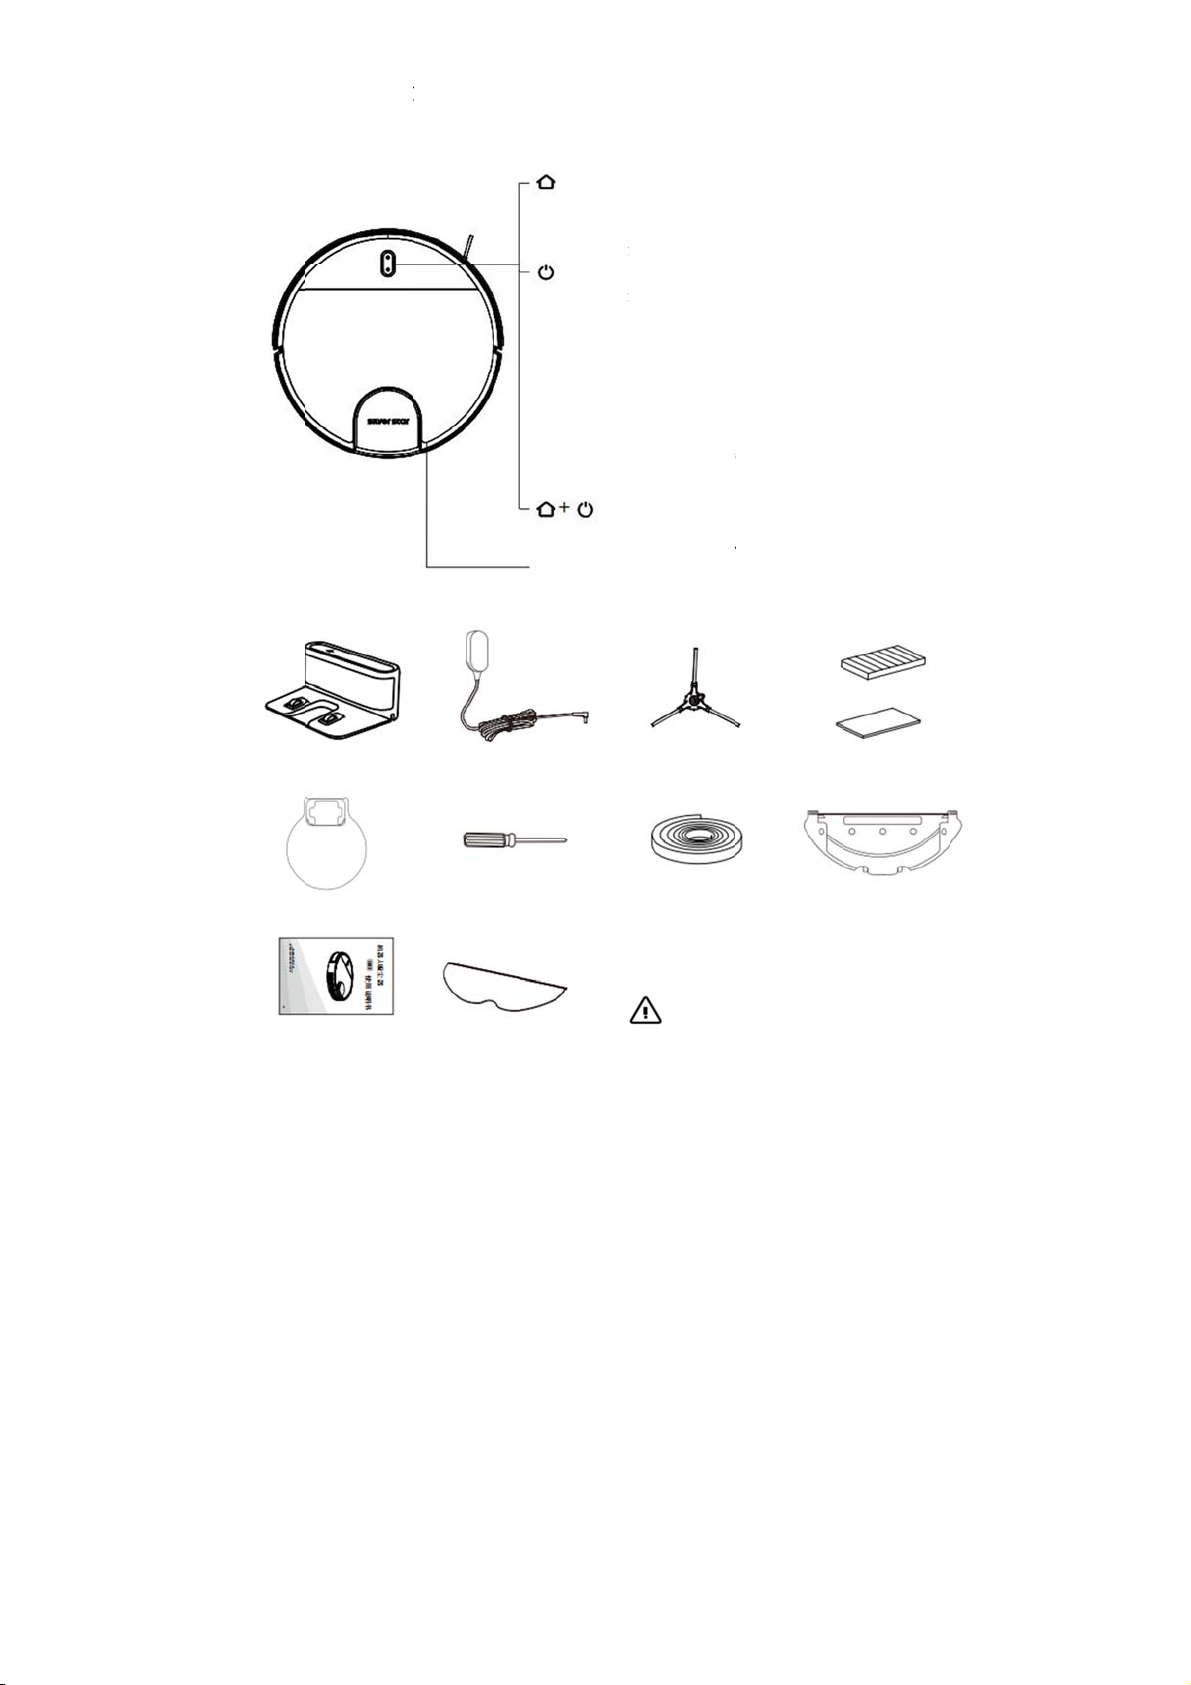
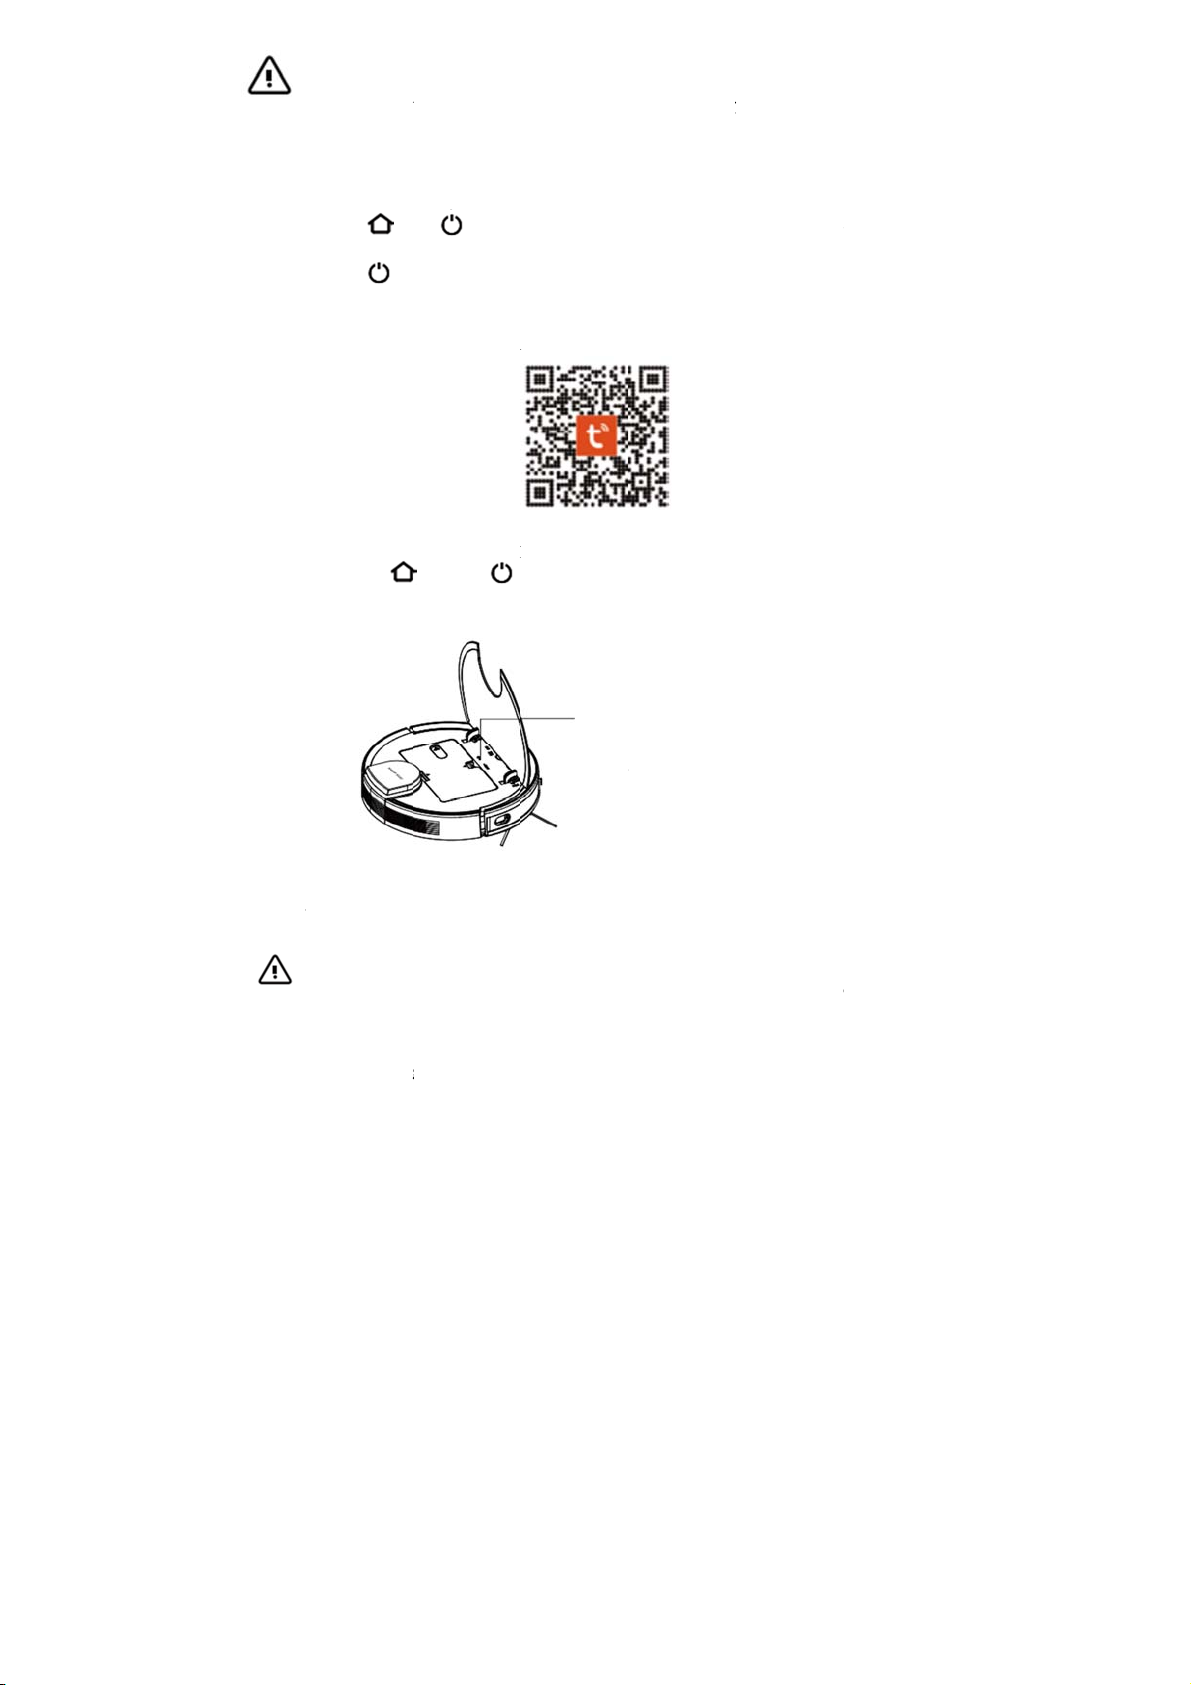
• Press t
o
pause
• Press a
n
Sweep/o
• Press a
n
it's no
t
• Press t
o
• Press t
o
Power I
n
• White:
• Pink:
B
• Blinki
n
• Blinki
n
Rec
h
• Pr
e
fo
r
Flip port
p
ter ×1
v
er ×1
n
al)
V
loth ×1
n
al)
*
A
we
l
ma
e
button
o
return for c
h
n
d hold for 3 s
e
n/off button
n
d hold for 3 s
e
being charged
)
o
start sweep
o
pause the tas
k
n
dicator
Battery level
≥
B
attery level <
2
n
g like breathin
g
n
g fast in red: F
h
arge button +
o
e
ss and hold bo
t
r
3 seconds to r
Side sweep ×1
(1 is optional)
V
irtual magneti
c
stripe wall ×1
(Optional)
Tips:
A
side brush an
d
l
l as a battery
h
c
hine.
h
arging. Press
a
e
conds to start
l
e
conds to turn
)
k
being perfor
m
≥
20%
2
0%
n
g: Being charg
e
F
ault
o
n/off button
t
h buttons sim
u
r
eset WiFi con
n
Filter co
m
(O
p
c Mop
p
holder
×
d
a filter combi
n
h
ave been insta
l
a
gain to
l
ocal sweep
on or off (if
m
ed
e
d or started
u
ltaneously
n
ection
m
bination ×1
p
tional)
p
ing cloth
1 (Optional)
n
ation as
l
led in the

2.2
M
W
Cleani
n
A
i
M
achine and
d
W
ater inlet
n
g brush
i
r outlet
Filter
d
ust box
High-
p
erfo
r
Foam filter
Pre-filter
- 06 -
r
mance filte
r
Watertan
k
B
u
Dustbo
x
tank se
p
- 06-
Dust
b
WiFi
i
Blink
i
W
sl
e
to
Blink
i
B
e
Nor
m
W
Syste
m
Butto
n
and
w
W
a
Co
an
d
W
a
k
outlet
u
ckle
x
and water
p
aration button
b
ox and water
t
indicator:
i
ng slowly in
w
W
ait for connection
e
ep mode, the ma
c
connect a WiFi n
e
i
ng fast in whi
t
e
ing connected to
W
m
ally on in whit
e
W
iFi connected
m
reset button
n
for taking ou
t
w
ater tan
k
a
ter inlet cap
o
mbination of
w
d
dust box (det
a
a
ter outlet ada
p
Suction inl
e
t
an
k
w
hite:
(When in
c
hine is unable
e
twork)
e:
W
iFi
e
:
t
dust box
w
ater tank
a
chable)
p
te
r
e
t

2.3
M
Si
Wat
e
2.4
M
B
M
achine and
i
de brush
Caster
e
r outlet
M
op module
B
uckle Water
Removal
i
ts sensors
A
n
outlet Buckl
e
l
button Washab
l
- 07 -
n
ti-drop senso
r
e
l
e mopping cloth
Col
l
Alo
n
Pre
s
Lid
a
Stick a mopping c
l
l
ision bumpe
r
ng-wall sensor
s
sure senso
r
a
r module
C
h
C
R
R
c
lothhere Slo
t
arging electro
d
C
aste
r
R
olling brush
R
olling brush co
e
v
e
r
2.5 C
h
Chargi
n
Norma
l
machi
n
White
l
3. P
r
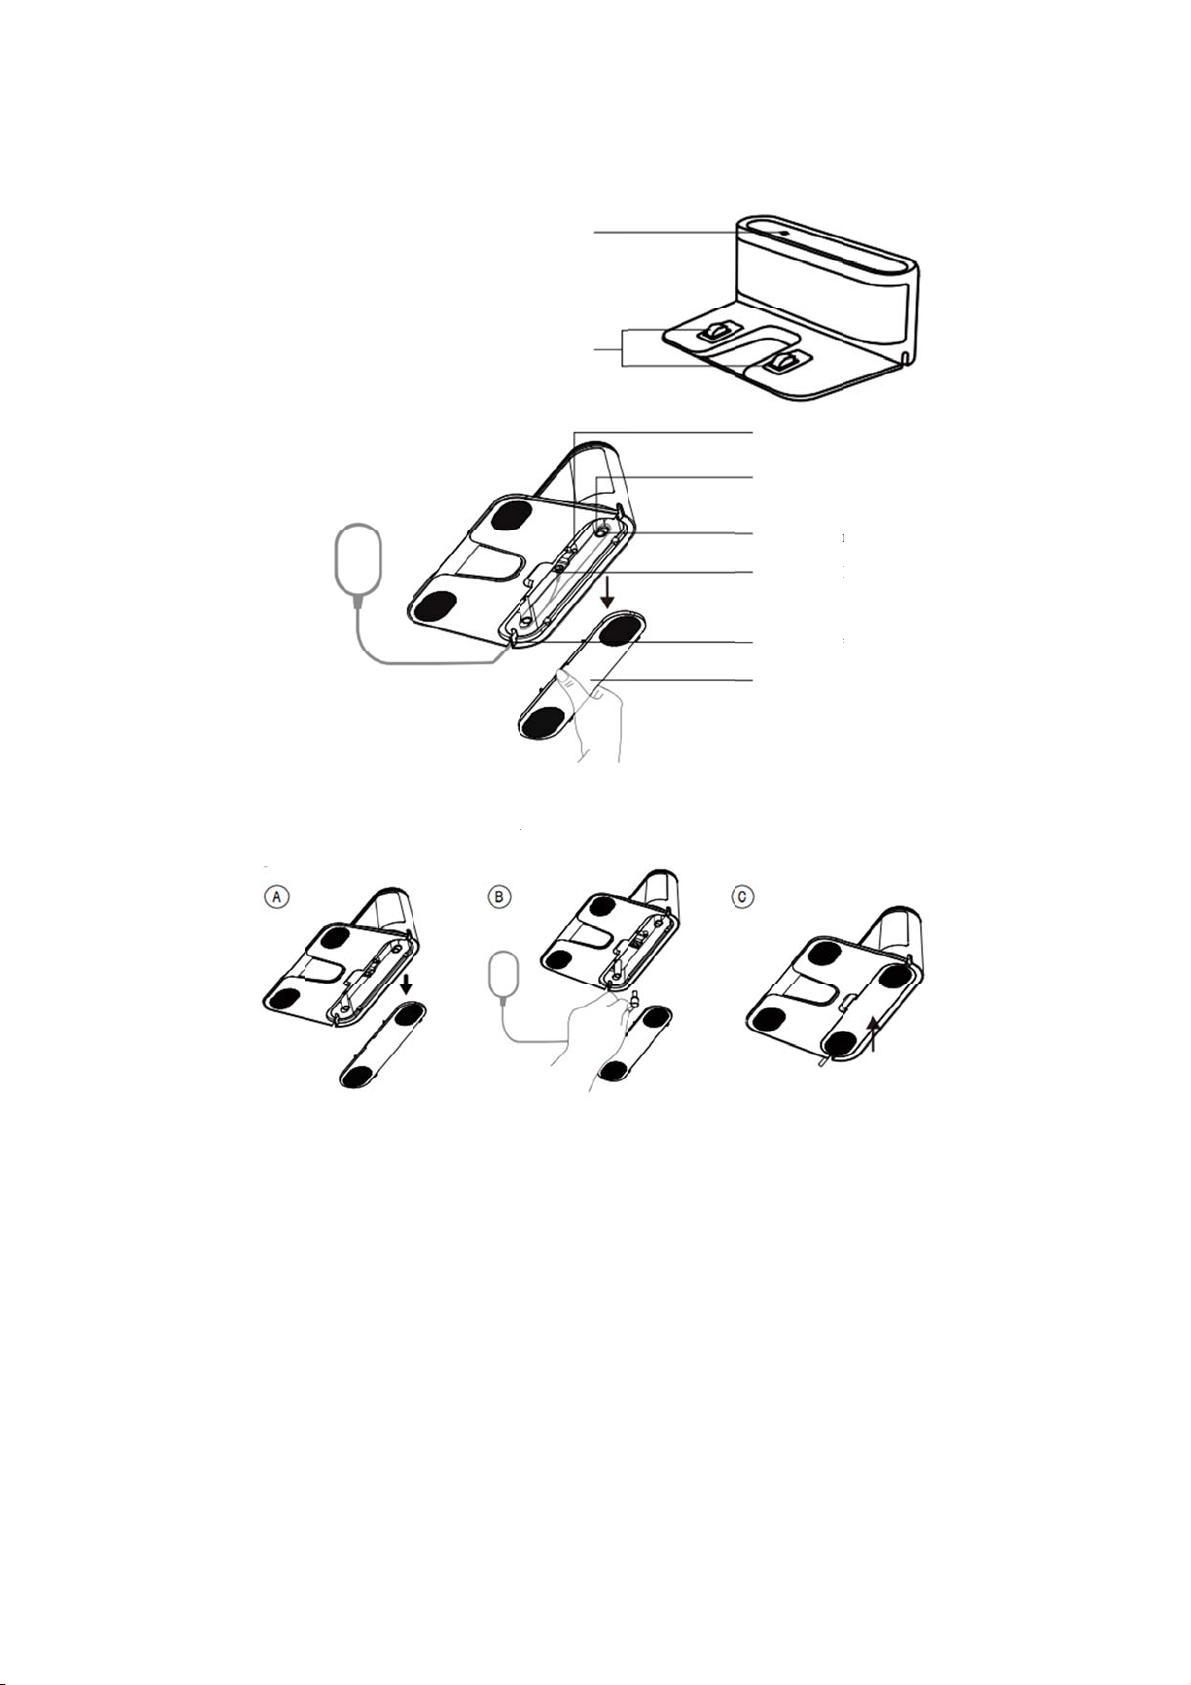
1. Con
n
machi
n
h
arging doc
k
n
g dock indica
t
l
ly on in white:
n
e is not conne
c
l
ight off: The
m
r
oduct I
n
n
ect the chargi
n
n
e during swee
p
k
t
or
The charging
d
c
ted to the char
g
m
achine is corr
e
Statu
s
Charging
n
stallati
o
n
g dock with t
h
p
- 08 -
d
ock has been
c
g
ing dock)
e
ctly connected
s
indicato
r
electrode
o
n
h
e adapter. Prev
c
onnected to a
p
with the charg
i
e
nt the adapter
p
ower supply (
w
i
ng doc
k
Powercor
d
Powercor
d
Wiringter
m
Powersoc
k
Wireoutl
e
Cover
wire from win
d
w
hen the
d
take-up bin
d
m
inal
k
et
e
t
d
ing the
2. Bas
e
connec
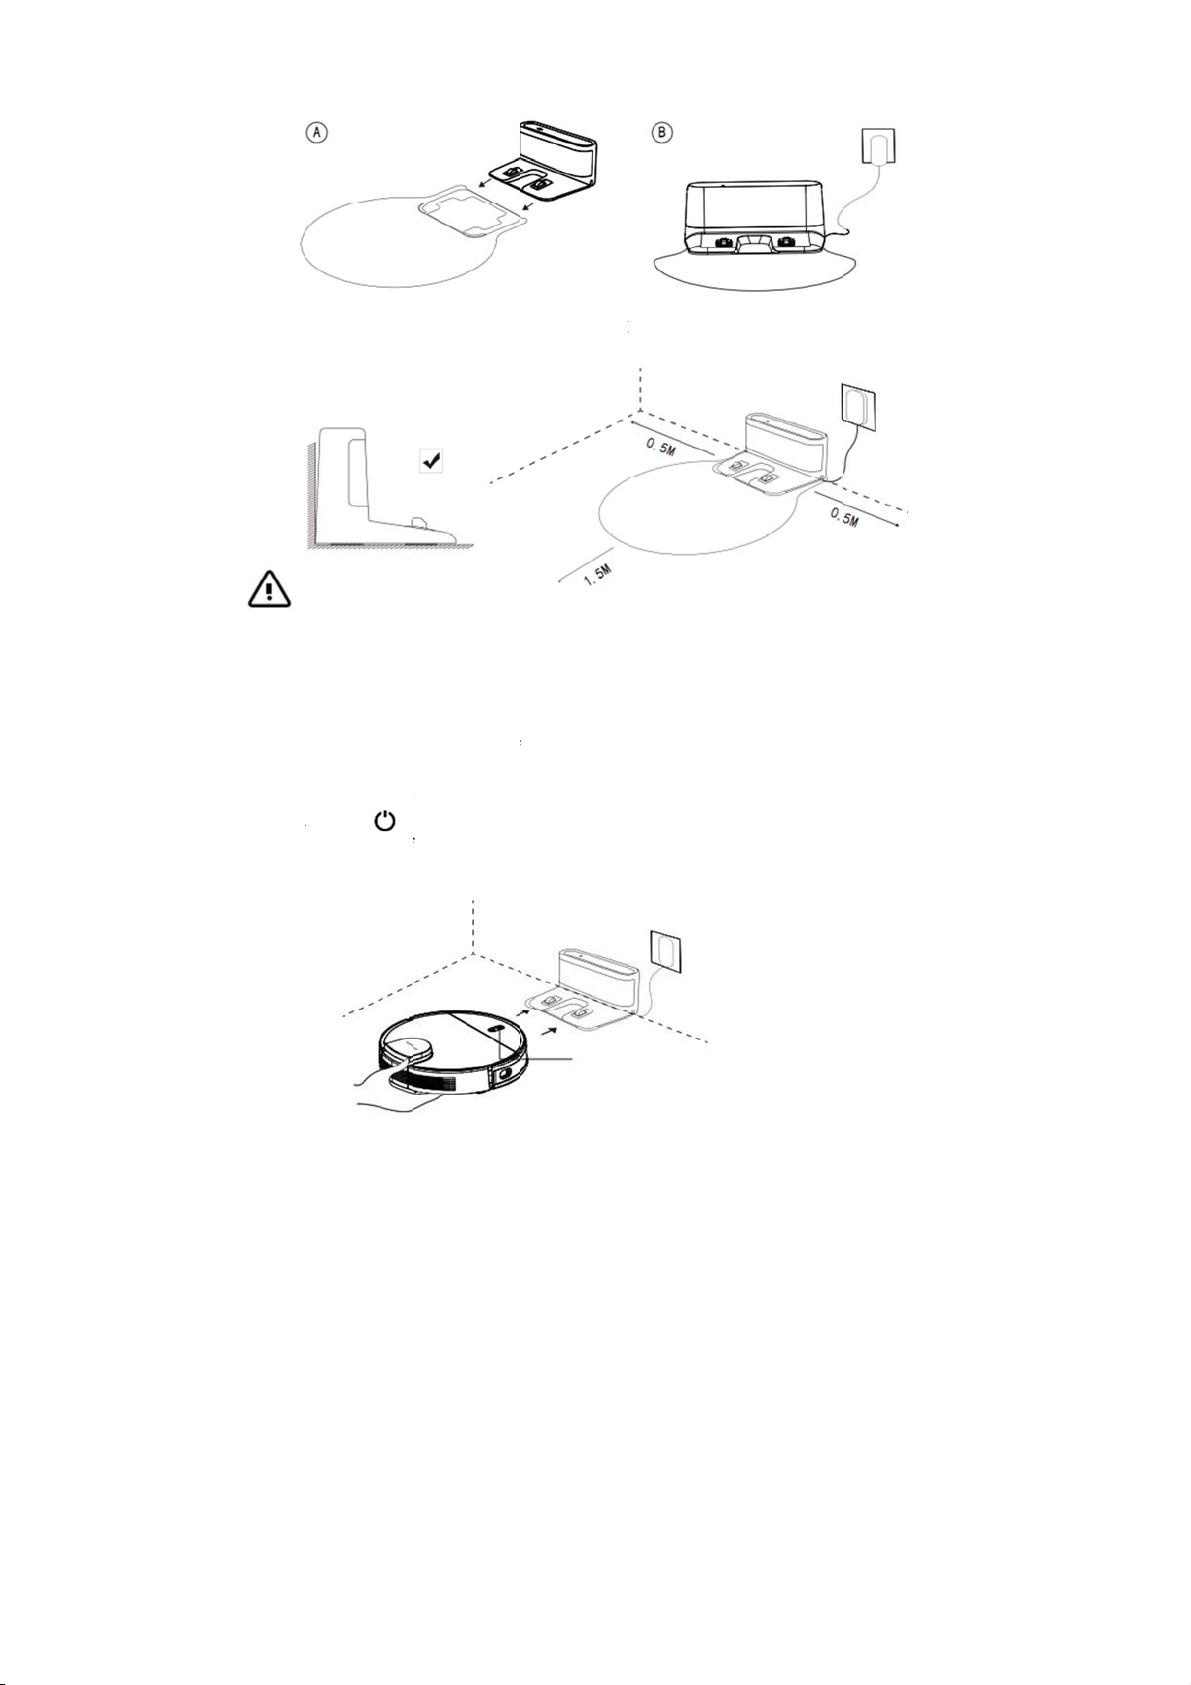
3. Plac
e
obstac
l
N
o
*
*
*
4. Star
t
Press
a
the ma
c
*
e
d on your pers
o
t the adapter to
e
the charging
d
es within 1.5
m
o
te:
*
Install the c
h
recommend
e
b
lanket, aga
i
*
Keep the ch
a
*
To ensure n
o
machine loc
repositionin
g
t
up and chargi
n
a
nd hold
o
c
hine shall be
fu
Place the m
the white in
d
o
nal needs, de
c
the wall socke
Waterproof
d
ock on a flat
h
m
eters in front
o
h
arging dock a
t
e
d to place the
c
inst a wall.
a
rging dock ch
a
o
rmal charging
,
ation is chang
e
g
failure (for d
e
n
g
o
n the machine
fu
lly charged (a
b
achine on the
c
d
icator on the
c
- 09 -
c
ide whether to
t and keep the
p
pad (optional)
h
ard ground per
p
o
f it and within
t
a location eas
i
c
harging dock
o
a
rged, or the m
a
,
do not move t
h
e
d, the machine
e
tails, see Oper
for 3 seconds
b
out 4 hours) t
o
c
harging dock
c
harging dock
g
The po
w
*White
*Pink
<
install a water
p
p
ower on.
p
endicular to a
0.5 meters on i
t
ly accessible b
y
o
n a hard grou
n
a
chine will not
h
e charging do
c
may regenerat
e
a
ting Instructi
o
to turn it on.
B
o
ensure norm
a
a
nd align it wi
g
oes off, chargi
n
w
er indicator c
o
≥20%
<
20%
p
roof pad. Afte
r
wall and keep
ts left and righ
t
y
the machine.
n
d, instead of a
automatically
r
c
k frequently.
O
e
a map due to
o
ns > Map Man
B
efore use for t
h
a
l operation.
i
th the chargin
g
n
g will begin.
o
lor indicates t
h
r
installation,
it clear of
t
.
It is
carpet or
r
eturn.
O
nce the
agement).
h
e first time,
g
port. When
h
e battery leve
l
l
:
5. Inst
a
①Do
w
Search
②Re
s
A. Op
e
B. Pre
s
till the
entere
d
③Ad
d
Open t
h
p
age,
a
Note t
h
its net
w
N
*
*
*
N
ote:
* You may no
t
charge it an
d
* To ensure t
h
every six m
o
* To enter the
hold a
n
WiFi will be
Press t
o
a
ll the app
w
nload
for "Smart Gr
a
s
et WiFi
e
n the machine
t
s
s and hold
WiFi indicator
d
the network c
o
d
devices
h
e app and cre
a
a
nd select "Rob
o
h
at "Configur
e
w
ork configur
a
N
ote:
*
Only the 2.4
G
Please switch
*
If the connect
i
again and ad
d
*
As version up
g
app for opera
t
t be able to sta
r
d
try again.
h
e service life o
o
nths.
low power sta
n
n
d for 20
disabled when
o
exit the low p
o
a
ffiti" in a pho
n
t
op cover to ex
p
and the
starts blinking
o
nfiguration m
o
a
te a new acco
u
o
t Vacuum" fro
e
Network wit
h
a
tion mode.
G
Hz band, but
n
to the 2.4GHz
i
on between y
o
d
it again after
e
g
rade and upd
a
t
ion.
- 10 -
r
t the machine
w
f the battery, p
l
n
dby mode wh
e
seconds until t
h
this mode is ac
o
wer standby
m
n
e app store or
s
p
ose the WiFi
i
simultaneousl
y
slowly in whit
e
o
de.
WiFii
n
Blinki
n
W
a
un
a
Blinki
n
Norm
a
u
nt, click the "
+
m "Add Manu
a
h
Hotspot (Co
m
n
ot the 5GHz o
n
band if your
W
o
ur phone and r
o
e
ntering the net
w
a
te may be mad
w
hen the batter
y
ease charge an
d
e
n the machine
h
e power statu
s
t
ive.
m
ode.
s
can the QR co
d
i
ndicator.
y
till the voice
p
e
, indicating th
a
n
dicator:
n
g slowly in w
h
a
it for connection
(
a
ble to connect to
a
n
g fast in whit
e
a
lly on in white
" icon in the u
p
a
lly".
m
patibility M
o
n
e, is supporte
d
W
iFi network is
o
bot vacuum f
a
w
ork configur
a
e
, please follo
w
r
y is low. Pleas
e
d
discharge at l
is being charg
e
s
indicator goe
s
d
e below to do
w
p
rompts "WiFi
a
t the robot va
c
h
ite:
(
When in sleep m
o
a
WiFi network)
e
: Being connecte
d
: WiFi connected
p
per right corn
e
o
de)" shall be
d
in the WiFi c
o
dual-
b
and and
a
ils, you can re
s
a
tion mode.
w
internal guid
e
e
fully
east once
e
d, press and
s
off.
w
nload app.
reset". Wait
c
uum has
o
de, the machine i
s
d
to WiFi
e
r of the
selected as
o
nnection.
t
ry again.
s
et WiFi
e
lines in the
s
6. Star
t
The m
a
conditi
A. The
B. Sw
e
b
at
t
wo
r
N
*
4.
O
4.1 U
s
A. Sta
r
* W
h
it
w
* If t
h
sta
r
* If t
h
sh
u
B. Star
t
* Pre
ch
a
rou
wa
l
an
o
N
o
*
*
*
t
sweep by ope
r
a
chine automat
i
o
ns:
machine has c
o
e
ep has not bee
n
ery is charged
t
r
k.
N
ote:
*
Do not move
t
return for cha
r
charging doc
k
O
peratin
g
s
e of the ma
c
r
tup/shutdown
h
en the machin
e
w
ill be started a
u
h
e machine is
n
r
t it up. Wait u
n
h
e machine is
n
u
t it down.
t
sweep
ss to star
t
a
rging dock, sc
a
t
e, and divide t
h
l
l to sweep bac
k
o
ther.
o
te:
*
If the battery
l
*
Before sweep
,
interruption
o
*
In the auto s
w
duration is sh
o
r
ating it from t
h
i
cally returns t
o
o
mpleted swee
p
n
completed ye
t
t
o 80%, the ma
c
t
he charging d
o
r
ging. If autom
a
k
.
g
Instru
c
hine
e
is connected
t
u
tomatically.
n
ot connected t
o
n
til the power s
t
n
ot connected t
o
t
the auto swee
p
a
n automaticall
y
h
e space into
m
k
and forth in a
l
evel is too lo
w
,
all wires on t
h
o
r damage to ar
t
w
eep mode, by
d
o
rter than 10 m
i
- 11 -
h
e app or pressi
o
the charging
d
p
;
t
but the batter
y
c
hine will resu
m
o
ck during swe
e
a
tic recharge f
a
ctions
t
o the charging
o
its charging
d
t
atus indicator
t
o
its charging
d
p
mode. Once i
t
y
to generate a
m
m
ultiple areas.
T
zigzagging w
a
w
to start sweep
,
h
e ground shou
l
t
icles caused b
y
d
efault the mac
h
i
nutes.
n
g manu
a
d
ock for chargi
n
y
power level i
s
m
e to complet
e
e
p, or the mach
i
ils, you shall
m
dock and the p
o
d
ock, press and
t
urns white an
d
d
ock, press and
t
is started, the
m
ap, intelligen
t
T
he sweep rout
e
a
y to sweep dif
f
please charge
i
l
d be well orga
n
y
pulling the p
o
h
ine will do s
w
a
lly.
n
g under the fo
l
s
insufficient;
O
e
the remaining
h
ine may not be
m
anually conne
c
o
wer supply is
hold for
3
d
is kept ON.
hold for
3
machine will l
e
n
tly determine i
t
e
will be plann
e
f
erent areas on
e
it first.
n
ized for fear o
o
wer cord duri
n
w
eeping twice i
f
l
lowing
O
nce the
sweep
able to
c
t it to the
turned ON,
3
seconds to
3
seconds to
e
ave the
t
s sweep
e
d along the
e
after
f power
n
g sweep.
f
the sweep

C. Pau
s
* W
h
sw
e
do
c
D. Hib
e
* If i
t
aut
Pre
E. Cha
r
* Au
t
aut
* Ma
n
F. Faul
t
* Pl
e
w
h
is
G. Res
e
* Pr
e
yo
u
co
n
Th
e
res
e
Af
t
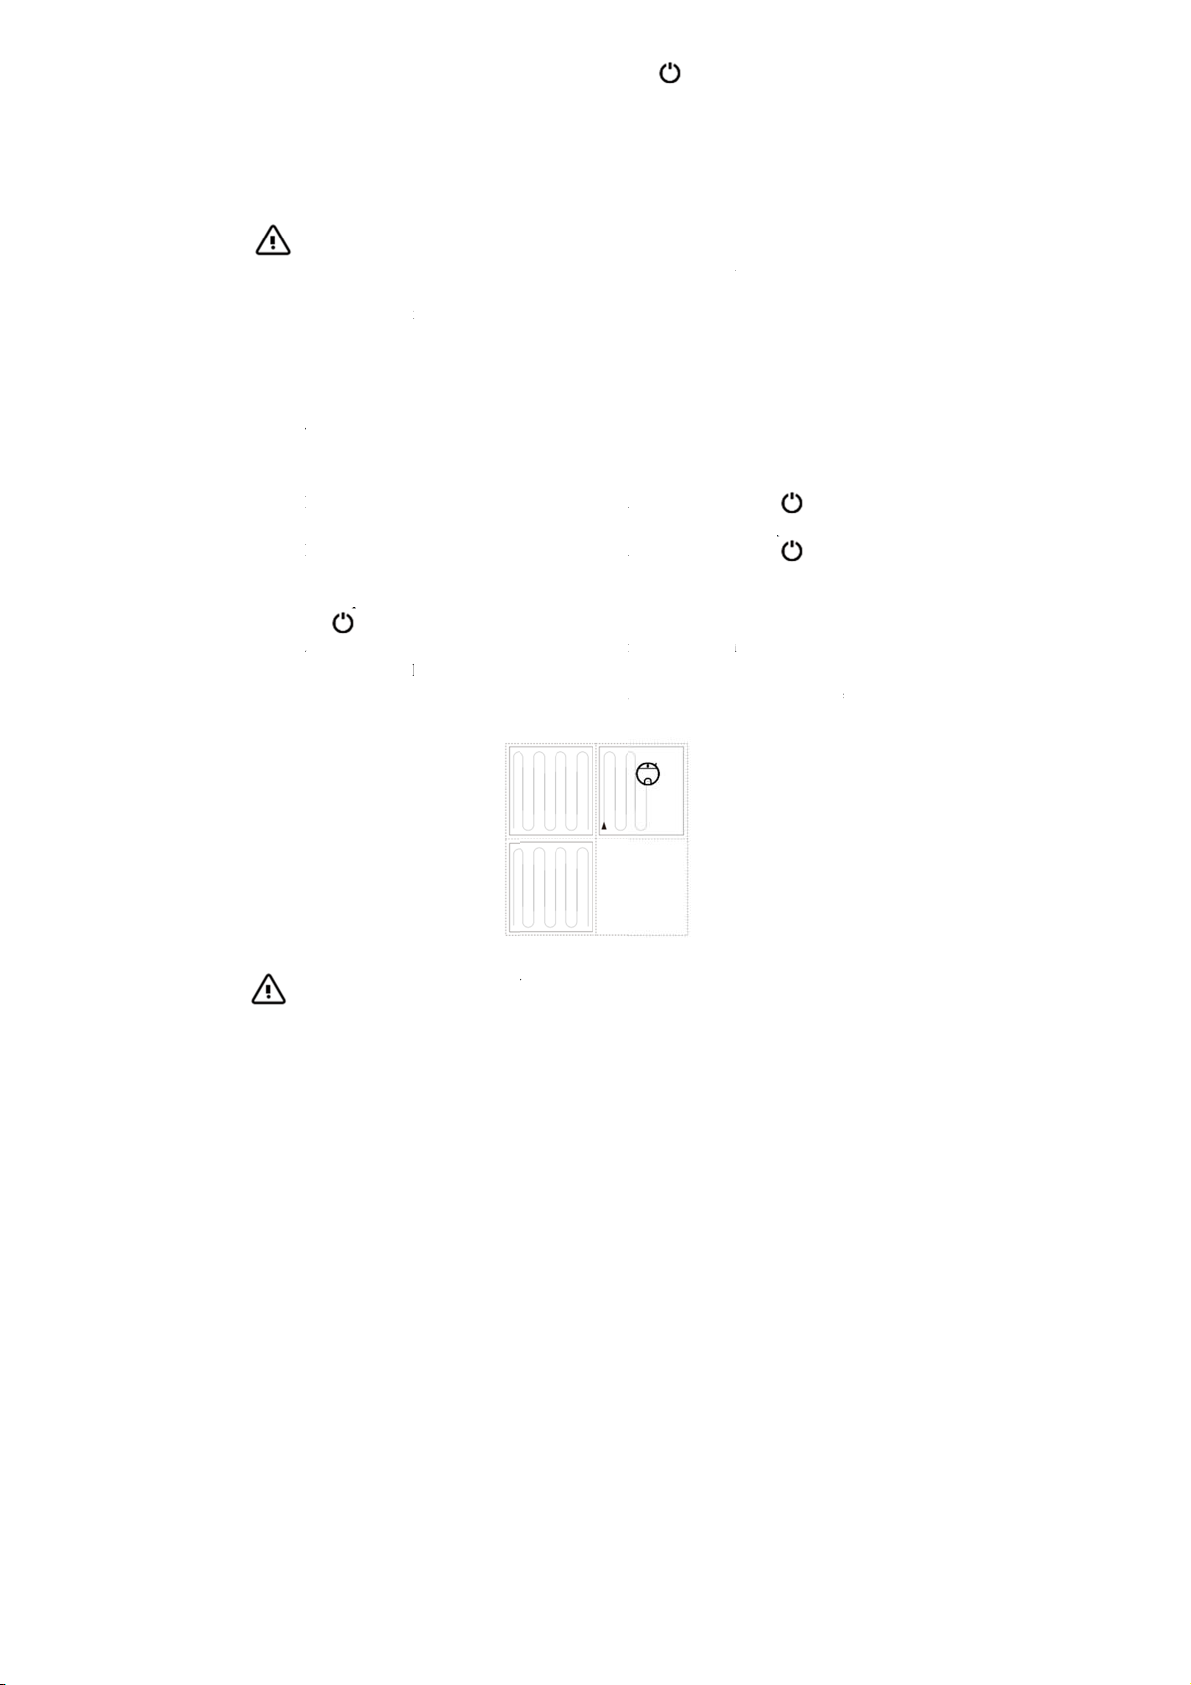
4.2 S
w
A. A
u
*A
u
st
a
s
w
re
c
B. S
w
* A
f
ce
n
to
c
Af
t
ch
a
a:
b
:
s
e
h
en the robot v
a
e
ep. During sw
c
k automaticall
y
e
rnation
t
is inactive an
d
omatically swi
t
ss any button t
o
r
ging
t
o recharge: A
ft
omatically ret
u
n
ual recharge:
a
b
t
e
ase refer to th
e
h
en any abnor
m
b
linking in red
Note:
* If it cannot
b
Department
e
t WiFi
e
ss and
u
r router has c
h
n
nect to the ma
c
e
WiFi status i
n
e
t, there will b
e
t
er that, you ca
n
w
eep modes
u
to Sweep
u
to Sweep is t
h
a
rt off the cha
r
w
eep your roo
m
c
harge. It is fas
t
w
eep at Fixed P
o
f
ter the mode i
n
tered on itself.
c
lean.
t
er such speci
f
a
rging dock.
Manual startu
p
seconds to star
t
Startup using
instructions.
a
cuum is opera
t
eep, press
y
.
d
the charging
d
t
ch to sleep mo
o
wake up the
m
ft
er sweep, the
w
u
rn to the charg
i
a
. If it is pause
d
b
. When the m
a
manually ret
u
e
"Common Fa
u
m
ality occurs to
with voice pro
m
b
e repaired afte
r
for consultatio
n
simultaneo
u
h
anged, you've
f
c
hine normally
n
dicator will be
e
a voice prom
p
n
reset the WiF
i
h
e default mo
d
r
ging dock, au
t
m
s. After the ta
s
t
and convenie
n
o
int
s enabled, the
This mode is
v
f
ic area has be
p
: Move the ma
t
it up.
app: Open t
h
- 12 -
t
ing, press
to stop the cu
r
d
ock is not con
n
de.
m
achine.
w
hite light will
i
ng dock for ch
a
d
, press to
a
chine is stuck
o
u
rn it to the ch
a
u
lts” section h
e
your robot va
c
m
pts.
r
the above ope
n
or repair. Do
u
sly for 3 seco
n
f
orgotten the p
a
for other reaso
blinking slow
l
p
t.
i
connection as
d
e after startup
t
omatically sca
n
s
k is complete,
n
t.
machine will
s
v
ery useful if y
o
en swept, the
chine to the ar
e
h
e app, select
to pause. Pres
r
rent sweep an
d
n
ected for 10
m
keep blinking
a
a
rging.
recharge it aut
o
o
r cannot find t
h
a
rging dock for
e
rein or guideli
n
c
uum in operati
o
r
ations, please
not disassem
b
l
n
ds to reset you
r
a
ssword or you
r
ns.
l
y in white. Aft
e
instructed in t
h
. Press t
o
n
and plan th
e
the machine
w
s
weep a rectan
g
o
u have any ar
e
machine will
a
e
a to be cleane
d
Sweep at Fi
x
s
s again t
o
d
return to the
c
m
inutes, the ma
c
a
nd the machi
n
omatically;
t
he charging do
charging.
n
es in the app
f
on and the po
w
contact our Se
r
e the machine
b
r WiFi connect
i
r
phone is una
b
e
r the WiFi co
n
h
is app.
o
start it. The
m
e
sweep map a
n
w
ill return auto
m
g
ular area of
1
e
a with much
d
automatically
r
d
, press and ho
l
x
ed Point, an
d
o
resume
c
harging
c
hine will
n
e will
c
k, please
f
or repair
w
er indicator
r
vice
b
y yourself.
i
on when
le to
n
nection is
m
achine will
n
d path, and
m
atically for
1
.5m X 1.5m
d
ust or debris
r
eturn to the
l
d for 3
d
follow the

C. Are
a
*Se
l
ar
D. Re
m
*M
a
ar
e
4.3 S
e
a
-specific Swe
e
l
ect Area-speci
f
ea only and ret
u
Note:
* Area-speci
f
m
otely Controll
e
a
nual Remotel
y
e
a to be cleane
d
e
lect suction
Select an swe
e
Qui
e
Aut
o
Pow
Sup
e
e
p (only in-app
f
ic Sweep in th
u
rn to the char
g
f
ic Sweep can
o
e
d Sweep (onl
y
y
-Controlled S
w
d
.
intensity (o
n
e
p intensity in t
h
e
t
o
erful
er
-powerful
- 13 -
operation supp
e app and set a
g
ing dock after
o
nly
b
e started
a
y
in-app operati
w
eep is availab
l
n
ly in-app o
p
h
is app as requ
i
orted)
sweep area. T
h
sweep.
a
fter a map is c
r
on supported)
l
e in the app to
p
eration sup
p
i
red:
h
e machine wil
l
r
eated.
make the mac
h
p
orted)
l
sweep this
h
ine go to the
4.4 U
s
①I
n
②T
a
③We
inst
a
obs
t
④Se
l
the
mo
car
p
s
e of mop m
o
n
stall the chargi
n
a
ke out the wat
e
t
your moppin
g
a
ll the holder t
o
t
acle-crossing
p
l
ect a sweep m
o
app as neces
s
pping your fl
o
p
et areas using
o
dule
n
g dock on the
e
r tank and ad
d
g
cloth before
m
o
the machine
b
p
erformance wi
o
de to start sw
e
s
ary. (To preve
n
o
or, it is reco
m
the app to pro
t
- 14 -
waterproof pa
d
d
water.
m
opping, instal
l
b
ottom. (In ord
e
ll be reduced a
f
e
ep, and select
t
n
t the machin
e
m
mended to pl
a
t
ect your carpet
d
(optional).
l
the mopping
c
e
r to ensure mo
p
f
ter the moppi
n
t
he amount of
m
e
from wetting
a
ce virtual wal
l
s)
c
loth on its hol
d
pping results, t
h
n
g cloth is put i
n
m
opping wate
r
any of your
c
l (for no mop
p
d
er, and then
h
e machine's
n
.)
r
(3 levels) in
c
arpets when
p
ing) around
④Sel
as
n
⑤W
h
b
o
t
⑥E
m
an
d
N
o
*
P
*
I
*
W
*
I
t
*
t
p
*
H
i
e
ct a sweep m
o
n
ecessary (3 le
v
h
en the machin
e
t
h sides by han
d
m
pty the remain
i
d
odor.
o
te:
P
lease do not
u
I
t is recommen
d
W
hen the mac
h
I
n order to ach
i
t
imes with the
m
To avoid dam
a
t
he charging d
o
p
ad (optional)
When moppin
g
H
owever, the c
i
n time.
o
de to start swe
e
v
els).
e
returns to the
d
and drag bac
k
i
ng water in th
e
u
se the moppin
g
d
ed to wash th
e
h
ine is being c
h
i
eve better mo
p
m
achine befor
e
a
ging your wo
o
o
ck immediate
l
g
is paused or
loth remains w
- 15 -
e
p, and select
a
charging dock
k
ward to remov
e
water tank.
Wa
g
mode on any
c
e
mopping clot
h
h
arged or idle,
p
p
ping results, it
e
installing the
m
o
d floor, please
l
y after floor
m
finished, the
m
et and should
n
a
level of mopp
i
M
a
fter completi
n
e the mop mod
u
Wa
sh the moppi
n
c
arpet.
h
after each mo
p
p
lease remove t
h
is recommend
e
m
op module.
make sure to
t
m
opping is com
p
m
achine will
a
n
ot be left in pl
a
i
ng water outle
t
M
opping water
settings
Low
Medium
High
n
g its work, hol
d
d
ule.
n
g cloth to avoi
d
o
pping.
h
e mop modul
e
e
d to sweep yo
u
t
ake out the m
o
p
lete. Install th
a
utomatically c
a
ce for too lon
g
t
in the app
d
buckles on
d
mildew
e
.
u
r floor three
o
p module or
e waterproof
u
t off water.
g
but handled

4.5 M
a
A. M
a
*R
e
sw
e
du
r
Ge
n
a.
b
.
c.
B. Rep
* If
t
ch
a
ad
a
a.
b
.
c.
N
*
*
4.6 Sy
s
* If
t
th
e
a
b
c
a
p manageme
n
a
p your rooms
i
e
al-time mappi
n
e
ep, a floor pla
n
r
ing each swee
p
n
erate a compl
e
Open room do
Remove any
o
After generati
n
o
sitioning and
m
t
he location of
t
a
nges significa
n
a
pt to the surro
u
If repositionin
g
If repositionin
for new swee
p
If repositionin
g
available in th
e
any restricted
a
N
ote:
*
Make sure th
a
*
Do not move
t
b
ack to its ho
m
s
tem reset
t
he machine do
e
system.
a
. Ensure that t
h
b
. Press the res
e
automatical
c
. Connect the
m
reset will b
e
Note:
* After reset
t
including th
e
n
t
i
n real time
n
g helps you ea
s
n
of your roo
m
p
to ensure nor
m
e
te floor plan o
f
ors so that the
m
o
bject that may
n
g maps, pleas
e
m
ap regenerati
o
t
he machine/c
h
n
tly, the machi
n
u
nding environ
m
g
is successful,
g fails, the ma
c
p
;
g
fails and virt
u
e
original map,
a
rea.
a
t the machine
a
t
he equipment
f
m
e position.
es not respond
h
e machine is
n
e
t button with
a
ly.
m
achine to the
c
e
completed.
t
ing the syste
m
e
virtual bound
a
- 16 -
s
ily understan
d
m
s will be gener
a
m
al navigation.
f
your rooms:
m
achine gener
a
block or jam t
h
e
do not disasse
o
n
h
arging dock is
a
n
e will try repo
s
m
ent. Details a
r
the machine
w
c
hine will rege
n
u
al boundary i
n
the machine
w
a
lways starts s
w
f
requently duri
n
after pressing
a
n
ot on the char
g
a
paper clip an
d
c
harging dock
o
m
, the machi
n
a
ry.
d
the sweep rou
t
a
ted. Maps wil
l
a
tes a map of e
a
h
e machine;
mble or move
t
a
djusted or the
s
itioning and
m
r
e as follows:
w
ill resume swe
e
n
erate a map to
formation (no-
s
w
ill not start a n
e
w
eep from the
c
n
g sweep. Oth
e
a
ny button ther
e
g
ing dock;
the machine
w
o
r press t
o
n
e may lose
m
t
e and environ
m
l
be updated in
a
ch room;
t
he charging d
o
surrounding e
n
m
ay regenerate
a
e
p;
ensure normal
s
weep, no-mo
p
e
w sweep to a
v
c
harging dock.
e
rwise, put the
m
e
on, it is an op
t
w
ill shut down
o
turn it ON an
d
m
aps and ori
g
m
ent. After
real time
o
ck;
n
vironment
a
map to
navigation
ping) is
v
oid crossing
m
achine
ion to reset
d
system
g
inal settings
5.
M
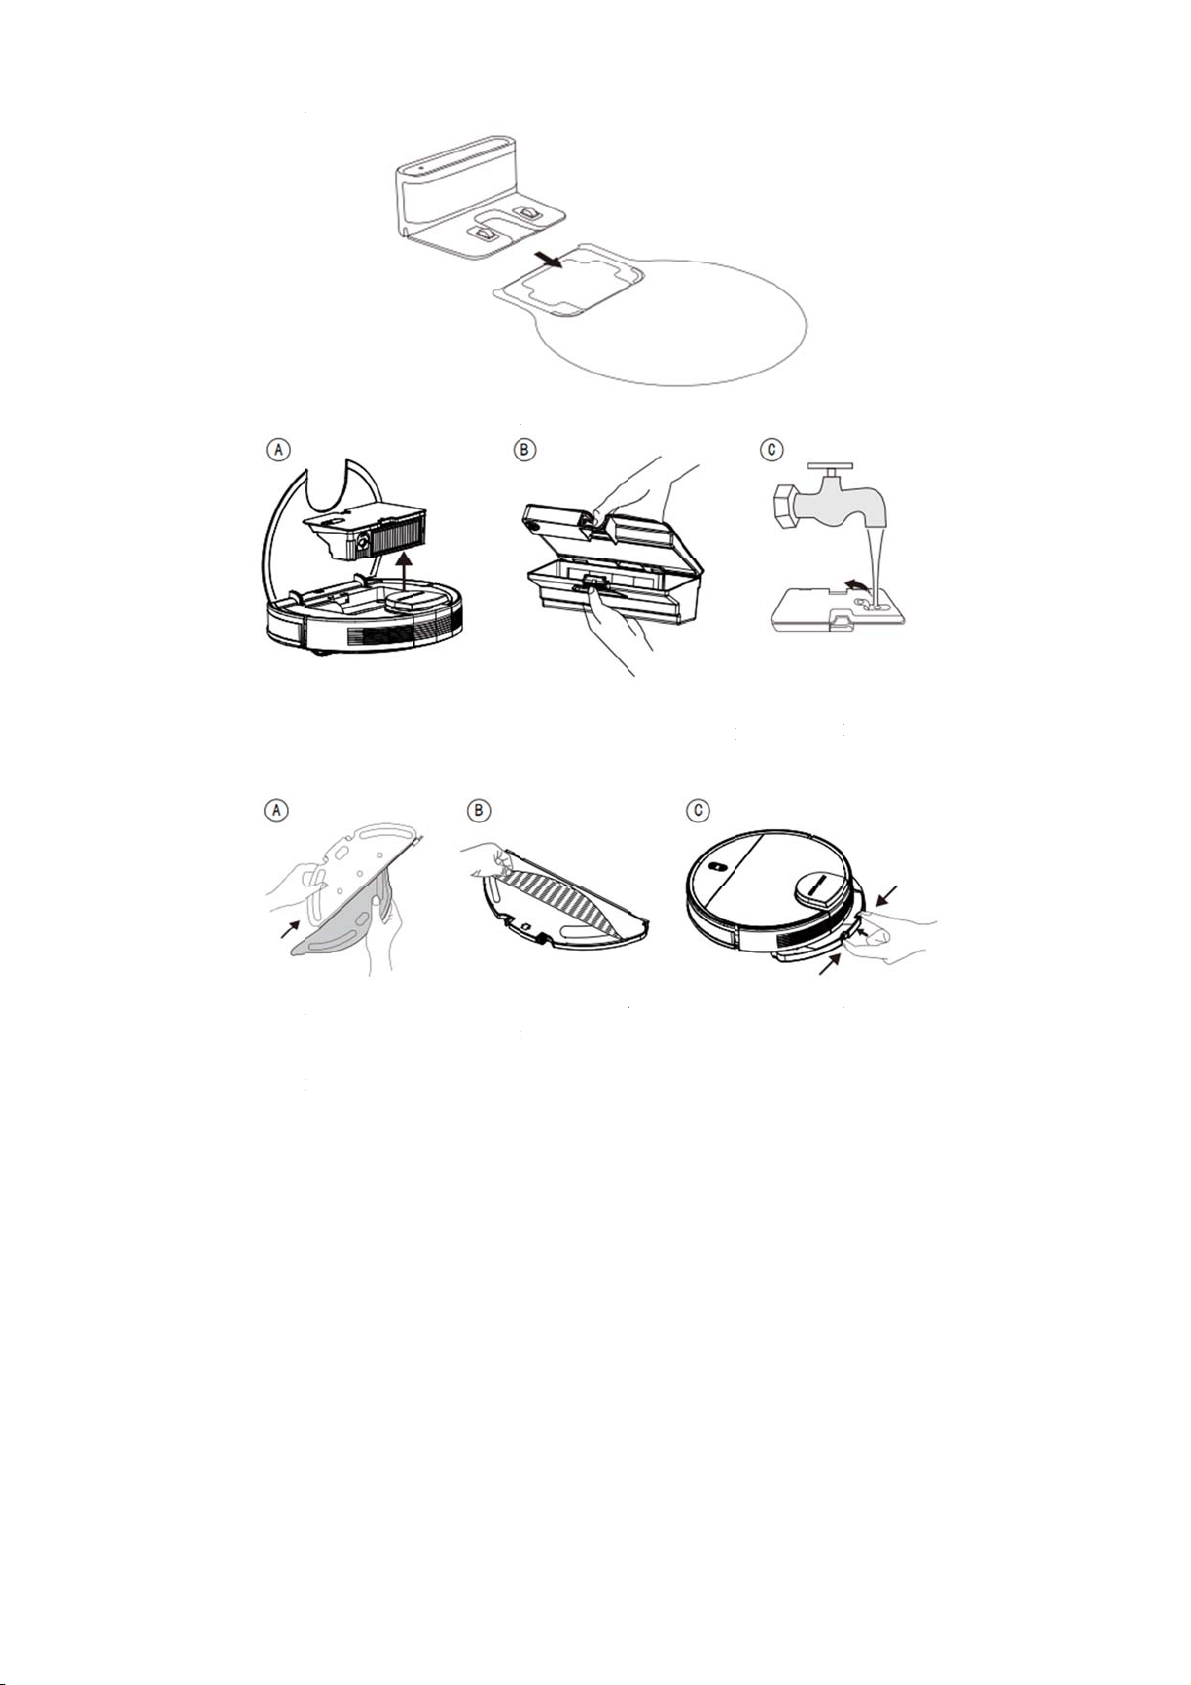
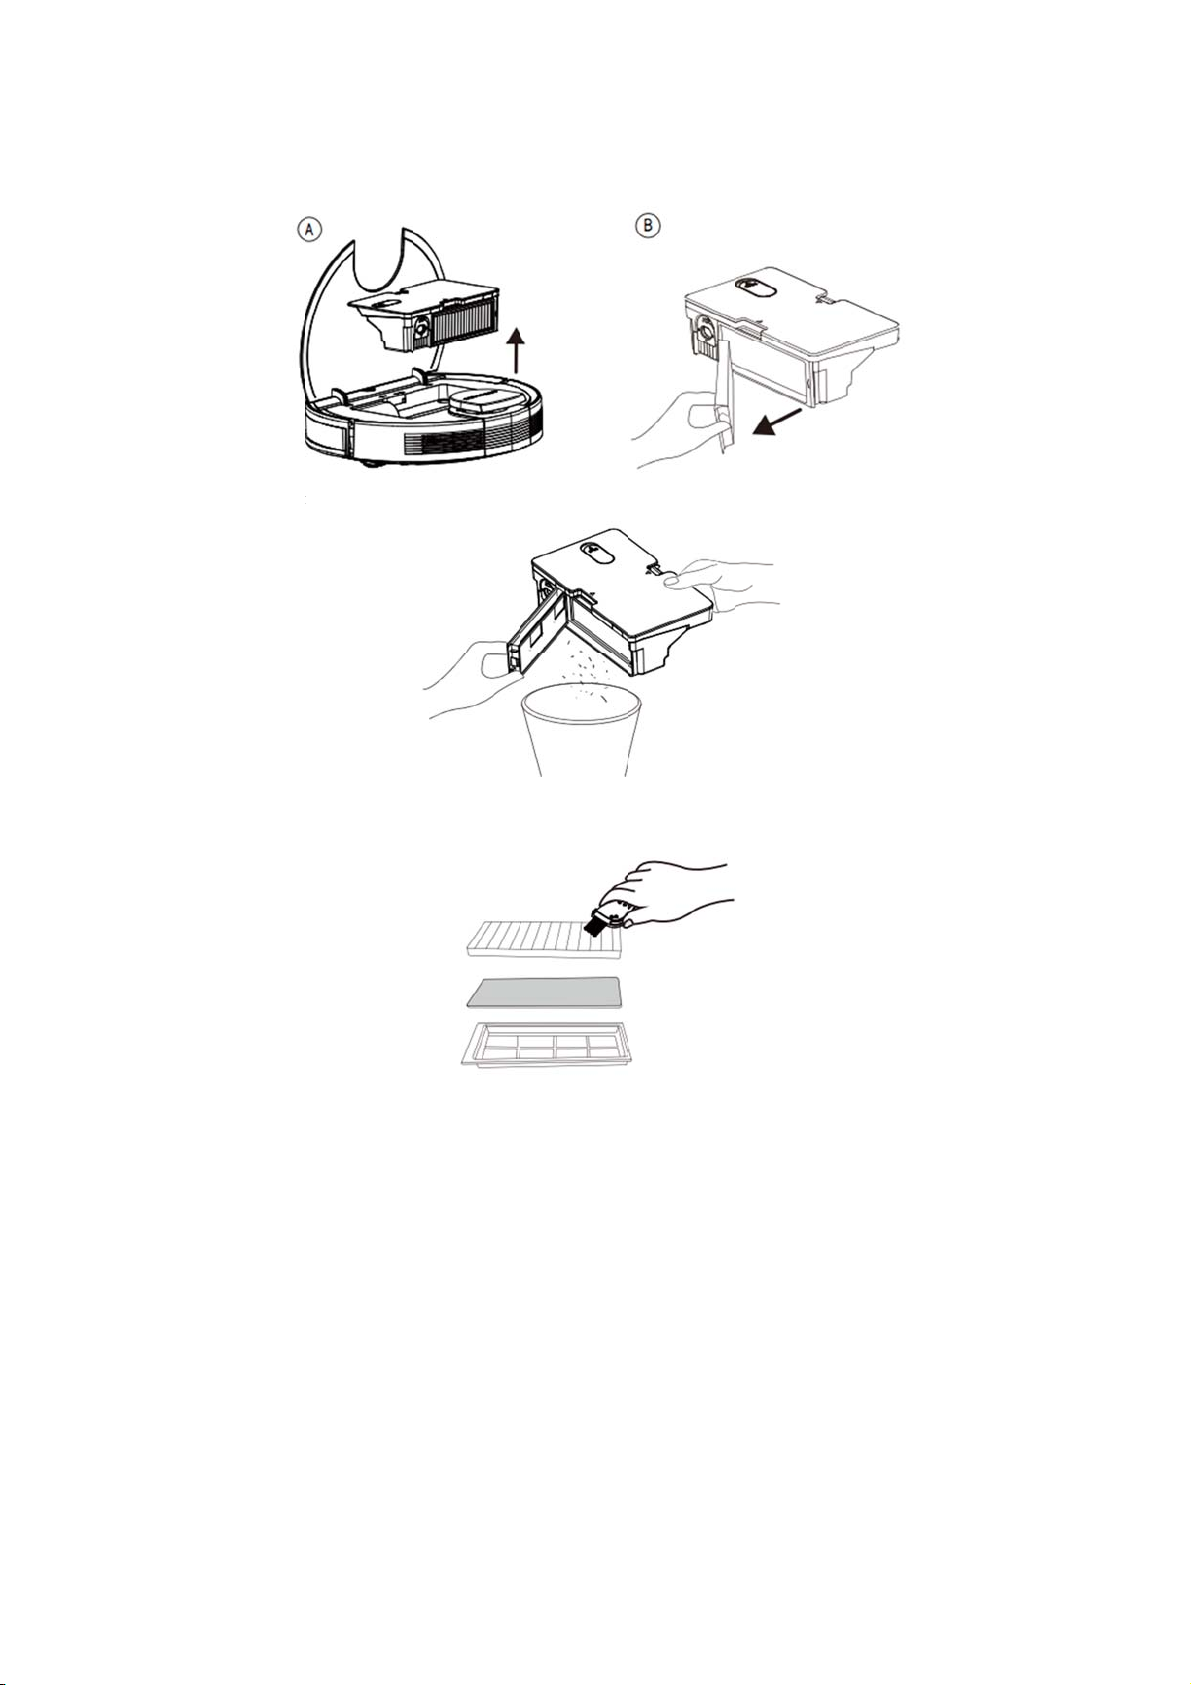
5.1 C
l
A.
O
R
B.E
m
C.
M
ainten
a
l
ean its dust
O
pen the machi
n
R
emove the filt
e
m
pty the dust
b
Disassemble t
h
filter, and clea
n
a
nce
box and wa
t
n
e top cover an
d
e
r module.
b
ox. Put the du
s
h
e removed filt
e
n
filters with a
c
- 17 -
t
er tank
d
remove the c
o
s
t box against a
e
r, remove the
p
c
leaning brush.
o
mbination of
d
dustbin, tap th
e
p
re-filter, foam
d
ust box and w
a
e box to knock
filter and high
-
a
ter tank.
off excess dirt
.
-
performance
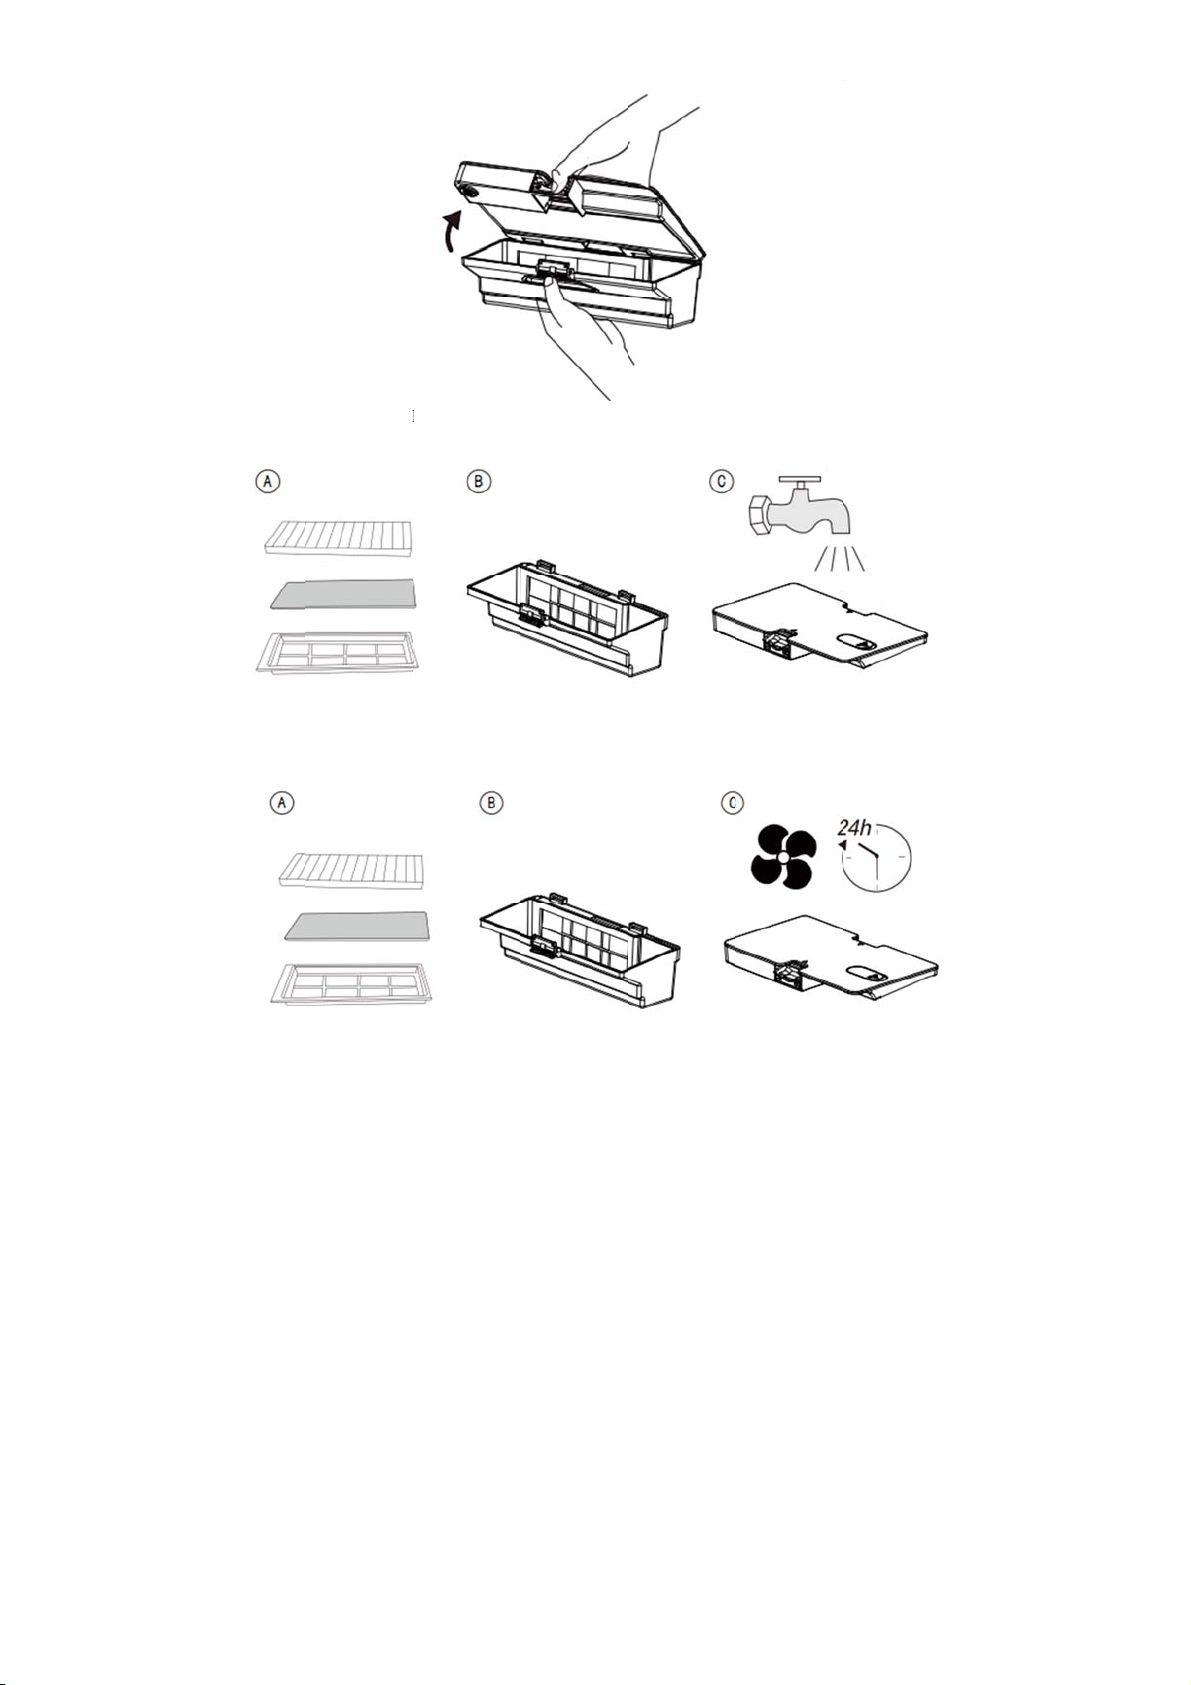
D. Pre
s
E. Flus
Filters
F. Aft
e
air-dri
e
s
s the release b
u
h the water tan
k
shall not be cl
e
e
r cleaning, th
e
e
d.
u
tton of dust b
o
k
, dust box an
d
e
aned with hot
w
e
water tank,
t
- 18 -
o
x to separate t
h
d
filter module
t
w
ater or deterg
e
t
he dust box
a
h
e dust box fro
m
t
horoughly wit
h
e
nt).
n
d the filter
m
m
the water ta
n
h
water as nece
m
odule shall b
e
n
k.
s
sary (Note:
e
thoroughly
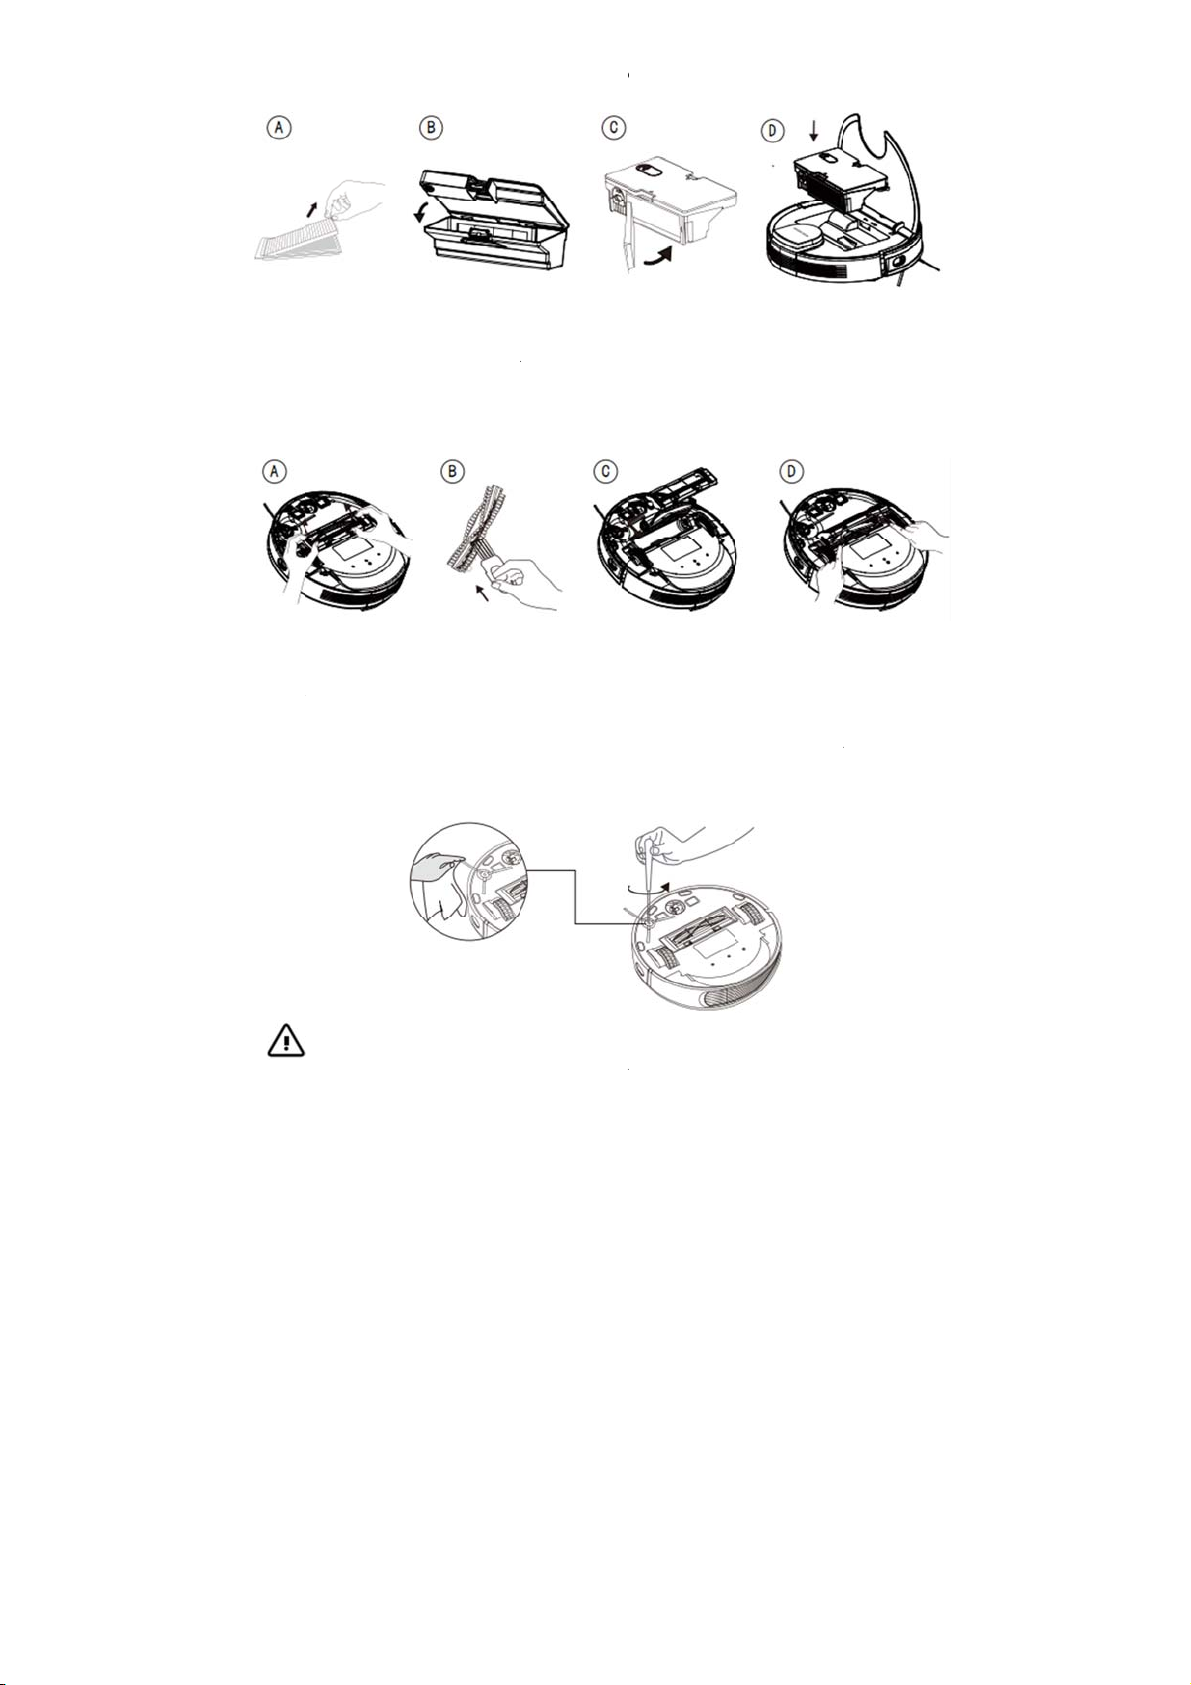
G. Rea
the ma
c
5.2 C
l
A. As
s
and
t
B. Cle
a
C. Put
o
D. Pre
s
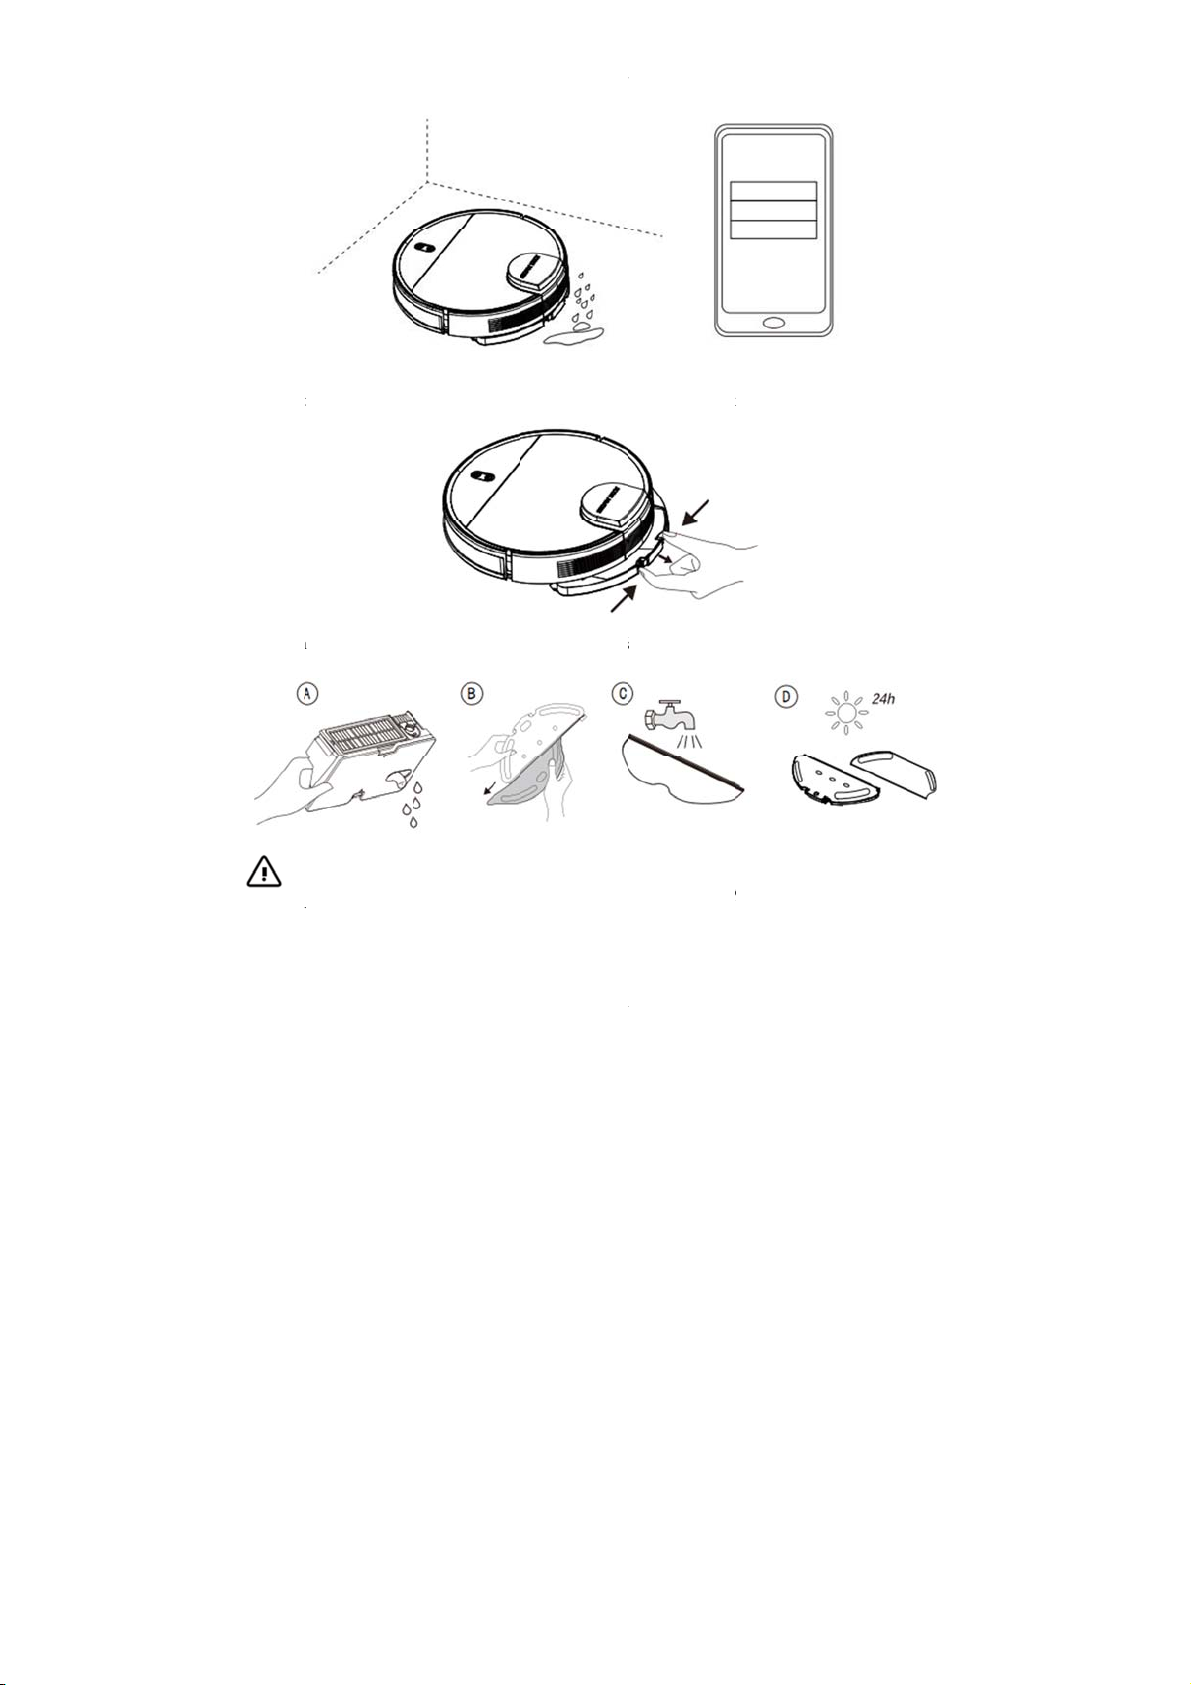
5.3 C
l
Foreig
n
Please
b
A. Tur
n
B. Re
m
wet
C. Inst
a
*
ssemble the air
c
hine.
l
ean the mai
n
s
hown in the fo
l
t
ake out the rol
a
n the rolling b
r
o
ne end of roll
i
s
s the brush co
v
l
ean its side
b
n
matter such a
s
b
e sure to clea
n
n
over the mac
h
m
ove side brus
h
cloth based on
a
ll side brushe
s
Note:
*
It is recomme
n
results.
-dried water ta
n
n
brush
l
lowing figure,
ling brush up
w
r
ush with clean
i
ng brush into t
h
v
er and fix it w
i
b
rushes
s
hair is easily
t
n
it regularly.
h
ine and remov
h
es, clear the
m
your personal
s
back and tight
n
ded to replac
e
- 19 -
n
k, dust box an
d
press down th
e
w
ards.
ing tools inclu
d
h
e correspondi
n
i
th the buckle.
t
angled in a sid
e screws with
a
m
of hair or for
e
needs.
en screws.
e
side brushes e
v
d
filter module
,
e
buckle to tak
e
d
ed in the acce
s
n
g hole first.
e
brush, and di
r
a
Phillips scre
w
e
ign matters, a
n
v
ery 3-6 mont
h
, and install th
e
e
out the protec
t
s
sories.
r
t may attach t
o
w
driver.
n
d decide whe
t
h
s to ensure cle
a
e
m back into
t
ive cover,
o
it.
t
her to use a
a
ning
Table of contents
Other SilverStar Vacuum Cleaner manuals

Popular Vacuum Cleaner manuals by other brands


BLACK DECKER
BLACK DECKER SVJ520BFS Original instructions

BLACK DECKER
BLACK DECKER BDX19301-4B manual

H.Koenig
H.Koenig STC68 instruction manual

BLACK DECKER
BLACK DECKER DUSTBUSTER DB1440SV instruction manual

Swiss Pro+
Swiss Pro+ SP-RVC150 instructions

Gtech
Gtech Pro2 OPERATING MANUAL ORIGINAL INSTRUCTIONS


