SilverStone SST-ECM23 User manual

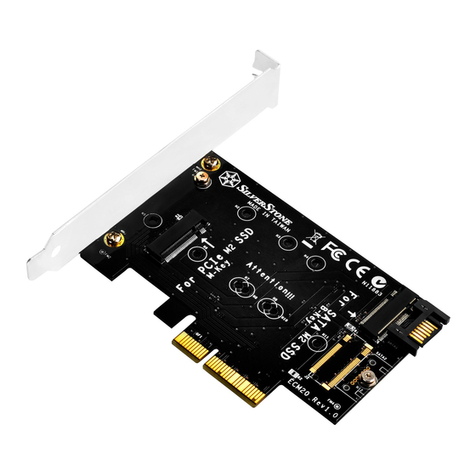
Converts one M.2 port (M key) into one PCIe x4 interface
Includes aluminum heatsink and thermal pad for enhanced M.2 SSD cooling
Supports 2230,2242,2260 and 2280 length M.2 SSD
No driver installation required
Note: ECM23 support 'M' key only, not good for B-Key SATA base M.2 SSD.
Note: If you wish to boot off using M.2 SSD, your motherboard needs to support it. Due to
BIOS limitations, not all motherboards support booting off M.2 SSD so please consult
your motherboard manual or vendor for more details on how to enable this function.
Note : M.2 PCIe-NVMe mode SSD requires the use of Intel® 9 series (Z97 H97 Z170 X99)
or higher version chipset motherboard with Windows 8 or higher version operating
system.
NO.G11234200
Specification
SST-ECM23
PCIe M.2 SSD Read / Write LED: Blue blinking
PCI Express x4 via full size x16 pinout
M.2 (NGFF)
PCIe x4 NVMe-based M key
30mm, 42mm, 60mm, 80mm
Microsoft Windows 7 (32bit/64bit), 8/8.1/10 (32bit/64bit) or
future release version, Mac OS 10.2.8 or above
Linux
Heatsink with PCB:105mm (W) x 11mm (H) x 44mm (D),52g
1.5W/m.k
-40 °C ~ 220 °C
0.5 / 1 / 1.5 mm
Charcoal Pad:70 mm (W) x 0.5 mm (H) x 20mm (D), 1.95g
Blue Pad :70 mm (W) x 1 mm (H) x 20mm (D), 3.6g
Gray Pad: 70 mm (W) x 1.5 mm (H) x 20mm (D), 5.5g
ECM23 PCB with heatsink x 1
Screwdriver x 1
Spare outer shell screw x 2
PCB
导热鳍片
导热贴
Blue thermal pad x 1
Gray thermal pad x 1
Charcoal Pad x 1
Package Content
Model No.
LED indicator
Interface
SSD Interface
Module Key
Support Length of M.2 SSD
Operating system support
Net weight & Dimension
Thermal Pad
Thermal conductivity
Operating temperature
Thermal pad thickness
Net weight & Dimension
ECM23
M.2 NVMe SSD to PCIe 3.0 x16
adapter with heatsink
C
onverts one M.2
por
t (M
key
) in
to one P
C
Ie x4 inter
f
ac
e
Includes aluminum heatsink and therm
al p
ad for enhanced M.2 SSD cool
ing
S
upports 2230,2242,2260 and 2280 len
g
th M.2 SSD
N
o driver installation re
q
uire
d
Warranty Information
This product has a limited 1 year warranty in North America and Australia.
For information on warranty periods in other regions, please contact your reseller or SilverStone authorized
distributor.
本产品自购买之日起,于中国地区(不包含澳门,香港特别行政区)享有一年有限责任保固(部分产品为二年,
三年或五年)。详细保固年限请参照官方网站 https://silverstonetek.com.cn/ 公布之产品型号为依据。
1. Product component defects or damages resulted from defective production is covered under warranty.
Defects or damages with the following conditions will be fixed or replaced under SilverStone Technology’s
jurisdiction.
a) Usage in accordance with instructions provided in this manual, with no misuse, overuse, or other
inappropriate actions.
b) Damage not caused by natural disaster (thunder, fire, earthquake, flood, salt, wind, insect, animals, etc…)
c) Product is not disassembled, modified, or fixed. Components not disassembled or replaced.
d) Warranty mark/stickers are not removed or broken.
Loss or damages resulted from conditions other than ones listed above are not covered under warranty.
2. Under warranty, SilverStone Technology’s maximum liability is limited to the current market value for the
product (depreciated value, excluding shipping, handling, and other fees). SilverStone Technology is not
responsible for other damages or loss associated with the use of product.
3. Under warranty, SilverStone Technology is obligated to repair or replace its defective products. Under no
circumstances will SilverStone Technology be liable for damages in connection with the sale, purchase,
or use including but not limited to loss of data, loss of business, loss of profits, loss of use of the product or
incidental or consequential damage whether or not foreseeable and whether or not based on breach of
warranty, contract or negligence, even if SilverStone Technology has been advised of the possibility of
such damages.
4. Warranty covers only the original purchaser through authorized SilverStone distributors and resellers and
is not transferable to a second hand purchaser.
5. You must provide sales receipt or invoice with clear indication of purchase date to determine warranty
eligibility.
6. If a problem develops during the warranty period, please contact your retailer/reseller/SilverStone
authorized distributors or SilverStone
http://www.silverstonetek.com.
Please note that: (i) You must provide proof of original purchase of the product by a dated itemized receipt;
(ii) You shall bear the cost of shipping (or otherwise transporting) the product to SilverStone authorized
distributors. SilverStone authorized distributors will bear the cost of shipping (or otherwise transporting) the
product back to you after completing the warranty service; (iii) Before you send the product, you must be
issued a Return Merchandise Authorization (“RMA”) number from SilverStone. Updated warranty
information will be posted on SilverStone’s official website.
Please visit http://www.silverstonetek.com for the latest updates.
Warranty terms & conditions
Additional info & contacts
For North America
SilverStone Technology in NorthAmerica may repair or replace defective product with refurbished product that is not
new but has been functionally tested.
Replacement product will be warranted for remainder of the warranty period or thirty days, whichever is longer.
All products should be sent back to the place of purchase if it is within 30 days of purchase, after 30 days,
customers need to initiate RMAprocedure with SilverStone Technology in USA by first downloading the “USA
RMA form for end-users” form from the below link and follow its instructions.
http://silverstonetek.com/contactus.php
For Australia only
Our goods come with guarantees that cannot be excluded under the Australian Consumer Law.
You are entitled to a replacement or refund for a major failure and for compensation for any other reasonably
foreseeable loss or damage.
You are also entitled to have the goods repaired or replaced if the goods fail to be of acceptable quality and the failure
does not amount to a major failure.
Please refer to above “Warranty terms & conditions” for further warranty details.
SilverStone Technology Co., Ltd. 12F No. 168 Jiankang Rd., Zhonghe Dist., New Taipei City 235 Taiwan R.O.C.
+ 886-2-8228-1238 (standard international call charges apply)

Выверните 4 винта из ECM23
卸下ECM23上4個螺絲。
卸下ECM23上4个螺丝。
ECM23から4本のネジを外します。
4 Schrauben vom ECM23 entfernen
Retirez les 4 vis du ECM23
Retire 4 tornillos del ECM23
Rimuovere 4 viti da ECM23
ถอดสกรูทั้ง 4 ตัวออกจาก ECM23
ไทย
ECM23에서 4개의 나사를 제거합니다.
Remove 4 screws from ECM23
Вывернуть винты на плате ECM23
從ECM23 PCB上移除螺絲。
从ECM23 PCB上移除螺丝。
ECM23 PCBのネジを外す
Blaue Wärmepaste auf der Leiterplatte auftragen
Retirez les vis de la carte de circuit imprimé ECM23
Retire los tornillos en la PCB ECM23
Rimuovere le viti sul PCB ECM23
ถอดสกรูบน PCB ECM23 ออก
ไทย
ECM23 PCB의 나사를 제거하십시오.
Remove screws on the ECM23 PCB
Прикрепите термопанель кпечатной плате. Для
одностороннего M.2 SSD (плоская задняя часть
без компонента), пожалуйста, используйте серое
покрытие толщиной 1,5 мм; для двухстороннего
M.2 SSD (собеих сторон скомпонентами)
используйте угольную подушку толщиной 0,5 мм.
Kleben Sie das Wärmeleitpad auf die Platine. Für
einseitige M.2 SSD (flache Rückseite ohne
Komponente) verwenden Sie bitte 1,5 mm dickes
graues Pad; für doppelseitige M.2 SSD (beide Seiten
mit Komponenten), verwenden Sie bitte 0,5 mm
dicke Holzkohlepad.
黏導熱貼片在PCB上。對於單面顆粒的M.2 SSD (背面
平整無元件),請使用1.5mm厚的淺灰色厚導熱貼;對
於雙面顆粒 (兩面皆有元件),請使用0.5MM厚的太空
灰導熱貼片。
Collez le coussin thermique sur le PCB. Pour un SSD
M.2 simple face (dos plat sans composant), veuillez
utiliser un tampon gris de 1,5 mm d'épaisseur; Pour un
SSD M.2 double face (des deux côtés avec des
composants), veuillez utiliser un tampon de charbon
de bois de 0,5 mm d'épaisseur.
黏传导贴片在PCB上。对于单面颗粒的M.2 SSD(背面
平整无元件),请使用1.5毫米厚的浅灰色厚导热贴;
对于双面颗粒(两面皆有元件),请使用0.5MM厚的
太空灰导热贴片。
Pegue la almohadilla térmica en la PCB. Para SSD
M.2 de una cara (parte posterior plana sin componente),
utilice una almohadilla gris de 1,5 mm de grosor; para
M.2 SSD de doble cara (ambos lados con componentes),
use una almohadilla de carbón de 0.5mm de espesor.
サーマルパッドをPCBに貼り付けます。 片面M.2 SSD
(コンポーネントなしのフラットバック)の場合、
厚さ1.5mmの灰色のパッドを使用してください。
両面M.2 SSD(両面に部品あり)の場合は、厚さ0.5mm
のチャコールパッドを使用してください。
Attaccare il cuscinetto termico sul PCB. Utilizzare un
SSD M.2 a un lato (retro piatto senza componenti),
utilizzare uno spessore di 1,5 mm di spessore; per
doppio lato SSD M.2 (entrambi i lati con componenti),
si prega di utilizzare pastiglie di carbone di spessore
0,5 mm.
ติดแผ่นระบายความร้อนบน PCB สำหรับ M.2 SSD แบบด้า
นเดียว (ด้านหลังแบบแบนโดยไม่มีส่วนประกอบ) โปรดใช้
แผ่นสีเทาหนา 1.5 มม. สำหรับสองด้าน SSD M.2 (ทั้งสอง
ด้านมีส่วนประกอบ) โปรดใช้แผ่นถ่านขนาด 0.5 มม.
ไทย
열 패드를 PCB에 붙입니다. 단면 M.2 SSD (부품없이
플랫 백)의 경우 1.5mm 두께의 회색 패드를
사용하십시오. 양면 M.2 SSD (부품이있는 양면)의
경우 0.5mm 두께의 숯 패드를 사용하십시오.
Stick the thermal pad on the PCB. For single sided
M.2 SSD (flat back without component), please use
1.5mm thick gray pad; for double sided M.2 SSD
(both sides with components), please use 0.5mm
thick charcoal pad.
Поместите собранную плату ECM23 обратно в
корпус, так чтобы накопитель SSD PCIe M.2
был направлен вниз, как показано на фотоснимке
將安裝好的ECM23 PCB朝下,重新放回M.2 PCIe
SSD主機殼。(如圖)
将安装好的ECM23 PCB朝下,重新放回M.2 PCIe
SSD机箱。(如图)
写真のように、組み上げられたECM23 PCBをM.2
PCIe SSD面を下にしてエンクロージャーに戻し
ます。
Montierte ECM23-Leiterplatte wieder im Gehäuse
platzieren, wobei die M.2-PCIe-SSD wie abgebildet
nach unten zeigt.
Remettez la carte à circuit imprimé ECM23
assemblée dans le boîtier avec le SSD PCIe M.2
orienté vers le bas comme indiqué dans la photo
Coloque el PCB ECM23 montado de nuevo en la
carcasa con el SSD M.2 PCIe colocado hacia abajo
como se muestra en la foto
Riporre la PCB ECM23 montata nel box con l'SSD
M.2 PCIe rivolto verso il basso, come mostrato nella
foto
วาง ECM23 ที่ทำการติดตั้งเรียบร้อยกลับเข้าสู่ตัวเรือนโด
ยการหันด้าน M.2 SSD ลงดังที่แสดงในภาพ
ไทย
사진에 표시된 대로 M.2 PCIe SSD가 아래를
향하게 하여 조립된 ECM23 PCB를 인클로저에
도로 조립합니다.
Place the assembled ECM23 PCB back into the
enclosure with M.2 PCIe SSD facing down as
shown in the photo
黏贴蓝色导热贴在M.2上
使用されるM.2 NVMe SSDの長さに応じて取り付
け穴を選んでネジで固定します。
Вверните винты вподходящие монтажные
отверстия взависимости от размера
используемого SSD-накопителя NVMe M.2
Klebe das blaue Wärmeleitpad auf den M.2.
黏貼藍色導熱貼在M.2上
Fixez les vis dans les trous de montage adaptés en
fonction de la longueur du SSD NVMe M.2 utilisé
Coloque los tornillos en el agujero de montaje
adecuado dependiendo de la longitud del SSD M.2
NVMe
Fissare le viti ad un foro di montaggio adeguato in
base alla lunghezza dell'SSD M.2 NVMe utilizzato
ขันกวดสกรูเข้ากับขายึดตามขนาดความสยาวของ M.2
NVMe SSD ที่ใช้งาน
ไทย
사용된 M.2 NVMe SSD의 길이에 따라 적합한
장착 구멍에 나사를 고정합니다.
Stick the blue thermal pad on the M.2.
Прикрепите нижнюю крышку ккорпусу с
помощью винтов для завершения установки
用螺絲將底蓋固定在主機殼,即完成安裝。
用螺丝将底盖固定在机箱,即完成安装。
底部カバーをエンクロージャーに固定すると、
インストール完了です。
Zum Abschließen der Installation untere Abdeckung
mit Schrauben am Gehäuse sichern.
Fixez le couvercle inférieur sur le boîtier avec les vis
pour terminer l'installation
Fije la cubierta la inferior a la carcasa con tornillos
para finalizar la instalación
Fissare la copertura inferiore al box con viti per
terminare l'installazione
กวดยึดฝาปิดล่างเข้าสู่ตัวเรือนด้วยสกรูเพื่อเสร็จสิ้นการติดตั้ง
ไทย
나사를 사용하여 하단 커버를 인클로저에 고
정합니다.
Secure bottom cover to the enclosure with screws
to finish installation
Установите M.2 NVMe SSD изакрепите
винты подходящим монтажным отверстием
взависимости от длины M.2 NVMe SSD
依M.2 NVMe SSD的長度,安裝M.2 NVMe SSD,
並將螺絲固定於合適的螺絲安裝孔。
依M.2 NVMe SSD的长度,安装M.2 NVMe SSD,
并将螺丝固定于合适的螺丝安装孔。
M.2 NVMe SSDを取り付け、使用されるM.2 NVMe
SSDの長さに応じてネジを適切な取り付け穴に固
定します
Schrauben je nach Länge der verwendeten M.2-
NVMe-SSD in einem geeigneten Montageloch
sichern.
Installez le SSD M.2 NVMe et fixez les vis à l'orifice
de montage approprié en fonction de la longueur du
SSD M.2 NVMe utilisé
Instale la M.2 NVMe SSD y los tornillos de seguridad
en un orificio de montaje adecuado según la longitud
de M.2 NVMe SSD utilizado
Installare M.2 NVMe SSD e fissare le viti al foro di
montaggio adatto in base alla lunghezza dell'SSD
M.2 NVMe utilizzato
ติดตั้ง M.2 NVMe SSD และสลักเกลียวยึดเข้ากับรูยึดที่เห
มาะสมตามความยาวของ M.2 NVMe SSD ที่ใช้
ไทย
M.2 NVMe SSD를 설치하고 사용 된 M.2 NVMe
SSD의 길이에 따라 적절한 장착 구멍에 나사를
고정하십시오
1
2 5
6
7
3
4
Install M.2 NVMe SSD and secure screws to suitable
mounting hole depending on the length of M.2 NVMe
SSD used
Table of contents
Other SilverStone Adapter manuals

SilverStone
SilverStone SST-PP08B User manual

SilverStone
SilverStone SST-EC02 User manual

SilverStone
SilverStone FP57 User manual

SilverStone
SilverStone FP510 User manual

SilverStone
SilverStone SDP11 User manual

SilverStone
SilverStone AD120-DC User manual

SilverStone
SilverStone ECWA2 User manual

SilverStone
SilverStone ECD01 User manual

SilverStone
SilverStone ECM24 User manual

SilverStone
SilverStone MUA01 User manual