SilverStone ES02-PCIe User manual

ES02-PCIe
2.4GHz wireless computer power
and reset remote switch
www.silverstonetek.com
NO: G11231761
Additional info & contacts
SilverStone Technology in North America may repair or replace defective product with refurbished product that is not new but has been functionally tested.
Replacement product will be warranted for remainder of the warranty period or thirty days, whichever is longer. All power supplies should be sent back to the place of purchase if it is within 30 days of purchase, after 30 days, customers need to
initiate RMA procedure with SilverStone Technology in USA by first downloading the “USA RMA form for end-users” form from the below link and follow its instructions.
http://silverstonetek.com/contactus.php
Our goods come with guarantees that cannot be excluded under the Australian Consumer Law.
You are entitled to a replacement or refund for a major failure and for compensation for any other reasonably foreseeable loss or damage.
You are also entitled to have the goods repaired or replaced if the goods fail to be of acceptable quality and the failure does not amount to a major failure.
Please refer to above “Warranty terms & conditions” for further warranty details.
SilverStone Technology Co., Ltd. 12F No. 168 Jiankang Rd., Zhonghe Dist., New Taipei City 235 Taiwan R.O.C. + 886-2-8228-1238 (standard international call charges apply)
Warranty Information
This product has a limited 1 year warranty in North America, Europe, and Australia.
For information on warranty periods in other regions, please contact your reseller or SilverStone authorized distributor
.
1. Product component defects or damages resulted from defective production is covered under warranty.
Defects or damages with the following conditions will be fixed or replaced under SilverStone Technology’s jurisdiction.
a) Usage in accordance with instructions provided in this manual, with no misuse, overuse, or other inappropriate actions.
b) Damage not caused by natural disaster (thunder, fire, earthquake, flood, salt, wind, insect, animals, etc…)
c) Product is not disassembled, modified, or fixed. Components not disassembled or replaced.
d) Warranty mark/stickers are not removed or broken.
Loss or damages resulted from conditions other than ones listed above are not covered under warranty.
2. Under warranty, SilverStone Technology’s maximum liability is limited to the current market value for the product (depreciated value, excluding
shipping, handling, and other fees). SilverStone Technology is not responsible for other damages or loss associated with the use of product.
3. Under warranty, SilverStone Technology is obligated to repair or replace its defective products. Under no circumstances will SilverStone
Technology be liable for damages in connection with the sale, purchase, or use including but not limited to loss of data, loss of business, loss of
profits, loss of use of the product or incidental or consequential damage whether or not foreseeable and whether or not based on breach of warranty,
contract or negligence, even if SilverStone Technology has been advised of the possibility of such damages.
4. Warranty covers only the original purchaser through authorized SilverStone distributors and resellers and is not transferable to a second hand
purchaser.
5. You must provide sales receipt or invoice with clear indication of purchase date to determine warranty eligibility.
6. If a problem develops during the warranty period, please contact your retailer/reseller/SilverStone authorized distributors or SilverStone
http://www.silverstonetek.com.
Please note that: (i) You must provide proof of original purchase of the product by a dated itemized receipt; (ii) You shall bear the cost of shipping
(or otherwise transporting) the product to SilverStone authorized distributors. SilverStone authorized distributors will bear the cost of shipping
(or otherwise transporting) the product back to you after completing the warranty service; (iii) Before you send the product, you must be issued a
Return Merchandise Authorization (“RMA”) number from SilverStone. Updated warranty information will be posted on SilverStone’s official website.
Please visit http://www.silverstonetek.com for the latest updates.
Warranty terms & conditions
䚼ӊৡ⿄
⬉ᄤᵓ
㒓ᴤ
㶎ϱ
ࣙᴤ
䘹఼
ƻ
ƻ
ƻ
ƻ
ƻ
ƻ
ƻ
ƻ
ƻ
ƻ
ƻ
ƻ
ƻ
ƻ
ƻ
ƻ
ƻ
ƻ
ƻ
ƻ
ƻ
ƻ
ƻ
ƻ
ƻ
ƻ
ƻ
ƻ
ƻ
ƻ
⒈Ѡ㣃䝮
(PBDE)
⒈㘨㣃
(PBB)
݁Ӌ䫀
(Cr(VI))
䬝
(Cd)
∲
(Hg)
䪙
(Pb)
ƻ˖㸼⼎䆹᳝↦᳝ᆇ⠽䋼䆹䚼ӊ᠔᳝
ഛ䋼ᴤ᭭Ёⱘ䞣ഛ6-7
ޚ㾘ᅮⱘ䰤䞣㽕∖ҹϟDŽ
h˖㸼⼎䆹᳝↦᳝ᆇ⠽䋼䆹䚼ӊᴤ᭭
Ёⱘ䞣䍙ߎ6-7
ޚ㾘ᅮⱘ䰤䞣㽕∖DŽ
ᴀ㸼Ё᳝hⱘ䚼ӊഛヺড়ⲳ5R+6⊩㾘ˈ
ⲳ(8োᣛҸ㽕∖DŽ
This device complies with Part 15 of the FCC Rules. Operation is subject to the following two conditions: (1) this device may not cause harmful interference, and (2) this device must accept
any interference received, including interference that may cause undesired operation.
Changes or modifications not expressly approved by the party responsible for compliance could void the user's authority to operate the equipment。
Note: This equipment has been tested and found to comply with the limits for a Class B digital device, pursuant to part 15 of the FCC Rules. These limits are designed to provi de reasonable
protection against harmful interference in a residential installation. This equipment generates, uses and can radiate radio frequency energy and, if not installed and used in accordance with
the instructions, may cause harmful interference to radio communications. However, there is no guarantee that interference will not occur in a particular installation. If this equipment does
cause harmful interference to radio or television reception, which can be determined by turning the equipment off and on, the user is encouraged to try to correct the interference by one or
more of the following measures:
—Reorient or relocate the receiving antenna. —Increase the separation between the equipment and receiver.
—Connect the equipment into an outlet on a circuit different from that to which the receiver is connected. —Consult the dealer or an experienced radio/TV technician for help.
ѻકড়Ḑ䆕
Ẕ偠˖Ẕ
⫳ѻ᮹ᳳ˖㾕ѻકᴵⷕ
䘹ᓔ݇ ᳝↦᳝ᆇ⠽䋼ܗ㋴ঞ݊࣪ᄺ䞣㸼
Bitte befolgen Sie zur sachgemäßen Installation der ES02-PCIe die nachstehend aufgelisteten Schritte:
▓Fahren Sie den Computer herunter und ziehen Sie Netzstecker und alle anderen Kabel ▓Entfernen Sie die Gehäuseabdeckung des Computers
▓Trennen Sie Strom- und Reset-Kabel vom Motherboard ▓Suchen Sie nach einem freien PCI- oder PCIe-Steckplatz
▓Bitte beachten Sie zur Synchronisierung der Fernbedienung mit der Adapterkarte vor der Nutzung die Fragen und Antworten in der Anleitung
Para instalar el ES02-PCIe de forma apropiada, por favor siga los pasos enumerados a continuación:
▓Apague su ordenador y desconecte el cable de potencia y todos los cables ▓Retire la cubierta de la carcasa de su ordenador
▓Desconecte el cable de potencia y el cable de reseteo de su placa base ▓Localice un zócalo disponible PCI o PCIe
▓Por favor, consulte la sección de P y R en el manual para sincronizar el mando a distancia con la tarjeta adaptadora antes de su uso
Attenersi alle istruzioni che seguono per installare in modo appropriato la scheda ES02-PCIe:
▓Spegnere il computer e scollegare il cavo di alimentazione e tutti i cavi ▓Rimuovere la copertura del case del computer
▓Scollegare il cavo di alimentazione e di ripristino dalla scheda madre ▓Individuare un alloggio PCI o PCIe disponibile
▓Fare riferimento alla sezione Domande e Risposte nel manuale per sincronizzare il telecomando con l'adattatore prima dell'uso
To install ES02-PCIe properly, please follow steps listed below:
▓Turn off your computer and unplug the power cord and all cables ▓Remove your computer’s case cover ▓Unplug the power cable and reset cable from motherboard
▓Locate an available PCI or PCIe slot ▓Please refer to Q&A in manual to sync the remote with adapter card prior to use
Для правильной установки карты ES02-PCIe следуйте описанным ниже действиям:
▓Выключите компьютер, отключите кабель питания ивсе прочие кабели ▓Снимите крышку корпуса компьютера
▓Отсоедините кабель питания икабель сброса от системной платы ▓Найдите свободное гнездо PCI или PCIe
▓Пожалуйста, ознакомьтесь сразделом Q&A вруководстве пользователя, чтобы синхронизировать пульт садаптером перед началом использования
lzWYTwjp⪰G㥐⦐G㉘㾌䚌⥘⮨SG㙸⣌㜄G⇌㜨═G␜⪰G♤⪨㐡㐐㝘aG
▓䀨䘜䉤⪰GⅸḔG㤸㠄G䂈☐㝴G⯜☔G䀴㢨⽈㡸G⺸⫠䚝⏼␘G▓䀨䘜䉤㢌G䀴㢨㏘G䀘ⶸ⪰G㥐ᶤ䚝⏼␘
▓⮈㢬⸨☐㜄㉐G㤸㠄G䀴㢨⽈ḰG㸼ὤ䞈G䀴㢨⽈㡸G⺸⫠䚝⏼␘G▓㇠㟝Gᴴ⏙䚐GwjpG❄⏈GwjpG㏠⦣㡸G㵲㏩⏼␘G
▓㇠㟝䚌ὤG㤸㜄G㛨⑅䉤G㾨☐⪰G㫴㠄䚌⏈G⫠⯜䏬㝴G┍ὤ䞈G䚌ὤG㠸䚨G㇠㟝㣄G㉘⮹㉐㢌GxMh⪰G㵬Ḕ䚌㜠G㨰㐡㐐㝘
㽕ℷ⺎ⱘᅝ㺱(63&,Hˈ䂟ᣝ✻ϟ߫ℹ倳᪡
▓䂟ܜ䮰䭝ᙼⱘ䳏㜺䳏⑤ˈᢨᥝ䳏⑤㎮㟛Ⳍ䮰㎮ᴤ▓ᠧ䭟ᙼⱘ″←و㪟
▓ᢨᥝЏ″ᵓϞⱘ䳏⑤㎮㟛݊Ҫ㎮ᴤ▓ᡒϔןৃ⫼ⱘ3&,3&,Hᦦῑ▓Փ⫼ࠡˈ䂟গ✻Փ⫼ݞ㺵ⱘ4$ˈҹ֓ৠℹ࣪䘭఼㟛ᬊ
㽕ℷ⹂ⱘᅝ㺙(63&,Hˈ䇋ᣝ✻ϟ߫ℹ偸᪡
▓䇋ܜ݇䯁ᙼⱘ䅵ㅫᴎ⬉⑤ˈᢨᥝ⬉⑤㒓ϢⳌ݇㒓ᴤ▓ᠧᓔᙼⱘᴎㆅջⲪ
▓ᢨᥝЏᵓϞⱘ⬉⑤㒓Ϣ݊Ҫ㒓ᴤ▓ᡒϔϾৃ⫼ⱘ3&,3&,Hᦦῑ▓Փ⫼ࠡˈ䇋খ✻Փ⫼ݠ䞠ⱘ4$ˈҹ֓ৠℹ࣪䘹఼Ϣᬊ
ES02-PCIeを正しくインストールするには、下記 のステップに従ってください:
▓コンピューターの電源をオフにし、電源コードその他ケーブルを全て外します▓コンピューターのケースのカバーを外します
▓マザーボ ードから電 源ケーブル およびリセットケーブルを外します▓利用可能なPCIまたはPCIeスロットを見つけます
▓ご使用前に、アダプタカードとリモートでの同期方法について、マニュアルのQ&Aをご参照ください
Pour installer l'ES02-PCIe correctement, veuillez suivre les étapes indiquées ci-dessous:
▓Mettez votre ordinateur hors tension et débranchez son cordon d'alimentation et tous ses câbles ▓Retirez le couvercle du boîtier de votre ordinateur
▓Débranchez le câble d'alimentation et de redémarrage de la carte mère ▓Localisez un connecteur PCI ou PCIe disponible
▓Veuillez consulter la section Questions-Réponses du manuel pour synchroniser la télécommande avec la carte adaptateur avant utilisation
w
e
r
t
e
s
w
itc
h
ww
w.silv
er
st
o
ove
your computer’s
case
c
sy
nc the remot
e wi
th
Control your computer from anywhere
in the room using 2.4GHz RF remote
2.4GHz receiver PCI or PCIe card included
Works as far away as twenty meter
Includes power / reset switch Y cable
Includes optional low profile expansion slot cover
Integrated PC speaker on receiver assist
in providing auditory feedback while in use
P1: ¿Por qué no puedo encender el ordenador cuando presiono el botón de encendido?
R1: Por favor, compruebe si el indicador LED parpadea cuando presiona el botón de
Encendido ó Reseteo. Si no parpadea debería cambiar la batería. Si parpadea pero aun
así no puede encender el ordenador, por favor siga los pasos siguientes:
(1) Desconecte el cable de corriente del ordenador, tire e inserte la tarjeta varias veces y
compruebe si el zócalo de expansión está vacío. Limpie los conectores dorados (los
pines de metal del conector) con una goma de borrar, luego reinserte la tarjeta.
(2) Compruebe si POWER SW y RESET SW están conectados en la posición correcta,
asegúrese de que no están sueltos.
Si estos pasos no funcionan, entonces compruebe el menú BIOS / UEFI de su placa base
para asegurarse de que las funciones PCIe están discapacitados.
P2: Ambos indicadores LED del control remoto y el adaptador ES02-PCIe se encienden, ¿por
qué no se enciende el ordenador cuando presiono el botón?
R2:Solución: Resincronice el control remoto y el adaptador ES02-PCIe.
Paso 1: Por favor, presione y mantenga pulsado el botón S1 durante 3 segundos en el
adaptador ES02-PCIe hasta que su indicador se encienda
Paso 2: Presione cualquier botón en el control remoto hasta que la luz indicadora se
apague en el adaptador ES02-PCIe
P3: ¿Cómo es que no obtengo respuesta cuando presiono el botón de control remoto
dentro de la distancia especificada?
R3: Por favor, asegúrese de que la función de suspensión USB está encendida dentro de
la configuración BIOS / UEFI de la placa base para el cabezal al que conecte el ES02-PCIe.
Si su carcasa está hecha de metal, la distancia del control remoto se verá afectada. La
distancia afectada variará dependiendo de la composición del material, grosor y la
colocación relativa del ES02-PCIe dentro de la carcasa.
P4: ¿Cómo es que no obtengo respuesta cuando presiono el botón del control remoto?
R4: Cuando presione el botón del control remoto, asegúrese de que el LED del control
remoto también responde, puesto que indica que el control remoto está enviando una
señal.
P5: ¿Cómo apago el altavoz para PC integrado de la ES02-PCIe?
R5: La configuración por defecto de fábrica es tener el altavoz para PC encendido de
modo que los usuarios puedan discernir si el receptor está respondiendo al mando a
distancia. Para apagar el altavoz para PC integrado en el receptor de la ES02-PCIe, por
favor mueva el jumper al lado izquierdo sobre los pines 1 y 2
(como se muestra en la ilustración).
Q1:電源ボタンを押してもコンピューターの電源が入らないのはなぜですか?
A1:電源またはリセットボタンを押した時、L EDインジケータが点滅 するか 確認し
ます。もし 点 滅し な い なら ば 、電池を交換する必要があります。点滅してもコンピ
ューターの電源が入らない場合は、以下のステップを試してみます:
(1) コンピューターの電源コードを外し、カードを数回抜き差しして拡張スロットに
汚れがないか確かめます。消しゴムでゴールドフィンガー(コネクタの金属部分),
を清掃してから、カードを差します。
(2) POWERSWおよびRESETSWが正しい位置に接続され、かつ緩んでいないこと
を確認します。
これらの手順でも解決しない場合は、マザーボードのBIOS/UEFIメニューをチェ
ックして、PCIe機能が有効になっているか確認してください。
Q2:ボタンを押すと、リモコンとES02-PCIeアダプタの両方のLEDインジケーターが
点灯しますが、コンピューターが起動しません。なぜですか?
A2:解決策:リモコンとES02-PCIeアダプタを再同期させます。
ステップ1:ES02-PCIeアダプタのインジケーターが点灯するまで、S1いボタンを
3秒間押します
ステップ2:ES02-PCIeアダプタのインジケーターが消えるまで、リモコンの 任意
のボタンを押し続けます
Q3:仕様の距離範囲でリモコンを押しても反応がないのはなぜでしょうか?
A3:マザーボードのBIOS/UEFI設定からES02-PCIeの接続されたピンヘッダに対する
USBスタンバイ機能が有効になっているか確認してください。ケースが金属製の場合は、
リモコン仕様距離が影響を受けます。結果として、距離はケースの金属素材、厚さ、ケー
ス内でのES02-PCIeの相対的な位置により左右されます。
Q4:それでもリモコンボタンを押した時反応がないのはなぜですか?
A4:リモコンのボタンを押す時、リモコンのL EDが 反応しているか見てみます。これがリモ
コンから信号が出ているかを示しています。
Q5:ES02-PCIe内蔵のPCスピーカーは、どうやって オフ にしま す か ?
A5:工場からのデフォルト設定では、リモコンに受信側が反応しているかチェックできる
ようPCスピーカーはオンになっています。ES02-PCIeの受信側の内蔵PCスピーカーをオ
フにするには、ピン1および2の左側にジャンパーを移動してください(図参照)。
D1: Perché non è possibile accendere il computer premendo il tasto di accensione?
R1: Controllare se il LED lampeggia quando si preme tasto d’alimentazione o reset; se non
lampeggia è necessario sostituire la batteria. Se lampeggia, ma non è possibile accendere
il computer, provare la procedura che segue:
(1) Scollegare il cavo di alimentazione del computer, estrarre ed inserire la scheda più volte
e verificare se l’alloggio d’espansione è sporco. Utilizzare una gomma per pulire i contatti
dorati (pin metallici del connettore), quindi reinserire la scheda.
(2) Verificare che POWER SW e RESET SW siano collegati nella posizione corretta ed
accertarsi che non siano allentati.
Se questa procedura non funziona, controllare il menu BIOS / UEFI della scheda madre
per assicurarsi che le funzioni PCIe siano state attivate.
D2: Entrambi i LED sul telecomando e sull'adattatore ES02-PCIe sono accesi, perché il
computer non si accende quando si preme il tasto?
R2:Soluzione: Risincronizzare il telecomando e l'adattatore ES02-PCIe.
Fase 1: Tenere premuto il tasto S1 per 3 secondi sull'adattatore ES02-PCIe finché
l'indicatore non si accende
Fase 2: Premere un tasto sul telecomando finché l'indicatore non si spegne
sull'adattatore ES02-PCIe
D3: Perché non si ottiene alcuna risposta quando si preme il telecomando entro la distanza
specificata?
R3: Assicurarsi che la funzione standby USB sia attivata per il connettore e che ES02-PCIe
sia collegato all'impostazione BIOS / UEFI della scheda madre. Se il case è in metallo,
potrebbe influire sulla distanza del telecomando. La distanza varia in base alla composizione
del materiale, allo spessore e alla posizione di ES02-PCIe all'interno del case.
D4: Perché non si ottiene alcuna risposta quando si preme il tasto del telecomando?
R4: Quando si preme il tasto del telecomando, assicurarsi che il LED sul telecomando
risponda e indichi se il telecomando invia il segnale.
D5: Come si spegne l'altoparlante del PC integrato di ES02-PCIe?
R5: La configurazione predefinita è impostata per accendere l'altoparlante del PC in modo
che gli utenti possano capire se il ricevitore risponde al telecomando. Per spegnere
l'altoparlante del PC integrato sul ricevitore ES02-PCIe, spostare il ponticello verso sinistra
sul pin 1 e 2 (come mostrato nell'illustrazione).
xXa㤸㠄Gⶸ䏰㡸G⍀⤴⏈⒤⓸G䀨䘜䉤ᴴG䁐㫴㫴G㙾㏩⏼␘f
hXa㤸㠄G❄⏈G㸼ὤ䞈Gⶸ䏰㡸G⍀⤴㡸G⚀GslkG䖐㐐☥㢨Gᾐ⾕ᶤ⫠⏈㫴G
䞉㢬䚌㐡㐐㝘UGᾐ⾕ᶤ⫠㫴G㙾㡰⮨SGⵤ䉤⫠⪰GẄ䞌䚨㚰G䚝⏼␘UG䖐㐐☥㡴G
ᾐ⾕ᶤ⫠⏈⒤G䀨䘜䉤ᴴG㜠㤸䢼G䁐㫴㫴G㙾㡸G㟤SG␘㢀G␜⪰G
㐐⓸䚨⸨㐡㐐㝘aG
(1) 䀨䘜䉤㢌G㤸㠄G䂈☐⪰G⺸⫠䚌ḔG㾨☐⪰G㜠⤠GⶼG␘ᴴG↰㟤ḔSG䞉㣙G
㏠⦣㢨G㝘㜰╌㛼⏈㫴G䞉㢬䚝⏼␘UGG㫴㟤ᵐ⪰G㇠㟝䚌㜠GḜ☐G䚅ᶤO䀘≙䉤㢌G
Ἴ㋁G䙴P⪰G㷡㋀䚐G䟸G㾨☐⪰G␘㐐G↰㟵⏼␘UG
(2) wv~lyGz~㝴Gylzl{Gz~ᴴG㝠ⵈ⪬G㠸㾌㜄G㜤╌㛼⏈㫴SG⏄㏜䚌㫴G㙾㡴㫴G
䞉㢬䚝⏼␘U
㢨G␜⪰Gᶤ㸄⓸G㣅┍䚌㫴G㙾㡰⮨SG⮈㢬⸨☐㢌GipvzGVG|lmpG⮈⎨㜄㉐GwjpG
ὤ⏙㢨G䁐㦀⏈㫴G䞉㢬䚝⏼␘U
xYaG⫠⯜䀜ḰGlzWYTwjpG㛨⑅䉤㜄G㢼⏈GslkG䖐㐐☥G▌G␘G䁐㥬G㢼⏈⒤SGⶸ䏰㡸G⍀⤠⓸G
䀨䘜䉤ᴴG䁐㫴㫴G㙾㏩⏼␘U
hYaG䚨㵹aG⫠⯜䀜ḰGlzWYTwjpG㛨⑅䉤⪰G␘㐐G┍ὤ䞈䚌㐡㐐㝘U
X␜aG䖐㐐☥㢨G䁐㫼G⚀ᾀ㫴GlzWYTwjpG㛨⑅䉤㢌GzXㇽGⶸ䏰㡸GZ㸼G┍㙼G⌸⪨ḔG
㢼㡰㐡㐐㝘
Y␜aGlzWYTwjpG㛨⑅䉤㢌G䖐㐐☥㢨G㫼G⚀ᾀ㫴G⫠⯜䀜㢌G㙸ⱨGⶸ䏰㢨⇌G⌸⪹⏼␘
xZaG㫴㥉═Gᶤ⫠G⇨㜄㉐G⫠⯜䀜㡸G⍀⤠⓸G㢅㡸Gⵏ㫴G⯯䚌⏈G㢨㡔⏈Gⱨ㛻㢹⏼ᾀfG
hZaG⮈㢬⸨☐㢌GipvzGVG|lmpG㉘㥉㜄㉐G|ziGὤGὤ⏙㢨lzWYTwjpGᴴG㜤═G䙴G
䜘⒈㜄G䚨G䁐㦀⏈㫴G䞉㢬䚌㐡㐐㝘UG䀴㢨㏘ᴴGἼ㋁㡰⦐G⬀☘㛨㫸G㟤G⫠⯜䀜G
ᶤ⫠ᴴG㜵䛙㡸Gⵏ㏩⏼␘UG㜵䛙㡸Gⵏ⏈Gᶤ⫠⏈G㣠㫼SG▄GⵃG䀴㢨㏘G⇨㢌lzWYTwjpG
㢌Gㇵ㤵G㠸㾌㜄G♤⢰G␘⪹⏼␘U
x[aG⫠⯜䀜Gⶸ䏰㡸G⍀⤠⓸G㜠㤸䢼G㢅㡸Gⵏ㫴G⯯䚌⏈G㢨㡔⏈Gⱨ㛻㢹⏼ᾀf
h[aG⫠⯜䀜Gⶸ䏰㡸G⌸⪰G⚀G⫠⯜䀜㢌GslkᴴG㢅䚌⮨㉐G⫠⯜䀜㢌G㐔䝬G㋕㐔G㜠⺴⪰G
䖐㐐䚌⏈㫴G䞉㢬䚌㐡㐐㝘U
x\aGlzWYTwjp㢌G䋩䚝䝉GwjG㏘䙰䀘⪰G㛨⛯G↉⏼ᾀf
h\aGḩ㣙G㻐ḔG㐐Gὤ⸬GẠ㉥㡴GwjG㏘䙰䀘ᴴG䁐㫴⓸⦑G㉘㥉╌ὤG⚀ⱬ㜄G㇠㟝㣄⏈G
㍌㐔ὤᴴG⫠⯜䀜㜄Gⵌ㢅䚌⏈㫴G㜠⺴⪰G䑀㙹䚔G㍌G㢼㏩⏼␘UGGlzWYTwjp㢌G
㍌㐔ὤ㜄G䋩䚝═GwjG㏘䙰䀘⪰Gⅸ⥘⮨GἬ⫰㜄G䖐㐐═G⦐G㥄䒰⪰G䙴GXḰG䙴GY㢌G
㞰㯱㡰⦐G㢨┍䚌㐡㐐㝘U

Power / Rest pin photo
Installation Guide
02
01
1. Entfernen Sie die Abdeckung des Erweiterungssteckplatzes, indem Sie die
entsprechende Schraube lösen
2. Installieren Sie die ES02-PCIe vorsichtig im PCIe-Steckplatz und schließen
Sie dann „POWER SW“ und „RESET SW“ an die entsprechenden Stiftleisten am
Motherboard an. Befestigen Sie die ES02-PCIe mit der zuvor von der Abdeckung
des Erweiterungssteckplatzes entfernten Schraube am Gehäuse
* Falls Sie den entsprechenden Kontakt zum Anschluss an Ihrem Motherboard
nicht finden können, werfen Sie bitte einen Blick in die Motherboard-Anleitung.
1. Retire el tornillo que fija la cubierta del zócalo de expansión para retirarla
2. Instale con cuidado el ES02-PCIe en el zócalo PCIe, luego conecte “POWER SW”
y “RESET SW” a los pines correspondientes de la placa base. Fije el ES02-PCIe
a la carcasa usando el tornillo que retiró de la cubierta del zócalo de expansión
* Si no pudo encontrar los pines correspondientes para conectarlo a su placa base,
por favor consulte el manual de su placa base
1. Rimuovere la vite che fissa il coperchio dell’alloggio d’espansione per rimuoverlo
2. Installare delicatamente ES02-PCIe nell’alloggio PCIe, quindi collegare "POWER
SW" e "RESET SW" sui corrispondenti connettori della scheda madre. Fissare
ES02-PCIe al case utilizzando la vite che è stata rimossa dal coperchio dell’alloggio
di espansione
* Se non si riesce a trovare il pin corrispondente per eseguire il collegamento alla
scheda madre, consultare il manuale della scheda madre.
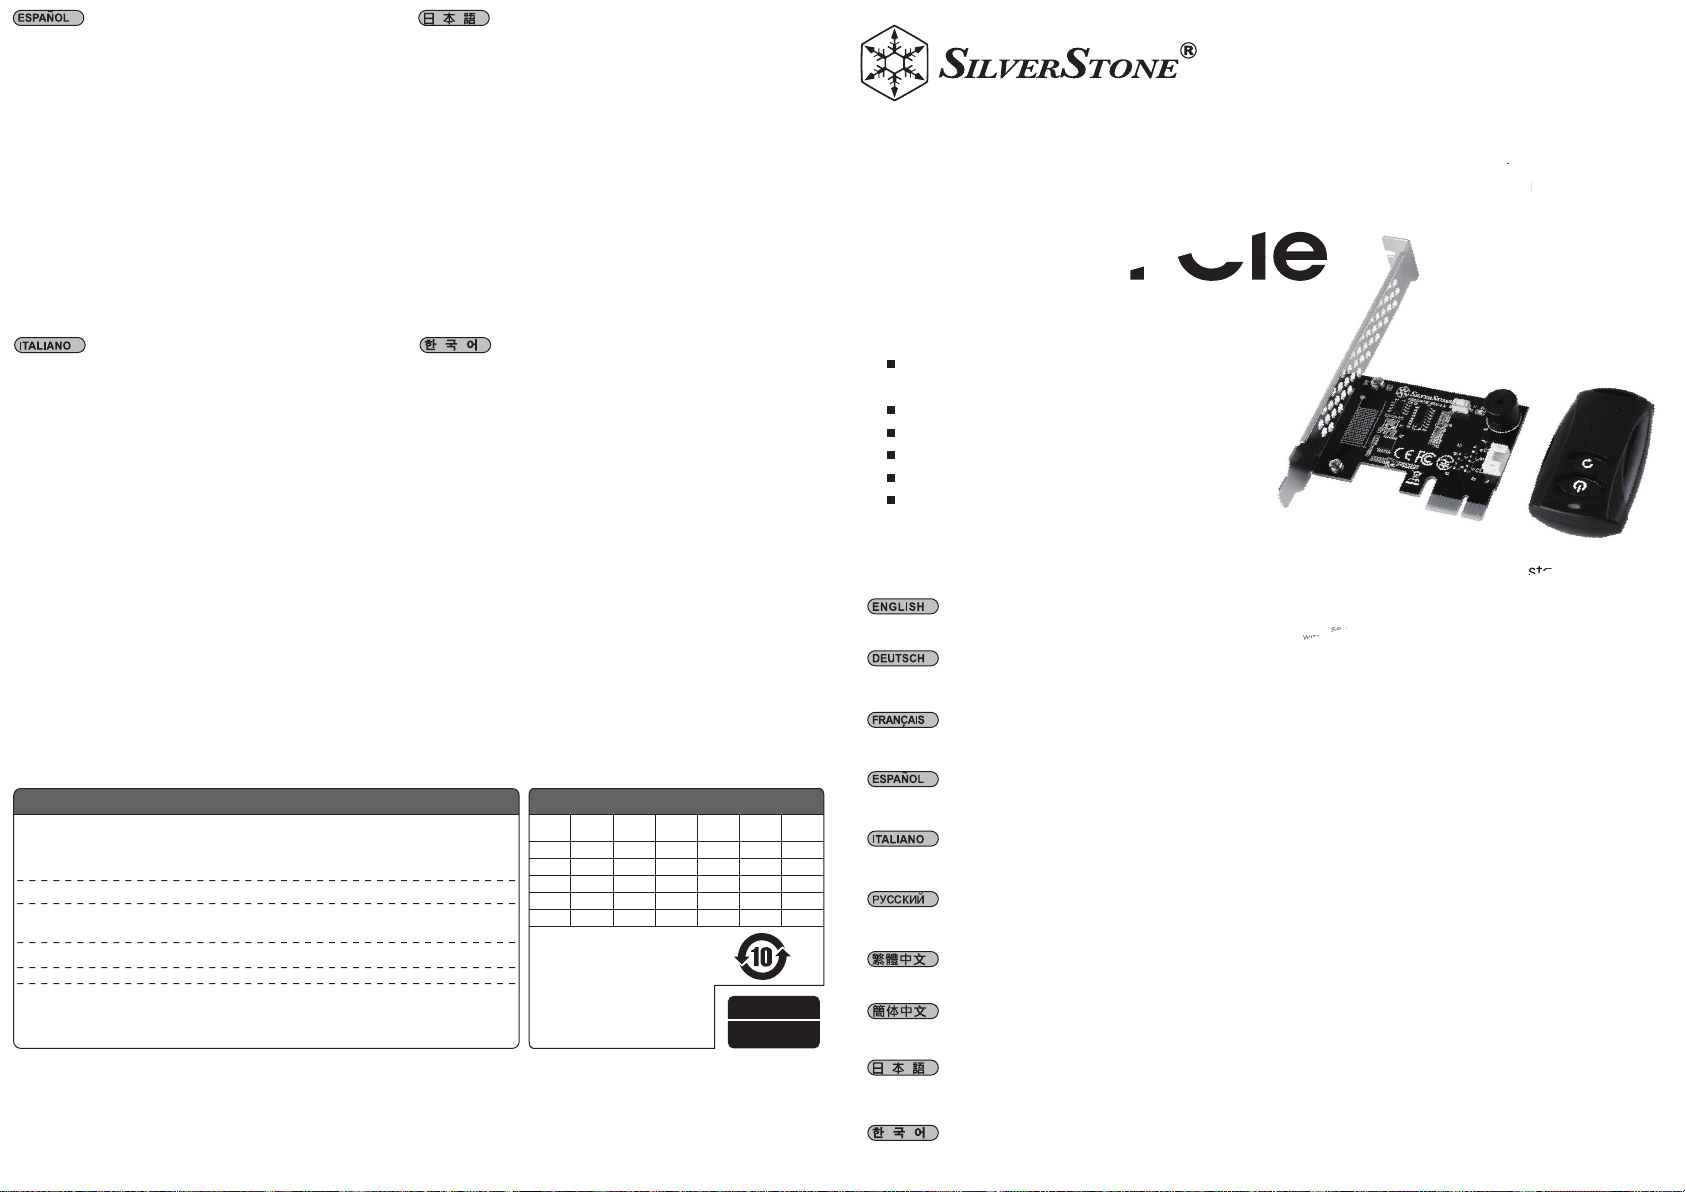
1. Remove screw that secures the expansion slot cover to remove it
2. Carefully install ES02-PCIe into the PCIe slot, then connect the “POWER SW”
and “RESET SW” to the corresponding pin headers on the motherboard. Secure
the ES02-PCIe to the case using the screw that was removed from the expansion
slot cover
* If you could not find the corresponding pin to connect on your motherboard,
please refer to your motherboard manual.
1. Отверните винты крепления крышки слота расширения иснимите крышку
2. Осторожно установите устройство ES02-PCIe вгнездо PCIe, затем подсоедините
"POWER SW" и"RESET SW" ксоответствующим штыревым разъемам на системной
плате. Спомощью снятого скрышки слота расширения винта прикрепите устройство
ES02-PCIe ккорпусу
* Если вы не можете найти соответствующий штыревой разъем для подключения на
системной плате, обратитесь круководству сописанием вашей системной платы.
পϟᅮܙῑ㪟ⱘ㶎㍆ˈᇛ݊ϟ
ᇛ(63&,Hᦦܹ3&,Hᦦῑˈপҷᴀ″←㟛Џ″ᵓⳌ䗷ⱘ䭟䮰㎮ᴤˈℷ⺎ഄ䗷Ϟ
Џ″ᵓⱘĀ32:(56:āĀ5(6(76:āԡ㕂ˈݡ⫼㶎㍆䥪ᵓ
㢹ᡒϡࠄЏ″ᵓϞⱘℷ⺎ԡ㕂ˈ䂟ܜগ㗗Џ″ᵓⱘ䁾ᯢDŽ
পϟᅮᠽሩῑⲪⱘ㶎ϱˈᇚ݊ϟ
ᇚ(63&,Hᦦܹ3&,HᦦῑˈপҷᴀᴎㆅϢЏᵓⳌ䖲ⱘᓔ݇㒓ᴤˈℷ⹂ഄ䖲Ϟ
ЏᵓⱘĀ32:(56:āĀ5(6(76:āԡ㕂ˈݡ⫼㶎ϱ䫕ḷᵓ
㢹ᡒϡࠄЏᵓϞⱘℷ⹂ԡ㕂ˈ䇋ܜখ㗗Џᵓⱘ䇈ᯢкDŽ
XUG䞉㣙G㏠⦣G䀘ⶸ⪰GḔ㥉䚌⏈G⇌㇠⪰G㥐ᶤ䚌㜠G䀘ⶸ⪰G⺸⫠䚝⏼␘
YUGlzWYTwjp㡸GwjpG㏠⦣㜄G㨰㢌䚌㜠G㉘㾌䚐G䟸Gˈwv~lyGz~ˉ㝴Gˈylzl{Gz~ˉ⪰G
⮈㢬⸨☐㢌G䚨G䙴G䜘⒈㜄G㜤䚝⏼␘UG䞉㣙G㏠⦣G䀘ⶸ㜄㉐G㥐ᶤ䚐G⇌㇠⪰G㇠㟝䚌㜠G
lzWYTwjp㡸G䀴㢨㏘㜄GḔ㥉䚝⏼␘
QGG⮈㢬⸨☐㜄㉐G㜤䚐G䚨G䙴㡸G㵲㫴G⯯䚐G㟤SG⮈㢬⸨☐G㉘⮹㉐⪰G㵬㦤䚌㐡㐐㝘U
1. 拡張スロットカバ ーを固 定しているネジ を外してカ バーを取り外します
2.ES02-PCIeをPCIeスロットに静かに装着し、「POWERSW」および「RESETSW」をマザーボ
ードの対応するピンヘッダに接続します。ES02-PCIeを拡張スロットカバーは外した時のネ
ジでケースに固定します
*お持ちのマザーボードで対応するピンヘッダが見つからない場合は、マザーボードマニ
ュアル をご 参 照 くだ さ い。
1. Retirez la vis qui fixe le couvercle du connecteur d'extension pour le retirer
2. Installez soigneusement l'ES02-PCIe sur le connecteur PCIe, puis connectez
« POWER SW » et « RESET SW » aux broches correspondantes sur la carte
mère. Fixez l'ES02-PCIe au boîtier avec la vis retirée du couvercle du connecteur
d'extension
* Si vous ne trouvez pas la broche correspondante sur votre carte mère,
consultez le manuel de votre carte mère.
Schließen Sie Netzkabel und alle anderen von Ihrem Computer benötigten Kabel
an und schalten Sie ihn mit der Ein / Aus-Taste ein
Conecte el cable de potencia y otros cables necesarios a su ordenador y luego
presione el botón de encendido para activarlo
Collegare il cavo di alimentazione e gli altri cavi richiesti dal computer, quindi
premere il tasto di alimentazione per accenderlo
Plug in the power cord and other cables, and then press the power button to turn
on the computer
Подключите кабель питания идругие необходимые кабели ккомпьютеру, а
затем нажмите кнопку питания, чтобы включить его
㤸㠄G䂈☐㝴G䀨䘜䉤㜄G䙸㟈䚐Gὤ䇴G䀴㢨⽈㡸G㜤䚐G䟸G㤸㠄Gⶸ䏰㡸G⍀⤠G䀨䘜䉤⪰G
䁡⏼␘
䗷䳏⑤㎮ঞ݊Ҫ㎮ᴤˈ㨫ৃ⬅䘭఼䭟䮰ଳࢩ䳏㜺
䖲⬉⑤㒓ঞ݊Ҫ㒓ᴤˈⴔৃ⬅䘹఼ᓔ݇ࡼ䅵ㅫᴎ
電源コードおよびコンピューターに必要なその他ケーブルを挿してから、電源ボタン
を押して起動させます
Branchez le cordon d'alimentation et les autres câbles requis par votre ordinateur
puis appuyez sur le bouton d'alimentation pour l'allumer
03
Bitte entfernen Sie die Schraube an der Fernbedienung zum Einlegen der
CR2032-Batterie. Sichern Sie die Fernbedienung dann, indem Sie die entfernte
Schraube wieder installieren
Please remove the screw on the remote to insert the CR2032 battery.
Then secure the remote by reinstalling the removed screw
Por favor, retire el tornillo del control remoto para insertar la batería CR2032.
Luego cierre el control remoto reinstalando el tornillo retirado
Veuillez retirer la vis sur la télécommande pour insérer la pile CR2032.
Puis fixez la télécommande en réinstallant la vis retiree
Rimuovere la vite del telecomando per inserire la batteria CR2032.
Quindi fissare il telecomando reinstallando la vite rimossa
Пожалуйста, удалите винт на пульте, чтобы установить батарею
CR2032. Затем закрутите винт обратно
⫠⯜䀜㢌G⇌㇠⪰G㥐ᶤ䚌ḔGjyYWZYGⵤ䉤⫠⪰G↰㟵⏼␘UGG
㥐ᶤ䚐G⇌㇠⪰G␘㐐G↰㠀G⫠⯜䀜㡸GḔ㥉䚝⏼␘
䂟পߎ䘭఼Ϟⱘ㶎㍆ˈ✊ᕠᬒܹ&5䳏∴DŽ
䗭Пᕠˈ䂟ᇛ㶎㍆䥪䘭఼Ϟ
䇋পߎ䘹఼Ϟⱘ㶎ϱˈ✊ৢᬒܹ&5⬉∴DŽ
䖭Пৢˈ䇋ᇚ㶎ϱ䫕䘹఼Ϟ
リモコンのネジをドライバーで外してC R20 32電 池を装 着します。
それから外した ネジを元 に戻します
F: Warum kann ich den Computer nicht über die Ein / Aus-Taste einschalten?
A: Bitte prüfen Sie, ob die LED-Anzeige bei Betätigung der Ein / Aus- oder Reset-Taste blinkt;
falls sie nicht blinkt, sollten Sie die Batterie wechseln.
Falls sie blinkt und Sie Ihren Computer dennoch nicht einschalten können, versuchen Sie es
bitte mit den folgenden Schritten:
(1)Ziehen Sie das Netzkabel des Computers, entfernen und installieren Sie die Karte
mehrmals und prüfen Sie, ob der Erweiterungssteckplatz verschmutzt ist. Reinigen Sie die
Goldkontakte (Metallkontakte des Anschlusses) mit einem Radiergummi und setzen Sie die
Karte dann wieder ein.
(2)Prüfen Sie, ob POWER SW und RESET SW in der richtigen Position und sicher
verbunden sind.
Falls sich der Computer dennoch nicht über die Fernbedienung einschalten lässt, prüfen Sie
im BIOS / UEFI-Menü des Motherboards, ob die PCIe-Funktionen eingeschaltet sind.
F: Obwohl die LED-Anzeigen an Fernbedienung und ES02-PCIe-Adapter leuchten,
schaltet sich mein Computer bei Betätigung der Ein / Aus-Taste nicht ein. Warum?
A: Lösung: Synchronisieren Sie Fernbedienung und ES02-PCIe-Adapter erneut.
Schritt 1: Bitte halten Sie die S1 Taste am ES02-PCIe-Adapter 3 Sekunden lang
gedrückt, bis die Anzeige aufleuchtet
Schritt 2: Drücken Sie eine beliebige Taste an der Fernbedienung, bis die Anzeige
am ES02-PCIe-Adapter erlischt
F: Warum geschieht nichts, wenn ich die Fernbedienung innerhalb der angegebenen
Reichweite benutze?
A: Bitte stellen Sie sicher, dass die USB-Bereitschaftsmodusfunktion für die Stiftleiste,
mit der ES02-PCIe verbunden ist, in den BIOS- / UEFI-Einstellungen des Motherboards
eingeschaltet ist. Falls Ihr Gehäuse aus Metall ist, wirkt sich dies auf die Reichweite der
Fernbedienung aus. Die Auswirkungen auf die Entfernung variieren je nach
Materialzusammensetzung, Dicke und relativer Position von ES02-PCIe im Gehäuse.
F: Warum geschieht immer noch nichts, wenn ich die Fernbedienung benutze?
A: Bitte achten Sie darauf, ob die LED an der Fernbedienung bei Betätigung einer Taste
reagiert und anzeigt, dass die Fernbedienung ein Signal sendet.
F: Wie schalte ich den integrierten PC-Lautsprecher von ES02-PCIe aus?
A: Der PC-Lautsprecher ist ab Werk standardmäßig eingeschaltet, damit Sie erkennen können,
ob der Empfänger auf die Fernbedienung reagiert. Bewegen Sie den Jumper zum Abschalten
des integrierten PC-Lautsprechers am Empfänger des ES02-PCIe zur linken Seite an Kontakt
1 und 2 (wie abgebildet).
Q : Why can’t I turn on the computer by pressing the power button?
A:Please check if the LED indicator blinks when pressing the Power or Reset button,
if it doesn’t blink, then you should change the battery.
If it blinks, but still can’t turn on the computer, please try the following steps:
(1)Unplug the computer’s power cord, pull and insert the card several times and check
if the expansion slot is dirty. Use an eraser to clean the gold fingers (connector’s metal pins),
then re insert the card.
(2)Check if the POWER SW and RESET SW are connected in the correct position, be
sure they are not loose.
If these steps do not work, then check in motherboard’s BIOS / UEFI menu to make sure
PCIe functions have been disabled.
Q : Both LED indicators on the remote and the ES02-PCIe adapter both lit up,
why doesn’t my computer turn on when I press the button?
A : Solution: Re-sync the remote and the ES02-PCIe adapter.
STEP 1: Please press and hold the S1 button for 3 seconds on the ES02-PCIe
adapter until its indicator lights up
STEP 2: Press any button on the remote until the indicator light turns off on the
ES02-PCIe adapter
Q : How come I get no response when I press the remote control within the specified distance?
A : Please make sure USB standby function is turned on for the pin header the ES02-PCIe is
connected to in the motherboard’s BIOS / UEFI setting. If your case is made of metal, the
remote control distance will be affected. The affected distance will vary depending on material
composition, thickness, and ES02-PCIe’s relative location inside the case.
Q : How come I still get no response when I press the remote control button?
A : When pressing the remote control button, please make sure LED on the remote control is
responding as well as it indicates if the remote control is sending signal.
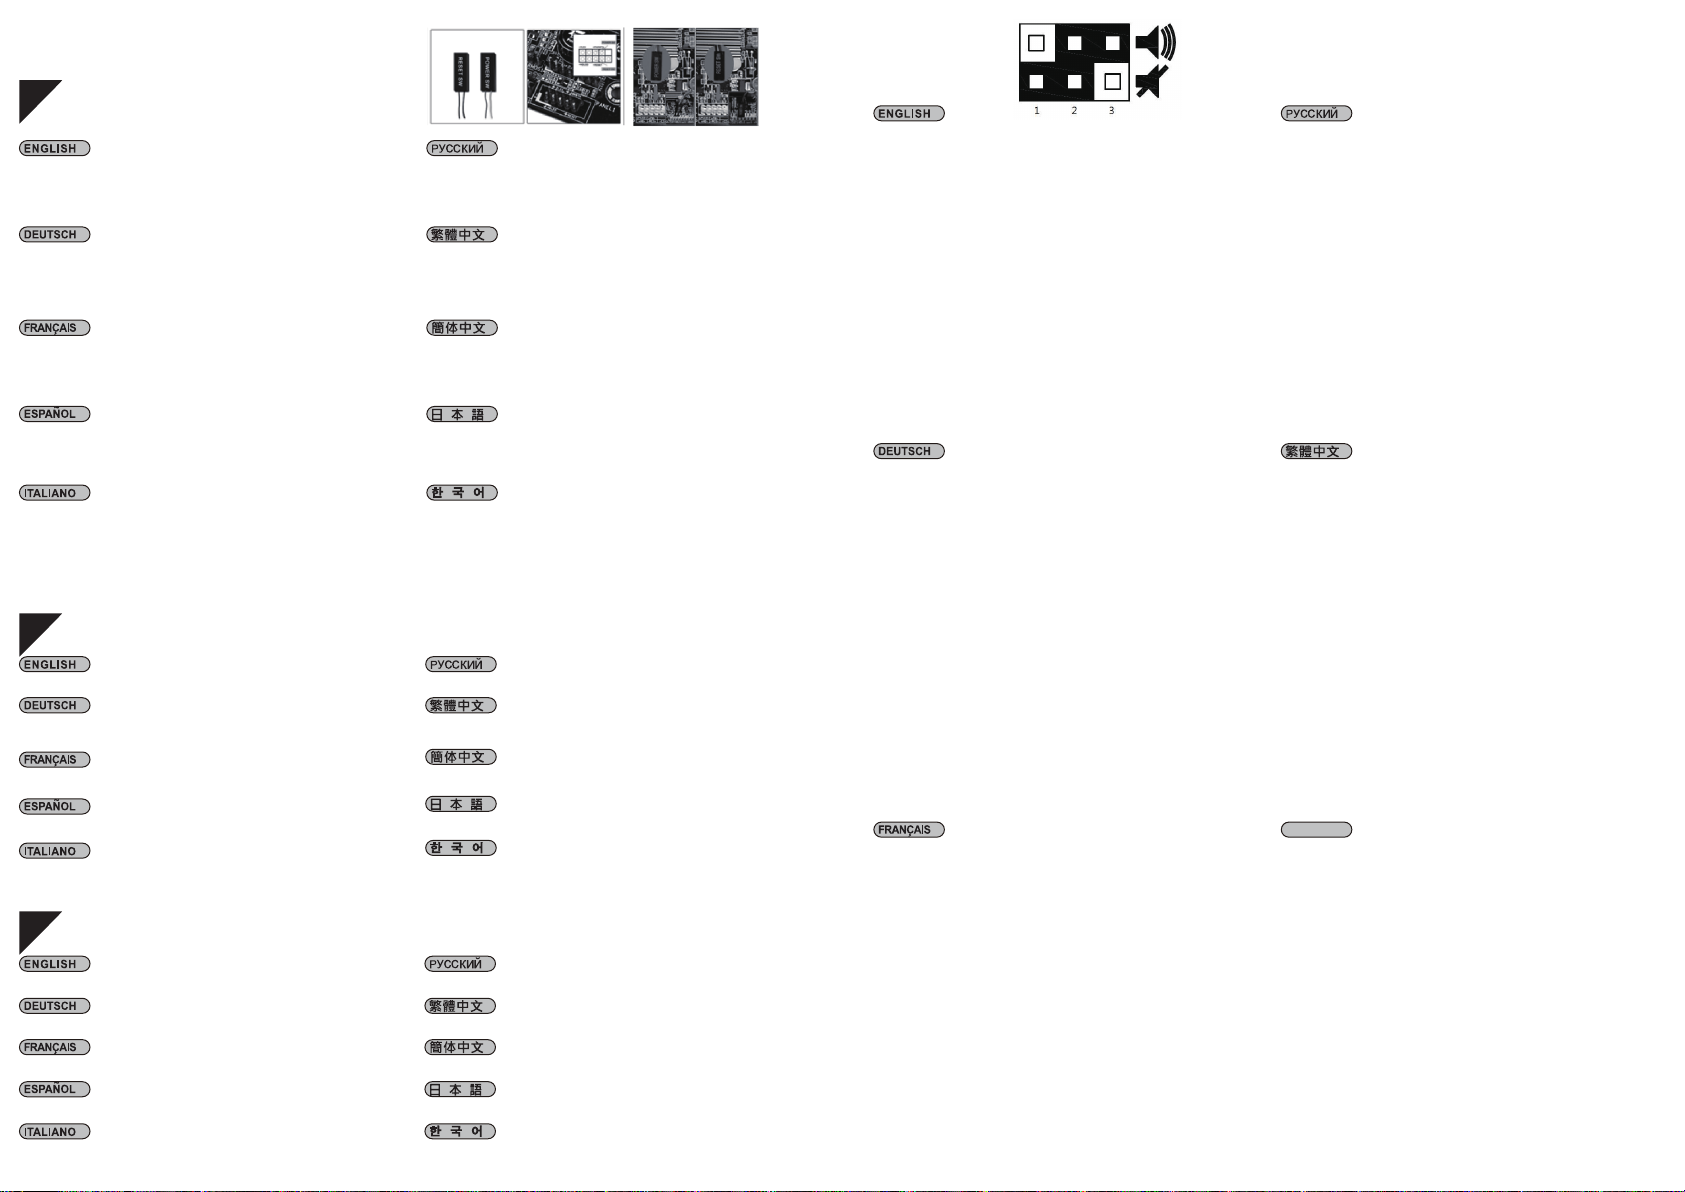
Q : How to turn off the ES02-PCIe’s integrated PC speaker?
A : The default configuration from the factory is set to have the PC speaker on so that users
can discern if the receiver is responding to the remote. To turn off the integrated PC speaker
on ES02-PCIe’s receiver, please move the jumper to the left side on pin 1 and 2 (as shown in
illustration).
B: Почему компьютер не включается, когда янажимаю на кнопку питания?
O: Пожалуйста, проверьте светодиодный индикатор, он должен мигать при нажатии
кнопки питания или кнопки перезагрузки. Если светодиод не мигает, то необходимо
заменить батарею.
Если светодиод мигает, но компьютер не включается, пожалуйста, попробуйте
выполнить следующее:
(1)Отключите кабель питания компьютера, извлеките ивставьте несколько раз
карту ипроверьте чистоту контактов слота расширения. Спомощью ластика очистите
золоченые контакты, затем установите карту вгнездо.
(2)Выводы "POWER SW" и"RESET SW" должны подключаться ксоответствующим
разъемам, проверьте надежность их установки.
Если это не помогает, проверьте меню BIOS / UEFI на системной плате иподключение
функций PCIe.
B:Оба светодиода на пульте управления ина адаптере ES02-PCIe горят, но
компьютер не включается?
О:Решение: Повторная синхронизация пульта иадаптера ES02-PCIe.
Шаг 1: Пожалуйста, нажмите иудерживайте S1 кнопку на адаптере ES02-PCIe в
течении 3 секунд пока индикатор не загорится
Шаг 2: Нажмите иудерживайте любую кнопку на пульте пока индикатор на
адаптере ES02-PCIe не погаснет
B: Почему яне получаю никакой реакции когда нажимаю на кнопку пульта
дистанционного управления впределах заданного расстояния?
O: Пожалуйста, убедитесь, что активирована функция ожидания включения
питания порта USB, ккоторому подключен ES02-PCIe, это можно сделать в
настройках BIOS / UEFI. Если ваш корпус выполнен из металла, то это может
оказывать влияние на работу пульта дистанционного управления. Рабочее
расстояние будет меняться взависимости от материала корпуса, толщины
металла ирасположения ES02-PCIe внутри корпуса.
B: Почему яне получаю никакой реакции когда нажимаю на кнопку пульта
дистанционного управления?
O: При нажатии на кнопку, пожалуйста, обратите внимание на светодиод на пульте,
при нажатии он должен реагировать, это говорит отом, что пульт дистанционного
управления корректно посылает сигнал.
B: Как отключить встроенный вES02-PCIe динамик?
O: По умолчанию конфигурация настроена так, чтобы динамик ПК был включен. Это
сделано для того, чтобы пользователь смог понять, отвечает ли приёмник на сигналы
от пульта управления. Для отключения динамика на приёмнике ES02-PCIe,
пожалуйста, переместите перемычку на левую сторону на контакты 1 и2 (как это
показано на рисунке).
4⚎Ҕ咐ᣝ䘭఼ⱘ䳏⑤ᣝ䟩⛵⊩䭟″"
$䂟⁶ᶹᣝϟ䳏⑤ᣝ䟩ᰖˈ䘭఼ⱘ/('ᣛ⼎➜ᰃ৺᳗䭗⟡ˈབᵰϡ䭗⟡ˈ㸼⼎ᯢᙼ䳔
㽕䳏∴DŽ
བᵰ᳝䭗⟡➜㰳ˈԚҡ⛵⊩䭟″ˈ䂟௫䀺ҹϟℹ倳˖
˄˅ᢨϟ䳏㜺ⱘ䳏⑤㎮ˈ䞡㻛ᦦᢨܙᑒˈ⁶ᶹᦦῑᰃ৺傦∵ˈ⫼‵Ⲃᣁ䞥
ᣛˈݡ䞡㺱ܙDŽ
˄˅⁶ᶹ32:(56:5(6(76:ᰃ৺ᦦℷ⺎ԡ㕂僚ࢩDŽ
བᵰ䗭ѯᮍ⊩ҡ⛵⊩䭟″ᰖˈৃ௫䀺⁶ᶹЏ″ᵓ%,26ܻ8(),䀁ᅮⱘ3&,Hᕙ″ࡳ㛑ଳࢩDŽ
4ᣝϟᣝ䟩ᰖˈ⛵㎮䘭䭟䮰ܙᣛ⼎➜䛑҂䍋ˈҡ⛵⊩䭟″˛
$㾷≎ᮍ⊩䳔㽕䞡ᮄᇡ丏DŽ
ℹ倳䂟䭋ᣝ(63&,H3&%Ϟⱘ6ᣝ䟩ˈⳈࠄ(63&,H3&%ᣛ⼎➜҂䍋
ℹ倳⾦䧬ᕠˈ(63&,H3&%ᣛ⼎➜᳗҂䍋ˈ✊ᕠᣝ䘭఼Ϟӏԩᣝ䟩ˈ
Ⳉࠄ3&%Ϟⱘᣛ⼎➜❘⒙
4⚎ԩ㽣㆘ⱘ䎱䲶㆘ೡܻ᪡䘭఼ˈԚ䳏㜺⛵ডឝ"
$䂟ܜ⺎䁡ᏆᇛЏ″ᵓ%,268(),ܻ䀁ᅮⱘ86%ᕙ″ࡳ㛑ଳࢩDŽ㢹″←⚎䞥ቀᴤ䊾ˈ
䘭䎱䲶ᇛফᕅ䷓ˈᕅ䷓㆘ೡᇛ㽪ᴤ䊾ǃᑺ㟛(63&,H″←ܻⱘᬒԡ㕂㗠ᅮDŽ
4⚎ԩᣝϟ䘭఼ⱘᣝ䥉ᰖˈձ✊⛵⊩䭟″៤ࡳ"
$⭊ᣝϟ(63&,H䘭఼ᰖˈ䂟⺎䁡䘭఼Ϟⱘ/('ᰃ৺⫼ˈ㮝ℸ߸ᮋ䘭఼ᰃ৺
䗕ߎ㿞㰳DŽ
4བԩ䮰䭝(63&,Hⱘ㳖勈఼"
$(63&,Hߎ䉼ᰖˈ䷤䀁ᰃᇛ㳖勈఼ᠧ䭟ˈᮍ֓Փ⫼㗙⺎䁡䳏㜺᳝ᬊࠄ䘭఼᠔ⱐ
ᇘߎ՚ⱘ㿞㰳ˈ؛㢹䳔㽕䮰䭝㳖勈఼ࡳ㛑ˈ䂟ᇛ-XPSHU⿏㟇Ꮊ䙞ⱘSLQ
བ೪᠔⼎DŽ
4ЎҔМᣝ䘹఼ⱘ⬉⑤ᣝ䪂᮴⊩ᓔᴎ"
$䇋Ẕᶹᣝϟ⬉⑤ᣝ䪂ᯊˈ䘹఼ⱘ/('ᣛ⼎♃ᰃ৺Ӯ䮾⚕ˈབᵰϡ䮾⚕ˈ㸼⼎ᯢᙼ
䳔㽕ᤶ⬉∴DŽ
བᵰ᳝䮾⚕♃োˈԚҡ᮴⊩ᓔᴎˈ䇋ᇱ䆩ҹϟℹ偸˖
˄˅ᢨϟ䅵ㅫᴎⱘ⬉⑤㒓ˈ䞡ᦦᢨᠽܙˈẔᶹᦦῑᰃ৺㛣∵ˈ⫼‵Ⲃ
ᣁ䞥ᣛˈݡ䞡㺙ᠽܙDŽ
˄˅Ẕᶹ32:(56:5(6(76:ᰃ৺ᦦℷ⹂ԡ㕂ᵒࡼDŽ
བᵰ䖭ѯᮍ⊩ҡ᮴⊩ᓔᴎᯊˈৃᇱ䆩ẔᶹЏᵓ%,26ݙ8(),䆒ᅮⱘ3&,Hᕙᴎࡳ㛑ࡼDŽ
4ᣝϟᣝ䪂ᯊˈ᮴㒓䘹ᓔ݇ᠽܙᣛ⼎♃䛑҂䍋ˈҡ᮴⊩ᓔᴎ˛
$㾷އᮍ⊩䳔㽕䞡ᮄᇍ乥DŽ
ℹ偸䇋䭓ᣝ(63&,H3&%Ϟⱘ6ᣝ䪂ˈⳈࠄ(63&,H3&%ᣛ⼎♃҂䍋
ℹ偸⾦䩳ৢˈ(63&,H3&%ᣛ⼎♃Ӯ҂䍋ˈ✊ৢᣝ䘹఼Ϟӏԩᣝ䪂ˈ
Ⳉࠄ3&%Ϟⱘᣛ⼎♃❘♁
4Ўԩ㾘㣗ⱘ䎱⾏㣗ೈݙ᪡䘹఼ˈԚ䅵ㅫᴎ᮴ডᑨ"
$䇋ܜ⹂䅸ᏆᇚЏᵓ%,268(),ݙ䆒ᅮⱘ86%ᕙᴎࡳ㛑ࡼDŽ㢹ᴎЎ䞥ሲᴤ䋼ˈ
䘹䎱⾏ᇚফᕅડˈᕅડ㣗ೈᇚ㾚ᴤ䋼ǃᑺϢ(63&,Hᴎݙⱘᨚᬒԡ㕂㗠ᅮDŽ
4Ўԩᣝϟ䘹఼ⱘᣝ䬂ᯊˈձ✊᮴⊩ᓔᴎ៤ࡳ"
$ᔧᣝϟ(63&,H䘹఼ᯊˈ䇋⹂䅸䘹఼Ϟⱘ/('ᰃ৺⫼ˈ㮝ℸ߸ᮁ䘹఼ᰃ
৺䗕ߎ䆃োDŽ
4བԩ݇䯁(63&,Hⱘ㳖号఼"
$(63&,Hߎ䋻ᯊˈ乘䆒ᰃᇚ㳖号఼ᠧᓔˈᮍ֓⫼᠋⹂䅸䅵ㅫᴎ᳝ᬊࠄ䘹఼᠔থ
ᇘߎᴹⱘ䆃োˈ؛㢹䳔㽕݇䯁㳖号఼ࡳ㛑ˈ䇋ᇚ-XPSHU⿏㟇Ꮊ䖍ⱘSLQ
བ᠔⼎DŽ
Q: Pourquoi ne puis-je pas allumer l'ordinateur en appuyant sur le bouton d'alimentation?
R: Veuillez vérifier que le voyant LED clignote lorsque vous appuyez sur le bouton d'alimentation
ou de redémarrage. S'il ne clignote pas, changez la pile.
S'il clignote mais que vous ne pouvez toujours pas allumer l'ordinateur, essayez les solutions
suivantes:
(1)Débranchez le cordon d'alimentation de l'ordinateur, tirez sur et replacez la carte plusieurs
fois et vérifiez si le connecteur d'extension est sale. Utilisez une gomme pour nettoyer les
broches dorées du connecteur, puis réinsérez la carte.
(2)Vérifiez que POWER SW et RESET SW sont connectés à la bonne position et que la
connexion n'est pas lâche.
Si ces solutions ne fonctionnent pas, consultez le menu BIOS / UEFI de la carte mère pour
vous assurer que les fonctions PCIe sont activées.
Q: Les 2 voyants LED sur la télécommande et l'adaptateur ES02-PCIe sont allumés,
pourquoi mon ordinateur ne s'allume-t-il pas lorsque j'appuie sur le bouton ?
A: Solution: Re-synchronisez la télécommande et l'adaptateur ES02-PCIe.
Étape 1: Veuillez appuyer et maintenir le bouton S1 enfoncé pendant 3 secondes
sur l'adaptateur ES02-PCIe jusqu'à ce que son indicateur s'allume
Étape 2: Appuyez sur n'importe quel bouton de la télécommande jusqu'à ce que
le voyant lumineux s'éteigne sur l'adaptateur ES02-PCIe
Q: Pourquoi n'obtiens-je aucune réponse lorsque j'appuie sur la télécommande dans la
distance spécifiée?
R: Veuillez vous assurer que la fonction veille USB est activée pour l'embase à broches à
laquelle l'ES02-PCIe est connecté dans le réglage BIOS / UEFI de la carte mère. Si votre
boîtier est fabriqué en métal, la distance de la télécommande est affectée. La distance
affectée varie en fonction de la composition du matériau, de l'épaisseur et de la position
relative d' ES02-PCIe à l'intérieur du boîtier.
Q: Pourquoi n'obtiens-je toujours aucune réponse lorsque j'appuie sur le bouton de la
télécommande?
R: Quand vous appuyez sur le bouton de la télécommande, veuillez vous assurer que la
LED de la télécommande répond et indique si la télécommande envoie un signal.
Q: Comment désactiver le haut-parleur de PC intégré de l'ES02-PCIe?
R: La configuration d'usine par défaut est définie pour que le haut-parleur de PC soit activé
afin que les utilisateurs puissent déterminer si le récepteur répond à la télécommande. Pour
désactiver le haut-parleur de PC intégré sur le récepteur de l'ES02-PCIe, veuillez positionner
le cavalier sur le côté gauche, sur la broche 1 et 2 (comme indiqué dans l'illustration).
Q & A
Ꭲѱϔಞ
This manual suits for next models
1
Other SilverStone PCI Card manuals

SilverStone
SilverStone ECL01 User manual

SilverStone
SilverStone EC03 User manual

SilverStone
SilverStone EC04-P User manual

SilverStone
SilverStone ECU07 User manual

SilverStone
SilverStone EC04 User manual

SilverStone
SilverStone ECU02-E User manual

SilverStone
SilverStone EC05 User manual

SilverStone
SilverStone ECU02 User manual

SilverStone
SilverStone EC04-E User manual

SilverStone
SilverStone ECM21-E User manual