Simbans OKOMAX User manual


2
Contents
Introduction ----------------------------------------------------------------------------------------------- P. 4-6
-Camera package and accessories
-Mounting the Action Camera with optional accessories
-Understanding the Camera
1. Charge the Action Camera ----------------------------------------------------------------------- P. 7
2. Turn on/ off the Action Camera ---------------------------------------------------------------- P. 7
3. Switching between Modes ---------------------------------------------------------------------- P. 7
4. Waterproof ------------------------------------------------------------------------------------------ P. 7
5. File Storage and Playback ----------------------------------------------------------------------- P. 7
6. Video Recording and Photo Shooting ------------------------------------------------------- P. 8
7. Connecting to Mobile App (GK Cam) via Wifi --------------------------------------------- P. 8
8. Basic Settings --------------------------------------------------------------------------------------- P. 9-10
(A) Deleting photo(s)
(B) Changing the resolution of the video
(C) Changing the resolution/ quality of the photo
(D) Special recording options
(E) Special photo shooting options
(F) Special camera options
(G) Changing date and time of the camera
(H) Changing the language
Thank you for purchasing Simbans Action Camera.
We hope you like our products.

3
CAUTIONS
Read all the instructions and warnings carefully prior to using this product.
Remove the battery from the camera and place it in dry storage if it will not be used for a long time.
Do not fall or from the action camera.
Do not store the action camera in a high temperature environment.
Do not place the action camera/ micro SD card near any strong magnetic interference objects to
avoid data error or loss.
Do not expose this action camera to moisture or submerge it in liquid. Keep action camera dry at all
times.
Do not attempt to charge the action camera using any other method or connection other than the
action camera’s provided charging cable.
Do not disassemble this action camera or attempt to repair or modify it in any manner.
Be cautious of excessive drops, bumps, abrasions or other impacts to this action camera.
If the product produces an abnormal smell, high temperature (low temperature during normal use),
discolours or changes shape abnormally, stop using the product immediately.

4
Introduction
Okomax Action Camera is a high-definition digital motion video recording device. It has a wide variety of
the leading features for digital video recording, photo shooting, audio recording with screen display and
detachable battery. Best suited for vehicle recording, outdoor sports, home security, diving and many
more activities. It is created to help you capture precious moments while enjoying it.
Camera package and accessories
The OKOMAX action camera pack comes with the camera body, 11 accessories and a protective case.
5
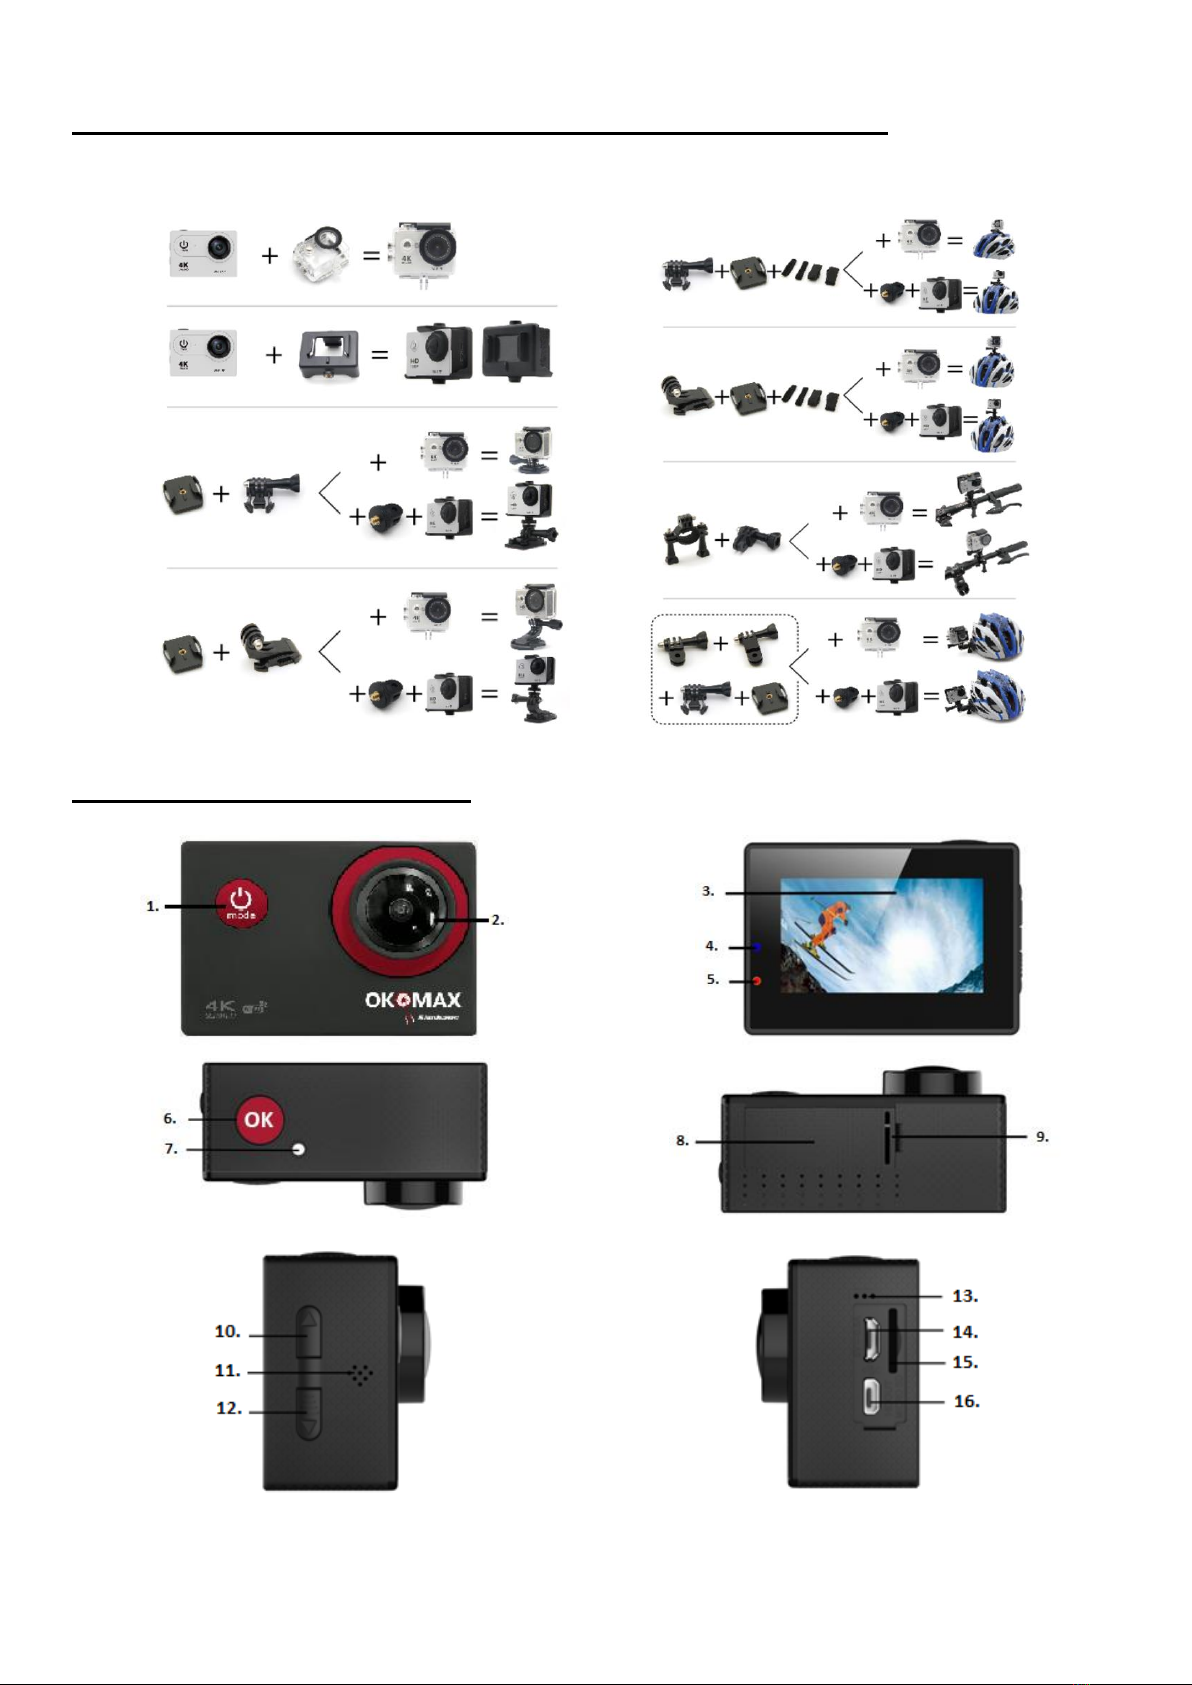
Mounting the Action Camera with optional accessories
Attach your camera to helmets, gear and equipment.
Understanding the Camera

6
Button
Description
1. Power key /
Mode key
Press and hold the power button for a few seconds to turn on the camera. The screen of the camera
will show a “welcome” page. To turn off the camera, press and hold the power button for a few
seconds until the screen shows “Goodbye”. You may also change the mode of the camera when it is
turned on.
2. Lens
Camera lens
3. Screen
Display image or settings menu
4. Charging status indicator
Charging status indicator lights up when the battery is charging. The indicator goes off when the
battery is fully charged.
5. Operation indicator
Operation indicator lights up when camera is in use.
6. Shutter/ Select Button
Press to start an action, e.g. start/ stop video recording, take a picture or select an option in settings.
7. Operation indicator
Operation indicator lights up when camera is in use.
8. Battery Door
Camera lid protecting the battery
9. Battery Door Latch
Push in latch to open the battery door
10. Wifi/ Zoom-in/ Selection
UP
Wi-Fi: Press this button once to enter Wi-Fi connection screen with Wi-Fi name and password;
Zoom-in: Long press this button to zoom in the camera in both video and camera mode;
Selection: Select an upper option in settings menu of the camera.
11. Speaker
Speaker for playing videos captured
12. Mute/ Zoom-out/
Selection DOWN
Mute: Press this button once to mute the built-in microphone of the camera;
Zoom-out: Long press this button to zoom out the camera in both video and camera mode;
Selection: Select a lower option in settings menu of the camera. Used together with the selection UP
button to cycle through options.
13. Microphone
Microphone of the camera
14. Micro USB
Micro USB port for connecting to the charger or the computer
15. Micro SD slot
Slot for MicroSD card expansion (supports up to 64 GB)
16. Micro HDMI output
Connect your camera to another displaying device with micro-HDMI cable

7
1. Charge the Action Camera
The camera comes with a rechargeable battery.
a) Push in the battery door latch (camera part 9) a bit and remove the battery door (camera part 8).
b) Correctly install battery into action camera as indicated by +/- symbols and direction of arrowed
marked on battery. Close the battery door.
c) Connect the camera to a computer of USB power supply with the micro-USB cable (camera part 14).
d) The charging status indicator (camera part 4) will light up when the battery is charging.
e) The indicator light will turn off when the battery is fully charged.
It will take about 3 hours to fully charge the camera. Please fully charge the battery before first use.
2. Turn on/ off the Action Camera
When the camera is inactive, press and hold the power key (camera part 1) for 3-5 seconds to turn
on the camera. You will see “Simbans” on the screen.
When the camera is in operation, press and hold the power key (camera part 1) for 3-5 seconds to
turn off the camera. You will see “Simbans” on the screen.
3. Switching between Modes
The Okomax Action Camera has 4 modes –video recording, photo shooting, playback and settings.
You can switch between the modes using the Mode button (camera part 1).
You can identify which mode you are in by looking at the icon displayed on the top left hand corner
of the screen.
4. Waterproof
The Okomax, along with the waterproof case, can go underneath the water up to 30 meters deep. Please
dry it in time after using; otherwise, the waterproof shell metal button will dust and reduce the waterproof
performance.
Note that the waterproof shell is a vulnerable product, we strongly recommend to replace the waterproof
shell in time, taking into account the environment and usage. You should stop using the battery after it is
being immersed in the water.
5. File Storage and Playback
You may view the photos directly on the camera by pressing the UP or DOWN button (camera parts 10 and
12) to cycle through the videos and photos. Alternatively, you may connect Okomax to a computer or use a
card reader to read the micro SD memory card. Make sure the action camera is turned off properly before
removing the micro SD card to avoid any data damage.

8
6. Video Recording and Photo Shooting
Before you begin video recording or photo shooting, insert a micro SD card (up to 64GB with an at least
CLASS10 80MB/s speed rating) into the Micro SD slot on the side of the camera (camera part 15).
In video recording mode, press the shutter button (camera part 6) to start recording. A red dot
indicator will start to flash next to the video mode icon during video recording. The timer on the top
right hand corner will you how long your video is. Press the shutter button to stop recording.
oThe Okomax will stop recording automatically when the battery runs out or when the
micr-SD memory card is full. Your video will be saved before the camera powers off.
oPress the DOWN button once to turn on/ off the video voice recording function and refer to
the microphone icon shown on the screen for current status.
When in photo shooting mode, press the shutter button to take photos.
Press and hold the UP or DOWN button (camera parts 10 and 12) to zoom in and out in both video
recording and photo shooting modes.
7. Connecting to Mobile App (GK Cam) via Wifi
The Wi-Fi App (gk cam) lets you control your camera remotely using a smart phone or tablet. Features
include full camera control, live preview, playback and sharing of selected content.
a) Search and download the GK Cam App to your smart phone or tablet from the Google Play or Apple
App Store.
b) Press the Power/Mode Button to power the camera ON.
c) Make sure the Wi-Fi is turn on in the camera setting menu.
d) Press the UP/Wi-Fi Button (camera part 10) to turn on Wi-Fi.
e) In your smart phone or tablet's Wi-Fi setting, connect to the network called “OKOMAX” followed by a
series of numbers.
f) Enter the password”max4k1234”
g) Open the GK Cam App on your smart phone or tablet. You may now use your mobile device as a
remote control to your camera and view photos on your mobile device.
h) Press and hold the Down/Wi-Fi Button (camera part 10) for seconds to turn off the Wi-Fi.
You may download the “GK CAM” app by searching for it on Google Play Store or Apple App Store.
Alternatively, you may scan the QR code below if you are using Android devices:

9
8. Basic Settings
You may change the settings of the camera after switching to the setting mode and navigate through the
options using the UP, DOWN and shutter button.
(A) Deleting photo(s)
-To delete a single photo, go to Playback mode and view the photo you want to delete. Switch to
setting mode page 4 and select “Delete” => “Delete current” => “OK”
-To delete all photos saved on the camera, simply go to setting mode page 4 and select “Delete”
=> “Delete all” => “OK”
(B) Changing the resolution of the video
-Go to setting mode page 1 and select “Resolution” and you will see the following options:
-4K 24 fps; 2K 30 fps; 1080P 60 fps; 1080P 30fps
-Estimated video recorindg time:
(C) Changing the resolution/ quality of the photo
-Go to setting mode page 2 and select “Image Size” and you will see the following options:
o20M / 16M / 14M/ 12M/ 10M/ 8M/ 5M
-Go to setting mode page 3 and select “Quality” and you will see the following options:
oFine/ Normal / Economy
(D) Special recording options
-Loop Recording: Off/ 1min / 3mins/ 5mins [settings page 1]
-Time-lapse record: Off/ 1s/ 2s/ 5s/ 10s/ 30s/ 1min [settings page 1]
-Slow Motion: Off/ 720p 120fps [settings page 2]
-Motion detection: Off/ On [settings page 2]
(E) Special photo shooting options
-Capture modes: single/ 2s/ 5s/ 10s/ 20s timer [settings page 3]
-Adjust sharpness, exposure, white balance, color [settings page 3]
-Adjust ISO [settings page 4]
(F) Special camera options
-Field of view: 170 / 140/ 110/ 70 degree [settings page 6]
-Fish eye adjust: Off/ On [settings page 6]
-Aqua mode: Off/ On [settings page 6]
-Car mode: Off/ On [settings page 5]
Micro SD CARD
4K 30fps
1080P 60fps
1080P 30fps
64GB
120mins
240mins
480mins
32GB
60mins
120mins
240mins
16GB
30mins
60mins
120mins

10
(G) Changing date and time of the camera
-Go to setting mode page 4 and select “Date/Time”, use UP/ DOWN button to adjust the date and
time. Quit Date/ Time setting page by pressing the mode button.
(H) Changing the language
-Go to setting mode page 5 and select “Language” => locate your desired language and press OK

11
Table of contents


